SkatterBencher #66: AMD Ryzen Threadripper 7980X Overclocked to 5750 MHz

We overclock the AMD Ryzen Threadripper 7980X up to 5750 MHz with the ASUS Pro WS TRX50-Sage WiFi motherboard and custom loop water cooling.
This will be the third time I overclock a Ryzen Threadripper CPU after the 3990X in SkatterBencher #36 and the 5990X in SkatterBencher #43. Those were also 64-core processors, but Zen 2 and Zen 3, respectively. While I struggled quite a bit to tune the 3990X and 5990X, the Zen 4 Threadripper seems much more accessible to optimize. I hope you enjoy the blog post!
AMD Ryzen Threadripper 7980X: Introduction
The Ryzen Threadripper 7980X is the flagship processor of AMD’s Zen 4-based Ryzen Threadripper 7000 high-end desktop series codenamed “Storm Peak.” The Storm Peak processors were announced on October 19, 2023, and entered the market as two distinct segments. The Ryzen Threadrippers and the TRX50 chipset are designed for high-end desktop. In contrast, the Ryzen Treadripper PRO and the WRX90 chipset are designed for workstation.

There are a couple of differences between the Threadripper and Threadripper PRO processors:
- Threadripper only supports up to 8 CCDs, so 64 cores, whereas Threadripper Pro supports up to 12 CCDs, up to 96 cores.
- Threadripper only supports 4-channel memory, whereas Threadripper Pro has 8 memory channels.
- Threadripper supports up to 48 PCIe Gen 5 lanes, whereas Threadripper Pro has 112 PCIe Gen 5 lanes.

The TRX50 and WRX90 chipsets are both Promontory 21, identical to the B650 chipset.

The CCDs on the Ryzen Threadripper 7000 are the same as those on the Ryzen 7000 processors … there’s just more of them. That means Zen 4 core architecture, 5nm TSMC, DDR5, and PCIe 5 support.

The CPUs come with a new TR5 or SP6 socket. While there’s a significant difference in pin count versus the Threadripper 5000 predecessor, thus making them incompatible, the physical size of the socket is the same. That means you can repurpose your old TR4/SP3 thermal solutions … as long as they can handle the 350W TDP, of course!
The Ryzen Threadripper 7980X has 64 cores with 128 threads. The base frequency is 3.2 GHz, and the listed maximum boost frequency is 5.1 GHz. However, the programmed Fmax is 5.65 GHz for one CCD and 5.35 GHz for the others. The C-State Boost limiter restricts the core frequency to 4.8 GHz when 8 or more cores are active. The TDP is 350W, and the TjMax is 95 degrees Celsius.

In this video, we will cover four different overclocking strategies:
- First, we enable Precision Boost Overdrive 2 and enable DOCP.
- Second, we tune the frequency using the Precision Boost Overdrive 2 toolkit.
- Third, we try out the ASUS AI Overclocking technology.
- Lastly, we try a manual overclock.

However, before we jump into overclocking, let us quickly review the hardware and benchmarks used in this video.
AMD Ryzen Threadripper 7980X: Platform Overview
The system we’re overclocking today consists of the following hardware.
| Item | SKU | Price (USD) |
| CPU | AMD Ryzen Threadripper 7980X | 4999 |
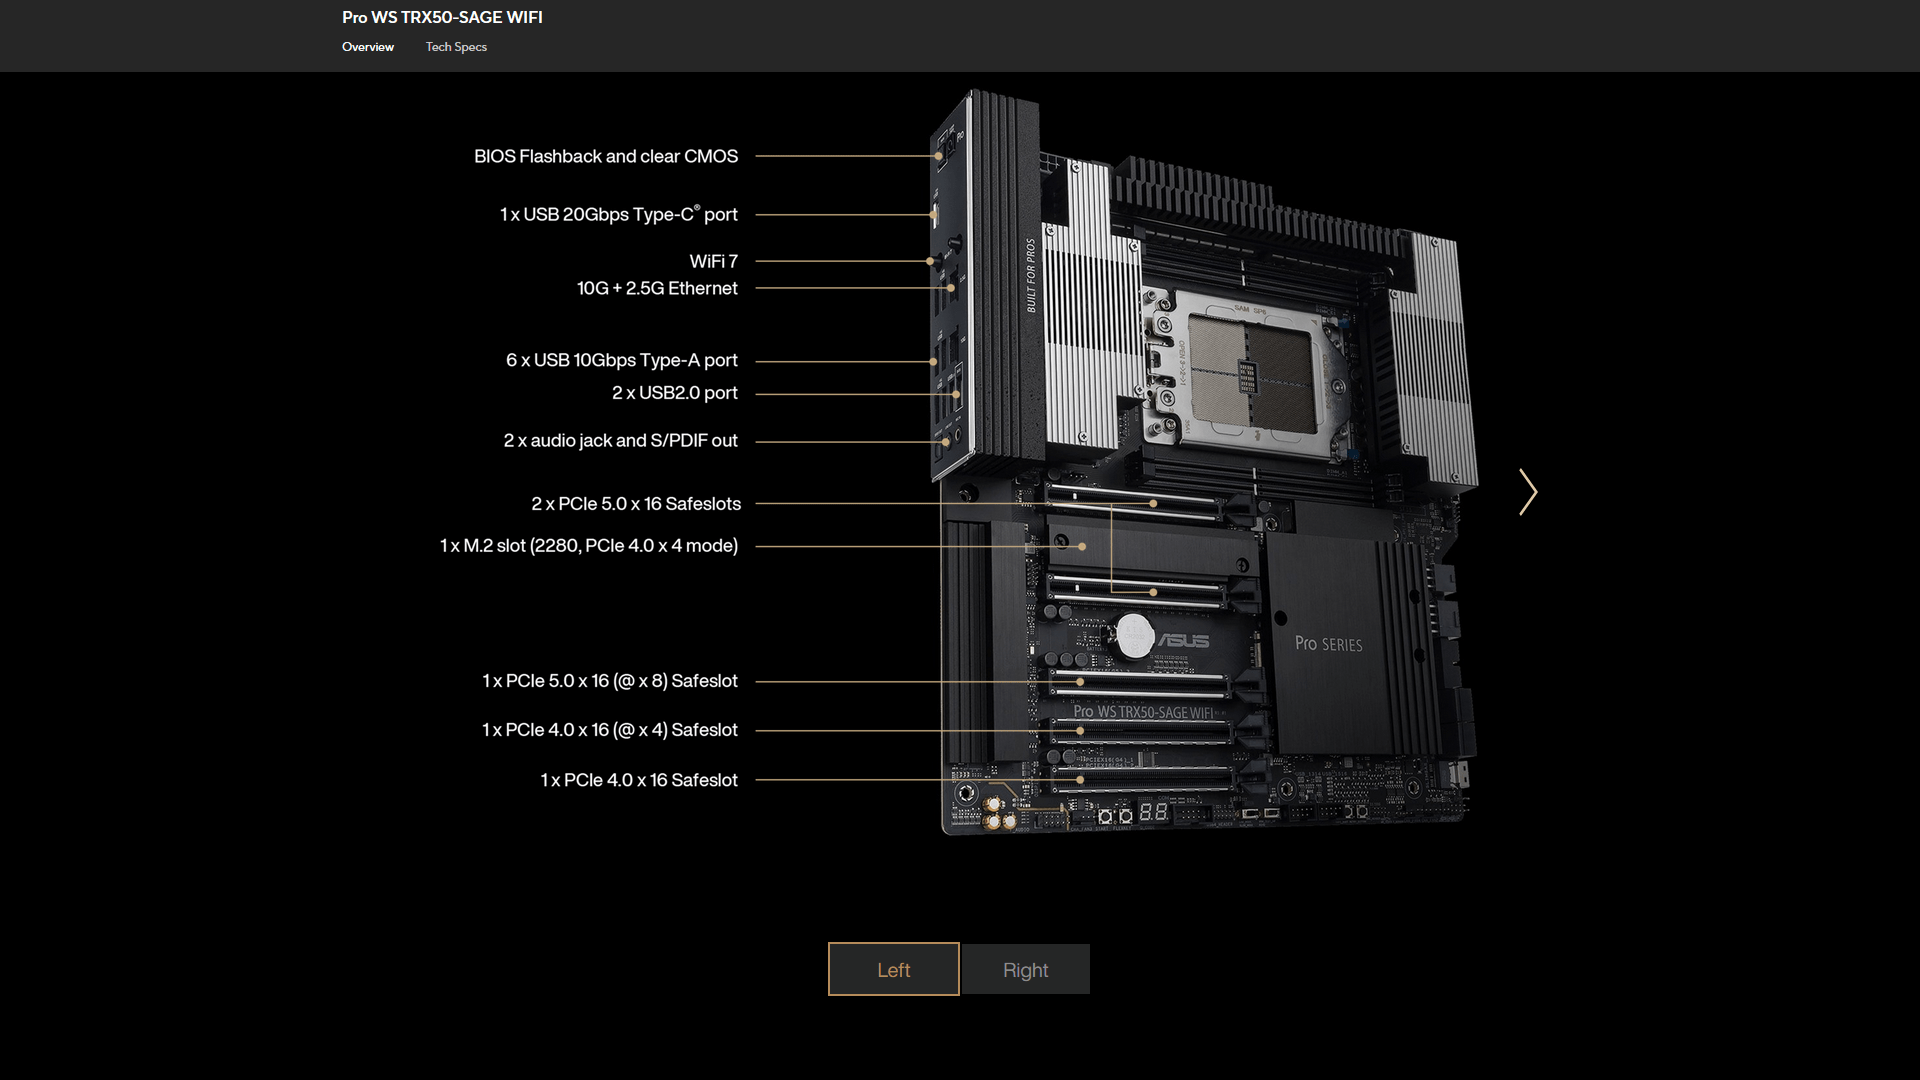
| Motherboard | ASUS Pro WS TRX50-SAGE WiFi | 1100 |
| CPU Cooling | EK-Quantum Magnitude sTRX4 EK-Pro QDC Kit P360 EK-Quantum Surface P360M EK-Vardar EVO 120ER Black (x3) | 360 840 141 |
| Fan Controller | ElmorLabs EFC-X9 | 60 |
| Memory | G.SKILL DDR5-6800 RDIMM | |
| Power Supply | Enermax Revolution ATX 3.0 1200W | 250 |
| Graphics Card | ASUS ROG Strix RTX 2080 TI | 850 |
| Storage | AORUS RGB 512 GB M.2-2280 NVME | 90 |
| Chassis | Open Benchtable V2 | 200 |
| Other | ElmorLabs PMD-USB | 60 |
ElmorLabs EFC-X9
The ElmorLabs EFC-X9 is an evolution of the original EFC and its fancy brother, the Easy Fan Controller SkatterBencher Edition (EFC-SB). I’ve used these fan controllers in many previous SkatterBencher guides.
I explained how I use the EFC devices in many previous SkatterBencher guides. I monitor the ambient temperature (EFC), water temperature (EFC), and fan duty cycle (EFC). I include the measurements in my Prime95 stability test results.
I also use the device to map the radiator fan curve to the water temperature. Without going into too many details, I have attached an external temperature sensor from the water in the loop to the EFC-X9. Then, I use the low/high setting to map the fan curve from 25 to 40 degrees water temperature. I use this configuration for all overclocking strategies. The main takeaway from this configuration is that it gives us a good indicator of whether the cooling solution is saturated.

AMD Ryzen Threadripper 7980X: Benchmark Software
We use Windows 11 and the following benchmark applications to measure performance and ensure system stability.
| BENCHMARK | LINK |
| SuperPI 4M | https://www.techpowerup.com/download/super-pi/ |
| Geekbench 6 | https://www.geekbench.com/ |
| Cinebench 2024 | https://www.maxon.net/en/cinebench/ |
| CPU-Z | https://www.cpuid.com/softwares/cpu-z.html |
| V-Ray 5 | https://www.chaosgroup.com/vray/benchmark |
| Corona Benchmark | https://corona-renderer.com/benchmark |
| AI-Benchmark | https://ai-benchmark.com/ |
| Y-Cruncher | http://www.numberworld.org/y-cruncher/ |
| Blender | https://opendata.blender.org/ |
| 3DMark Night Raid | https://www.3dmark.com/ |
| Handbrake | https://handbrake.fr/ |
| Shadow of the Tomb Raider | https://store.steampowered.com/app/750920/Shadow_of_the_Tomb_Raider_Definitive_Edition/ |
| Final Fantasy XV | http://benchmark.finalfantasyxv.com/na/ |
| Prime 95 | https://www.mersenne.org/download/ |
AMD Ryzen Threadripper 7980X: Stock Performance
Before starting overclocking, we must check the system performance at default settings. The default Precision Boost 2 parameters for the Ryzen Threadripper 7980X are as follows:
- PPT: 350 W
- TDC: 175 A
- EDC: 235 A
- THM: 95 C
- VID: 1.4718 V
- FMAX: 5650 / 5350 MHz
- FIT: 2127.8
- C-State: 8 cores / 4800 MHz
- PCC: 848 W

Here is the benchmark performance at stock:
- SuperPI 4M: 29.908 seconds
- Geekbench 6 (single): 2,868 points
- Geekbench 6 (multi): 24,020 points
- Cinebench 2024 Single: 114 points
- Cinebench 2024 Multi: 5,660 points
- CPU-Z V17.01.64 Single: 733.9 points
- CPU-Z V17.01.64 Multi: 49,903.2 points
- V-Ray 5: 56,212 vsamples
- Corona 10: 30.28 MRays/s
- AI Benchmark: 9,023 points
- Y-Cruncher Pi MT 10B: 126.830 seconds
- Blender (Monster): 813.60 fps
- Blender (Classroom): 395.40 fps
- 3DMark Night Raid: 74,309 marks
- Handbrake (H265, 1080P): 48.48 fps
- Tomb Raider: 195 fps
- Final Fantasy XV: 196.91 fps

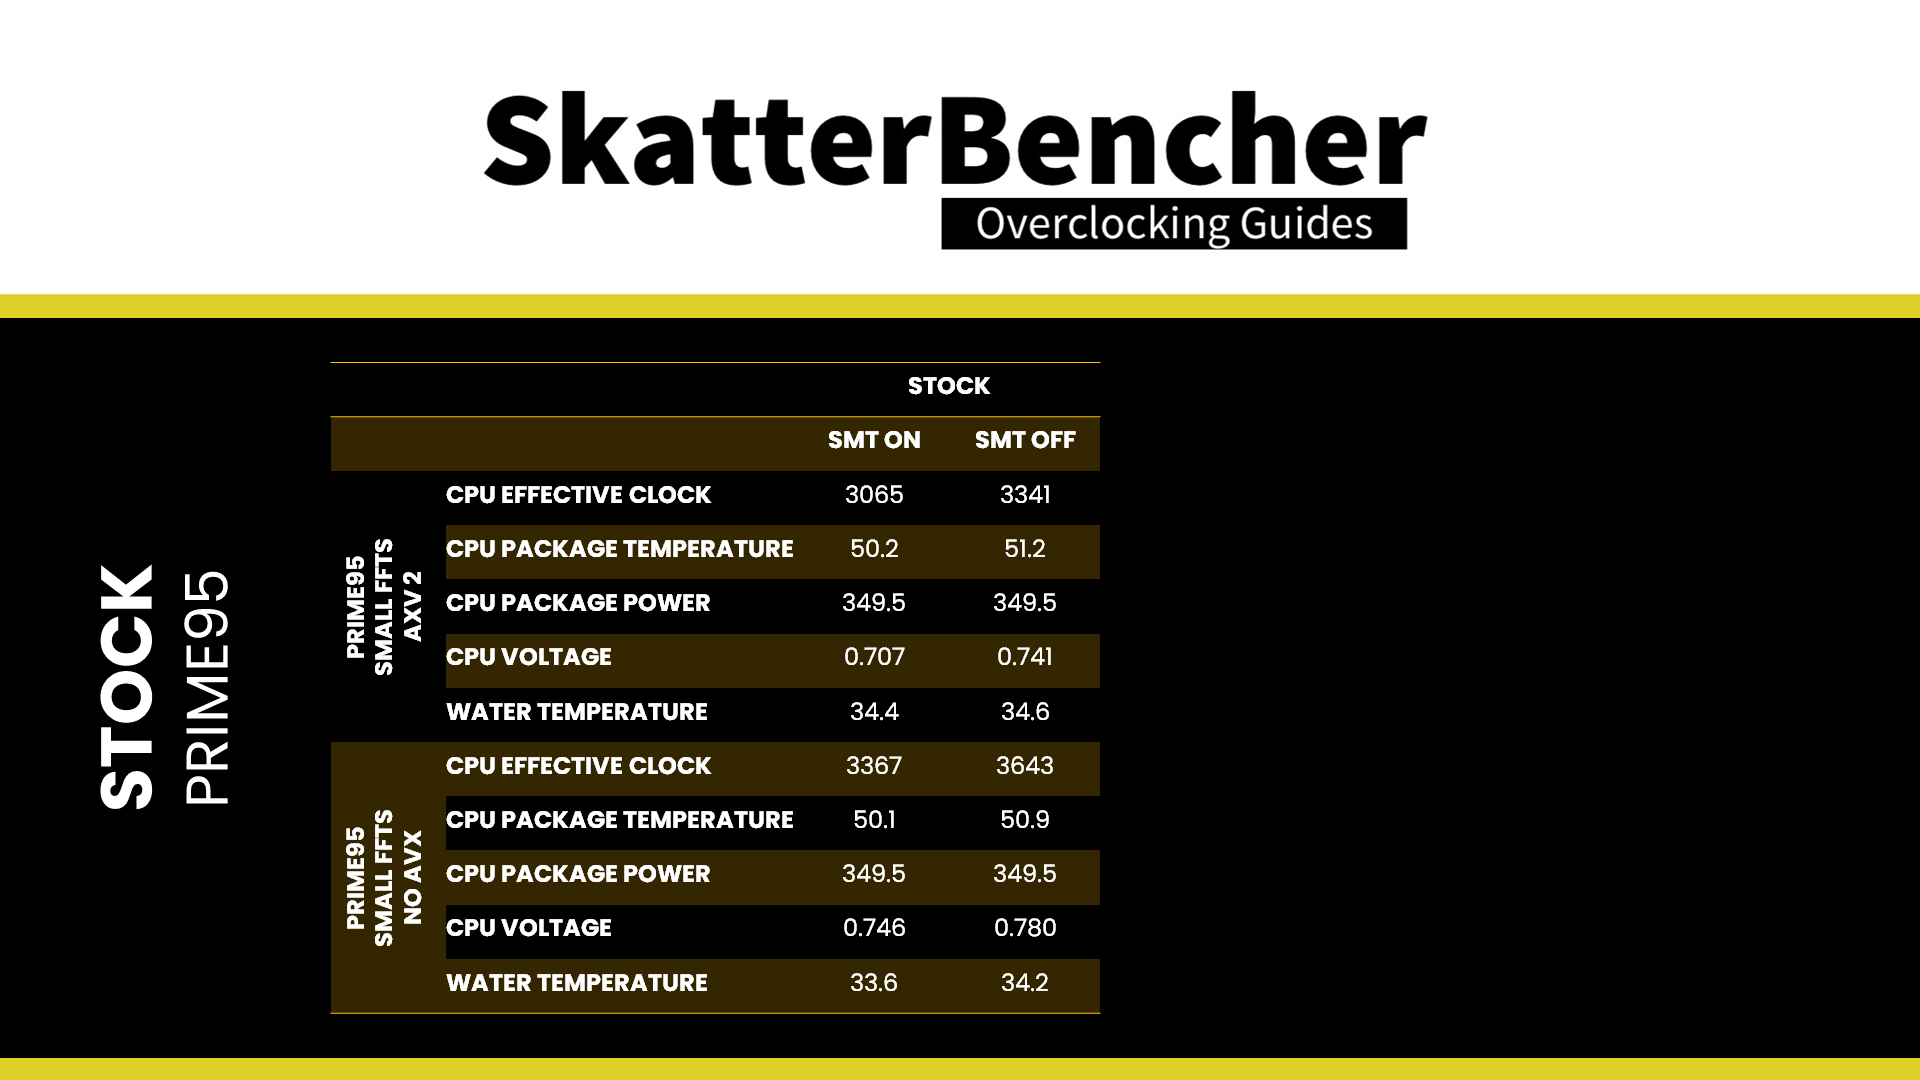
When running Prime 95 Small FFTs with AVX2 enabled, the average CPU core effective clock is 3065 MHz with 0.707 volts. The average CPU temperature is 50.2 degrees Celsius. The ambient and water temperature is 26.2 and 34.4 degrees Celsius. The average CPU package power is 349.5 watts.

When running Prime 95 Small FFTs with AVX disabled, the average CPU core effective clock is 3367 MHz with 0.746 volts. The average CPU temperature is 50.1 degrees Celsius. The ambient and water temperature is 25.7 and 33.6 degrees Celsius. The average CPU package power is 349.5 watts.

Going forward, I will simplify the Prime95 result overview to highlight the differences rather than explicitly state the figures.
Like in SkatterBencher #36 with the Threadripper 3990X and SkatterBencher #43 with the Threadripper 5990X, Windows and our benchmark applications don’t always handle over 128 threads very well. So, from the performance tuning perspective, it makes sense to check if turning off SMT helps improve performance with some benchmarks.
AMD Ryzen Threadripper 7980X: Stock Performance (SMT OFF)
To run stock with SMT disabled, you have to first go into the BIOS
- Go to the AMD CBS menu
- Enter the CPU Common Options submenu
- Enter the Thread Enablement submenu
- Set SMT Control to Disabled
- Enter the Thread Enablement submenu
Then save and exit the BIOS.

We re-ran the benchmarks and checked the performance compared to the default operation.
- SuperPI 4M: +4.50%
- Geekbench 6 (single): +3.17%
- Geekbench 6 (multi): +3.93%
- Cinebench 2024 Single: +3.51%
- Cinebench 2024 Multi: -18.87%
- CPU-Z V17.01.64 Single: +5.10%
- CPU-Z V17.01.64 Multi: -21.15%
- V-Ray 5: +23.12%
- Corona 10: -5.37%
- AI Benchmark: +3.37%
- Y-Cruncher Pi MT 10B: +8.70%
- Blender (Monster): -19.65%
- Blender (Classroom): -19.09%
- 3DMark Night Raid: +5.71%
- Handbrake (H265, 1080P): +20.87%
- Tomb Raider: -1.03%
- Final Fantasy XV: -1.19%

Similar to the Ryzen Threadripper 3990X and Ryzen Threadripper 5990X we tested before, some benchmark applications perform better when we disable SMT. Most notably, we see a +23% performance uplift in V-Ray 5. However, in some benchmarks, we see a performance downgrade. For example, our CPU-Z Multi-thread performance is down 21%.
When comparing the Prime95 results, we find that disabling SMT provides additional performance headroom in both AVX and non-AVX workload scenarios. The Precision Boost algorithm boosts the frequency 276 MHz higher in an AVX and non-AVX all-core multi-threaded workload. That’s possible because disabling SMT creates additional voltage headroom within the Precision Boost limits. This extra voltage headroom then translates into higher clock frequencies.


It is important to note that, unlike with the Ryzen Threadripper 5990X, where TDC and EDC limit the multi-threaded performance, the Ryzen Threadripper 7980X is constrained by the TDP in both AVX and non-AVX scenarios. We’ll get back to why that is later in the blog post.
Of course, we can increase the maximum power consumption limit using Precision Boost Overdrive. That’s what we’ll do in our first overclocking strategy. However, before we get going, make sure to locate the CMOS Clear button.
Pressing the Clear CMOS button will reset all your BIOS settings to default, which is helpful if you want to start your BIOS configuration from scratch. The Clear CMOS button is located at the top of the I/O panel.
OC Strategy #1: PBO + D.O.C.P.
In our first overclocking strategy, we simply take advantage of enabling Precision Boost Overdrive 2 and ASUS DOCP.
Precision Boost Overdrive 2
With the launch of Zen 3, AMD introduced an improved version of the Precision Boost Overdrive toolkit, allowing for manual tuning of the parameters affecting the Precision Boost frequency boost algorithm.
Precision Boost Overdrive 2 builds on the PBO implementation of Zen 2. In addition to the overclocking knobs from Zen+ (PPT, TDC, EDC) and Zen 2 (Boost Override and Scalar), Precision Boost Overdrive 2 also introduced Curve Optimizer.

There are essentially 3 levels of Precision Boost Overdrive
- AMD’s stock values, which can be set by disabling PBO
- The motherboard vendor values, which are programmed into the BIOS to match the motherboard VRM specification and can be set by enabling PBO
- Custom values, which can be programmed by the end-user
I most recently took a deep dive into the Precision Boost Overdrive 2 toolkit in my Ryzen 7000 launch content. If you want to learn more about the impact of each of these settings, I suggest you check out that article.
In this overclocking strategy, we’re just enabling Precision Boost Overdrive, whereas, in the following strategies, we’ll explore tuning the parameters. By enabling Precision Boost Overdrive, we rely on the motherboard pre-programmed PBO parameters. We find that the following values have changed:

Increasing the PPT and, to a lesser extent, the TDC and EDC limit will help unleash the frequency in multi-threaded workloads previously limited by the EDC.
DOCP – Direct Over Clock Profile
DOCP stands for Direct Over Clock Profile. It is an ASUS technology that aims to replicate the AMD EXPO feature. AMD EXPO allows memory vendors such as G.SKILL to program higher performance settings onto the memory sticks. If the motherboard supports EXPO, you can enable higher performance with a single BIOS setting. So, it saves you lots of manual configuration.
BIOS Settings & Benchmark Results
Upon entering the BIOS
- Go to the Ai Tweaker menu.
- Set Ai Overclock Tuner to DOCP I
- Enter the Precision Boost Overdrive submenu
- Set Precision Boost Overdrive to Enabled
Then save and exit the BIOS.
We re-ran the benchmarks and checked the performance increase compared to the default operation with both SMT enabled and disabled.
SMT Enabled
- SuperPI 4M: +0.06%
- Geekbench 6 (single): +4.43%
- Geekbench 6 (multi): +3.34%
- Cinebench 2024 Single: +0.88%
- Cinebench 2024 Multi: +14.98%
- CPU-Z V17.01.64 Single: +4.02%
- CPU-Z V17.01.64 Multi: +17.38%
- V-Ray 5: +5.18%
- Corona 10: +20.55%
- AI Benchmark: +4.60%
- Y-Cruncher Pi MT 10B: +16.91%
- Blender (Monster): +22.25%
- Blender (Classroom): +27.31%
- 3DMark Night Raid: +1.29%
- Handbrake (H265, 1080P): +0.37%
- Tomb Raider: +4.10%
- Final Fantasy XV: 0.55%

SMT Disabled
- SuperPI 4M: +4.78%
- Geekbench 6 (single): +3.73%
- Geekbench 6 (multi): +7.21%
- Cinebench 2024 Single: +5.26%
- Cinebench 2024 Multi: -11.43%
- CPU-Z V17.01.64 Single: +5.64%
- CPU-Z V17.01.64 Multi: -14.78%
- V-Ray 5: +36.41%
- Corona 10: +4.10%
- AI Benchmark: +5.03%
- Y-Cruncher Pi MT 10B: +26.04%
- Blender (Monster): -14.82%
- Blender (Classroom): -9.97%
- 3DMark Night Raid: +6.68%
- Handbrake (H265, 1080P): +21.23%
- Tomb Raider: +1.54%
- Final Fantasy XV: +1.37%

We get significant performance gains in all multi-threaded benchmark applications by enabling Precision Boost Overdrive. The highest performance increase is in V-Ray 5, with +36.41% over stock performance. In light multi-threaded applications, however, we only see minor performance improvement.
In Prime 95, by enabling Precision Boost Overdrive, we get a ridiculous performance improvement across the board. Across all Prime 95 configurations, we get an additional 1 GHz of performance. With SMT and AVX enabled, we almost get 1.3 GHz higher frequency. That’s incredible!


If you remember, the performance uplift from enabling PBO on the 3990X was “only” about 700 MHz. With the Threadripper 5990X, it was slightly less than 1.2 GHz. Another thing to note is that the limiting factor is our CPU temperature. Despite running 2 360mm radiators and six fans at 100% speed, the water temperature exceeds 40 degrees Celsius. That means there is no more thermal dissipation capacity left.
OC Strategy #2: PBO Tuned + D.O.C.P.
In our second overclocking strategy, we tune the CPU’s Precision Boost dynamic frequency technology using the Precision Boost Overdrive 2 toolkit.
PBO 2: Fmax Boost Override
Fused maximum frequency, or Fmax, is one of the Precision Boost 2 infrastructure limiters constraining the CPU performance. The limiter determines the maximum allowed processor frequency across all CPU cores inside your CPU. Boost Clock Override or Fmax Override is one of the overclocker tools available in the PBO 2 toolkit. It allows the user to override the arbitrary clock frequency limit between -1000 MHz and +200 MHz in steps of 25 MHz.
We need to make two important notes about Boost Clock Override:
- The override only adjusts the upper ceiling of the frequency and doesn’t act as a frequency offset. Ultimately, the Precision Boost 2 algorithm still determines the actual operating frequency.
- Each CCD can have its own programmed Fmax limit. We already saw this with the multi-die Ryzen 7000X3D processors where, for example, the 7950X3D had one CCD with an Fmax of 5750 MHz and the other with an Fmax limit of 5150 MHz.
The same applies to the Ryzen Threadripper 7000X processors. Even though the listed maximum boost frequency for the AMD Ryzen Threadripper 7980X is 5.1 GHz, the programmed boost limit is 5650 MHz for CCD0 and 5350 MHz for CCDs 1 to 7. So, even though you may have 8 CCDs on the 64-core Threadripper 7980X, only one of the CCDs has a high maximum boost frequency, and the others have a lower maximum boost frequency.

When we increase the Fmax boost limit by 200 MHz, CCD0’s new Fmax is 5850 MHz, and the other CCDs have a new boost limit of 5550 MHz.

PBO 2: C-State Boost Limiter
Like the Ryzen 7000, Storm Peak’s multi-core performance is restricted by the Precision Boost C-State Boost Limiter. I spoke about this limiter in a standalone article post-Ryzen 7000 launch.
The C-State Boost limiter is one of the many performance limiters that impact the Precision Boost algorithm. Effectively, C-State Boost limits the maximum frequency when a certain number of cores are active. On the 64-core Ryzen Threadripper 7980X, the C-State Boost limiter restricts the CPU core frequency to 4.8 GHz when more than 8 cores are active.

For Ryzen 7000, the C-State boost limiter was enabled on the launch AGESA code. However, the ASUS ROG team developed a Medium Load Boostit feature to work around this problem. I explain how this feature works in a video titled “WHY Your Ryzen 7000 Doesn’t Boost Past 5.5 GHz (anymore).” On later AGESA versions, it appears AMD disabled the C-State Boost Limit.
Unfortunately, on Ryzen Threadripper 7000, we cannot work around the C-State Boost limiter by using the ASUS Medium Load Boostit trick. So, for now, we’re stuck with this performance limiter regarding multi-threaded performance. However, when we increase the Fmax Boost Override, the C-State Boost limit is also offset. So, you can boost to 5 GHz when 8 or more cores are active.

PBO 2: Curve Optimizer
Curve Optimizer is an important new feature of Precision Boost Overdrive 2. Curve Optimizer allows end-users to adjust the factory-fused VFT or voltage-frequency-temperature curve for each CPU core separately. The VFT curve is a unique curve for each core inside your CPU that defines the required voltage for a given frequency at a given temperature. Higher frequencies or higher operating temperatures require higher voltage.

Curve Optimizer adjusts the VFT curve by offsetting the voltages of the factory-fused VFT curve. By setting a positive offset, you increase the voltage point. Conversely, you decrease the voltage point by setting a negative offset. You can offset the entire curve by up to 50 steps in a positive or negative direction. Each step represents approximately 5mV.
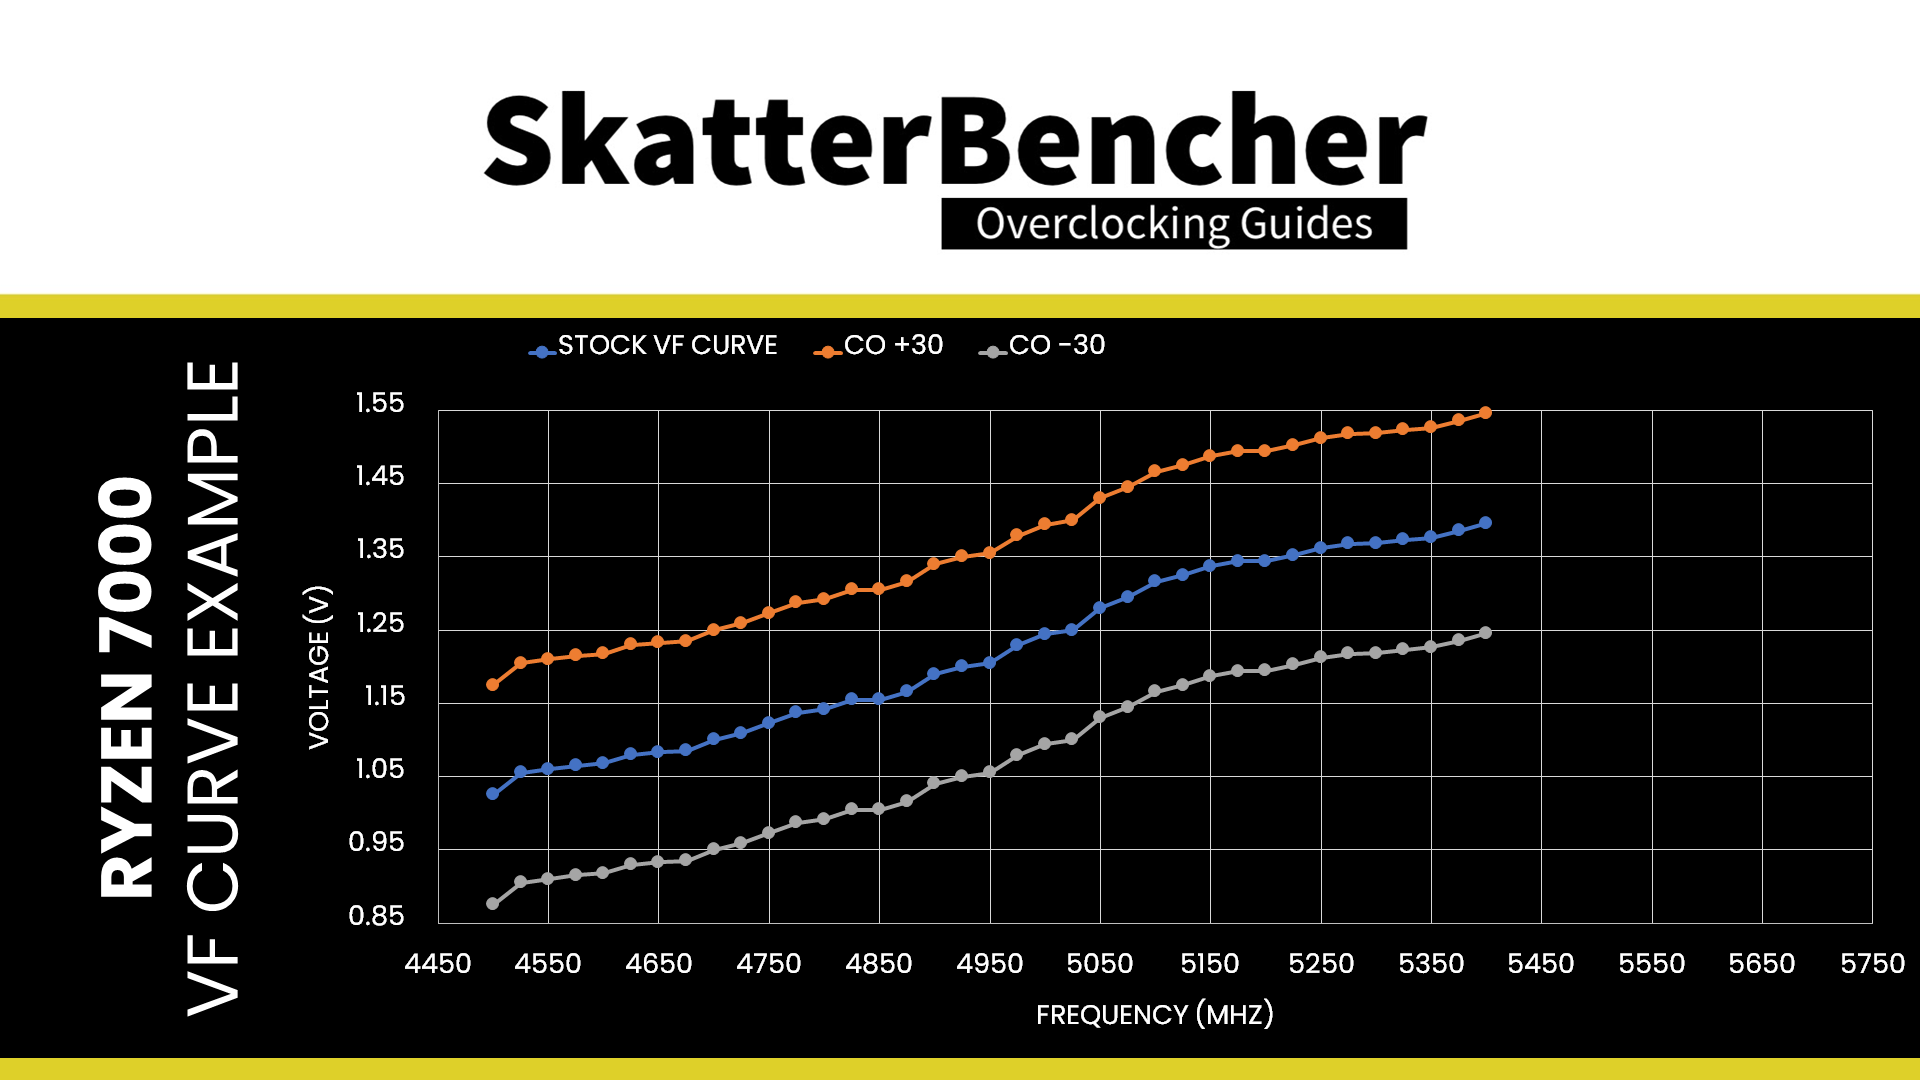
The traditional overclocking approach for AMD Ryzen CPUs is to set a negative curve optimizer. Two things happen when you adjust the VFT curve with a negative point offset.
- First, you tell the CPU that it needs less voltage for a given frequency. And, as a consequence, at a given voltage, it can apply a higher frequency.
- Second, the CPU temperature will be lower because you use less voltage at a given frequency. That extra thermal headroom will also encourage the Precision Boost algorithm to target higher voltages and frequencies.
In my AMD Raphael overclocking launch article, I explored the ins and outs of Curve Optimizing with Precision Boost Overdrive 2. If you want to learn more about the impact of Curve Optimizer, I suggest you check out that blog post.
On the Ryzen Threadripper 7000, Curve Optimizer is available per CPU, per CCD, or per core. The new feature, Per CCD Curve Optimizer tuning, offers extra flexibility. However, mixing and matching with per-core tuning is impossible. So, you tune Per CPU, Per Core, or Per CCD, but not some chiplets per CCD and others chiplets per core.

Like in the past, per-core tuning offers a real benefit as it provides some cores with a lot more frequency headroom.
Curve Optimizer Tuning Process
The manual tuning process for Curve Optimizer can become quite convoluted since it affects the CPU core voltage in all scenarios ranging from very light single-threaded workloads to heavy all-core workloads. Usually, I spend a lot of time on per-core curve optimization. But for this platform, I didn’t have that much time available. So, I took a more straightforward approach:
- I started with a negative curve optimizer of -15, then tried Prime95 Small FFTs with AVX2 on each core for a few seconds.
- I increased the negative curve optimizer magnitude by 5 steps for the cores that didn’t crash.
- I reduced the negative curve optimizer magnitude by 5 steps for the cores that did crash.
- Once all cores were dialed in, I ran another Prime95 Small FFTs with AVX and SMT disabled. The goal was to pass for 30 minutes without any core failing or clock stretching. Again, when a core fails, I reduce the negative curve optimizer magnitude by 5 steps.

The whole process lasted about an afternoon. Let me know in the comments below if you want to see me do this on a livestream with the 96-core CPU.
BIOS Settings & Benchmark Results
Upon entering the BIOS
- Go to the Ai Tweaker menu.
- Set Ai Overclock Tuner to DOCP I
- Enter the Precision Boost Overdrive submenu
- Set Precision Boost Overdrive to Enabled
- Set CPU Boost Clock Override to Enabled (Positive)
- Set Max CPU Boost Clock Override(+) to 200
- Enter the Curve Optimizer submenu
- Set Curve Optimizer to Per Core
- Set Core 0 to Core 63 Curve Optimizer Sign to Negative
- I set the Curve Optimizer for each core according to my test result. The curve Optimizer results range from -5 to -30
Then save and exit the BIOS.
We re-ran the benchmarks and checked the performance increase compared to the default operation with both SMT enabled and disabled.
SMT Enabled
- SuperPI 4M: +1.29%
- Geekbench 6 (single): +5.54%
- Geekbench 6 (multi): +6.85%
- Cinebench 2024 Single: +4.39%
- Cinebench 2024 Multi: +18.06%
- CPU-Z V17.01.64 Single: +6.46%
- CPU-Z V17.01.64 Multi: +22.07%
- V-Ray 5: +15.49%
- Corona 10: +29.68%
- AI Benchmark: +5.12%
- Y-Cruncher Pi MT 10B: +17.05%
- Blender (Monster): +27.78%
- Blender (Classroom): +32.35%
- 3DMark Night Raid: +6.42%
- Handbrake (H265, 1080P): +5.28%
- Tomb Raider: +4.62%
- Final Fantasy XV: +2.96%

SMT Disabled
- SuperPI 4M: +6.32%
- Geekbench 6 (single): +4.15%
- Geekbench 6 (multi): +8.27%
- Cinebench 2024 Single: +6.14%
- Cinebench 2024 Multi: -8.99%
- CPU-Z V17.01.64 Single: +6.46%
- CPU-Z V17.01.64 Multi: -12.69%
- V-Ray 5: +43.46%
- Corona 10: +10.12%
- AI Benchmark: +6.03%
- Y-Cruncher Pi MT 10B: +28.63%
- Blender (Monster): -7.73%
- Blender (Classroom): -4.85%
- 3DMark Night Raid: +8.99%
- Handbrake (H265, 1080P): +26.94%
- Tomb Raider: +4.10%
- Final Fantasy XV: +1.75%

We get significant performance gains in all multi-threaded benchmark applications by simply tuning Precision Boost Overdrive with Curve Optimizer. The highest performance increase is in V-Ray 5, with a +43.46% improvement compared to stock when we disable SMT. We also get a slight improvement in tests that use only a few cores, for example, +6.46% in CPU-Z.
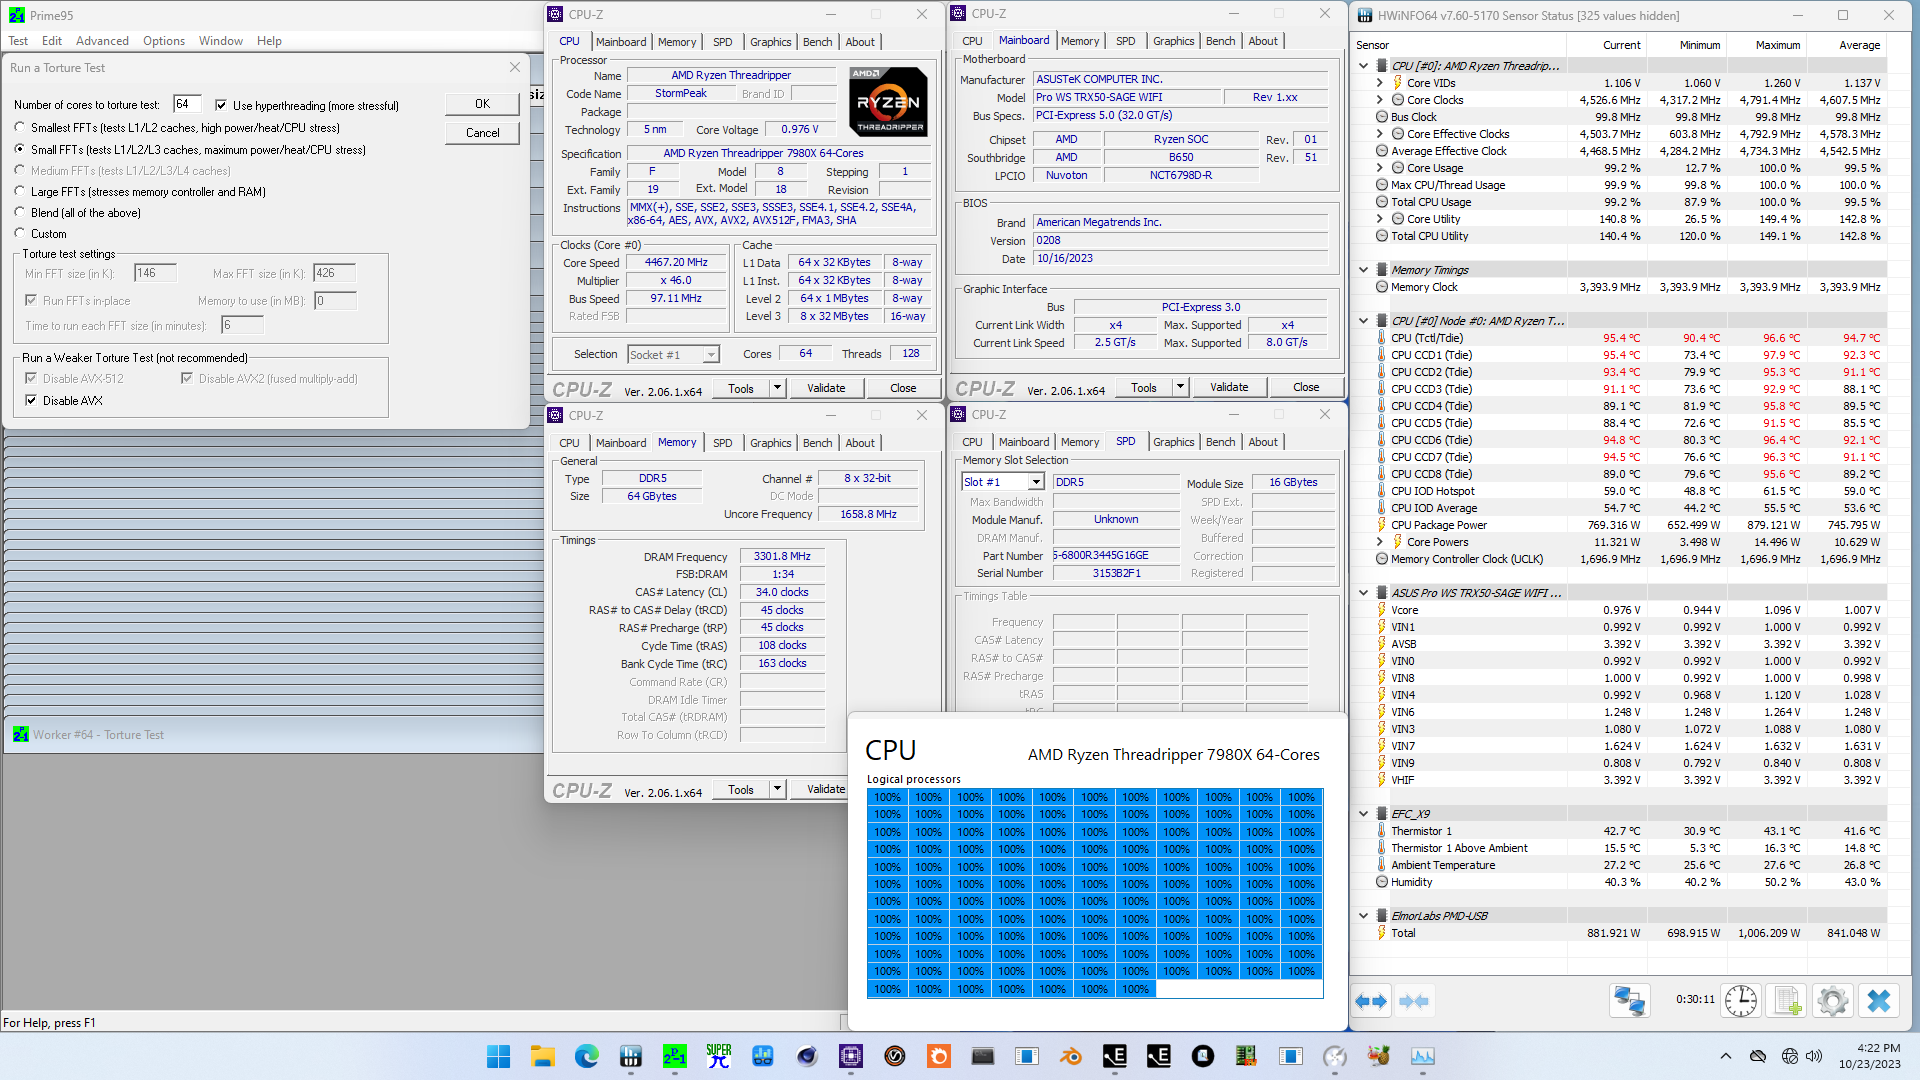
In Prime95, we get another significant boost from tuning Precision Boost Overdrive. The Fmax override and Curve Optimizer combination gives us another 275 MHz when AVX2 is enabled and SMT disabled. But the most impressive result for me is the average frequency of 4.9 GHz across all cores in Prime95 non-AVX and SMT disabled. Yes, that’s right, that’s all 64 cores running Prime95 at 4.9 GHz! Admittedly, we also get a hefty increase in power consumption: 64 cores at 4.9 GHz is pulling about 900W.


Ryzen Threadripper 7980X Prime95 Discussion
Before our next overclocking strategy, I want to discuss the Prime95 stability test results.
I mentioned several times that I previously overclocked the 64-core Zen 2 Ryzen Threadripper 3000, Zen 3 Ryzen Threadripper 5000, and, now, Zen 4 Ryzen Threadripper 7000. I think it’s worth bringing together the data points from each overclocking guide to see how AMD’s progressed in providing compute power.


The comparison rules are straightforward: I take the results from each overclocking guide with the “most tuned” Precision Boost Overdrive strategy. For each of the three platforms, it means unlocking the power limits and letting the CPU run until it’s limited by the TjMax, which is 95 degrees Celsius for each CPU.
Then, we compare the average CPU core effective clock frequency during a 30-minute Prime95 workload. We compare two scenarios:
- Prime95 Small FFTs with AVX2 and SMT enabled
- Prime95 Small FFTs with AVX and SMT disabled

Note that this is not a one-to-one fair comparison since the cooling solutions are slightly different, and I didn’t retest the older platforms. So take it for what it is. Now, onto the data.
If we look at frequency in the heaviest workload, Prime95 Small FFTs with AVX2 and SMT enabled, then the frequency improvement is remarkable. With the Zen 2 64-core, we could run almost 3.3 GHz, with Zen 3 slightly over 3.8 GHz, and with the Zen 4 chip, we can almost run 4.6 GHz. That’s 1.3 GHz more than Zen 2 and 800 MHz more than Zen 3.
If we look at frequency in the heaviest workload, Prime95 Small FFTs with AVX2 and SMT enabled, then the frequency improvement is remarkable. With the Zen 2 64-core, we could run almost 3.9 GHz, with Zen 3 slightly over 4.0 GHz, but with the Zen 4 chip, we can run a little over 4.9 GHz. That’s about a 1 GHz improvement!

The frequency improvement is a combination of many factors.
The first significant contributor is improvements in the manufacturing process, which shift the voltage-frequency curve in favor of higher frequencies at a given voltage. We can see this very well with the Ryzen Threadripper. In the heavy Prime95 workloads, the optimum voltage stays the same even though the Zen 4 7980X, built on TSMC 5N, runs at significantly higher frequencies.

A second major contributor is the ability to deliver substantial power to the CPU cores. I know it’s popular nowadays to comment negatively on CPUs with high power consumption. Still, from a business perspective, using slightly more power on 1 CPU to meet a particular performance requirement is better than using multiple CPUs. So, CPU and platform engineers must figure out how to reliably deliver such high power to the CPU.
As we can see from the data, the Zen 4 Ryzen Threadripper can push substantially more power through the 8 CPU chiplets. That’s mostly down to the VRM, I suspect. With Zen 2 and Zen 3 Ryzen Threadripper, the TDC, EDC, and VRM temperature were key limiting factors when overclocking. For Zen 4, AMD has moved to two VDDCR_CPU voltage rails to power the CPU cores, thereby significantly reducing the load on the CPU core voltage plane.

Anyway, enough about Prime95. Let’s move on to our next overclocking strategy.
OC Strategy #3: ASUS AI Overclock
We use the ASUS AI Overclocking feature integrated into the ASUS BIOS in our third overclocking strategy.
ASUS AI Overclocking
For many years, board vendors have tried to implement automatic overclocking features in their BIOS for more straightforward performance enhancement. This has always been a mixed bag, as most preset OC profiles are overly optimistic in frequency target or overly generous with the voltage selection. So often, you would end up with a slightly unstable or overheating system.
ASUS AI overclocking uses a unique strategy for automatic overclocking. Instead of working with preset frequency and voltage profiles, the system will monitor the CPU and cooling system throughout an initial testing phase. Based on its findings, it will then predict the optimal settings. The system automatically guides the overclocking process and adjusts voltages and frequency to match your cooling system. The better your cooling, the higher your AI overclock.

There are three steps to enabling AI overclocking. First, reset the BIOS to default settings. Then, reboot and enter the operating system. Run heavy workloads, such as Prime95 or Cinebench, for 10 to 30 minutes. Then, return to the BIOS and enable AI Overclock when ready.
In addition to automatic overclocking, AI Overclocking provides advanced information and suggestions in the AI Features menu. The information includes:
- P0 VID and SP values for each CPU core
- Precision Boost Overdrive 2 suggested overclocking parameters
- Dynamic OC Switcher suggested overclocking parameters
The SP value is based on the maximum boost frequency, temperature, and P0 VID combination. Generally, it indicates the quality of a particular core. A higher SP value would indicate a better-quality core with superior overclocking capabilities, though it’s not an exact science. The overclocking suggestions are based on a continued evaluation of your CPU thermal solution.
After enabling AI Overclock, the following settings have changed:

As you can see, AI Overclock provides a conservative +100 MHz increase of the Precision Boost maximum frequency. It also boosts the CPU to 4872 MHz in all-core workloads by enabling Dynamic OC Switcher.
BIOS Settings & Benchmark Results
Upon entering the BIOS
- Go to the Ai Tweaker menu
- Set Ai Overclock Tuner to DOCP I
- Set CPU Core Ratio to AI Optimized
Then save and exit the BIOS.
We re-ran the benchmarks and checked the performance increase compared to the default operation.
- SuperPI 4M: +0.79%
- Geekbench 6 (single): +0.91%
- Geekbench 6 (multi): +5.87%
- Cinebench 2024 Single: +4.39%
- Cinebench 2024 Multi: +13.37%
- CPU-Z V17.01.64 Single: +3.04%
- CPU-Z V17.01.64 Multi: +16.49%
- V-Ray 5: +10.94%
- Corona 10: +15.30%
- AI Benchmark: +4.47%
- Y-Cruncher Pi MT 10B: +9.64%
- Blender (Monster): +23.91%
- Blender (Classroom): +25.77%
- 3DMark Night Raid: +4.91%
- Handbrake (H265, 1080P): +4.83%
- Tomb Raider: +4.10%
- Final Fantasy XV: +1.46%

Enabling AI overclocking gives us a decent performance bump, especially in multi-threaded benchmark applications. We get the highest boost in performance of +25.77% in Blender Classroom.
When running Prime 95 Small FFTs, either with AVX2 enabled or AVX disabled, unfortunately, the CPU is not stable. AI Overclock targets the typical use-case and stability requirements, not a worst-case scenario like Prime95 with AVX.
OC Strategy #4: Manual Overclocking
In our fourth overclocking strategy, I will try manual overclocking. Since I was a little short on time with this platform, I focused on stability in our worst-case scenario: Prime95 Small FFTs with AVX2 and SMT enabled.
One could question the use-case for manual overclocking of the Ryzen Threadripper CPUs. Just like with all Ryzen processors, the major downside of manual overclocking is that you lose the benefits of Precision Boost 2 technology in low-threaded benchmark applications. So, whereas this 7980X can boost up to 5650 MHz with Precision Boost, it will be limited to your highest manual frequency when manually overclocking.
However, I believe there’s a good use case for manual overclocking on the Ryzen Threadripper, and that’s for maximizing workload-specific performance. As I demonstrated in SkatterBencher #43 with the Zen 3 Ryzen Threadripper, optimizing a specific workload can yield another 10 to 20 percent more performance than relying on a tuned Precision Boost algorithm.

Let’s look at its architecture in more detail to better understand the performance tuning opportunities embedded in the Ryzen Threadripper 7980X processor.
CPU Core Frequency & Voltage
The Ryzen Threadripper 7980X is AMD’s Storm Peak Zen 4-based flagship high-end desktop CPU. Storm Peak is derived from the EPYC Genoa server product line and may feature up to thirteen chips on the package: twelve (12) CCDs and a single IO die.

CCD stands for Core Chiplet Die and is a die on a Ryzen CPU with CPU cores. The Zen cores are packed together in a CCX, or Core Complex. A Zen 4 CCX consists of up to eight individual cores, each with its L1 and L2 cache and a shared 32MB of L3 cache.

The frequency of the CPU cores is driven by a 100 MHz reference clock input. Each CCX has its own PLL and thus can run an independent frequency. The cores within a CCX share the same PLL, so they’ll run at the same frequency. That means, for the Ryzen Threadripper 7980X, we can set an independent frequency for each of the 8 CCXs. Ironically, that means we have less tuning granularity than with the Zen 2 Ryzen Threadripper 3990X, as Zen 2 has 2 CCXs in 1 CCD and thus double the CCX frequency tuning capabilities.
The voltage of the CPU cores is provided by not one but two VDDCR_CPU voltage rails. This significant change from previous Ryzen Threadripper platforms will undoubtedly impact the overclocking experience.

The main advantage of adding an extra voltage plane is that it’s much less taxing on the VRM. In case you missed my SkatterBencher #43 overclocking guide with the Ryzen Threadripper 5990X processor, a key limiting issue for reaching maximum performance on the previous generation was that, under overclocked conditions, the EDC (or Electrical Design Current) would peak over 800 amps. That would trigger the VRM OCP and shut down the system.

With the current draw now split across two power planes, the current draw per power plane halves. As a result, there’s no VRM limitation when overclocking … even if you push all 64 cores to their limit.
Choosing the proper manual voltage is always a matter of finding a suitable trade-off between increased overclocking potential, the thermal challenges that come with increased voltage, and, of course, consideration of CPU lifespan.
Ryzen Threadripper 7980X Per-CCX Frequency Tuning Process
With that last thought, we kick off the most tedious or exciting aspect of Ryzen Threadripper overclocking: per-CCX frequency tuning.
Our limiting factor will ultimately be the cooling solution as power consumption increases exponentially with operating voltage and temperature scales (somewhat) linearly with power consumption. The maximum voltage will be determined by the application we’re tuning for.
So, the first step in our tuning process would be to set a fixed CPU ratio and check the maximum temperature when running our workload. If there’s thermal headroom left, increase the operating voltage. Once we know the maximum voltage, we can tune the CPU ratio of each CCX. Simply increase the CPU ratio of one CCX until the application shows signs of instability, then back off. Do this for each CCX sequentially, and you’ll end up with the maximum stable per-CCX frequency for a given voltage.

In this table, you can find the maximum ratio for each CCX.

As a reminder, the values in this table are for my specific system and a specific stability test. Your CPU may have wildly different values depending on the CPU sample, cooling and motherboard, and your chosen stability test.
BIOS Settings & Benchmark Results
Upon entering the BIOS
- Go to the Ai Tweaker menu
- Set Ai Overclock Tuner to DOCP I
- Enter the CPU Core Ratio (Per CCX) submenu
- Set Core VID 0 and 1 to 1.135
- Set CCD0 CCX0 Ratio to 48.50
- Set CCD1 CCX0 Ratio to 47.50
- Set CCD2 CCX0 Ratio to 46.00
- Set CCD3 CCX0 Ratio to 47.50
- Set CCD4 CCX0 Ratio to 47.75
- Set CCD5 CCX0 Ratio to 47.00
- Set CCD6 CCX0 Ratio to 47.00
- Set CCD7 CCX0 Ratio to 47.75
Then save and exit the BIOS.
We re-ran the benchmarks and checked the performance increase compared to the default operation:
- SuperPI 4M: -9.06%
- Geekbench 6 (single): -8.68%
- Geekbench 6 (multi): +3.96%
- Cinebench 2024 Single: -9.65%
- Cinebench 2024 Multi: +13.78%
- CPU-Z V17.01.64 Single: -8.08%
- CPU-Z V17.01.64 Multi: +15.60%
- V-Ray 5: +8.73%
- Corona 10: +15.66%
- AI Benchmark: +2.74%
- Y-Cruncher Pi MT 10B: +10.15%
- Blender (Monster): +21.47%
- Blender (Classroom): +26.39%
- 3DMark Night Raid: +2.46%
- Handbrake (H265, 1080P): +0.12%
- Tomb Raider: +4.62%
- Final Fantasy XV: +0.88%

As we are used to with AMD Ryzen, manual overclocking has the significant drawback of losing the single-threaded performance we get with Precision Boost. Whereas even at stock, the CPU cores can boost up to 5650 MHz, with our manual overclock, we only reach a maximum of 4850 MHz. That translates into about 10% performance loss in single-threaded applications. In multi-threaded applications, our manual overclock provides a decent uplift of up to +26.39% in Blender Classroom.
With manual tuning, we can squeeze out an extra 160 MHz in the most intense Prime95 workload variant. We now have all 128 threads running Prime95 AVX2 over 4.7 GHz. That’s pretty impressive. What’s more, in Prime95 Small FFTs without AVX, our system runs about 80 MHz less compared to using Precision Boost Overdrive. However, we do this at an incredible 14 degrees Celsius lower temperature and 240 W lower power consumption!


AMD Ryzen Threadripper 7980X: Conclusion
Alright, let us wrap this up.
Unfortunately, I have enough time with this platform before the launch to explore everything it offers. However, based on my limited hands-on experience, I’m thoroughly impressed with the Ryzen Threadripper 7000 platform. It’s so damn powerful, and it’s not that difficult to squeeze more performance.
The Ryzen Threadripper 7980X is the third 64-core Threadripper I’ve overclocked on this channel, following the Zen 2 3990X and Zen 3 5990X. The improvement in frequency and performance is incredible. I remember being so happy hitting 4 GHz Prime95 on all cores with the Threadripper 5000, but with Threadripper 7000, we’re less than 100 MHz away from 5 GHz. Yea … 5 GHz with all 64 cores running Prime95!
I think the most significant difference for overclockers is the dual VDDCR_CPU voltage rail. By doubling the voltage planes for the CPU, AMD has worked around the main bottleneck for the previous Ryzen Threadrippers: the VRM.
Anyway, that’s all for today! I also plan to check out the 96-core Ryzen Threadripper 7995WX in the future, so stay tuned if you’re interested. I want to thank my Patreon supporters for supporting my work. If you have any questions or comments, please drop them in the comment section below.
See you next time!
5 Minute Overclock: Ryzen Threadripper 7980X to 5750 MHz - 5 Minute Overclock
[…] I’ll speedrun you through the BIOS settings and provide some notes and tips along the way. Please note that this is for entertainment purposes only and not the whole picture. Please don’t outright copy these settings and apply them to your system. If you want to learn how to overclock this system, please check out the longer SkatterBencher article. […]