Almost 7 GHz 14900KS with EK Delta2 TEC

I show the BIOS configuration and some benchmarks with my 6.9 GHz Core i9-14900KS CPU cooled by the EK-Quantum Delta² TEC.
I had the opportunity to try out a Core i9-14900KS processor a week ahead of launch. Since EK just launched the Cryo Cooling technology installer supporting 14th gen processors, I figured I’d do the same as I did for the Core i9-13900KS launch: try to maximize the frequency with Cryo Cooling.
In this short video I want to share how I got to 6900 MHz and hopefully give you an idea of what’s possible with Raptor Lake’s last hurrah.
Core i9-14900KS Cryo: Platform Overview
The system we’re overclocking today consists of the following hardware.
| Item | SKU | Price (USD) |
| CPU | Intel Core i9-14900KS | |
| Motherboard | ASUS ROG Maximus Z790 Apex Encore | 700 |
| CPU Cooling | EK-Quantum Delta² TEC EK-Quantum Kinetic FLT 240 D5 EK-Quantum Surface P480M EK-Furious Meltemi 120 x4 | 540 778 98 |
| Thermal Paste | Thermalright TFX Extreme | 20 |
| Fan Controller | BENCHLAB | 200 |
| Memory | G.SKILL Trident Z5 RGB 32GB DDR5-8000C38 | 310 |
| Power Supply | XPG Fusion 1600W Titanium | 110 |
| Graphics Card | ASUS ROG Strix RTX 2080 TI | 880 |
| Storage | V-Color VP1368 512GB | 50 |
| Chassis | Open Benchtable V2 | 200 |
BENCHLAB
This is the first time I’m using the BENCHLAB in one of my videos. Full disclosure, I’m part of the BENCHLAB team so I might be a bit biased. For this system I thought it would be cool to set it up with the Open Benchtable in vertical mode to see if it works.

The BENCHLAB provides a bunch of power, voltage, temperature, and other telemetry data of the system on your test bench. I didn’t really use it that much for this guide, but I’ll probably show more of it in future videos.
I also used the BENCHLAB to map the radiator fan curve to the water temperature. Without going into too many details, I have attached an external temperature sensor from the water in the loop to the BENCHLAB. Then, I map the fan curve from 25 to 40 degrees water temperature.

Core i9-14900KS Cryo: Session Objectives
Since I was very limited on time to try out the 14900KS, I had to focus on specific objectives. I knew I wouldn’t be able to set the system up for a fully stable overclocking with all the required stress tests, so I decided I wanted to achieve the following:
- Only enable the P-cores
- Achieve the highest possible CPU frequency using Unregulated mode
- A configuration that’s stable enough to pass select benchmarks in both Cryo and Unregulated mode:
- Set it all up in the BIOS so no adjustments in the operating system are required.

Before I show the benchmark runs, let’s go through the BIOS configuration.
Core i9-14900KS Cryo: BIOS Overview
Now I’ll walk you through my BIOS configuration and provide some notes and comments along the way. Of course, please note that this is primarily for entertainment purposes and not the whole picture. Please don’t outright copy these settings and apply them to your system. I don’t consider this a fully stable system so take my settings for what they are.
P-Core Frequency Basic Configuration
Since we’re focusing on P-core performance in this video, let’s first disable the E-cores. So go to the Advanced Menu and enter the CPU Configuration submenu. Set Active Efficient Cores to 0.

Now, let’s set up our P-core overclock in the Extreme Tweaker menu. We will rely on the OCTVB technology to dynamically adjust the Turbo Ratio limits based on the CPU operating temperature. But, first, let’s set up the basic CPU frequency rules.
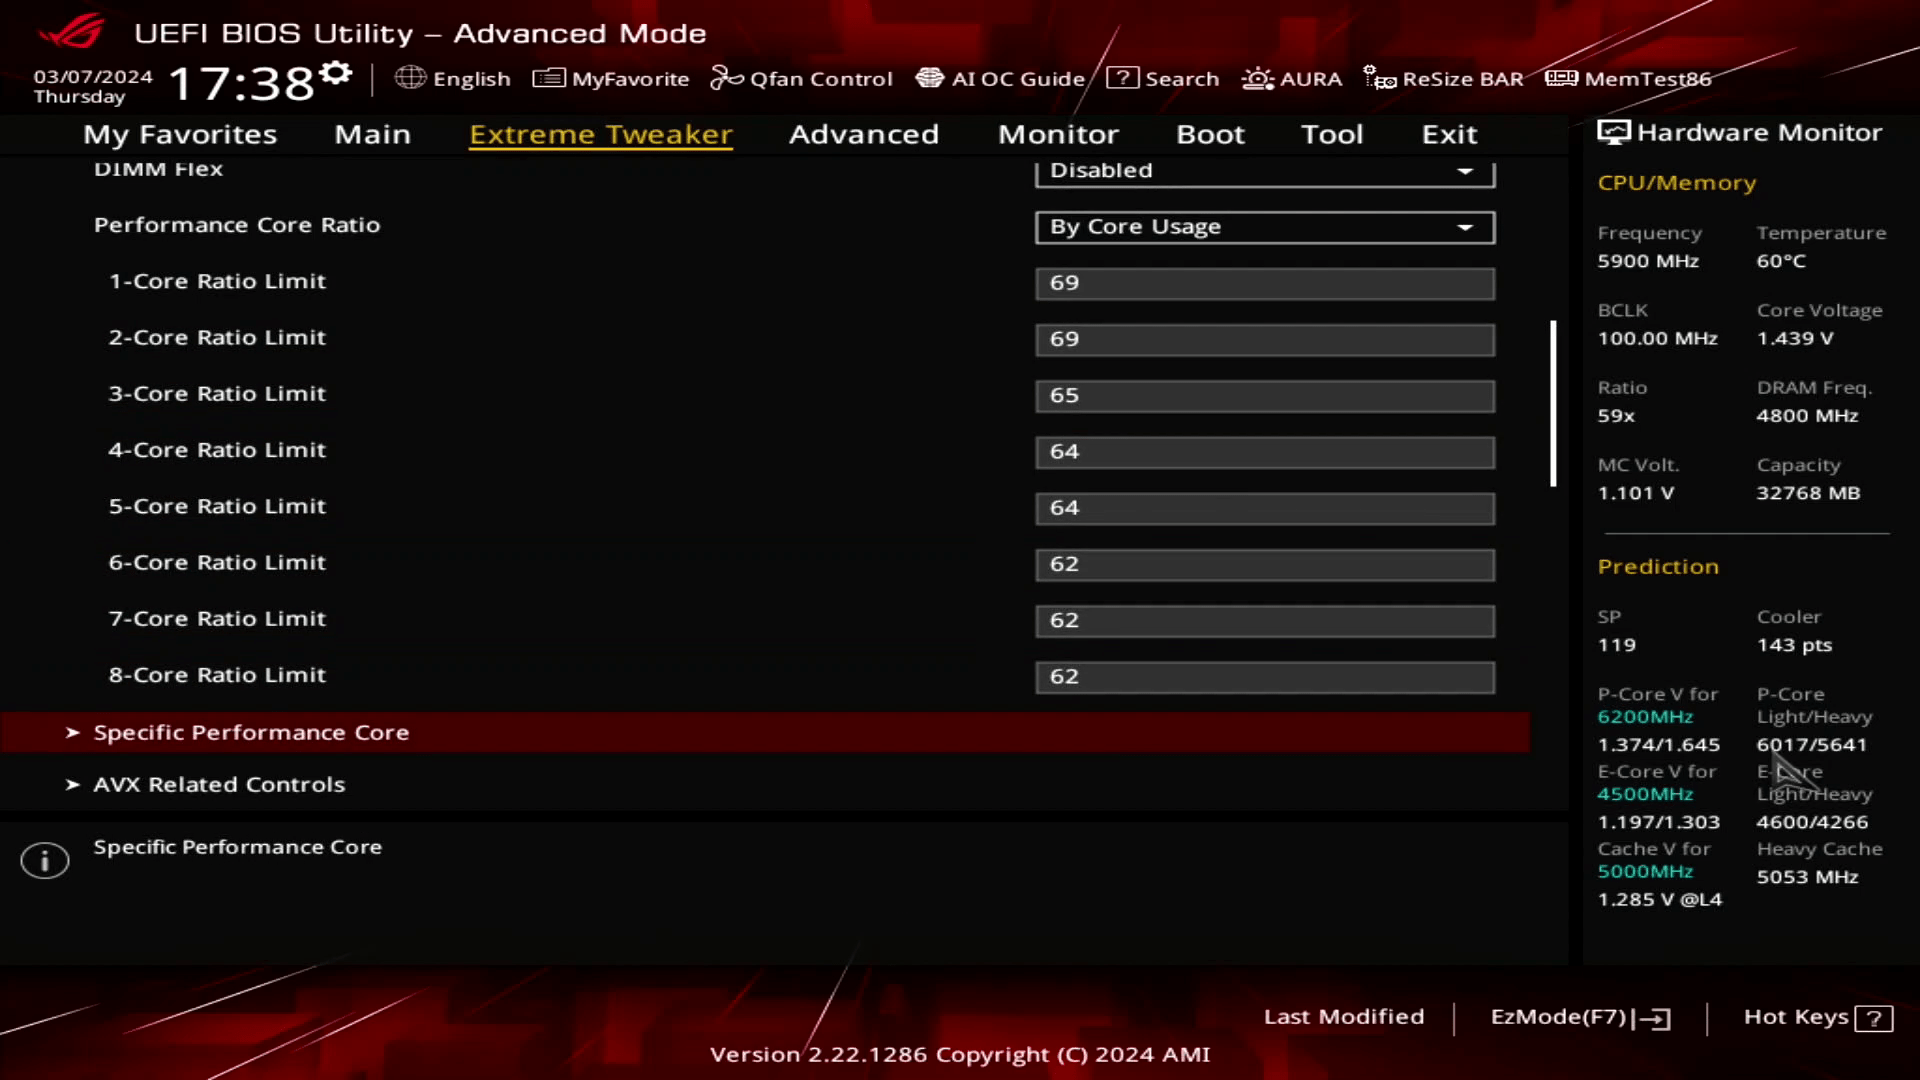
Set Performance Core Ratio to By Core Usage. That enables us to configure a dynamic P-core overclock as we can configure the maximum allowed P-core ratio for a given number of active P-cores.
- Set 1-Core and 2-Core Ratio Limit to 69
- Set 3-Core Ratio Limit to 65
- Set 4-Core and 5-Core Ratio Limit to 64
- Set 6-Core, 7-Core, and 8-Core Ratio Limit to 62
This configuration will boost the CPU to 6.9 GHz when up to 2 P-cores are active and up to 6.2 GHz when all 8 P-cores are active.
Enter the Specific Performance Core submenu. Here we can limit the maximum ratio for each P-core individually and define a core-specific adaptive voltage. The ratio limit is enforced even if the by-core usage turbo ratio configuration would allow for a higher P-core frequency.
- Set Performance Core0, Core1, Core2, and Core5 Specific Ratio Limit to 67
- Set Performance Core3, Core6, and Core7 Specific Ratio Limit to 69
- Set Performance Core4 Specific Ratio Limit to 66

Leave the Specific Performance Core submenu
Enter the AVX Related Controls submenu. Now we can adjust the AVX negative ratio offset, which lowers the P-core ratio when using AVX. The Offset is referenced against the Per P-core Ratio Limit, which we just configured.
- Set AVX2 Ratio Offset to per-core Ratio Limit to User Specify
- Set AVX2 Ratio Offset to 6

Leave the AVX Related Controls submenu.
P-Core Voltage Basic Configuration
The next step will be to configure the P-core voltage. Since I had limited time with this setup, I wasn’t able to dig into the V/F point configuration and finetuning. Hence, to the hardcore overclocking enthusiasts, my voltage configuration may look a bit basic.
In the Extreme Tweaker menu,
Set Global Core SVID Voltage to Adaptive Mode. This allows us to control the voltage associated with the highest point of the voltage-frequency curve. The configured adaptive voltage maps to what’s called the OC Ratio. The OC Ratio is equal to the highest configured CPU ratio. In our case, that’s 69X.

To better understand how this voltage affects the rest of the V/F curve, let’s go into the V/F Point Offset submenu.
In this menu we can configure Intel’s Advanced Voltage Offset feature, more commonly known as V/F Points. This feature extends the Adaptive Voltage mode by allowing end-users to undervolt or overvolt specific points of the CPU’s factory-fused voltage-frequency curve. It also informs us about the target voltage for a variety of other frequency points.
In the case of the 14900KS, V/F Points 9 and 10 are mapped to 62X. The voltages for the CPU ratios between 69X and the next V/F Point, 62X, is interpolated by the CPU. The factory-fused voltage for 62X is 1.418V, and I set the Adaptive Voltage for 69X to 1.525V.

Leave the V/F Point Offset submenu.
Set Global Core SVID Voltage Offset Mode Sign to +
Set Additional Turbo Mode CPU Core Voltage to 1.525.

Now, let’s move on to the more advanced part of the BIOS configuration.
P-Core Frequency Advanced Configuration
Let’s go back to the frequency configuration. As I said, I rely heavily on the OCTVB configuration to dynamically adjust the CPU frequency. So, in the Extreme Tweaker menu, enter the Thermal Velocity Boost submenu.
Set TVB Voltage Optimizations to Disabled. That prevents the CPU from automatically reducing the voltage based on its current operating temperature. This feature is useful when relying on the default voltages and ratios. However, it may cause instability when manually tuning the voltage-frequency curve.

Set Overclocking TVB to Enabled. The easiest way to think of OCTVB is to limit or clip the maximum allowed CPU ratio based on the operating temperature. The hotter the CPU, the more you clip the CPU ratio. OCTVB is based on the by core usage Turbo Ratio configuration. For each number of active cores, you can define two temperature points, each with a unique number of “down-bins’. A down-bin is essentially the number of ratios you want to drop.
- Set 1-Core to 8-Core Active to Enabled
- For 1-Core and 2-Core Active, set Temperature A to 10
- For 3-Core to 5-Core Active, set Temperature A to 40
- For 6-Core to 8-Core Active, set Temperature A to 70
- For each Core Active, set Negative Ratio Offset A to User Specify
- For 1-Core and 2-Core Active, set Ratio Offset A to 5
- For 3-Core, set Ratio Offset A to 2,
- For 4-Core to 8-Core Active, set Ratio Offset A to 1
- For 1-Core to 3-Core Active, set Temperature B to 50
- For 4-Core and 5-Core Active, set Temperature B to 70
- For 6-Core to 8-Core Active, set Temperature B to 80
- For each Core Active, set Negative Ratio Offset B to User Specify
- For each Core Active, set Ratio Offset B to 1
The configuration may look a little complex, but it’s actually quite straight-forward. Let’s look at a specific example.
When 1 P-Core is active and the temperature is below 10 degrees Celsius, then the P-Core Ratio will be set to 69X. When the temperature exceeds 10 degrees Celsius, the P-Core Ratio will be 5 bins lower. So 69X minus 5X, resulting in 64X. Then, when the temperature exceeds 50 degrees Celsius, the ratio down-bins once more to 63X.

Leave the Thermal Velocity Boost submenu
P-Core Voltage Advanced Configuration
We also need to make a couple adjustments to the voltage configuration.
First, enter the DIGI+ VRM submenu. Here we can make changes to the voltage regulator configuration. We adjust the VRM loadline to minimize the Vdroop. That is the voltage reduction when the CPU goes from idle to full load. We choose the VRM loadline with the small Vdroop, so the effective voltage deviates the least from our manually configured CPU voltage-frequency curve.

Set CPU Load-line Calibration to Level 7.

Leave the DIGI+ VRM submenu.
Then, enter the Internal CPU Power Management submenu.
Set Regulate Frequency by above threshold to disabled. This feature is a part of the ASUS AI Overclocking toolset. It allows you to configure a maximum temperature for the CPU. Once the temperature exceeds the target temperature, the motherboard reduces the CPU frequency by adjusting the Turbo Boost power limit parameters. By default, this feature is enabled and set to 90 degrees Celsius.

Set IA AC Load Line to 0.05. By defining the AC DC loadline, we can adapt the CPU voltage management to the motherboard’s electrical impedance. The AC loadline adjusts the voltage request from the CPU to the voltage regulator. By setting the AC Load Line very low, we tell the CPU not to deviate too much from the programmed voltage-frequency curve when issuing the VID request to the voltage controller.

Leave the Internal CPU Power Management submenu.
DDR5 Memory Configuration
The final piece that’s missing from this overclock is of course high speed memory. Now, usually I would simply rely on enabling the XMP 3.0 profile and then adjusting the frequency to achieve stability. However, for today’s overclock I will rely on ASUS’ DIMM Flex technology.
DIMM Flex is an ASUS overclocking technology that enables dynamic memory performance based on the memory operating temperature. It is in part based on an Intel technology called Dynamic Memory Boost which enables at runtime switching between JEDEC and XMP profiles.

ASUS goes one step further with DIMM Flex as they added a proprietary circuitry on the board to measure the memory temperature. Then, similar to Core Flex, you can define three memory performance levels which will activate based on the operating temperature. Level 1 is the default until you’ve entered the operating system.
The depth of the tuning is impressive as you’ve got access to lots of memory timings. In this case, I opt for one of the three available ASUS profiles.
In the Extreme Tweaker menu, set DIMM Flex to Enabled. This will immediately load this kit’s DDR5-8000 XMP profile with ASUS Tweaked timings. But, we’ll go one step further with the tuning.

Enter the DIMM Flex: Dynamic DRAM Temperature OC Switcher submenu. Here we can configure the DIMM flex configuration. But, as said, I’ll just use one of the profiles this time.
Enter the DIMM Flex Presets submenu.
Select Load Hynix 8533/8266/8000 2x16GB Single Rank profile.

This sets the base memory frequency of DDR5-8533, then shifts to DDR5-8200 when the temperature exceeds 45 degrees Celsius, and shifts once more down to DDR5-8000 when the temperature is above 55 degrees Celsius.
Then save, exit the BIOS, and boot into the operating system.
Here we set the Cryo Cooling Technology to Unregulated mode. That will make the EK Delta² TEC operate at the maximum power.

After letting the system idle for a while, we can see three of our P-Cores boost to 6.9 GHz when the 14900KS temperature is below 10 degrees Celsius.

Benchmark Results
Now that we configured the BIOS, let’s run some benchmarks. Here are some of the results from 3DMark CPU Profile, AIDA64, and Tomb Raider.

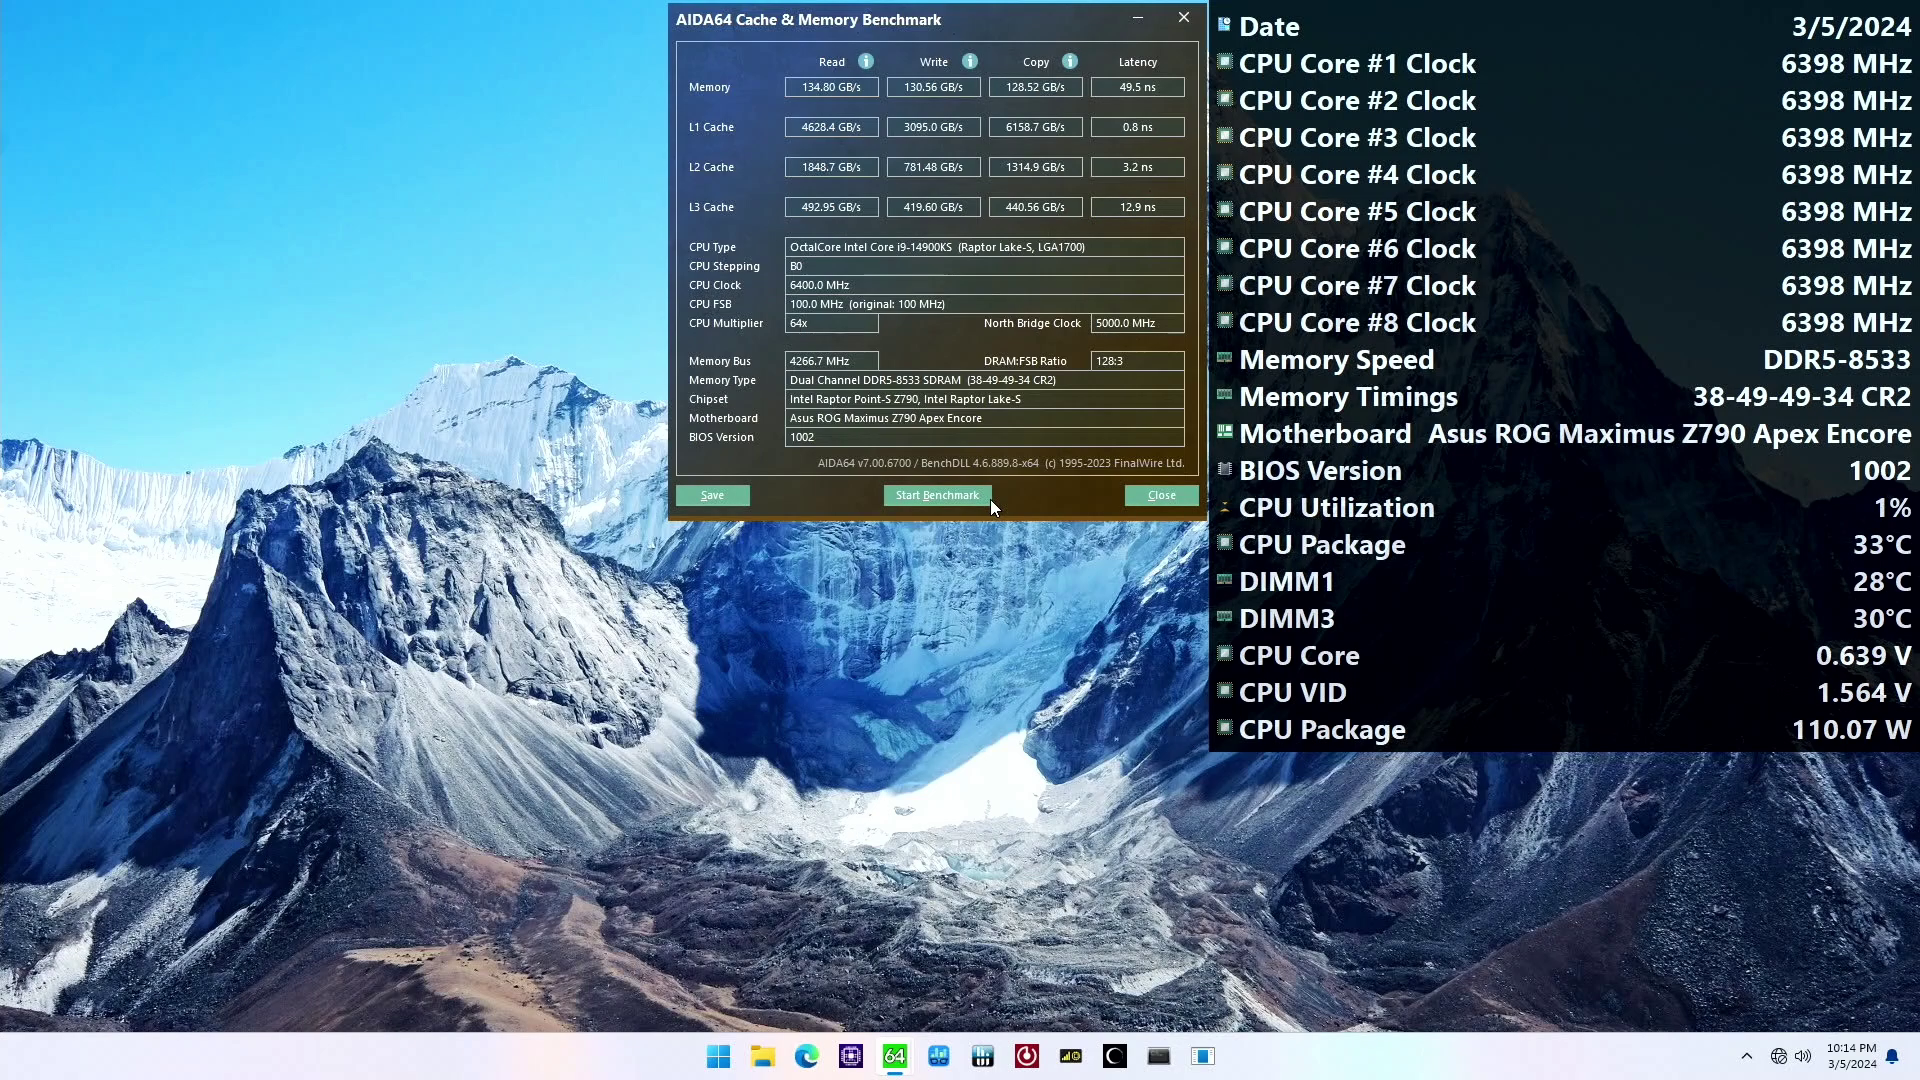

The Tomb Raider game benchmark is probably the most interesting as it shows all eight P-cores running at 6.2 GHz with a relatively low temperature and high-speed memory.
Core i9-14900KS Cryo: Conclusion
Alright, let’s wrap this up.
The Core i9-14900KS is not only Raptor Lake’s last hurrah, but the final iteration of Intel’s traditional monolithic processor architecture. When Arrow Lake comes around later this year, it’ll be tiles and interposers rather than just a chip on a substrate. It’s interesting to see what the best quality silicon looks like and in that regard the 14900KS doesn’t disappoint.
This particular 14900KS is a 119SP chip and it’s not even the highest SP I’ve seen. That would be the 121SP world record CPU. The out of the box boost frequency is 6.2 GHz, which is 200 MHz higher than the 14900K and 13900KS.

With the help of the EK Delta2 TEC and Intel’s Cryo Cooling Technology, we can increase the 14900KS’s maximum boost frequency to 6.9 GHz. Admittedly, that’s just idling on the desktop, but nevertheless it’s very cool to see that with water cooling. Under load, we can game at 6.2 to 6.3 GHz when only enabling the P-cores. That’s also pretty astonishing.
I did try to get 7 GHz and once in a while I could see the result, but it wasn’t stable unfortunately.

And with that, we say goodbye to Raptor Lake and look ahead to what Arrow Lake will bring us in terms of overclocking entertainment.
Anyway, that’s all for today!
I want to thank my Patreon supporters for supporting my work. For those who want a closer look at the results or read through my BIOS settings, I will also put up a written version of this video on my blog. If you have any questions or comments, feel free to drop them in the comment section below.
See you next time!