SkatterBencher #56: AMD Ryzen 9 7950X3D Overclocked to 5900 MHz

We overclock the AMD Ryzen 9 7950X3D up to 5900 MHz with the ASUS ROG Crosshair X670E Extreme motherboard and EK-Quantum water cooling.
Before we get going, I’d like to thank the folks at AMD for enabling overclocking support on X3D CPUs. While this may age like milk if they decide to lock OC after launch, it’s nice to see a change in approach from the first X3D CPU, which was entirely locked for overclocking.
That’s not to say overclocking is fully unlocked or as straightforward as with regular Ryzen 7000 CPUs (it certainly isn’t), but the intent is there, and I appreciate that!
All right, we have lots to cover, so let’s jump straight in.
AMD Ryzen 9 7950X3D: Introduction
The AMD Ryzen 9 7950X3D processor is part of the third wave of Ryzen 7000 Zen 4 AM5 desktop processors.
The first wave of Zen 4 Ryzen 7000 processors launched on August 29, 2022, during an AMD Livestream. At launch, there were 4 X-SKUs available, including the 6-core 105W Ryzen 5 7600X, 8-core 105W Ryzen 7 7700X, 12-core Ryzen 9 7900X, and the 16-core 170W Ryzen 9 7950X.

The second wave of Ryzen 7000 processors launched on January 4, 2023, during AMD’s CES 2023 keynote. This wave consisted of 3 non-X SKUs, available a few days after the announcement. The SKUs include the 6-core 65W Ryzen 5 7600, the 8-core 65W Ryzen 7 7700, and the 12-core 65W Ryzen 9 7900.

At the CES 2023 keynote, AMD also announced the third wave of Ryzen 7000 processors, which consists of exclusively X3D variants with 3D-V-Cache. The line-up consists of 3 SKUs include the 120W 8-core Ryzen 7 7800X3D, 120W 12-core Ryzen 9 7900X3D, and the 120W 16-core Ryzen 9 7950X3D.

The Ryzen 7 7800X3D is the direct successor of the Ryzen 7 5800X3D, AMD’s first consumer CPU with 3D V-Cache. Despite being locked for overclocking, we overclocked the Ryzen 7 5800X3D in SkatterBencher #39. The 7950X3D and 7900X3D are the first dual-CCD Ryzen X3D-enabled processors.


I won’t say too much about the technical aspect of 3D V-Cache, as plenty of other media will cover that part of the X3D story. Long story short, AMD has a 3D-stacked additional L3 cache on top of the CCD to expand the on-die cache capacity. That, in theory, should help improve the performance in latency-sensitive workloads. We’ll discuss the V-Cache and its impact on performance later in this blog post.
The Ryzen 9 7950X3D has two eight-core CCDs, totaling sixteen cores with 32 threads. One of those CCDs has V-Cache, while the other doesn’t. The base frequency is 4.2 GHz, and the maximum listed boost frequency is 5.7 GHz. The TDP is 120W, and PPT is 162W.
In this post, we will cover three overclocking strategies:
- First, we rely on AMD PBO and EXPO performance boost technologies
- Second, we tune Precision Boost Overdrive with Curve Optimizer
- Third, we tune Precision Boost Overdrive with asynchronous eCLK
However, before we jump into overclocking, let us quickly review the hardware and benchmarks used in this guide.
AMD Ryzen 9 7950X3D: Platform Overview
| Item | SKU | Price (USD) |
| CPU | AMD Ryzen 9 7950X3D | 699 |
| Motherboard | ASUS ROG Crosshair X670E Extreme | 1,000 |
| CPU Cooling | EK-Quantum Velocity2 EK-Quantum Power Kit Velocity² 360 | 137 686 |
| Fan Controller | ElmorLabs Easy Fan Controller ElmorLabs EVC2SX | 20 32 |
| Memory | G.SKILL Trident Z5 DDR5-6400 | 370 |
| Power Supply | Enermax MAXREVO 1500W | 370 |
| Graphics Card | ASUS ROG Strix RTX 2080 TI | 880 |
| Storage | AORUS RGB 512 GB M.2-2280 NVME | 120 |
| Chassis | Open Benchtable V2 | 200 |
ElmorLabs EFC & EVC2
I explained how I use ElmorLabs products in SkatterBencher #34. By connecting the EFC to the EVC2 device, I monitor the ambient temperature (EFC), water temperature (EFC), and fan duty cycle (EFC). I include the measurements in my Prime95 stability test results.
I also use the ElmorLabs EFC to map the radiator fan curve to the water temperature. Without going into too many details: I have attached an external temperature sensor from the water in the loop to the EFC. Then, I use the low/high setting to map the fan curve from 25 to 40 degrees water temperature. I use this configuration for all overclocking strategies.
The main takeaway from this configuration is that it gives us a good indicator of whether the cooling solution is saturated.
AMD Ryzen 9 7950X3D: Benchmark Software
We use Windows 11 and the following benchmark applications to measure performance and ensure system stability.
| BENCHMARK | LINK |
| SuperPI 4M | https://www.techpowerup.com/download/super-pi/ |
| Geekbench 5 | https://www.geekbench.com/ |
| Geekbench 6 | https://www.geekbench.com/ |
| Cinebench R23 | https://www.maxon.net/en/cinebench/ |
| CPU-Z | https://www.cpuid.com/softwares/cpu-z.html |
| V-Ray 5 | https://www.chaosgroup.com/vray/benchmark |
| AI-Benchmark | https://ai-benchmark.com/ |
| 3DMark CPU Profile | https://www.3dmark.com/ |
| 3DMark Night Raid | https://www.3dmark.com/ |
| CS:GO FPS Bench | https://steamcommunity.com/sharedfiles/filedetails/?id=500334237 |
| Shadow of the Tomb Raider | https://store.steampowered.com/app/750920/Shadow_of_the_Tomb_Raider_Definitive_Edition/ |
| Final Fantasy XV | http://benchmark.finalfantasyxv.com/na/ |
| Prime 95 | Phttps://www.mersenne.org/download/ |
I added Geekbench 6 right before finalizing the script, as it had just launched a few days ago. I will phase out Geekbench 5 and replace it with Geekbench 6.
AMD Ryzen 9 7950X3D: Stock Performance
Before starting overclocking, we must check the system performance at default settings. Note that on this motherboard, Precision Boost Overdrive is enabled by default.
So, to check the performance at default settings, you must enter the BIOS and
- Go to the Extreme Tweaker menu
- Enter the Precision Boost Overdrive submenu
- Set Precision Boost Overdrive to Disabled
Then save and exit the BIOS.
Note that the Precision Boost 2 boosting algorithm is still active even though we disabled Precision Boost Overdrive. The standard parameters of the Precision Boost algorithm for the Ryzen 9 7950X3D are as follows:

These values don’t tell the whole picture of how Precision Boost works on the 7000X3D processors. I’ll get back to that later in the article.
Here is the benchmark performance at stock:
- SuperPI 4M: 29.079 seconds
- Geekbench 5 (single): 2,231 points
- Geekbench 5 (multi): 21,909 points
- Geekbench 6 (single): 2,920 points
- Geekbench 6 (multi): 17,891 points
- Cinebench R23 Single: 2,029 points
- Cinebench R23 Multi: 35,840 points
- CPU-Z V17.01.64 Single: 737.1 points
- CPU-Z V17.01.64 Multi: 15,221.1 points
- V-Ray 5: 28,334 vsamples
- AI Benchmark: 6,405 points
- 3DMark Night Raid: 80,861 points
- CS:GO FPS Bench: 618.38 fps
- Tom Raider: 204 fps
- Final Fantasy XV: 179.20 fps

Here are the 3DMark CPU Profile scores at stock
- CPU Profile 1 Thread: 1,127
- CPU Profile 2 Threads: 2,161
- CPU Profile 4 Threads: 4,327
- CPU Profile 8 Threads: 8,095
- CPU Profile 16 Threads: 14,096
- CPU Profile Max Threads: 14,348

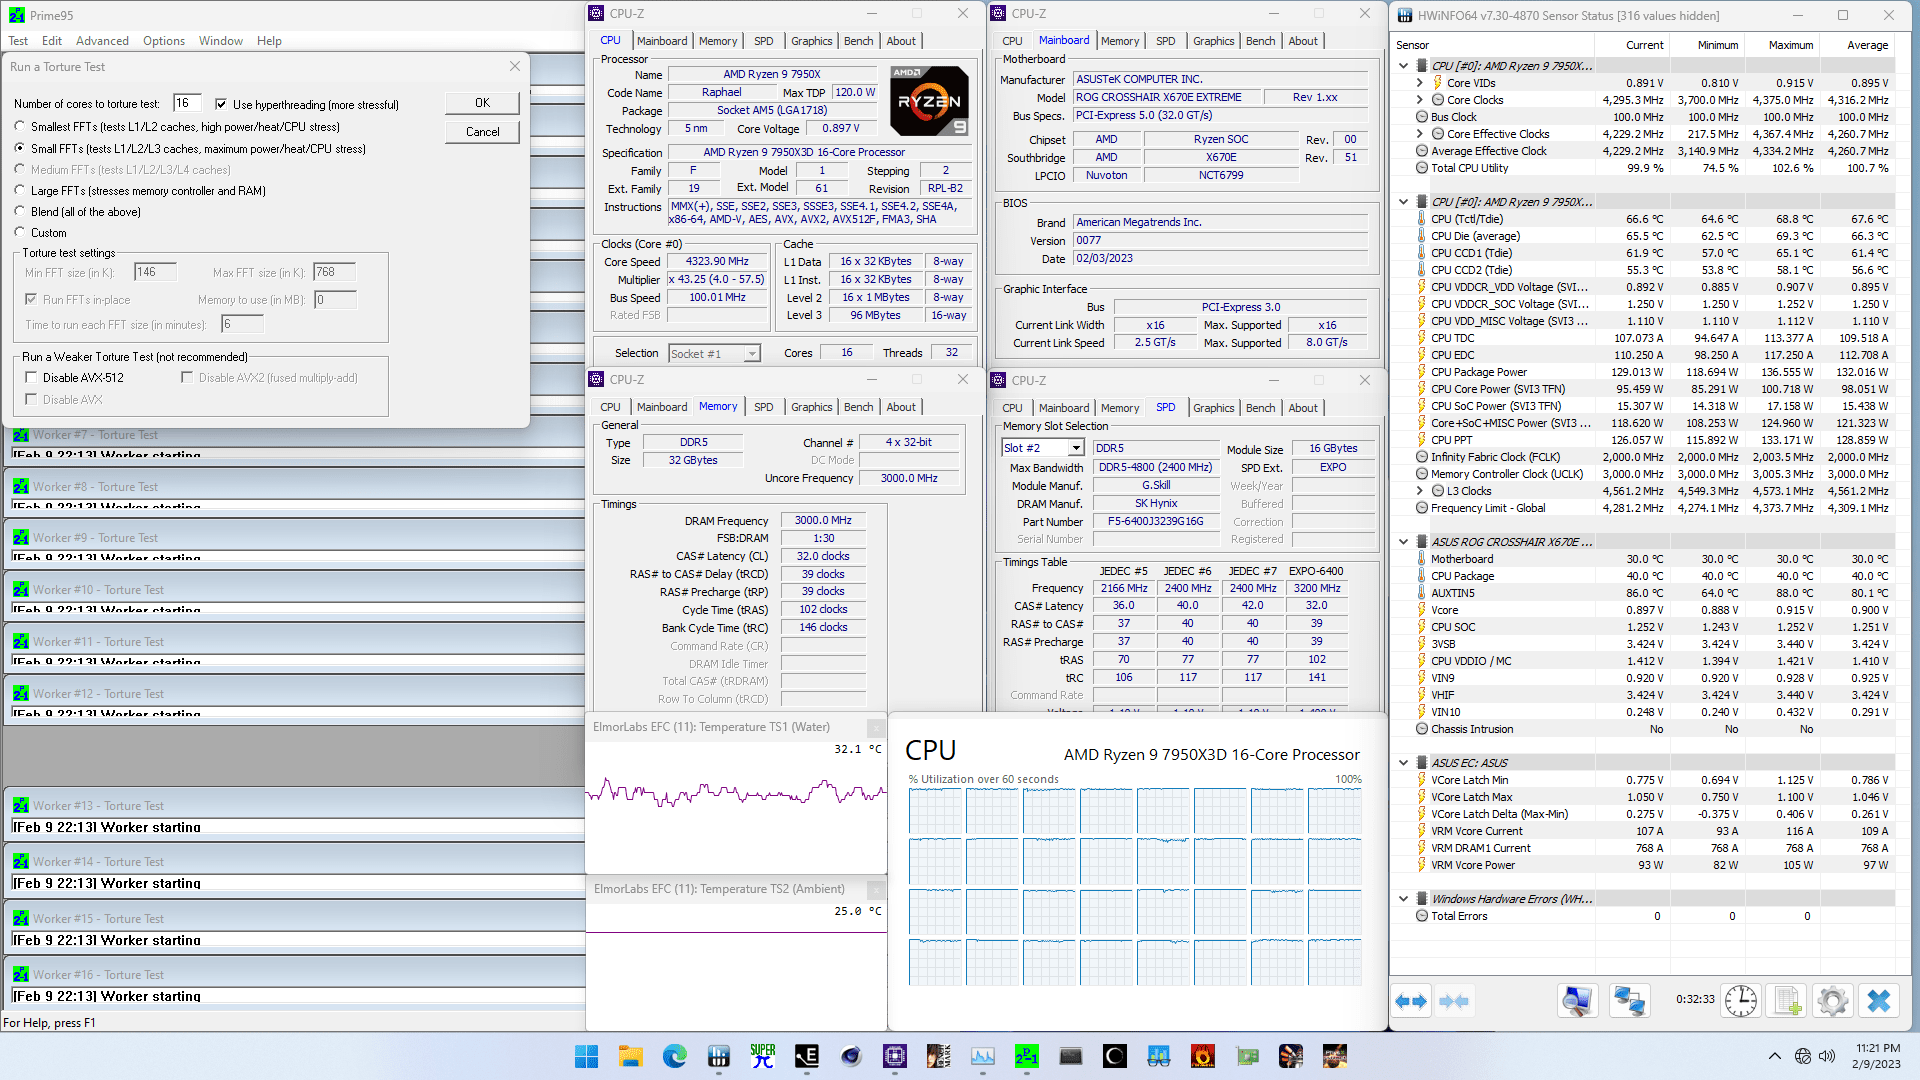
When running Prime 95 Small FFTs with AVX-512 enabled, the average CPU effective clock is 4255 MHz with 0.900 volts. The average CPU temperature is 66.8 degrees Celsius. The ambient and water temperature is 23.2 and 30.6 degrees Celsius. The average CPU package power is 121.6 watts.

When running Prime 95 Small FFTs with AVX disabled, the average CPU effective clock is 4553 MHz with 0.959 volts. The average CPU temperature is 81.5 degrees Celsius. The ambient and water temperature is 23.2 and 30.8 degrees Celsius. The average CPU package power is 134.2 watts.

Now, let us try our first overclocking strategy.
However, before we get going, make sure to locate the CMOS Clear button
Pressing the Clear CMOS button will reset all your BIOS settings to default which is helpful if you want to start your BIOS configuration from scratch. However, it does not delete any of the BIOS profiles previously saved. The Clear CMOS button is located on the rear I/O panel.
OC Strategy #1: PBO 2 + EXPO
In our first overclocking strategy, we take advantage of AMD-exclusive features Precision Boost Overdrive 2 and Extended Profiles for Overclocking. However, before discussing Precision Boost Overdrive, let’s return to Precision Boost.
I spoke at length about the Precision Boost 2 technology in my “Raphael Overclocking: What’s New” launch content. To better understand what I’m going to explain about Ryzen 9 7950X3D overclocking, it’s vital to understand the basics of Precision Boost technology.
PB 2 – Precision Boost 2
Precision Boost 2 is an automatic performance-maximizing technology available in all AMD Ryzen processors since the 2018 Ryzen 2000 series. This technology improves system performance by dynamically increasing your processor clock speeds beyond stock depending on many factors, including temperature, power consumption, current draw, and the number of active cores.

SMU – System Management Unit
The fundamental building block of the Precision Boost 2 algorithm is the SMU or System Management Unit.
Each chip on your Raphael CPU has an SMU, meaning there are 3 SMUs on a Ryzen 9 7950X3D CPU. One of those SMUs functions as Master SMU, while the others work as Slave SMUs. Typically, the SMU in the IO die would be the Master SMU. All SMUs are connected using a low-bandwidth control bus called SCF or Scalable Control Fabric.

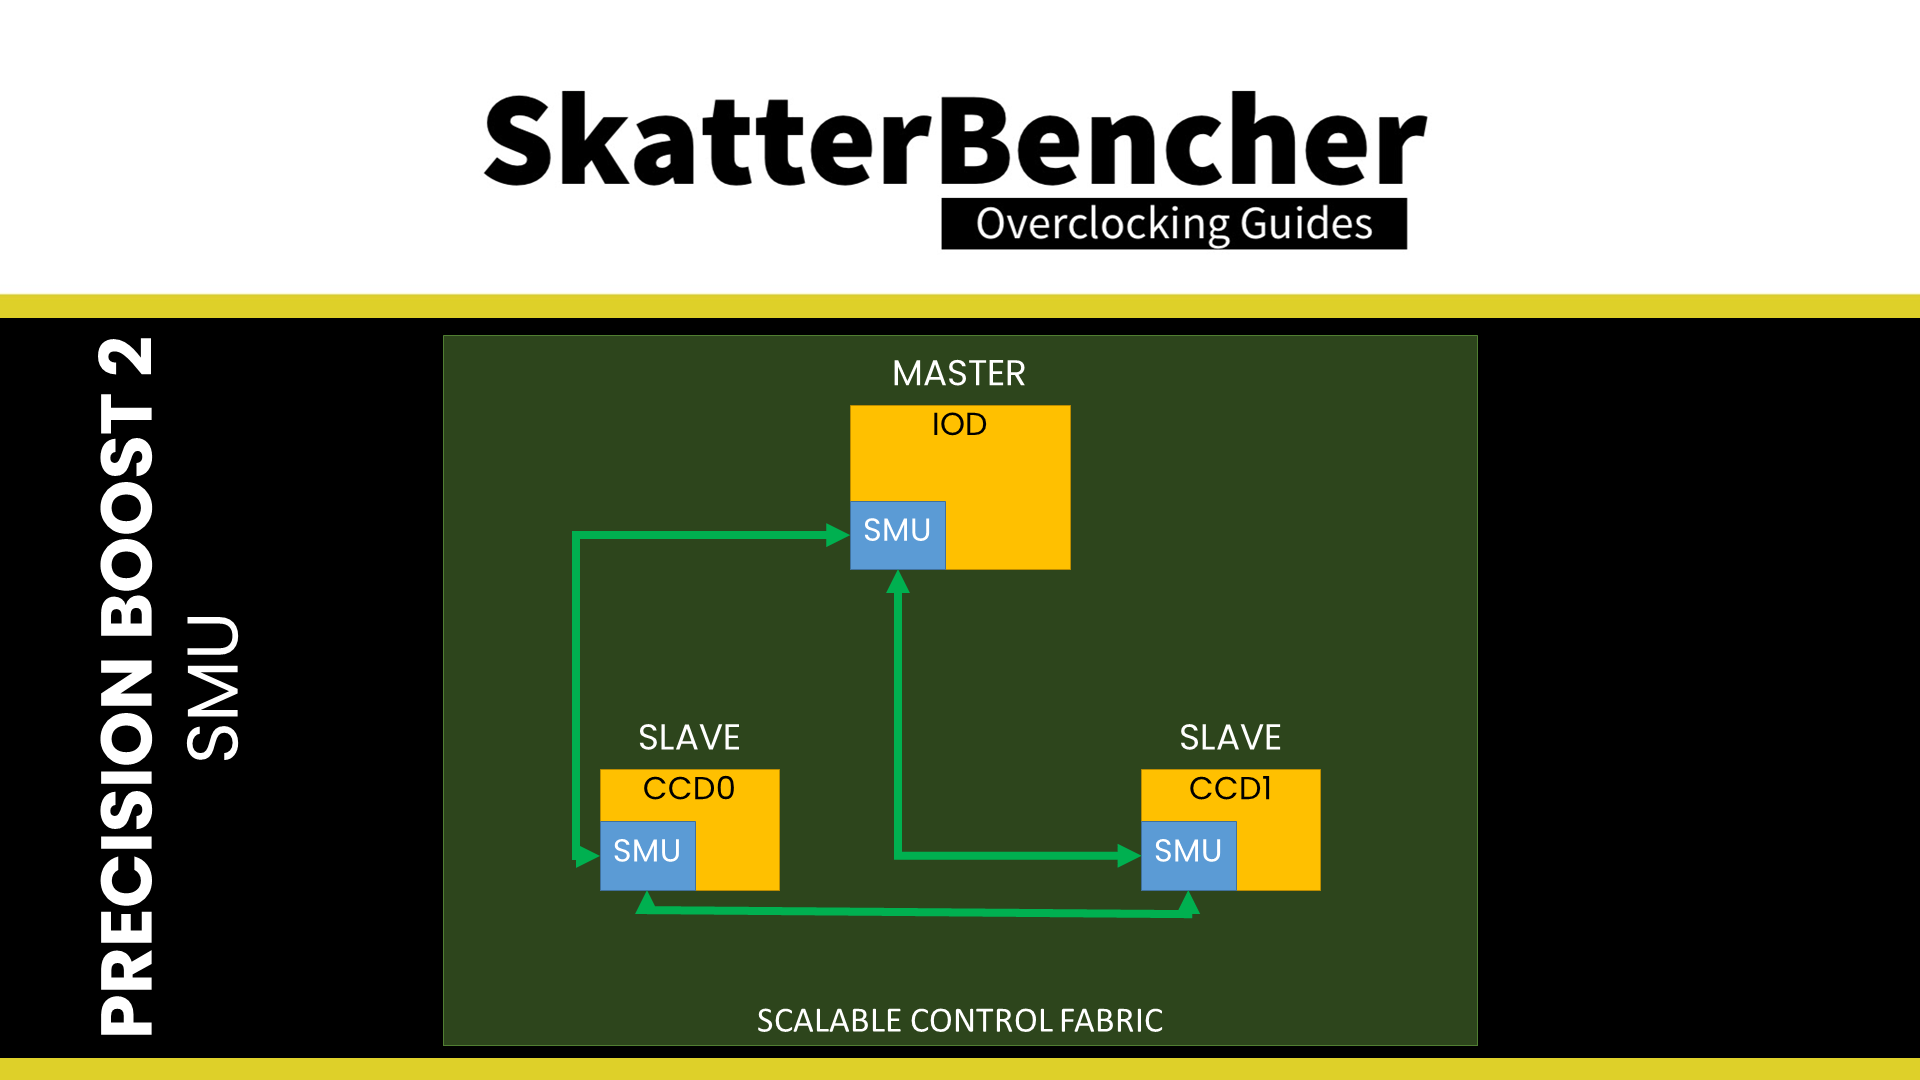
The SMU has a range of capabilities, including, most importantly, the ability to manage the CPU performance within the infrastructure constraints. The infrastructure restricts the maximum operating limits on various metrics, including power draw, temperature, and voltage.

The primary function of the slave SMUs is to capture the measurement data related to the infrastructure limits, then prepare that data to be sent to the master SMU. The master SMU’s primary function is to analyze the package-wide measurement data and determine the actions needed for performance management.


Each infrastructure limit has its algorithm and is managed independently by the master SMU to determine the infrastructure-limited frequency. The firmware then selects the most constraining limit as the global frequency limit.

Then, either of two things can happen: the current frequency exceeds the limit, or it doesn’t. If it does, the frequency is reduced. If it doesn’t, there’s frequency headroom, and the frequency will increase. Either way, the master SMU passes the frequency change request to the slave, and each slave applies the frequency changes to the CPU cores of the local die. The frequency changes are coordinated with the global voltage plane by the master SMU.
Now comes the part that’s important for Ryzen 7000X3D!
Every slave SMU can make independent decisions based on local conditions. So, it can apply lower frequencies than the frequency requested by the master SMU if the on-die conditions require so. For example, one CCX may run at a lower frequency in all-core workloads. Additionally, when dLDO is enabled, each SMU can independently adjust the voltage for each core within the CCX.
Precision Boost Infrastructure Limiters
The Precision Boost algorithm has many infrastructure limiters, some of which are also exposed to the end user. While all these limiters are on a Ryzen 7000 CPU, it doesn’t mean they’re all active or configured. Furthermore, the infrastructure limiters are not the same for both CCDs as CCD0, with V-Cache, is severely more constrained than CCD1 without V-Cache!
Here’s a list of the Precision Boost limiters we’re aware of. I discussed these at length in my “Raphael Overclocking: What’s New” launch blog, so I’ll discuss the relevant ones for the Ryzen 9 7950X3D.


The main limiter constraining the Ryzen 9 7950X3D is the voltage limit.

I will refer to the V-Cache CCD as CCD0 and the non-V-Cache CCD as CCD1.
As you can see from the table, the VID limit for both Ryzen 7000X3D CCDs is lower than that of a regular 7950X processor. Furthermore, at 1.2V, the voltage limit for CCD0 is significantly lower than for CCD1.
Raphael only has one VDDCR voltage rail powering the CPU cores in the CCDs via the VDDCR_CPU rail and the cache via the VDDCR_VDDM rail. As I discussed in my Raphael launch content, it means that when any core in CCD0 is active, it will also restrict the maximum voltage for the cores in CCD1. That will also constrain its operating frequency.

Note that the voltage limits are the absolute limits at zero load. When the CPU is under a substantial load, the Precision Boost algorithm will further restrict the allowed voltage. The maximum voltage in an all-core workload with active cores in CCD0 is a mere 1.0V. That’s similar to the maximum voltage for a stock non-X Ryzen 7000 processor. The maximum voltage in an all-core workload for CCD1 is 1.2V
The V/F curves for both CCDs are similar, meaning they run approximately the same frequency at the same voltage. In an all-core workload with cores in both CCDs active, the frequency is about 4.6 GHz at 1.0V. However, in that same workload, the cores in CCD1 can run at 5.2 GHz at 1.2V.

Another limit constraining the Ryzen 9 7950X3D is the Fmax limit. Unsurprisingly, the CCD with V-Cache cannot run at equivalent speeds to the non-V-Cache CCD since the L3 Cache operates at the same frequency. We also saw this with the Ryzen 7 5800X3D, which had a 200 MHz lower maximum boost clock than the Ryzen 7 5800X.
On the Ryzen 9 7950X3D, CCD0 has a Fmax of 5250 MHz, and CCD1 has a Fmax of 5750 MHz. Fortunately, each CCX has its PLL, so theoretically, you could run the cores in CCD0 at 5.25 GHz and the cores in CCD1 at 5.75 GHz. That won’t happen in the real world since there’s only 1 VDDCR_CPU voltage rail powering both CCDs.
If only dLDO were available on Raphael.
V-Cache Performance Management
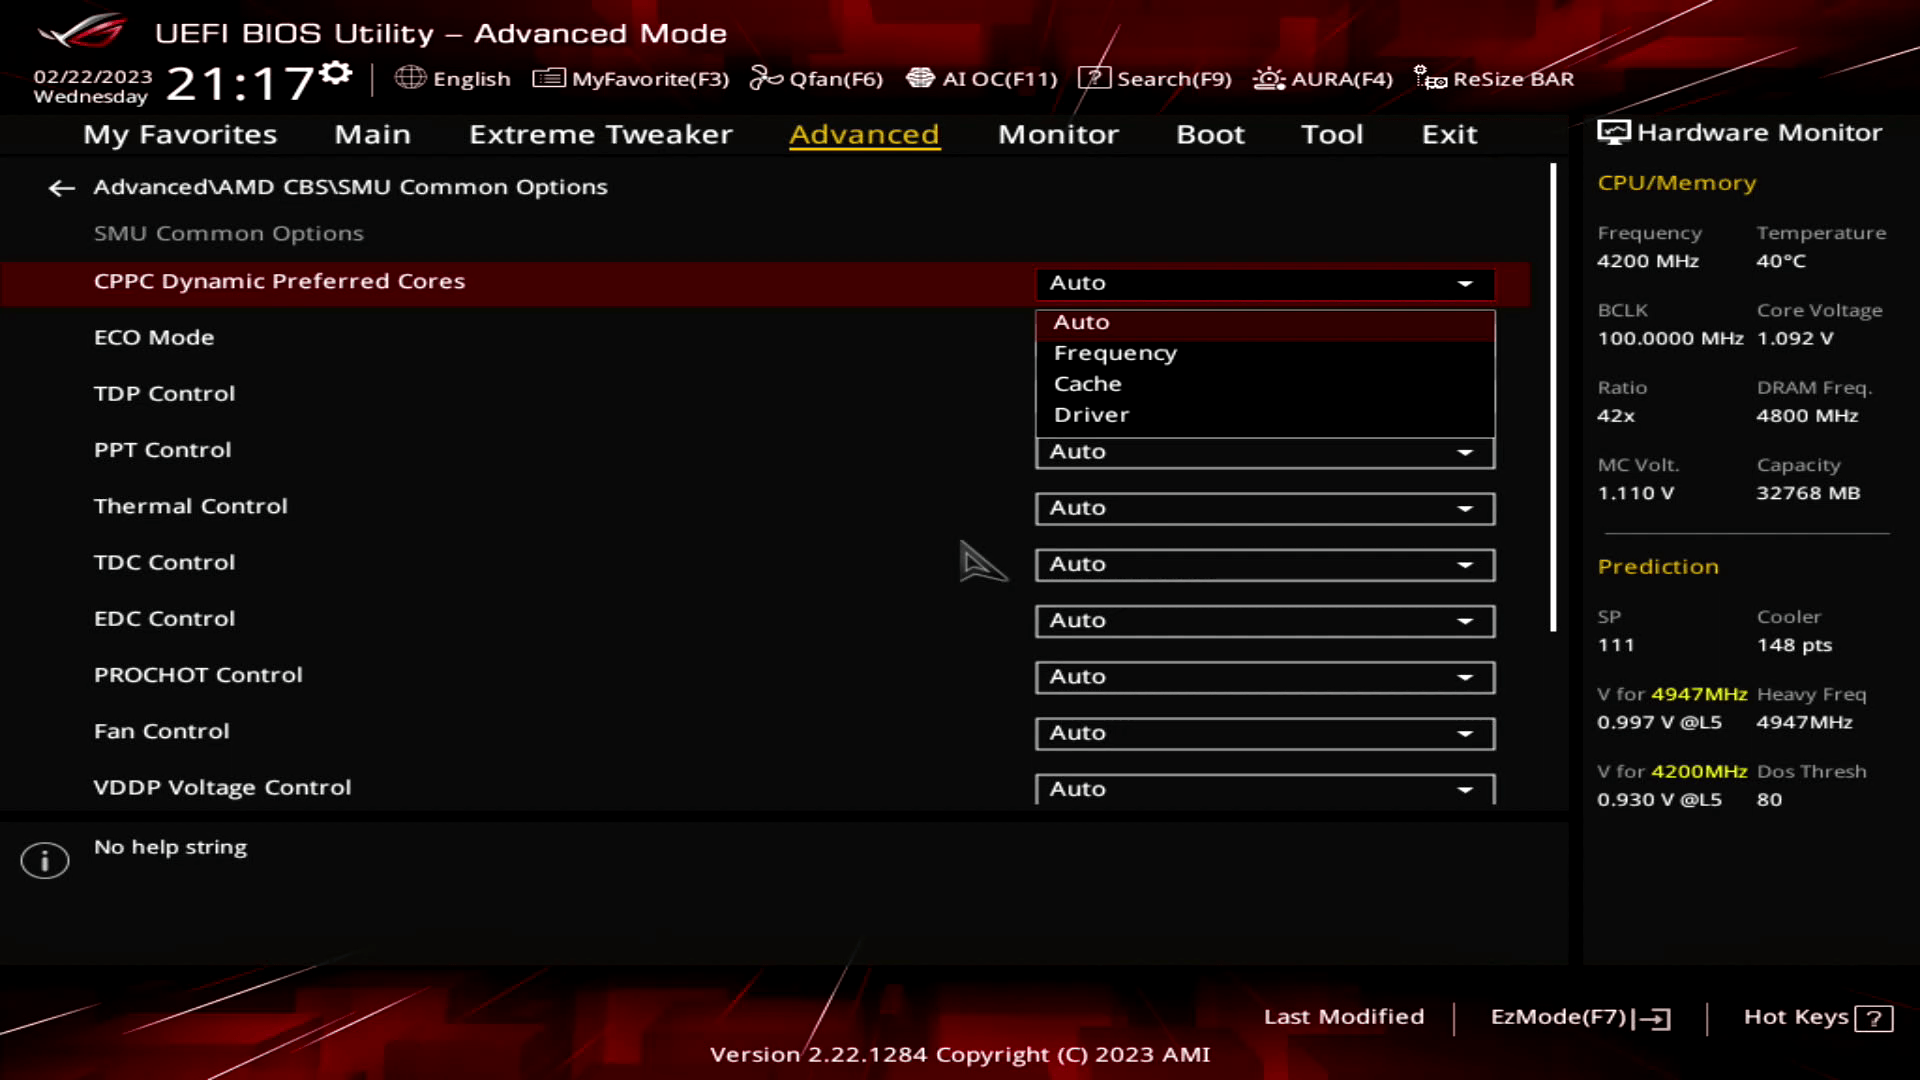
There’s one last point I want to discuss regarding the two very distinctly different CCDs. Each CCD has a specific strength: CCD0 has the extra L3 cache but lower frequency, and CCD1 has the additional frequency but less cache. Of course, you want to run your application on the CCD which gives you the most significant advantage. So how does AMD do it?
Long story short: through drivers. To make a short story slightly longer, you can choose how to prioritize in the BIOS. Let the system drivers take control and prioritize the CCD with the extra cache or the CCD with the additional frequency.
ASUS ROG has also implemented a custom prioritization algorithm using its Core Flex feature. You can load the X3D Core Flex Gaming Preset to check its impact on system performance.

The Core Flex algorithm is a little complicated, but it comes down to this. There are three states: level 1, level 2, and level 3. Levels 1 and 3 prioritize CCD1, and level 2 prioritizes CCD0.
Two threshold values trigger the states: level 1 and level 2. The profile’s condition to check is the Core Current, and the threshold values are 20 and 50 amps, respectively. If the Core Current is below 20 amps, level 1 state is active. If the Core Current is between 20 and 50 amps, level 2 state is active. If the Core Current exceeds 50 amps, level 3 state is active.
An active state doesn’t mean there’s core reprioritization just yet. In addition to the core current check, there’s also a Memory Activity Threshold. CCD Priority switching will only occur if the memory activity exceeds the threshold.

You can interpret the algorithm’s functionality as follows:
- If the system’s idle, there’s no CCD reprioritization
- In case of a memory-intensive workload that doesn’t use more than eight cores, Core Flex prioritizes CCD0 with V-Cache to benefit from the extra L3 cache.
- In case of a memory-intensive workload that utilizes more than eight cores, Core Flex prioritizes CCD1 to benefit from the higher average CPU frequency.

It’s not easy to get a good feeling of which method for CCD prioritization is the best, so I suggest you experiment with your system to see what works best for you.
Precision Boost Infrastructure Limiters: C-State Boost
It would be remiss of me not to at least mention the impact of the lesser-known Precision Boost C-State Limiter. I made a separate blog post on this topic a while back, but it’s a pertinent limiter when discussing overclocking and improving performance.
Long story short, since AGESA 1003, the Precision Boost C-State Boost Limiter prevents Zen 4 CPUs from boosting over 5.5 GHz when more than four cores are active. However, this C-State limiter appears not present on AGESA 1005, which came with this BIOS. I’ve not been able to confirm this with a regular X-SKU, so be on the lookout for forum posts or media reports.

That concludes our shallow dive into the Precision Boost 2 technology. There’s much more to tell about Ryzen 7000 frequency and voltage configuration, but I’ll refer you to my Raphael launch content.
It’s time to move on to the Ryzen 7000X3D overclocking and Precision Boost Overdrive 2.
PBO 2 – Precision Boost Overdrive 2
With the launch of Zen 3, AMD introduced an improved version of the Precision Boost Overdrive toolkit, allowing for manual tuning of the parameters affecting the Precision Boost frequency boost algorithm.
Precision Boost Overdrive 2 builds on the PBO implementation of Zen 2. In addition to the platform overclocking knobs from Zen+ (PPT, TDC, EDC) and processor overclocking knobs from Zen 2 (Boost Override and Scalar), Precision Boost Overdrive 2 introduces Curve Optimizer.

There are essentially 3 levels of Precision Boost Overdrive
- AMD’s stock values, which can be set by disabling PBO
- The motherboard vendor values, which are programmed into the BIOS to match the motherboard VRM specification and can be set by enabling PBO
- Custom values, which the end-user can program
In this overclocking strategy, we’re just enabling Precision Boost Overdrive, whereas, in the following strategies, we’ll explore tuning the parameters.

We rely on the motherboard’s pre-programmed PBO parameters by enabling Precision Boost Overdrive. We find that the following values have changed:

For previous Ryzen CPUs, increasing the platform boost parameters substantially impacted performance, especially for the higher core-count CPUs. For Ryzen 7000 X-series CPUs, however, AMD’s default platform parameters were relatively unconstraining. For the X3D-series CPUs, it seems the limiters are again slightly more constraining. During a Prime95 non-AVX workload, we see that maximum values for PPT, TDC, and EDC are 135W, 117A, and 120A, respectively. So both TDC and EDC are close to or at the limit.
EXPO – Extended Profiles for Overclocking
EXPO stands for AMD Extended Profiles for Overclocking. It is an AMD technology that enables ubiquitous memory overclocking profiles for AMD platforms supporting DDR5 memory. EXPO allows memory vendors such as G.SKILL to program higher performance settings onto the memory sticks. If the motherboard supports EXPO, you can enable higher performance with a single BIOS setting. So, it saves you lots of manual configuration.

While our memory kit is rated at DDR5-6400, I had to run it at DDR5-6000 for stability reasons, as my system wasn’t stable at higher frequencies.
BIOS Settings & Benchmark Results
Upon entering the BIOS
- Go to the Extreme Tweaker menu
- Set Ai Overclock Tuner to EXPO I
- Set Memory Frequency to DDR5-6000MHz
- Enter the Precision Boost Overdrive submenu
- Set Precision Boost Overdrive to Enabled
Then save and exit the BIOS.
We re-ran the benchmarks and checked the performance increase compared to the default operation.
- SuperPI 4M: +1.04%
- Geekbench 5 (single): +2.38%
- Geekbench 5 (multi): +5.88%
- Geekbench 6 (single): +1.68%
- Geekbench 6 (multi): +7.82%
- Cinebench R23 Single: +0.89%
- Cinebench R23 Multi: +0.18%
- CPU-Z V17.01.64 Single: +0.24%
- CPU-Z V17.01.64 Multi: +0.38%
- V-Ray 5: +0.26%
- AI Benchmark: +8.17%
- 3DMark Night Raid: +1.16%
- CS:GO FPS Bench: +1.17%
- Tomb Raider: +0.00%
- Final Fantasy XV: +0.91%

Here are the 3DMark CPU Profile scores:
- CPU Profile 1 Thread: +0.09%
- CPU Profile 2 Threads: +0.46%
- CPU Profile 4 Threads: +0.25%
- CPU Profile 8 Threads: +0.61%
- CPU Profile 16 Threads: +0.01%
- CPU Profile Max Threads: +0.57%

As expected, enabling Precision Boost Overdrive does little to improve the system’s performance. After all, the CPU is primarily limited by operating voltage, not by any platform power parameters. Thanks to enabling EXPO, we get a performance improvement of +8.17% in AI Benchmark.
When running Prime 95 Small FFTs with AVX-512 enabled, the average CPU effective clock is 4261 MHz with 0.900 volts. The average CPU temperature is 67.6 degrees Celsius. The ambient and water temperature is 25.0 and 32.1 degrees Celsius. The average CPU package power is 132.0 watts.
When running Prime 95 Small FFTs with AVX disabled, the average CPU effective clock is 4540 MHz with 0.958 volts. The average CPU temperature is 82.6 degrees Celsius. The ambient and water temperature is 25.1 and 32.6 degrees Celsius. The average CPU package power is 143.9 watts.

OC Strategy #2: PBO Tuned with Curve Optimizer
In our second overclocking strategy, we will use Fmax Boost Override and the Curve Optimizer tool included in the Precision Boost Overdrive 2 overclocker’s toolkit.
PBO 2: Fmax Boost Override
Fused maximum frequency, or Fmax, is one of the Precision Boost infrastructure limiters constraining the CPU performance. The limiter determines the maximum allowed processor frequency across all CPU cores inside your CPU.
Boost Clock Override, or Fmax Override, is one of the overclocker tools available in the PBO 2 toolkit. It allows the user to override the arbitrary clock frequency limit between -1000 MHz and +200 MHz in steps of 25 MHz. It is available for both the CPU core clock and, if present, the Graphics core clock.
We need to make two important notes about Boost Clock Override:
- The override only adjusts the upper ceiling of the frequency and doesn’t act as a frequency offset. Ultimately, the Precision Boost 2 algorithm still determines the actual operating frequency.
- CCD0 – the one with V-Cache – appears locked from increasing the Fmax. So, while setting a negative boost override to lower the Fmax works, setting a positive boost override to increase the Fmax doesn’t work. The Fmax remains at 5250 MHz.

PBO 2: Curve Optimizer
As mentioned in this article, Curve Optimizer is an important new feature of Precision Boost Overdrive 2.
Curve Optimizer allows end-users to adjust the factory-fused VFT or voltage-frequency-temperature curve for each CPU core separately. The VFT curve is a unique curve for each core inside your CPU that defines the required voltage for a given frequency at a given temperature. Higher frequencies or higher operating temperatures require higher voltages.
Curve Optimizer adjusts the VFT curve by offsetting the voltages of the factory-fused VFT curve. By setting a positive offset, you increase the voltage point. Conversely, you decrease the voltage point by setting a negative offset.

The traditional overclocking approach for AMD Ryzen CPUs is to set a negative curve optimizer. When you adjust the VFT curve with a negative point offset, two things happen.
- First, you tell the CPU that it needs less voltage for a given frequency. And, as a consequence, at a given voltage, it can apply a higher frequency.
- Second, the CPU temperature will be lower because you use less voltage at a given frequency. That extra thermal headroom will also encourage the Precision Boost algorithm to target higher voltages and frequencies.
As I mentioned already, Curve Optimizer is available on a per-core basis. Like in the past, per-core tuning offers a real benefit as it provides some cores with a lot more frequency headroom.
Ryzen 9 7950X3D Curve Optimizer Tuning Process
The manual tuning process for Curve Optimizer can become quite convoluted since it affects the CPU core voltage in all scenarios ranging from very light single-threaded workloads to heavy all-core workloads.
My Curve Optimizer process for this Ryzen 9 7950X3D was as follows.
First, I use a broad tuning approach to get a big-picture understanding of the tuning opportunity. Then, I narrow the per-core curve optimizer settings to achieve stability in a light workload. Then, I verify the stability in all-core multi-threaded workloads. Lastly, I run through all my benchmarks to validate stability in a wide range of test scenarios.
The broad tuning process includes the following:
- Using Shamino’s Boost Curve tool to track the average frequency across an increasing amount of active threads
- Gradually increasing an all-core negative curve optimizer until the point of instability
- Gradually increasing Fmax Boost Override in case the boost frequency is hitting the frequency ceiling
The narrow tuning process includes the following:
- Using CoreCycler (00-x86) to stress test each core for 2 minutes to check for stability
- Gradually increasing the per-core negative curve optimizer until the point of instability for each core
- Gradually increasing Fmax Boost Override in case the boost frequency is hitting the frequency ceiling
The all-core stability process includes running Prime 95 Small FFTs with AVX-512 enabled and disabled.
The benchmark validation process includes completing all the benchmarks I’ve included in this guide. If a benchmark is unstable, I increase every core’s per-core curve optimizer value by two until I reach stability.

In my case, I used a per-core Curve Optimizer ranging from -40 on Core 6 to -15 on Core 2 and a Fmax boost override of +150 MHz.

I will show you the BIOS configuration in a minute. First, note that the per-core curve optimizer settings are CPU-specific, and the optimal values of your CPU may differ substantially.
The following chart shows the boost profile for this specific CPU.

We can make a couple of interesting observations.
At stock, the boost curve shows several cores running higher than the advertised boost frequency of 5.7 GHz. That’s not unexpected, as we know the fused Fmax is 5.75 GHz, but it’s still nice to see some cores overdelivering on their promise. Furthermore, we can also see that several V-Cache cores run at their Fmax of 5250 MHz.
It’s also interesting to see the average frequency across an increasing number of active threads during the Shamino Boost Curve workload. It nicely shows how the average frequency decreases when the first eight CCD1 cores are loaded, then eight CCD0 cores, then the eight SMT CCD1 cores, and finally, the eight SMT CCD0 cores.
After Curve Optimizing, we see a substantial frequency uplift across the board. Some cores almost hit the new Fmax ceiling of 5.9 GHz, and all V-Cache cores hit the 5.25 GHz Fmax. The average frequency under load has also increased by roughly 200 MHz across the board.
BIOS Settings & Benchmark Results
Upon entering the BIOS
- Go to the Extreme Tweaker menu
- Set Ai Overclock Tuner to EXPO I
- Set Memory Frequency to DDR5-6000MHz
- Enter the Precision Boost Overdrive submenu
- Set Precision Boost Overdrive to Enabled
- Set CPU Boost Clock Override to Enabled (Positive)
- Set Max CPU Boost Clock Override to 150
- Enter the Curve Optimizer submenu
- Set Curve Optimizer to Per Core
- For every core, set Curve Optimizer Sign to Negative
- For Cores 0, 5, 9, and 12, set Curve Optimizer Magnitude to 30
- For Cores 1, 3, 8, 10, and 11, set Curve Optimizer Magnitude to 20
- For Core 2, set Curve Optimizer Magnitude to 15
- For Cores 4, 14, and 15, set Curve Optimizer Magnitude to 35
- For Core 6, set Curve Optimizer Magnitude to 40
- For Cores 7 and 13, set Curve Optimizer Magnitude to 35
Then save and exit the BIOS.
We re-ran the benchmarks and checked the performance increase compared to the default operation.
- SuperPI 4M: +4.08%
- Geekbench 5 (single): +4.48%
- Geekbench 5 (multi): +9.50%
- Geekbench 6 (single): +4.25%
- Geekbench 6 (multi): +10.39%
- Cinebench R23 Single: +3.06%
- Cinebench R23 Multi: +4.24%
- CPU-Z V17.01.64 Single: +1.60%
- CPU-Z V17.01.64 Multi: +3.48%
- V-Ray 5: +3.40%
- AI Benchmark: +10.54%
- 3DMark Night Raid: +2.78%
- CS:GO FPS Bench: +2.46%
- Tomb Raider: +0.49%
- Final Fantasy XV: +0.92%

Here are the 3DMark CPU Profile scores
- CPU Profile 1 Thread: +3.28%
- CPU Profile 2 Threads: +4.07%
- CPU Profile 4 Threads: +2.52%
- CPU Profile 8 Threads: +3.72%
- CPU Profile 16 Threads: +3.57%
- CPU Profile Max Threads: +4.76%

While the performance uplift after Curve Optimizing is not earth-shattering, it’s nice to see we achieve better performance across the board. We see the highest performance improvement of +10.54% in AI Benchmark.
When running Prime 95 Small FFTs with AVX-512 enabled, the average CPU effective clock is 4432 MHz with 0.885 volts. The average CPU temperature is 67.6 degrees Celsius. The ambient and water temperature is 23.4 and 30.8 degrees Celsius. The average CPU package power is 137.7 watts.

When running Prime 95 Small FFTs with AVX disabled, the average CPU effective clock is 4732 MHz with 0.945 volts. The average CPU temperature is 82.5 degrees Celsius. The ambient and water temperature is 23.7 and 31.9 degrees Celsius. The average CPU package power is 150.0 watts.

OC Strategy #3: PB Supercharged with ECLK
In our final overclocking strategy, we take advantage of the return of the ECLK mode. ECLK stands for external clock and is precisely what the term suggests: an external clock generator. It was previously available on Ryzen 2000 Pinnacle Ridge processors but was removed afterward.
Raphael ECLK Overview
The standard Raphael platform has a 48 MHz crystal input to the integrated CGPLL clock generator. The CGPLL then generates a 48 MHz clock for the USB PLL and a 100 MHz reference clock for the FCH, which contains the CCLK PLL for the CPU cores and several SOC PLLs.

The external clocks are inputs to the FCH. There you can configure how you want to use the external clocks. In addition to the standard internal CGPLL, Raphael supports up to two external clock modes. They’re called eCLK0 Mode and eCLK1 Mode.
In eCLK0 Mode, an external 100MHz reference clock is used for both the CPU and SOC PLLs. In other words, it’s a reference clock that affects the CPU core clocks and the PCIe and SATA clocks.

In eCLK1 Mode, there are two distinct external 100MHz reference clocks. One clock provides the 100MHz input for the CPU PLL, and another provides the 100MHz reference clock for the SOC PLLs.

In previous SkatterBencher overclocking guides, the ones before Ryzen 7000, I referred to the technique of overclocking the reference clock as “supercharging PBO.” Unlike previous Ryzen CPUs, reference clock overclocking is very well supported and provides a viable path to overclocking.
The overclocking strategy with ECLK is the polar opposite of what we’re used to with Ryzen CPUs. OC Strategy #2 shows that Ryzen overclocking is typically done with a negative curve optimizer. That pushes the Precision Boost algorithm to reach higher boost frequencies.
With ECLK, we still build on the factory-fused VFT curve but adjust the frequency by adjusting the reference clock. For example, if the Precision Boost has a VFT point for 5000 MHz at 1.15V at 50C, with an ECLK of 105 MHz, the actual point will be 5250 MHz at 1.15V at 50C.
The default voltage for this VFT point won’t suffice for stable operation. So, counter-intuitively, we use a positive curve optimizer to increase the voltages of the VFT point. For example, a +30 curve optimizer may increase the voltage by 100mV. Thus, the resulting VFT point will be 5250 MHz at 1.25V at 50C.
One more critical point: ECLK also affects the maximum frequency ceiling. With an ECLK of 105 MHz, the newly programmed Fmax for the 7950X3D is 5750 MHz x 1.05 = 6038 MHz. That’s way too high for this CPU. With non-X3D CPUs, we could use a negative Fmax boost override to fix this. However, it’s a little more complicated since the CCDs have a different default Fmax. So reducing the Fmax for CCD1 also impacts CCD0.

Ryzen 9 7950X3D ECLK Tuning Process
The manual tuning process for eCLK tuning can become quite convoluted since it affects the CPU core stability in all scenarios ranging from very light single-threaded workloads to heavy all-core workloads.
My ECLK tuning process for this Ryzen 9 7950X3D was as follows.
First, I use a broad tuning approach to get a big-picture understanding of the tuning opportunity. Then, I narrow the per-core curve optimizer settings to achieve stability in a light workload. Then, I verify the stability in all-core multi-threaded workloads. Lastly, I run through all my benchmarks to validate stability in a wide range of test scenarios.
The broad tuning process includes the following:
- Using Shamino’s Boost Curve tool to track the average frequency across an increasing amount of active threads
- Gradually increasing the ECLK frequency until the point of instability
- In case of instability, increase the positive all-core curve optimizer setting.
The narrow tuning process includes the following:
- Using CoreCycler (00-x86) to stress test each core for 2 minutes to check for stability
- In case of instability, increase the per-core curve optimizer
The all-core stability process includes running Prime 95 Small FFTs with AVX-512 enabled and disabled.
The benchmark validation process includes completing all the benchmarks I’ve included in this guide. If a benchmark is unstable, I increase every core’s per-core curve optimizer value by two until I reach stability.

In my case, I used an ECLK of 104 MHz and a per-core Curve Optimizer ranging from 0 on Core 7 to +25 on Core 2. I will show you the BIOS configuration in a minute. First, note that these settings, especially the curve optimizer, are CPU-specific, and the optimal values of your CPU may differ substantially.
The following chart shows the boost profile for this specific CPU.

We can make a couple of interesting observations.
We can use eCLK tuning to increase the frequency of the cores of “locked” 3D V-Cache CCD. It also helps us improve the frequency in the other CCD, though not much more than what we got from Curve Optimizing.
While tuning with eCLK provides, generally speaking, higher boost frequencies than tuning exclusively with Curve Optimizer, the maximum boost frequencies are not that far apart.
Overall, the eCLK strategy typically provides an avenue to slightly higher frequencies at the cost of slightly higher voltages. While this offers better performance in light workloads, the higher voltages will push the CPU quicker to the thermal limit. Thus, in heavy workloads, strictly using the Curve Optimizer tool for undervolting yields slightly better results.
BIOS Settings & Benchmark Results
Upon entering the BIOS.
- Go to the Extreme Tweaker menu
- Set Ai Overclock Tuner to EXPO I
- Set eCLK Mode to Asynchronous Mode
- Set BCLK2 Frequency to 104
- Set Memory Frequency to DDR4-6000MHz
- Enter the Precision Boost Overdrive submenu
- Set Precision Boost Overdrive to Enabled
- Enter the Curve Optimizer submenu
- Set Curve Optimizer to Per Core
- For every core, set Curve Optimizer Sign to Positive
- For Cores 0, 4, 5, 8, and 10, set Curve Optimizer Magnitude to 10
- For Core 1, set Curve Optimizer Magnitude to 20
- For Core 2, set Curve Optimizer Magnitude to 25
- For Core 3, set Curve Optimizer Magnitude to 15
- For Cores 6, 9, 11, 12, and 13, set Curve Optimizer Magnitude to 5
- For Cores 7, 14, and 15, set Curve Optimizer Magnitude to 0
Then save and exit the BIOS.
We re-ran the benchmarks and checked the performance increase compared to the default operation.
- SuperPI 4M: +4.16%
- Geekbench 5 (single): +2.64%
- Geekbench 5 (multi): +6.57%
- Geekbench 6 (single): +4.14%
- Geekbench 6 (multi): +9.63%
- Cinebench R23 Single: +3.35%
- Cinebench R23 Multi: +1.18%
- CPU-Z V17.01.64 Single: +3.63%
- CPU-Z V17.01.64 Multi: +1.58%
- V-Ray 5: +0.30%
- AI Benchmark: +8.60%
- 3DMark Night Raid: +2.25%
- CS:GO FPS Bench: +0.16%
- Tomb Raider: +0.49%
- Final Fantasy XV: +1.70%

Here are the 3DMark CPU Profile scores at stock
- CPU Profile 1 Thread: +4.17%
- CPU Profile 2 Threads: +4.67%
- CPU Profile 4 Threads: +2.89%
- CPU Profile 8 Threads: +2.20%
- CPU Profile 16 Threads: +2.41%
- CPU Profile Max Threads: +2.03%

While we can increase the performance over stock, it’s clear that the need for using a positive curve optimizer is impacting the overall performance. As expected, we see the most significant improvement in single-threaded benchmarks, especially those running on the V-Cache CCD. However, in multi-threaded benchmarks, we see less improvement than with Curve Optimizing due to the need for using the positive curve optimizer. We get the highest performance improvement of +9.63% in Geekbench 6 Multi.
When running Prime 95 Small FFTs with AVX-512 enabled, the average CPU effective clock is 4307 MHz with 0.905 volts. The average CPU temperature is 68.2 degrees Celsius. The ambient and water temperature is 22.5 and 31.1 degrees Celsius. The average CPU package power is 140.8 watts.

When running Prime 95 Small FFTs with AVX disabled, the average CPU effective clock is 4592 MHz with 0.963 volts. The average CPU temperature is 83.3 degrees Celsius. The ambient and water temperature is 22.3 and 31.3 degrees Celsius. The average CPU package power is 152.1 watts.

AMD Ryzen 9 7950X3D: Conclusion
All right, let us wrap this up.
I want to start by repeating what I wrote at the beginning of this article: a quick thanks to the folks at AMD who decided to support overclocking for the second-generation Ryzen X3D CPUs. Overclocking today is very different from 15 years ago, and nowadays, it takes substantial effort to support, enable, and validate the overclocking toolkits. I appreciate that work was done.
Now that’s not to say overclocking is fully enabled on the 7000X3D series. Far from it, actually. Manual OC mode is still disabled, and we cannot increase the Fmax on the V-Cache CCD. However, we can use Curve Optimizer, and that’s still better than with the Ryzen 7 5800X3D. Finally, you can rely on asynchronous eCLK to force higher V-Cache clocks if you want to.
Anyway, that’s all for today!
I want to thank my Patreon supporters for supporting my work. As usual, if you have any questions or comments, please drop them in the comment section below.
See you next time!
Cau
with bclk 105, my vcore is reaching 1.38, this is normal?
Pieter
Is it static 1.38V? If yes, double-check if also the core clocks are static – some boards will automatically switched to “OC Mode” (and disable PBO) when the ECLK is above a certain value.
ALIEN_i_AM
@skatterbencher
i had my old 5800x running on a static vcore and multiplier. Is there a way to disable PBO and CorePerformanceBoost (which makes the CPU run at 0.9v and 4200mhz) and have that be higher, manually ?
Like 4800mhz with 1.05 Vcore fixxed ?
I could not find any valuable information about it, if there is a way to do it. There is no multiplier or Vcore Setting on my Asus B650-A Strix Mainboard.
i guess that it is not possible at all, no matter what Bios Version you use, because of the different DIE Clock Difference and Vcore Difference. I know i can have a max clock for every core with PBO but i want to get rid of PBO and CorePerformanceBoost all together and just have a static clock and Vcore Value for both CCDs.
Thanks in advance for your time to respond.
best regards From Germany
ALIEN_I_AM
Pieter
AMD didn’t allowed for “OC Mode” (which is manual configuration of voltage and frequency) until the Ryzen 9000 series. So PBO with Fmax boost override is the only supported way to overclock.
On certain boards with the right feature set, you can also use asynchronous ECLK to increase the clock frequency when PBO is disabled. I cover that in my 7800X3D video https://skatterbencher.com/2023/04/05/skatterbencher-60-amd-ryzen-7-7800x3d-overclocked-to-5400-mhz/#OC_Strategy_5_Manual_Overclock. But I think they have disabled manual Vcore override these days.
Mikey Antonakakis
Thanks for this awesome writeup! One thing I just found out today regarding Boost Clock Override: with it enabled (I had it set to +200) I was getting really poor single-core benchmark results. Disabling it increased for example Cinebench R23 single from ~1800 to 2048, and OCCT single SSE from 92 to 109. HUGE impact. Apparently when it’s enabled it messes up the scheduler, I could clearly see that CCD0 was being used for those single-core benchmarks, hence the poor results.
BTW to get the core parking/scheduling working correctly I’m using Game Mode On, Game Bar updated, core preference in BIOS set to “Driver” and AMD 3D VCache driver is running on my system (basically the settings recommended by JaysTwoCents and GamersNexus from this week).
ANTHO
Merci pour ce guide ainsi que toutes tes explications.
Je te félicite pour ce travail de TITAN que tu as effectué.
Je possède également un 7950X3D.
Je me suis bcp documenté avant de mettre les mains dedans et faire n’importe quoi.
De mon côté, j’ai utilisé la méthode de curve optimiser, méthode par coeur. J’ai utiliser core cycler et joué sur la valeur jusqu’à atteindre l’instabilité. J’ai ensuite effectuéun travail sur l’ensemble des coeurs, durant 30 minutes en ajoutant un couer à chaque fois au travail. C’est un travail très fastidieux….Tout ça à été effectué avec le logiciel OCCT.
Je tiens à te préciser qu’à la fin de ce travail, la machine était très stable, les bench passaient favorablement, pas de plantage en jeux vidéo. tout était OK.
Jusqu’au jour où, un bench du logiciel AIDA64 fasse planter la machine. C’est le bench CPU SHA3. J’ai été très surpris, j’ai dû revoir le curve optimiser par coeur du CPU jusqu’à ce que le CPU SHA3 ne plante plus.
As-tu une explication avec ce bench CPU SHA3?
Sur le Cinebench R23, j’arrive juste au dessus des 34000, ce qui est vraiment très peu à mon sens. Je n’ai pas de watercooling maison, juste un bon AIO 360mm (Corsair iCUE H150i ELITE CAPELLIX XT).
As-tu une explication à ce “petit” 34000 mais également à ce CPU SHA3 alors que tout était stable auparavant? En fouillant sur le net, j’ai remarqué que d’autres utilisateurs étaient dans mon cas.
Merci par avance de ton retour.
Jay
Hiya! I’m very new and reading to learn more about overclocking and how to overclock this CPU. Thank you for this guide!
I wanted to ask, where can I find the Shamino’s Boost Curve tool. You refer to it multiple times but I don’t know where to find it
Pieter
It is in the ROG X670E ocpak/octools, which you can find here: https://rog-forum.asus.com/t5/amd-600-series/x670-resource/m-p/901576 > ocpak/octools > DB Query > AMD V/F > Get Boost Curve.
SkatterBencher #60: AMD Ryzen 7 7800X3D Overclocked to 5400 MHz - SkatterBencher
[…] already overclocked the Ryzen 9 7950X3D in SkatterBencher #56, the Ryzen 9 7900X3D in Skatterbencher #58, and the 5800X3D in SkatterBencher #39. The Ryzen 7 […]
Update on Ryzen 7000 C-State Boost Limiter - SkatterBencher
[…] Feb 27 Update: based on my limited testing with the Ryzen 9 7950X3D, it appears the C-State Boost Limiter is not present on AGESA 1.0.0.5. […]
SkatterBencher #58: AMD Ryzen 9 7900X3D Overclocked to 5789 MHz - SkatterBencher
[…] already overclocked the Ryzen 9 7950X3D in SkatterBencher #56 and the 5800X3D in SkatterBencher #39. The Ryzen 9 7900X3D is like the 7950X3D, a dual-CCD […]
CPU AMD Ryzen 9 7950X3D vai a 5.9 GHz em overclock |
[…] SkatterBencher e […]
AMD Ryzen 9 7950X3D Gets Overclocked to 5.9 GHz – Infowire
[…] on YouTube has successfully overclocked the new AMD Ryzen 9 7950X3D. 5.9GHzSuccessfully overclocking these chips is no small feat. The seasoned YouTuber (also known as his […]
2023 - AMD Ryzen 9 7950X3D wird auf 5,9 GHz übertaktet
[…] ScatterBencher hat es geschafft, den neuen AMD Ryzen 9 7950X3D zu übertakten 5,9 GHz. Das erfolgreiche Übertakten dieser Chips ist keine einfache Aufgabe, und der erfahrene YouTuber […]
AMD Ryzen 9 7950X3D Gets Overclocked to 5.9 GHz - Softs Geek
[…] ScatterBencher has managed to overclock the new AMD Ryzen 9 7950X3D to 5.9 GHz. Successfully overclocking these chips is no simple feat, and the skilled YouTuber (also known as […]
Radek
Have problem when i do all you tip my ccd0 and ccd1 dont boost over 5150mhz
Pieter
Which OC Strategy in particular do you follow?
AMD Ryzen 9 7950X3D Gets Overclocked to 5.9 GHz – 1 World Solutions Technology News & Info
[…] ScatterBencher has managed to overclock the new AMD Ryzen 9 7950X3D to 5.9 GHz. Successfully overclocking these chips is no simple feat, and the skilled YouTuber (also known as […]
AMD Ryzen 9 7950X3D Gets Overclocked to 5.9 GHz | Sounds Nerdy
[…] ScatterBencher has managed to overclock the new AMD Ryzen 9 7950X3D to 5.9 GHz. Successfully overclocking these chips is no simple feat, and the skilled YouTuber (also known as […]
AMD Ryzen 9 7950X3D Gets Overclocked to 5.9 GHz – Mist Vista
[…] ScatterBencher has managed to overclock the new AMD Ryzen 9 7950X3D to 5.9 GHz. Successfully overclocking these chips is no simple feat, and the skilled YouTuber (also known as […]
"AMD Ryzen 9 7950X3D Achieves a Record-Breaking 5.9 GHz Overclock!" - Daily News Circuit
[…] ScatterBencher has managed to overclock the new AMD Ryzen 9 7950X3D to 5.9 GHz. Successfully overclocking these chips is no simple feat, and the skilled YouTuber (also known as […]
Paul Anderegg
For the 7800X3D, is the anticipation that the boost will remain fused at 5250, and assuming such, what benefits to performance or thermals would you expect from the single CCD with just curve optimization available.
Pieter
Hi Paul! Looks like the listed maximum boost for the 7800X3D is 5000 MHz, so I would expect the fused Fmax to be 5050 MHz.
I would expect the impact of CO to be similar like with the 7950X3D. So ~200 MHz if you have a good CPU. The main reason I am this optimistic is because the X3D parts are primarily voltage constrained by design, so any additional improvement in operating voltage will yield immediate results.
Of course this is just speculation and I could be very wrong. I have not tested this part yet.
El Ryzen 7950X3D con OC a 5,9 GHz no mejora el rendimiento en juegos
[…] logrado hacer overclock en su Ryzen 9 7950X3D hasta los 5,9 GHz. Para los más curiosos, os dejamos todo el proceso que ha seguido y sus resultados. Como resumen, el nuevo Ryzen 9 7950X3D tiene un límite overclock de 5.250 MHz y 1.2V en su CCD0, […]
AMD Ryzen 9 7950X3D ha sido overclockeado a 5.9 GHz y delidded – Liukin
[…] tiene una larga artículo y video sobre overclocking del Ryzen 9 7950X3D, mientras der8auer No escatimó tiempo en lanzar la […]
Ryzen 9 7950X3D Can Still Be Overclocked To 5.9 GHz, But That Makes Almost No Sense - Tech News Space
[…] an external clock and, last but not least, a very high-quality cooling system. SkatterBencher has detailed instructions (in English) how to overclock Ryzen 7000X3D chips in this way. The final result of overclocking […]
bmagnien
What was your ram running at before setting 6000 EXPO? Could you give a sense of the performance uplift between stock ram timings and the fastest tuned timings you could run stable? On 5800x3d, tuned ram timings didn’t make a very large difference. has that changed at all on the 7950x3d? thanks
Pieter
The memory was running at DDR5-4800 before enabling EXPO. I think you can have a look at the results from OC Strategy #1 to see the performance improvements from faster memory. On average ~1.63% with biggest improvements in Geekbench 6 and AI Benchmark.