SkatterBencher #99: Intel Xeon 678X Overclocked to 5300 MHz

Today we undervolt and overclock the Intel Xeon 678X processor up to 5300 MHz with the ASUS Pro WS W890E-Sage SE motherboard and water cooling.
I do this by leveraging several of the advanced tools in Intel’s overclocking toolkit, including adaptive voltage, and the Turbo Ratio limits. In this guide, I break down the Xeon 678X tuning process into five unique overclocking strategies for beginner and advanced overclockers.
- First, we unlock the power limits and load a memory preset,
- Second, we overclock using ASUS’ water-cooled oc preset,
- Third, we manually tune our CPU core overclock,
- Fourth, we finetune the memory timings,
- And, finally, we improve performance with an undervolt.
However, before we jump into overclocking, let us quickly review the hardware and benchmarks used in this video.
Intel Xeon 678X: Introduction
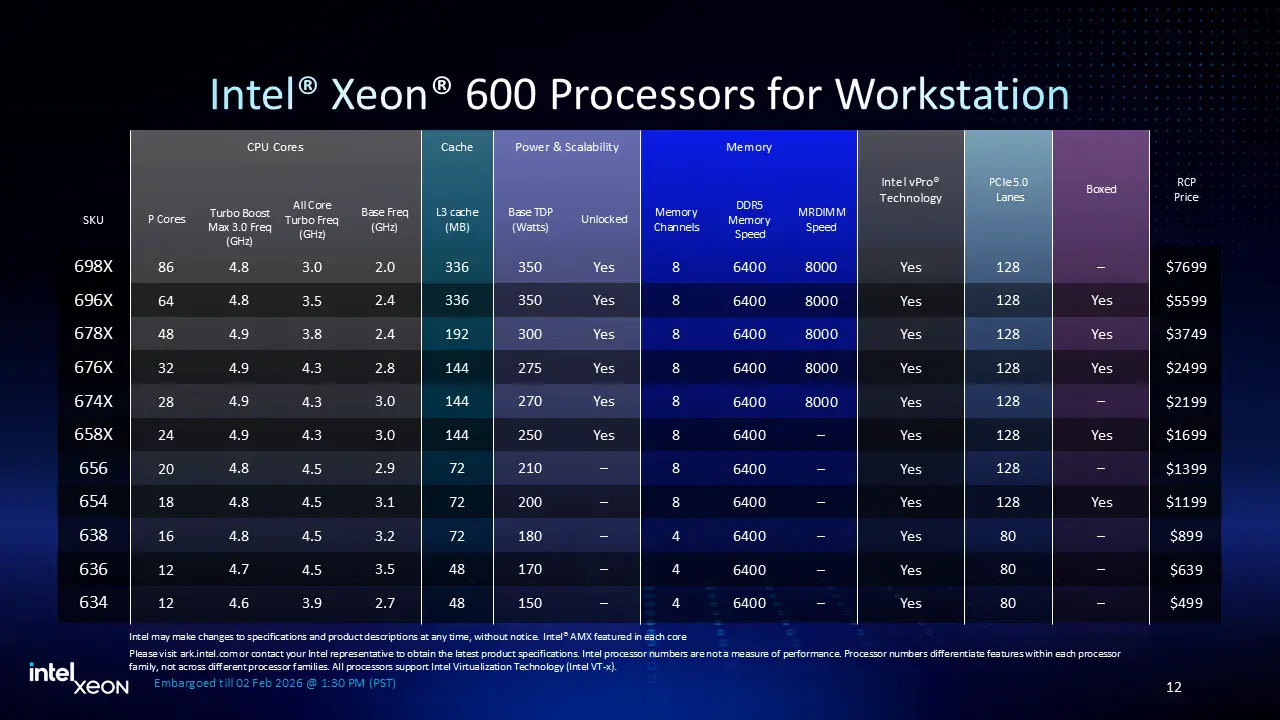
The Intel Xeon 678X is part of Intel’s Granite Rapids based Xeon 600 for workstation processor lineup. The processors were announced in February 2026 even though its datacenter counterparts have been available since September 2024.
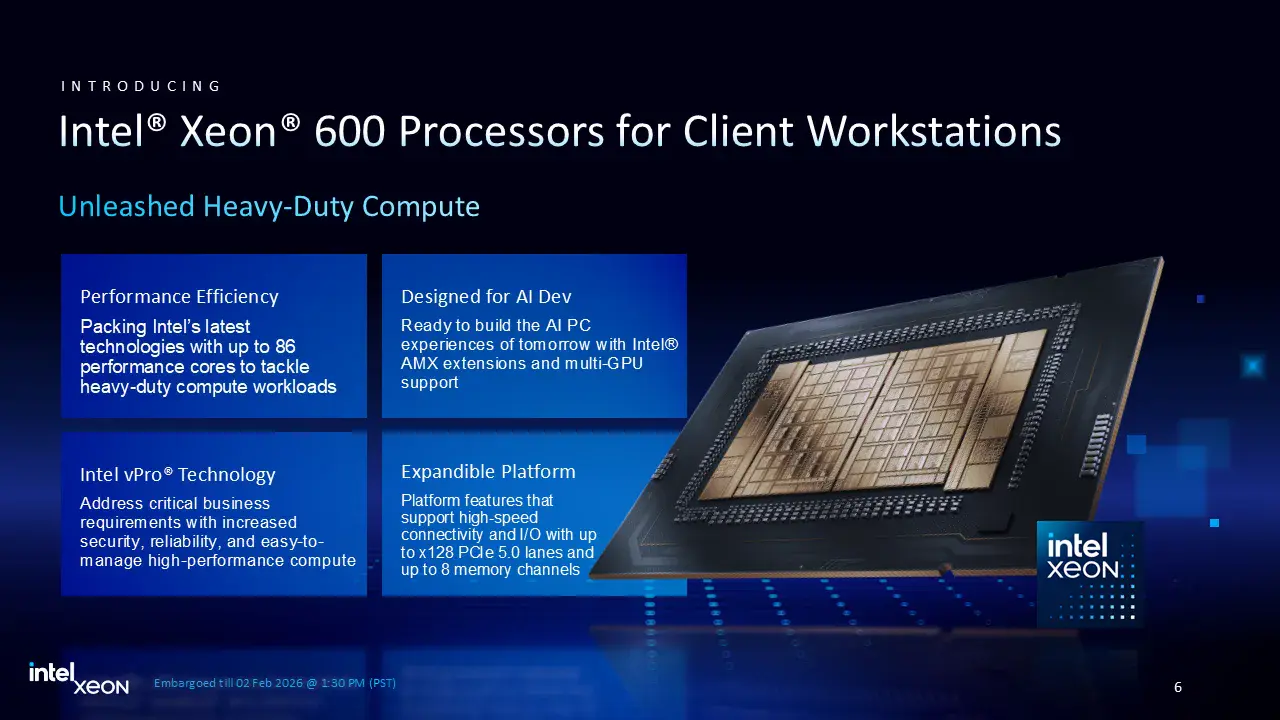
Granite Rapids features up to 86 Redwood Cove+ P-cores built using the Intel 3 manufacturing process. You also get up to 8 memory channels and 128 CPU PCIe 5.0 lanes.
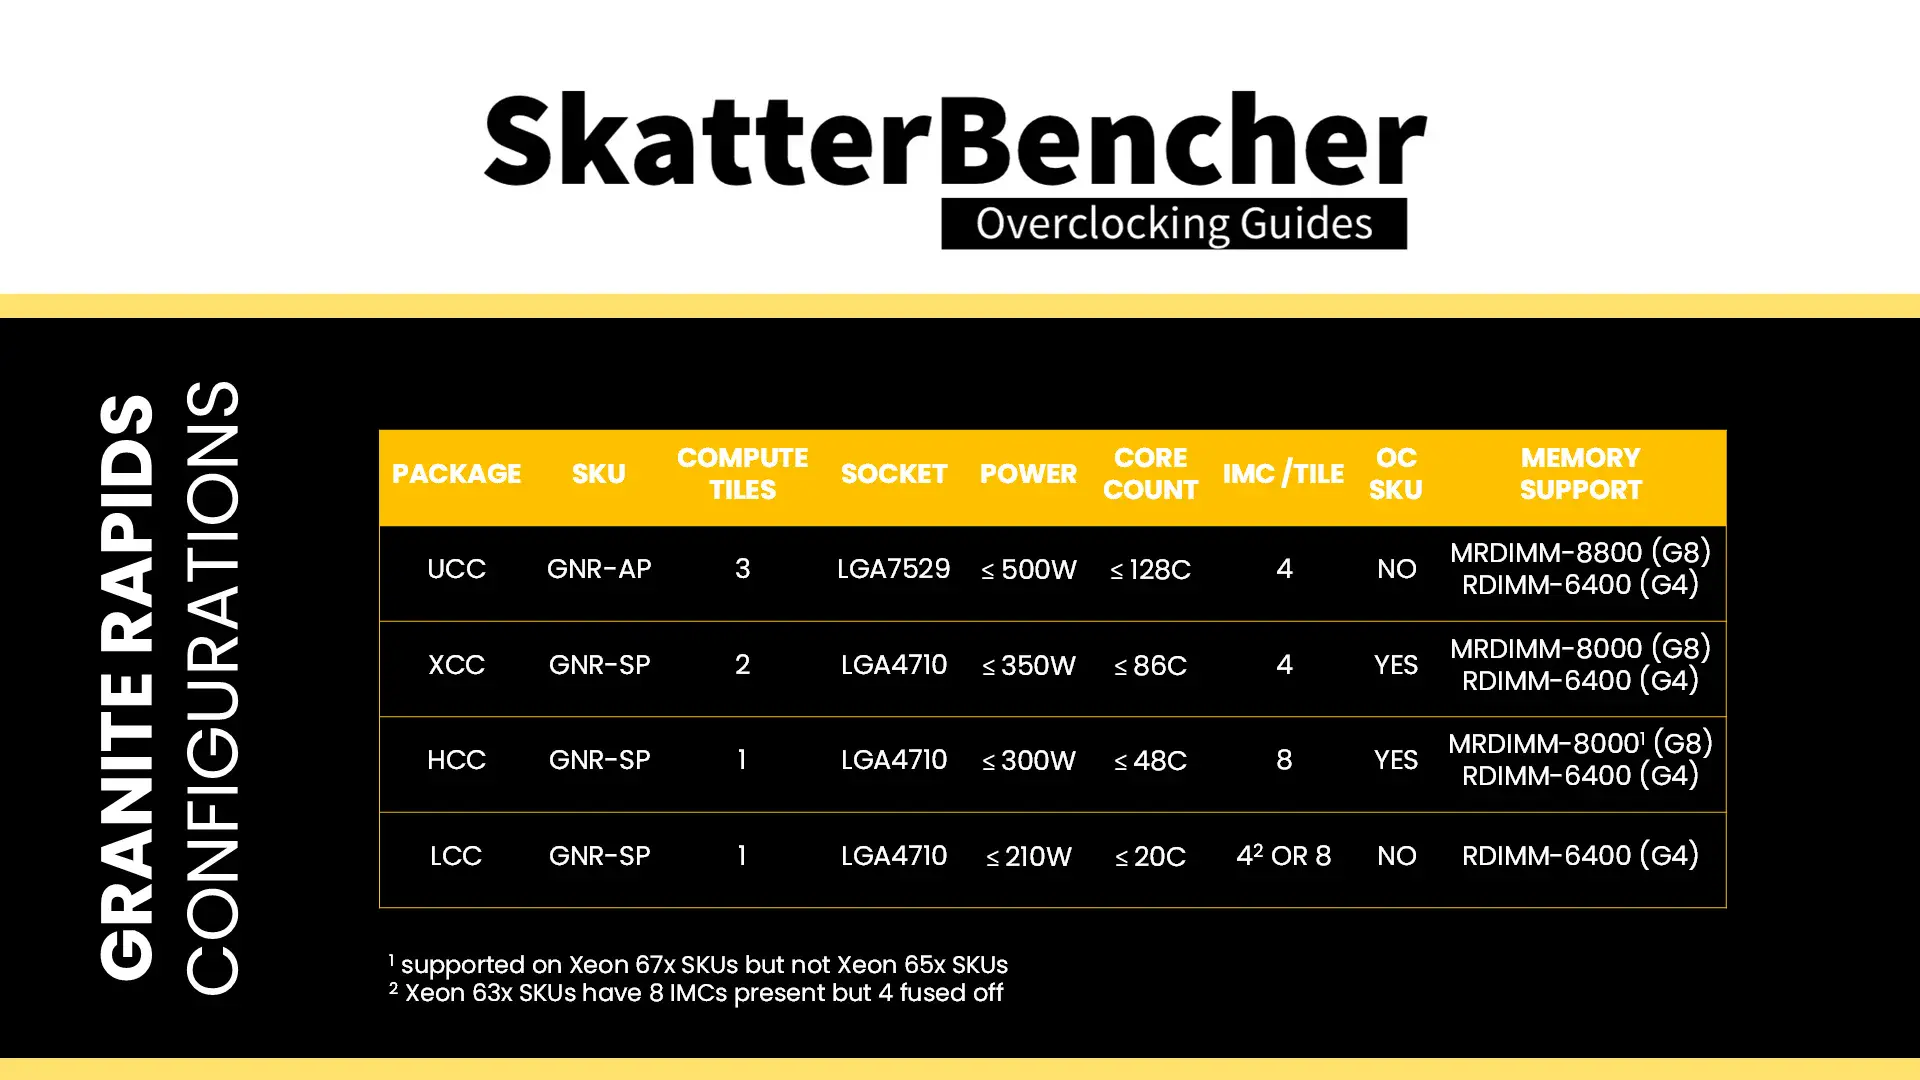
There are four variants of the Granite Rapids package: UCC, XCC, HCC, and LCC.
- The UCC package comes with three compute dies and is only available for data center as it requires the larger LGA7529 socket.
- The XCC package features two compute dies and is available in 64- and 86-core configurations. All SKUs are unlocked for overclocking.
- The HCC package features a single compute die and is available in 24-, 28-, 32-, and 48-core configurations. All SKUs are unlocked for overclocking.
- The LCC package also features a single compute die, but, unfortunately, doesn’t have a single unlocked part.

The Xeon 678X we’re overclocking today features the HCC package with 48 cores and a 300W TDP. It has a base frequency of 2.4 GHz for SSE workloads and 1.7 GHz for AMX workloads. It also has a maximum frequency of 4.9 GHz when up to 2 cores are active.
Platform Overview
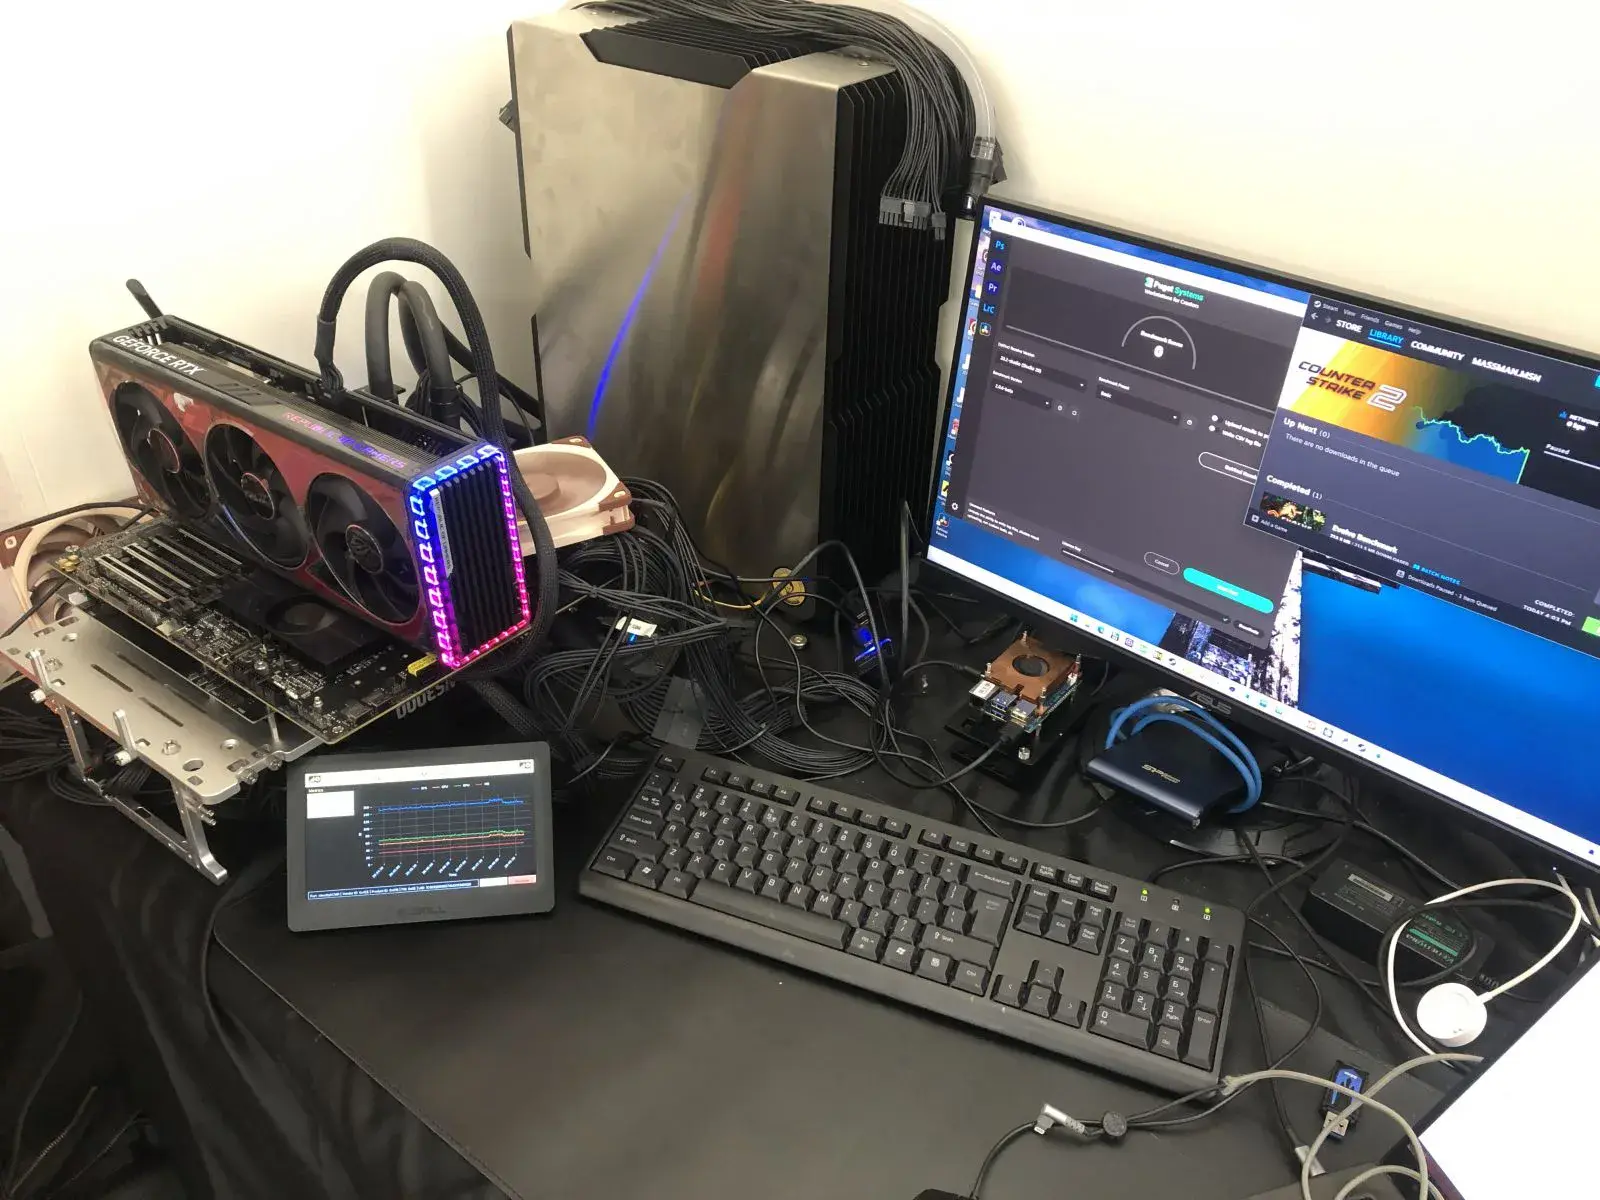
The system we’re overclocking today consists of the following hardware.
| Item | SKU | Price (USD) |
|---|---|---|
| CPU | Intel Xeon 678X | 3749 |
| Motherboard | ASUS Pro WS W890E-Sage SE | |
| CPU Cooling | Bitspower Summit LGA4677 2x EK-Quantum Surface S360 | 210 |
| Memory | G.SKILL R-DIMM DDR5-6400 512GB F5-6400R3848F64GE8-T5N | |
| Power Supply | Corsair WS3000 3000W | 599 |
| Graphics Card | ASUS ROG Strix RTX 4090 OC | 800 |
| Storage | Corsair MP700 Elite 2TB PCIe 5.0 NVME | 280 |
| Chassis | Open Benchtable V2 | 199 |
| Telemetry | BENCHLAB | 199 |
| Monitor | ASUS TUF Gaming VG249Q3R | 190 |
Benchmark Software
We use Windows 11 and the following benchmark applications and games to measure performance and ensure system stability.
| Benchmark | Link |
|---|---|
| 3DMark CPU Profile | https://www.3dmark.com/ |
| 7-Zip 25.01 | https://www.7-zip.org/ |
| AI-Benchmark | https://ai-benchmark.com/ |
| AIDA64 | https://www.aida64.com/ |
| Blender 4.5.0 | https://opendata.blender.org/ |
| Cinebench 2024.1 | https://www.maxon.net/en/cinebench/ |
| Corona 10 Benchmark | https://corona-renderer.com/benchmark |
| CPU-Z | https://www.cpuid.com/softwares/cpu-z.html |
| Geekbench 6 | https://www.geekbench.com/ |
| Geekbench AI | https://www.geekbench.com/ai/ |
| IndigoBench | https://www.indigorenderer.com/indigobench |
| LocalScore 14B | https://www.localscore.ai/ |
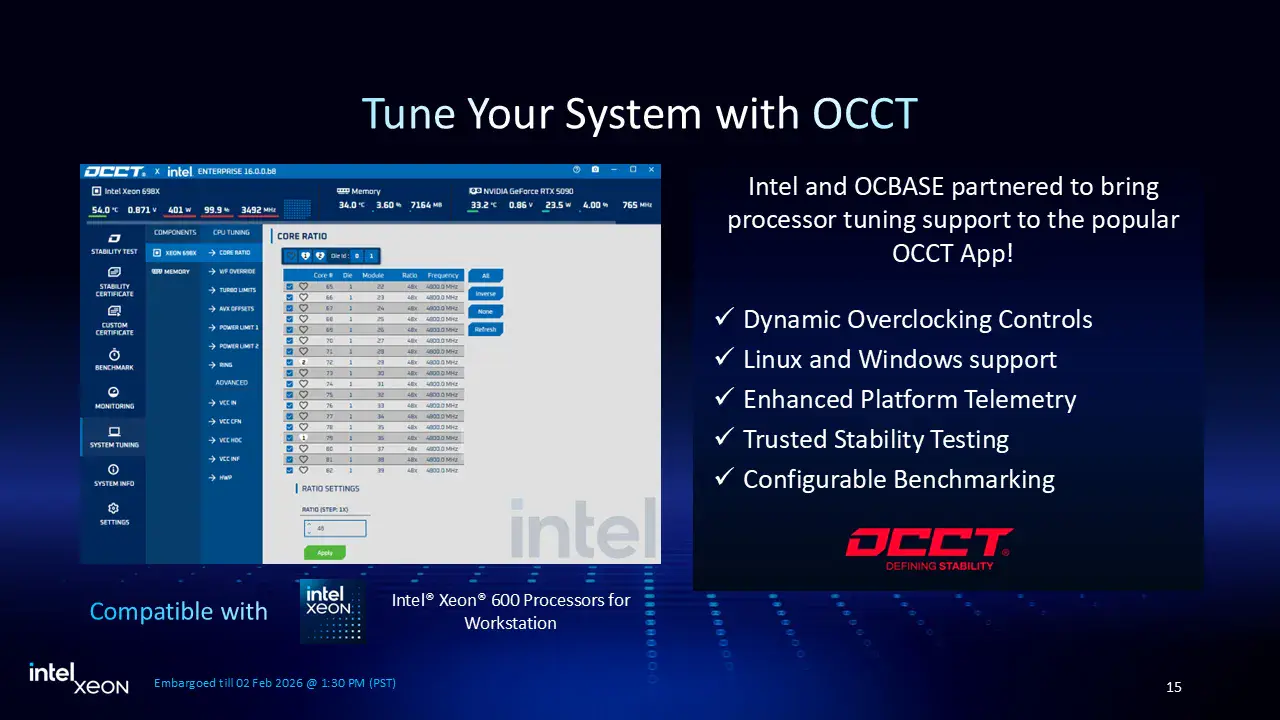
| OCCT | https://www.ocbase.com/ |
| PugetBench for Creators | https://www.pugetsystems.com/pugetbench/creators/ |
| Pov-Ray 2.01 | https://www.povray.org/ |
| PYPrime 2.0 32B | https://github.com/mbntr/PYPrime-2.x |
| V-Ray 6 | https://www.chaosgroup.com/vray/benchmark |
| Y-Cruncher 25B | http://www.numberworld.org/y-cruncher/ |
| Game | Link |
|---|---|
| Counter Strike 2 | https://store.steampowered.com/app/730/CounterStrike_2/ |
| Shadow of the Tomb Raider | https://store.steampowered.com/app/750920/Shadow_of_the_Tomb_Raider_Definitive_Edition/ |
| Homeworld 3 | https://store.steampowered.com/app/1840080/Homeworld_3/ |
Intel Xeon 678X: Stock Performance
Before starting overclocking, we must check the system performance at default settings.
In the past, there was some confusion about what constitutes default settings for Intel processors. For new platforms, Intel spends extra resources clarifying to industry and media partners what constitutes default settings. This default configuration is available in the BIOS
In the ASUS BIOS we can easily enforce the default settings by switching the Performance Preferences option to Intel Default Settings. The Intel Default Turbo Boost 2.0 and Turbo Ratio Limit parameters for the Xeon 678X are as follows:
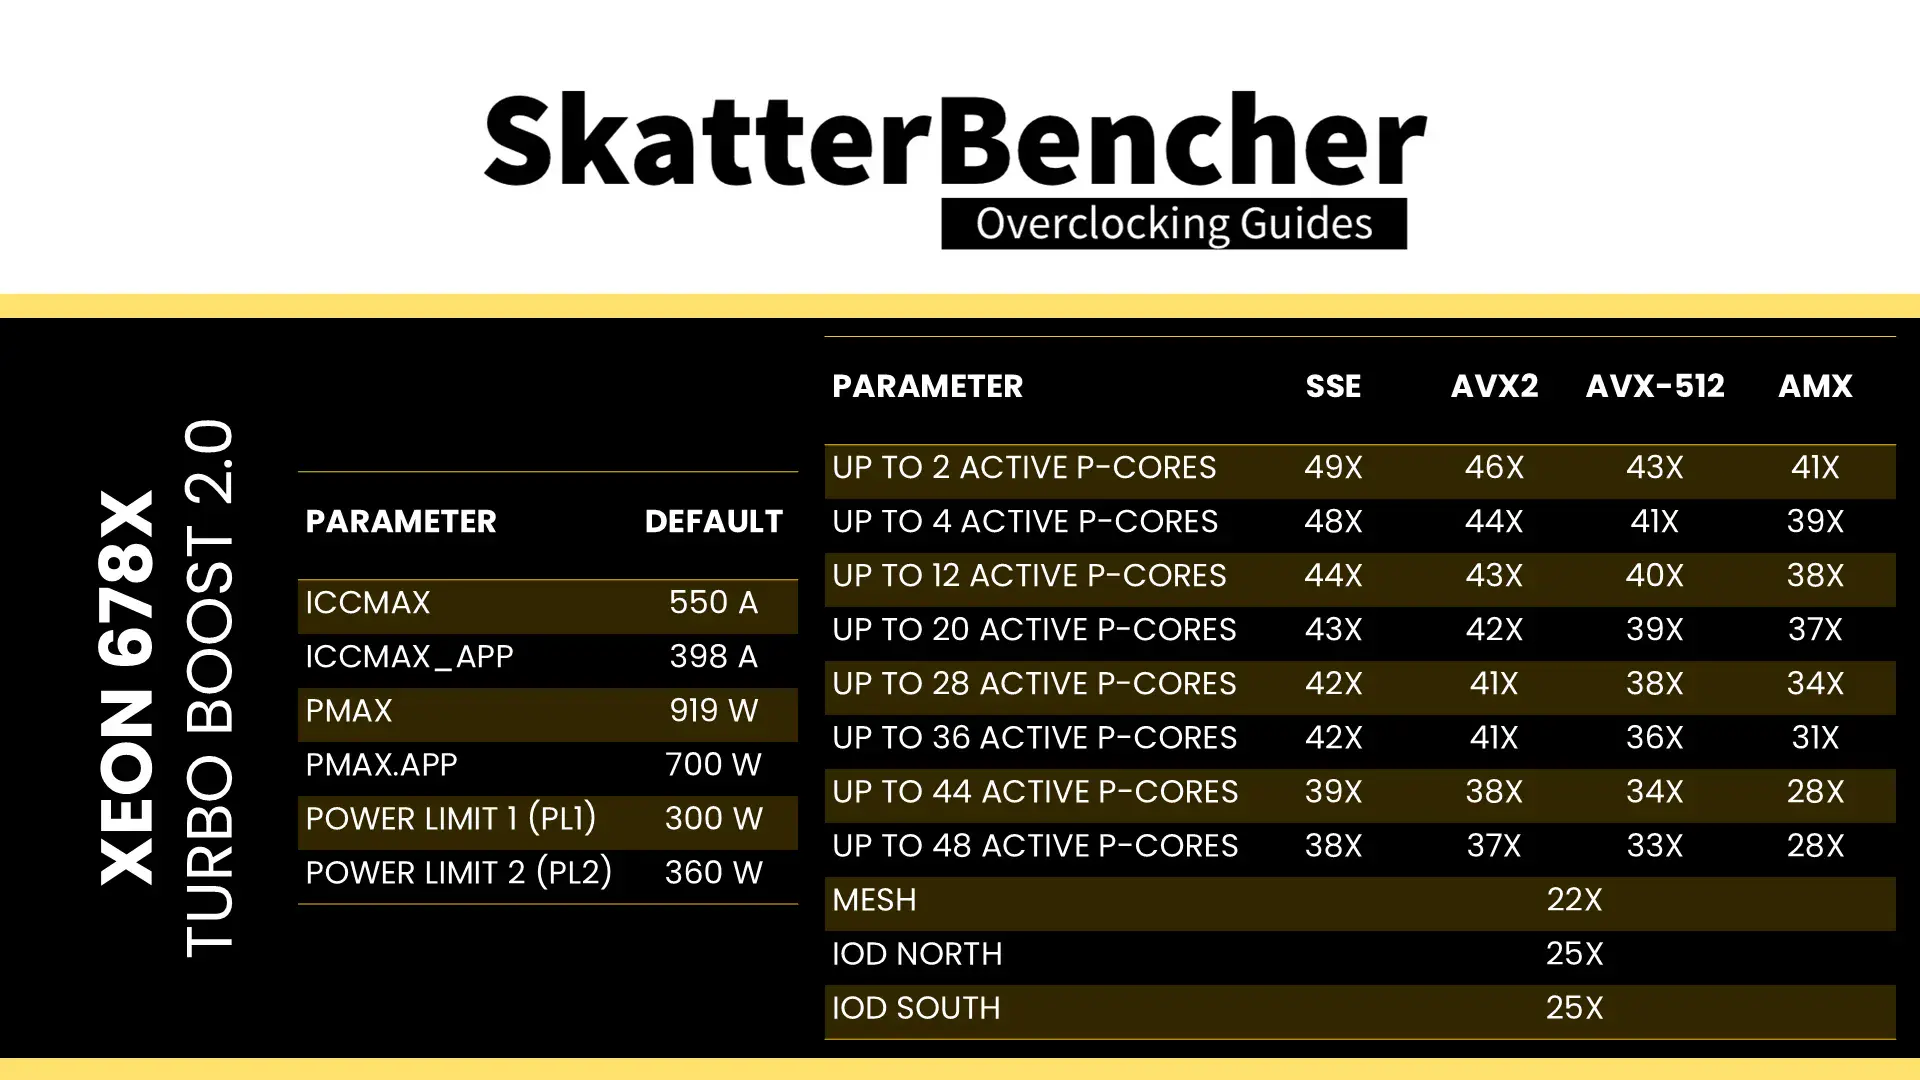
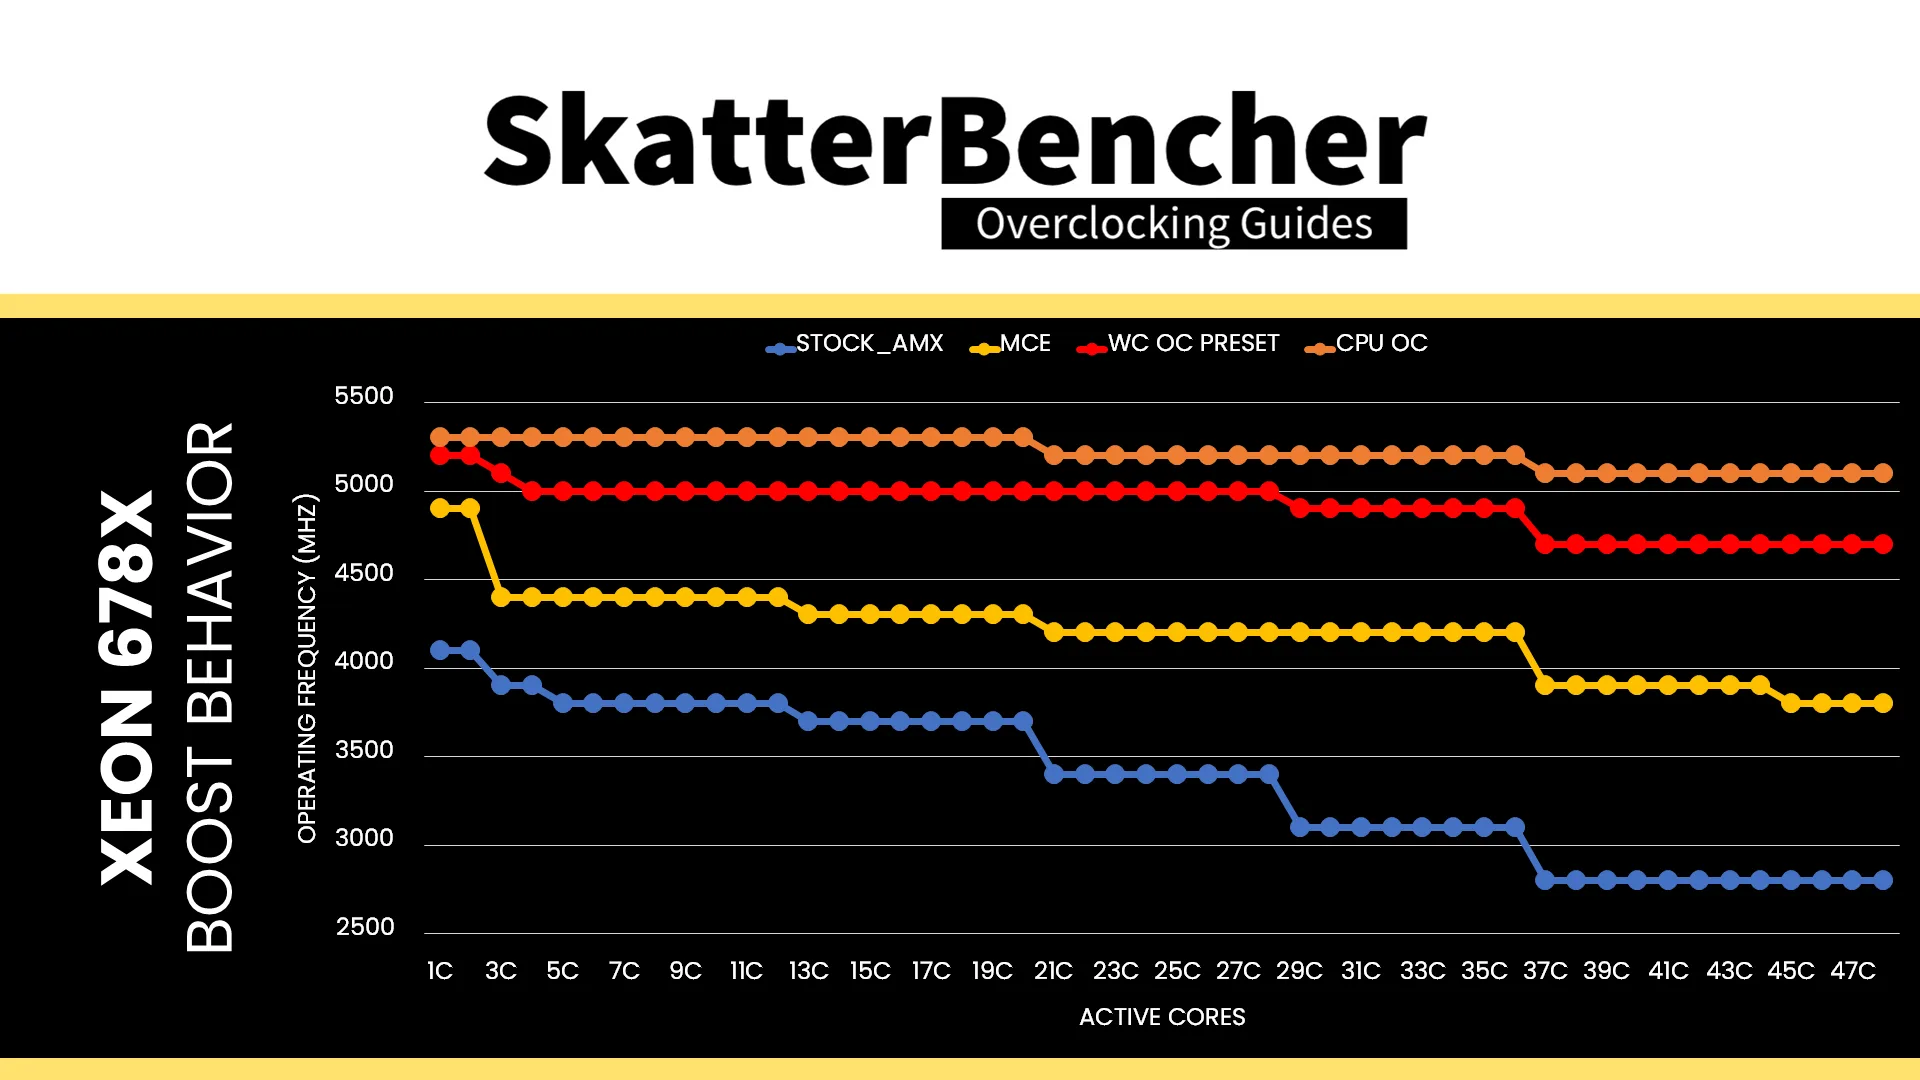
We can see that the operating frequency of the Xeon 678X is a dynamic term. We note that the biggest difference in operating frequency between SSE and AMX workloads is 1.1 GHz, which occurs when between 37 and 44 cores are active.
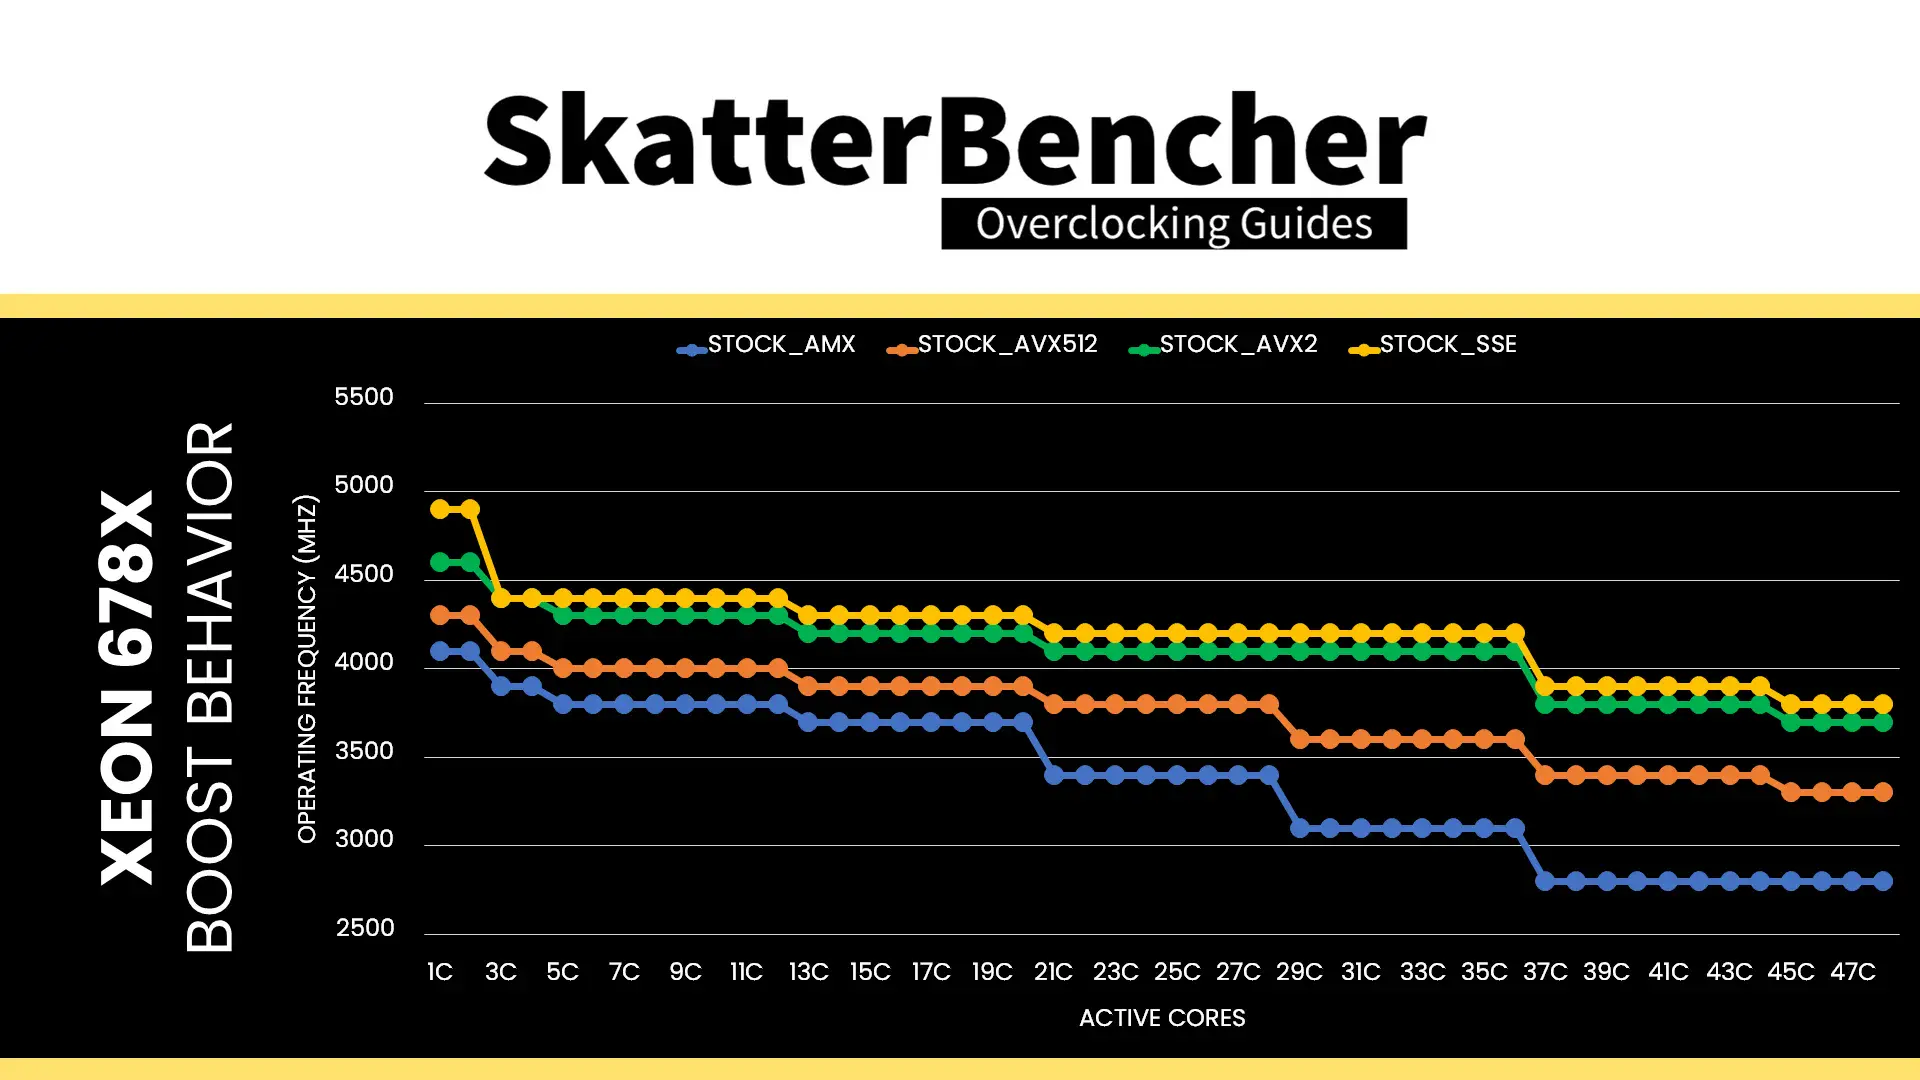
We have a total of 48 P-cores, two of which can boost to 4.9 GHz, two can boost to 4.8 GHz, and the remaining 44 P-cores are limited up to 4.7 GHz.
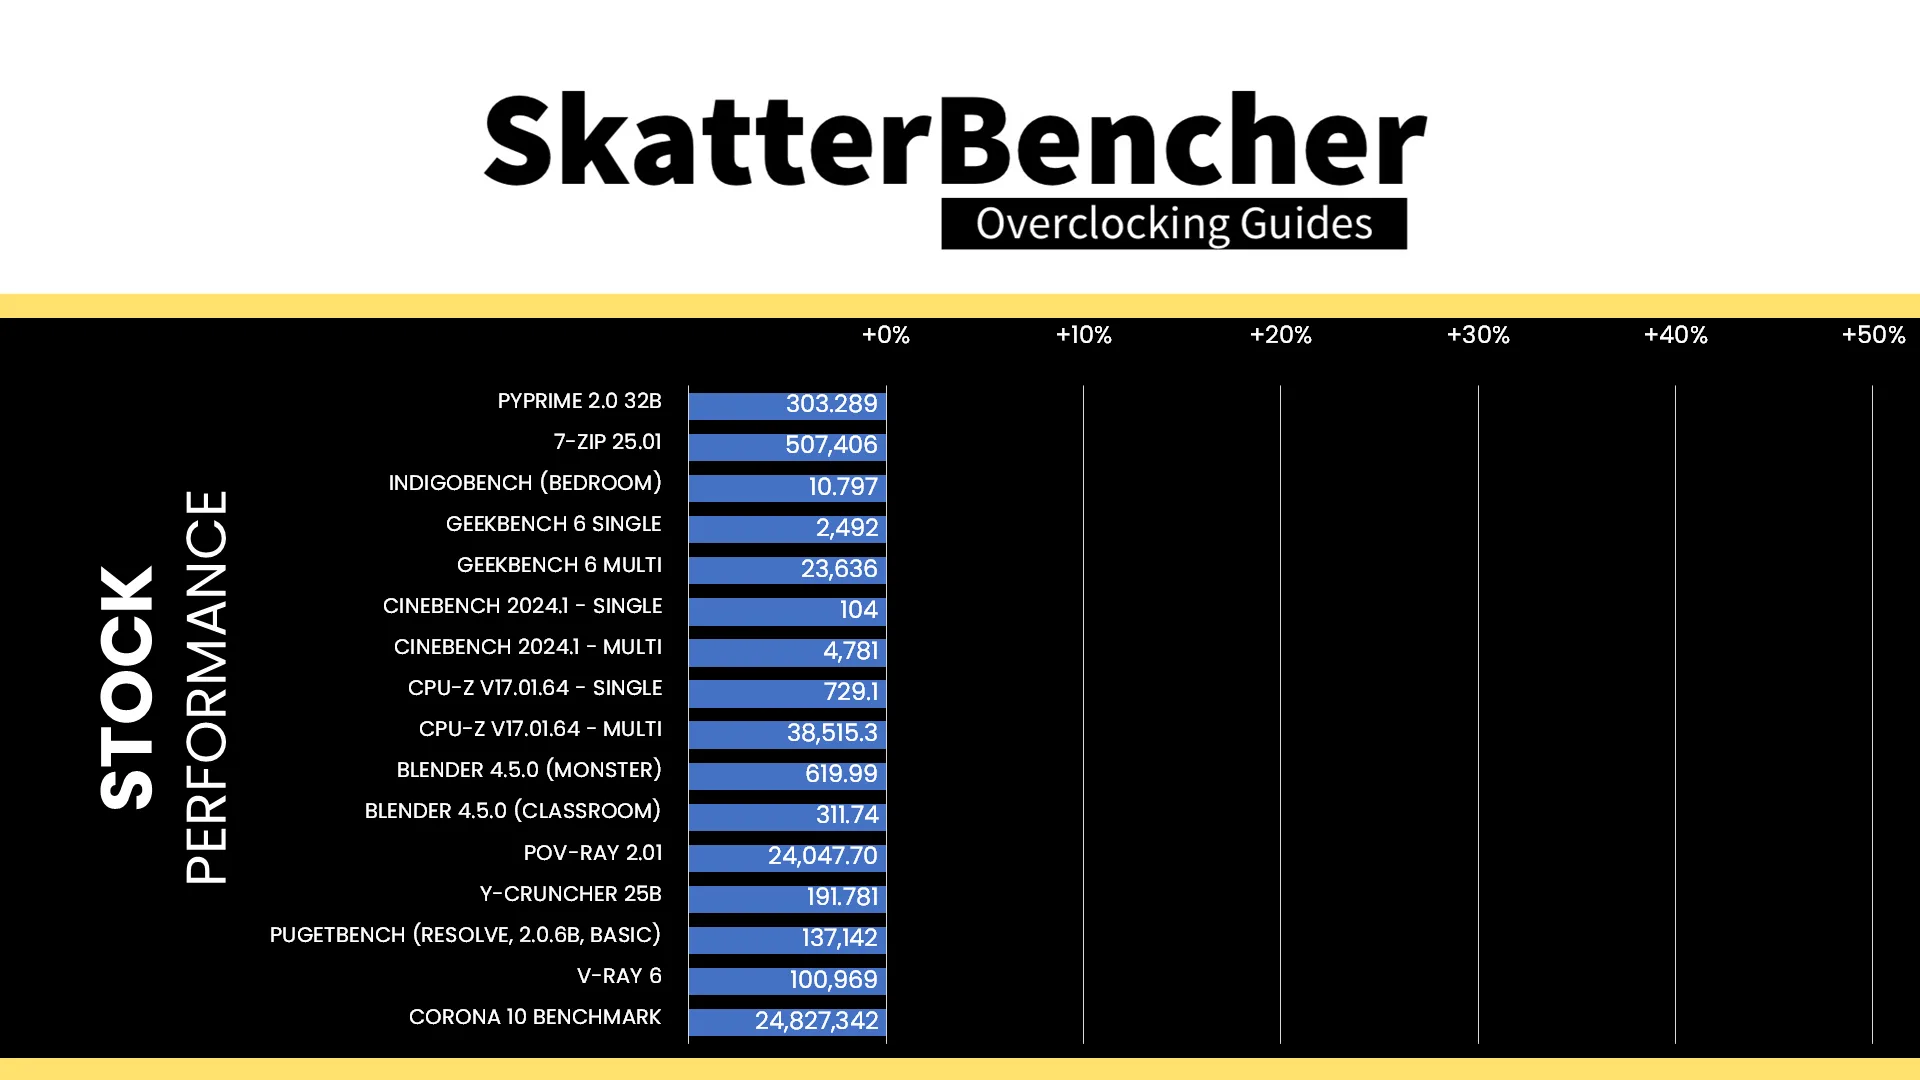
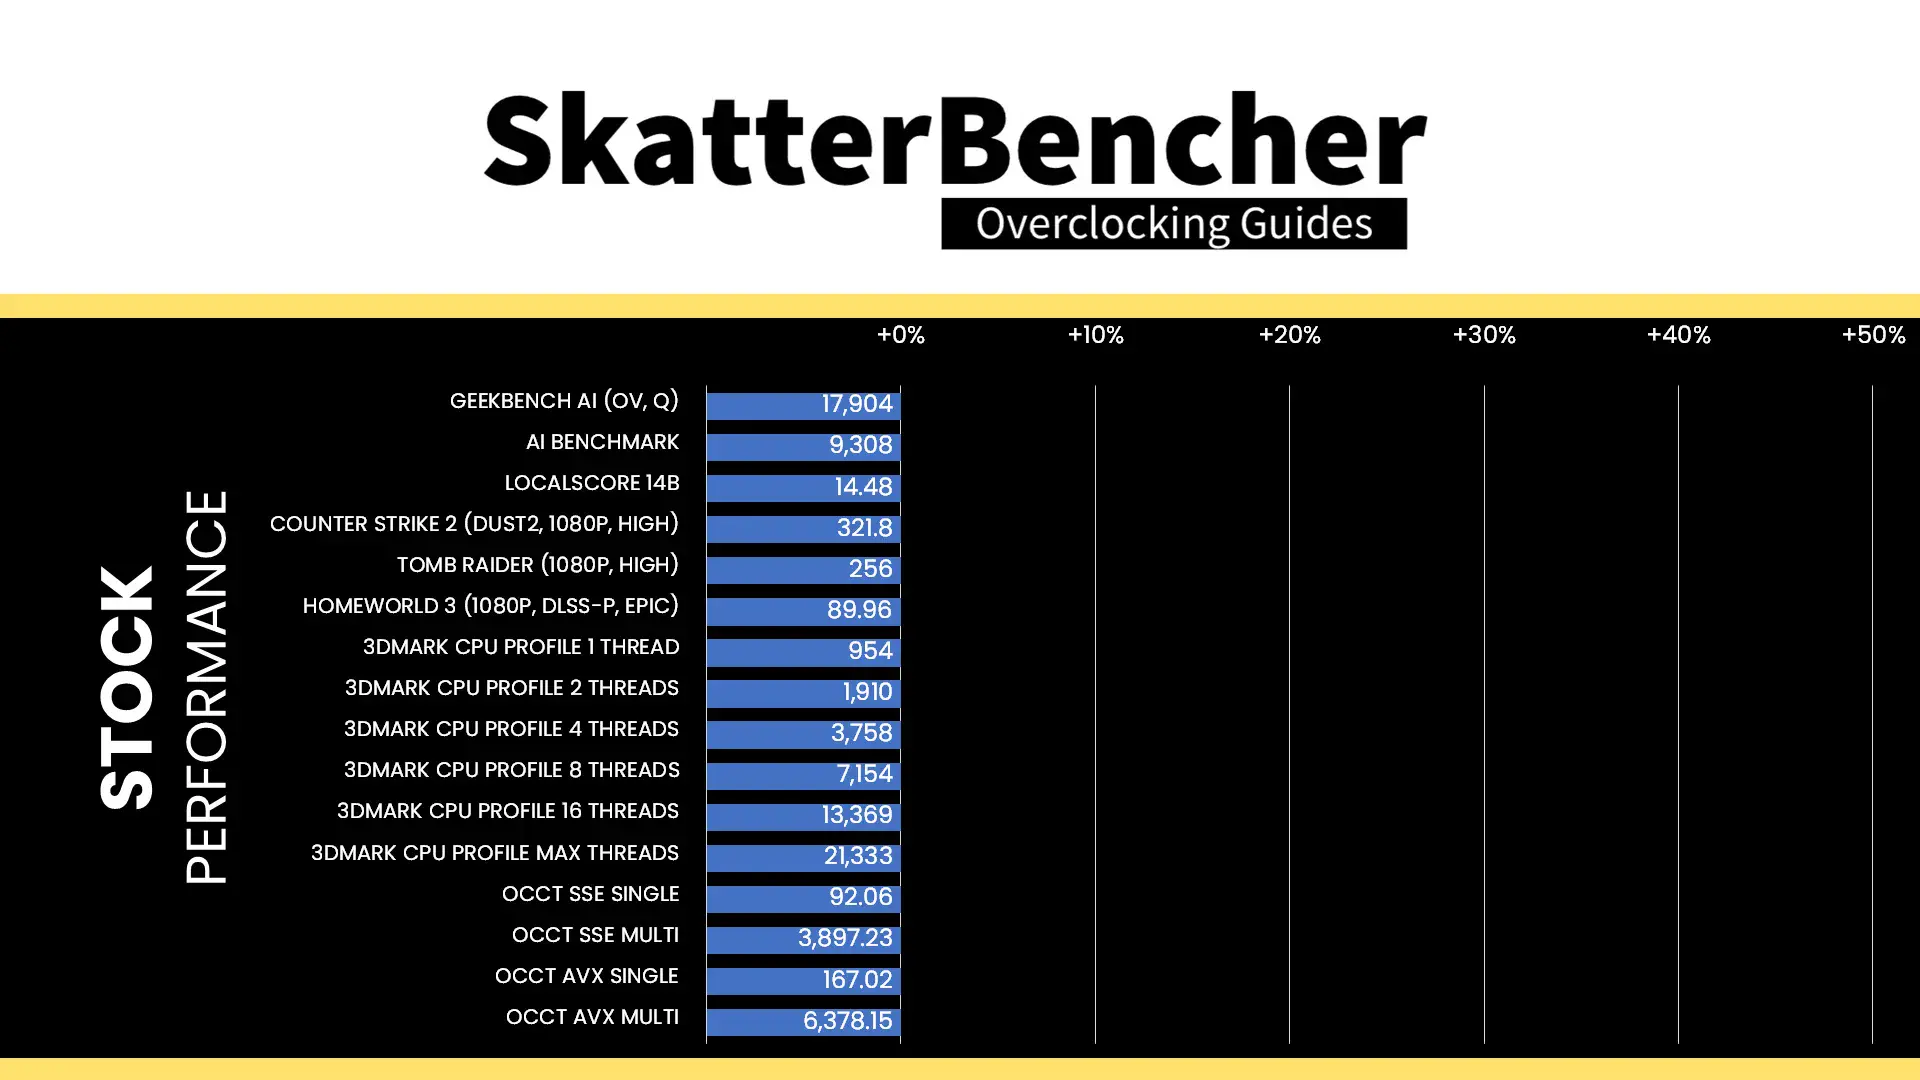
Here is the benchmark performance at stock:
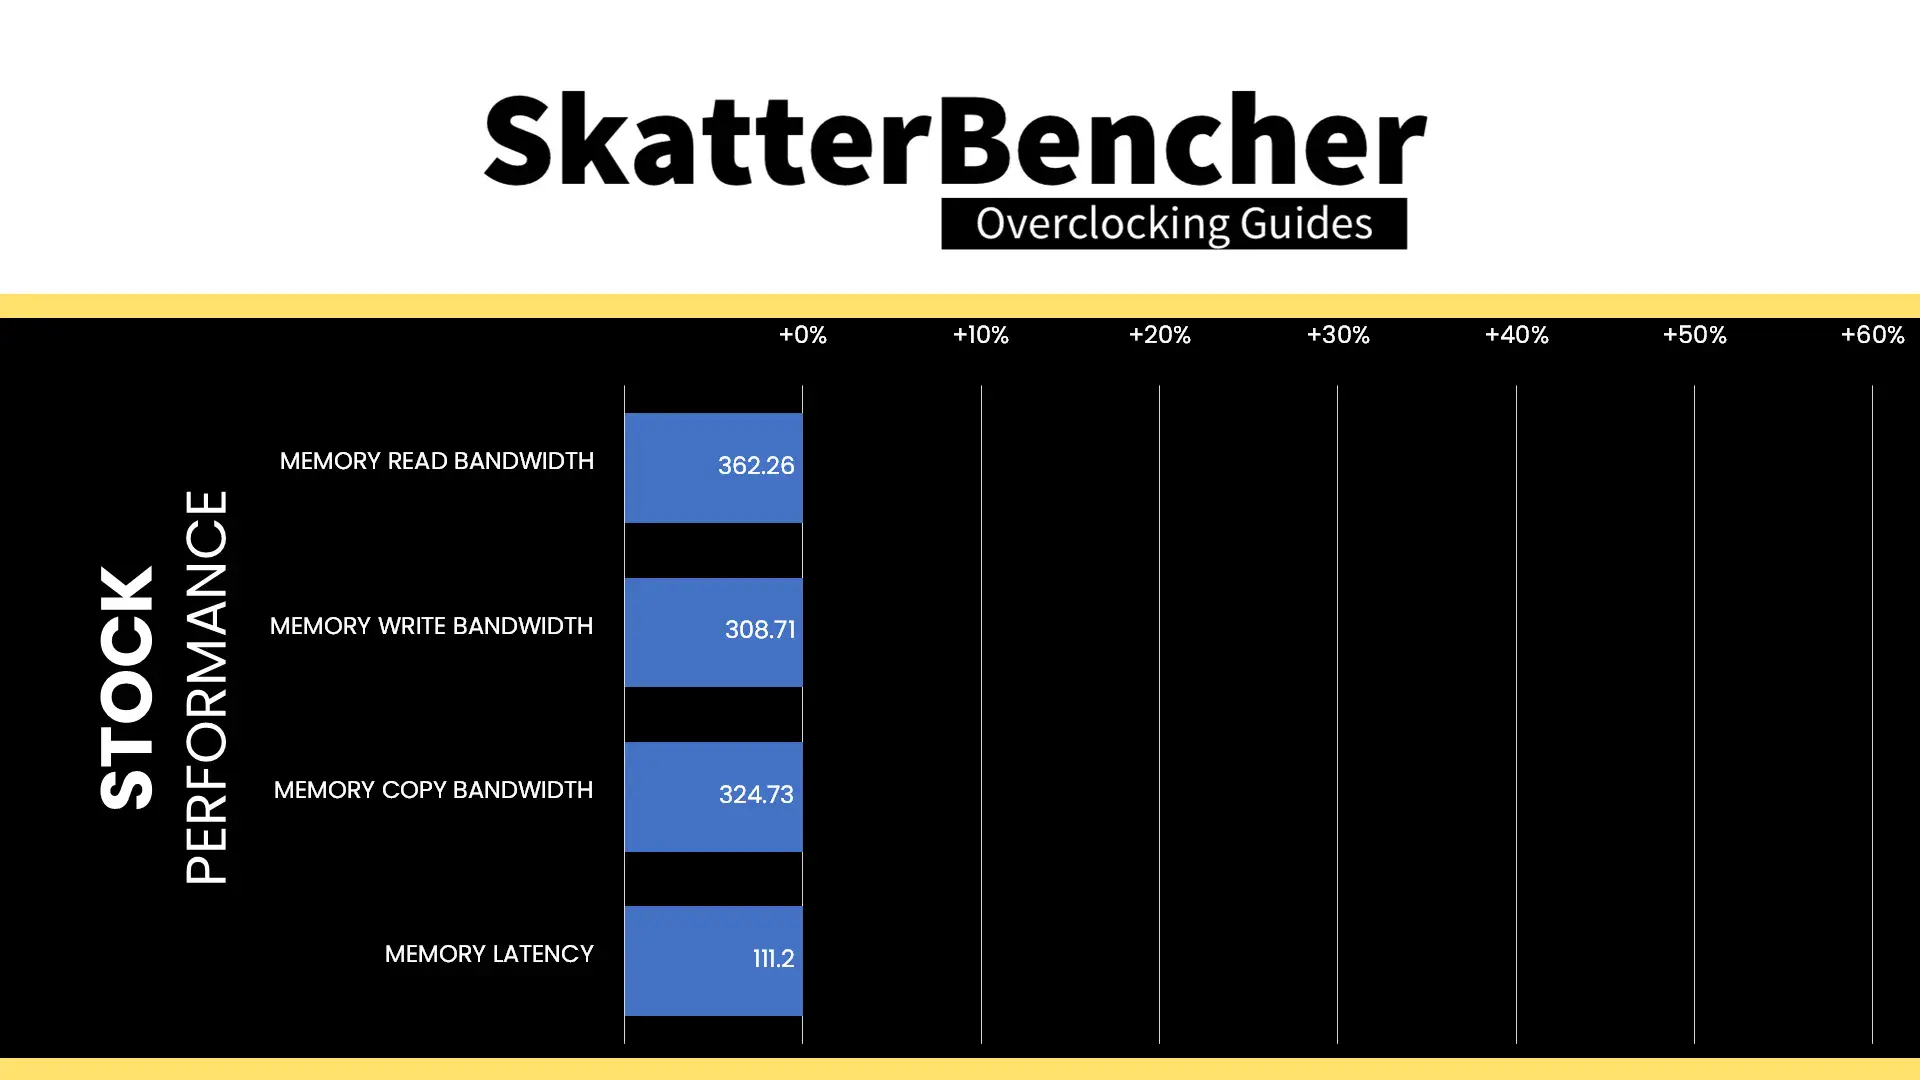
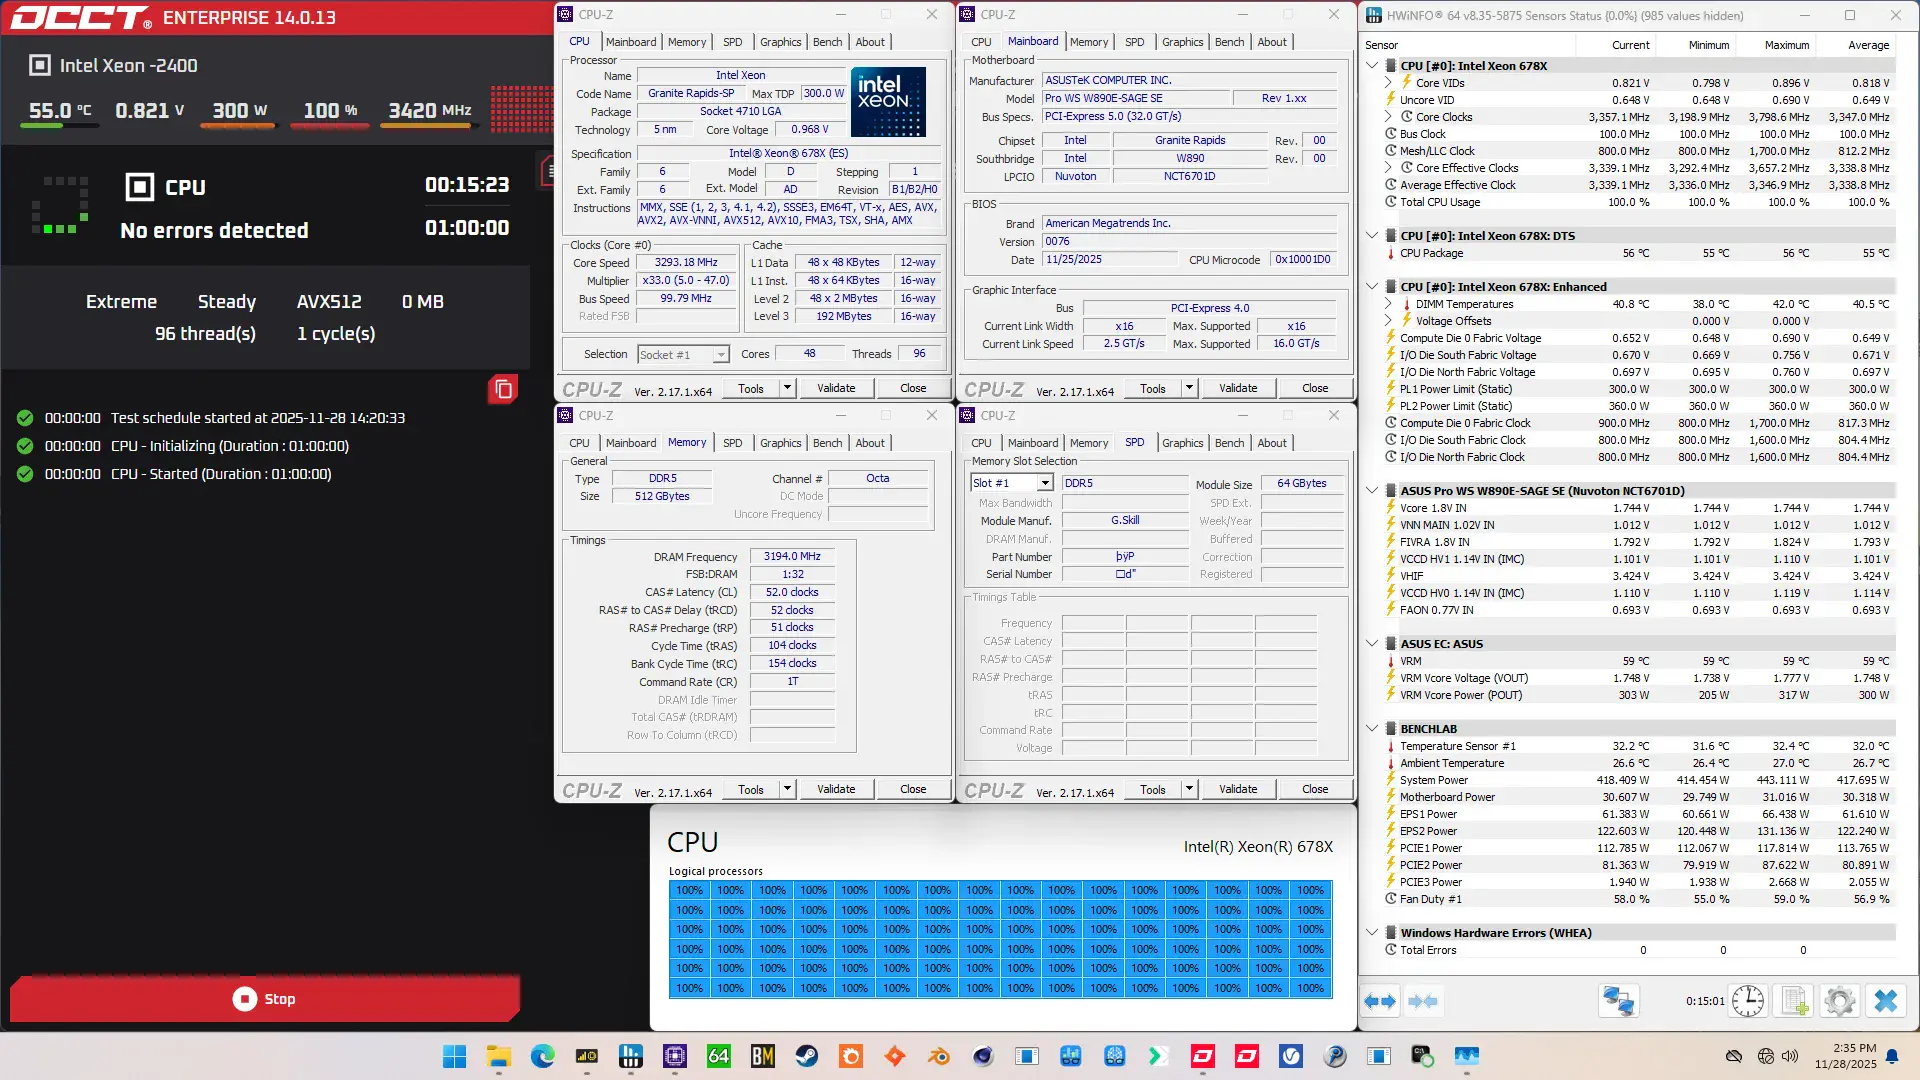
When running the OCCT CPU AVX512 Stability Test, the average CPU core effective clock is 3338 MHz with 0.818 volts. The average CPU temperature is 55 degrees Celsius. The average system power is 417.7 watts.
When running the OCCT CPU SSE Stability Test, the average CPU core effective clock is 3595 MHz with 0.840 volts. The average CPU temperature is 58 degrees Celsius. The average system power is 418.2 watts.

Of course, we can increase the maximum power consumption limit using Turbo Boost 2.0 adjustments. That’s what we’ll do in our first overclocking strategy.
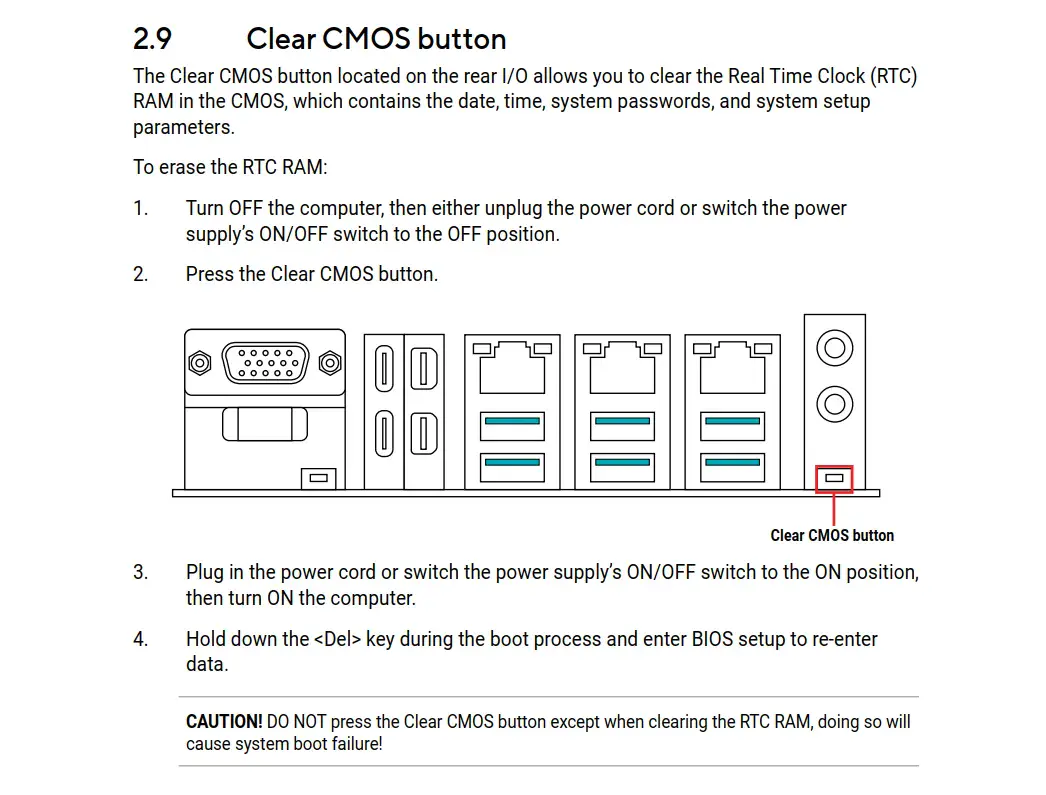
However, before we get going, make sure to locate the CMOS Clear button. Pressing the Clear CMOS button will reset all your BIOS settings to default, which is helpful if you want to start your BIOS configuration from scratch. The Clear CMOS button is located on the back I/O of the motherboard.
OC Strategy #1: OC Profile + MCE + Memory Preset
In our first overclocking strategy, we leverage Intel Turbo Boost 2.0 to increase the power limits and use ASUS Memory Presets to boost memory performance.
ASUS Advanced OC Profile
As I mentioned earlier, Intel has clarified the rules of engagement by defining what constitutes default settings. In doing so, it created stricter rules for default BIOS settings but also opened up new avenues for innovation. One such innovation is the ASUS Advanced OC Profile.
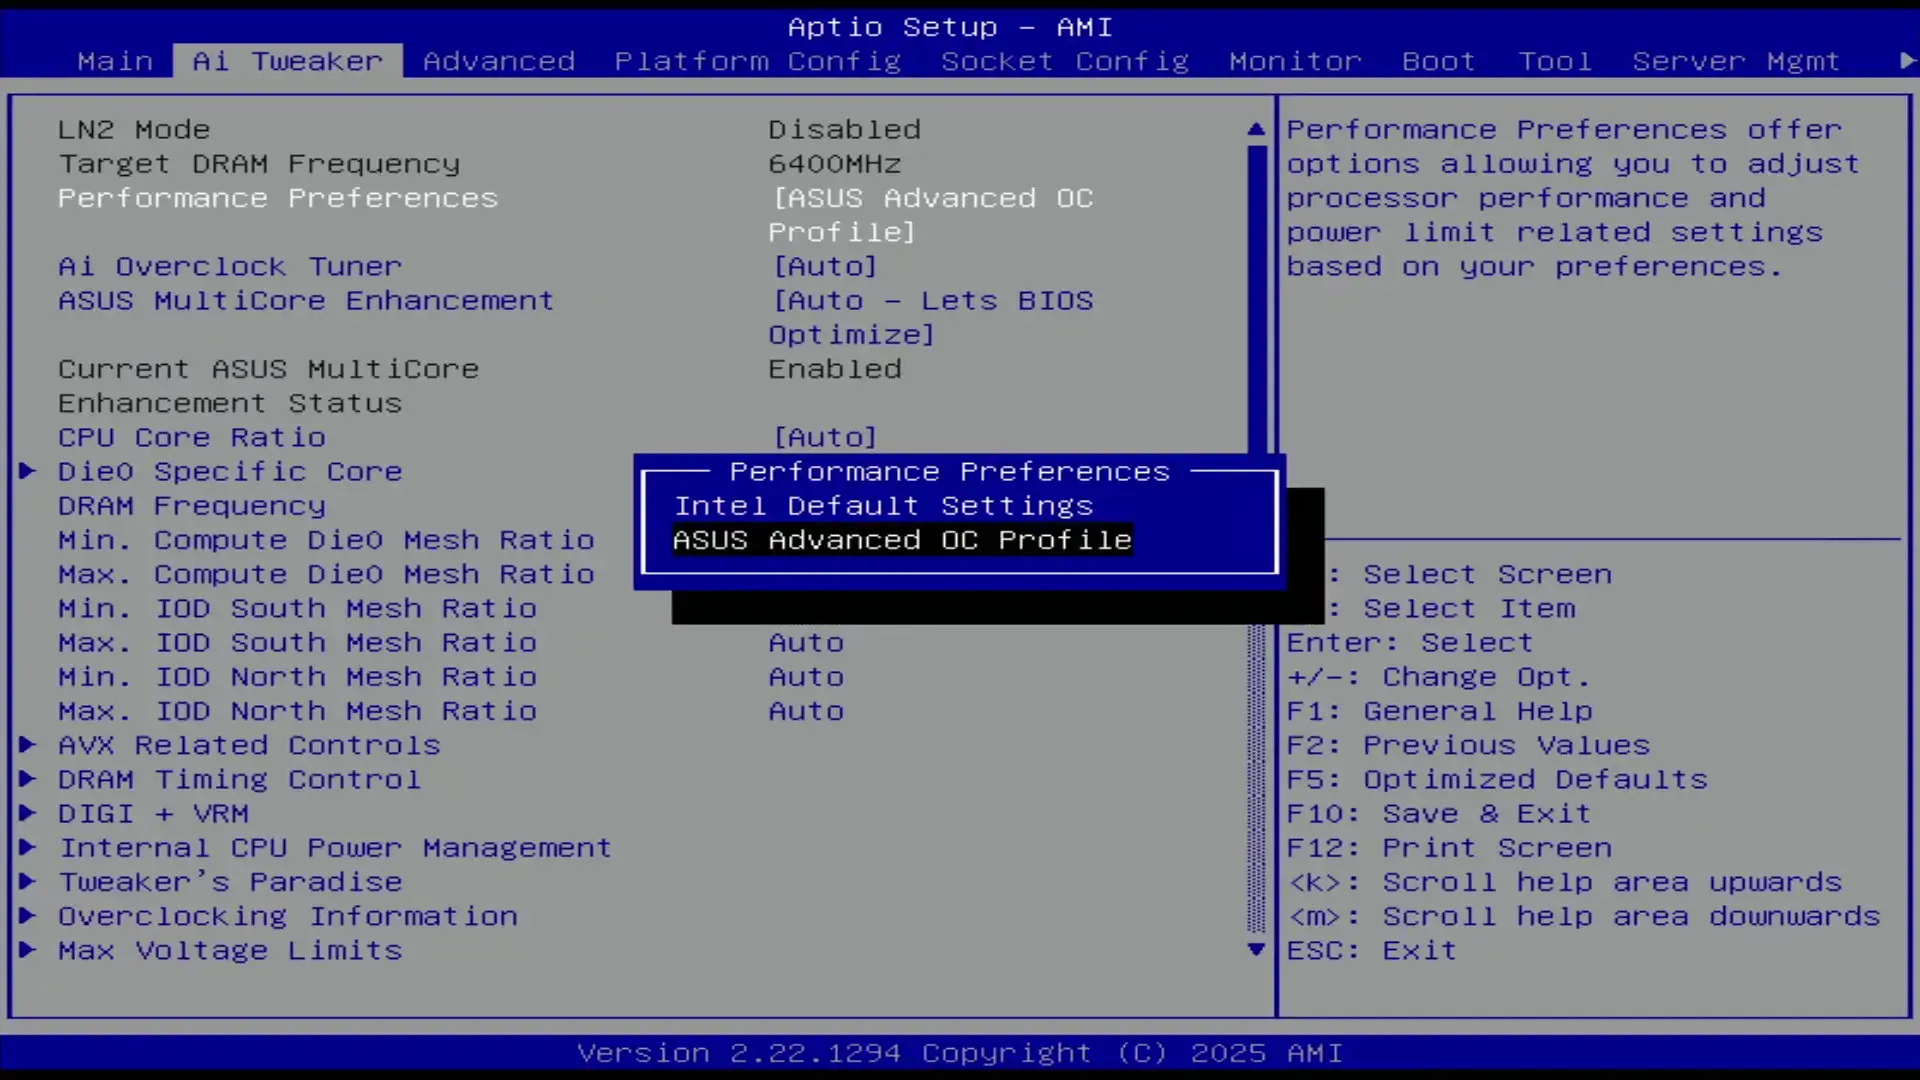
In essence, the ASUS Advanced OC Profile sets up the BIOS so it’s ready for overclocking. Not only does it reconfigure some of the parameters included in the definition of Intel’s Default Settings, but it also configures a number of other settings related to power-saving, performance limiters, and so on.
By modifying some parameters, it’s possible to improve the system performance. Most importantly for our guide, however, you’re required to switch to the Advanced OC Profile for any kind of overclocking.
Intel Turbo Boost 2.0
Intel Turbo Boost 2.0 Technology allows the processor cores to run faster than the base operating frequency if the processor is operating below rated power, temperature, and current specification limits. The ultimate advantage is opportunistic performance improvements in both multi-threaded and single-threaded workloads.
The turbo boost algorithm works according to an EWMA formula. This stands for Exponentially Weighted Moving Average. There are three main parameters to consider: PL1, PL2, and Tau.
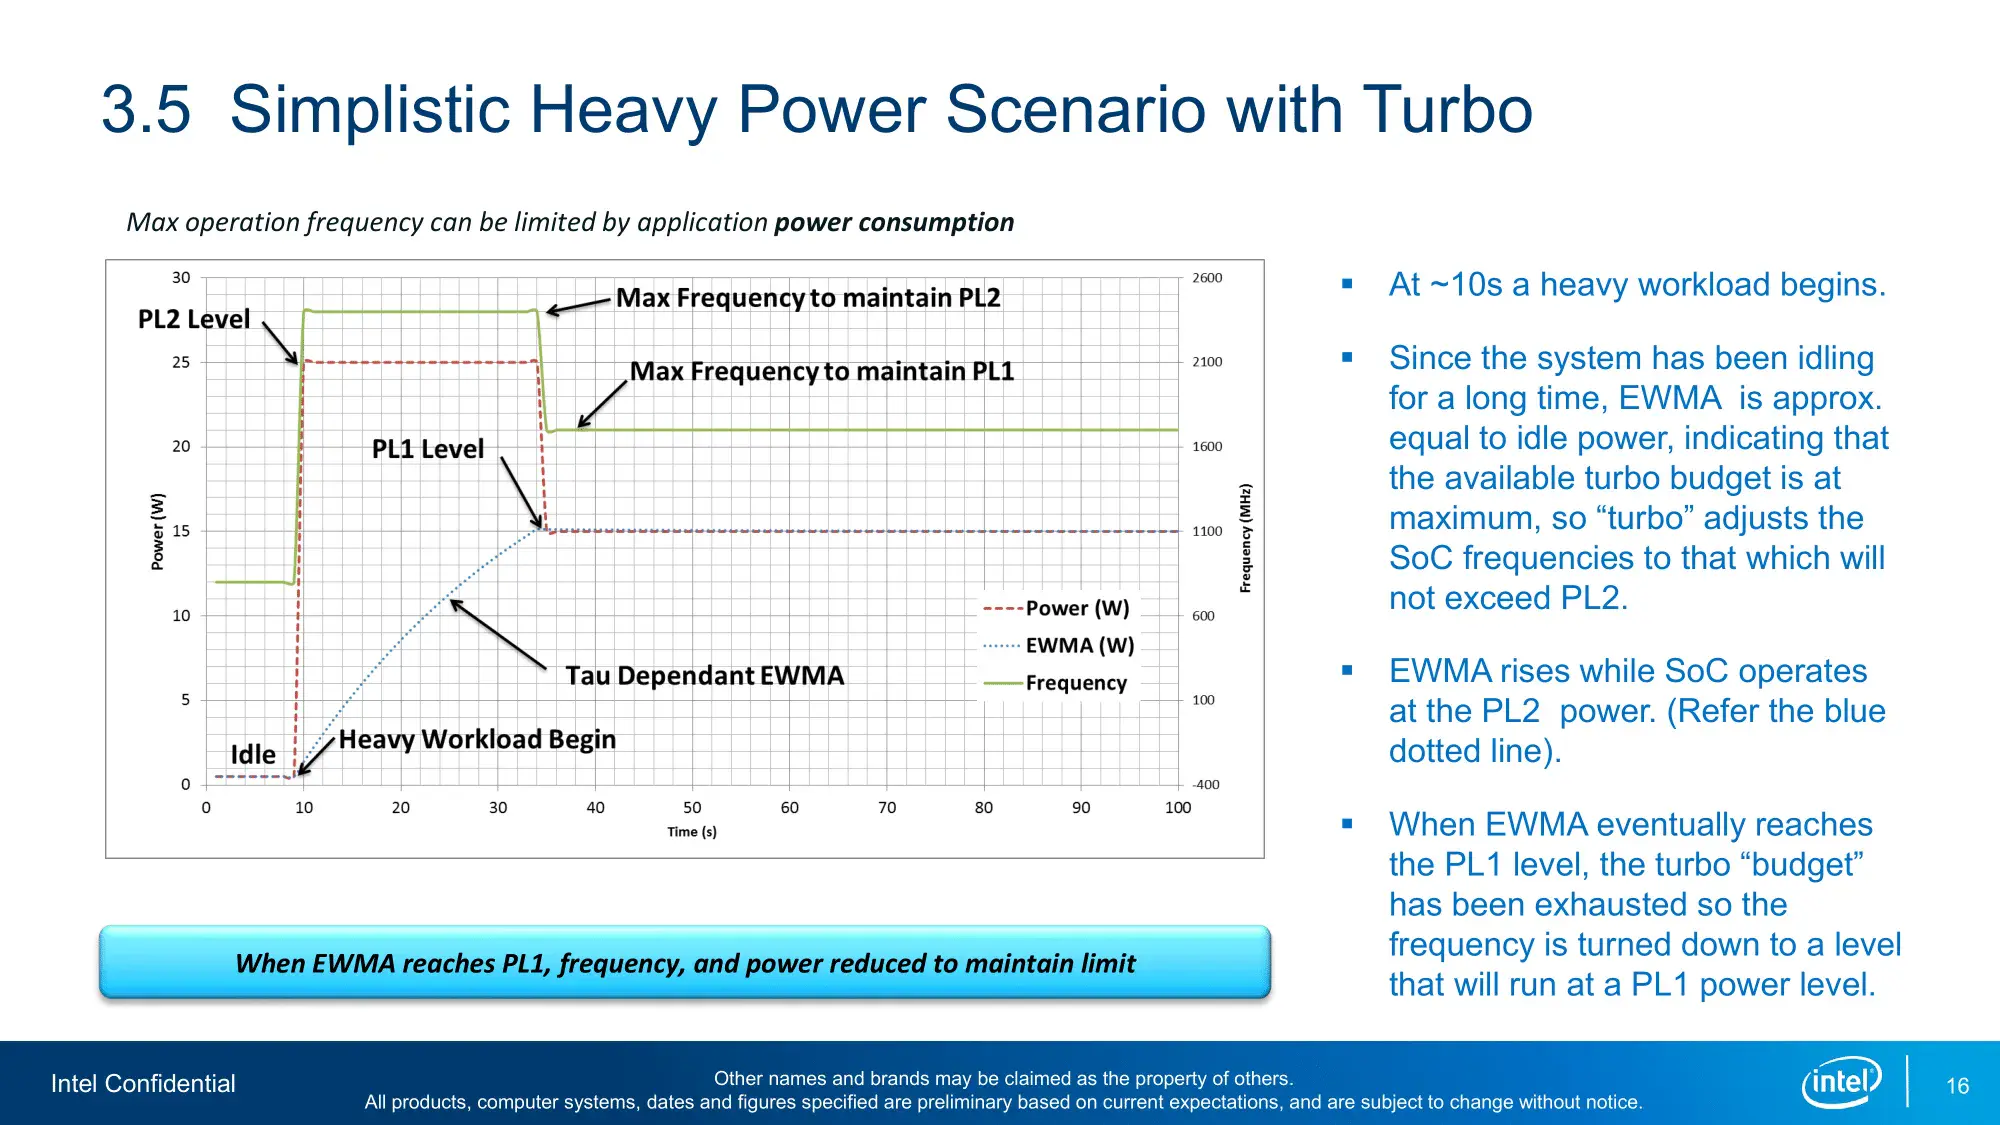
- Power Limit 1, or PL1, is the threshold that the average power will not exceed. Historically, this has always been set equal to Intel’s advertised TDP. Very importantly, PL1 should not be set higher than the thermal solution cooling limits.
- Power Limit 2, or PL2, is the maximum power the processor is allowed to use for a limited amount of time.
- Tau is a weighing constant used in the algorithm to calculate the moving average power consumption. Tau, in seconds, is the time window for calculating the average power consumption. If the average power consumed is higher than PL1 the CPU will reduce the CPU frequency.
Turbo Boost 2.0 Technology has evolved over the past years to incorporate a lot of power, thermal, and electrical performance limiters, including PL3, PL4, IccMax, TCC_Offset, VR_TDC, RATL, Pmax, and many more.
An easy ASUS MultiCore Enhancement option on ASUS motherboards allows you to unleash the Turbo Boost power limits. Set the option to Enabled – Remove All Limits and enjoy maximum performance. Enabling ASUS MultiCore Enhancement adjusts the following parameters:
ASUS Memory Presets
Normally I’d use the Intel XMP 3.0 technology to improve the memory performance, but this kit only has an EXPO profile which didn’t work that well with this board and BIOS combination. Luckily, ASUS offers an alternative in the form of memory presets.
ASUS Memory Presets is an ASUS overclocking technology that provides you with a selection of memory tuning presets for certain memory ICs. The presets will adjust the memory timings and voltages.
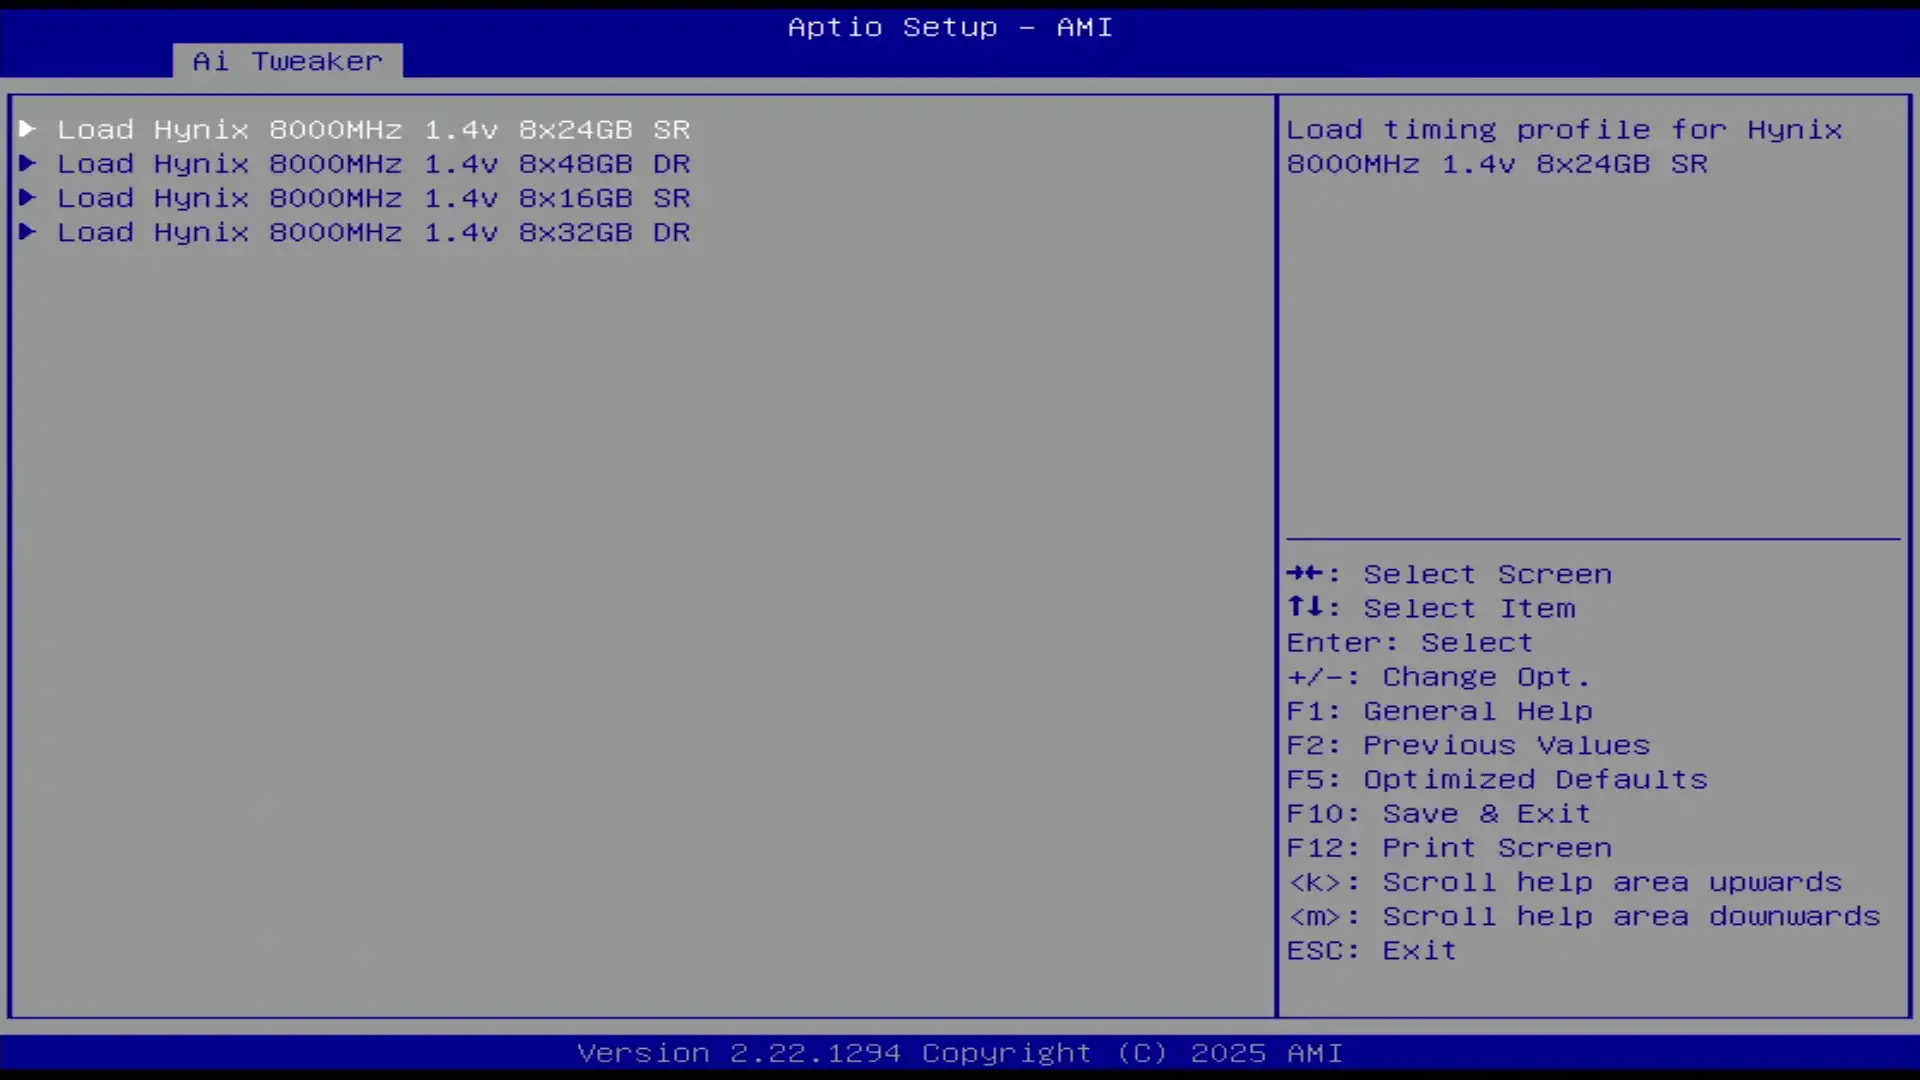
On this pre-release ASUS Pro WS W890E-Sage SE BIOS 0076 there’s four available profiles, each for DDR5-8000 but with a different memory configuration. Unfortunately, there’s no available profile for 8x64GB but turns out the profile for 8x32GB was stable enough with the default DDR5-6400 memory frequency.
BIOS Settings & Benchmark Results
Upon entering the BIOS
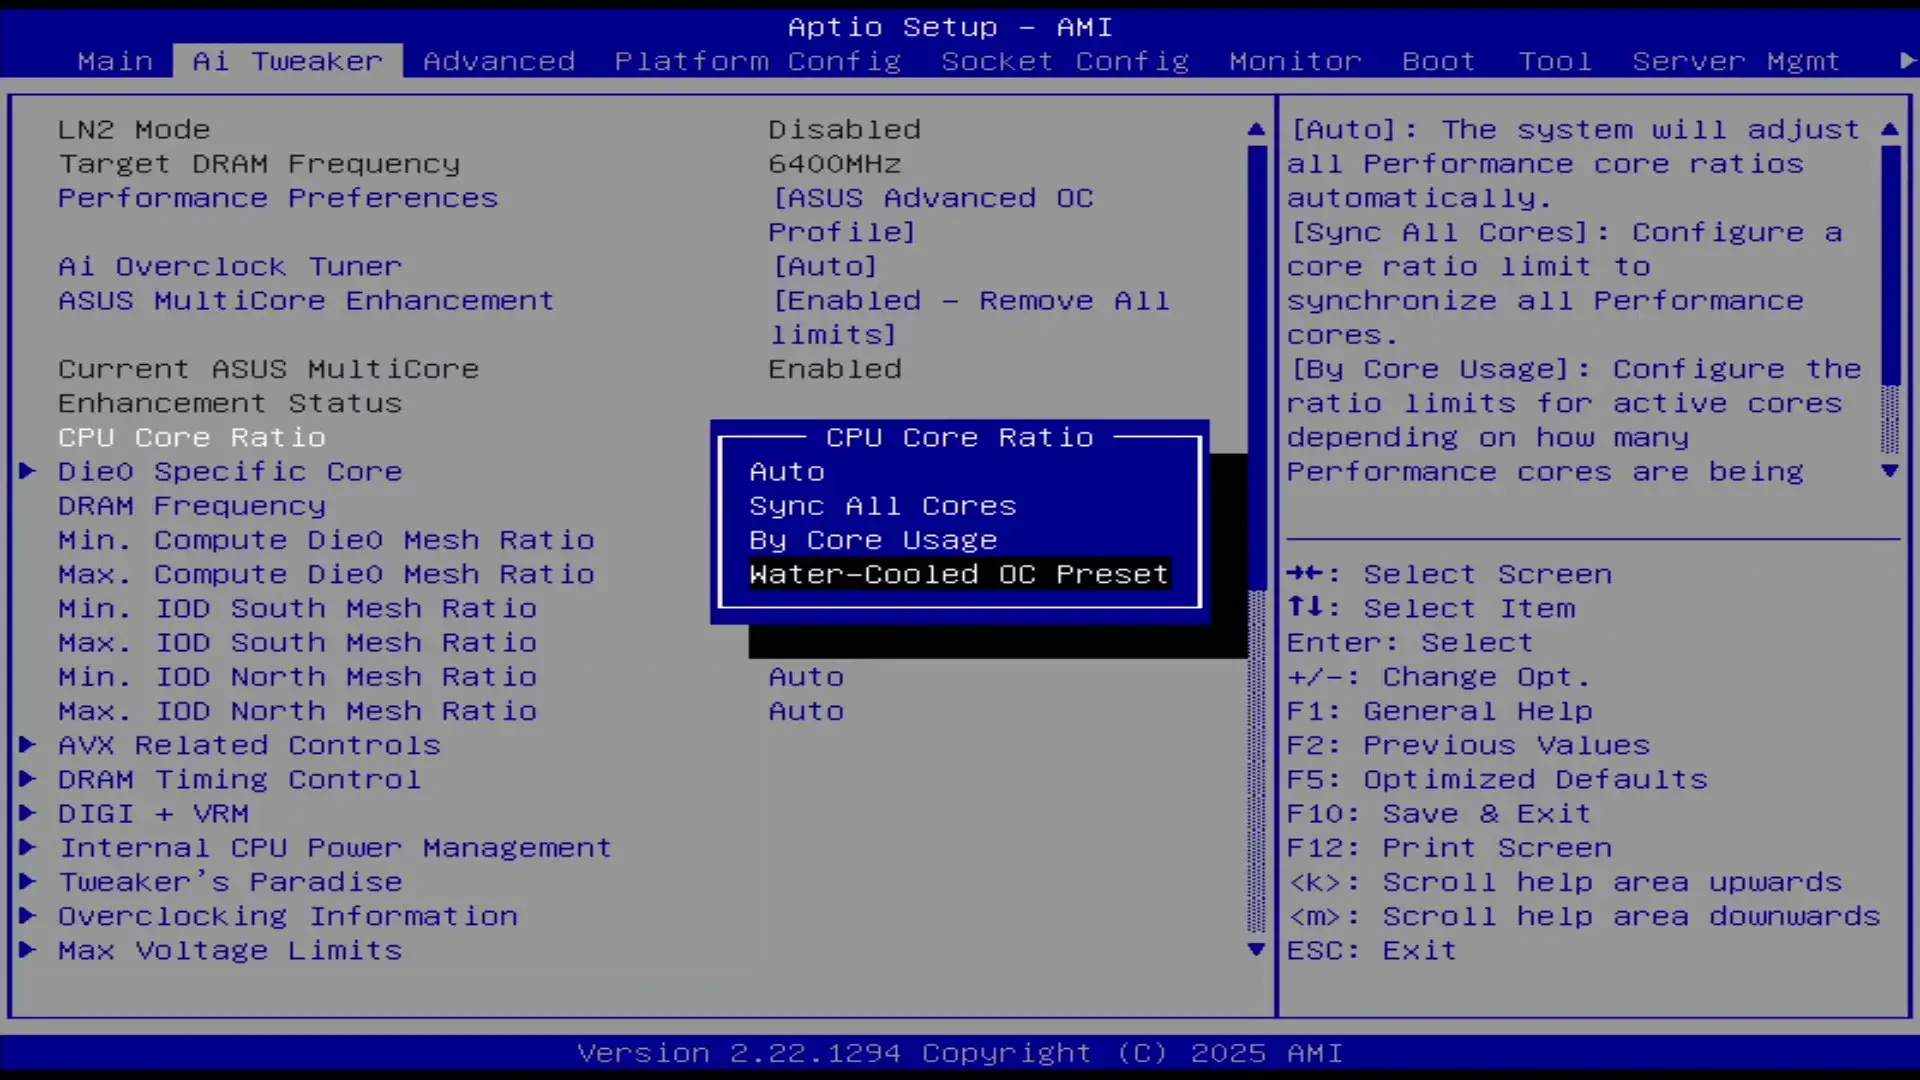
- Go to the Ai Tweaker menu
- Set Performance Preferences to ASUS Advanced OC Profile
- Set ASUS MultiCore Enhancement to Enabled – Remove All limits
- Enter the DRAM Timing Control submenu
- Enter the Memory Presets submenu
- Select Load Hynix 8000 1.4V 8x32GB DR
- Select Yes
- Enter the Memory Presets submenu
Then save and exit the BIOS.
We re-ran the benchmarks and checked the performance increase compared to the default operation.
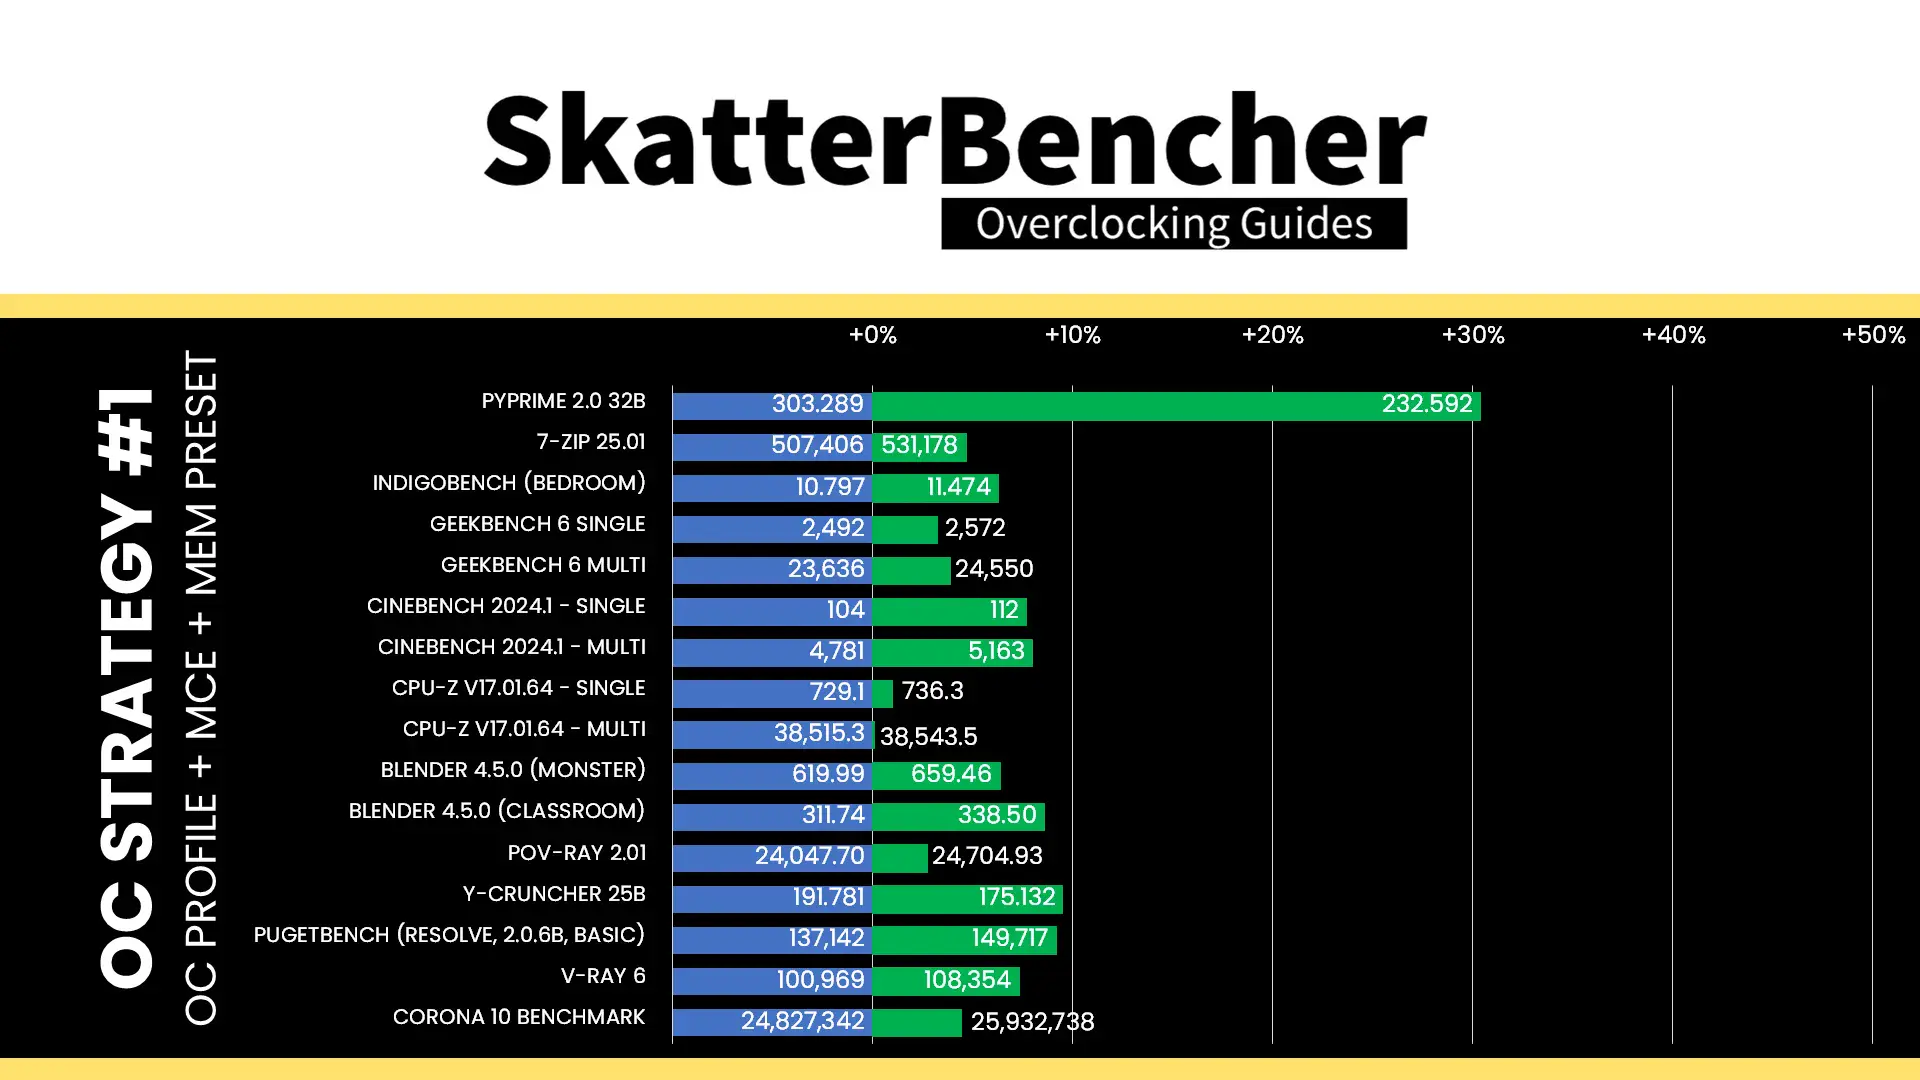


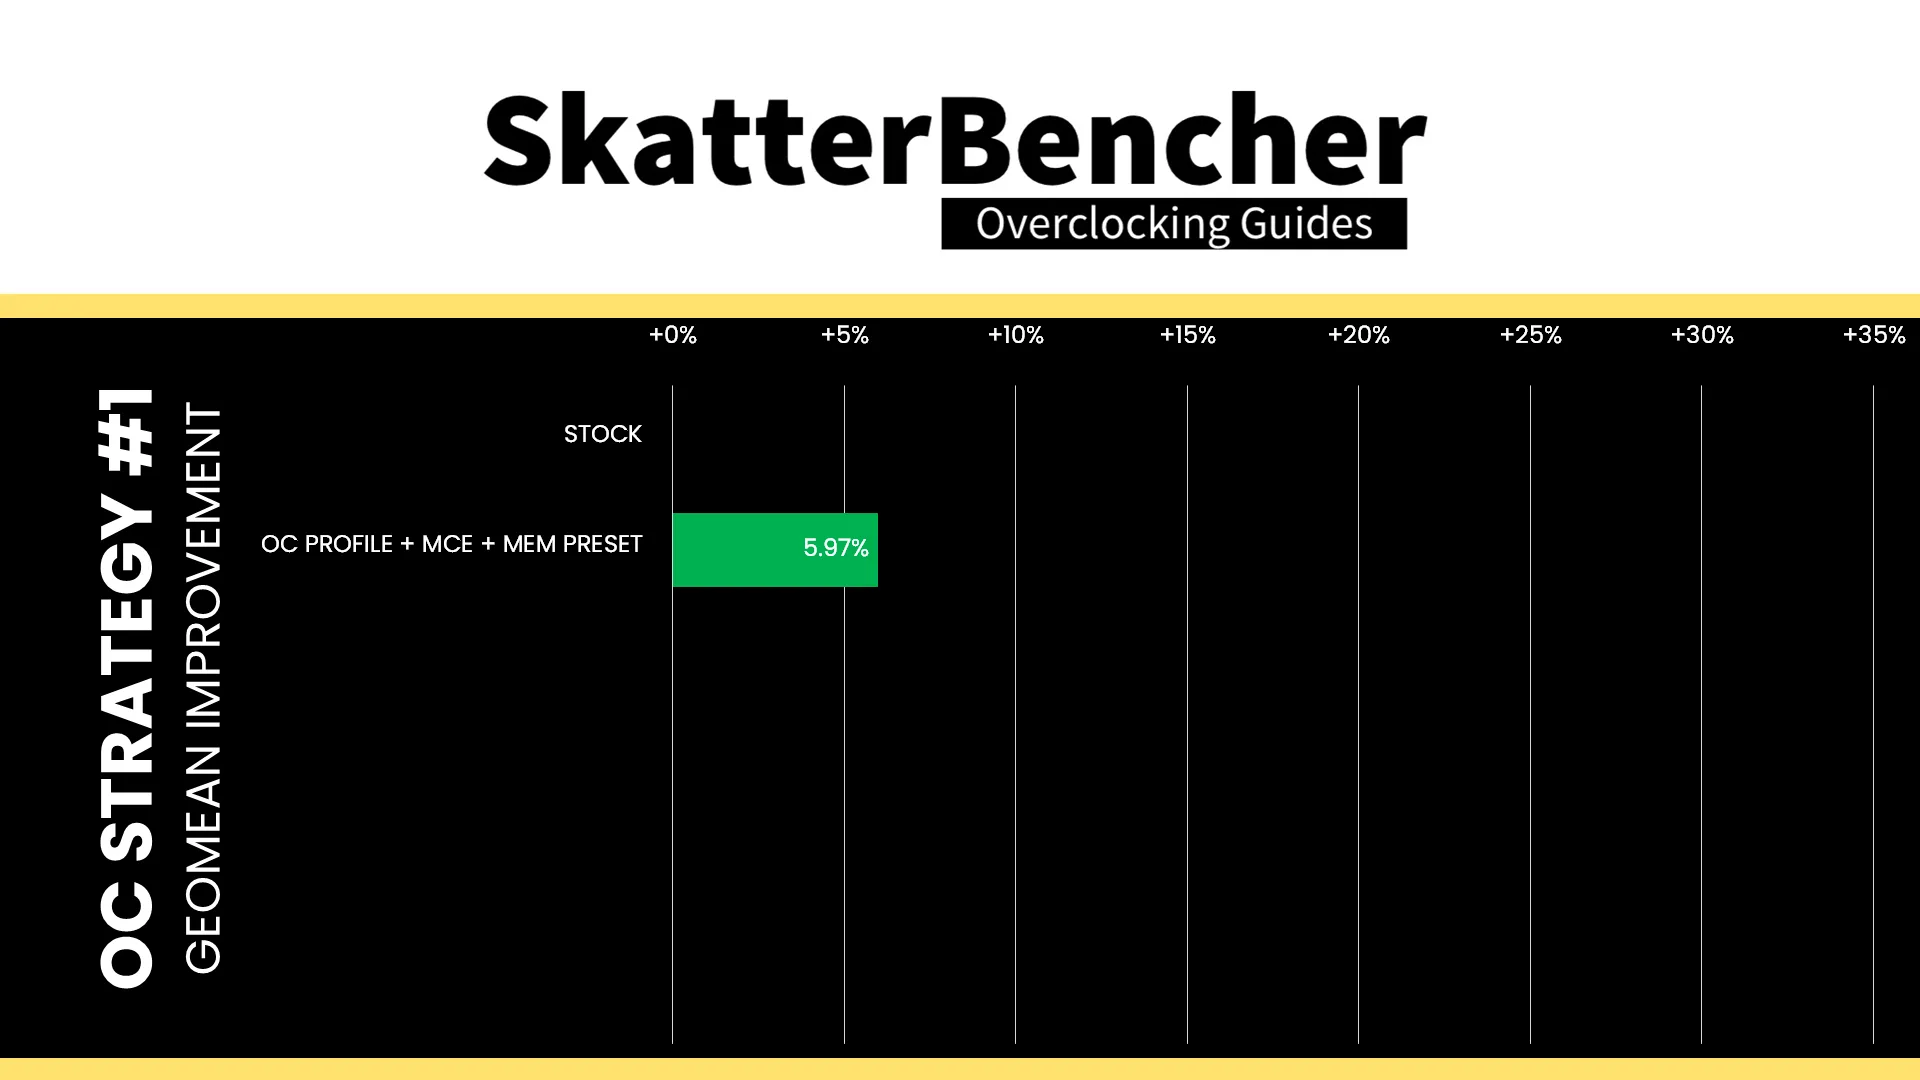
While you’d expect unlocking the power limits would make this chip fly, we’re still performance limited by the default Turbo Ratios. So overall, the performance improvement is not that much although with the help of slightly better memory we do get a nice bump in most workloads. The Geomean performance speedup is +5.97%, and we get a maximum benchmark improvement of +30.40% in PyPrime.
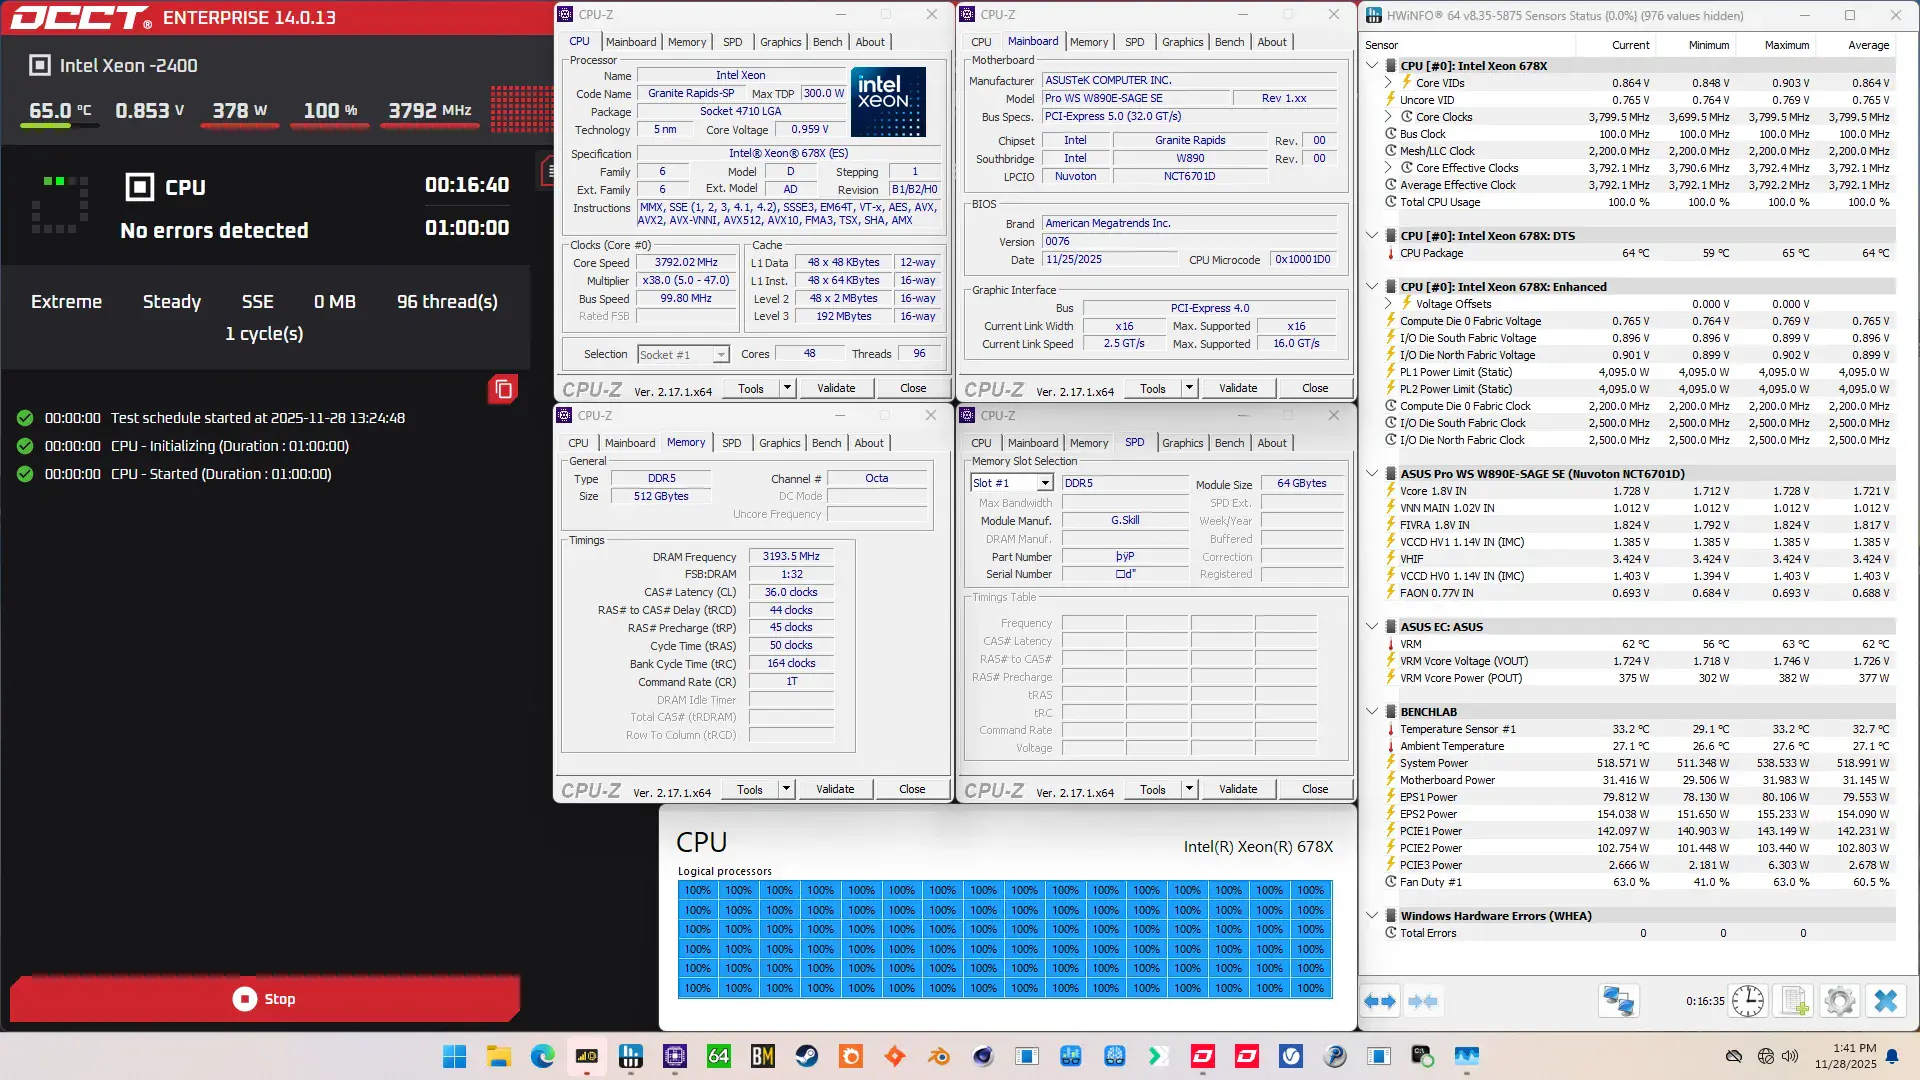
When running the OCCT CPU AVX512 Stability Test, the average CPU core effective clock is 3316 MHz with 0.815 volts. The average CPU temperature is 59 degrees Celsius. The average system power is 491.2 watts.

When running the OCCT CPU SSE Stability Test, the average CPU core effective clock is 3792 MHz with 0.864 volts. The average CPU temperature is 64 degrees Celsius. The average system power is 519.0 watts.
OC Strategy #2: Water-Cooled OC Preset
In our second overclocking strategy, we use ASUS’s water-cooled oc preset to overclock the CPU cores. That changes the Turbo Ratio Limits, Per Core Ratio Limits, and adjusts the Turbo Boost 2.0 power limits.
ASUS Water-Cooled OC Preset
The ASUS water-cooled OC preset is an excellent addition to the ASUS Pro WS W890 motherboards, giving Xeon customers an easy path to additional performance. We can enable the preset with a single button click.
The preset drastically improves the all-core performance by changing the Turbo Ratio Limit and Per Core Ratio Limit configuration. It also sets a per core adaptive target voltage and a -20mV per core adaptive voltage offset. Lastly, it also manages the temperature and power consumption by adjusting the Turbo Boost 2.0 power limit to 480W.

To better understand what the preset does in terms of CPU frequency, let’s briefly talk about the relevant Intel overclocking technologies and see how the water-cooled preset uses them.
Intel Turbo Ratio Limit
We all know the Turbo Boost 2.0 technology from its impact on the power limits, but a second significant aspect of Turbo Boost 2.0 is configuring the CPU frequency based on the number of active cores.
Turbo Ratio Limits allows us to configure the overclock for different scenarios ranging from 1 active core to all active cores. That enables us to run some cores significantly faster than others when the conditions are right. Intel provides eight (8) registers to configure the Turbo Ratio Limits.
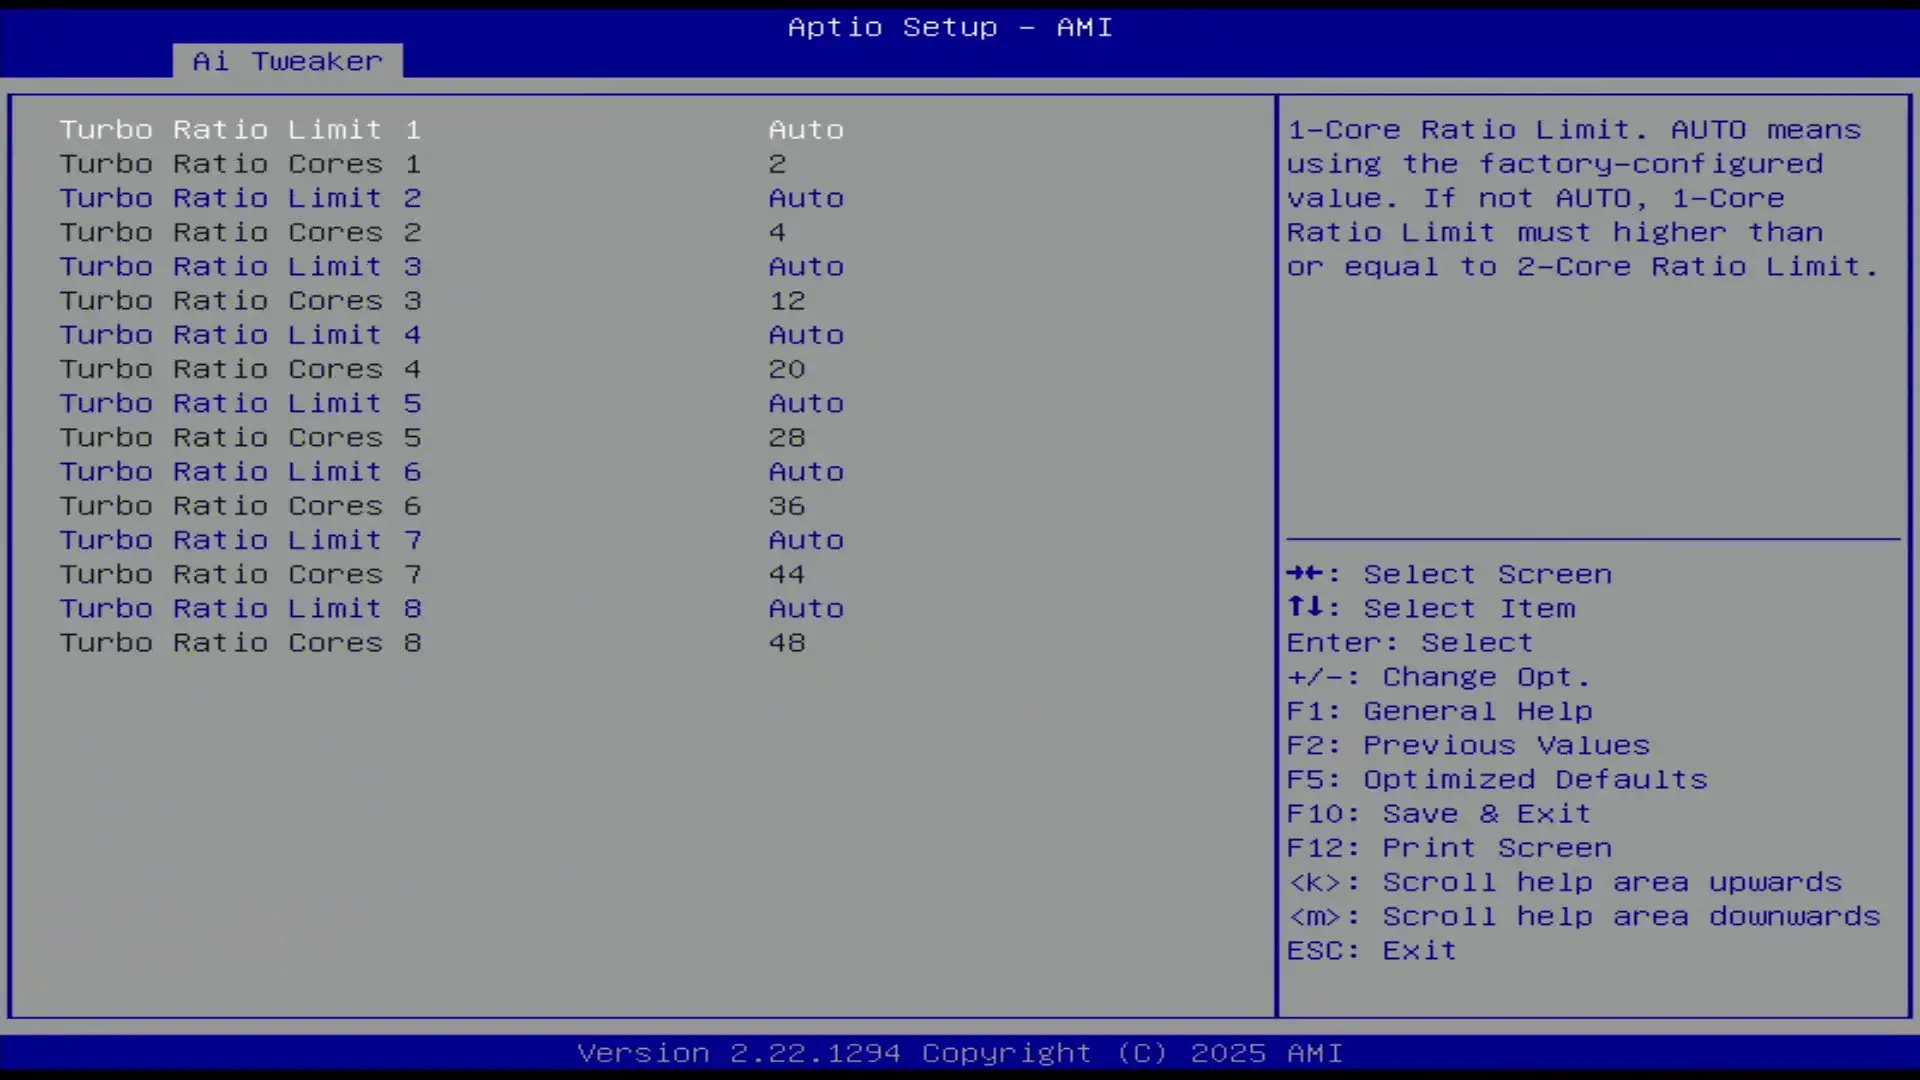
On mainstream platforms where the top SKU has no more than 8 P-cores, these registers are configured from 1-active P-core to 8-active P-cores. However, on platforms with core counts beyond eight cores, we can configure each register by target Turbo Boost Ratio and the number of active cores. Well … we used to but on Granite Rapids it appears the Turbo Ratio Limit registers are configured for a specific active core count.
For the Xeon 678X, the registers are configured as follows:
- Turbo Ratio Limit 1: up to 2 active cores, 49X
- Turbo Ratio Limit 2: up to 4 active cores, 48X
- Turbo Ratio Limit 3: up to 12 active cores, 44X
- Turbo Ratio Limit 4: up to 20 active cores, 43X
- Turbo Ratio Limit 5: up to 28 active cores, 42X
- Turbo Ratio Limit 6: up to 36 active cores, 42X
- Turbo Ratio Limit 7: up to 44 active cores, 39X
- Turbo Ratio Limit 8: up to 48 active cores, 38X
Enabling the water-cooled OC preset adjusts the Turbo Ratio Limits as follows:
- Turbo Ratio Limit 1: up to 2 active cores, 49X -> 52X
- Turbo Ratio Limit 2: up to 4 active cores, 48X -> 51X
- Turbo Ratio Limit 3: up to 12 active cores, 44X -> 50X
- Turbo Ratio Limit 4: up to 20 active cores, 43X -> 50X
- Turbo Ratio Limit 5: up to 28 active cores, 42X -> 50X
- Turbo Ratio Limit 6: up to 36 active cores, 42X -> 49X
- Turbo Ratio Limit 7: up to 44 active cores, 39X -> 47X
- Turbo Ratio Limit 8: up to 48 active cores, 38X -> 47X

By Core Usage is not the same as configuring each core individually. When using By Core Usage, we determine an overclock according to the actual usage. For example, if a workload uses four cores, the CPU determines which cores should execute this workload and applies our set frequency to those cores.
Intel Per Core Ratio Limit
Per Core Ratio Limit allows you to set a maximum CPU Ratio for every individual P-core. It is an extension of the Intel Turbo Boost Max 3.0 technology introduced in 2016. It acts independently from the Turbo Ratio Limit, meaning that when you set a Per Core Ratio Limit, the core ratio will be restricted even if the Turbo Ratio Limit allows for a higher boost frequency.
The Per Core Ratio Limit plays an important role in the Granite Rapids overclocking process. It’s not only the ratio used in the V/F point configuration but also the ratio referenced by many other ratio tuning technologies.
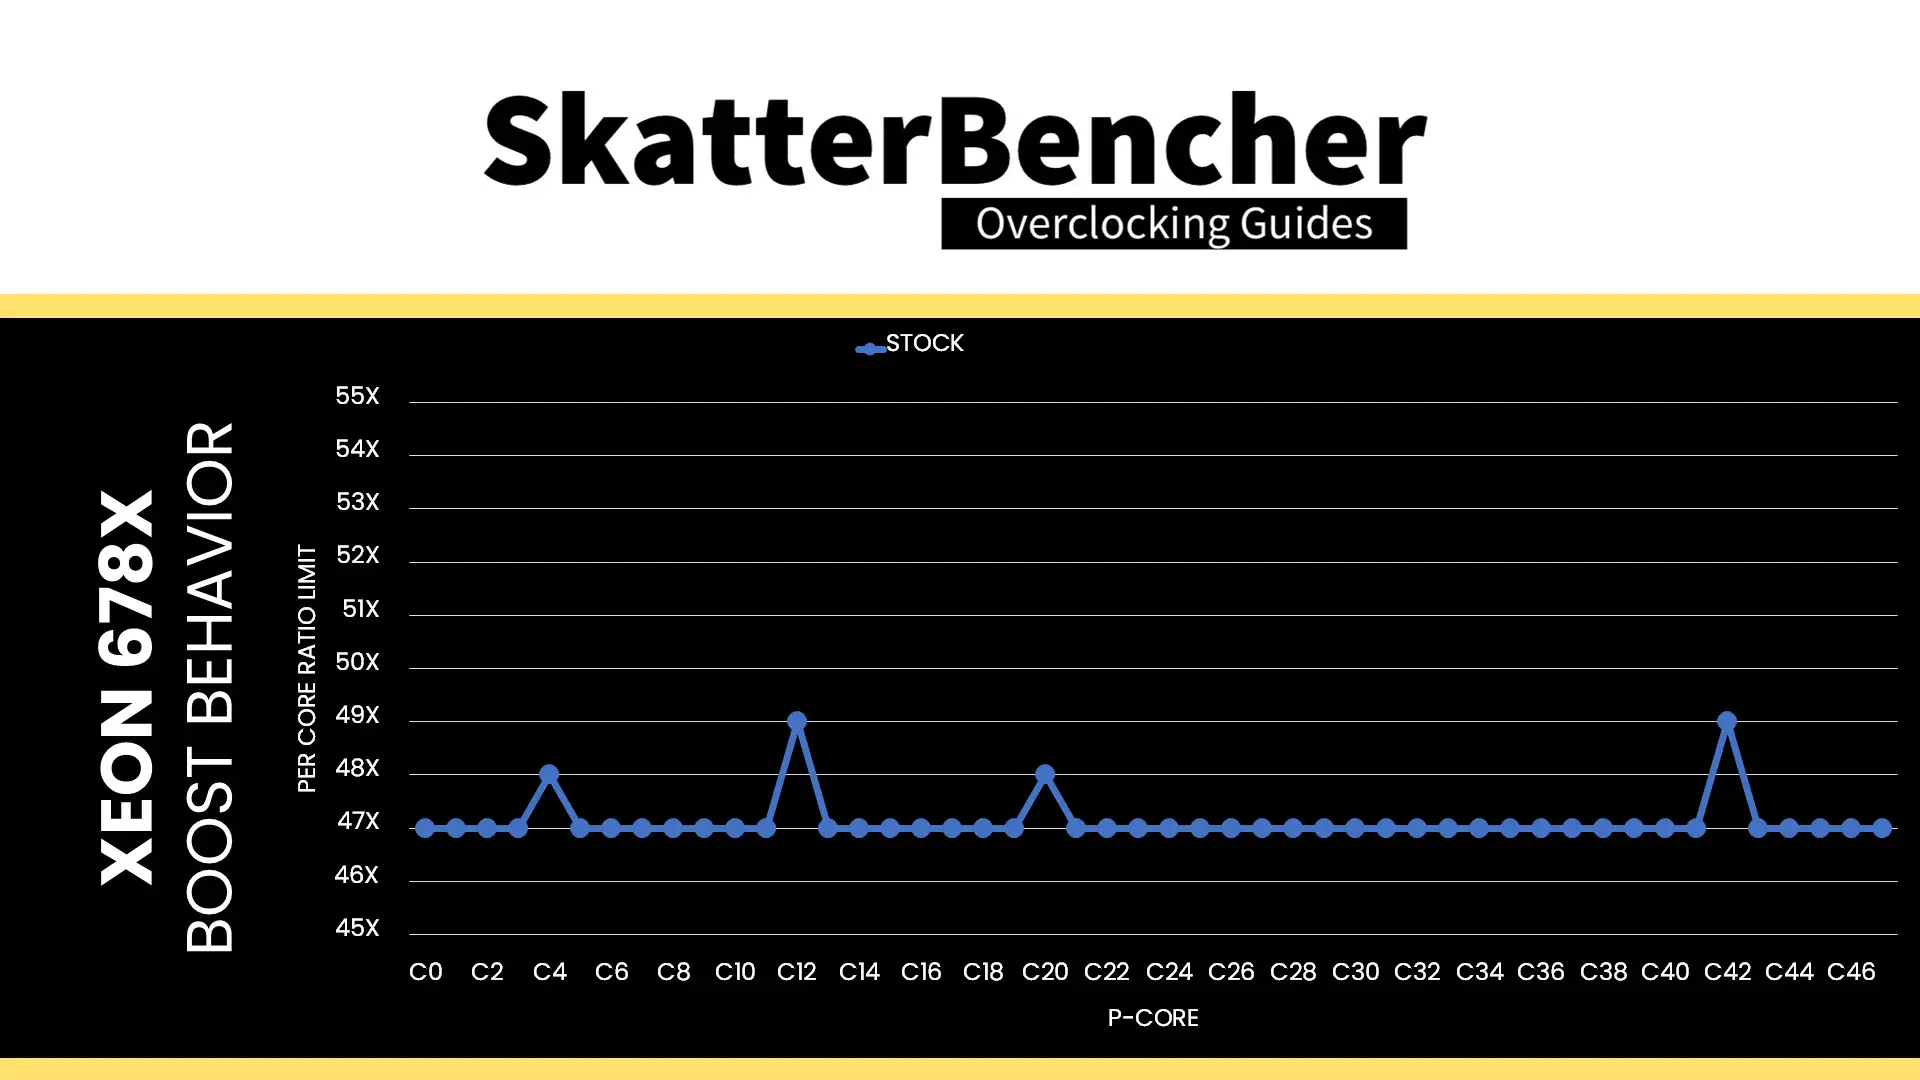
For now, what’s important to know is that each Granite Rapids processor has a number of favored cores which are allowed to boost higher than others. These cores are different for each CPU. For my Xeon 678X, the favored cores are:
- Up to 49X: Core 12 and Core 42
- Up to 48X: Core 4 and Core 20
The rest of the non-favored cores can all boost up to 47X.
The water-cooled oc preset adjusts these Per Core Ratio Limits as follows:
- Up to 52X: Core 12 and Core 42
- Up to 51X: Core 4 and Core 20
- Up to 50X: 24 cores
- Up to 49X: 8 cores
- Up to 47X: 12 cores
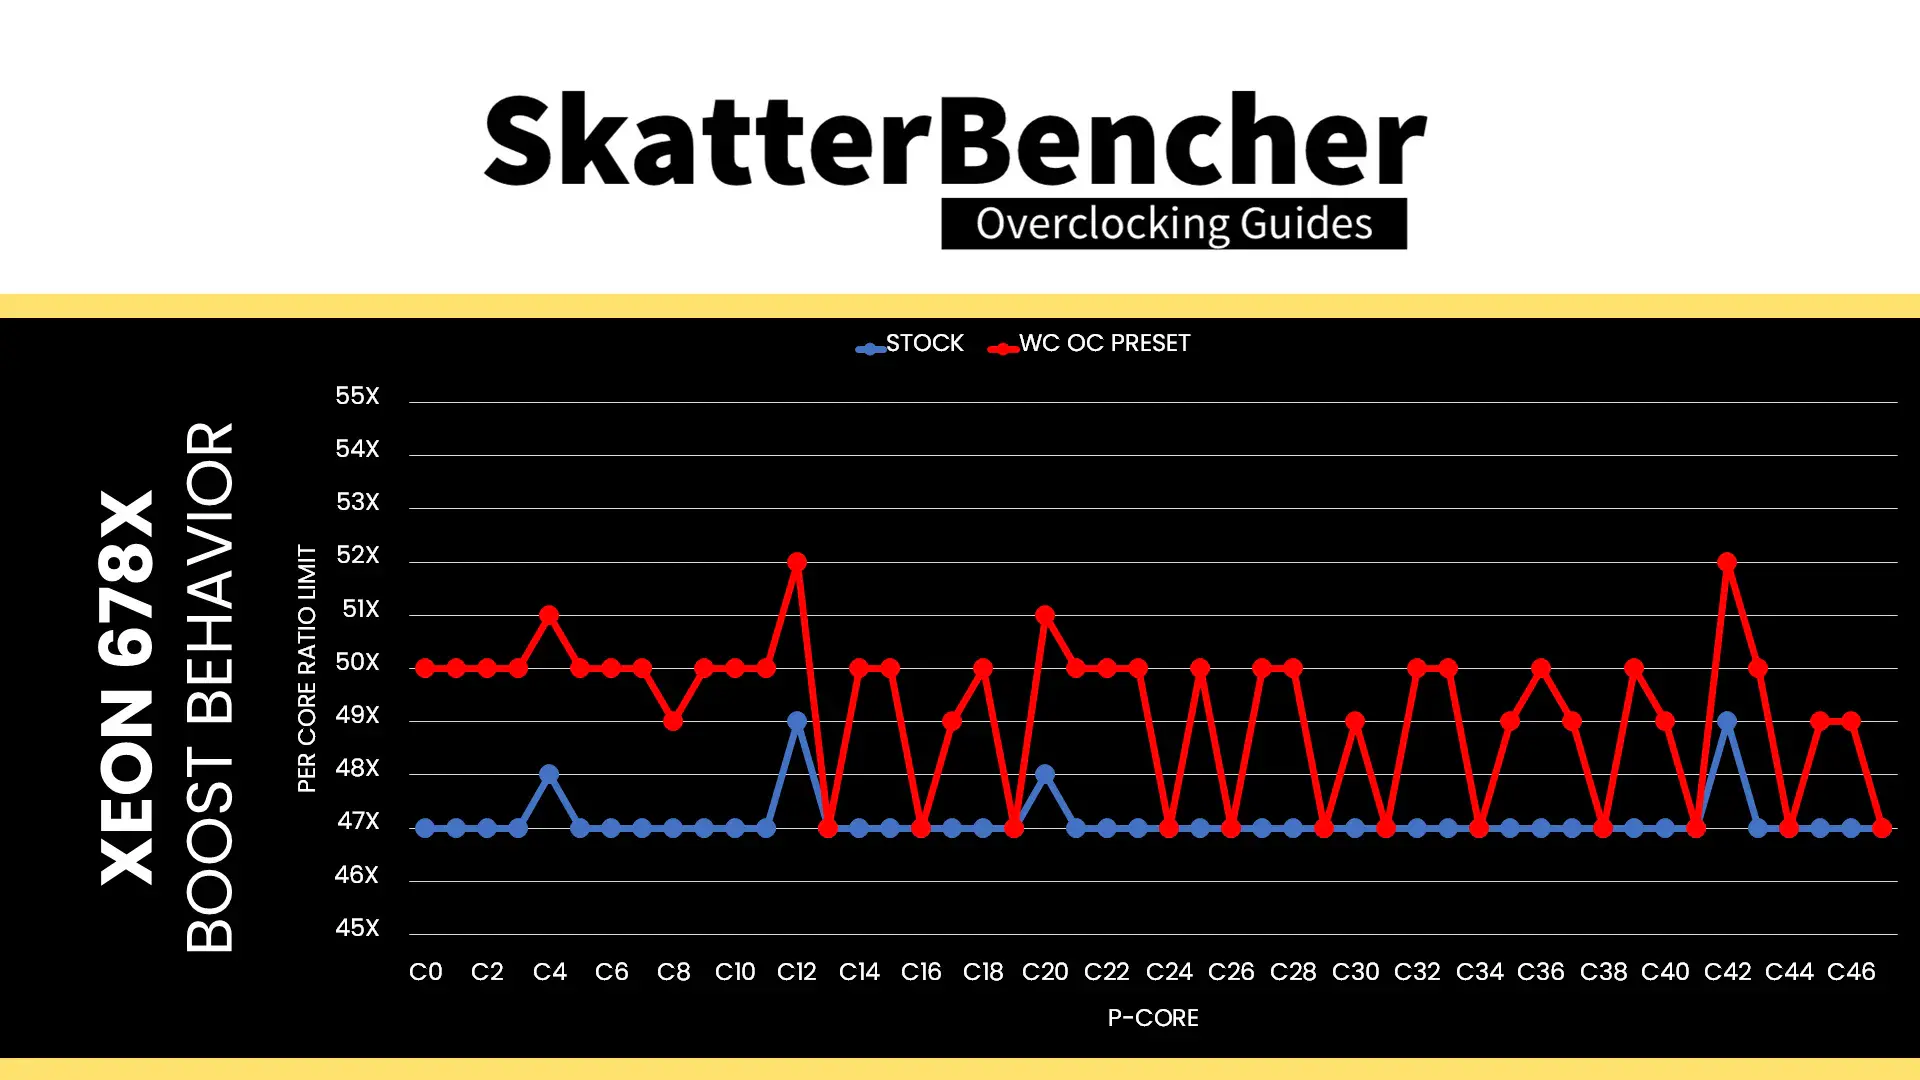
So, all except 12 cores got “promoted” to boost to a higher frequency.
BIOS Settings & Benchmark Results
Upon entering the BIOS
- Go to the Ai Tweaker menu
- Set Performance Preferences to ASUS Advanced OC Profile
- Set ASUS MultiCore Enhancement to Enabled – Remove All limits
- Set CPU Core Ratio to Water-Cooled OC Preset
- Enter the DRAM Timing Control submenu
- Enter the Memory Presets submenu
- Select Load Hynix 8000 1.4V 8x32GB DR
- Select Yes
- Enter the Memory Presets submenu
Then save and exit the BIOS.
The boost curve now starts at 5.2 GHz when 1 core is active and gradually decreases to 4.7 GHz when all cores are active. That’s between 300 and 900 MHz higher frequency than stock. All except 12 P-cores now also boost to a higher frequency than at stock.


We re-ran the benchmarks and checked the performance increase compared to the default operation.
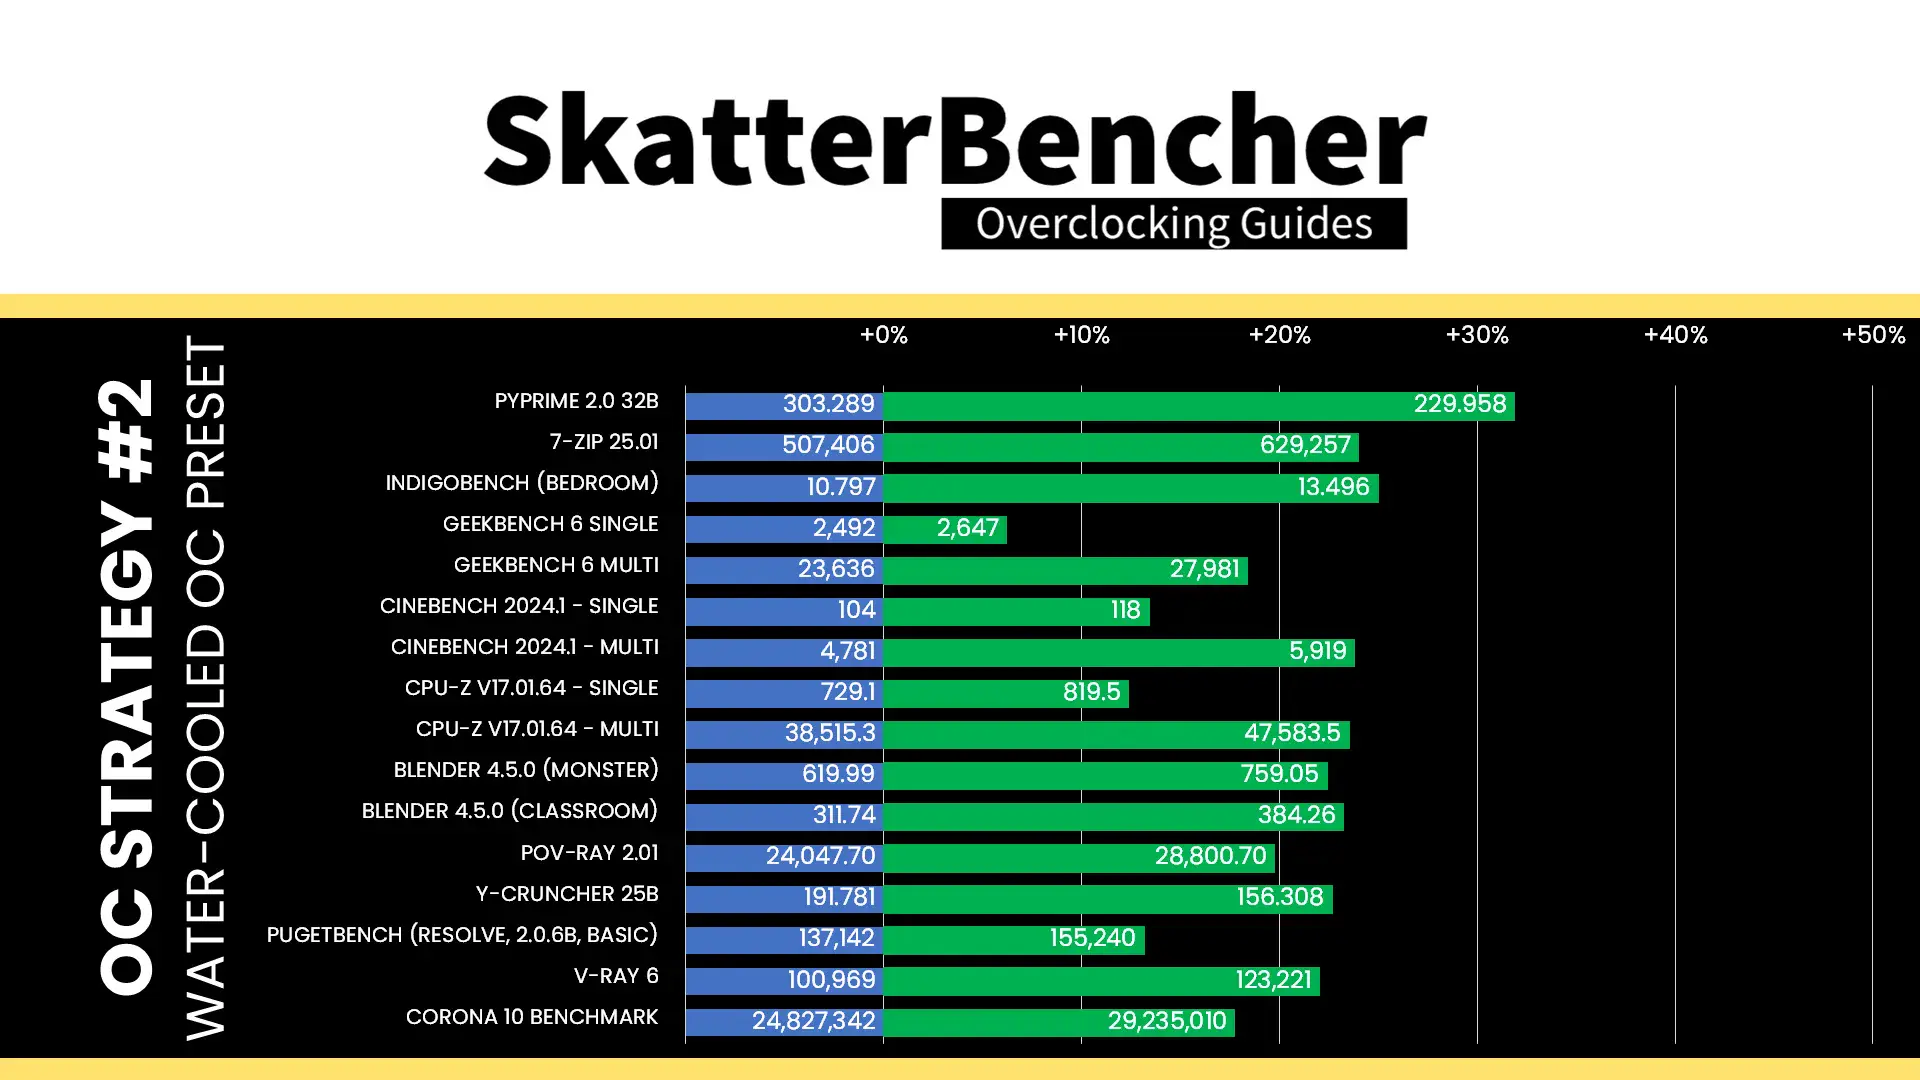
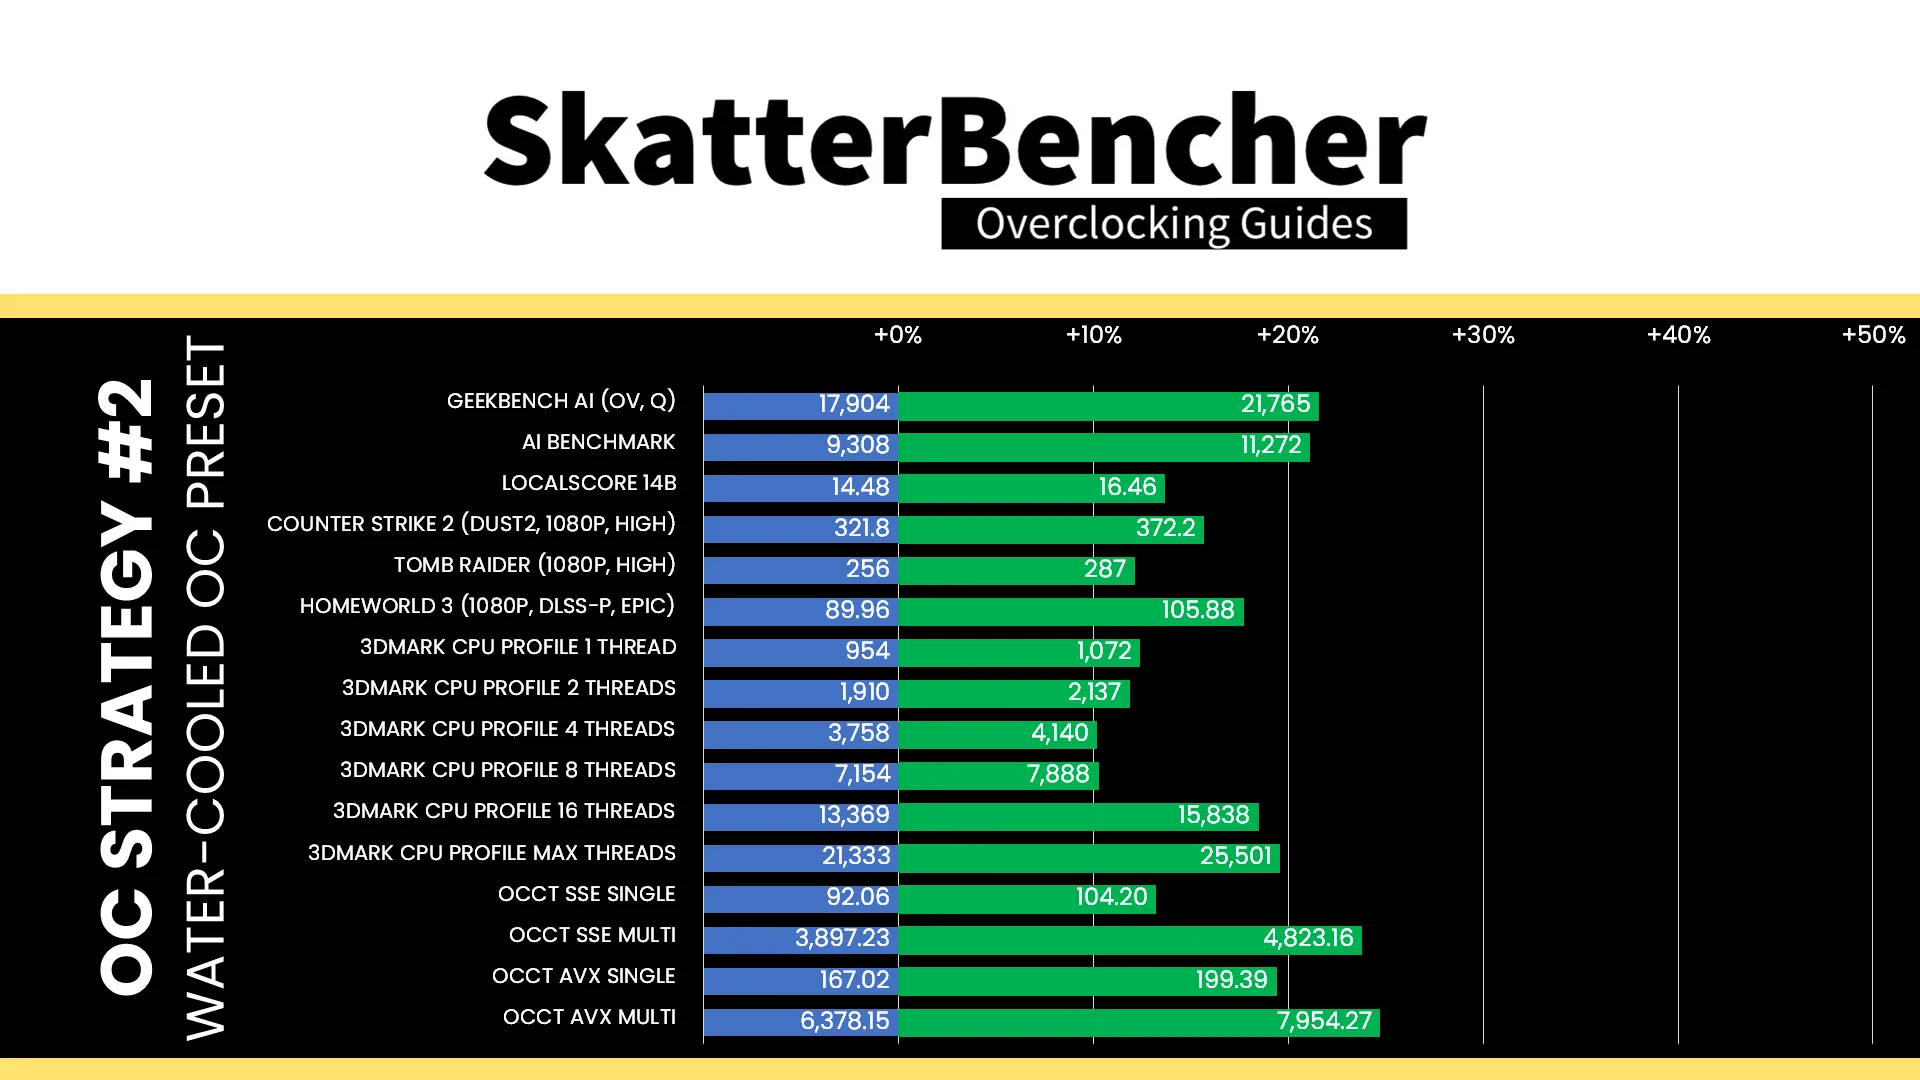
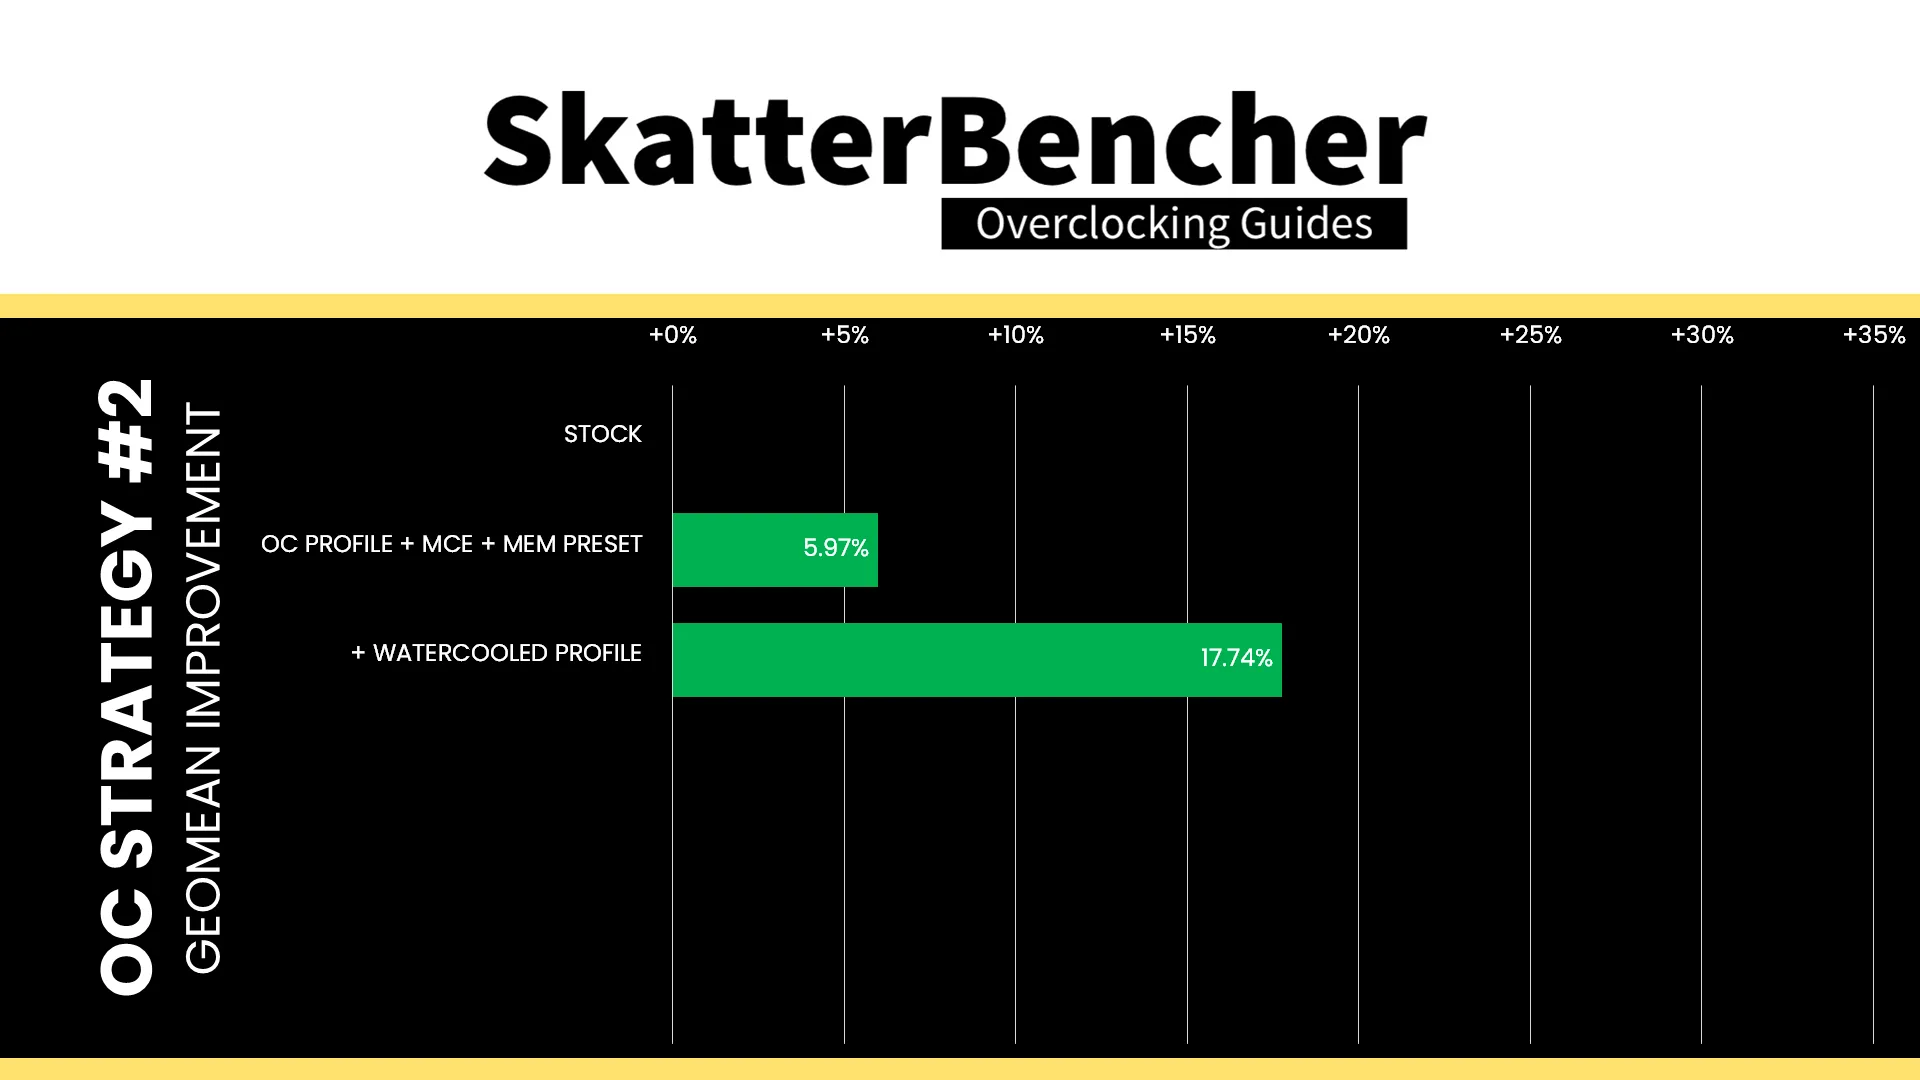
The water-cooled oc preset is the simplest way to extract more performance from the CPU P-cores on ASUS W890 motherboards. The additional frequency obviously adds performance across the board. Geomean performance speedup improves by almost 11 percentage points and we get a maximum benchmark improvement of +31.89% PyPrime.
When running the OCCT CPU AVX512 Stability Test, the average CPU core effective clock is 4036 MHz with 0.950 volts. The average CPU temperature is 82 degrees Celsius. The average system power is 762.7 watts.
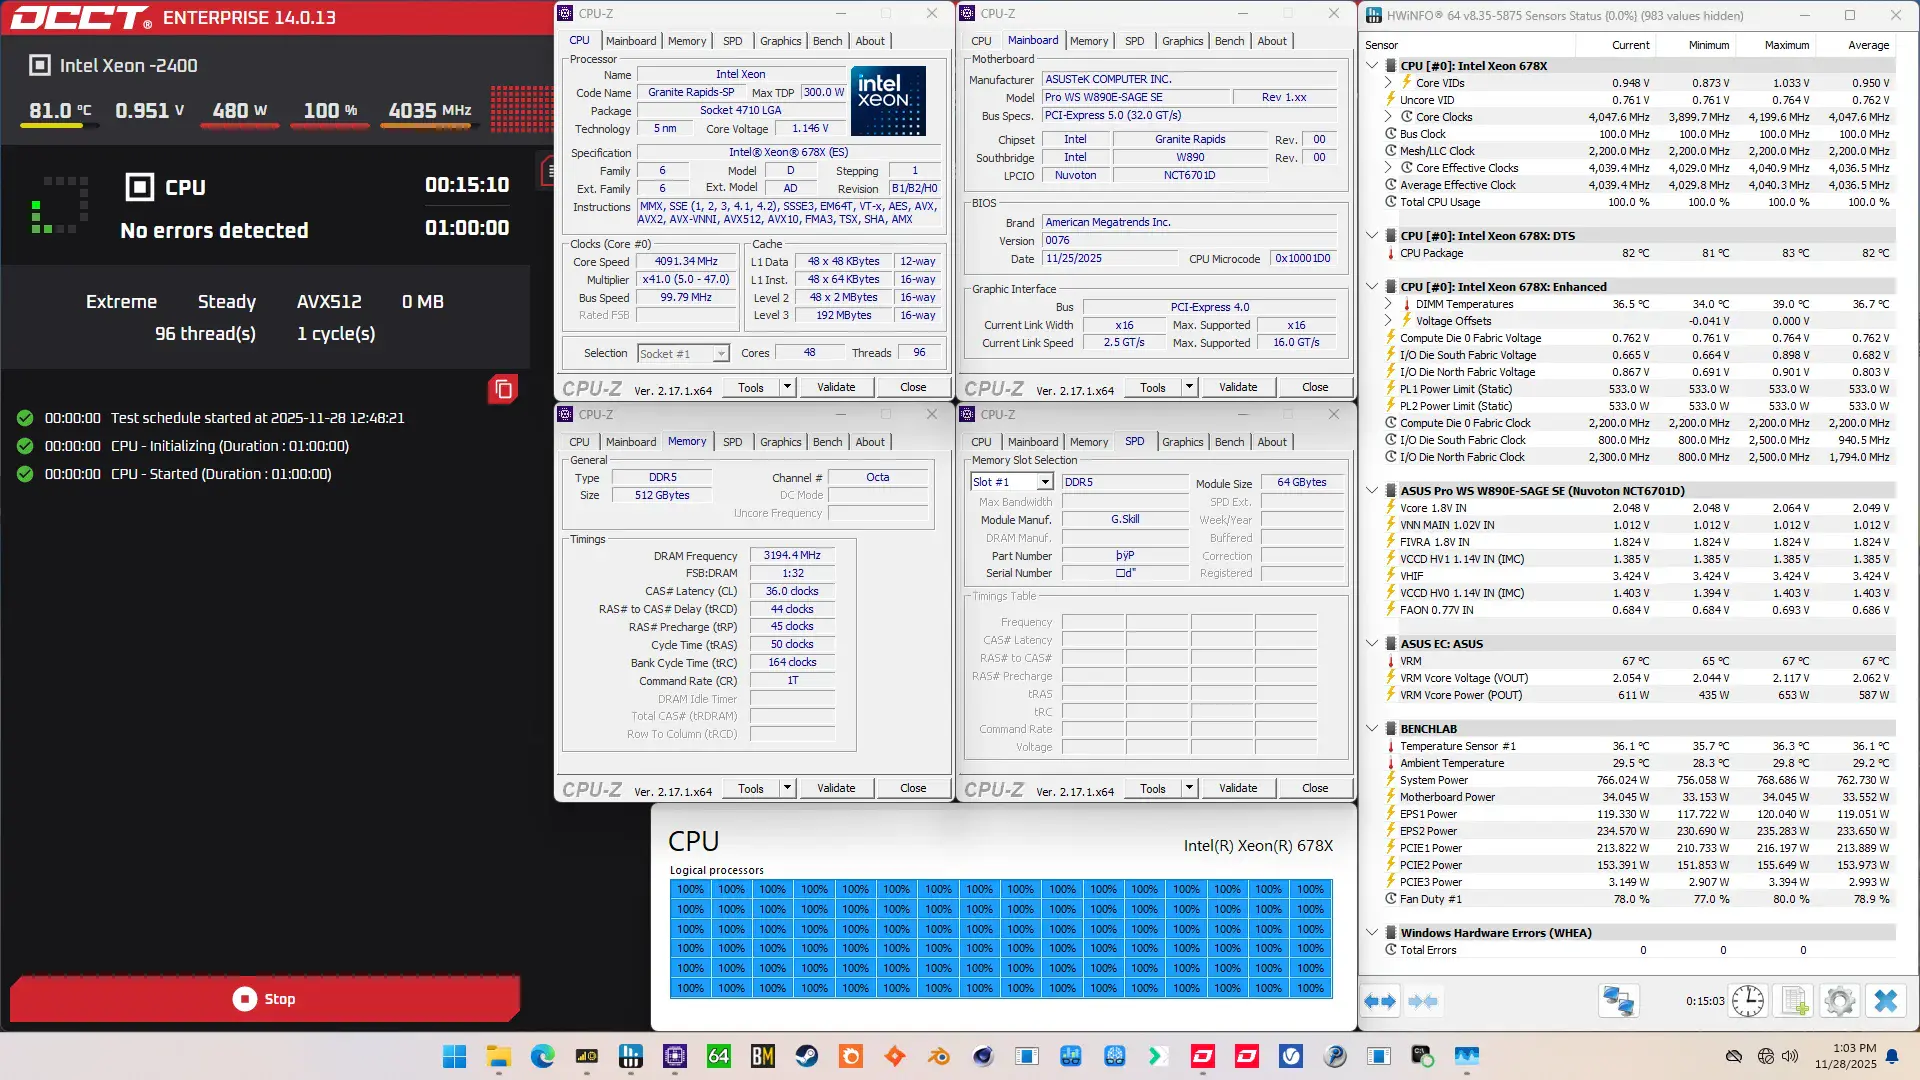
When running the OCCT CPU SSE Stability Test, the average CPU core effective clock is 4339 MHz with 0.982 volts. The average CPU temperature is 88 degrees Celsius. The average system power is 762.0 watts.

OC Strategy #3: Manual CPU P-core Overclock
In our third overclocking strategy, we pursue a basic manual, dynamic CPU P-core overclock using the Turbo Ratio Limits and adaptive voltage mode. Before we get to the settings, I need to briefly cover Intel’s overclocking toolkit for Granite Rapids as well as have a look at the Granite Rapids Clocking and Voltage topology.
Granite Rapids Clocking Topology
The clocking of a standard Granite Rapids platform slightly differs from what we’re used to with mainstream platforms. The standard clocking topology relies on a 25 MHz crystal or crystal oscillator input to the PCH and the processor. The processor then generates four 100 MHz reference clocks which is used for the various on-chip and off-chip devices, including those connected via the PCH.
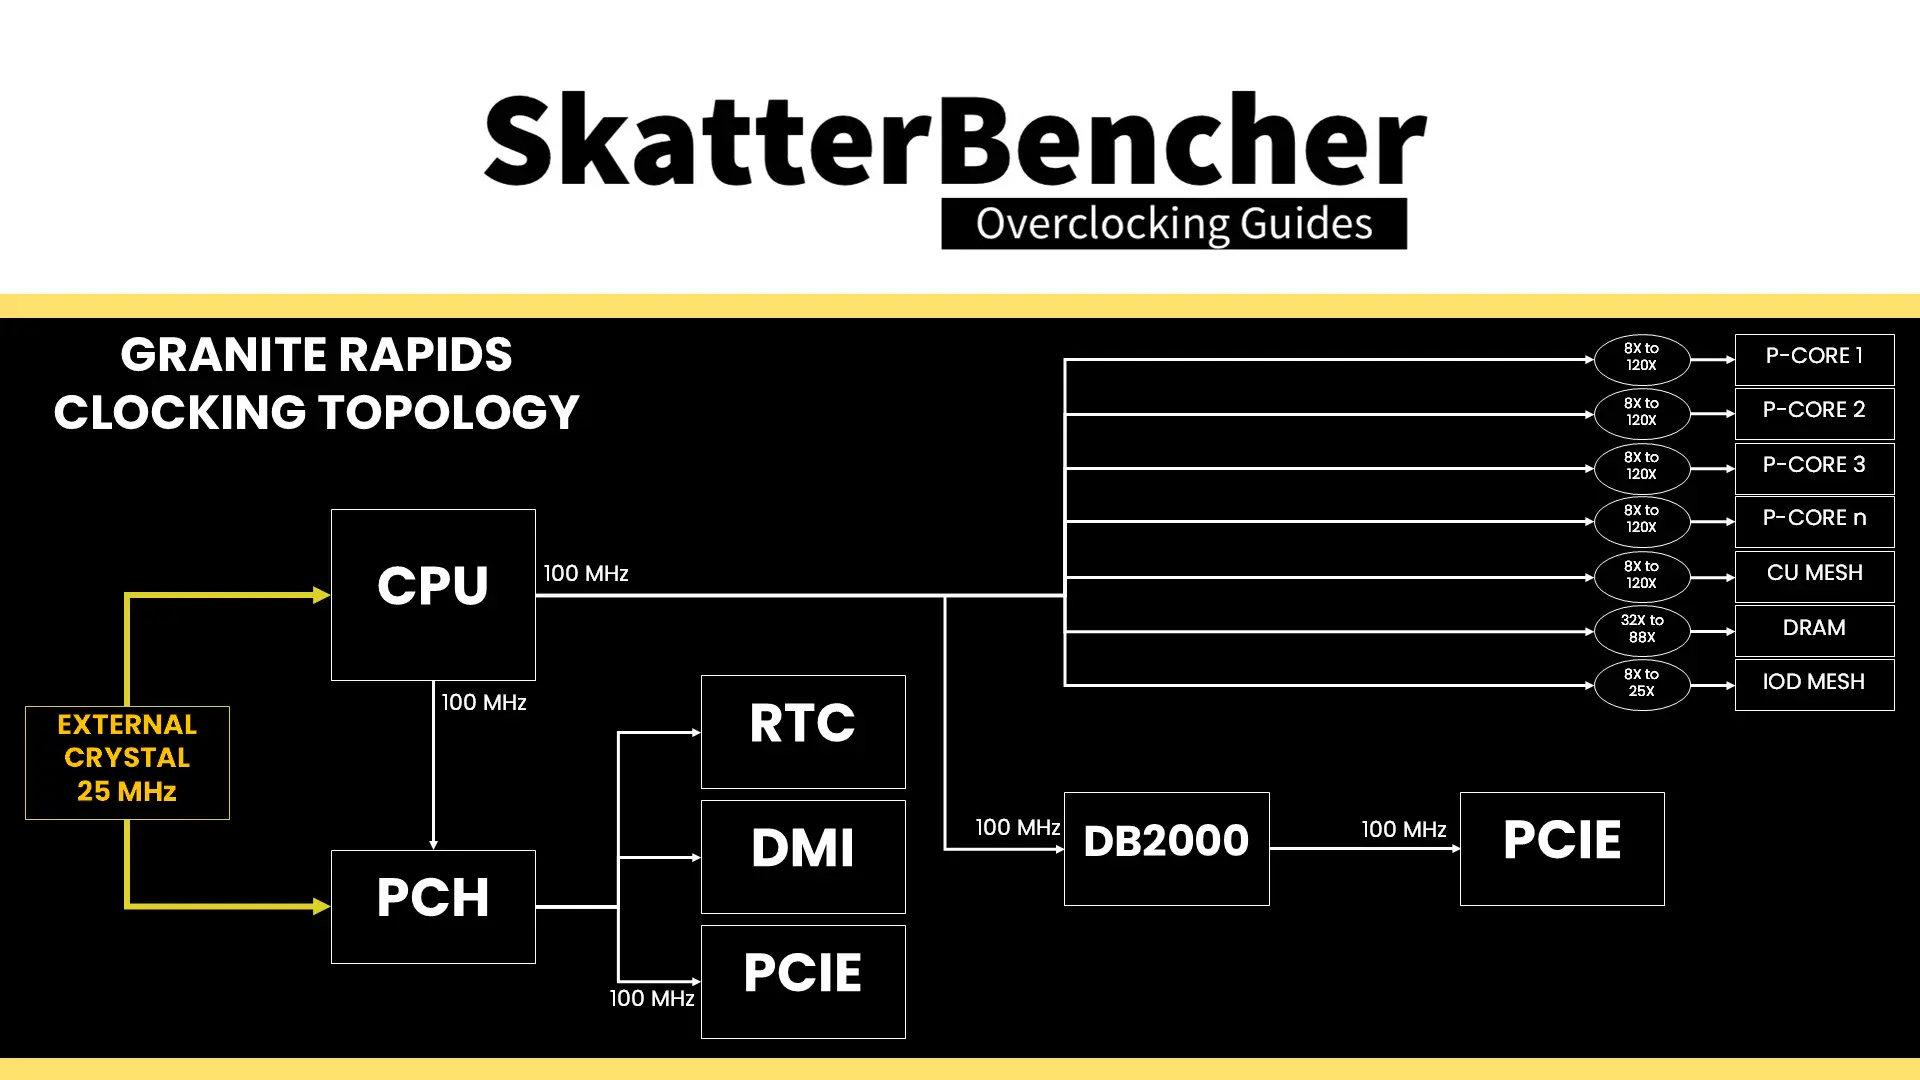
Unfortunately, there’s no reference clock control like we had on previous platforms. We can’t even adjust the frequency to 101 MHz! That’s a bit unfortunate because, as we’ll see later on, it limits the clock granularity of, for example, the system memory.
The 100 MHz CPU BCLK is then multiplied with specific ratios for each of the different parts in the CPU.
- Each P-core can run at an independent frequency with ratio support of up to 127X.
- The mesh frequency ties together the last-level cache and CHAs. It can run an independent frequency from the P-cores. Unlike Sapphire Rapids, the Mesh Ratio is fully unlocked on single-tile as well as multi-tile CPUs. It has ratio support up to 80X
- The memory frequency is also driven by the CPU BCLK and multiplied by a memory ratio. The available memory ratios depend on the type of system memory. For regular R-DIMM, the memory controller is fixed at Gear 4 and for MR-DIMM it’s fixed at Gear 8!
Then, there’s also a mesh frequency for the two IO dies (referred to as IO Die North and South). Their ratios are limited to 25X even though you can program the register up to 100X.
Granite Rapids Voltage Topology
Granite Rapids uses a combination of fully integrated voltage regulators (FIVR) and motherboard voltage regulators (MBVR) for power management. There are eight (8) distinct voltage inputs to a Granite Rapids processor, most of them FIVR or fully integrated voltage regulator. The FIVR then manages the voltage provided to specific parts of the CPU. The end user can control some of these voltages.

The voltages most relevant for Granite Rapids Xeon 600 processor overclocking are those driven by the VccIN, including the P-core and Mesh voltages, and, to a lesser extent, the voltages driven by the VccFA_EHV for the PCIE & IO and VccD_HVx for the memory controllers.
Granite Rapids Overclocking Toolkit
Long story short, Intel developed and maintained a technology called the OC Mailbox which contains the entire overclocker’s toolkit. This toolkit is not always the same for each CPU architecture, as sometimes we need different tools.
On Granite Rapids, the overclocking toolkit consists of the following tools:
- Global turbo ratio limit and voltage control
- Per core ratio limit, oc ratio, and voltage control
- Mesh ratio limit, oc ratio, and voltage control
- HDC, DDRD, and INF voltage control
- DRAM ratio and timings control
- AVX2, AVX-512, and TMUL ratio offset
- Voltage limits & undervolt protection
- SVID disable
- XMP 3.0 support
Notably missing from the OC toolbox are prominent features we know from mainstream desktop like Advanced Voltage Offset, better known as V/F points, and OverClocking Thermal Velocity Boost, or OCTVB, as well as XTU support. However, they did enable at runtime CPU overclocking in collaboration with OCCT!
Xeon 678X Voltage-Frequency Curve
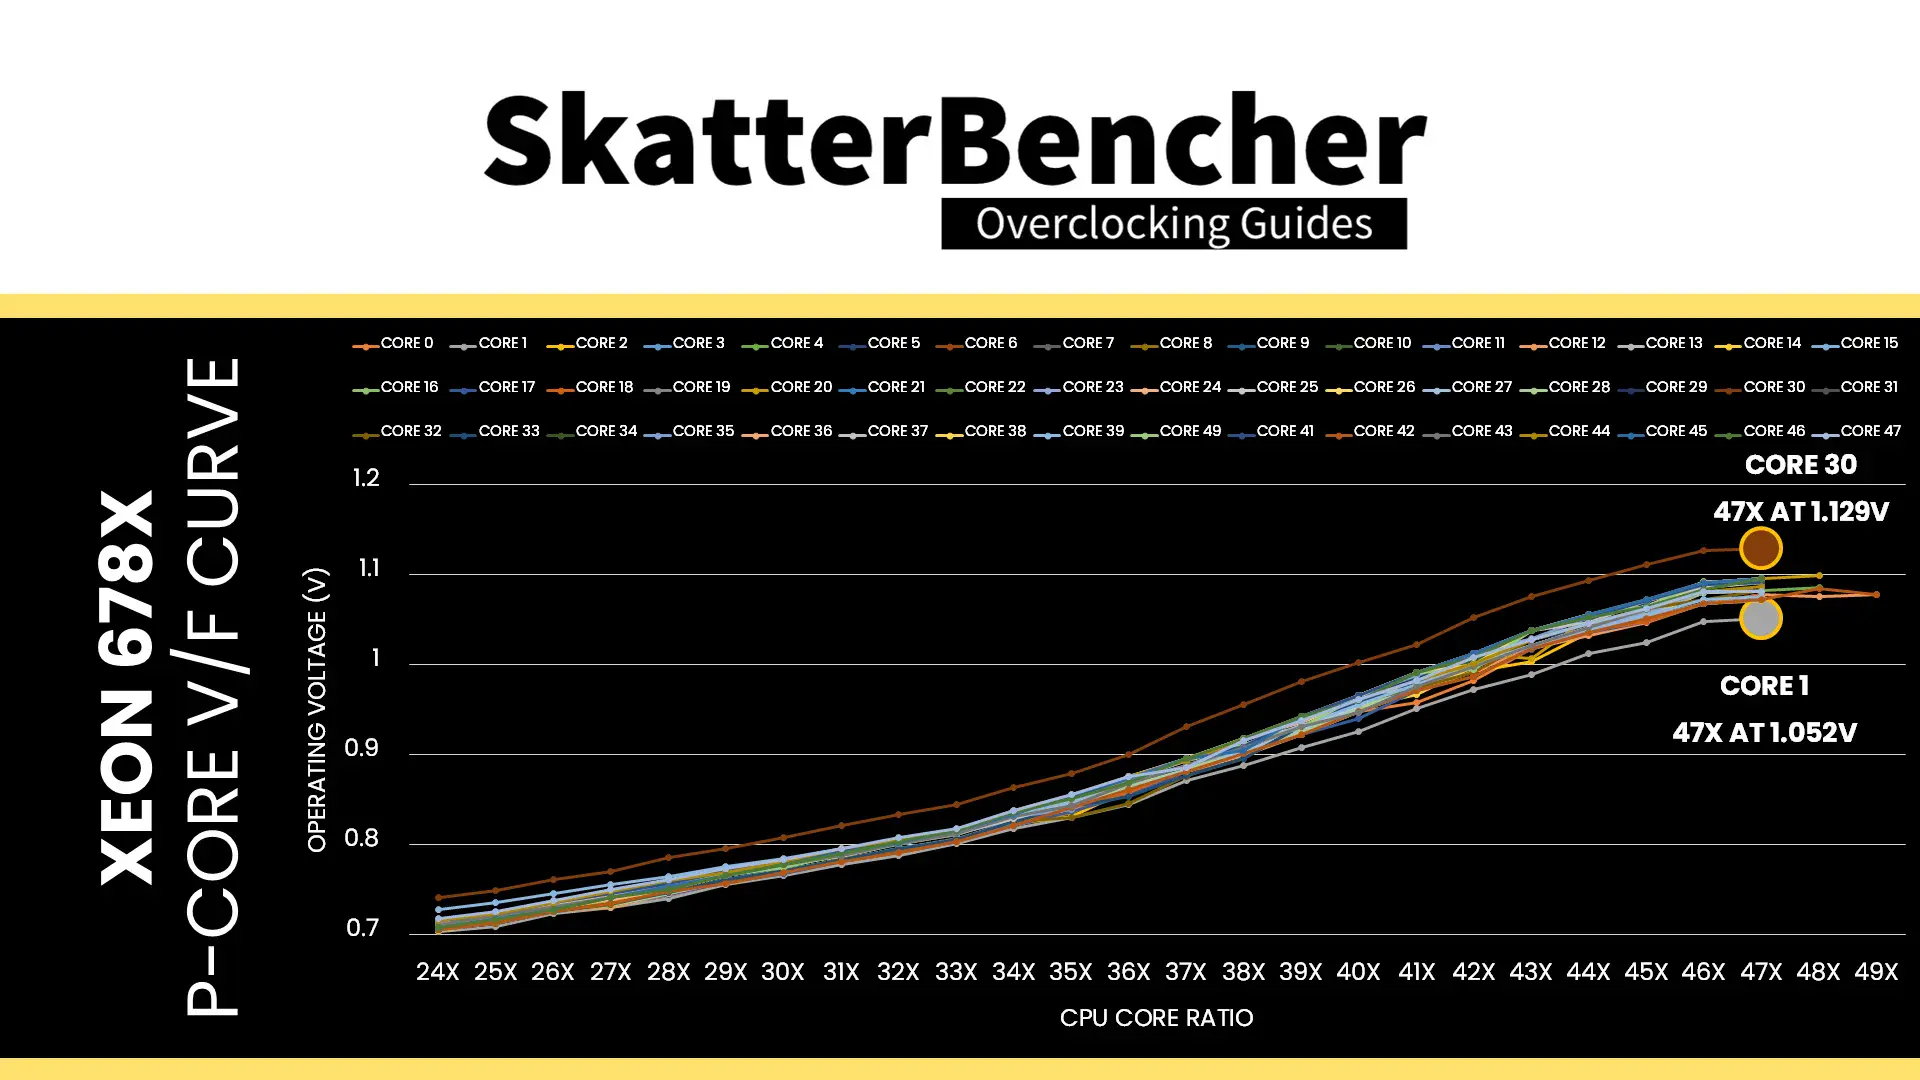
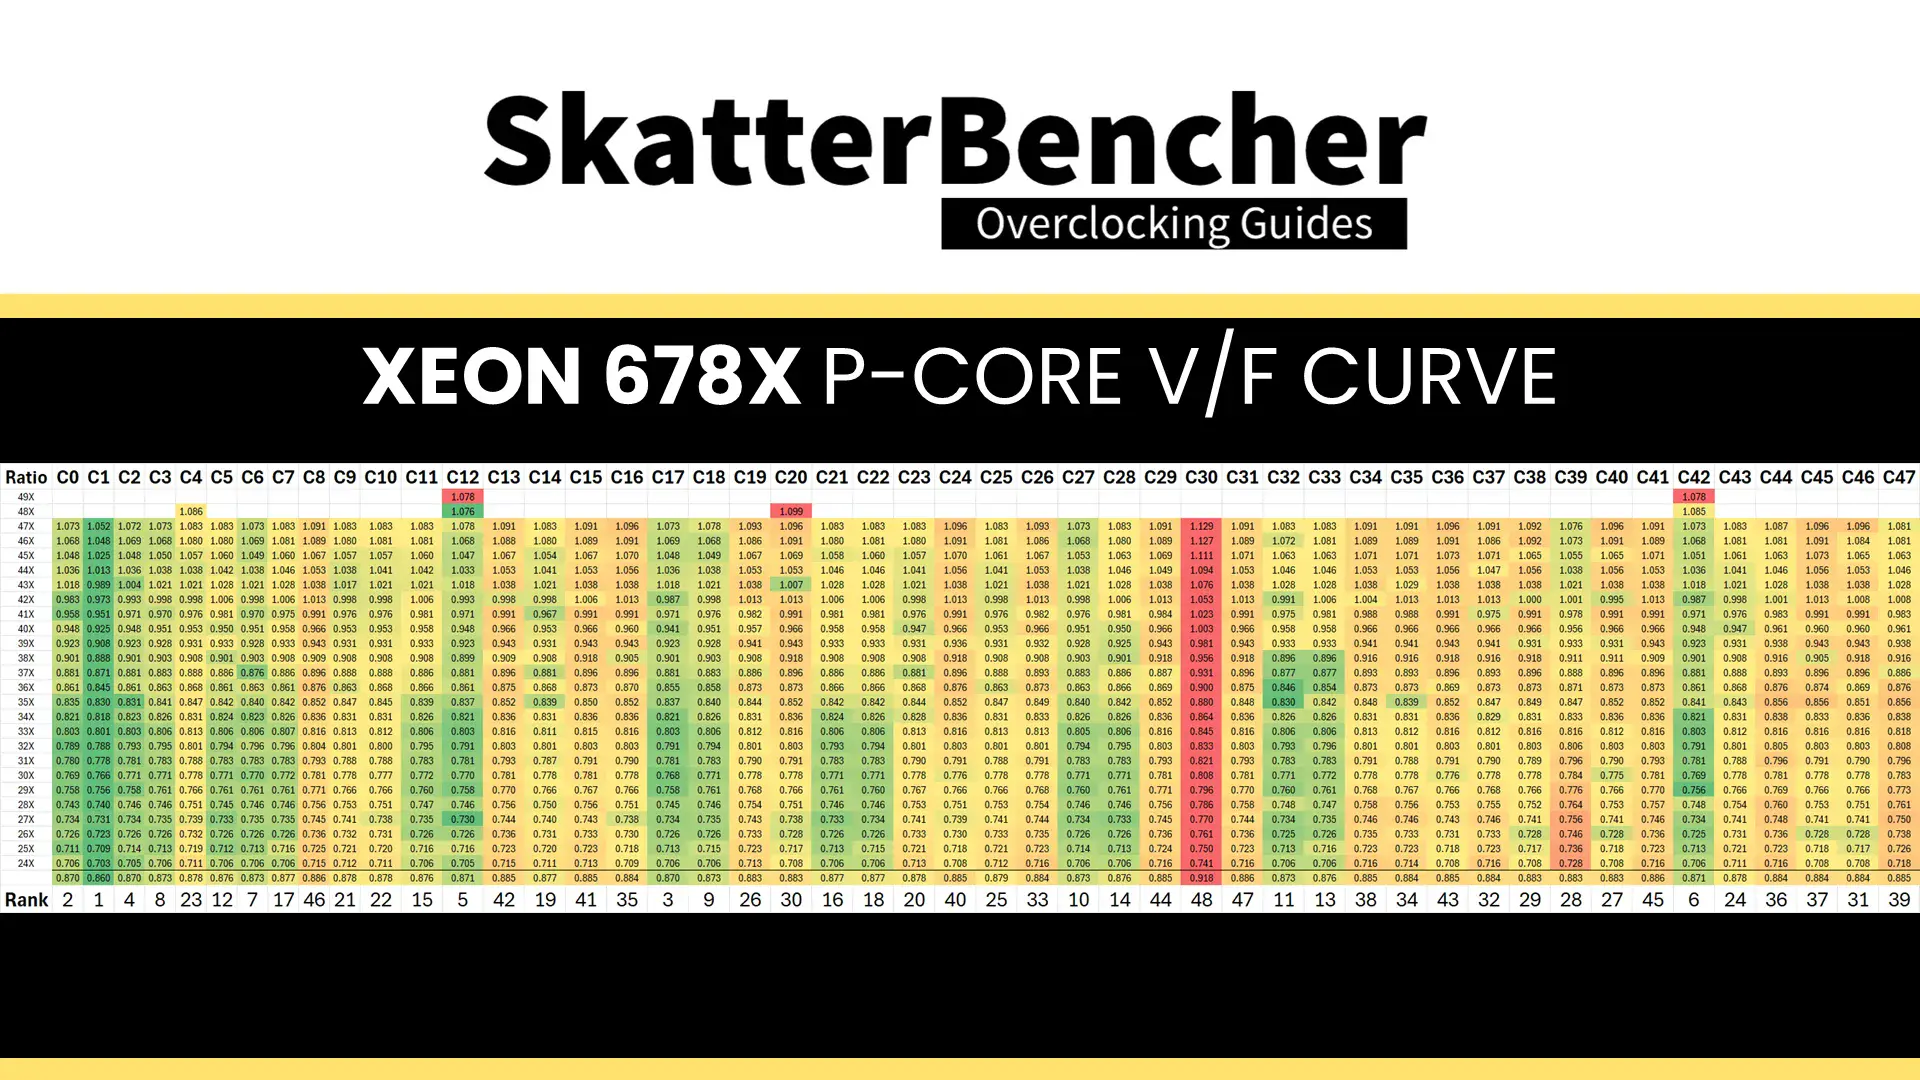
Each core inside this Xeon 678X has its own factory-fused voltage-frequency curve. According to the specification, two cores can run up to 4.9 GHz, two cores can run up to 4.8 GHz, and the rest of the 44 cores can only run up to 4.7 GHz.
Unfortunately, there’s no simple way to extract the V/F curve from the CPU. However, we can use HWiNFO and a light workload to get an approximation of the curve.
The maximum voltage at 47X ranges from 1.052V (Core 1) to 1.129V (Core 34). We also find that the favored cores are not necessarily those with the best V/F curves. For example, Core #12 can boost to 49X but has only the 5th best V/F curve.
Granite Rapids Adaptive Voltage Mode
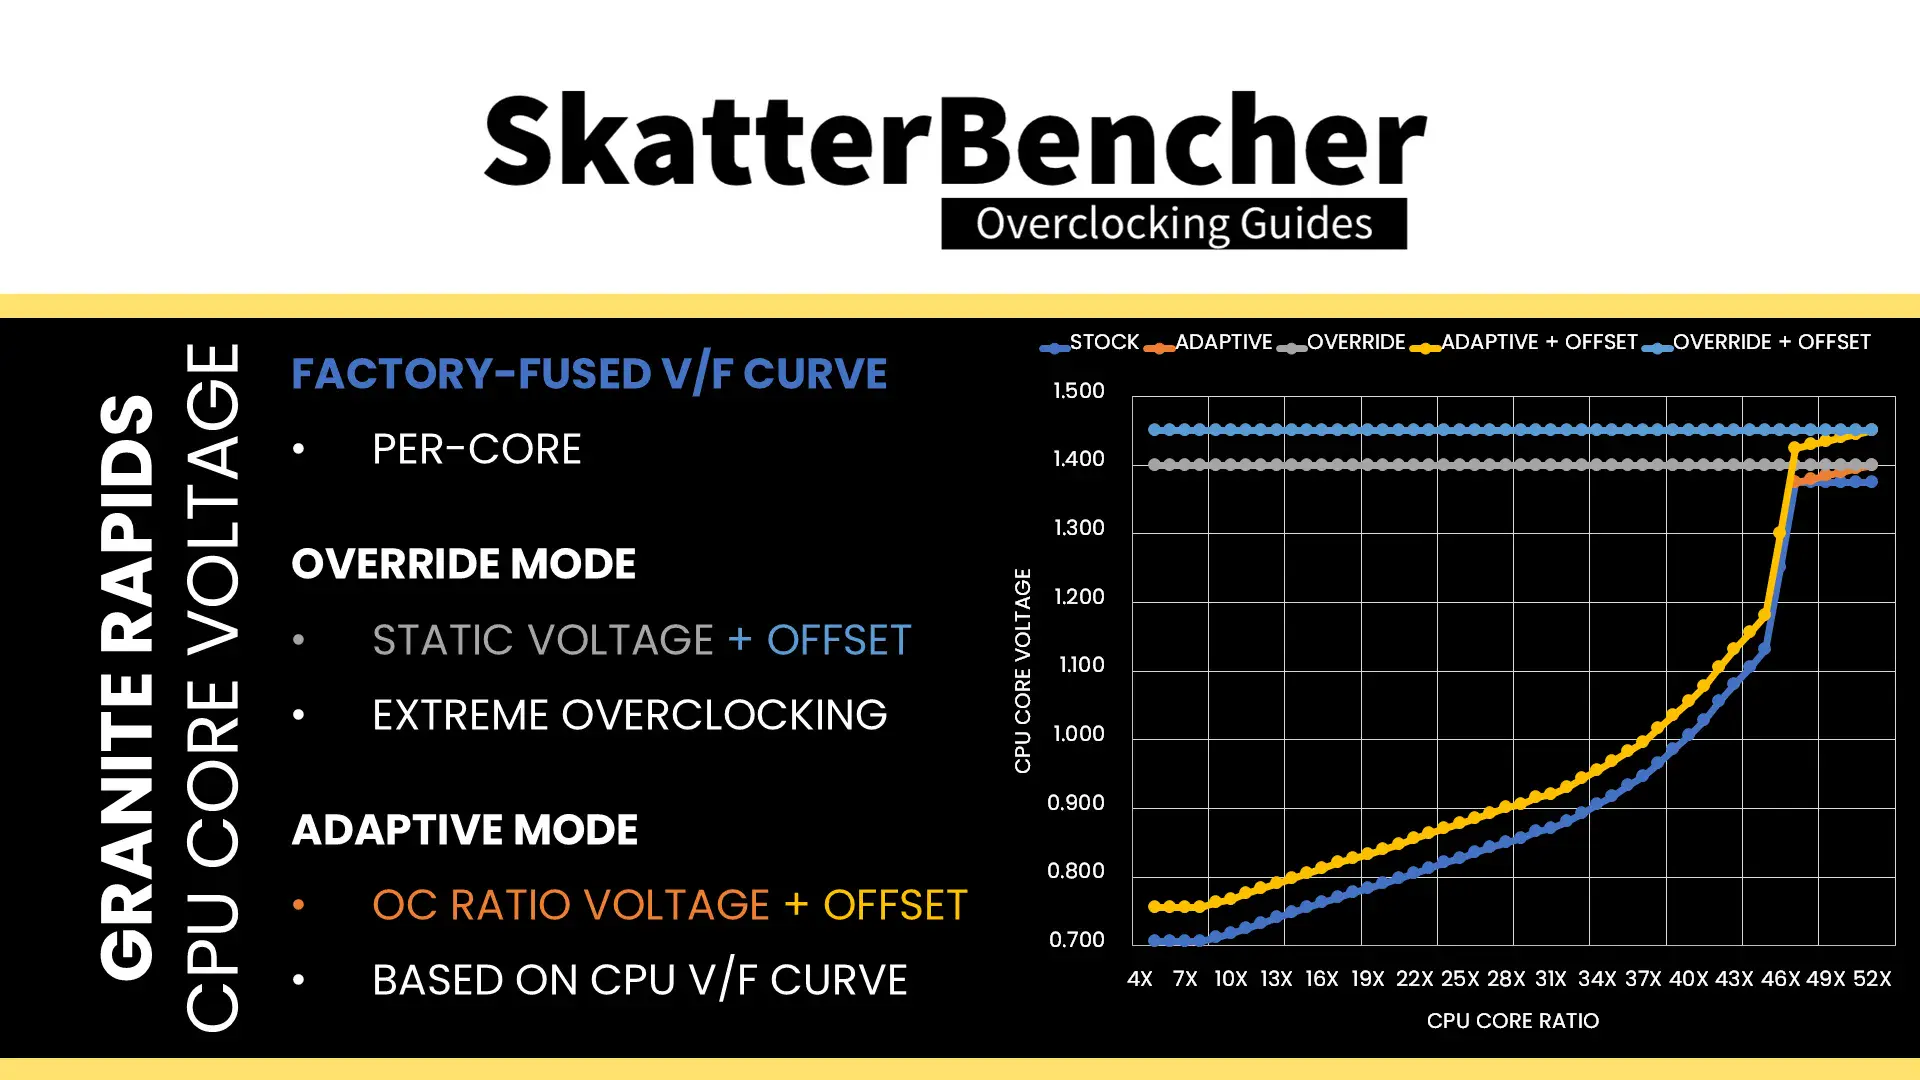
Like any previous Intel architecture, there are two main ways of configuring the voltage for the CPU cores: override mode and adaptive mode.
- Override mode specifies a single static voltage across all ratios. It is mainly used for extreme overclocking where stability at high frequencies is the only consideration.
- Adaptive mode is the standard mode of operation. In Adaptive Mode, the CPU relies on the factory-fused voltage-frequency curves to set the appropriate voltage for a given ratio. When configuring an adaptive voltage, it is mapped against the “OC Ratio, ” the highest configured ratio. We’ll get back to that in a minute.
Since Granite Rapids uses FIVR, we can only adjust the core voltage by configuring the CPU PCU registers via BIOS or specialized tools.
We can specify a voltage offset for override and adaptive modes. Of course, this doesn’t make much sense for override mode – if you set 1.15V with a +50mV offset, you could just set 1.20V – but it can be helpful in adaptive mode as you can offset the entire V/F curve by up to 500mV in both directions.
On Granite Rapids, you can configure the override or adaptive voltage on a Global or Per-Core level. Let’s focus on adaptive mode voltage configuration and first look at how it works for a single core.
When we set an adaptive voltage for a core, this voltage is mapped against a core-specific “OC Ratio.” This ratio is not always configurable from BIOS and is usually equal to the Per Core Ratio Limit, though can in theory be configured independently. In the case of the Xeon 678X, that ratio would be 49X for two super-favored cores, 48X for the other two favored cores, and 47X for the rest of the cores.
Then, specific rules govern what adaptive voltage can be set.
A) the voltage set for a given ratio n must be higher than or equal to the voltage set for ratio n-1.
Suppose Core 0 of our Xeon 678X runs 47X at 1.05V. In that case, setting the adaptive voltage, mapped to 47X, lower than 1.05V, is pointless. 47X always runs at 1.05V or higher. Usually, BIOSes may allow you to configure lower values. However, the CPU’s internal mechanisms will override your configuration if it doesn’t follow the rules.
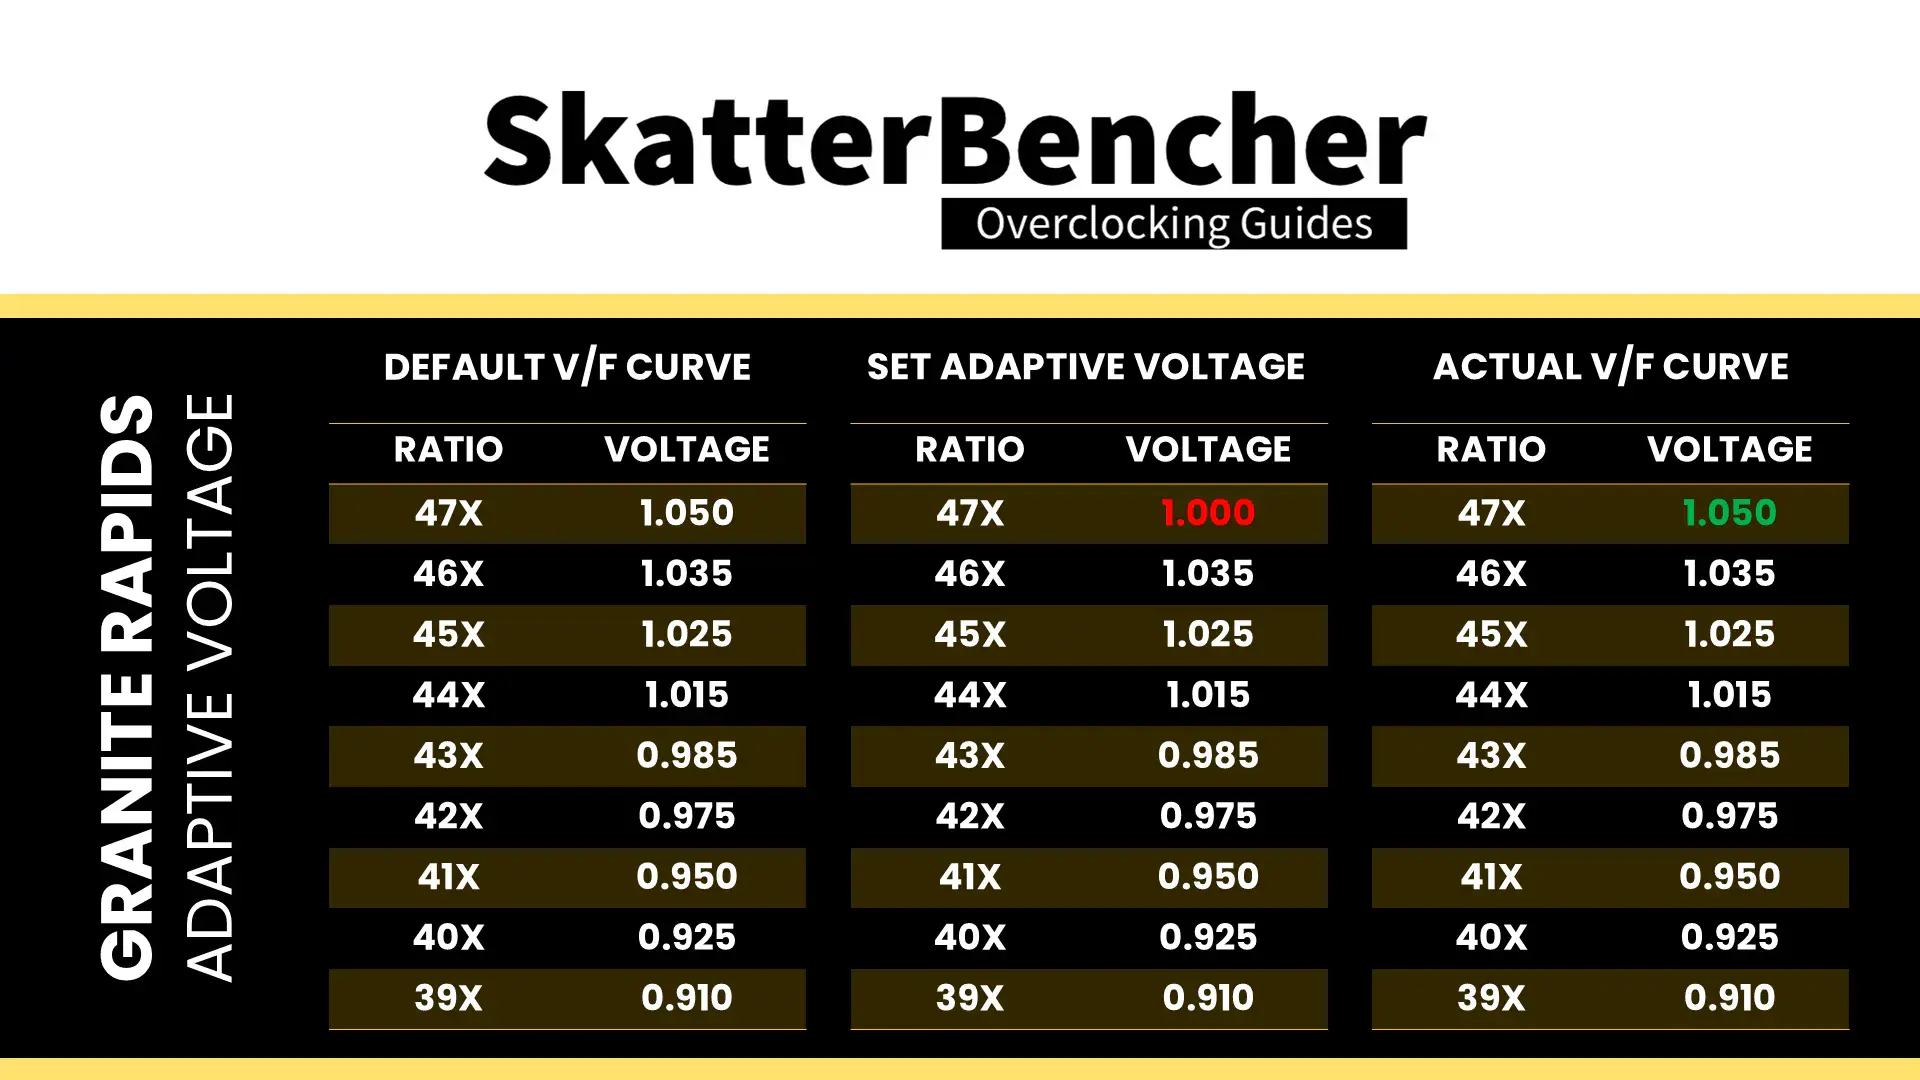
B) the adaptive voltage configured for any ratio below the default maximum Turbo Ratio will be ignored.
Take the same example of Core 0, specified to run 47X at 1.05V. If you try to configure all cores to 45X and set 0.95V, the CPU will ignore this because it has its own factory-fused target voltage for all ratios up to 47X and will use this voltage. You can only change the voltage of the OC Ratio, which, as mentioned before, on most cores is 47X. If you wish to set a fixed frequency and voltage, you should switch to override mode.
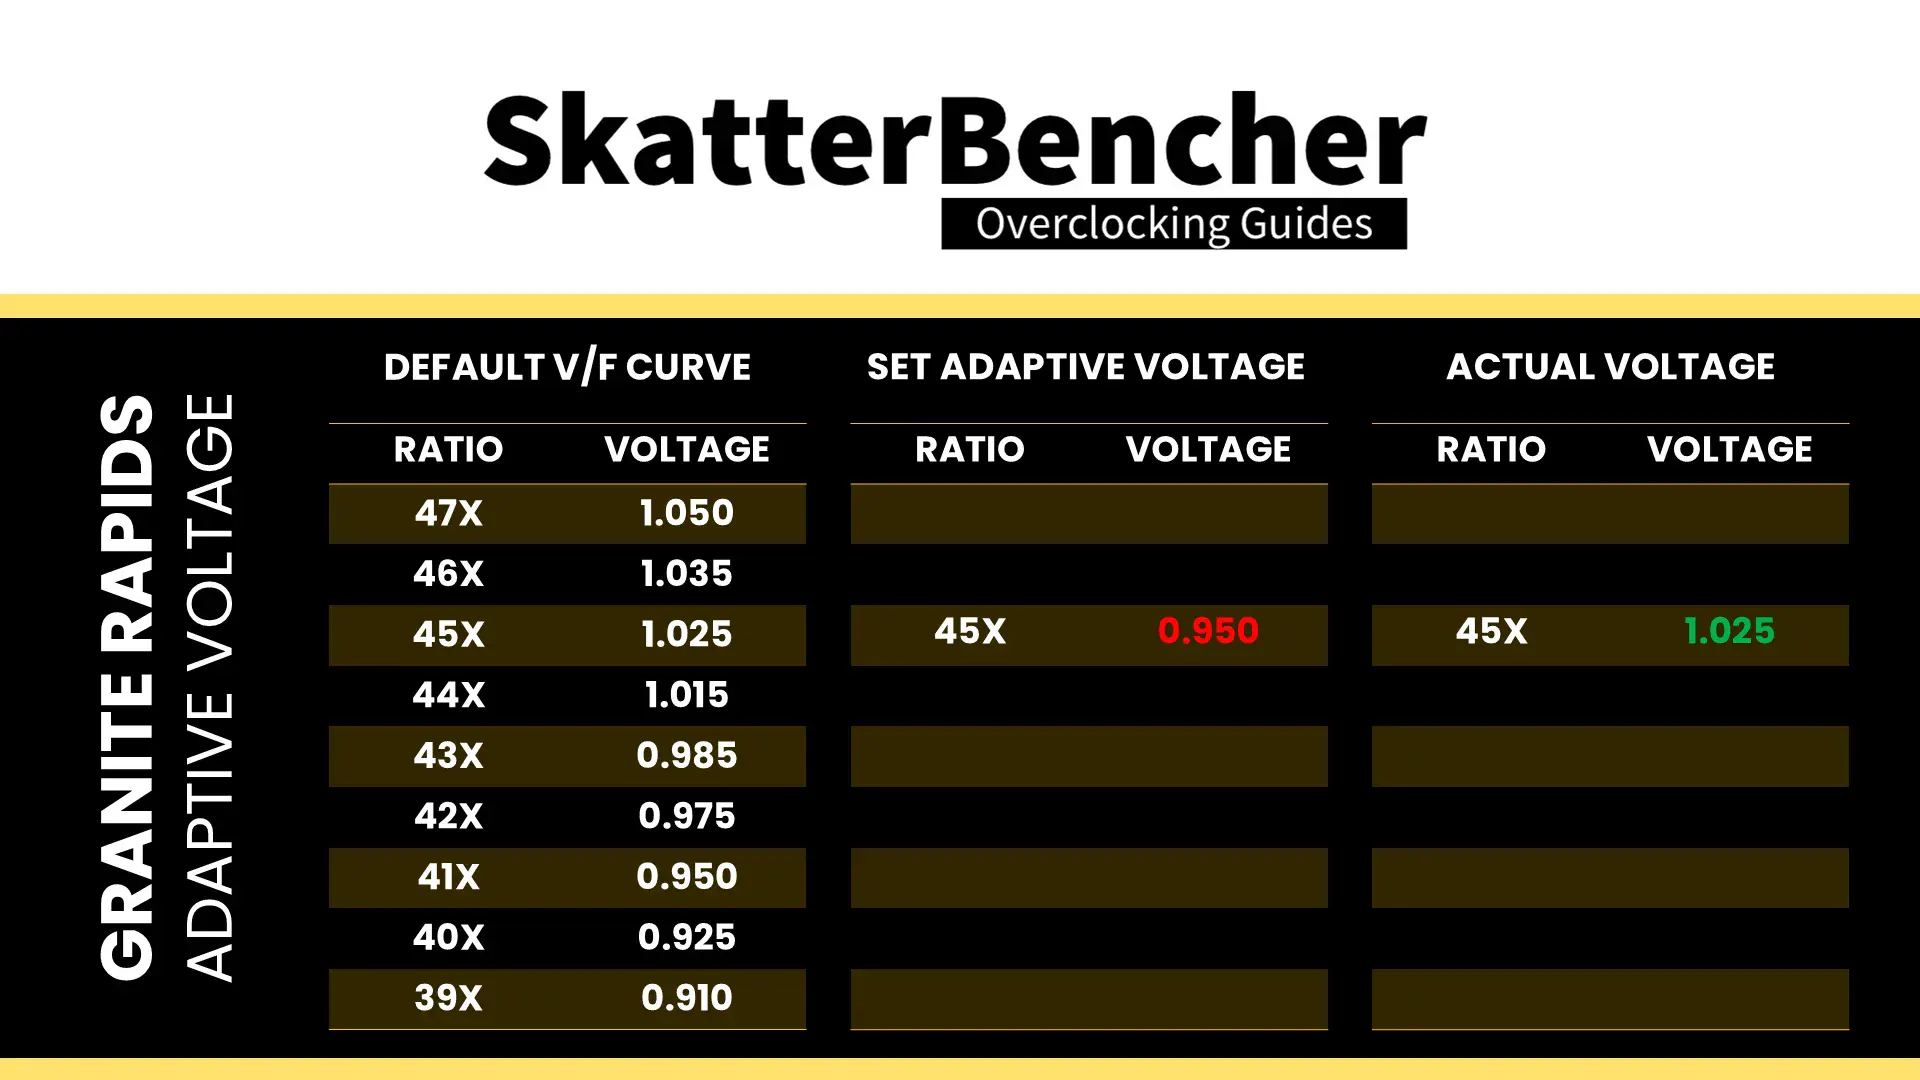
C) for ratios between the set OC Ratio and default maximum Turbo Ratio, the voltage is interpolated between the set adaptive voltage and the factory-fused voltage.
Returning to the Core 0 example, specified to run 47X at 1.05V, let’s say we manually configure the OC ratio to be 53X at 1.25V. The target voltage for ratios 48X, 49X, 50X, 51X, and 52X will now be interpolated between 1.05V and 1.25V

As I mentioned already, we can do this for each core individually. However, that would be rather painful, especially on a 48-core CPU! Fortunately, there’s also an alternative way: set a global adaptive voltage.
When we set a global adaptive voltage, it maps this voltage to the OC Ratio for each core in our CPU. That certainly makes things easier.
Granite Rapids Per Core Ratio Limit & Voltage
While we only recently saw the addition of per-core ratio control on mainstream desktop with Rocket Lake, on the high-end desktop, the ability to control the maximum ratio and voltage for each core has been around since Broadwell-E in 2016.
The Per Core Ratio Limit and Voltage control options let you control the upper end of the voltage-frequency curve of each core inside your CPU. While the general rules of adaptive voltage mode still apply, this enables two crucial new avenues for CPU overclocking.
- First, it allows users to overclock each core and find its maximum stable frequency individually.
- Second, it allows users to set an aggressive by core usage overclock while constraining the worst cores.
Since each core has an independent FIVR-regulated power rail, it’s possible to fine-tune each core to its maximum capability.
In theory, the Per Core Ratio Limit’s only function is to limit the maximum frequency of a specific P-core. That means you could independently define a core’s V/F curve and its maximum allowed ratio. For example, set the Core 0 to 1.25V at 53X but limit the core’s maximum ratio to 52X at its interpolated voltage. However, on most motherboards, the auto-rules will use the Per Core Ratio Limit value to also configure the P-core’s OC Ratio.
Xeon 678X: Manual Tuning Process
With all the theory in mind, let’s get clocking. Our basic manual overclock consists of two main steps:
- Set a global adaptive voltage, which the motherboard auto-rules will then for each core’s OC Ratio.
- Push the Turbo Ratio Limits to increase the performance when 1 to all cores are active.
For the adaptive voltage, I pick 1.235V which is the default maximum allowed voltage for the P-cores. We’ll talk more about the voltage limits in the final overclocking strategy.
Then, for the Turbo Ratio Limit I first try to find the maximum stable configuration in the heaviest possible workload. In my case, that’s OCCT AVX-512. Here I find that setting 51X is stable but 52X will shut down the system.
For the per-core stability I let the OCCT core cycler function to the heavy lifting – again with an AVX-512 workload. Here I found that 53X was stable for all cores while 54X started giving some issues. I decided to just keep 53X for all cores rather than trying to identify which cores can run 1 step higher.

BIOS Settings & Benchmark Results
Upon entering the BIOS
- Go to the Ai Tweaker menu
- Set Performance Preferences to ASUS Advanced OC Profile
- Set ASUS MultiCore Enhancement to Enabled – Remove All limits
- Set CPU Core Ratio to By Core Usage
- Enter the By Core Usage submenu
- Set Turbo Ratio Limit 1 to 4 to 53
- Set Turbo Ratio Limit 5 and 6 to 52
- Set Turbo Ratio Limit 7 and 8 to 51
- Leave the By Core Usage submenu
- Enter the DRAM Timing Control submenu
- Enter the Memory Presets submenu
- Select Load Hynix 8000 1.4V 8x32GB DR
- Select Yes
- Leave the Memory Presets submenu
- Enter the Memory Presets submenu
- Leave the DRAM Timing Control submenu
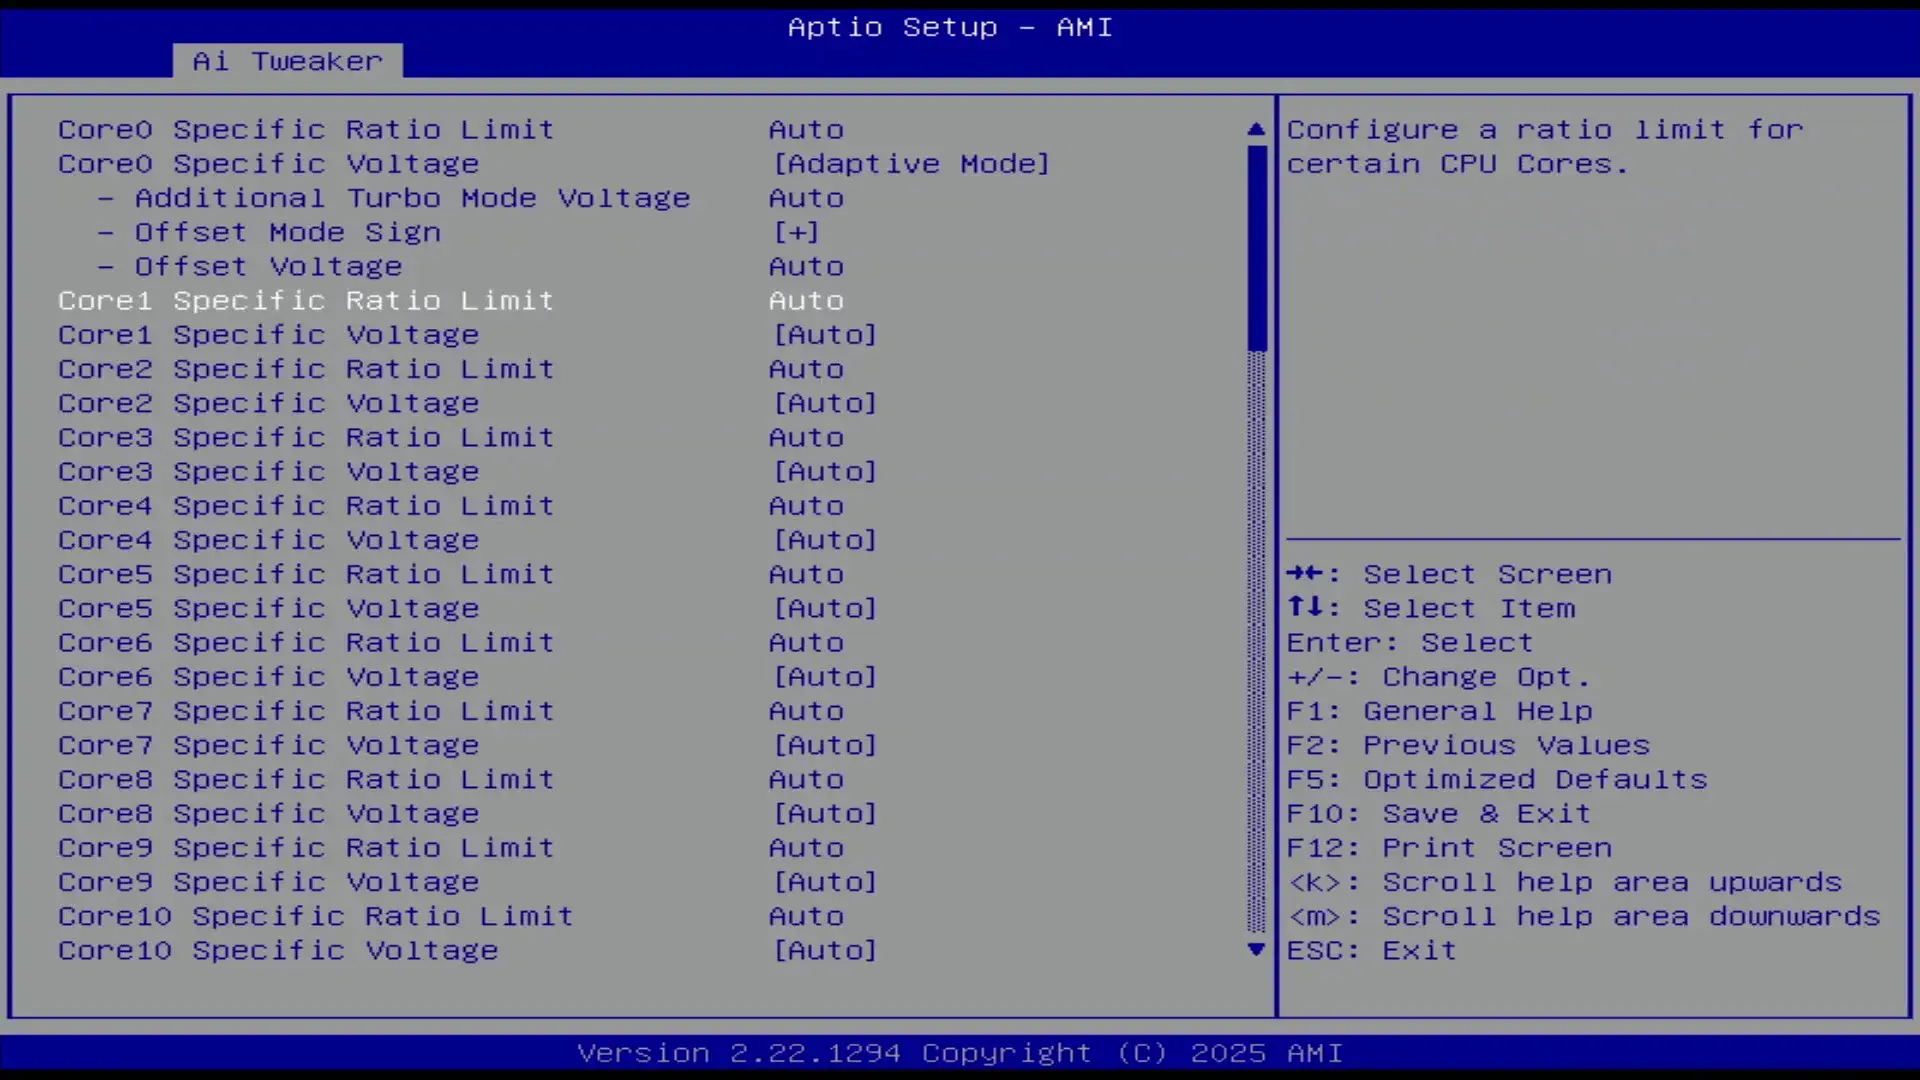
- Set Compute Die0 Core Voltage to Adaptive Mode
- Set Additional Turbo Mode Voltage to 1.235
- Set Vcore 1.8V IN to Manual Mode
- Set Vcore 1.8V IN Override to 2.20
Then save and exit the BIOS.
The boost curve now starts at 5.2 GHz when one core is active and trails off to 4.7 GHz when all 48 cores are active. Every P-core is now able to boost up to 5.3 GHz too, which is 600 MHz than stock for most cores.

We re-ran the benchmarks and checked the performance increase compared to the default operation.
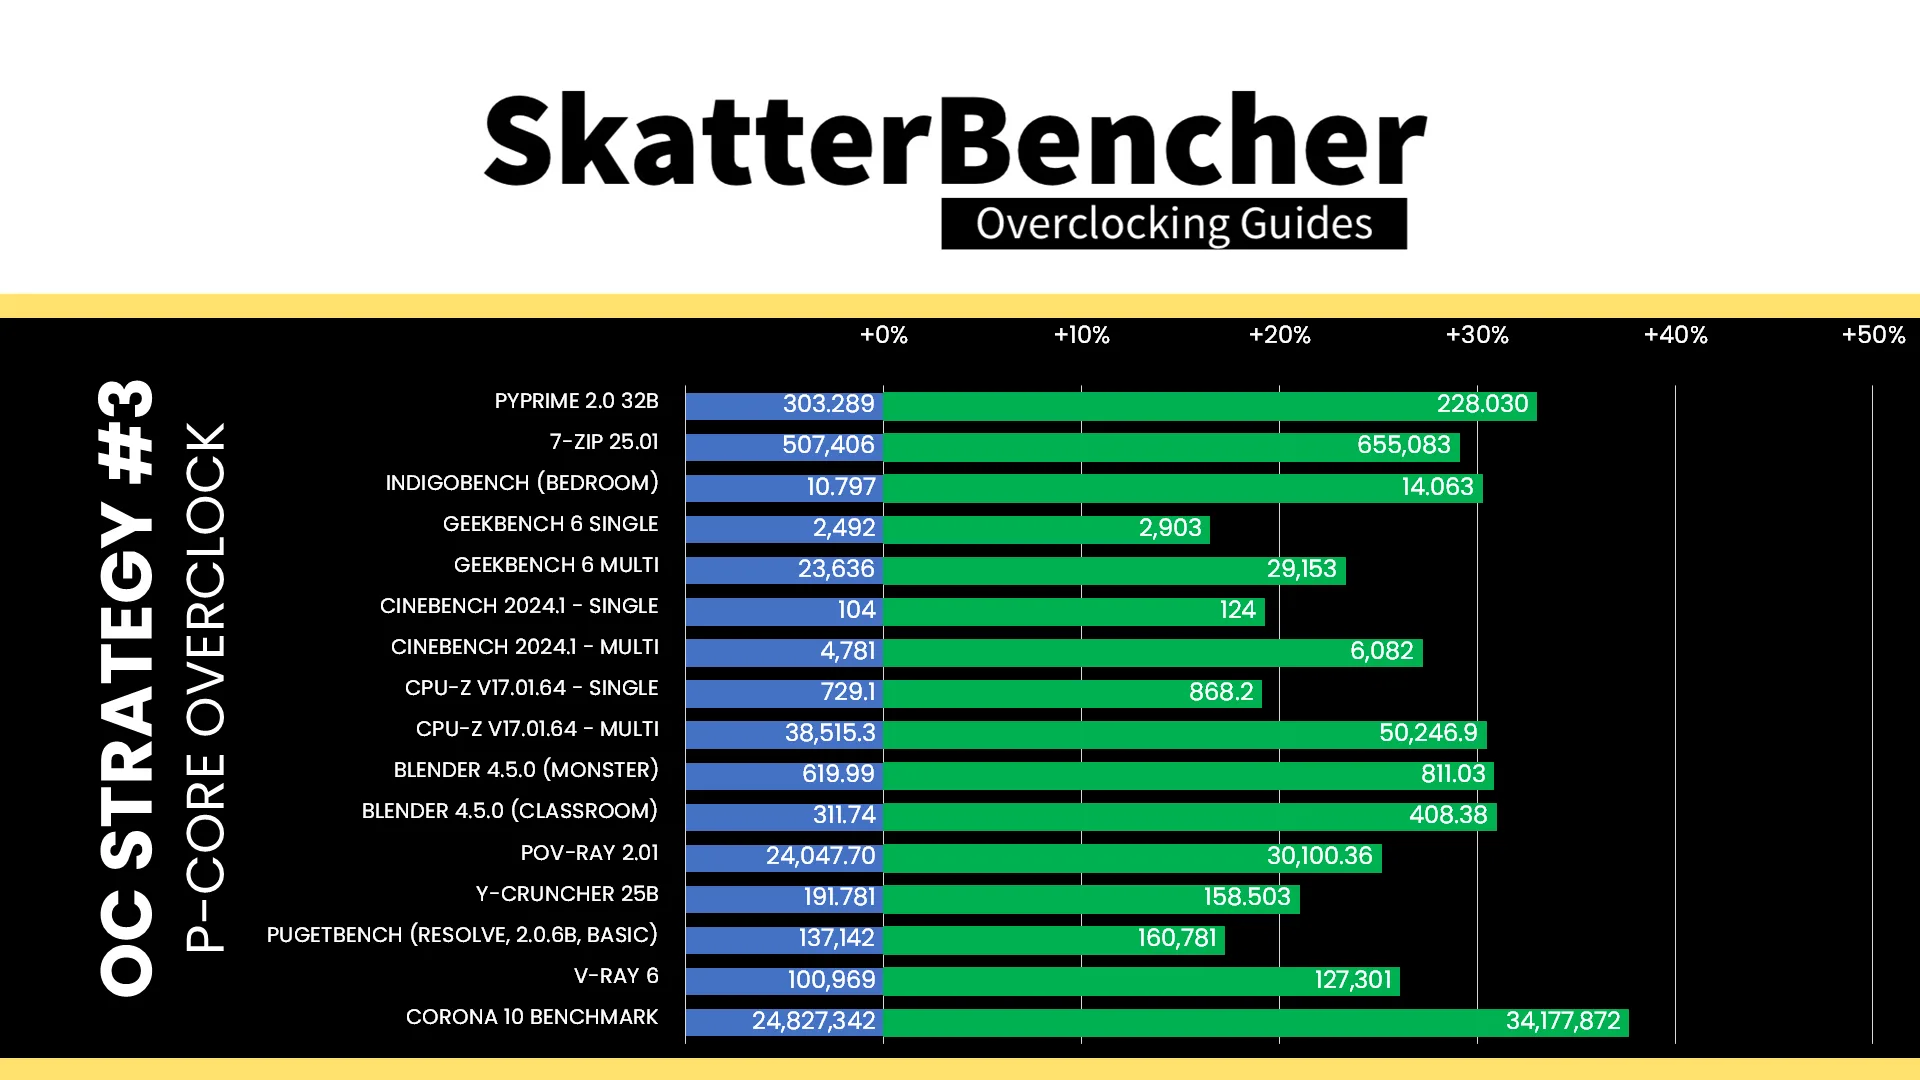
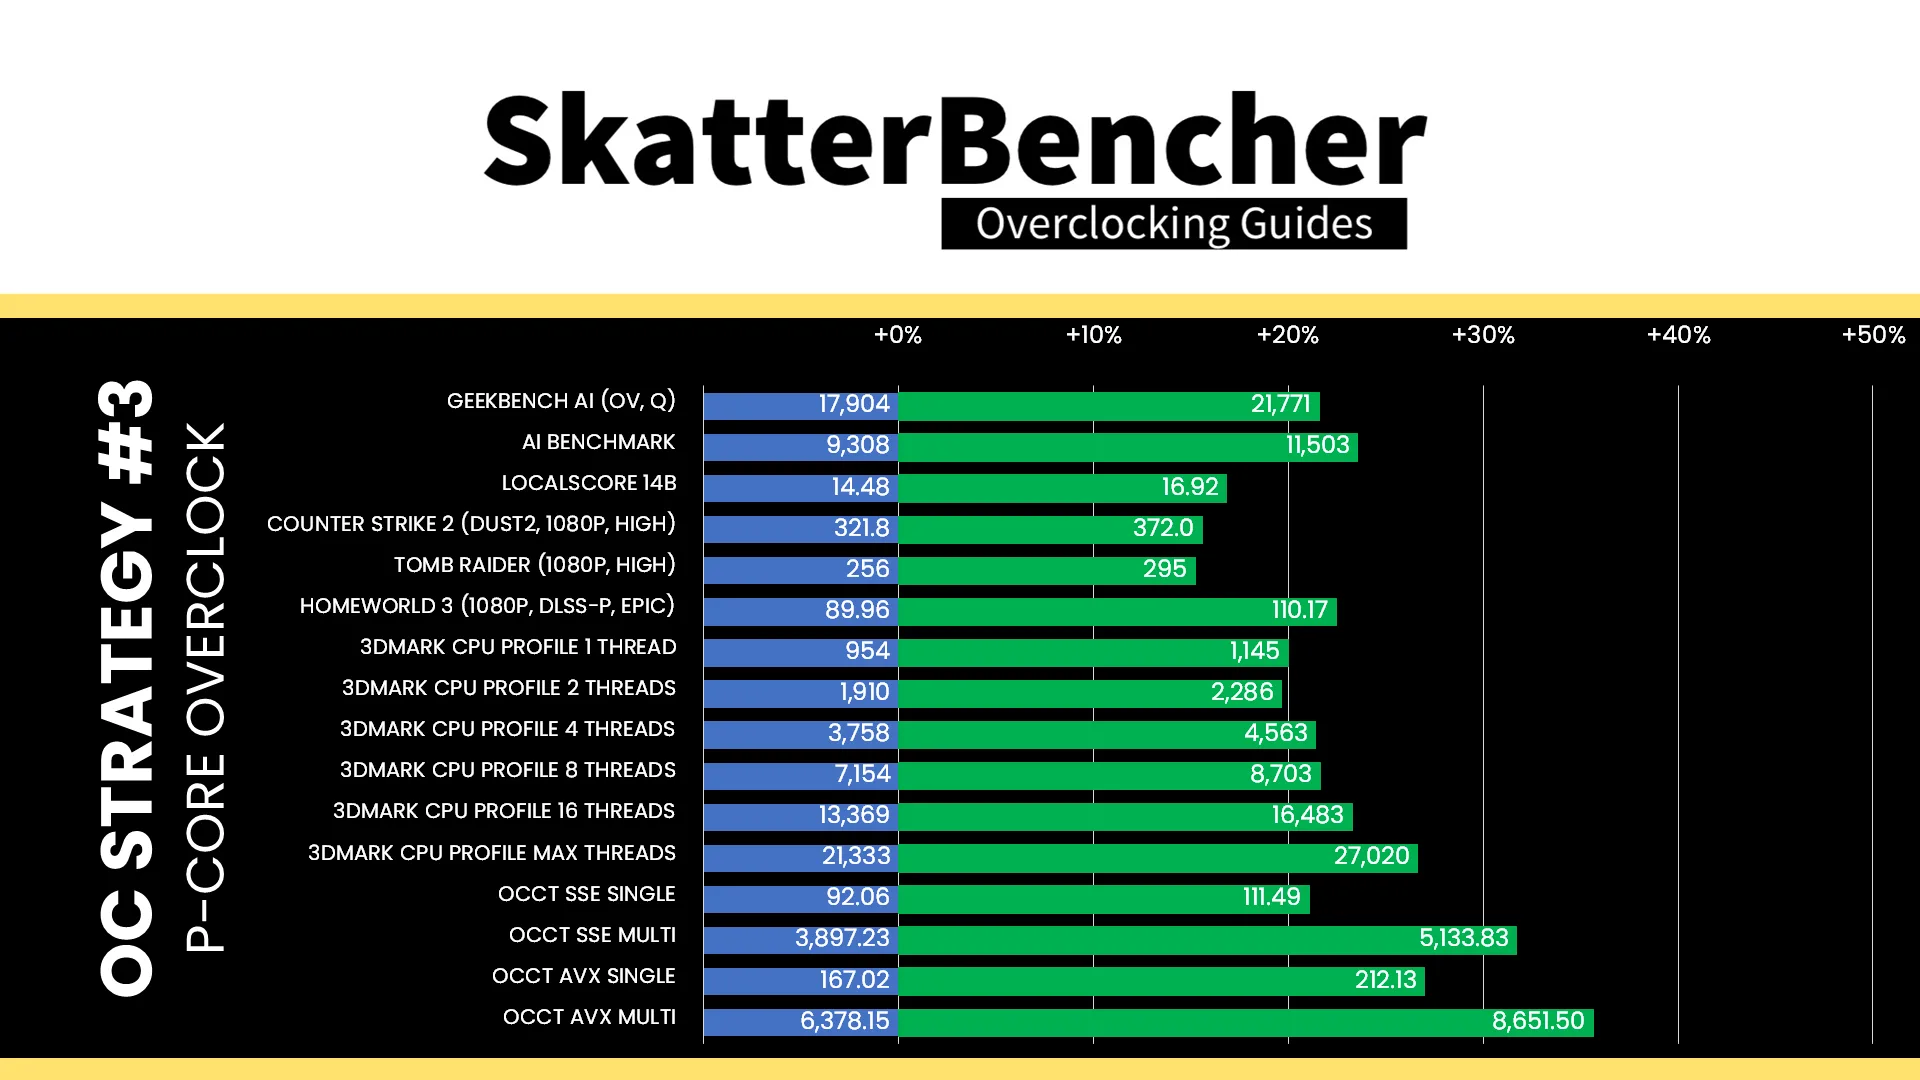

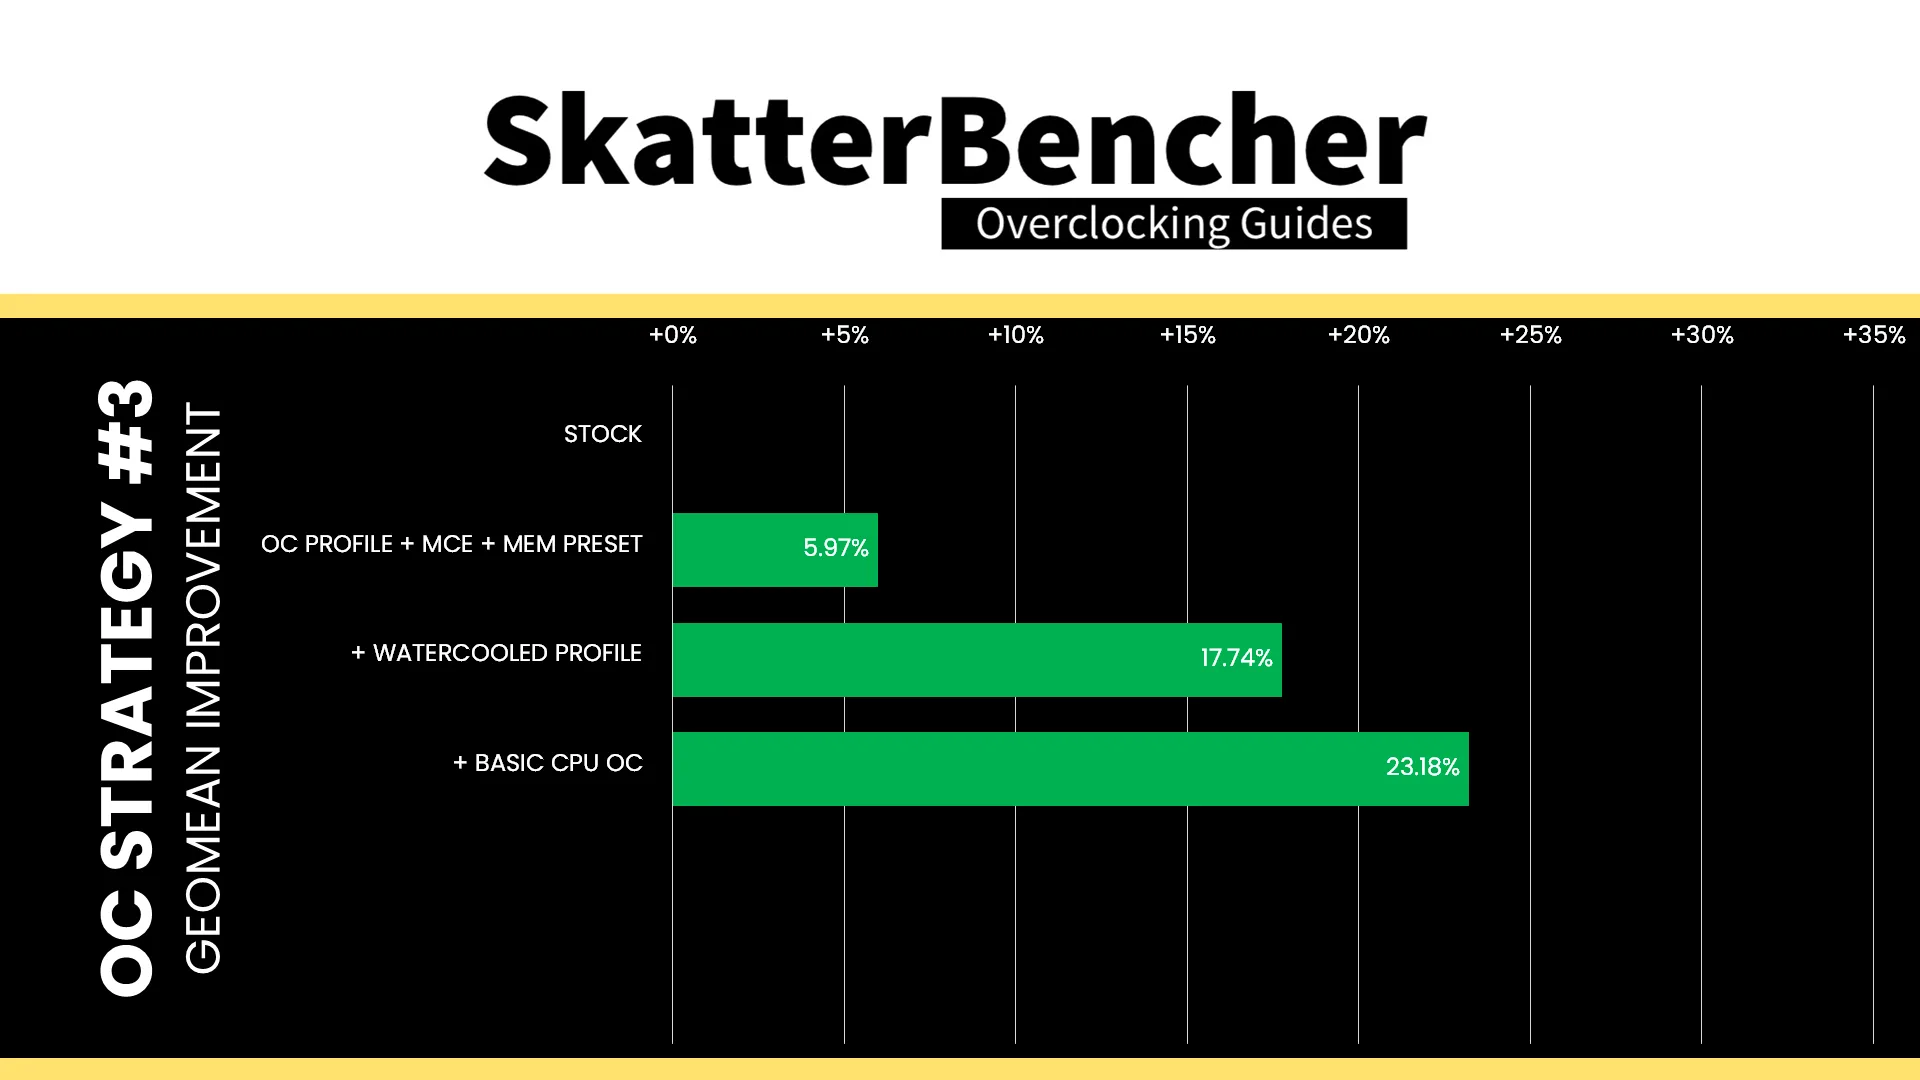
Manually fine-tuning the P-core frequency gives us a significant bump above the water-cooled oc preset we tried before, but also makes us hit the thermal limit in intense multi-core workloads. So, while the performance increases significantly in lighter workloads, we see less scaling in the more demanding workloads. The Geomean performance speedup improves by another five percentage points and we get a maximum benchmark improvement of +37.66% Corona 10.
When running the OCCT CPU AVX512 Stability Test, the average CPU core effective clock is 4374 MHz with 1.042 volts. The average CPU temperature is 103 degrees Celsius. The average system power is 1114.4 watts.
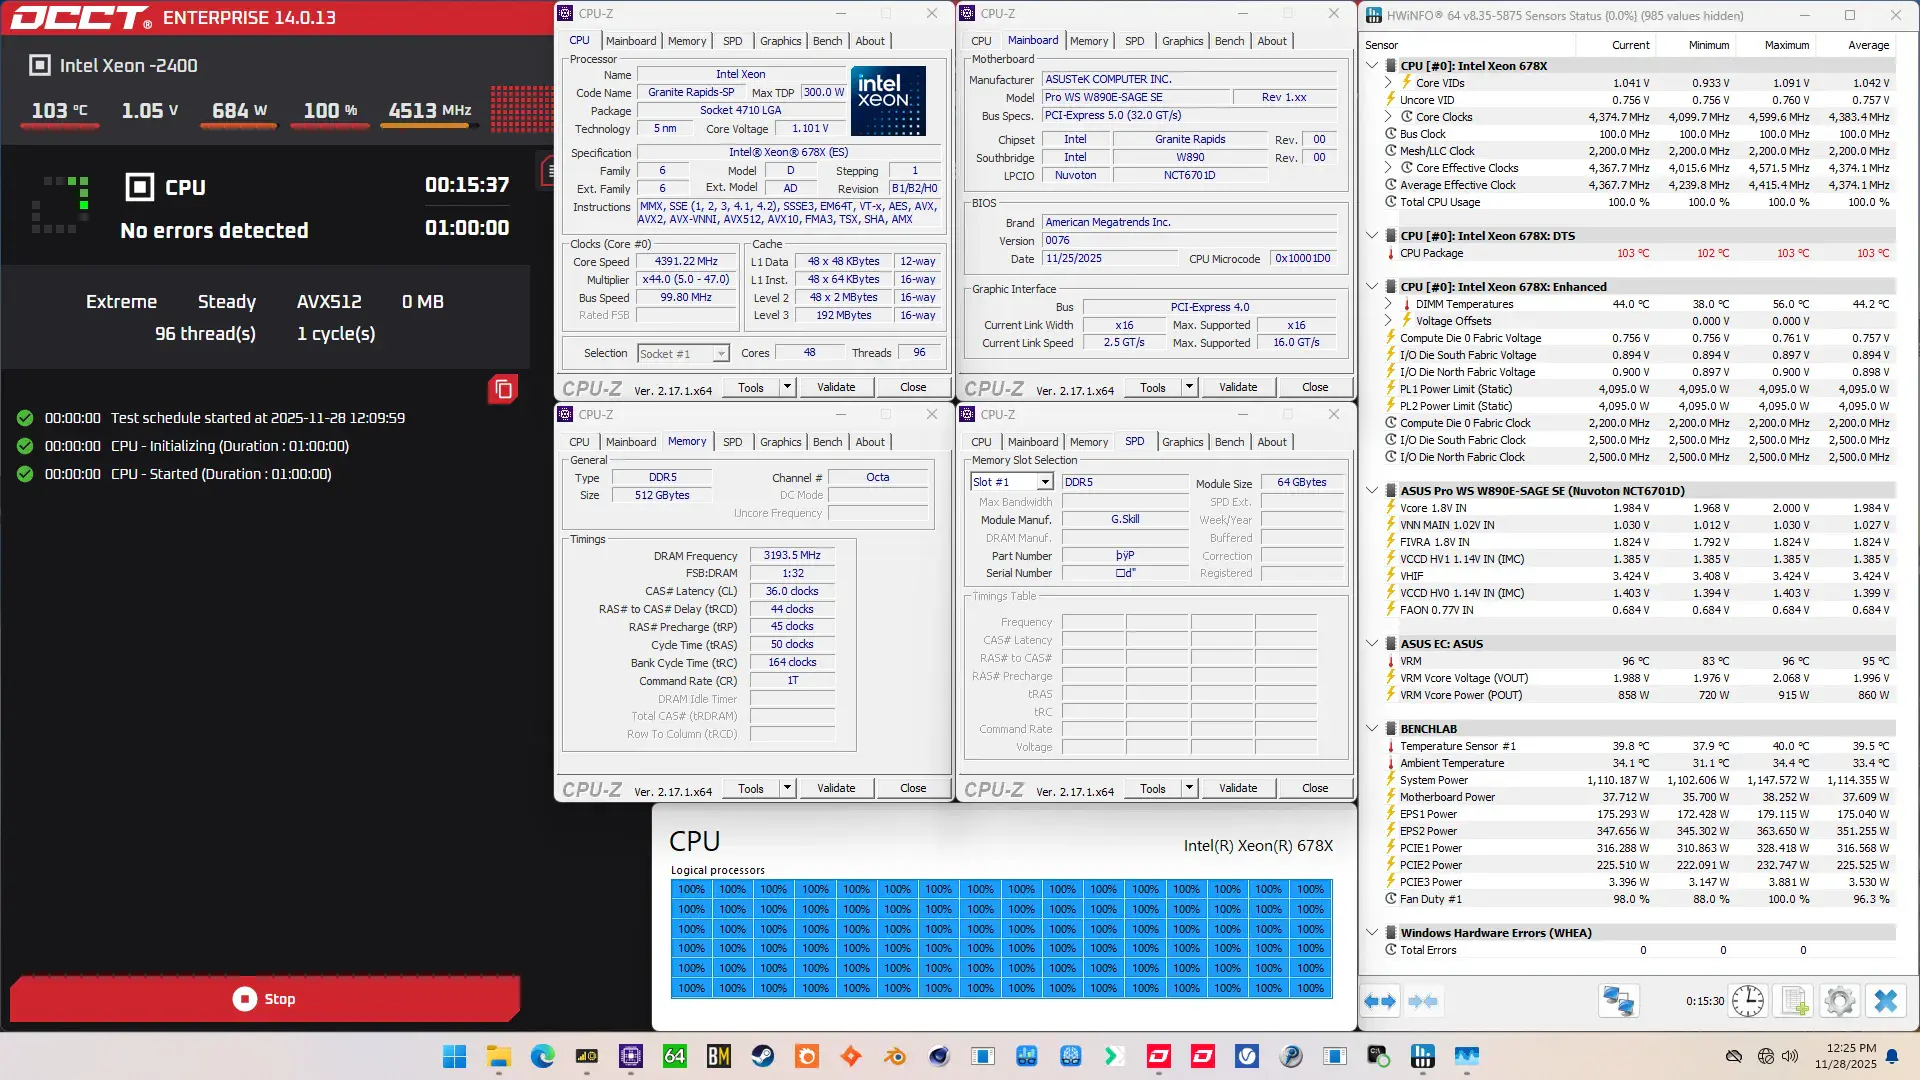
When running the OCCT CPU SSE Stability Test, the average CPU core effective clock is 4607 MHz with 1.052 volts. The average CPU temperature is 102 degrees Celsius. The average system power is 986.9 watts.

OC Strategy #4: Memory Subsystem Tuning
In our fourth overclocking strategy, we delve into tuning the data fabric and memory subsystem which consists of the compute die mesh, memory controllers, and system memory.
Granite Rapids: Mesh
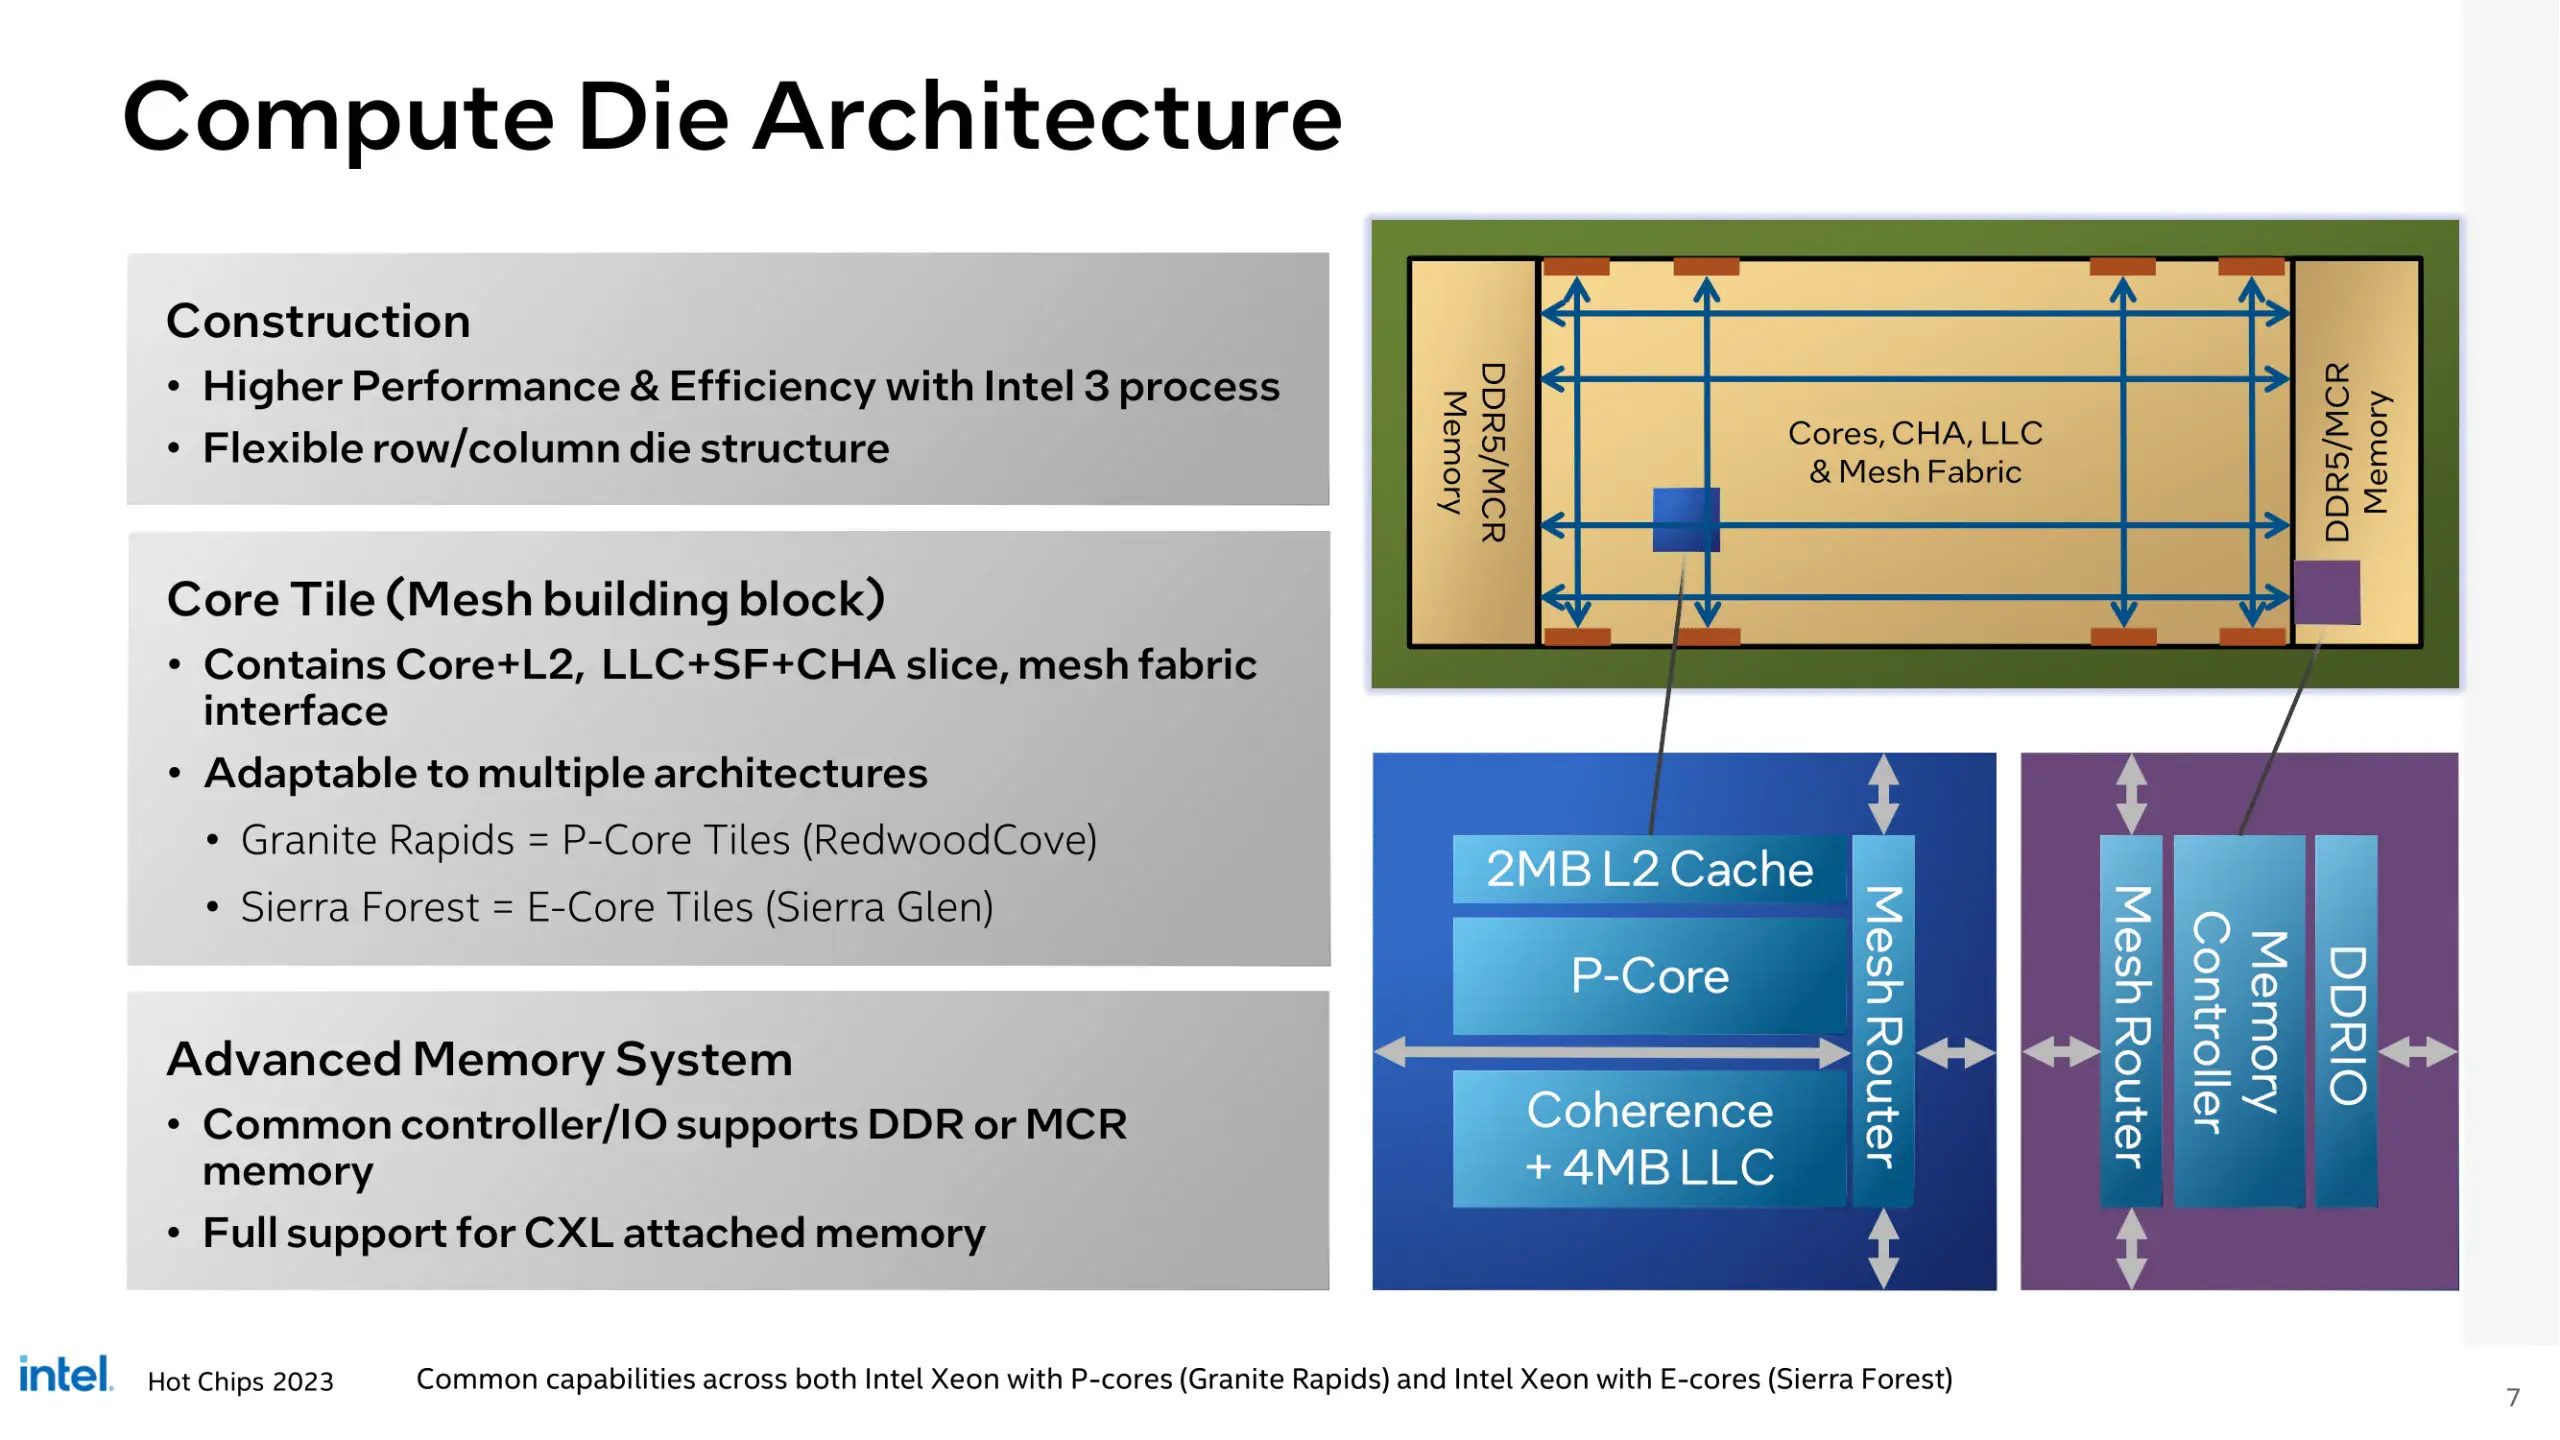
The Granite Rapids CPUs uses mesh interconnects on all tiles, including the Compute tiles and both IOD tiles. On the Compute tile, the Mesh ties together the various modules like CPU P-cores, memory controllers, last-level cache, and CHAs (Cache and Home Agent).

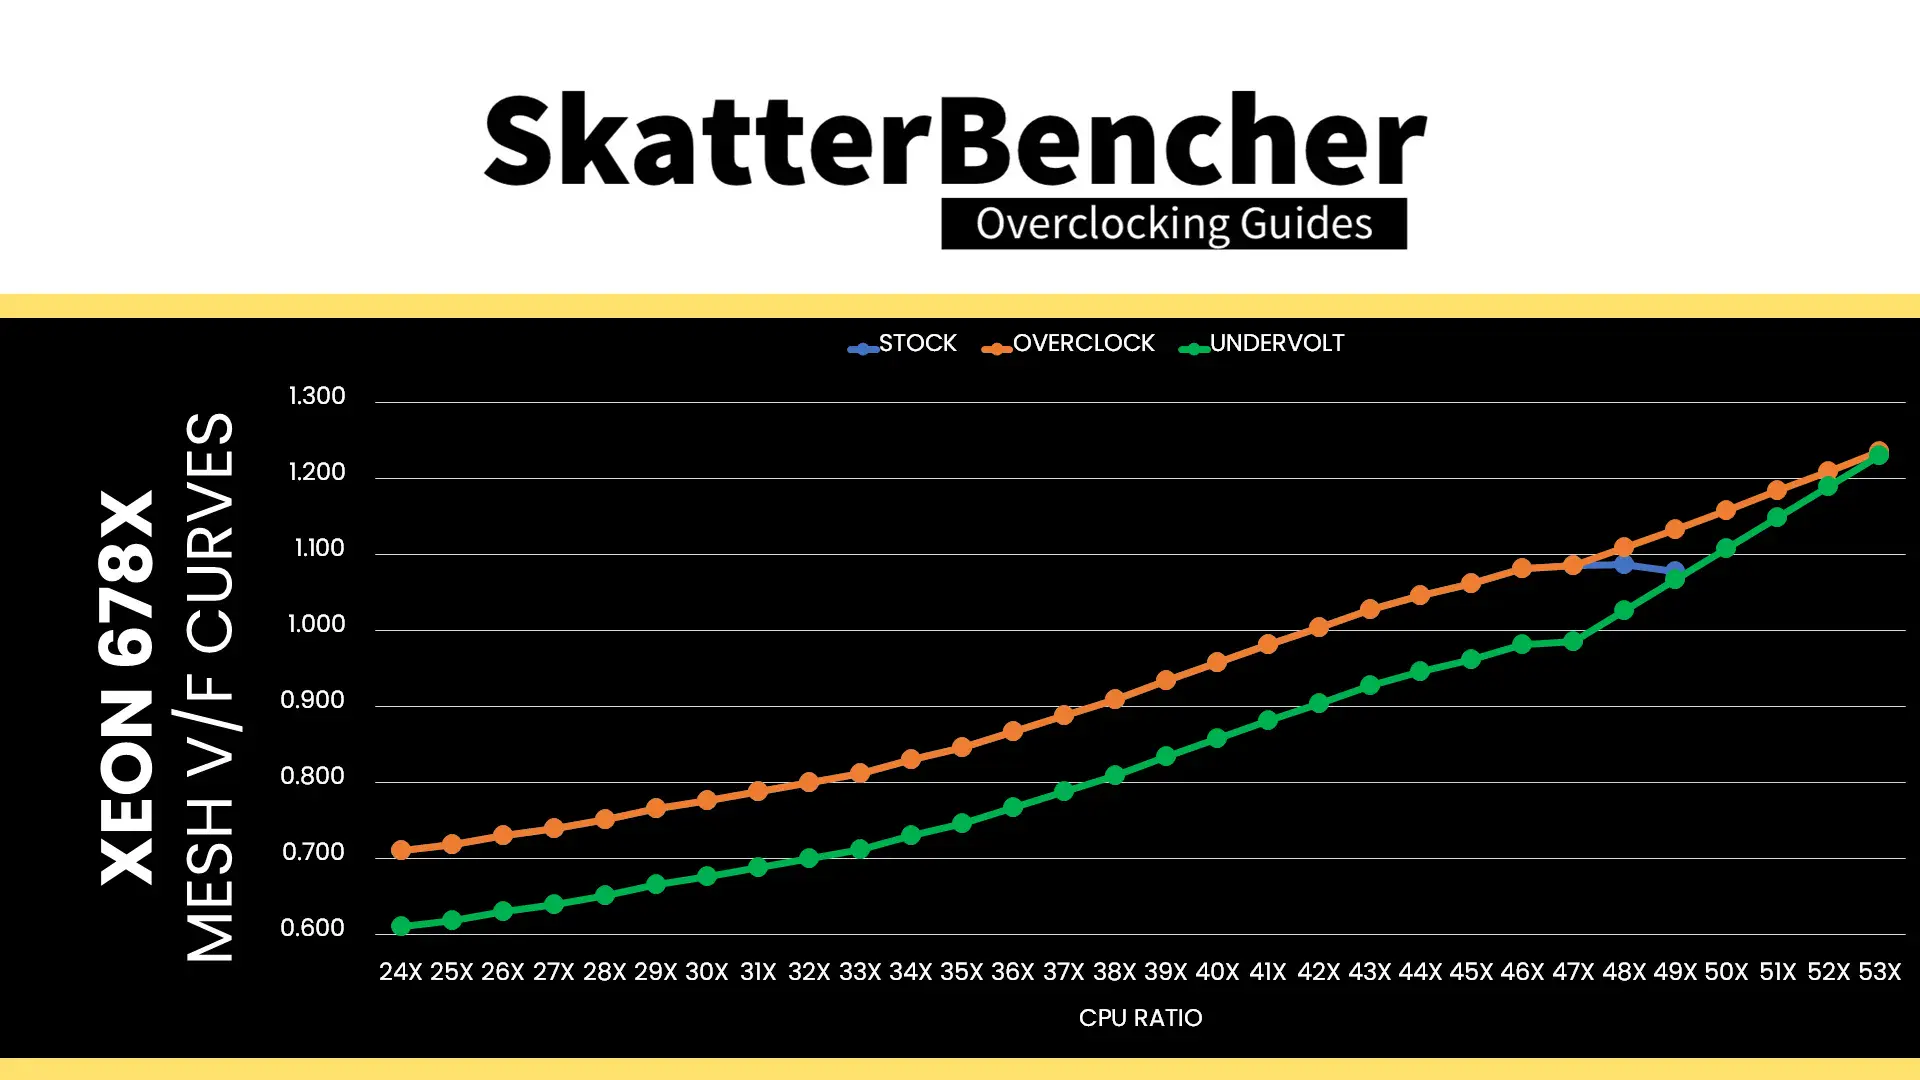
Each Mesh has its own V/F curve. Here is the Compute Mesh V/F curve for my specific Xeon 678X. The voltage is about 593 mV at 800 MHz and gradually increases to 730 mV at 2.2 GHz. As said, the IODs have their own V/F curve which is about 200 mV “worse” than the compute mesh.
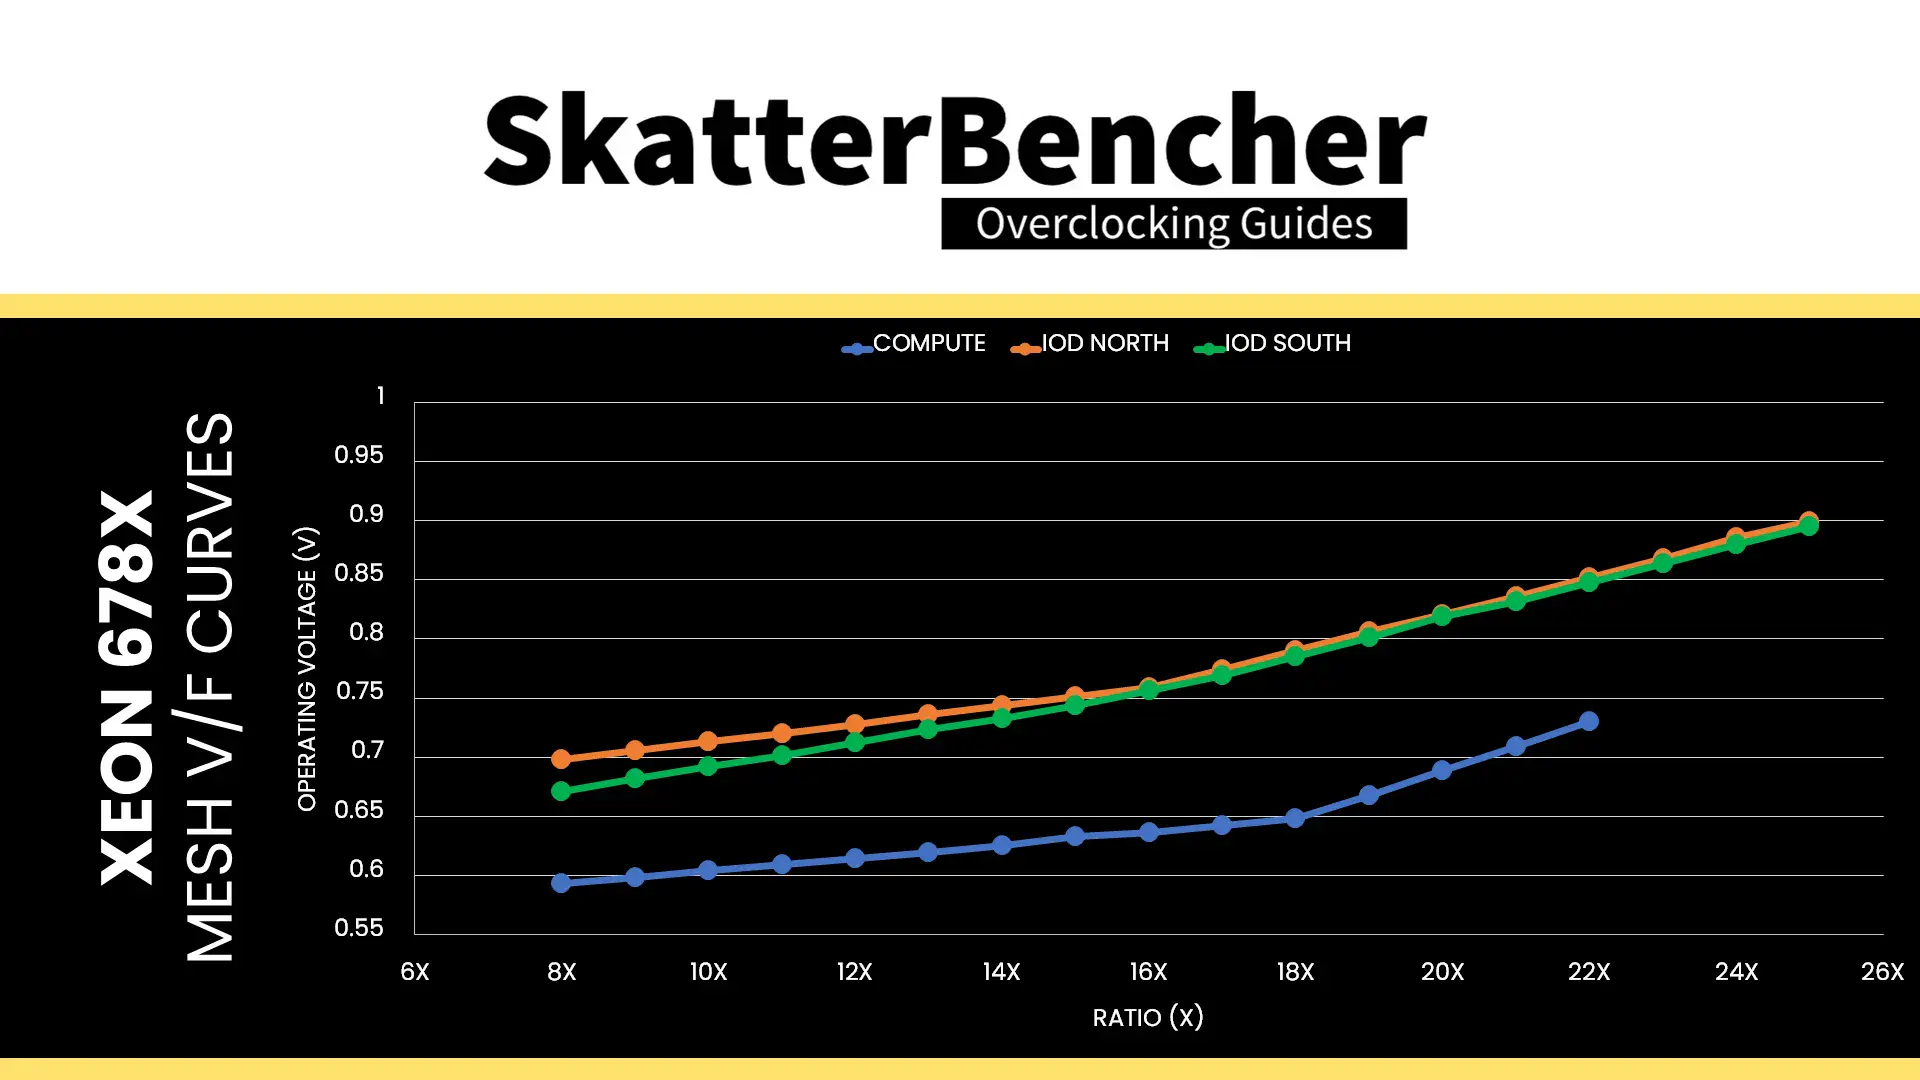
The mesh reference clock frequency is generated internally by the CPU. This clock affects all IP blocks in CPU and, unfortunately, cannot be adjusted. The reference clock is multiplied by the mesh ratio to achieve the final clock frequency. It operates independently. The default ratio is 22X, which yields a 2.2 GHz operating frequency. The Compute Mesh is entirely unlocked for overclocking. The IOD Meshes operate at 2.5 GHz by default but can’t be overclocked, unfortunately.
The voltage regulation for the mesh is more complex than mainstream platforms due to the use of FIVR. As we discussed earlier in the guide, the external VccIN motherboard voltage regulator (MBVR) provides the input voltage for individual P-cores and Mesh.
- VccCOREn is the rail powering an individual P-cores on the Compute tiles.
- VccMESH is the rail powering the Mesh on the Compute tiles.
- VccCFN is the rail powering the Mesh on the IO tiles
- VccHDC is the rail powering the cache on the Compute tiles.
- VccDDRD is the rail powering the digital part of the memory controllers on the Compute tiles
- VccHV1/2 is the rail powering the analog part of the memory controllers on the Compute tiles

Similar to the P-cores, the compute mesh voltage can be configured in adaptive and override voltage mode, each supporting additional offset as well. The specific rules governing the adaptive voltage mode which I covered at length in the previous OC Strategy also apply to the compute mesh adaptive voltage.
Granite Rapids: Memory Controller
The Granite Rapids memory controllers are integrated on the compute tiles, connected to the P-cores via the mesh interconnect.
Granite Rapids memory support comes in a variety of configurations, enabling different levels of channel count, DRAM type support, and DRAM speed.
- The UCC package for Granite Rapids-AP supports 12 memory channels (4 channels per Compute tile), both RDIMM and MRDIMM, with MRDIMM speeds up to DDR5-8800.
- The XCC package for Granite Rapids-SP supports 8 memory channels (4 channels per Compute tile), also both RDIMM and MRDIMM, but MRDIMM only up to DDR5-8000.
- The HCC package for Graphite Rapids-SP supports 8 memory channels (8 channels per Compute tile) but has split DRAM type support as only 28 core and up supports MRDIMM.
- The LCC package for Granite Rapids-SP has split memory channel support with core counts below 18 only having 4 memory channels. All SKUs support RDIMM up to DDR5-6400
Unlike other Intel DDR5 platforms, the memory controller frequency is fixed in the sense that you can only run gear 4 mode with R-DIMM and gear 8 mode with MR-DIMM.
In terms of memory overclocking, not much news as it’s the same as previous RDIMM platforms.
The voltage regulation for the memory controller is more complex than mainstream platforms due to the use of FIVR. As we discussed earlier in the guide, the external VccIN motherboard voltage regulator (MBVR) provides the input voltage for various IP blocks in the compute tile.
- VccCOREn is the rail powering an individual P-cores on the Compute tiles.
- VccMESH is the rail powering the Mesh on the Compute tiles.
- VccCFN is the rail powering the Mesh on the IO tiles
- VccHDC is the rail powering the cache on the Compute tiles.
- VccDDRD is the rail powering the digital part of the memory controllers on the Compute tiles
- VccHV1/2 is the rail powering the analog part of the memory controllers on the Compute tiles
System Memory Tuning
Usually for the DRAM tuning section I rely on the ASUS Memory Presets. Unfortunately, there’s no preset available for my 8x64GB configuration. Luckily, I got this particular kit on loan from someone who had already tried to squeeze the maximum performance and they graciously shared the configuration.
Here is the tuned memory configuration:
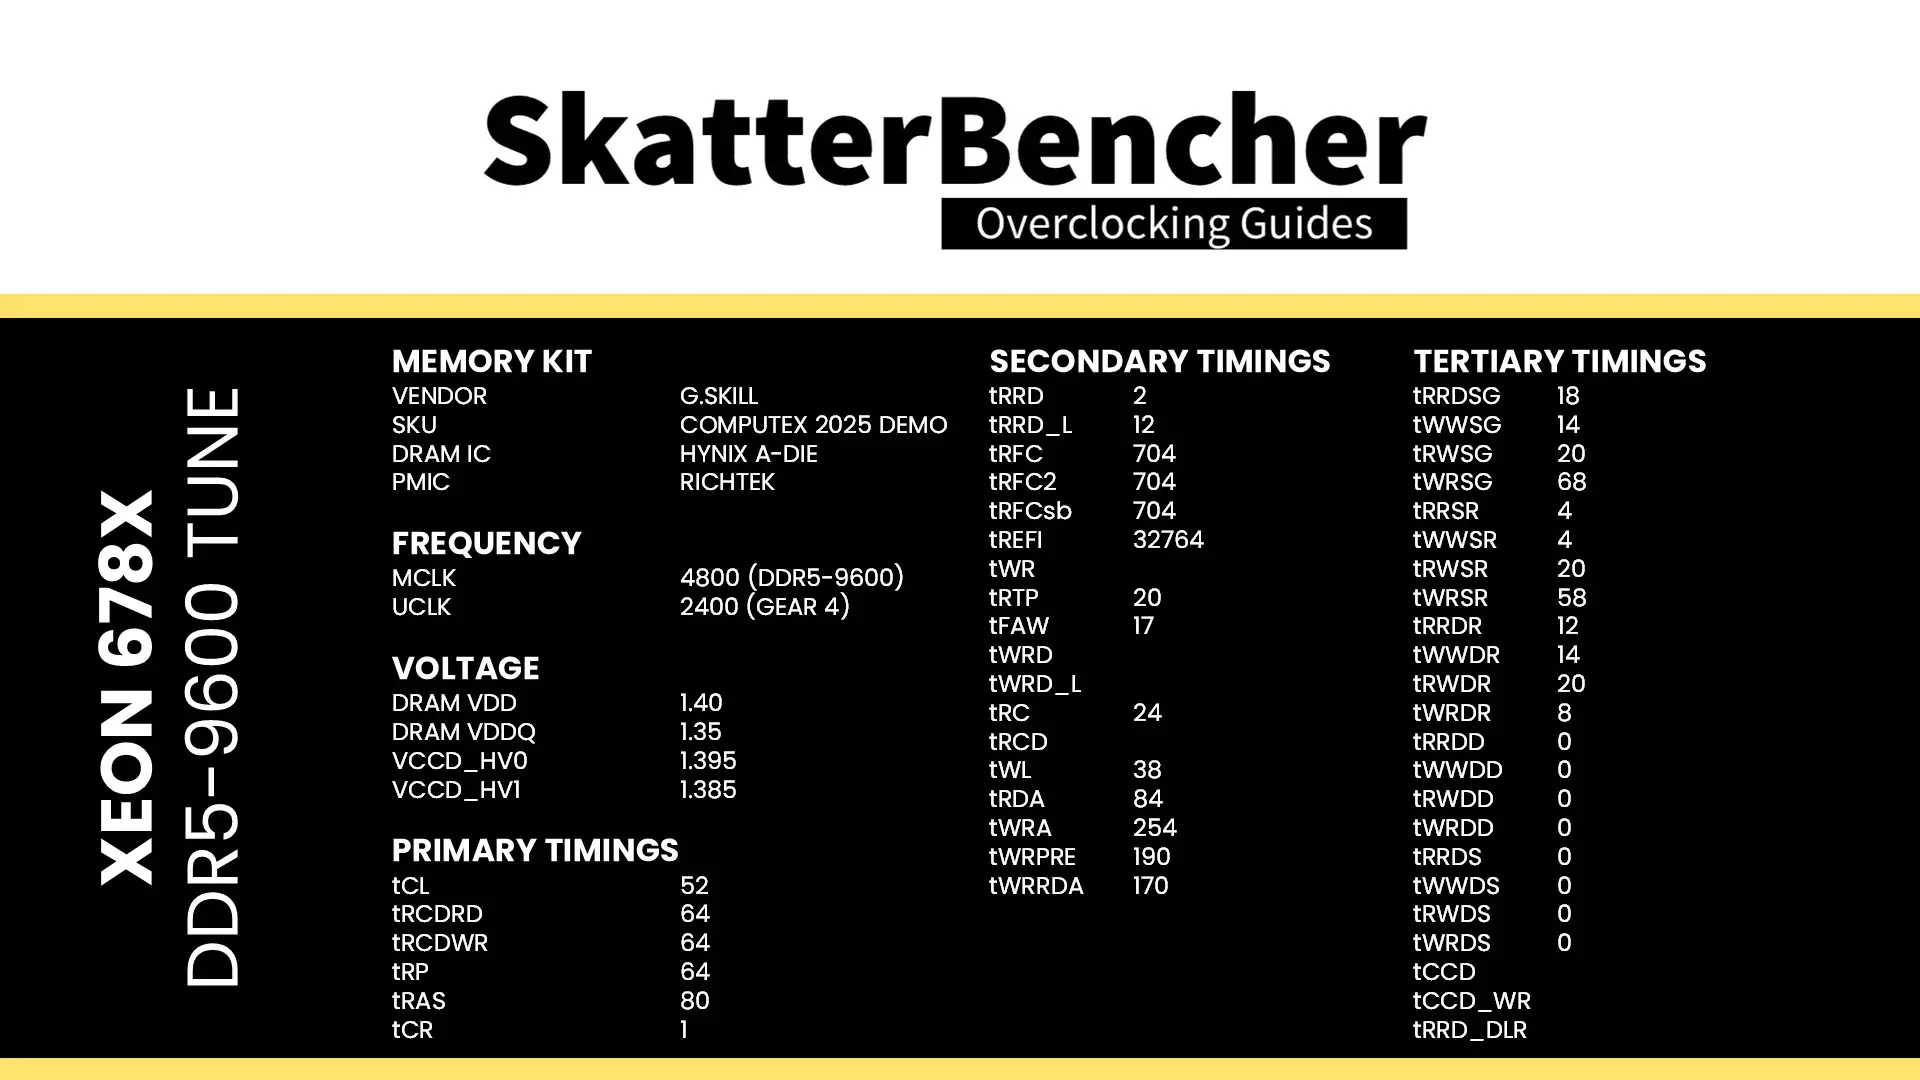
This configuration was stable in a quick OCCT Memory Stress Test but unfortunately I didn’t have time to run it for a longer period of time.
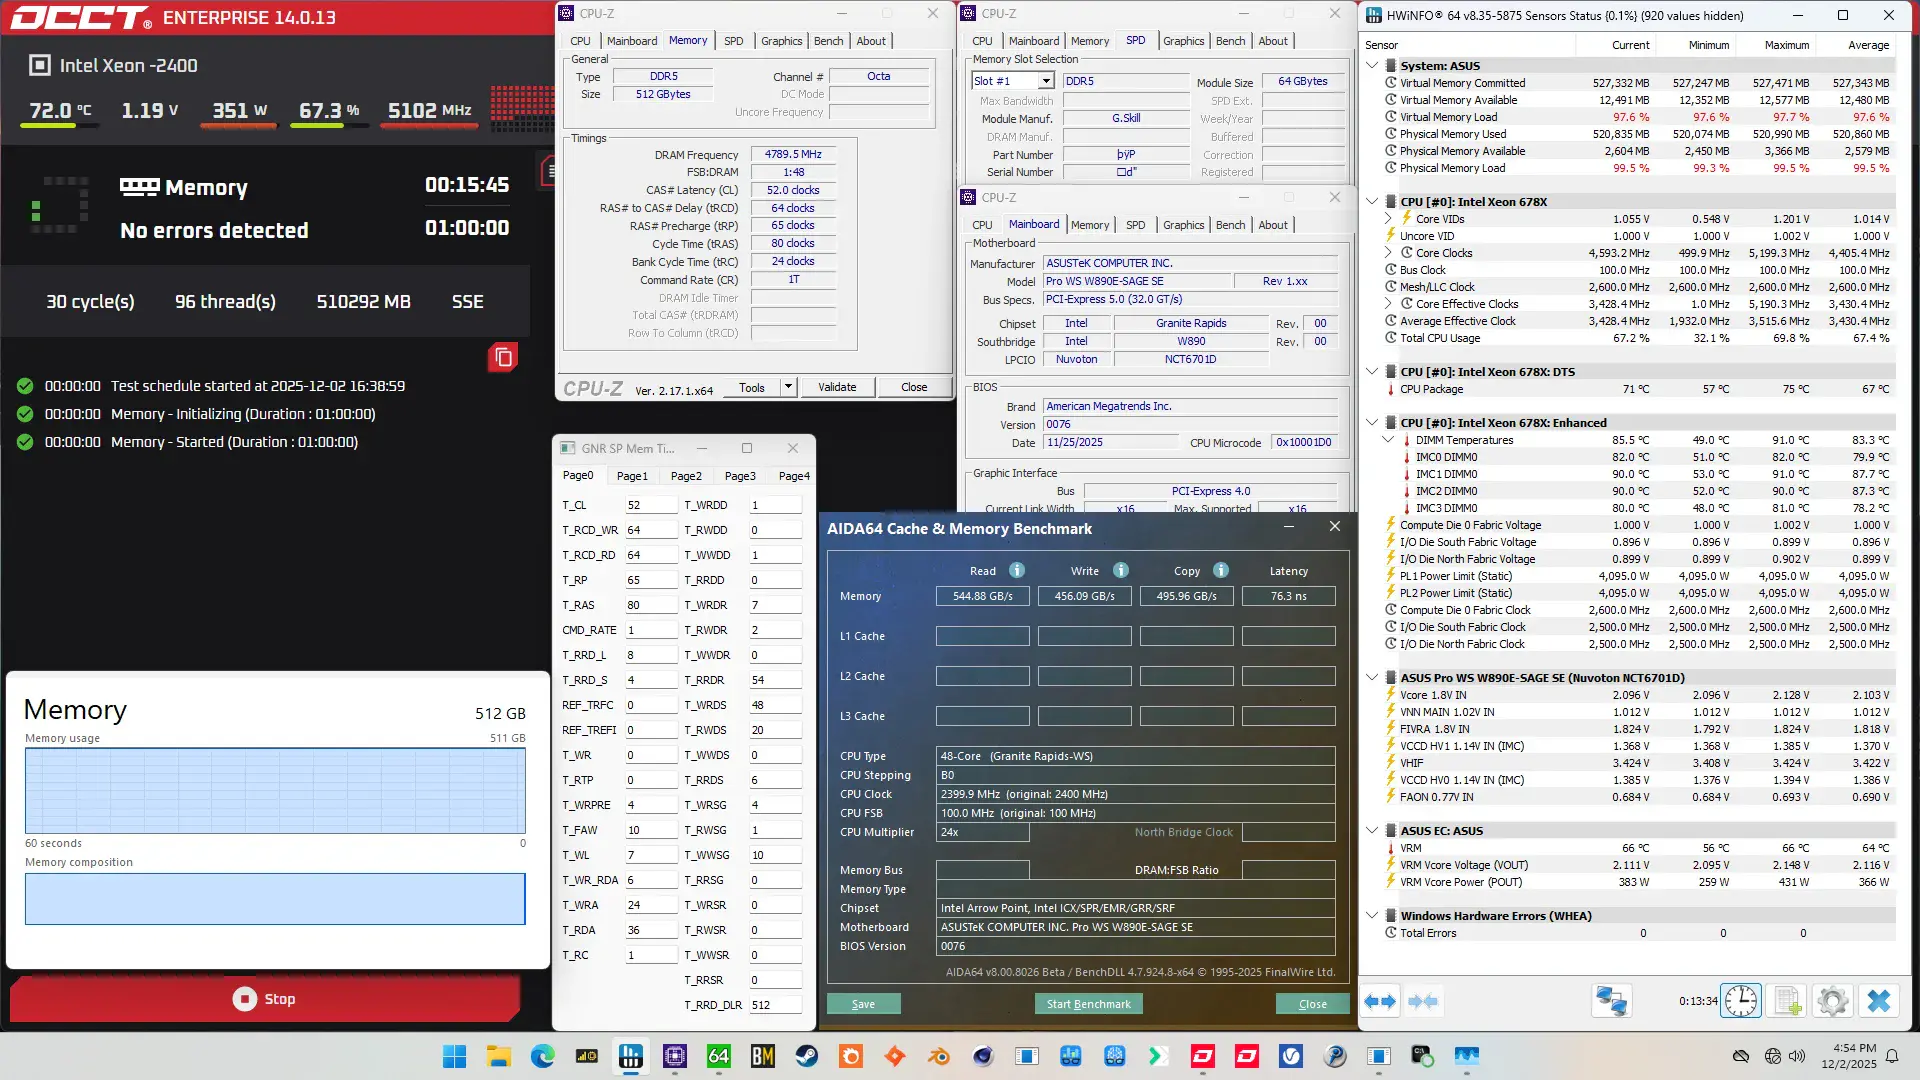
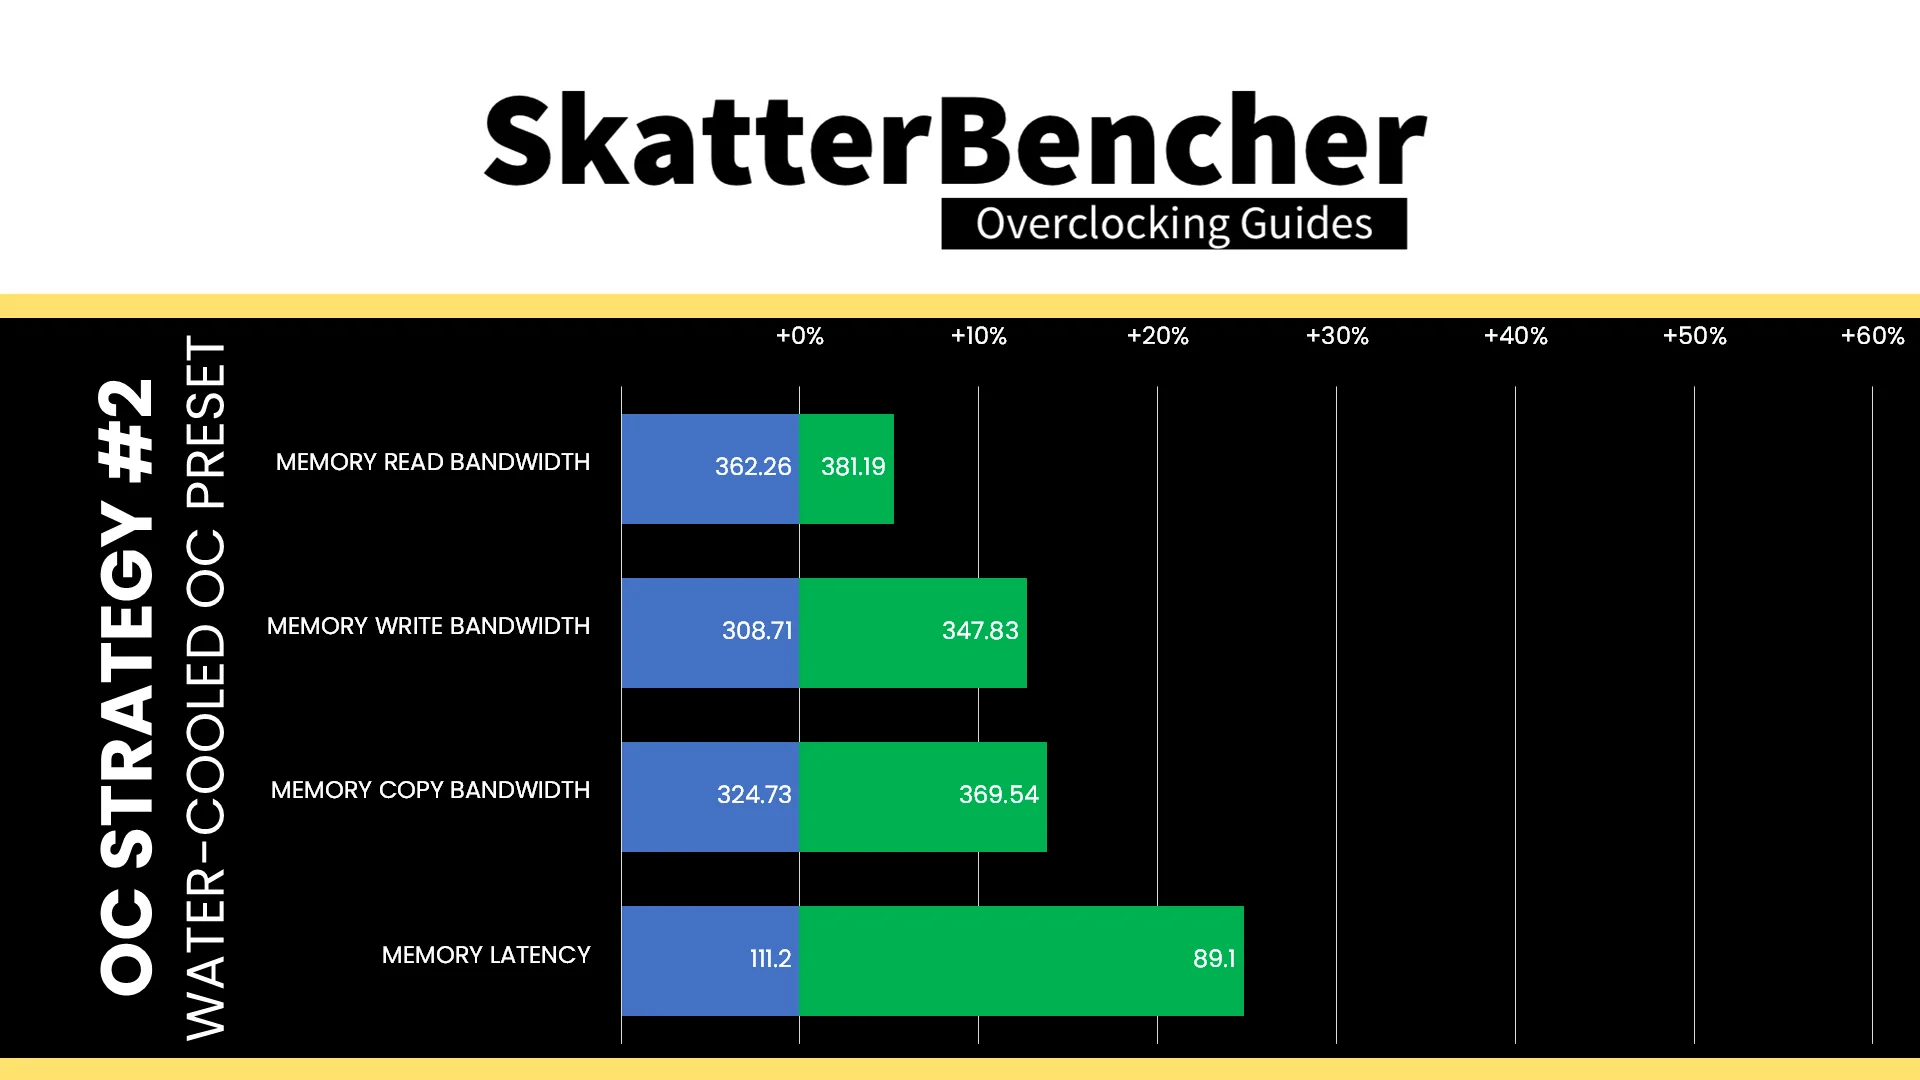
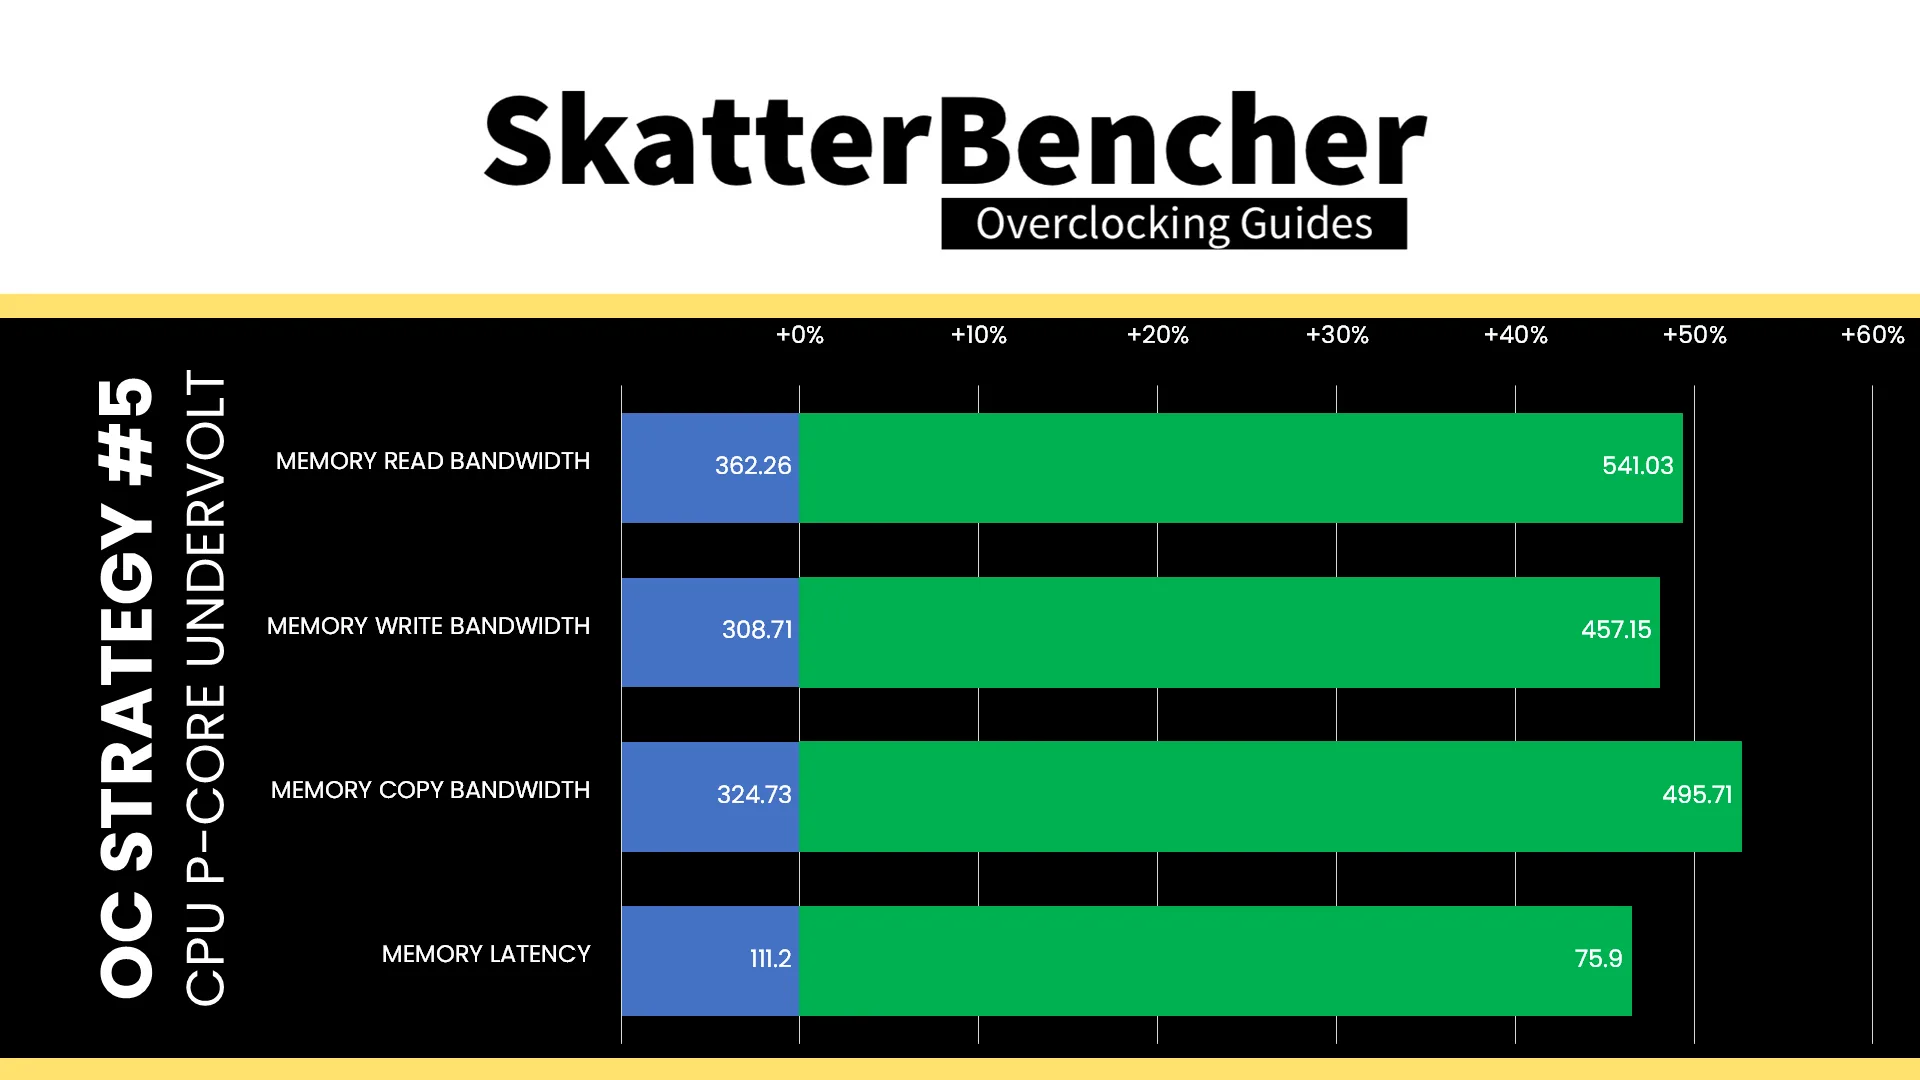
Here you can see the memory configuration. We’re running the 512GB 8-channel memory kit at DDR5-9600 (!) with reasonably tuned secondary and tertiary sub-timings. Not only does that push us over 500 GB/s read bandwidth, but we also see sub-80 nanosecond latency. Impressive!
BIOS Settings & Benchmark Results
Upon entering the BIOS
- Go to the Ai Tweaker menu
- Set Performance Preferences to ASUS Advanced OC Profile
- Set ASUS MultiCore Enhancement to Enabled – Remove All limits
- Set CPU Core Ratio to By Core Usage
- Enter the By Core Usage submenu
- Set Turbo Ratio Limit 1 to 4 to 53
- Set Turbo Ratio Limit 5 and 6 to 52
- Set Turbo Ratio Limit 7 and 8 to 51
- Leave the By Core Usage submenu
- Set DRAM Frequency to DDR5-9600
- Set Min and Max Compute Die0 Mesh Ratio to 26
- Set Min and Max IOD South and North Nesh Ratio to 25
- Enter the DRAM Timing Control submenu
- Set timings accordingly
- Enter the Max Voltage Limits submenu
- Set Compute Die0 Mesh Max Voltage limits to 1.10
- Leave the Max Voltage Limits submenu
- Set Compute Die0 Core Voltage to Adaptive Mode
- Set Additional Turbo Mode Voltage to 1.235
- Set Compute Die0 Mesh Voltage to Adaptive Mode
- Set Additional Turbo Mode Voltage to 1.00
- Set Vcore 1.8V IN to Manual Mode
- Set Vcore 1.8V IN Override to 2.20
Then save and exit the BIOS.
We re-ran the benchmarks and checked the performance increase compared to the default operation.

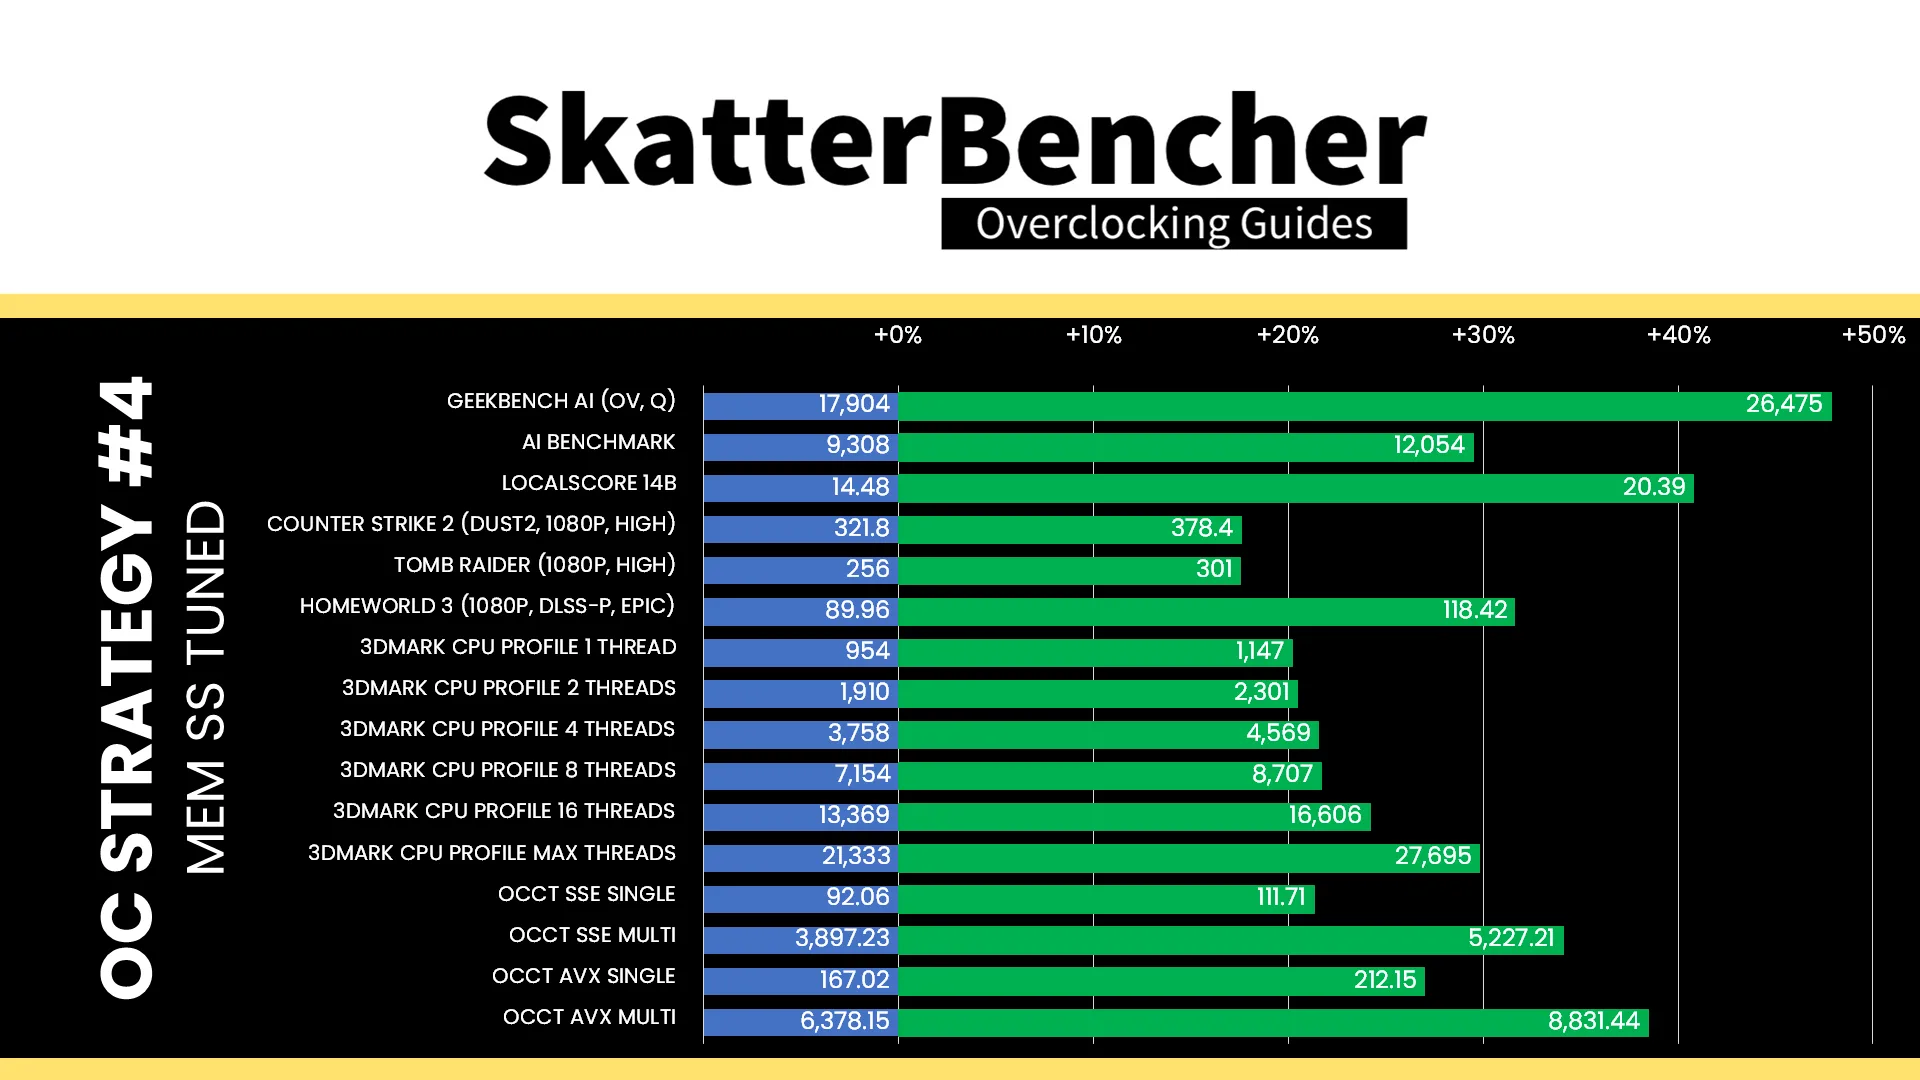

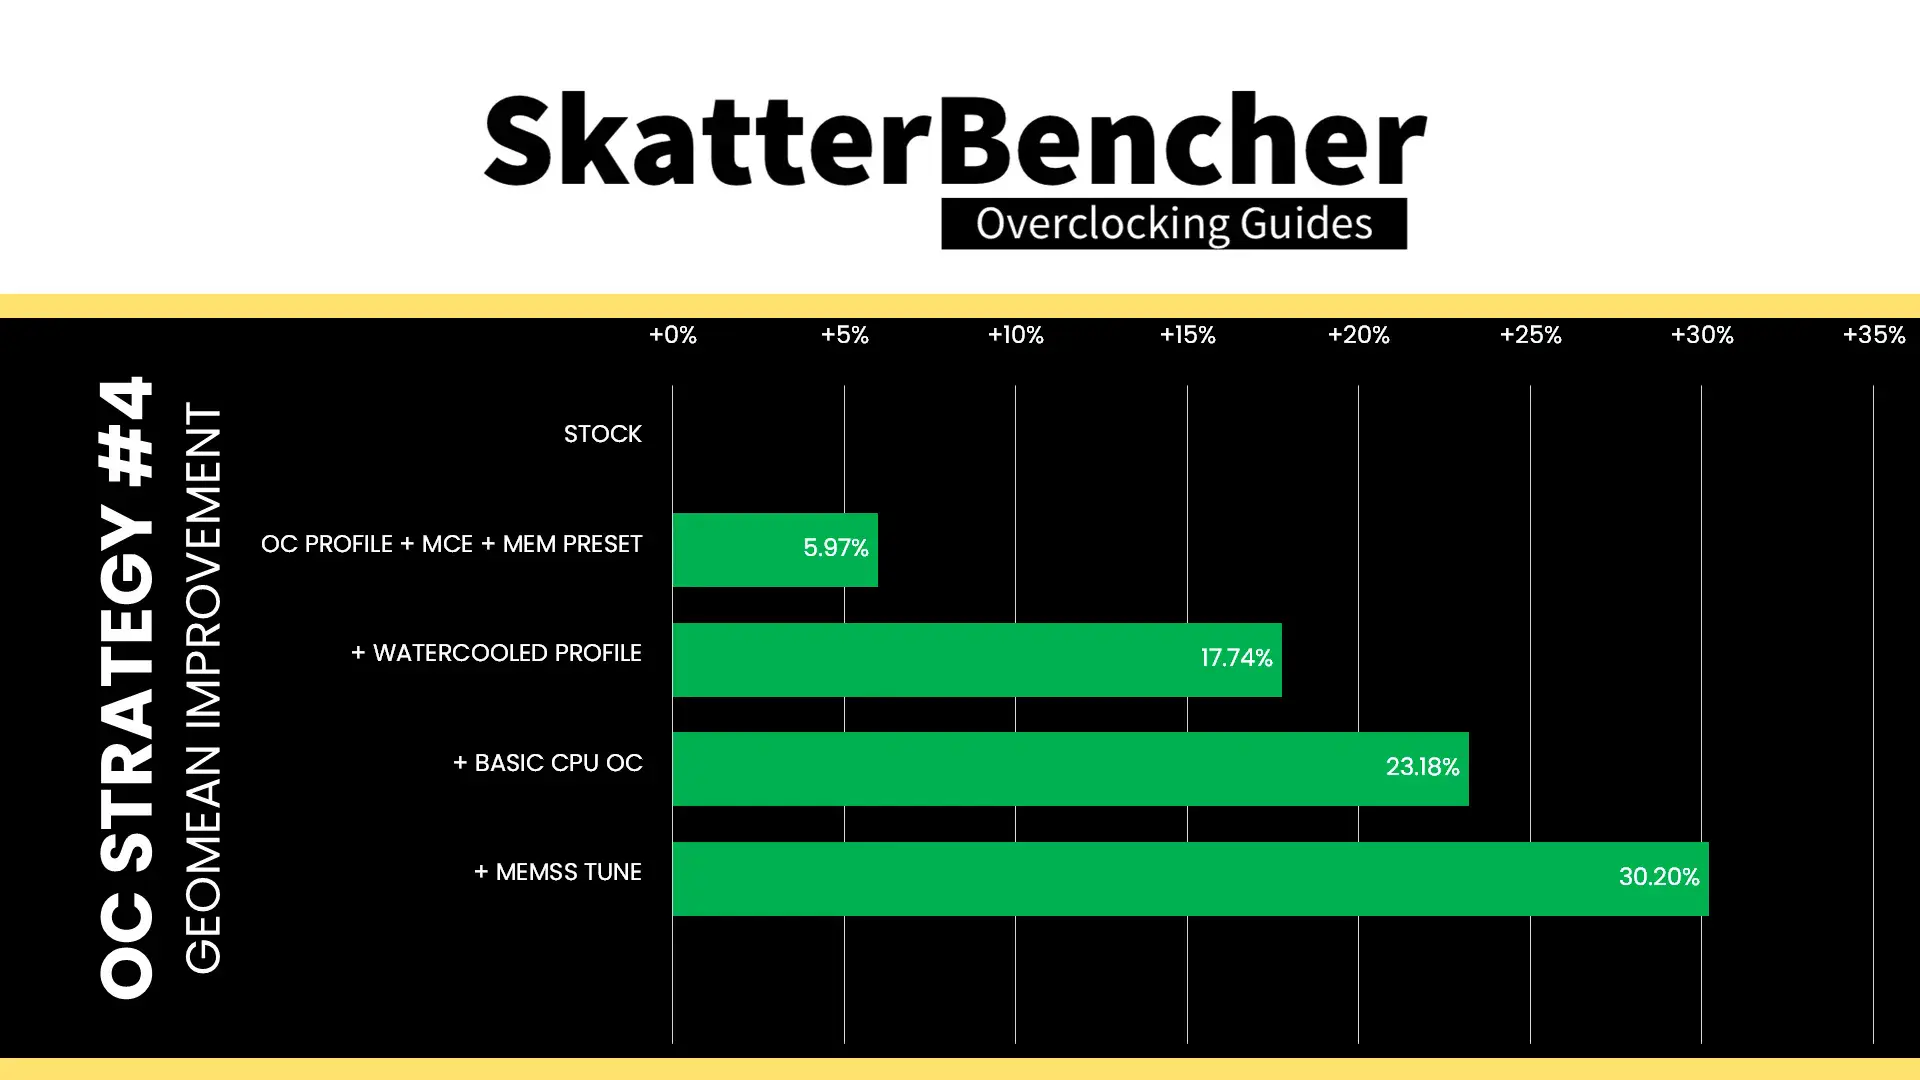
As we’re used to now even on mainstream desktop: optimizing the memory subsystem can have a significant impact on workload performance. That’s no different with this workstation platform as we see a performance uplift across the board. The geomean performance speedup improves by another seven percentage points and we get a maximum benchmark improvement of +47.87% in Geekbench AI.
When running the OCCT CPU AVX512 Stability Test, the average CPU core effective clock is 4303 MHz with 1.029 volts. The average CPU temperature is 103 degrees Celsius. The average system power is 1129.0 watts.

When running the OCCT CPU SSE Stability Test, the average CPU core effective clock is 4567 MHz with 1.042 volts. The average CPU temperature is 103 degrees Celsius. The average system power is 1009.7 watts.

OC Strategy #5: Undervolt
In our final overclocking strategy, we delve into undervolting to reduce the thermal throttling reducing performance in intense multi-threaded workloads. Ironically, that means we also have to increase the voltage limit.
Granite Rapids: Adaptive Voltage Mode
As we discussed earlier in the guide, the Granite Rapids overclocking toolkit lacks some of the advanced voltage tuning tools like V/F points. However, the adaptive voltage technology is pretty flexible in that we can set both a target voltage as well as use a voltage offset. So, we can use voltage offset to undervolt.
The process is pretty straight-forward: you can configure a negative voltage offset for each of the individual P-cores or configure a global adaptive voltage offset to adjust them all at once. The voltage offset is applied across the entire V/F curve, from idling at 800 MHz to boosting at over 5 GHz. That means stress-testing can become a little tricky since you need to verify stability across light and heavy workloads.
The ASUS water-cooled oc presets applies a negative 20 mV voltage offset, however I was able to set it to 100 mV. The main upside of the undervolt is that we’re using less voltage in the heavy all-core stress test, meaning the frequency will boost higher.
For example, in our previous OC Strategy we hit TjMax in the AVX-512 workload with 1.042V, which throttles the CPU cores from the maximum allowed 5.1 GHz when all cores are active to 4374 MHz average effective clock frequency. That’s a reduction of 700 MHz but still 1 GHz higher than default frequencies with power unlocked like I used in OC Strategy #1.
With the 100mV negative voltage offset, we still hit TjMax in the AVX-512 workload but at 4610 MHz instead. That’s an improvement of almost 250 MHz.
Granite Rapids: Undervolt Protection
Intel introduced an Undervolt Protection feature on 12th gen processors to mitigate Plundervolt exploits.
In essence, the feature disables at runtime undervolting when core isolation memory integrity or Hyper-V is enabled and must be enabled by default on all motherboards. Unfortunately, that makes it difficult to test undervolting headroom at runtime because the lowest allowed voltage is defined by the BIOS configuration.
The option can be disabled in the BIOS but it’s possible tuning tools won’t run unless Undervolt Protection is enabled. Also, if you set an override voltage in the BIOS and undervolt protection is enabled, then you can’t switch back to adaptive mode in the operating system.
Setting an undervolt in the BIOS is entirely unaffected by this feature, however. So, you can still try out the undervolting headroom by configuring it there.
Granite Rapids: Voltage Limits
To safeguard the processor, since Arrow Lake Intel imposes strict voltage limits for several IP blocks. This voltage limit effectively prevents the cores from requesting a higher voltage from the PCU.
By default, the voltage limit for the IP blocks is approximately 200mV above the default voltage, where for the P-cores it’s the lower P0 voltage. Then, you can increase the maximum voltage by another 100 mV.
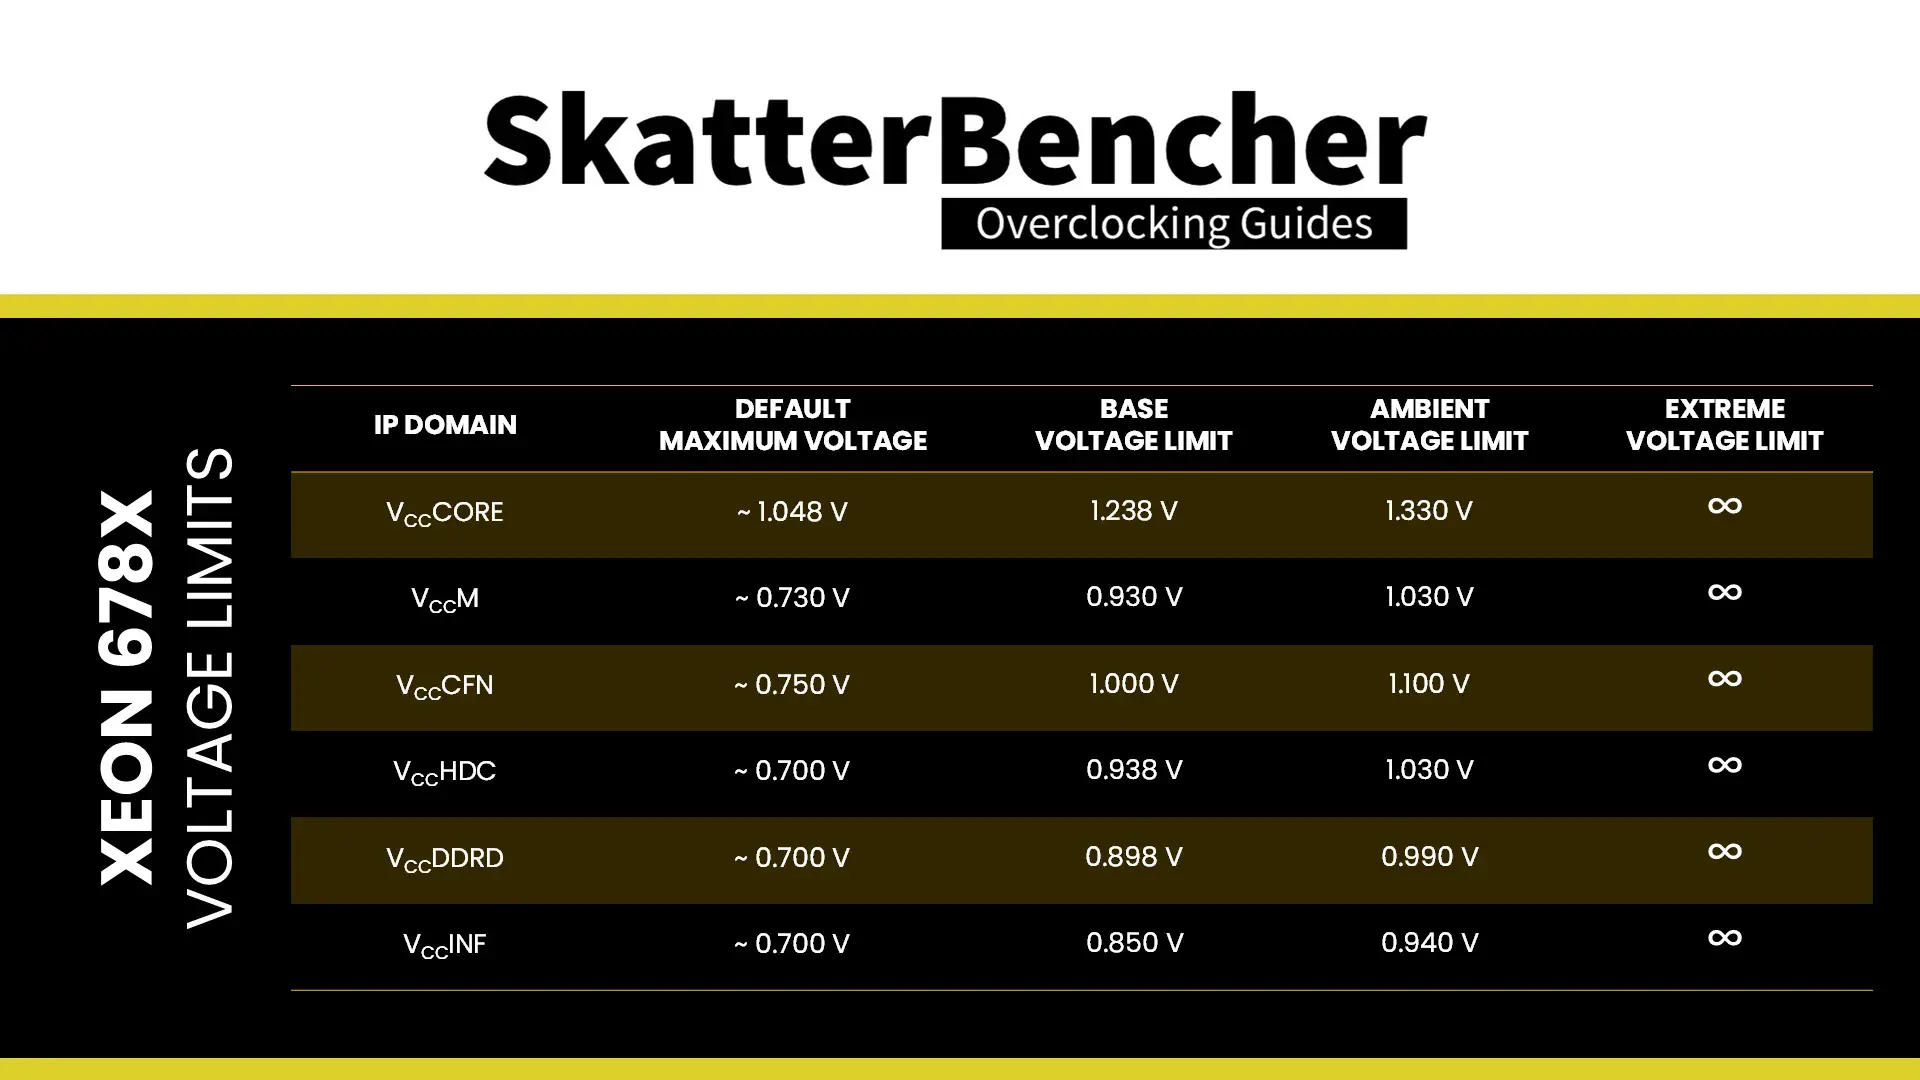
If you try setting the limit above the approved limit, the PCU will automatically adjust it to the highest allowed limit. If you disable voltage limits and the temperature is above 10 degrees Celsius, the CPU will operate in “safe mode” and limit the frequency to 400 MHz.
The voltage limit is relevant for our undervolting process because we need to increase the P-core voltage above the voltage limit to account for the negative offset.
BIOS Settings & Benchmark Results
Upon entering the BIOS
- Go to the Ai Tweaker menu
- Set Performance Preferences to ASUS Advanced OC Profile
- Set ASUS MultiCore Enhancement to Enabled – Remove All limits
- Set CPU Core Ratio to By Core Usage
- Enter the By Core Usage submenu
- Set Turbo Ratio Limit 1 to 4 to 53
- Set Turbo Ratio Limit 5 and 6 to 52
- Set Turbo Ratio Limit 7 and 8 to 51
- Leave the By Core Usage submenu
- Set DRAM Frequency to DDR5-9600
- Set Min and Max Compute Die0 Mesh Ratio to 26
- Set Min and Max IOD South and North Mesh Ratio to 25
- Enter the DRAM Timing Control submenu
- Set timings according to overview
- Enter the Max Voltage Limits submenu
- Set Compute Die0 Core Max Voltage limits to 1.35
- Set Compute Die0 Mesh Max Voltage limits to 1.10
- Leave the Max Voltage Limits submenu
- Set Compute Die0 Core Voltage to Adaptive Mode
- Set Additional Turbo Mode Voltage to 1.33
- Set Offset Mode Sign to –
- Set Offset Voltage to 0.1
- Set Compute Die0 Mesh Voltage to Adaptive Mode
- Set Additional Turbo Mode Voltage to 1.00
- Set Vcore 1.8V IN to Manual Mode
- Set Vcore 1.8V IN Override to 2.20
Then save and exit the BIOS.
We re-ran the benchmarks and checked the performance increase compared to the default operation.
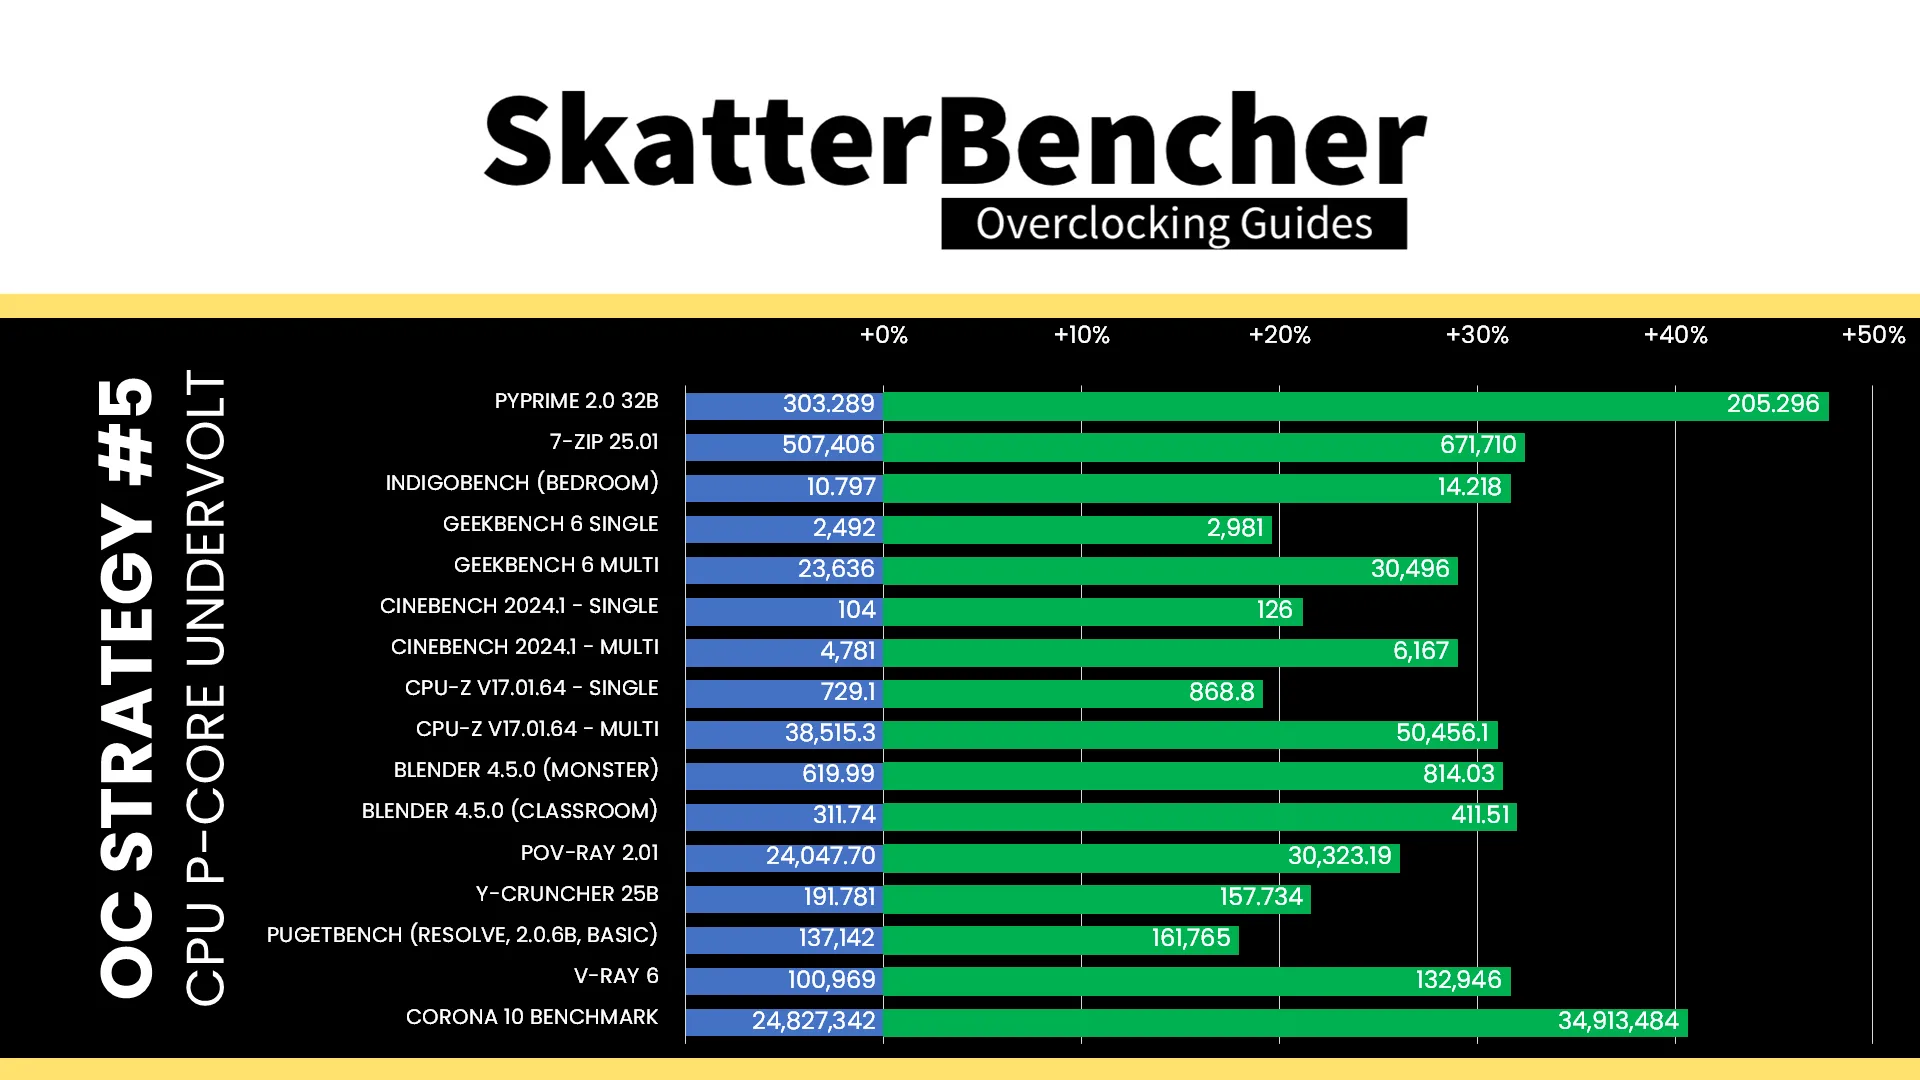
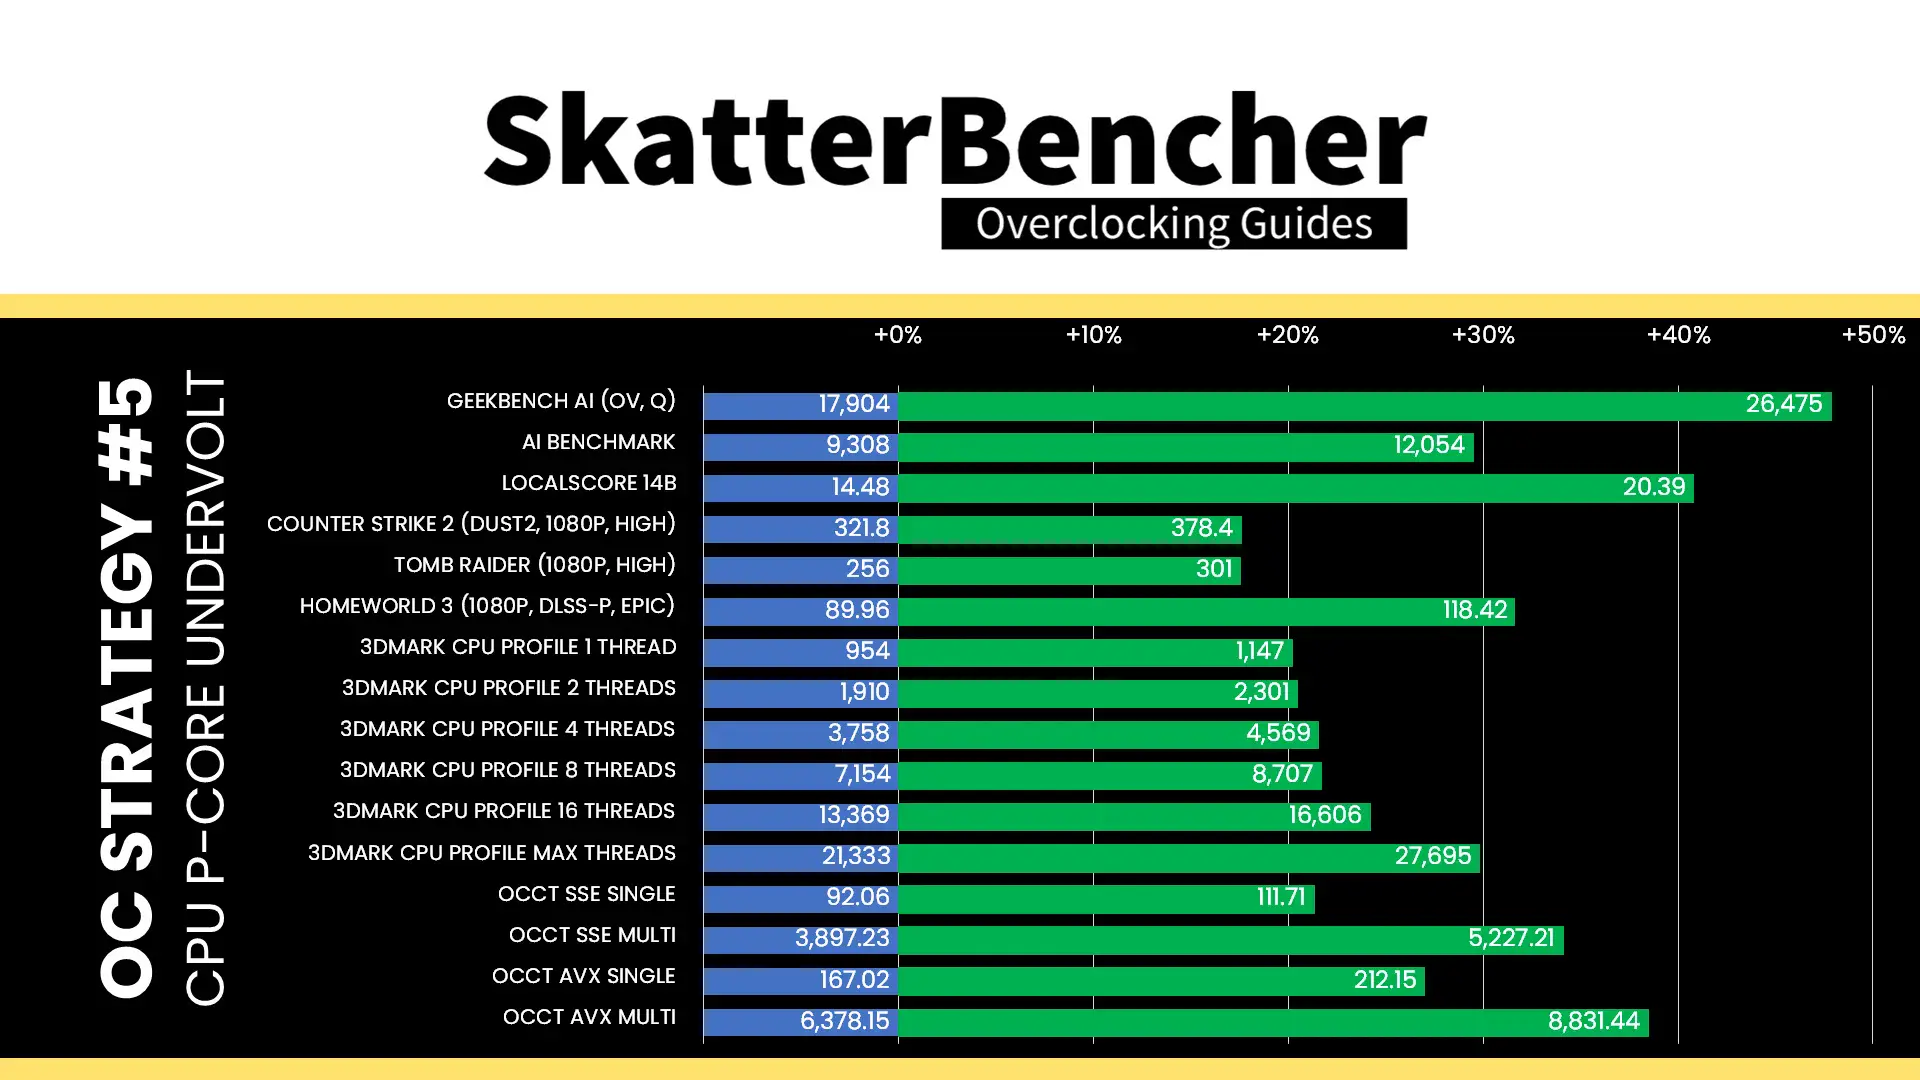
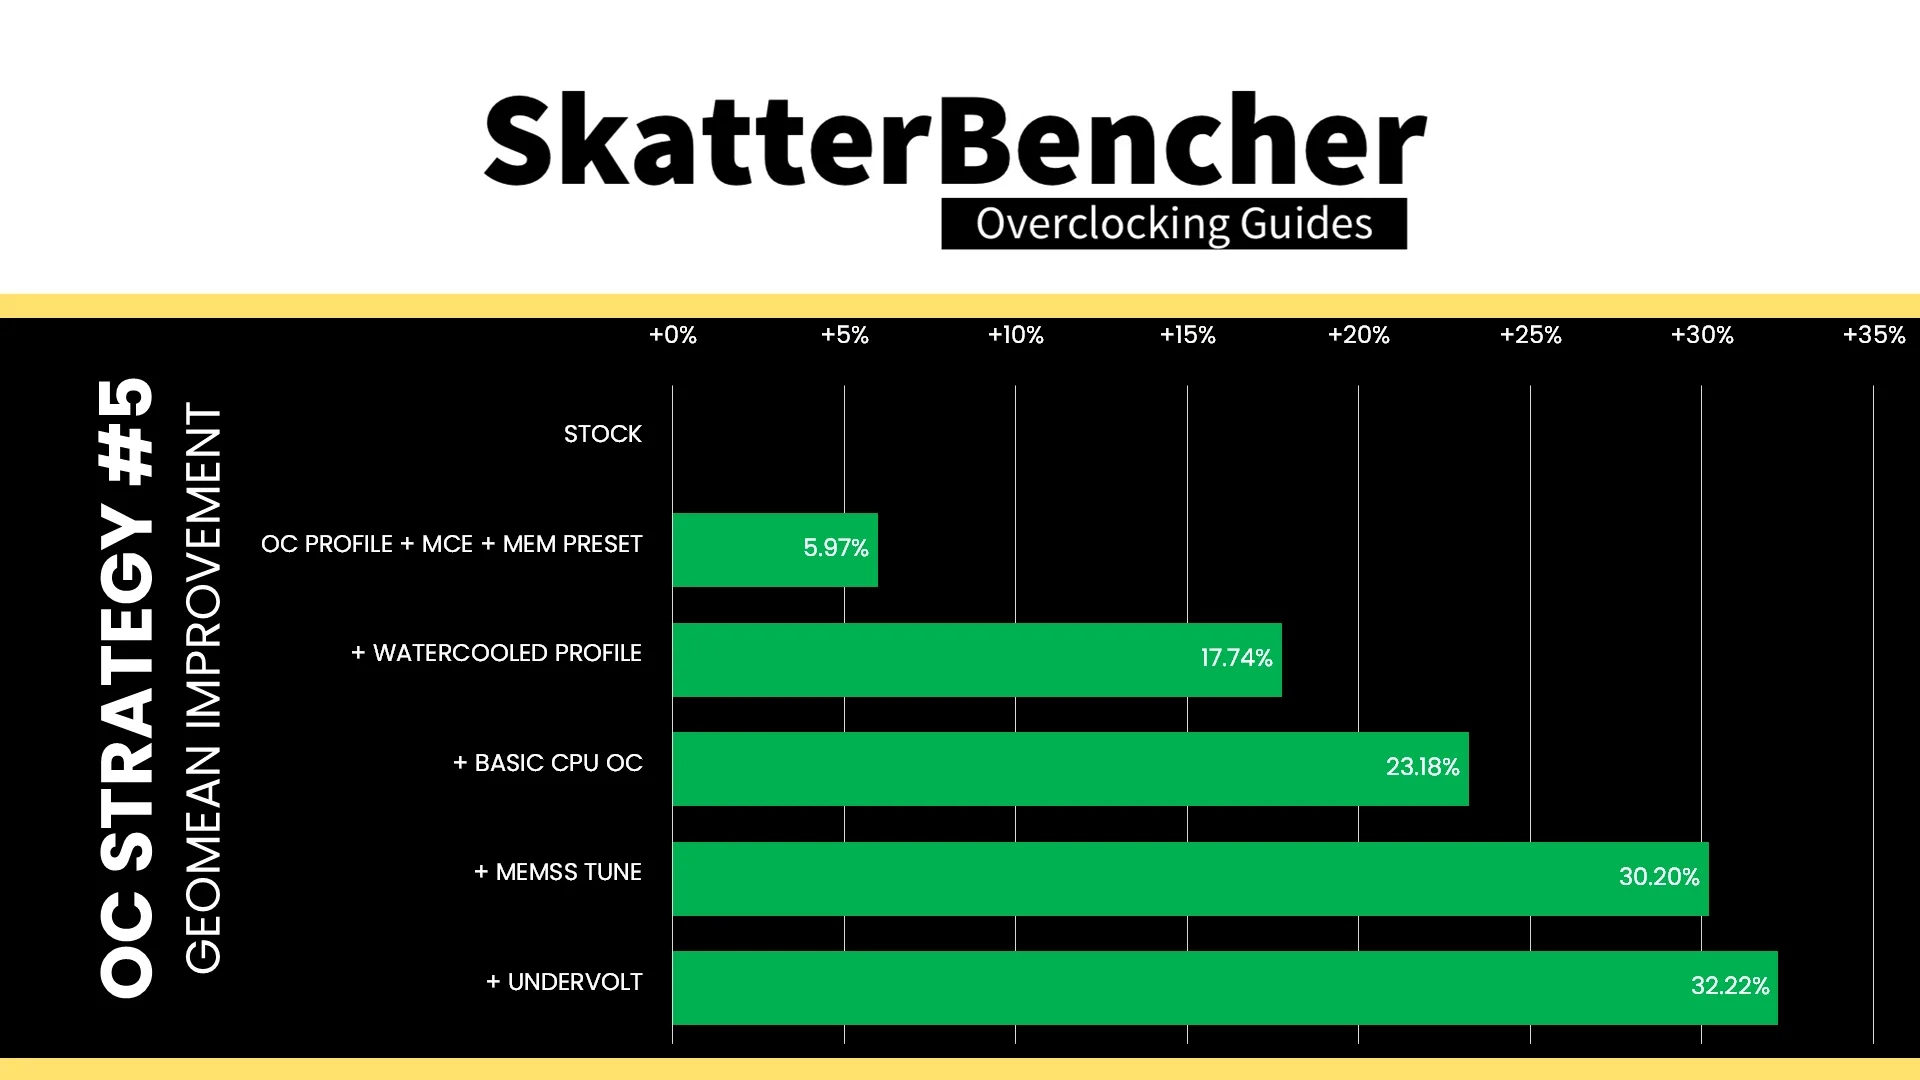
Undervolting the P-cores means they can boost to a higher frequency for a longer period of time because there’s less thermal throttling. That will improve performance especially in heavy workloads where we previously hit TjMax, but wouldn’t affect the lighter workloads. The geomean performance speedup improves by another two percentage points and we get a maximum benchmark improvement of +49.20% Geekbench AI.
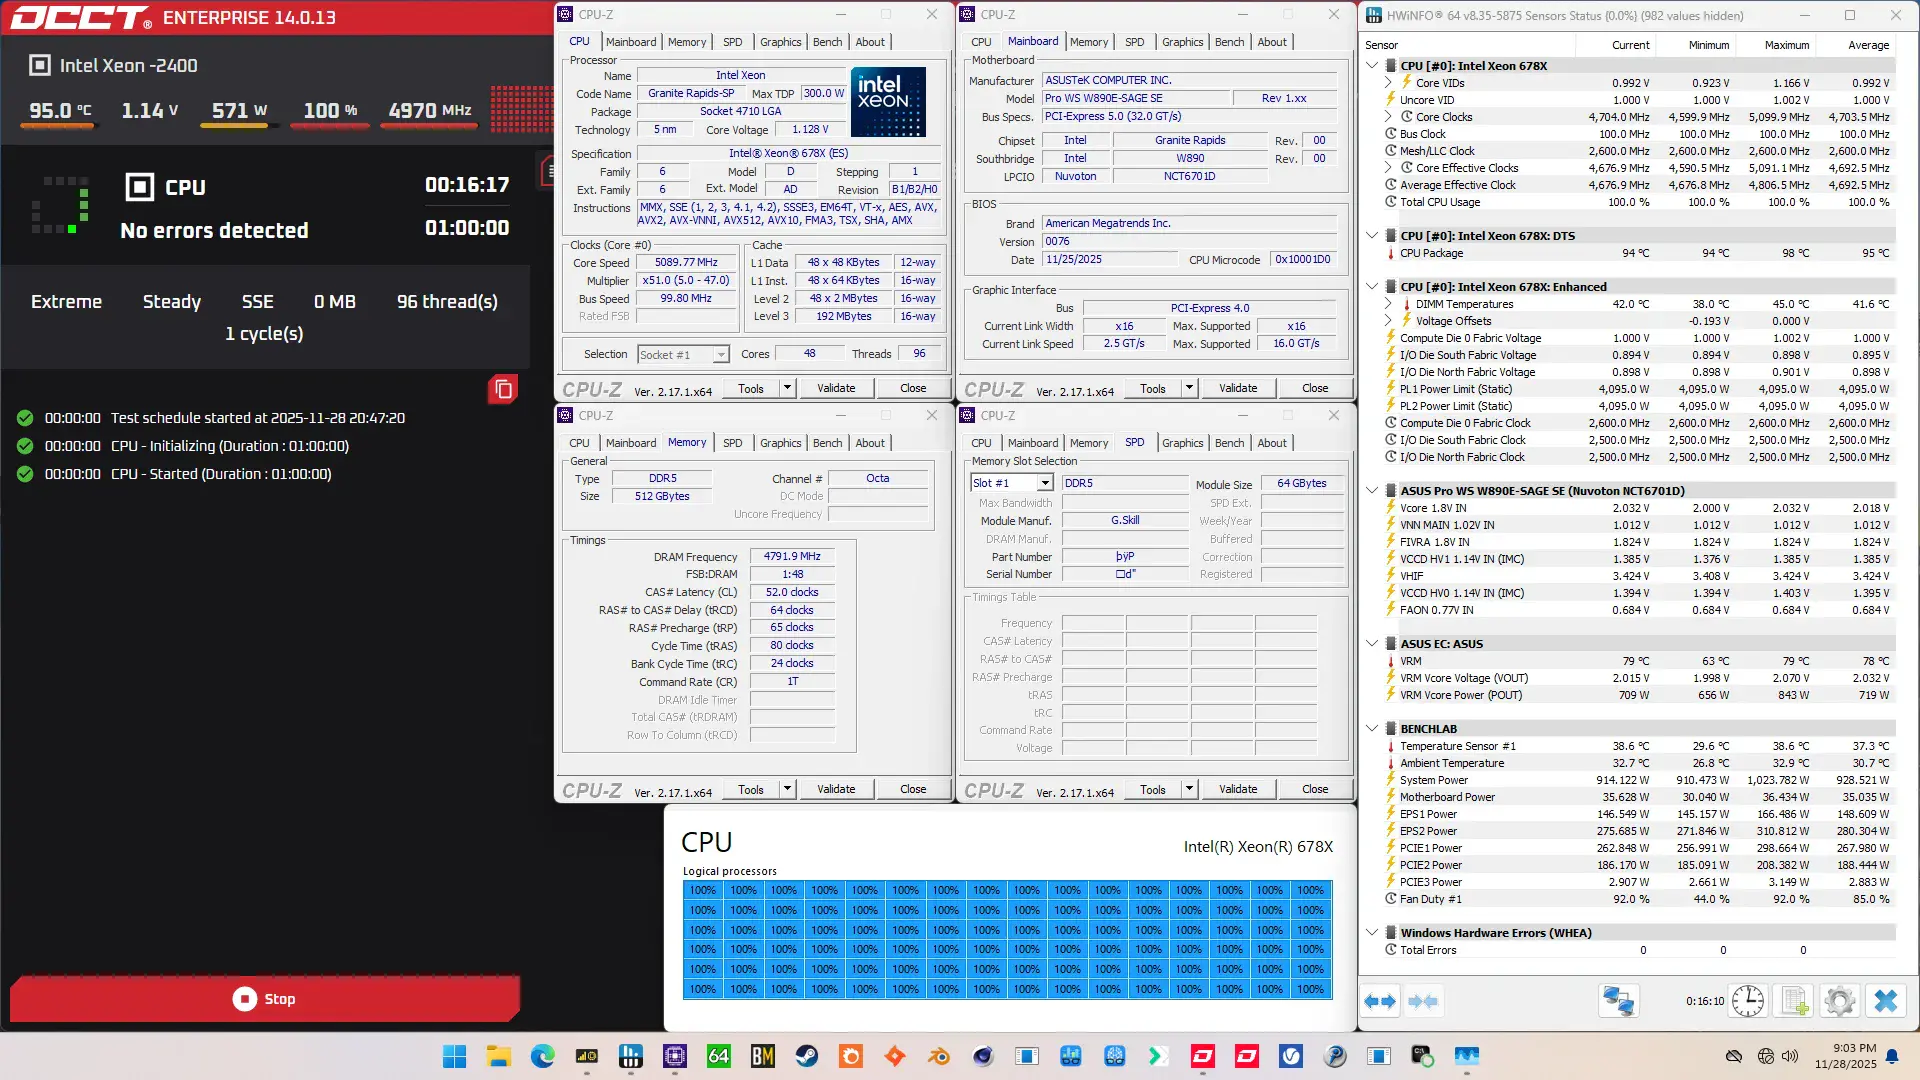
When running the OCCT CPU AVX512 Stability Test, the average CPU core effective clock is 4610 MHz with 0.992 volts. The average CPU temperature is 102 degrees Celsius. The average system power is 1082.1 watts.
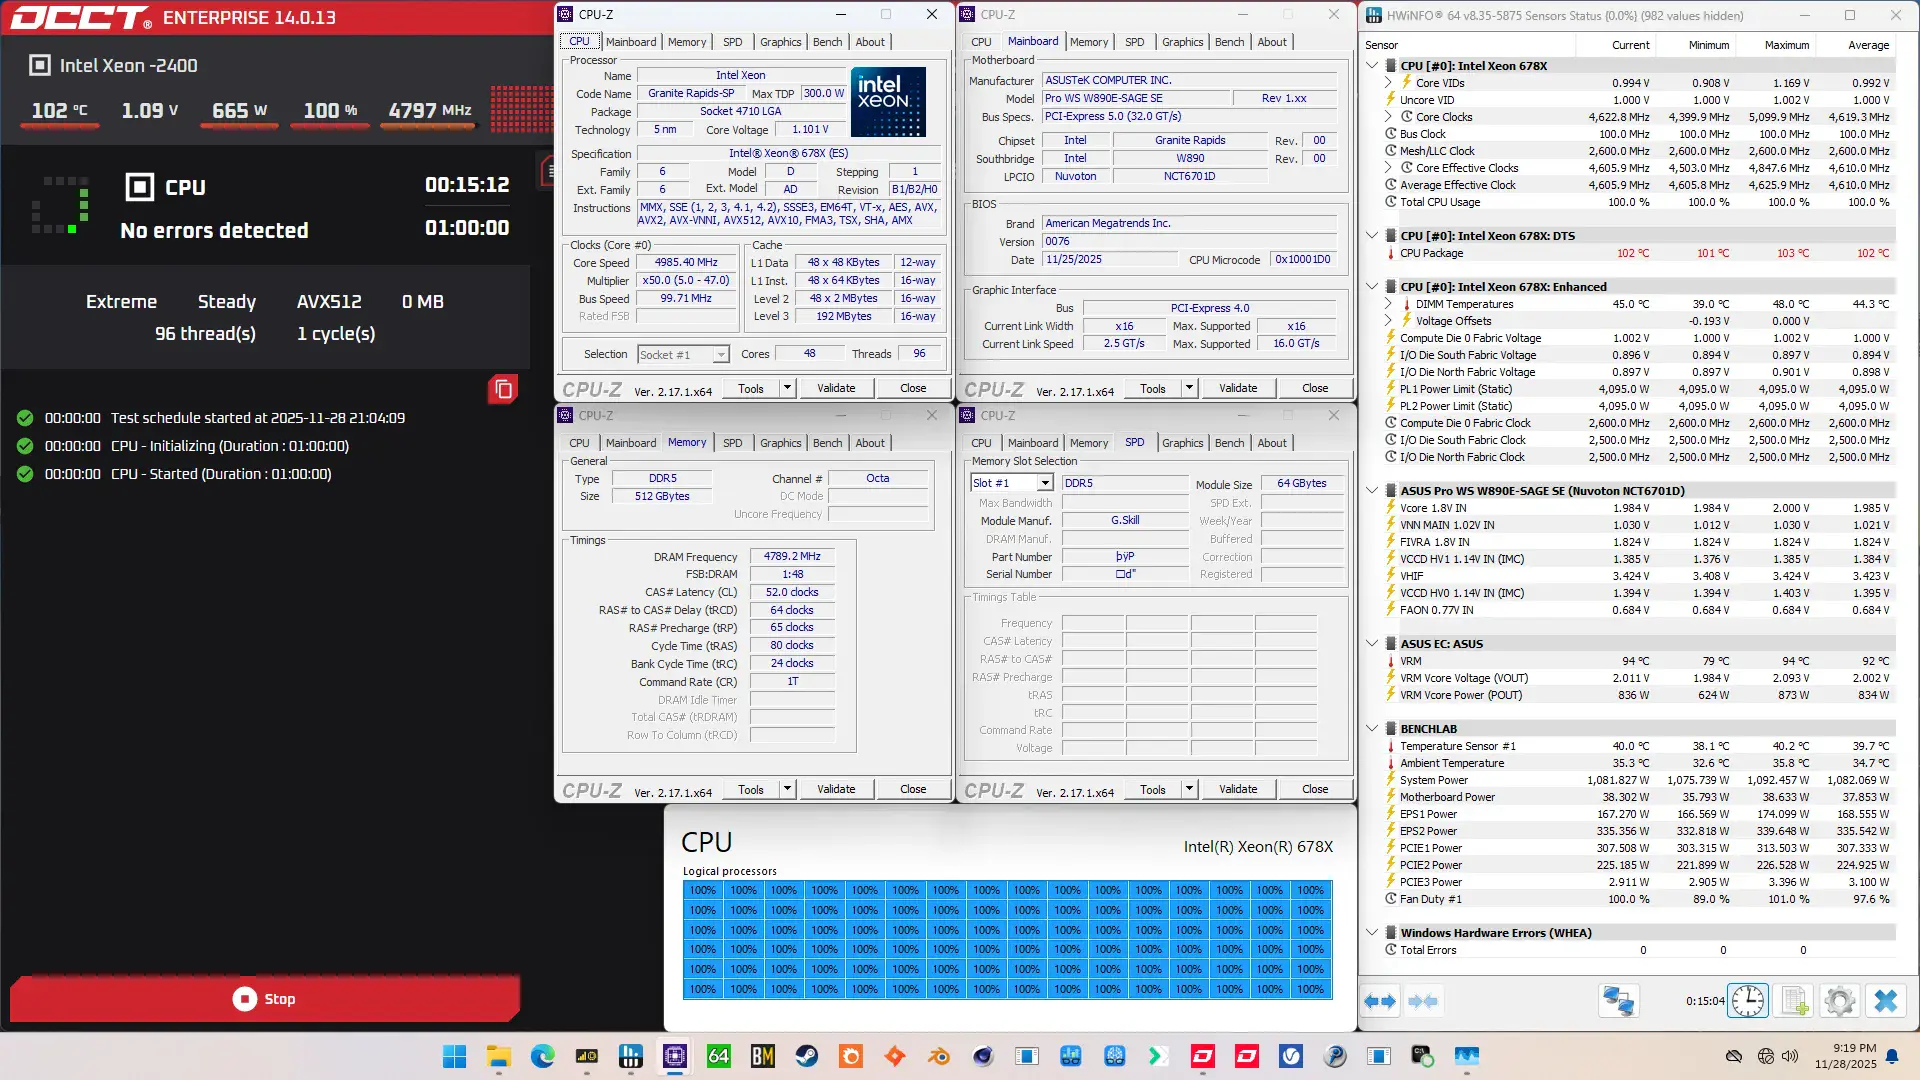
When running the OCCT CPU SSE Stability Test, the average CPU core effective clock is 4692 MHz with 0.992 volts. The average CPU temperature is 95 degrees Celsius. The average system power is 928.5 watts.
Intel Xeon 678X: Conclusion
Alright, let us wrap this up.
The Xeon 678X is the highest core count Intel CPU I’ve overclocked on this channel, featuring no less than 48 Redwood Cove+ P-cores. And I must admit its performance tuning headroom surprised me in a positive way.
Not only was it quite easy to get all cores to boost to 5.3 GHz, which is higher than I managed on previous Xeon platforms, it was also possible to get all cores to run at 4.6 GHz in a heavy AVX-512 stress test. That’s about the same frequency as we achieved with the Sapphire Rapids Xeon w7-3465X but with 20 additional P-cores. Not too shabby!
But what impressed me the most was the memory tuning capabilities. Not only did we nearly reach DDR5-10000 with 8 channels, but we did also it with half a terabyte of system memory. And despite being forced to run Gear 4, we see over 500 GB/s memory read bandwidth and sub 80 nanosecond memory latency.
Anyway, that’s it for this video.
I want to thank my Patreon supporters and YouTube members for supporting my work. For those who want a closer look at the results or read through my BIOS settings, I will also put up a written version of this video on my blog. I’ll have some other content available with this system on the channel as well which YouTube members have early access to.
If you have any questions or comments, please drop them in the comment section below.
See you next time!