6 GHz AIO Cooled Ryzen 9 9950X3D2
In this brief follow-up to SkatterBencher #100, I overclock the Ryzen 9 9950X3D2 to over 6 GHz with AIO cooling.
Just like with my previous Ryzen 9000 experiments, I’ll start by briefly showing the BIOS configuration, then move into the operating system and demonstrate how I tune the CPU to reach the highest possible frequency.
The goal here isn’t stability under heavy workloads. Instead, we’re trying to validate the highest possible clock frequency.
BIOS Configuration
For this attempt, I start from the PBO eCLK profile from my SkatterBencher guide.
By default, the CPU uses a 100 MHz reference clock. For this attempt, I am increasing it to 107 MHz to provide some extra frequency headroom. What this means is that every clock derived from that reference clock also scales up. For example: 1 GHz becomes 1.07 GHz & 5.65 GHz becomes about 6.05 GHz
With the eCLK strategy, the CPU still relies on the factory fused voltage-frequency curve to determine the operating frequency. Because of this, tuning the Precision Boost algorithm becomes very important. For the SkatterBencher guide I rely primarily on Curve Shaper, which allows me to fine-tune specific parts of the VF curve. The strategy is aggressive undervolting at lower frequencies, then gradually shifting toward overvolting at higher frequencies.
It’s important to clarify that on AMD CPUs, “overvolting” does not work the same way as traditional manual overclocking. The Precision Boost 2 algorithm first determines the voltage, then selects the corresponding frequency on the VFT curve. So, when we “overvolt,” what we’re really doing is shifting the VFT curve upward, meaning that for a given voltage the CPU will now select a different, lower frequency point.
For this frequency attempt, I’m not reconfiguring the entire profile from the SkatterBencher guide. Instead, I’m making a couple of changes to make it easier to boot into the operating system.
- Boost Clock Override: normally, you’d use positive boost clock override to increase frequency. However, here I set it to –1000 MHz, which is the maximum negative value. At stock, the CPU can boost to 5.65 GHz. With a -1000 MHz override, the maximum boost frequency becomes 4.65 GHz.
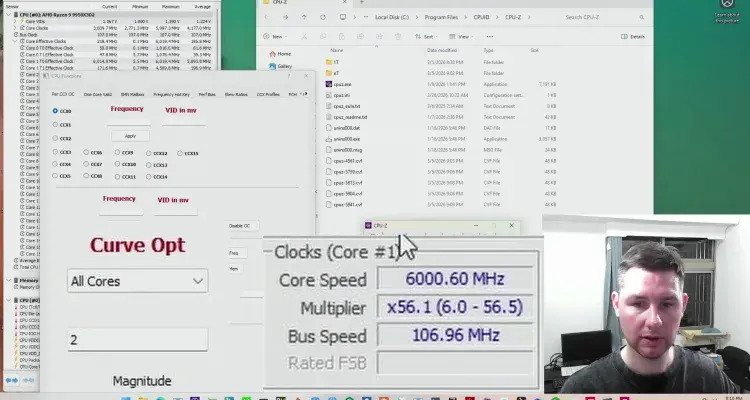
- Curve Optimizer: I also set Curve Optimizer to +30 on all cores. This is a large overvoltage offset that helps the system boot reliably. Once inside the operating system, I’ll gradually reduce this value to allow the CPU to boost to higher frequencies.
Operating System Setup
After booting into Windows, I prepare the tools needed for the tuning session. The main tools are:
CPU-Z is used to validate the achieved frequency. The validation process captures the current system configuration and uploads it to the CPU-Z database. For this experiment, I switch CPU-Z to Extreme OC mode. Normally CPU-Z runs a workload during validation, but Extreme OC mode simply records the current frequency. This makes it easier to capture peak clocks.
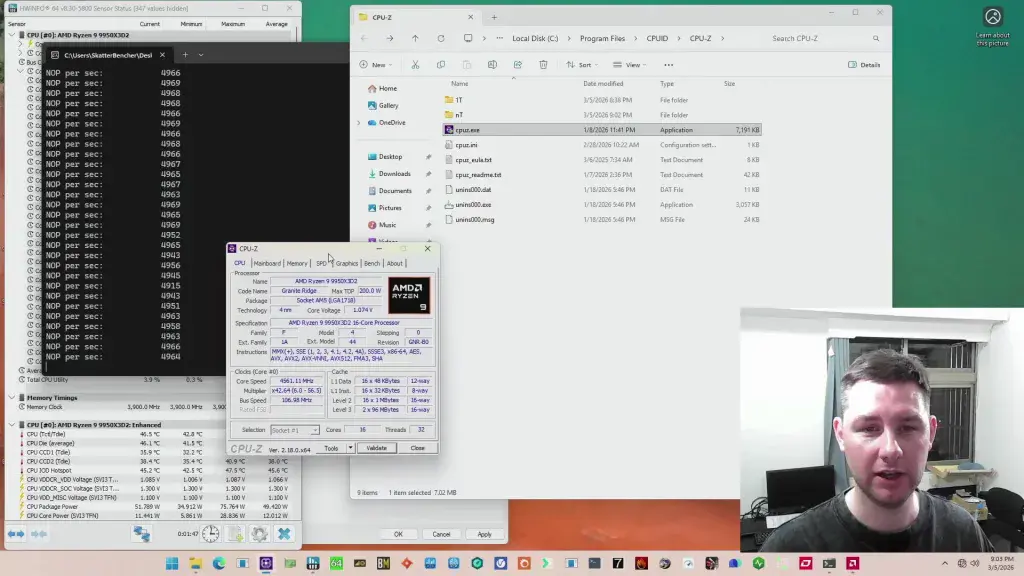
NOP stands for No Operation, meaning the CPU is technically executing instructions but doing essentially nothing. The purpose is to keep the core active with the lightest possible workload. This helps confirm that the effective clock reported in HWiNFO matches the configured frequency.
Shamino’s tuning utility allows me to adjust parameters like boost frequency and curve optimizer directly from the operating system. This lets me quickly test different configurations without rebooting.
6 GHz 9950X3D2 Validation Attempt
The first step is restoring the boost frequency limit.
Earlier in the BIOS I set Boost Clock Override to -1000 MHz. Now I increase it to +200 MHz, which is the maximum positive value. With a stock boost of 5650 MHz, the new limit becomes: 5850 MHz. Because the system is running a 107 MHz E-Clock, the theoretical frequency ceiling is much higher than 6 GHz. However, the CPU doesn’t actually boost that high because it is limited by its maximum fused voltage, which is about 1.4 V.
Initially the CPU boosts to around 5.75 GHz at about 1.39 V. To push the frequency higher, I begin adjusting the Curve Optimizer value. Recall that the system booted with +30 CO, which heavily overvolts the VF curve. As I gradually reduce that value, the curve moves downward, and the CPU can reach higher frequencies while staying within the 1.4 V limit.
Eventually, the CPU briefly boosts above 6 GHz. At this point, capturing the validation becomes partly a matter of timing. The frequency fluctuates slightly, so you need to press F7 at the right moment. While I couldn’t validate the 6 GHz frequency during the recording, I was able to capture a 6 GHz CPU-Z validation earlier. Here’s the validation link: https://valid.x86.fr/c124p8.

All-Core 9950X3D2 Validation Attempt
After the single-core attempt, I also wanted to test how high the CPU could run with all cores active. Instead of a heavy workload like OCCT, I again use a very light workload that keeps all cores active while doing essentially nothing. This allows the Precision Boost algorithm to maintain higher voltage and frequency.
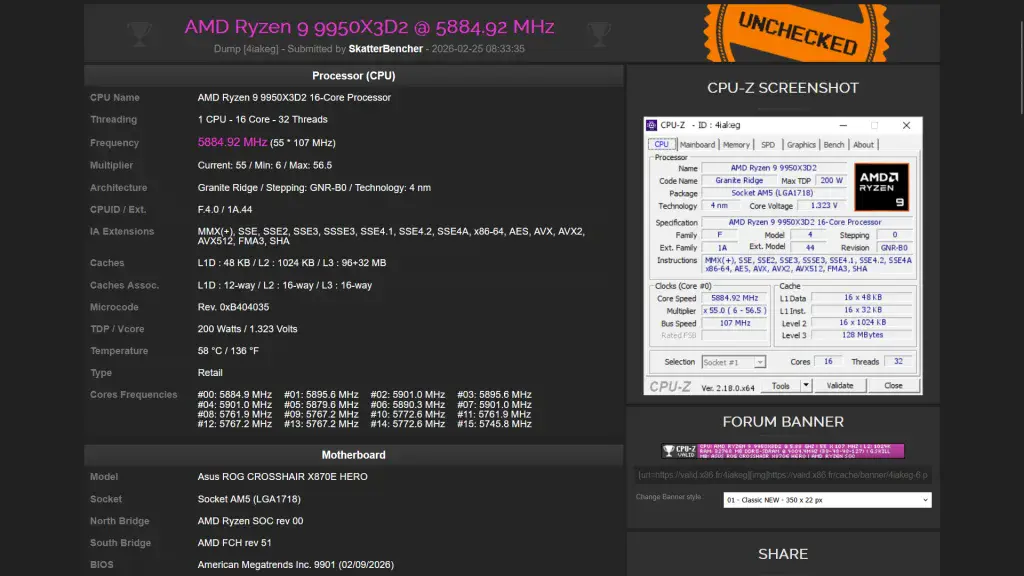
The Ryzen 9 9950X3D2 has two CCDs, which means each CCD can run at a different frequency. In this case, CCD0 can boost about 100 MHz higher than CCD1.
Another important difference compared to the single-core test is the maximum voltage limit. With one core active, the CPU could reach about 1.39–1.40 V. However, when all cores are active, Precision Boost lowers that limit to around 1.37 V.
With the same tuning process, I was able to reach almost 5.9 GHz across all cores under this light workload. Again, I achieved my best validation result off camera. Here’s the CPU-Z validation link: https://valid.x86.fr/4iakeg.
Final Thoughts
Using eCLK, Fmax Boost Override, and Curve Optimizer tuning, the Ryzen 9 9950X3D2 was able to reach 6 GHz single-core validation and almost 5.9 GHz with all cores active under a light workload. Not too shabby.
Thanks for reading, and stay tuned for more overclocking tips and guides!