SkatterBencher #24: AMD Ryzen 7 5700G Overclocked to 4850 MHz

We overclock the AMD Ryzen 7 5700G processor up to 4.85 GHz with the ASUS ROG STRIX B550-I GAMING motherboard and EK water cooling.
Introduction
The AMD Ryzen 7 5700G is the flagship model in AMD’s Zen 3 APU line-up codenamed Cezanne. Cezanne is the successor of the Renoir APU launched a little less than a year ago. The AMD Ryzen 7 5700G offers 8 cores and 16 threads with a listed base frequency of 3.8 GHz and a listed boost frequency up to 4.6 GHz. It also features an integrated Radeon Vega 8 GPU. It is rated at 65W TDP and is currently only available in OEM channels.
The ASUS ROG STRIX B550-I GAMING is a mini-ITX motherboard featuring the AMD B550 chipset. It offers a feature set usually found in the higher-end ROG Strix X570 line-up such as 8+2 power stages and DIY-friendly options like FlexKey, BIOS FlashBack, and temperature sensor header.
In this article, we will cover the basic overclocking steps to get your Ryzen 5 5700G APU all the way to 4.85 GHz and the integrated graphics up to 2.5 GHz using custom loop water cooling.
We will dig into four overclocking strategies.
- First, we will enable DOCP, Precision Boost Overdrive, and increase the GPU frequency.
- Second, we will further tune the FCLK and further increase the GPU frequency.
- Third, we will perform a manual overclock and push the limit on the GPU.
- Lastly, we will explore the limits of Precision Boost Overdrive 2 and Curve Optimizer to find the maximum performance.
Before we jump into the overclocking, let us talk a little bit more about AMD Cezanne and the hardware we will be using in this guide.
AMD Cezanne Overview
AMD Cezanne is the fourth generation of APUs featuring the AMD Ryzen CPU core architecture. It is the successor to the Ryzen 4000 Renoir APUs which featured the 7nm Zen 2 CPU cores with Vega 8 integrated graphics. The 5000G APUs are pretty much identical to their predecessors as they keep the same graphics and just get a CPU core upgrade to Zen 3.

In total AMD has launched 6 APUs for the AM4 desktop socket: 2 Ryzen 7s, 2 Ryzen 5s and 2 Ryzen 3s. The flagship Ryzen 7 5700G offers 8 cores and 16 threads with a base frequency of 3.8 GHz and a boost frequency of 4.6 GHz. The GPU has 8 compute units and runs at a frequency of 2 GHz. The TDP is 65W.
With the switch to the Zen 3 architecture, a Ryzen 5000G processor features a single 8-core CCX with unified L3 cache across all the cores and all the other performance increases that we already know from the Ryzen 5000 products launched in November last year.
AMD has confirmed the APUs will be supported by the X570, B550, and A520 chipsets. However, at the moment of recording the Ryzen 5 5700G APUs are not available yet in retail channels and are OEM-exclusive.
AMD Ryzen 7 5700G: Platform Overview
Along with the AMD Ryzen 7 5700G processor and ASUS ROG Strix B550-I Gaming motherboard, in this guide, we will be using a pair of G.SKILL Trident Z DDR4-4266 memory sticks, a Seasonic Prime 850W Platinum power supply, an ElmorLabs P80DB2 debug card, and of course EK-Quantum water cooling.
All this is mounted on top of our favorite Open Benchtable.
The cost of the components should be around $1,780.
- AMD Ryzen 7 5700G processor: $350
- EK-Quantum water cooling: $400 + $200
- ASUS ROG Strix B550-I Gaming motherboard: $220
- G.SKILL Trident Z DDR4-4266 memory: $180
- Seasonic Prime 850W Platinum power supply: $200
- Open Benchtable: $200
- ElmorLabs P80DB2 debug card: $30
With all this in mind, let us jump into the benchmarks and overclocking.
AMD Ryzen 7 5700G: Benchmark Software
Here is a list of the benchmarks and used in this guide.
- SuperPI 4M https://www.techpowerup.com/download/super-pi/
- Geekbench 5 https://www.geekbench.com/
- HWBOT X265 https://hwbot.org/benchmark/hwbot_x265_benchmark_-_4k/
- Cinebench R20 https://www.maxon.net/en/cinebench/
- V-Ray 5 https://www.chaosgroup.com/vray/benchmark
- ROG RealBench V2.56 https://rog.asus.com/rog-pro/realbench-v2-leaderboard/
- 3DMark Night Raid https://www.3dmark.com/
- CS:GO FPS Bench https://steamcommunity.com/sharedfiles/filedetails/?id=500334237
- Final Fantasy XV http://benchmark.finalfantasyxv.com/na/
- Prime 95 Small FFTs https://www.mersenne.org/download/
- Furmark https://geeks3d.com/furmark/
AMD Ryzen 7 5700G: Stock Performance
Before we get started with pushing the performance of the AMD Ryzen 7 5700G processor, let us first take a look at the scoring at stock settings:
Note that by default the ROG Strix B550-I Gaming has PBO unlocked, so to see the performance at stock settings you will have to go into the BIOS.
- Go to the Ai Tweaker menu
- Enter the Precision Boost Overdrive submenu
- Set Precision Boost Overdrive to Disabled
Then save and exit the BIOS.
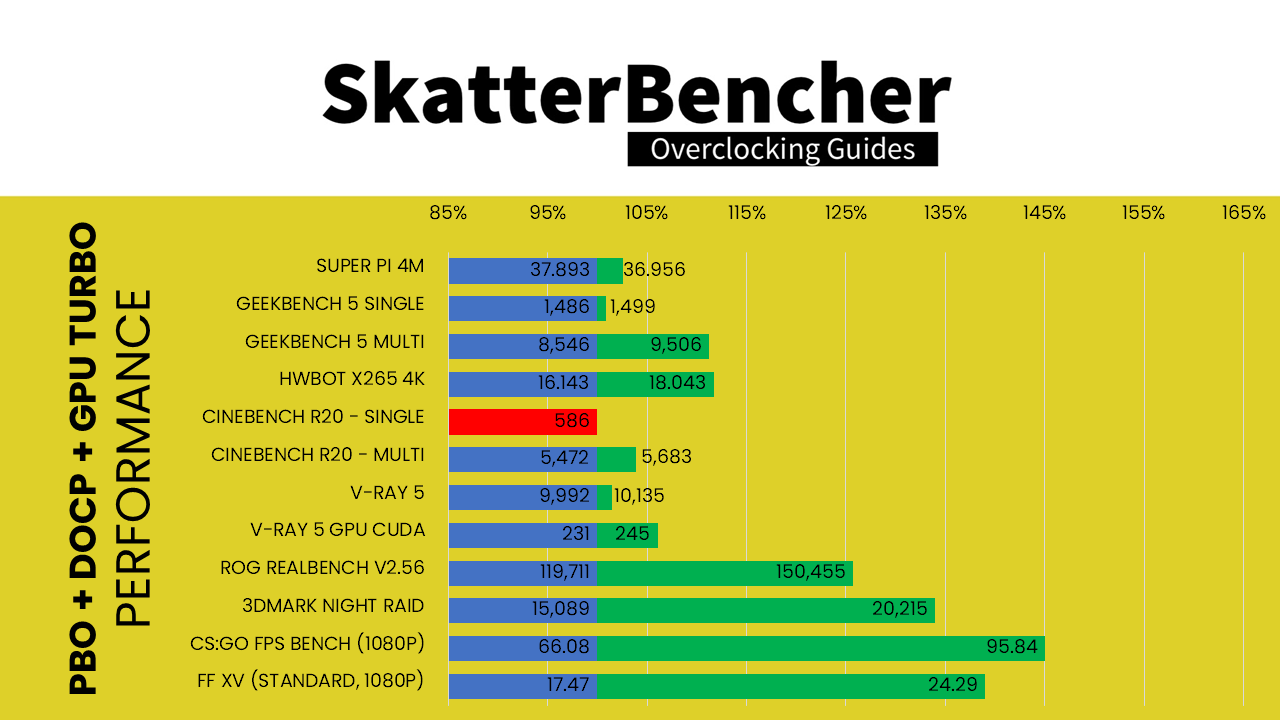
Here is the performance at stock:
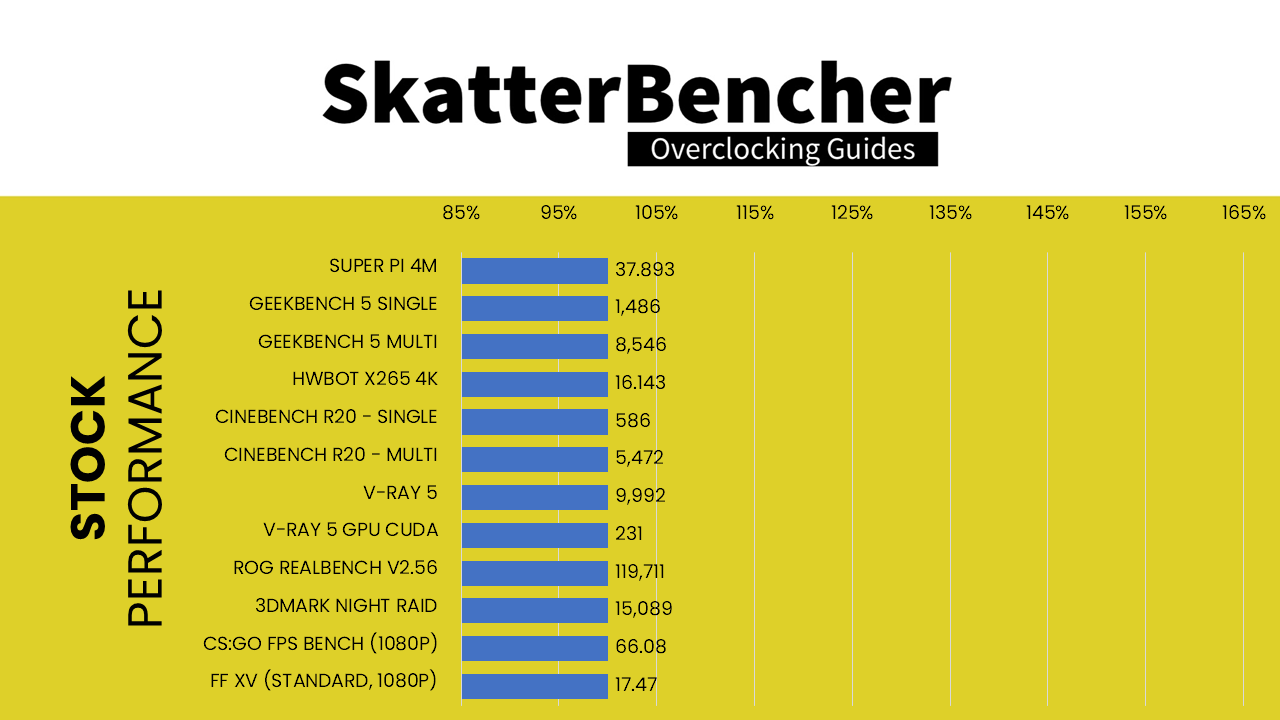
- SuperPI 4M: 37.893 seconds
- Geekbench 5 (single): 1,486 points
- Geekbench 5 (multi): 8,546points
- HWBOT X265 4K: 16.143 fps
- Cinebench R20 Single: 586 points
- Cinebench R20 Multi: 5,472 points
- V-Ray 5: 9,992 vsamples
- V-Ray 5 GPU CUDA: 231 vpaths
- ROG Realbench V2.56: 119,711
- 3DMark Night Raid: 15,089 points
- CS:GO FPS Bench: 66.08 fps
- Final Fantasy XV: 17.47 fps
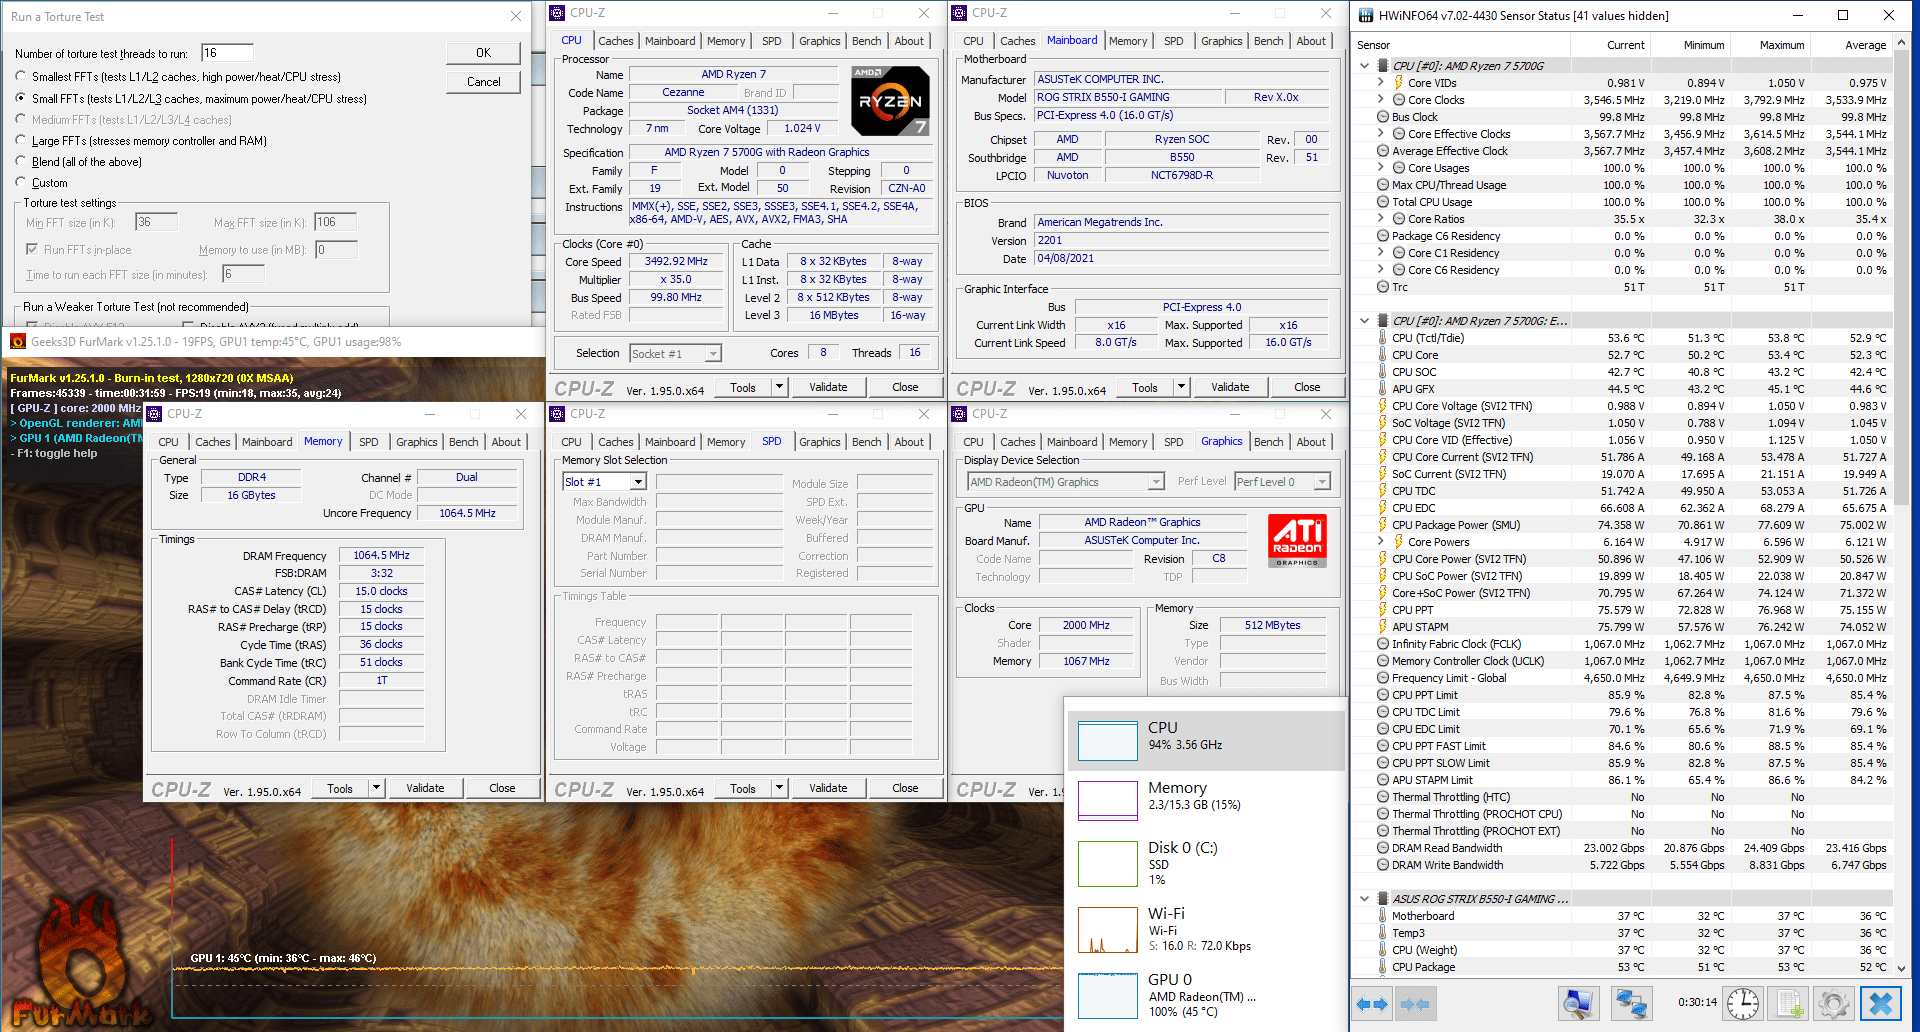
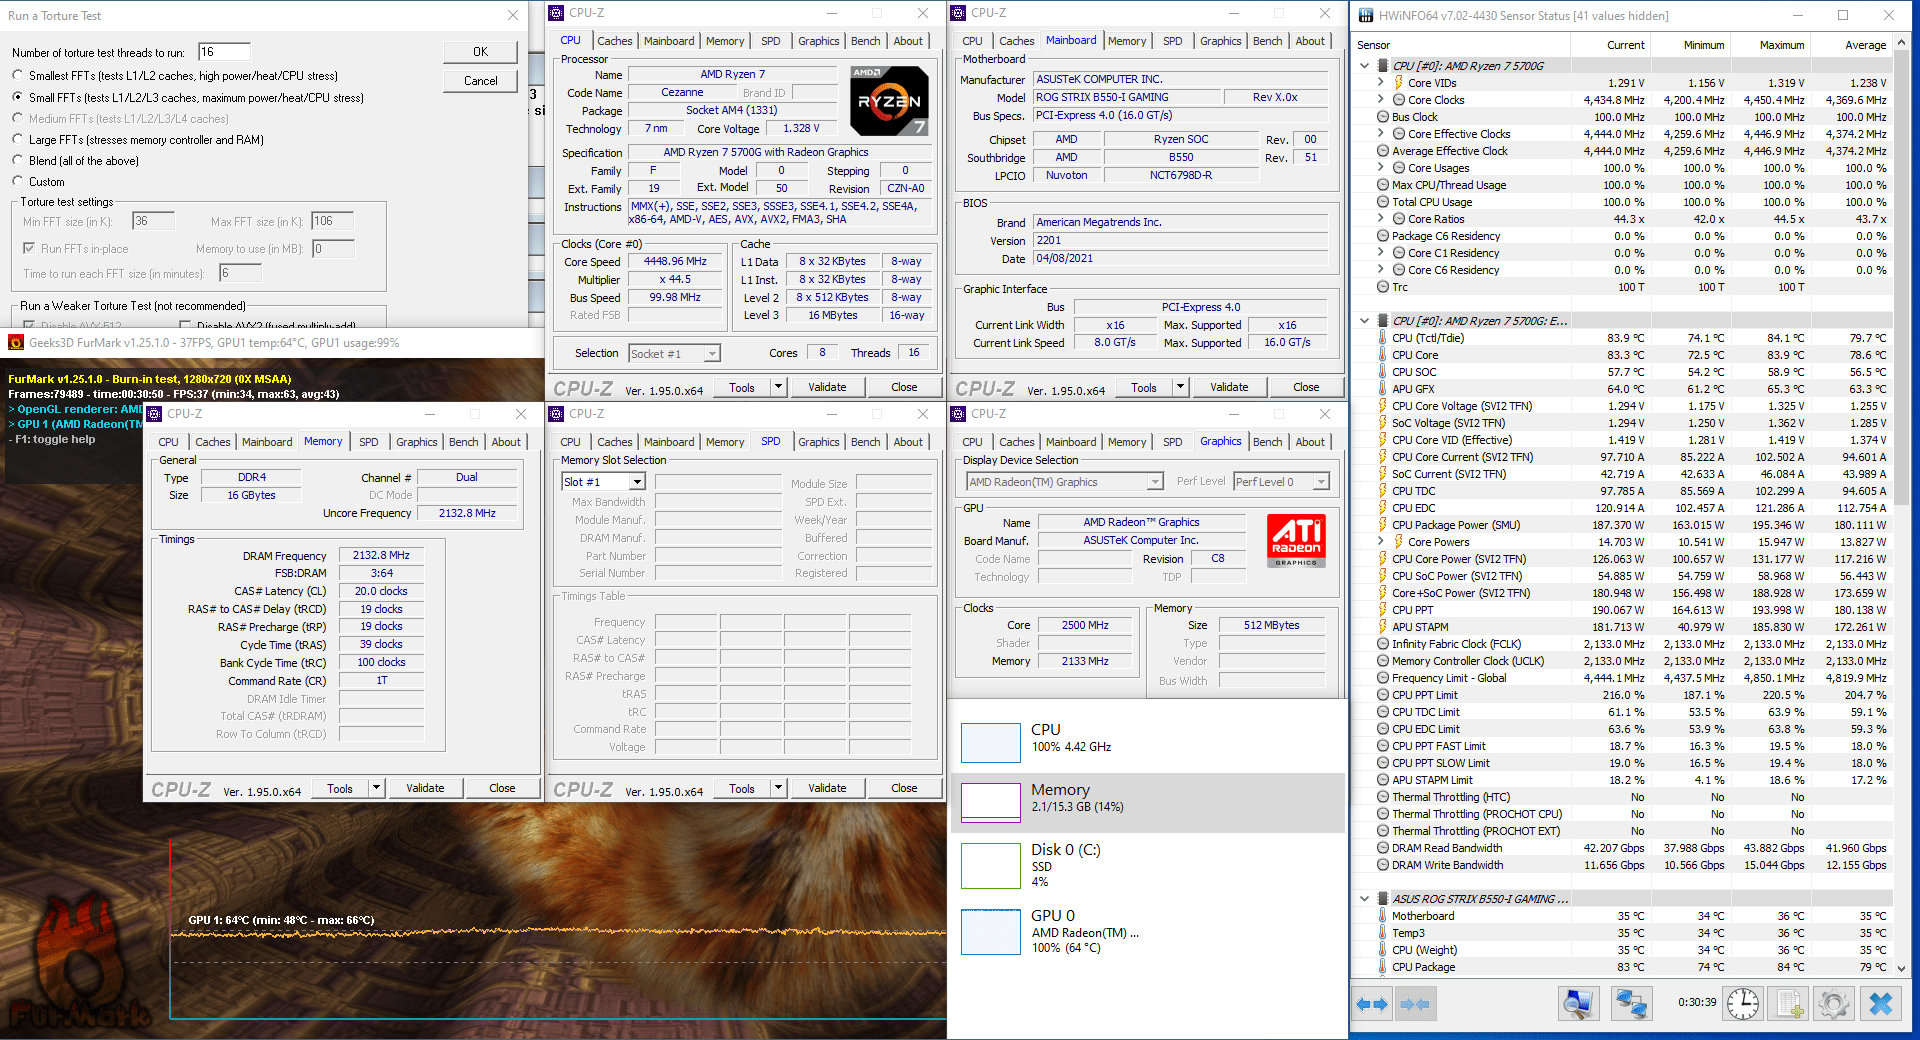
When running Prime 95 Small FFT with AVX enabled and Furmark concurrently, the Ryzen 5 5700G operates stably at 3531 MHz with 0.983 volts. The GPU operates at 2 GHz with 0.975v. The average CPU temperature is 53 degrees centigrade; the average GPU temperature is 50 degrees centigrade, and the average water temperature is 30 degrees centigrade. The average CPU package power is 75.2 watts.

When running Prime 95 Small FFT with AVX disabled, the Ryzen 5 5700G operates stably at 3823 MHz with 1.073 volts. The average CPU temperature is 54 degrees centigrade, and the average water temperature is 30 degrees centigrade. The average CPU package power is 60 watts.
Now, let us try our first overclocking strategy.
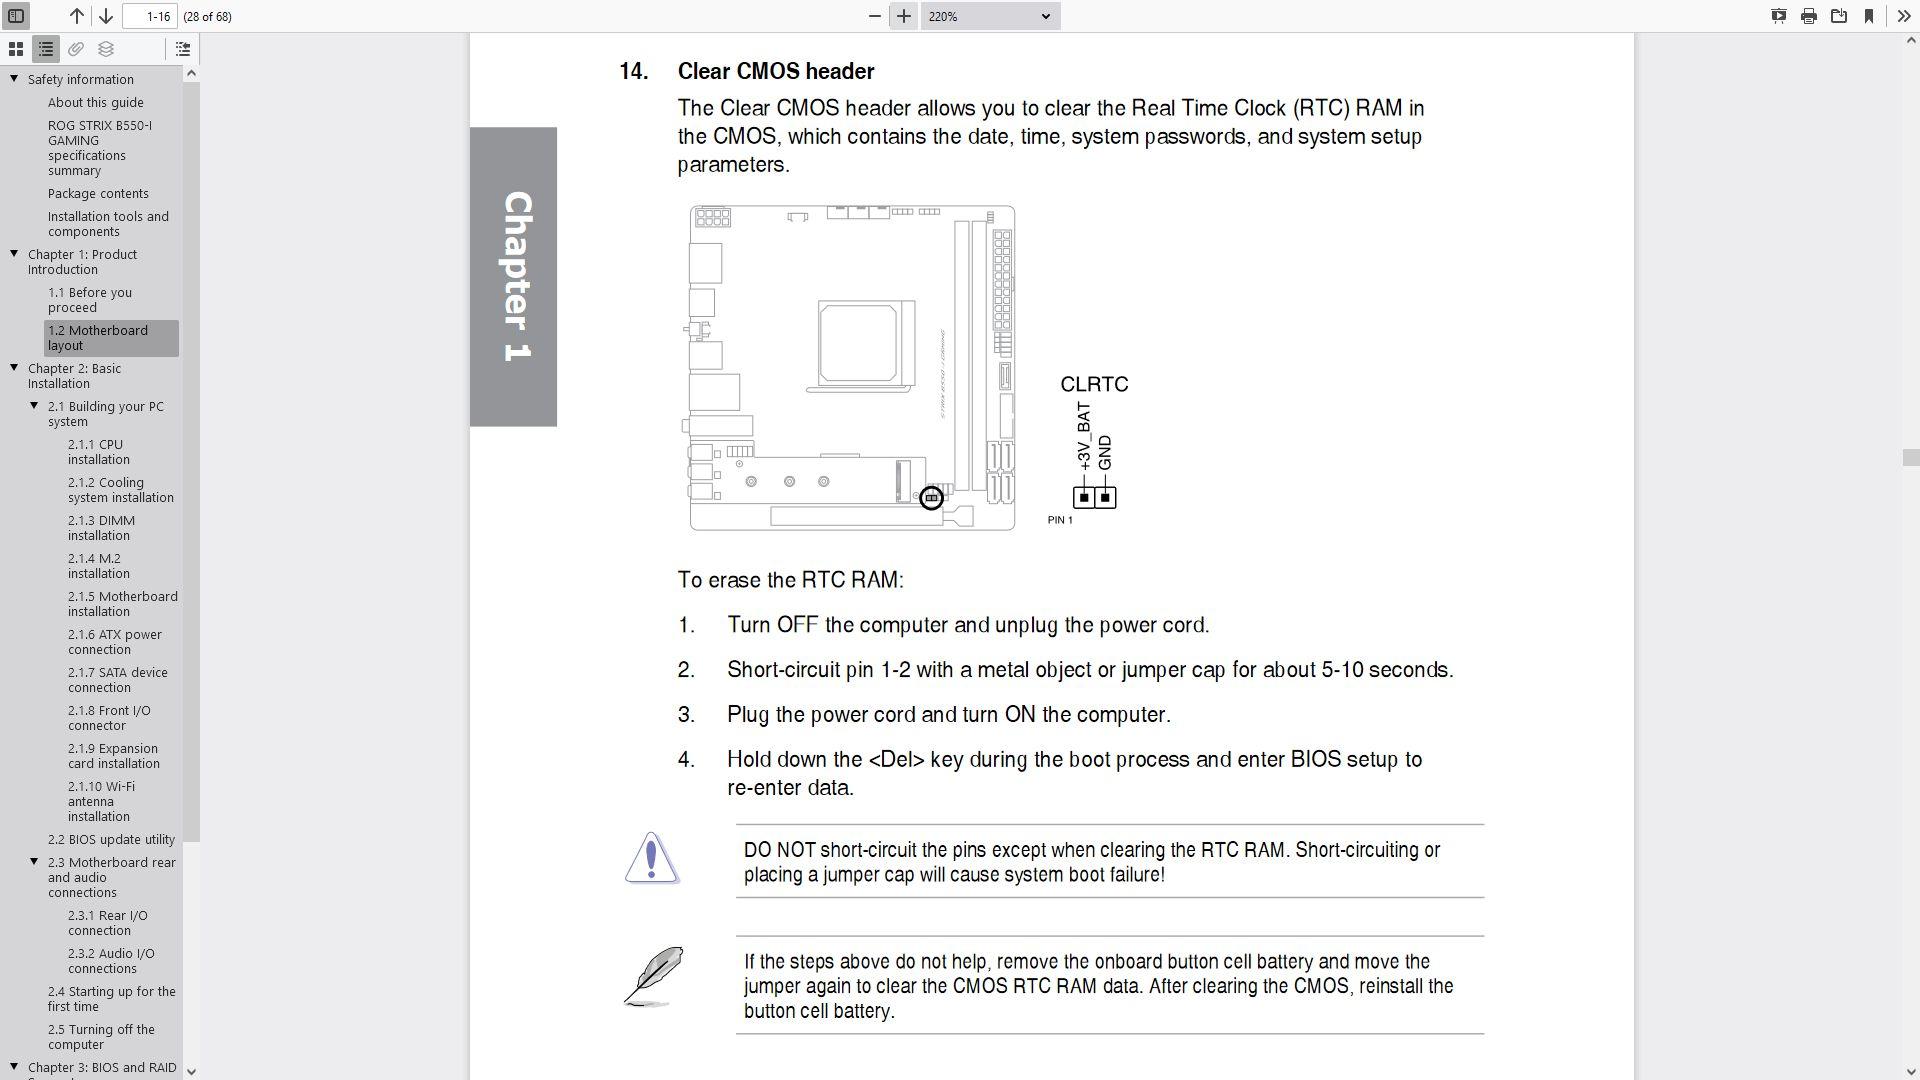
However, before we get started make sure to locate the Clear CMOS header on your motherboard. In case your system failed to boot up after you configured your settings, pressing this button will reset the bios and you will be able to boot up safely.
OC Strategy #1: PBO + DOCP + GPU TURBO
Any aspiring AMD overclocker should be familiar with PBO.
PBO stands for Precision Boost Overdrive. It is an extension of the Precision Boost technology that is included in all AMD Ryzen CPUs. Precision Boost allows the CPU to opportunistically increase its clock frequency over base frequency based on the available power and thermal headroom.
We will dig into the details of Precision Boost Overdrive in the final chapter of this overclocking video, but suffice to say that PBO simply lifts the limits of Precision Boost such that even higher frequencies can be achieved.
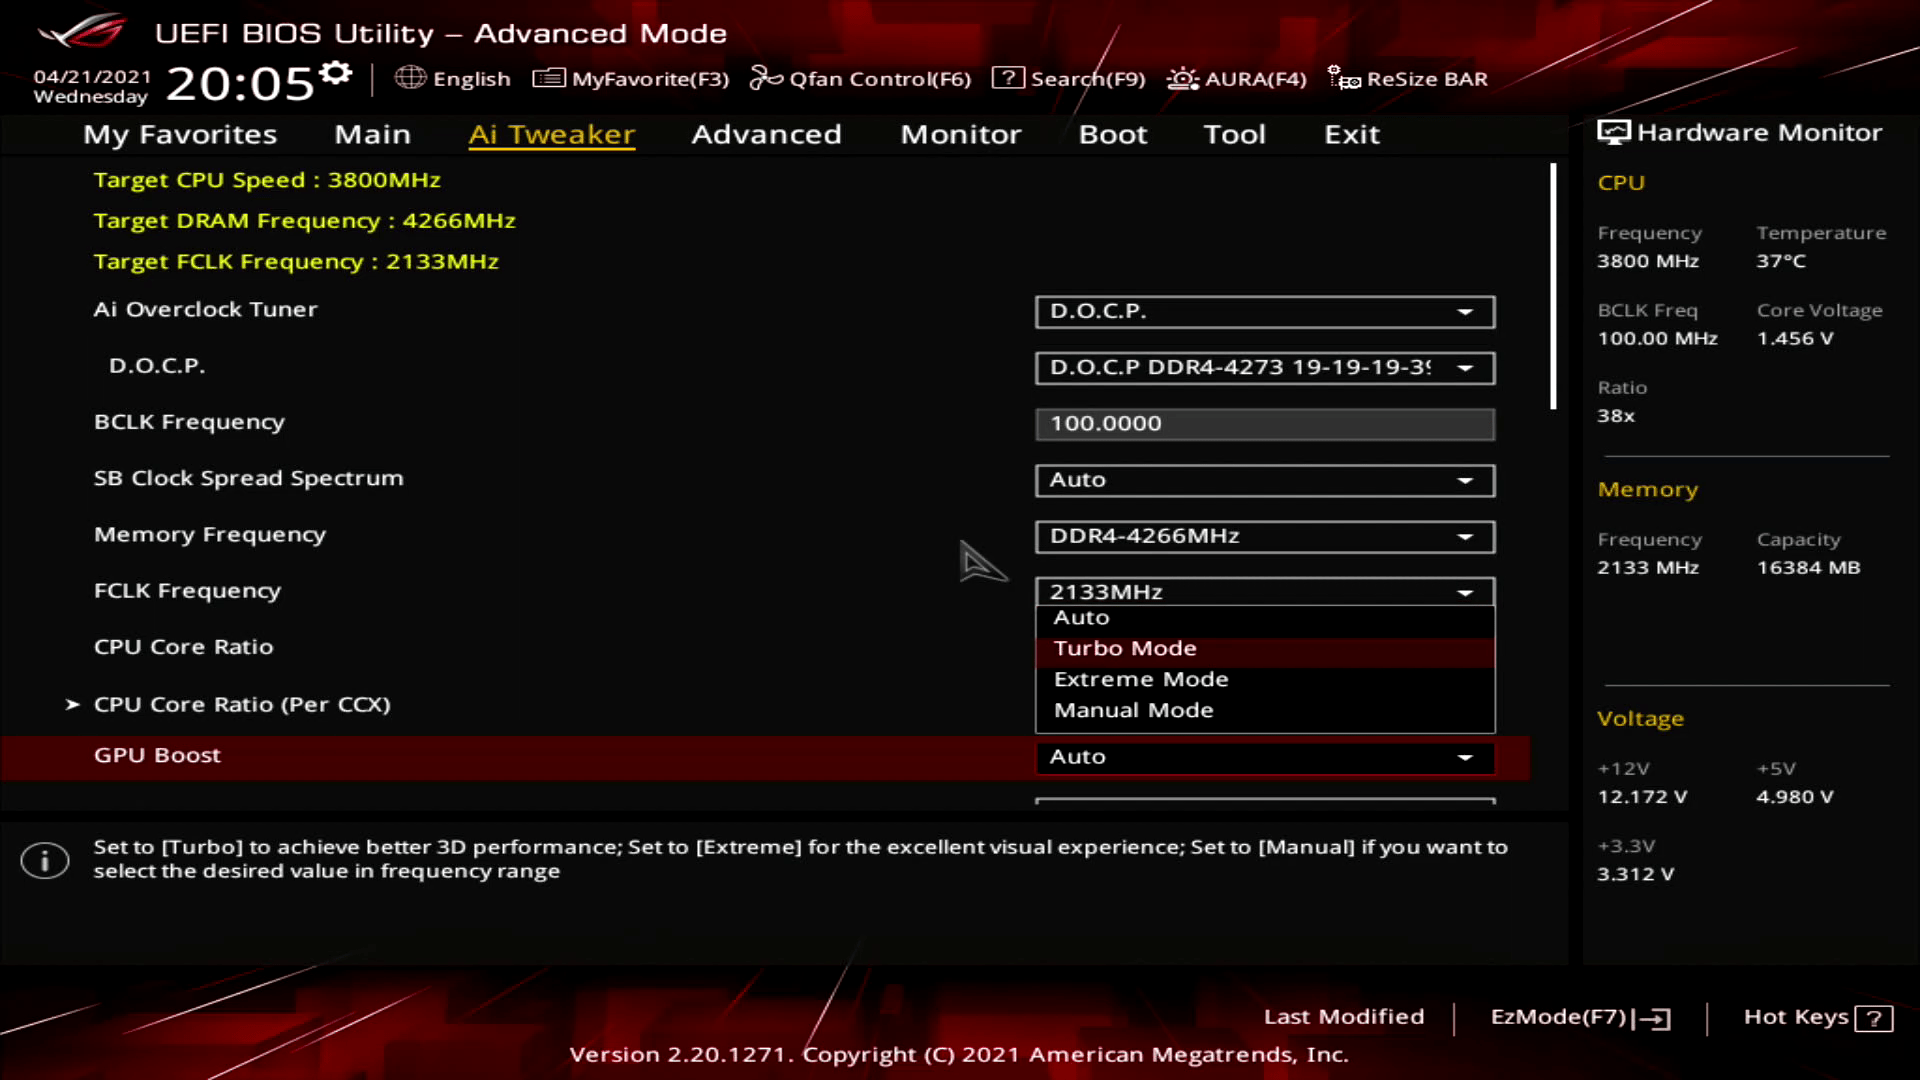
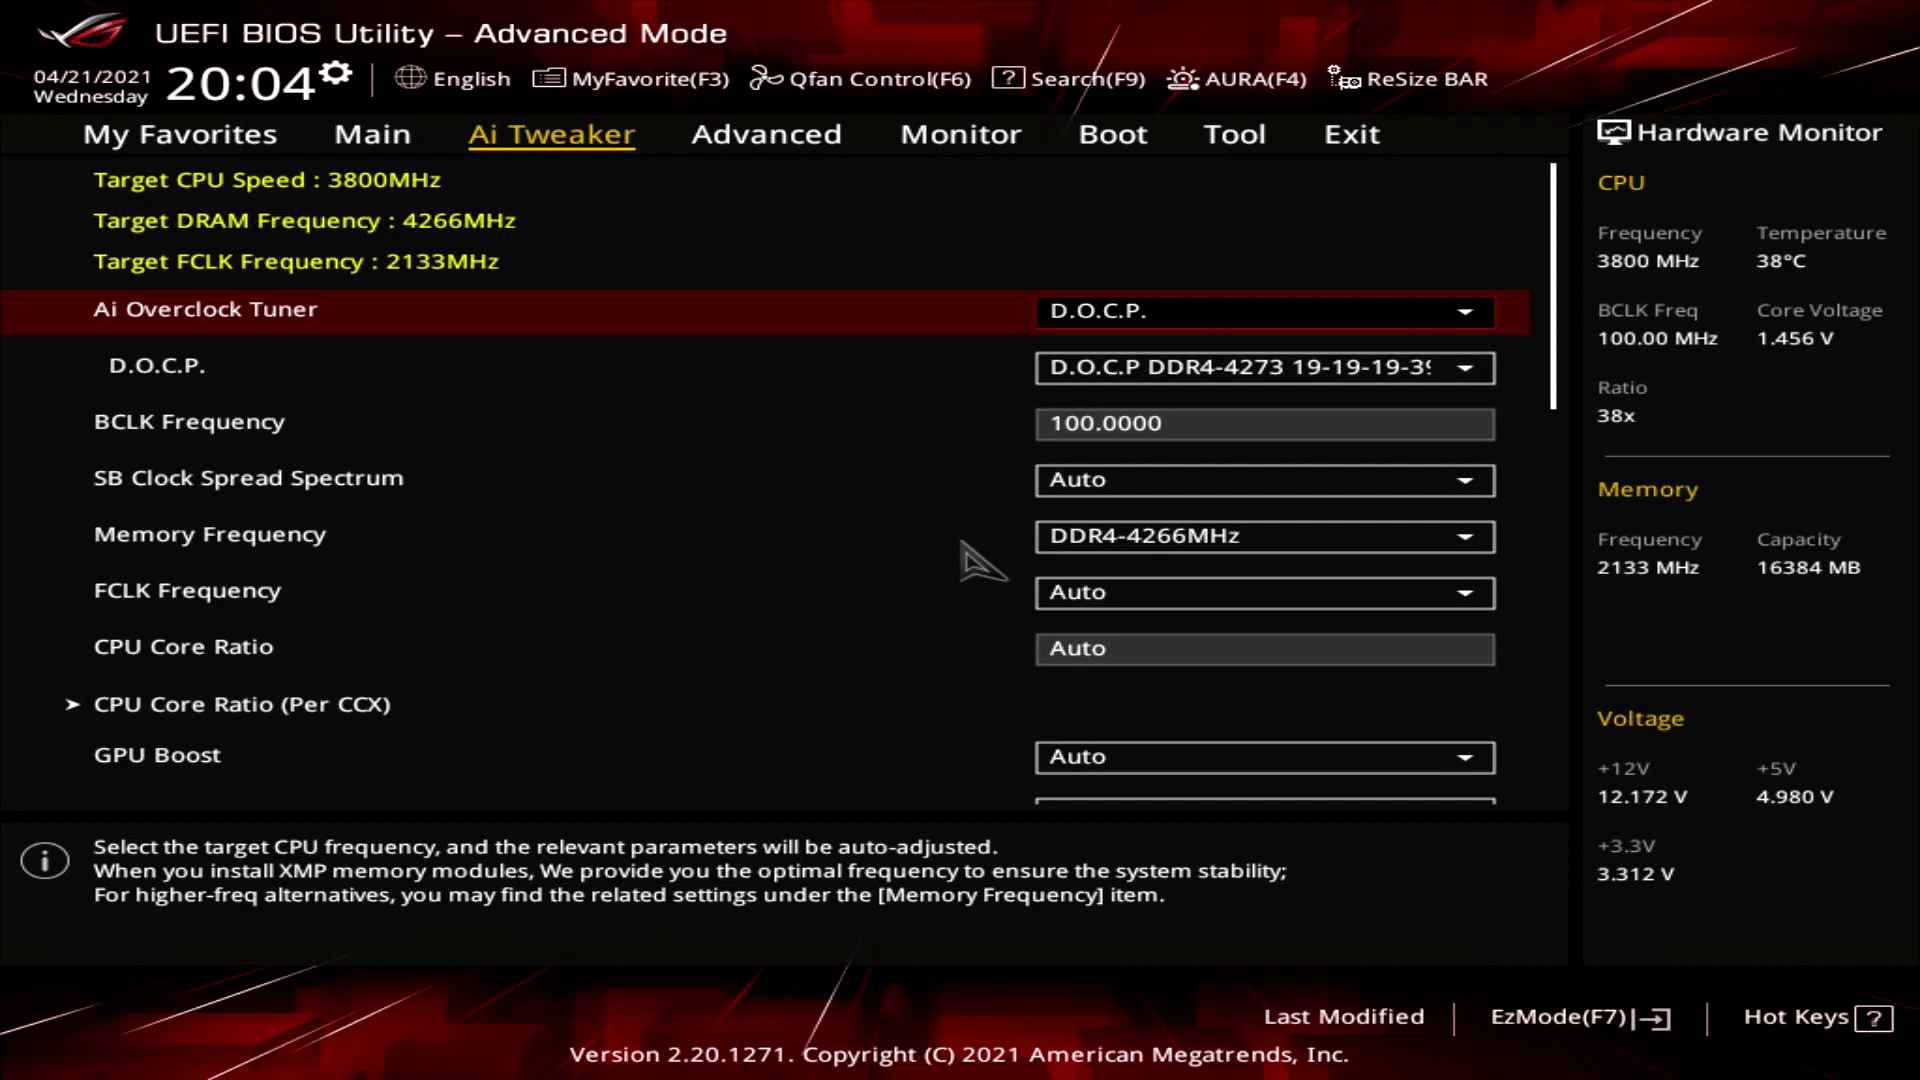
We also enable DOCP.
D.O.C.P. stands for Direct Over Clock Profile. It is an ASUS technology that aims to replicate the Intel XMP feature we know from Intel platforms. XMP allows memory vendors such as G.SKILL to program higher performance settings onto the memory sticks. If the motherboard supports XMP, then you can enable higher performance with a single BIOS setting. So, it saves you from lots of manual configuration.
We also increase the GPU frequency by using an ASUS preset in the BIOS. This Turbo Mode preset increases the frequency from 2GHz to 2.2GHz.

Upon entering the BIOS
- Go to the Ai Tweaker menu
- Set AI Overclock Tuner to D.O.C.P
- Set GPU Boost to Turbo Mode
- Enter the Precision Boost Overdrive submenu
- Set Precision Boost Overdrive to Enabled
Then save and exit the BIOS.
We re-ran the benchmarks and checked the performance increase compared to the default operation.
- SuperPI 4M: 2.54%
- Geekbench 5 (single): 0.87%
- Geekbench 5 (multi): 11.23%
- HWBOT X265 4K: 11.77%
- Cinebench R20 Single: -1.37%
- Cinebench R20 Multi: 3.86%
- V-Ray 5: 1.43%
- V-Ray 5 GPU CUDA: 6.06%
- ROG Realbench V2.56: 25.68%
- 3DMark Night Raid: 33.97%
- CS:GO FPS Bench: 45.05%
- Final Fantasy XV: 39.04%
As expected, we see the largest performance gains in multi-threaded and 3D benchmark workloads. The 3D benchmark performance increase is particularly notable.
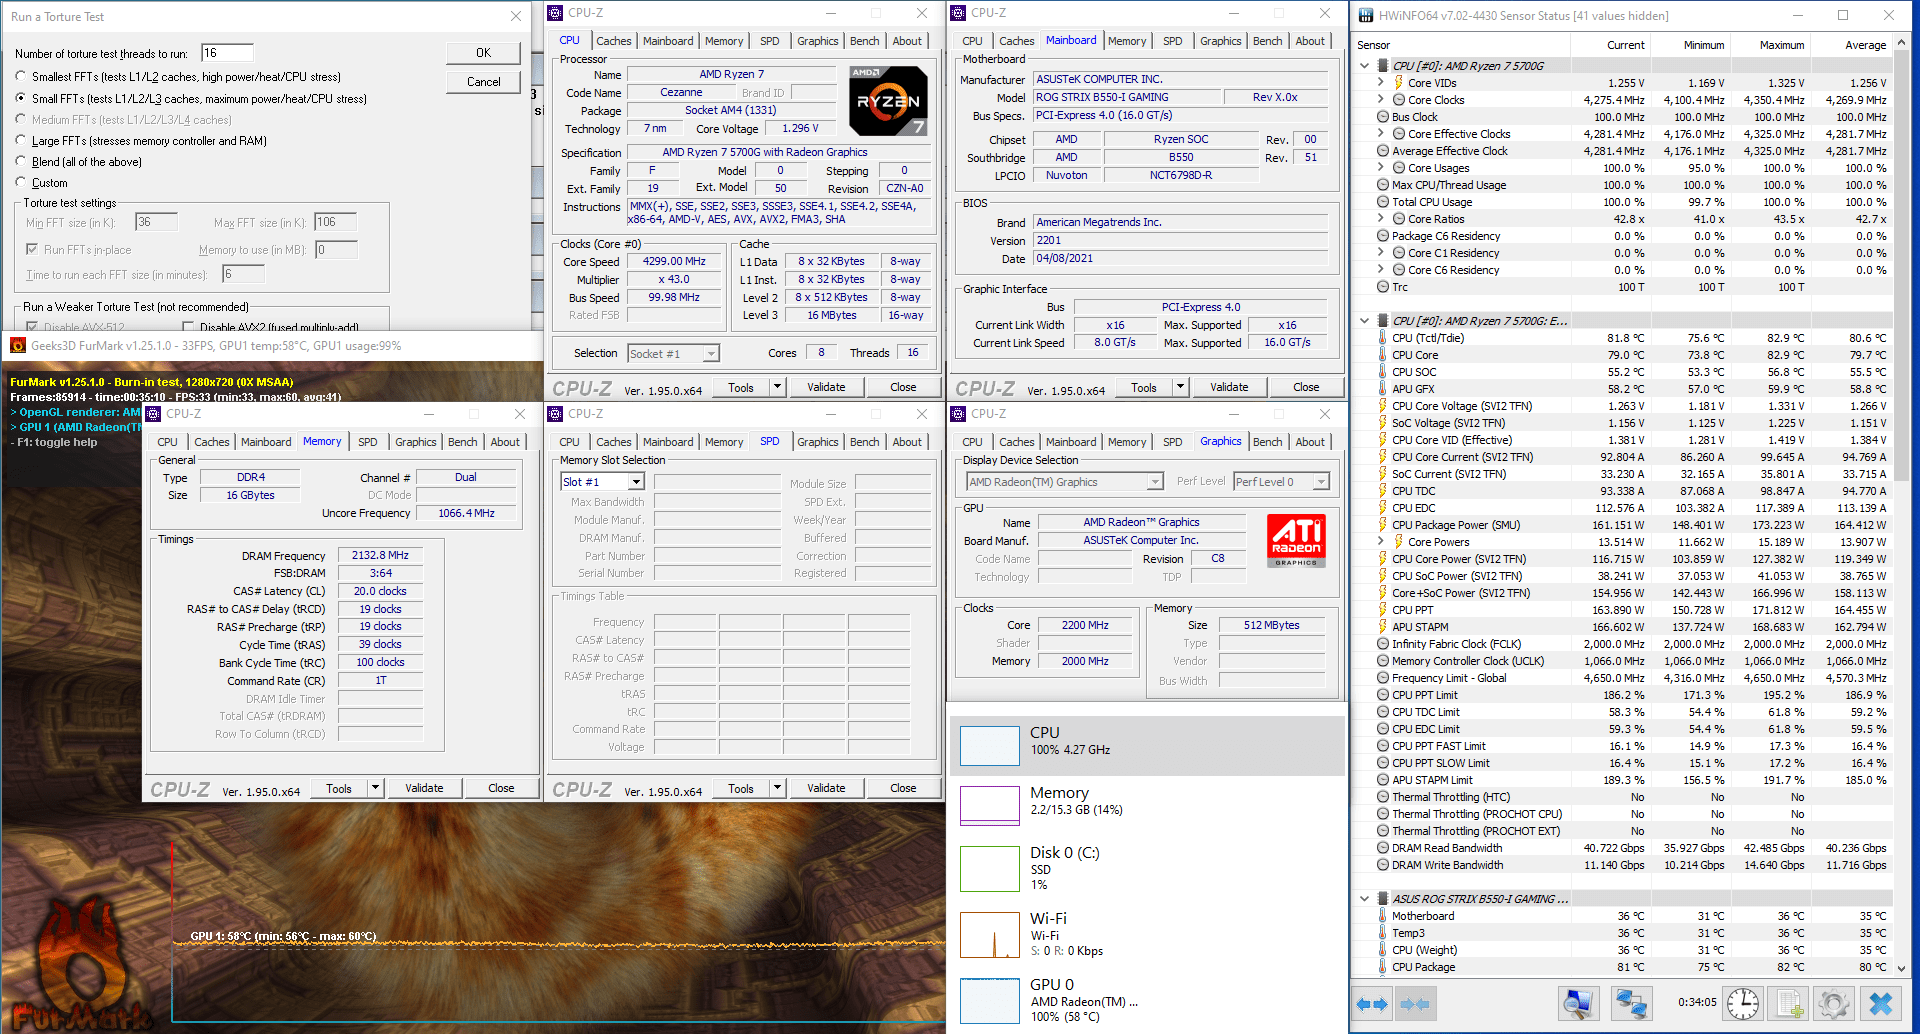
When running Prime 95 Small FFT with AVX enabled and Furmark concurrently, the Ryzen 7 5700G operates stably at 4281 MHz with 1.264 volts. The GPU operates at 2.2 GHz with 1.151v. The average CPU temperature is 80 degrees centigrade; the average GPU temperature is 75 degrees centigrade, and the average water temperature is 30 degrees centigrade. The average CPU package power is 164.1 watts.
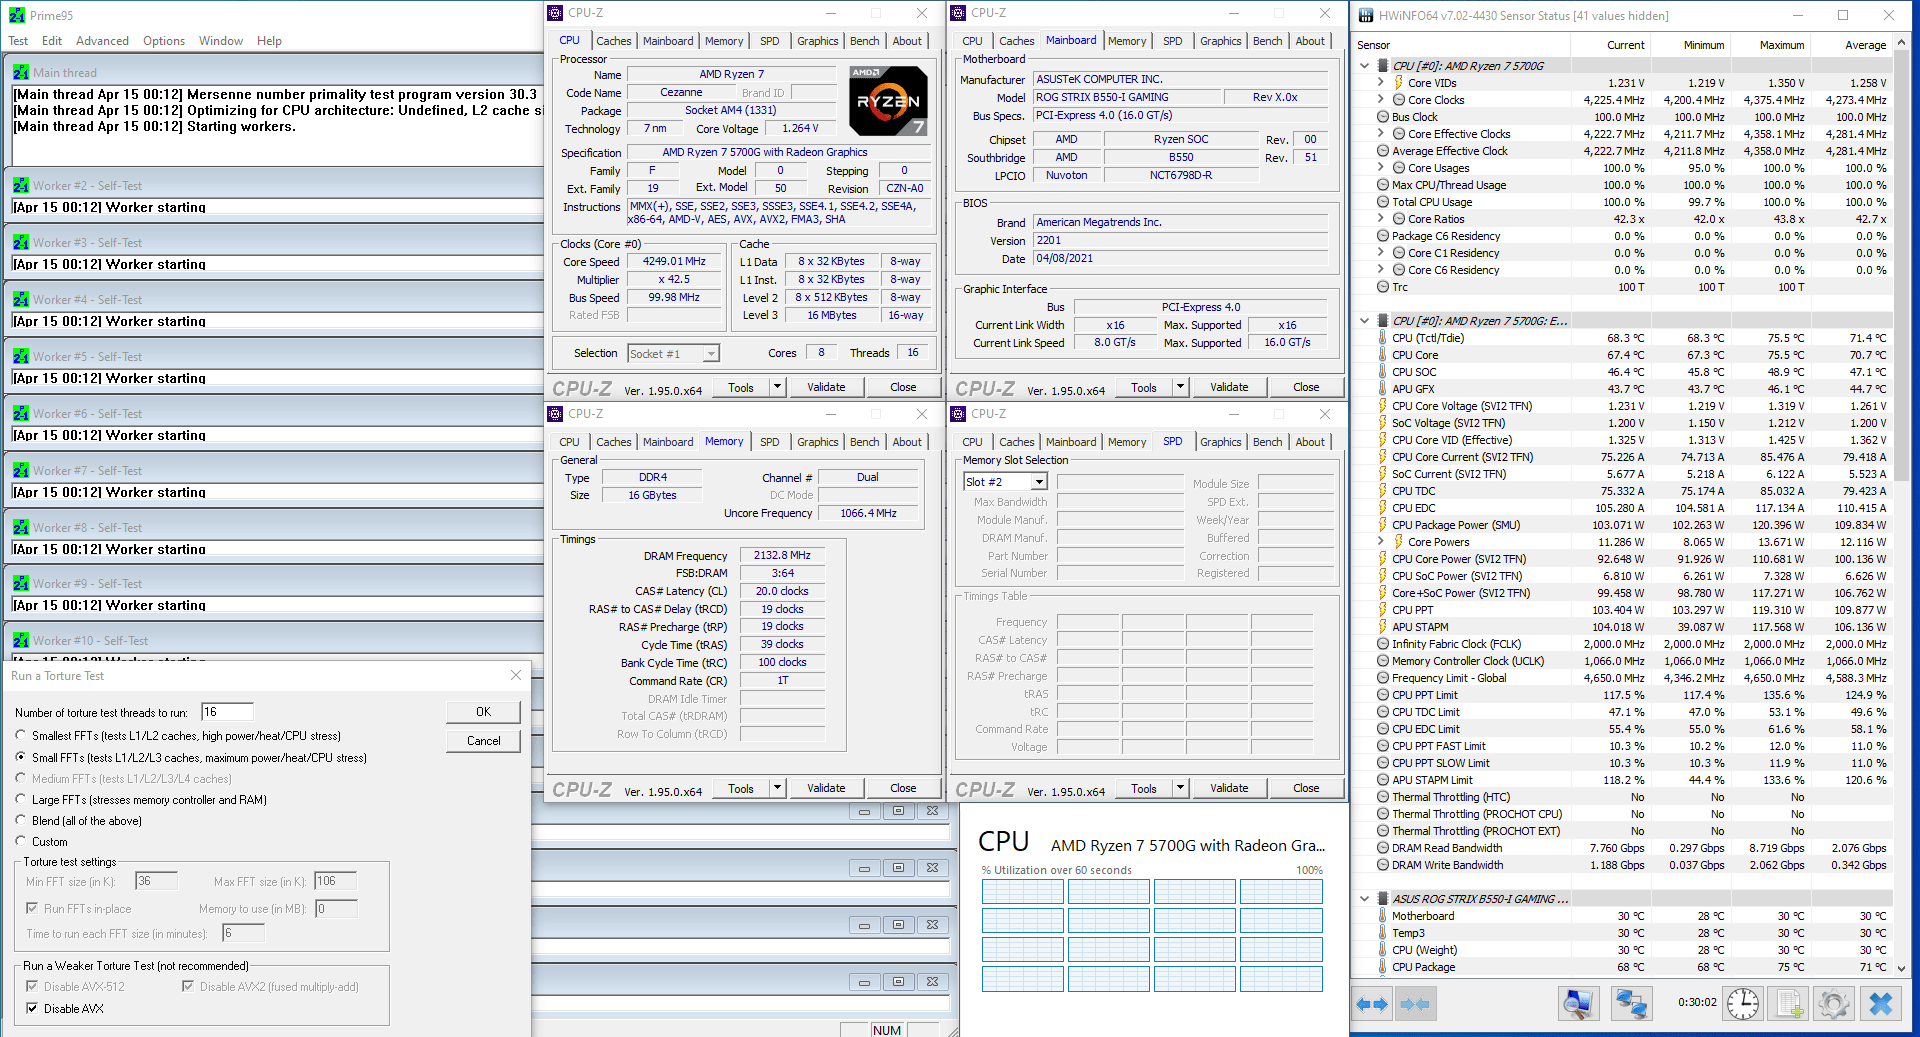
When running Prime 95 Small FFT with AVX disabled, the Ryzen 7 5700G operates stably at 4281 MHz with 1.26 volt. The average CPU temperature is 71.3 degrees centigrade, and the average water temperature is 30 degrees centigrade. The average CPU package power is 71 watts.
Let us make some further adjustments to this system with FCLK and push the GPU a little higher.
OC Strategy #2: PBO FMAX + DOCP + FCLK SYNC + GPU EXTREME
In our second strategy, we build on what we achieved in the first strategy.
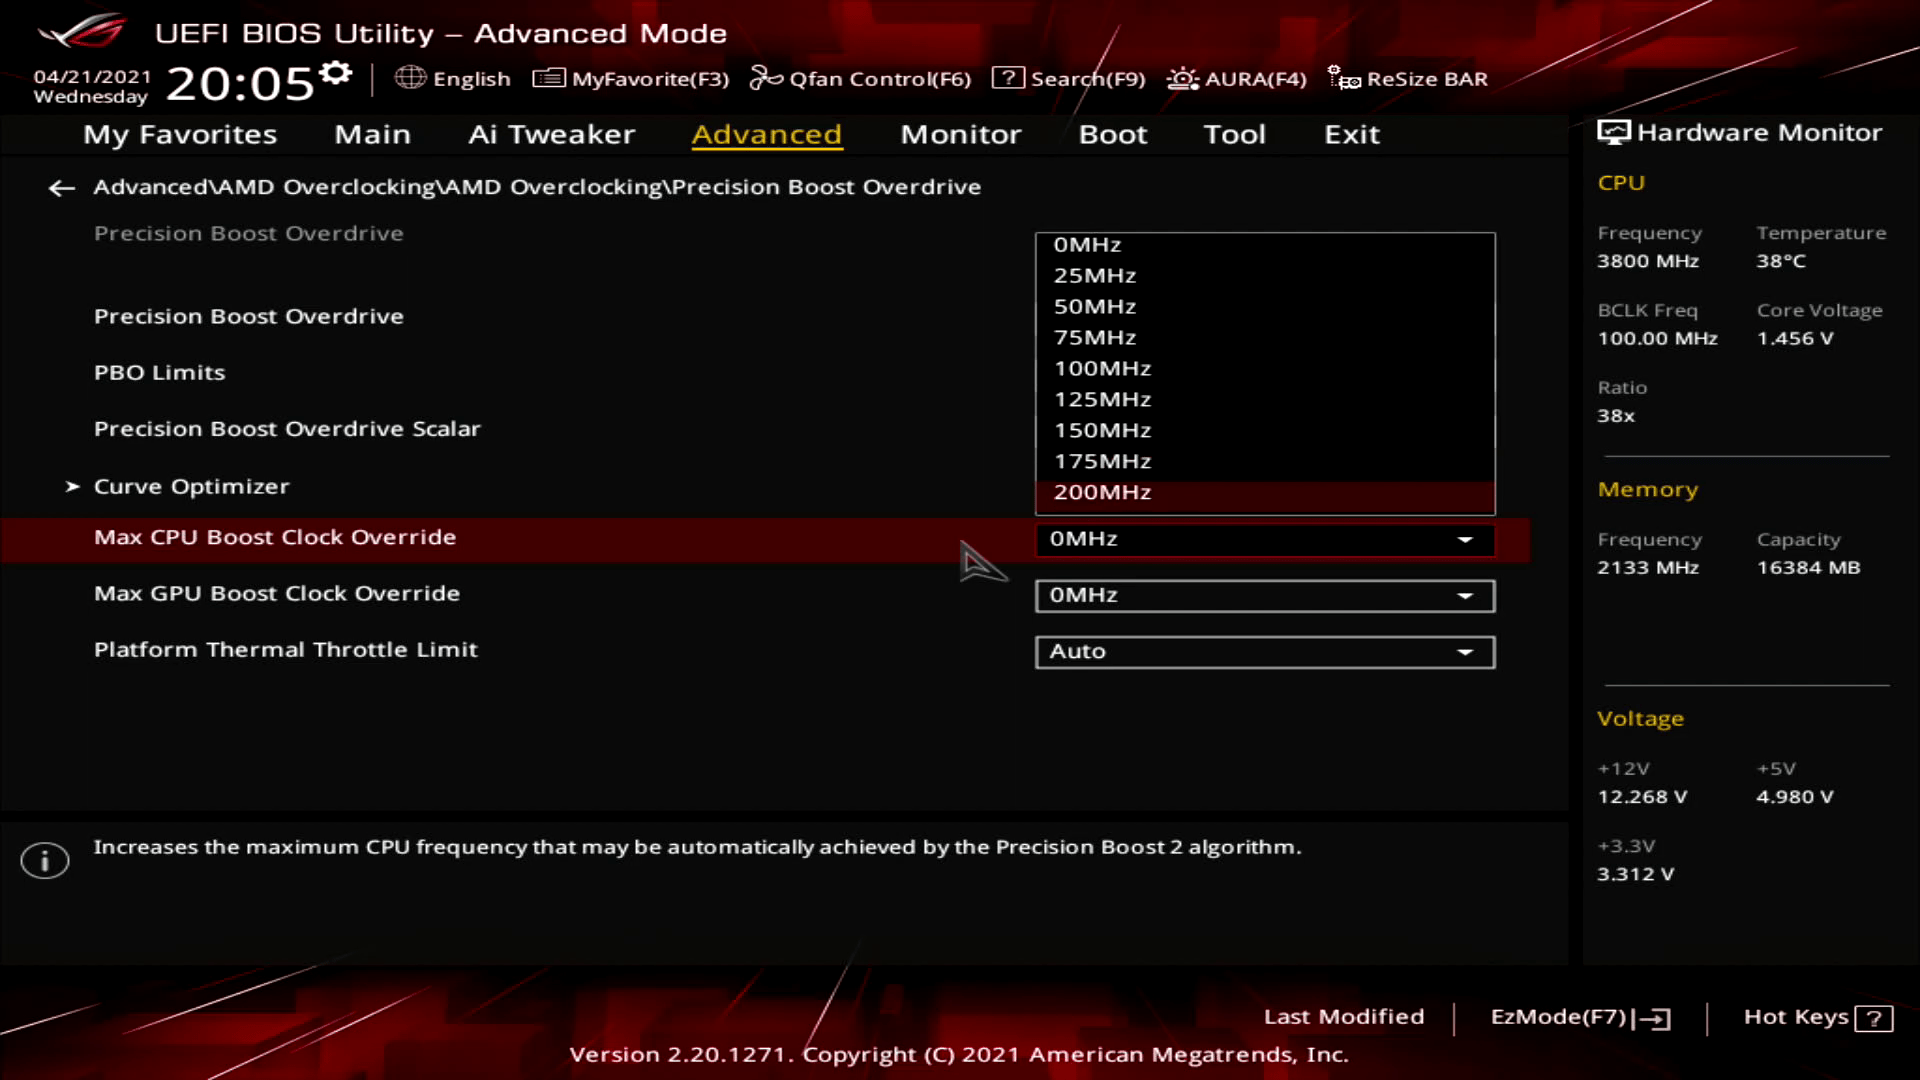
First, we extend the Precision Boost Overdrive frequency headroom by using Fmax Offset. We previously discussed the effects of the Fmax Offset in our Ryzen 5 5600X overclocking article. In short, every AMD Ryzen CPU is limited by its pre-programmed Fmax (or “max frequency”). For the Ryzen 7 5700G, the Fmax is 4.65 GHz. So, no matter how amazing your cooling solution is, Precision Boost Overdrive will never increase the frequency beyond Fmax.
Except of course if you use Fmax Offset. Fmax Offset is an option that allows you to raise the Fmax ceiling of your processor in steps of 25 MHz up to 200 MHz So, in the case of the Ryzen 7 5700G from 4.65 GHz to 4.85 GHz.
We also keep DOCP enabled so the memory is running at DDR4-4266.
Next, we ensure the Fabric, memory controller and system memory operate in synchronous mode.
By default, the fabric, memory controller, and memory frequency operate in “synchronous mode”. That means the CPU will run all frequencies in 1 to 1 ratio. Synchronous mode is relatively taxing for the CPU, so on most Ryzen CPUs, the system will automatically enable “Asynchronous mode” beyond a certain memory frequency. In asynchronous mode, the memory controller will operate at half the frequency of the system memory. The fabric clock will also run below system memory frequency. So, you will have a performance penalty.
In our case, since the performance of the integrated graphics is directly impacted by the latency and speed at which it can access the system memory, synchronous mode should give us a good performance uplift. Fortunately, we can run in synchronous mode with DDR4-4266 memory.
We also increase the GPU frequency by using an ASUS preset in the BIOS. The Extreme Mode preset increases the frequency from the baseline of 2GHz to 2.3GHz.


Upon entering the BIOS
- Go to the Ai Tweaker menu
- Set AI Overclock Tuner to D.O.C.P
- Set FCLK Frequency to 2133MHz
- Set GPU Boost to Extreme Mode
- Enter the Precision Boost Overdrive submenu
- Set Precision Boost Overdrive to Enabled
- Go to the Advanced Meu
- Enter the AMD Overclocking submenu
- Enter the Precision Boost Overdrive submenu
- Set Precision Boost Overdrive to Advanced
- Set Max CPU Boost Clock Override to 200MHz
Then save and exit the BIOS.
We re-ran the benchmarks and checked the performance increase compared to stock operation.
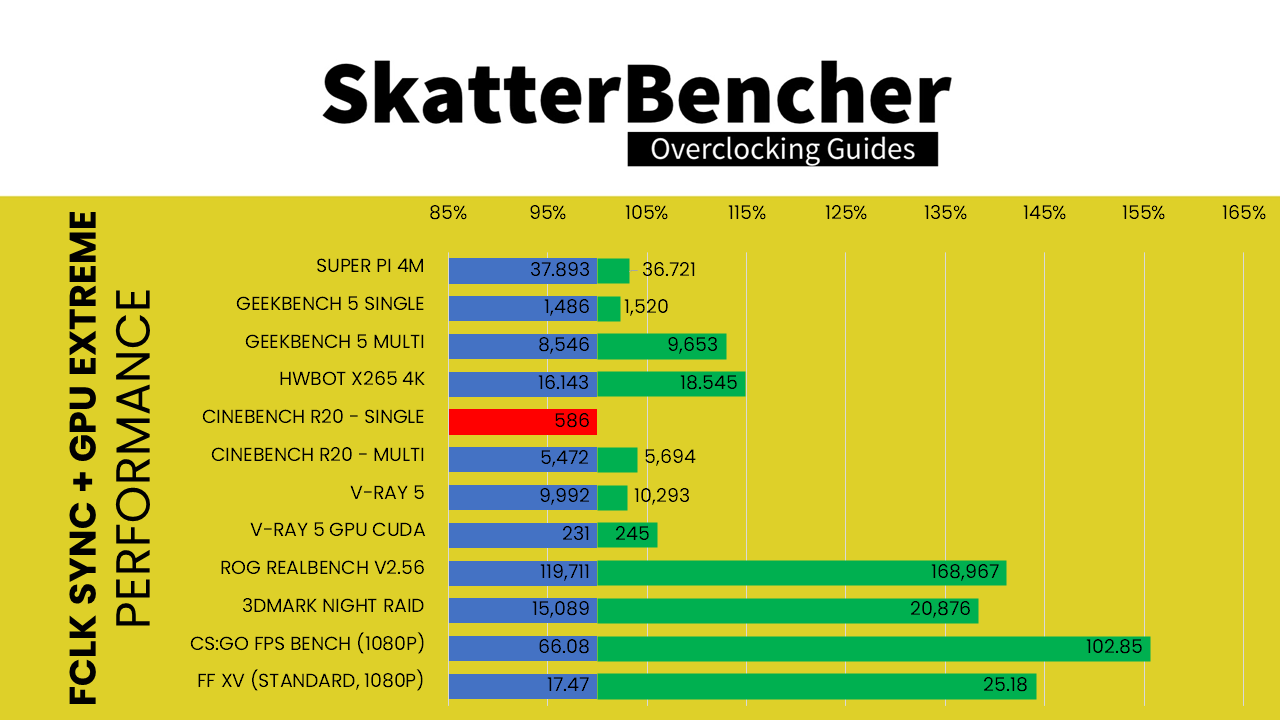
- SuperPI 4M: 3.19%
- Geekbench 5 (single): 2.29%
- Geekbench 5 (multi): 12.95%
- HWBOT X265 4K: 14.88%
- Cinebench R20 Single: -1.37%
- Cinebench R20 Multi: 4.06%
- V-Ray 5: 3.01%
- V-Ray 5 GPU CUDA: 6.06%
- ROG Realbench V2.56: 41.15%
- 3DMark Night Raid: 38.35%
- CS:GO FPS Bench: 55.64%
- Final Fantasy XV: 44.13%
As expected, the performance continues to rise especially in the 3D benchmarks.
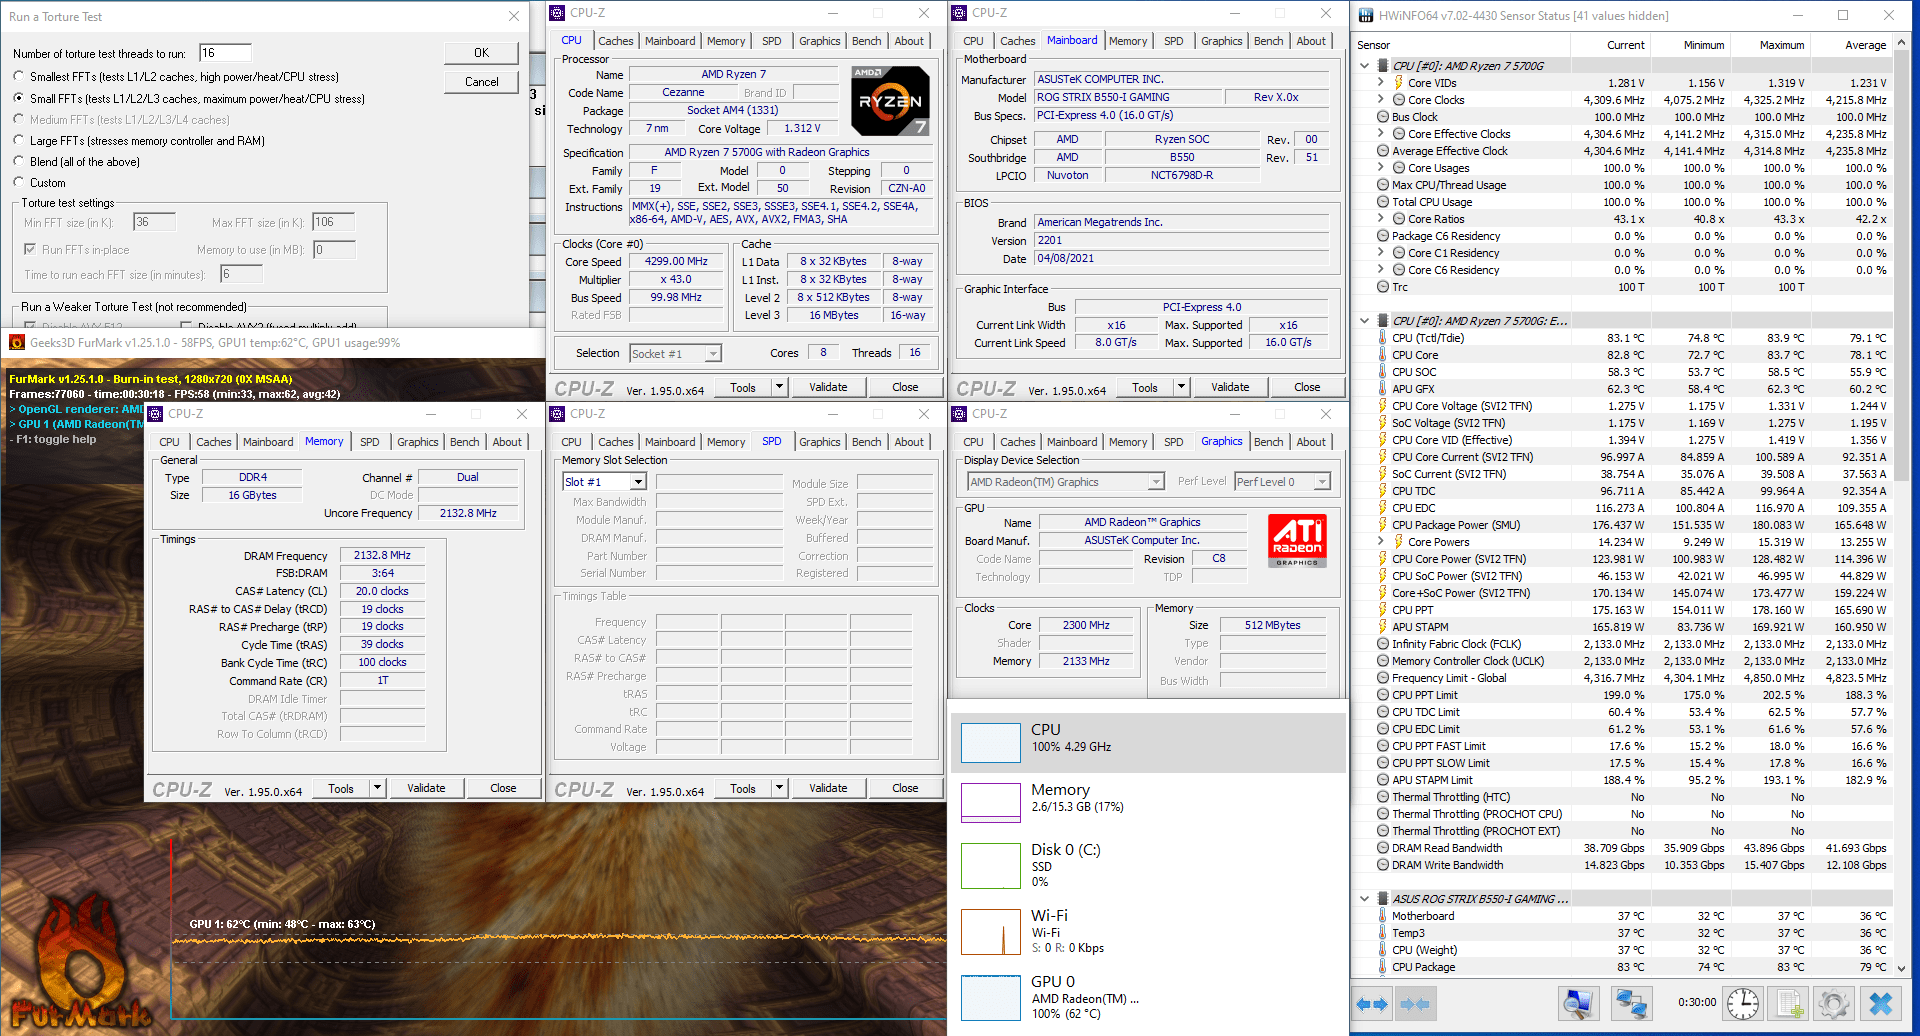
When running Prime 95 Small FFT with AVX enabled and Furmark concurrently, the Ryzen 7 5700G operates stably at 4236 MHz with 1.245 volts. The GPU operates at 2.3 GHz with 1.195v. The average CPU temperature is 79 degrees centigrade; the average GPU temperature is 74 degrees centigrade, and the average water temperature is 31 degrees centigrade. The average CPU package power is 165.7 watts.
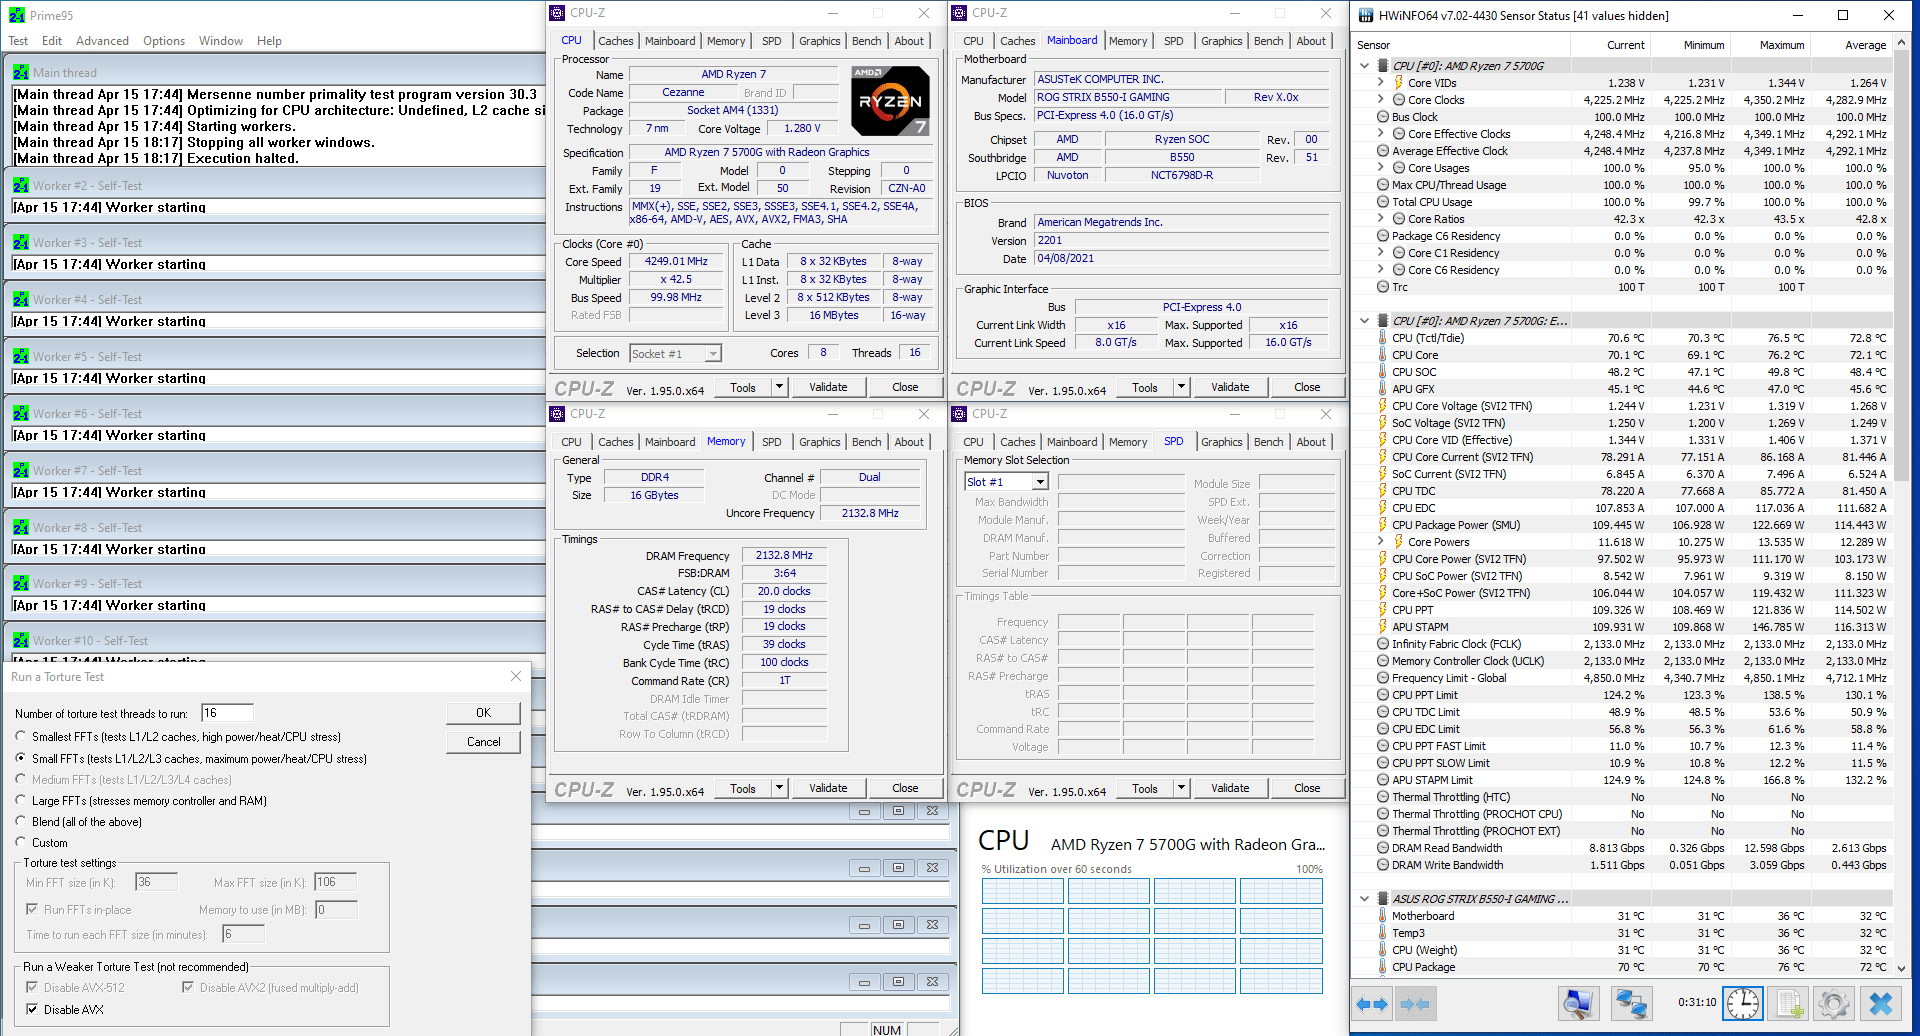
When running Prime 95 Small FFT with AVX disabled, the Ryzen 7 5700G operates stably at 4291 MHz with 1.267 volts. The average CPU temperature is 73 degrees centigrade, and the average water temperature is 31 degrees centigrade. The average CPU package power is 114 watts.
Now let us do some manual CPU overclocking.
OC Strategy #3: Manual APU Overclocking
In our third strategy, we will explore the limits of our APU with some manual overclocking.
Before we start, however, it is important to know that AMD has two overclocking modes: PBO and OC Mode.
The first mode you already know: precision boost overdrive. This mode allows the user to change a limited number of parameters that are included in the PBO algorithm. However, it is still the AMD PBO proprietary algorithm that will eventually determine the performance of the system.
The second overclocking mode is called OC Mode. OC Mode disables all the limiters, voltage controllers, and most protections. OC Mode is automatically activated when the user raises the base frequency. A major downside of OC Mode is that all automatic overclocking features are disabled too. That means you lose the benefit of the high single-threaded frequencies that PBO offers.
Based on the Prime95 results from our previous overclocking strategy, we know for multi-threaded heavy workloads there is about 10 degrees centigrade headroom at 4.2 GHz with 1.245V.
After a bit of testing, we eventually reached a stable overclock of 4.4 GHz with 1.325V set in the BIOS. This is a little over 150 MHz higher than what PBO offers for all-core frequency. However, it is also about 200 MHz lower than the default single-threaded turbo boost frequency.
We keep D.O.C.P enabled and maintain the synchronous mode for fabric and memory controller.
Next up is the integrated graphics. The voltage of the integrated graphics is derived from the SOC power domain. So, but simply setting a manual SOC Voltage we can increase the frequency headroom for the GPU. In the end, we managed to increase the GPU frequency up to 2.5 GHz.
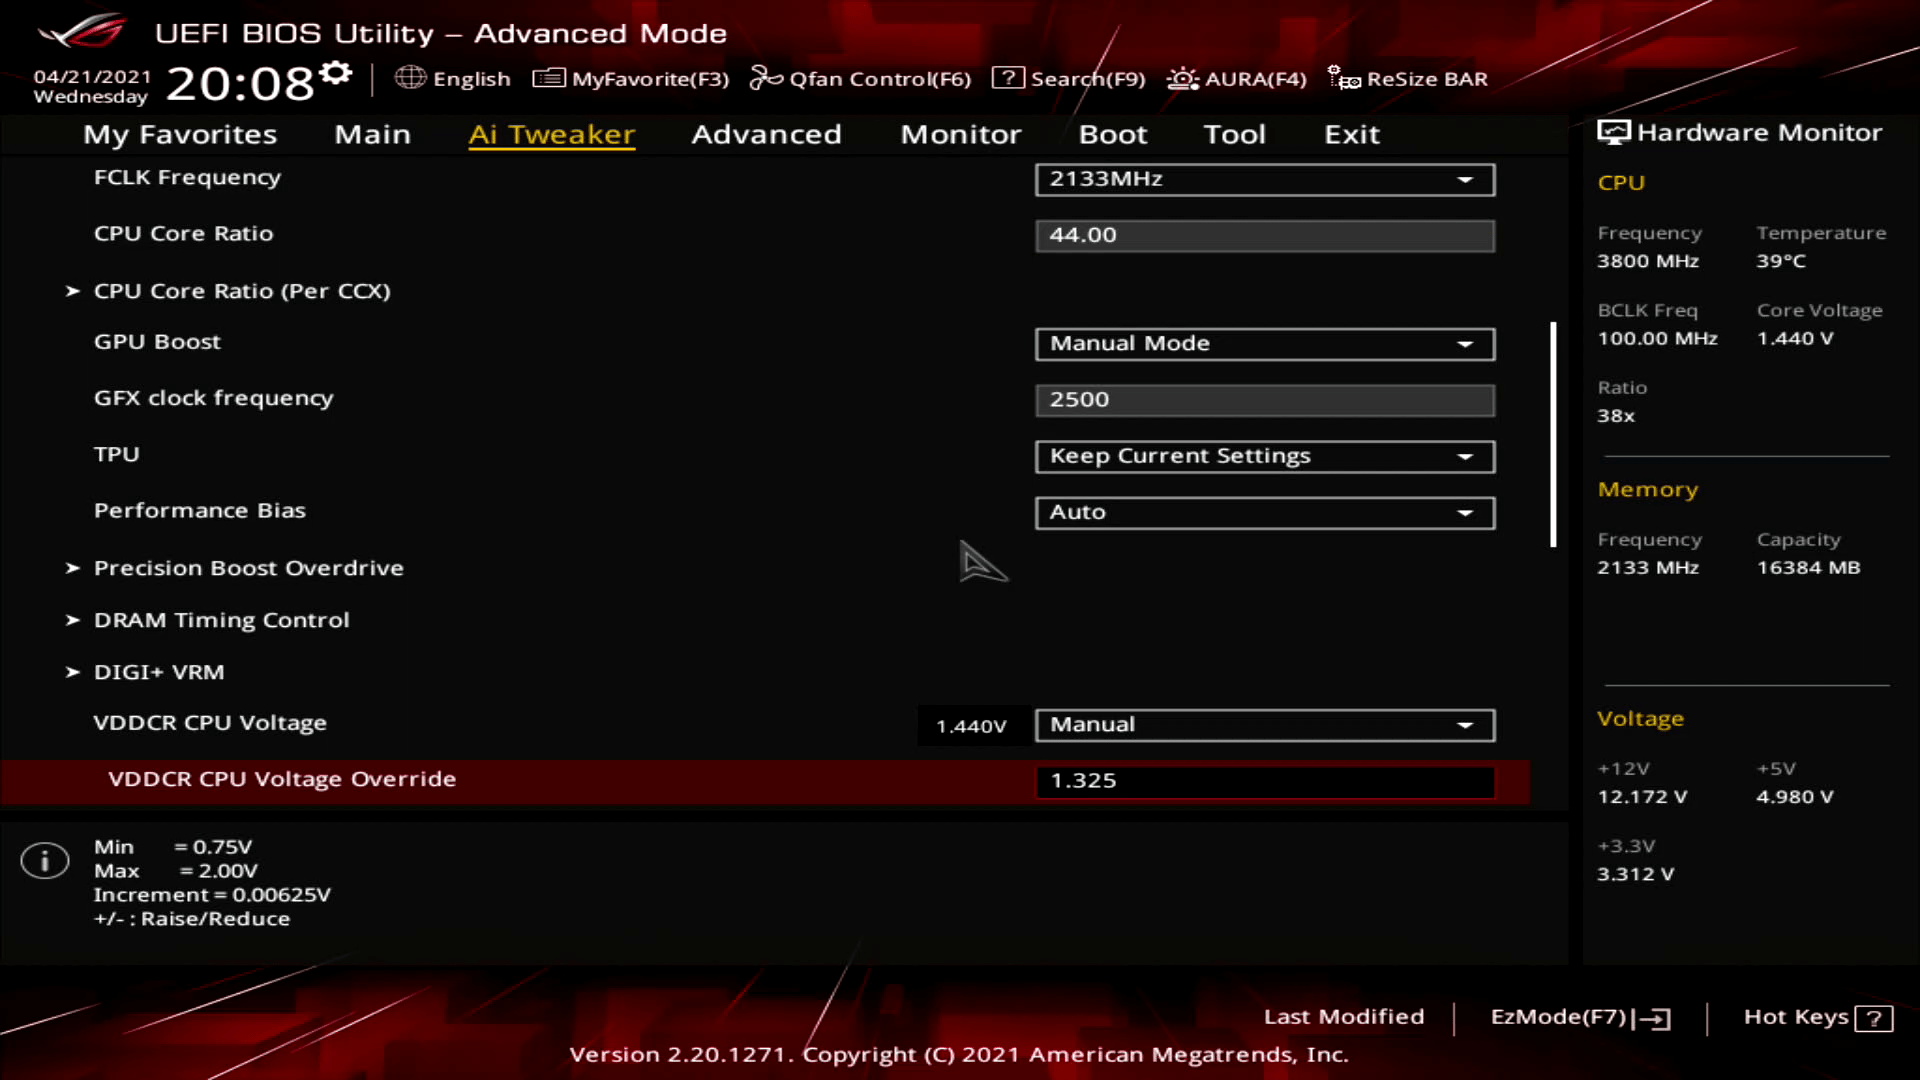


Upon entering the BIOS
- Go to the Ai Tweaker menu
- Set AI Overclock Tuner to D.O.C.P
- Set FCLK Frequency to 2133MHz
- Set CPU Core Ratio to 44
- Set GPU Boost to Manual Mode
- Set FGX clock frequency to 2500.
- Enter the DIGI+ VRM submenu.
- Set VDDCR CPU Load Line Calibration to Level 4
- Exit the DIGI+ VRM submenu.
- Go to the Advanced Menu
- Set VDDCR CPU Voltage to Manual
- Set VDDCR CPU Voltage Override to 1.325V
- Set VDDCR SOC Voltage to Manual
- Set VDDCR SOC Voltage Override to 1.35V
Then save and exit the BIOS.
We re-ran the benchmarks and checked the performance increase compared to stock operation.
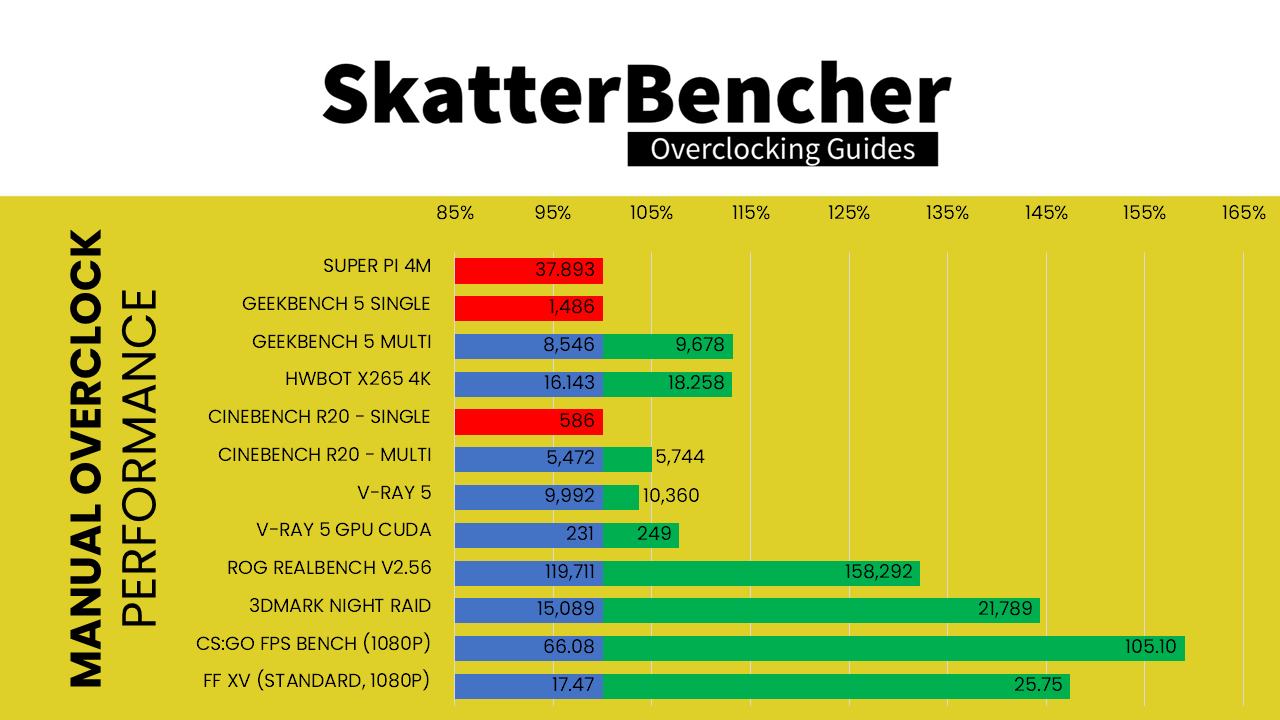
- SuperPI 4M: -1.02%
- Geekbench 5 (single): -0.87%
- Geekbench 5 (multi): +13.25%
- HWBOT X265 4K: +13.10%
- Cinebench R20 Single: -4.61%
- Cinebench R20 Multi: +4.97%
- V-Ray 5: +3.68%
- V-Ray 5 GPU CUDA: +7.79%
- ROG Realbench V2.56: +32.23%
- 3DMark Night Raid: +44.40%
- CS:GO FPS Bench: +59.05%
- Final Fantasy XV: +47.40%
As you can see, the performance increases across the board. We find the highest performance results in the multi-threaded benchmarks and also in the 3D benchmarks. However, in the single-threaded benchmarks, we lose out against an APU at default settings. That is of course because the default turbo boost is up to 4.6GHz and we are only running 4.4 GHz.
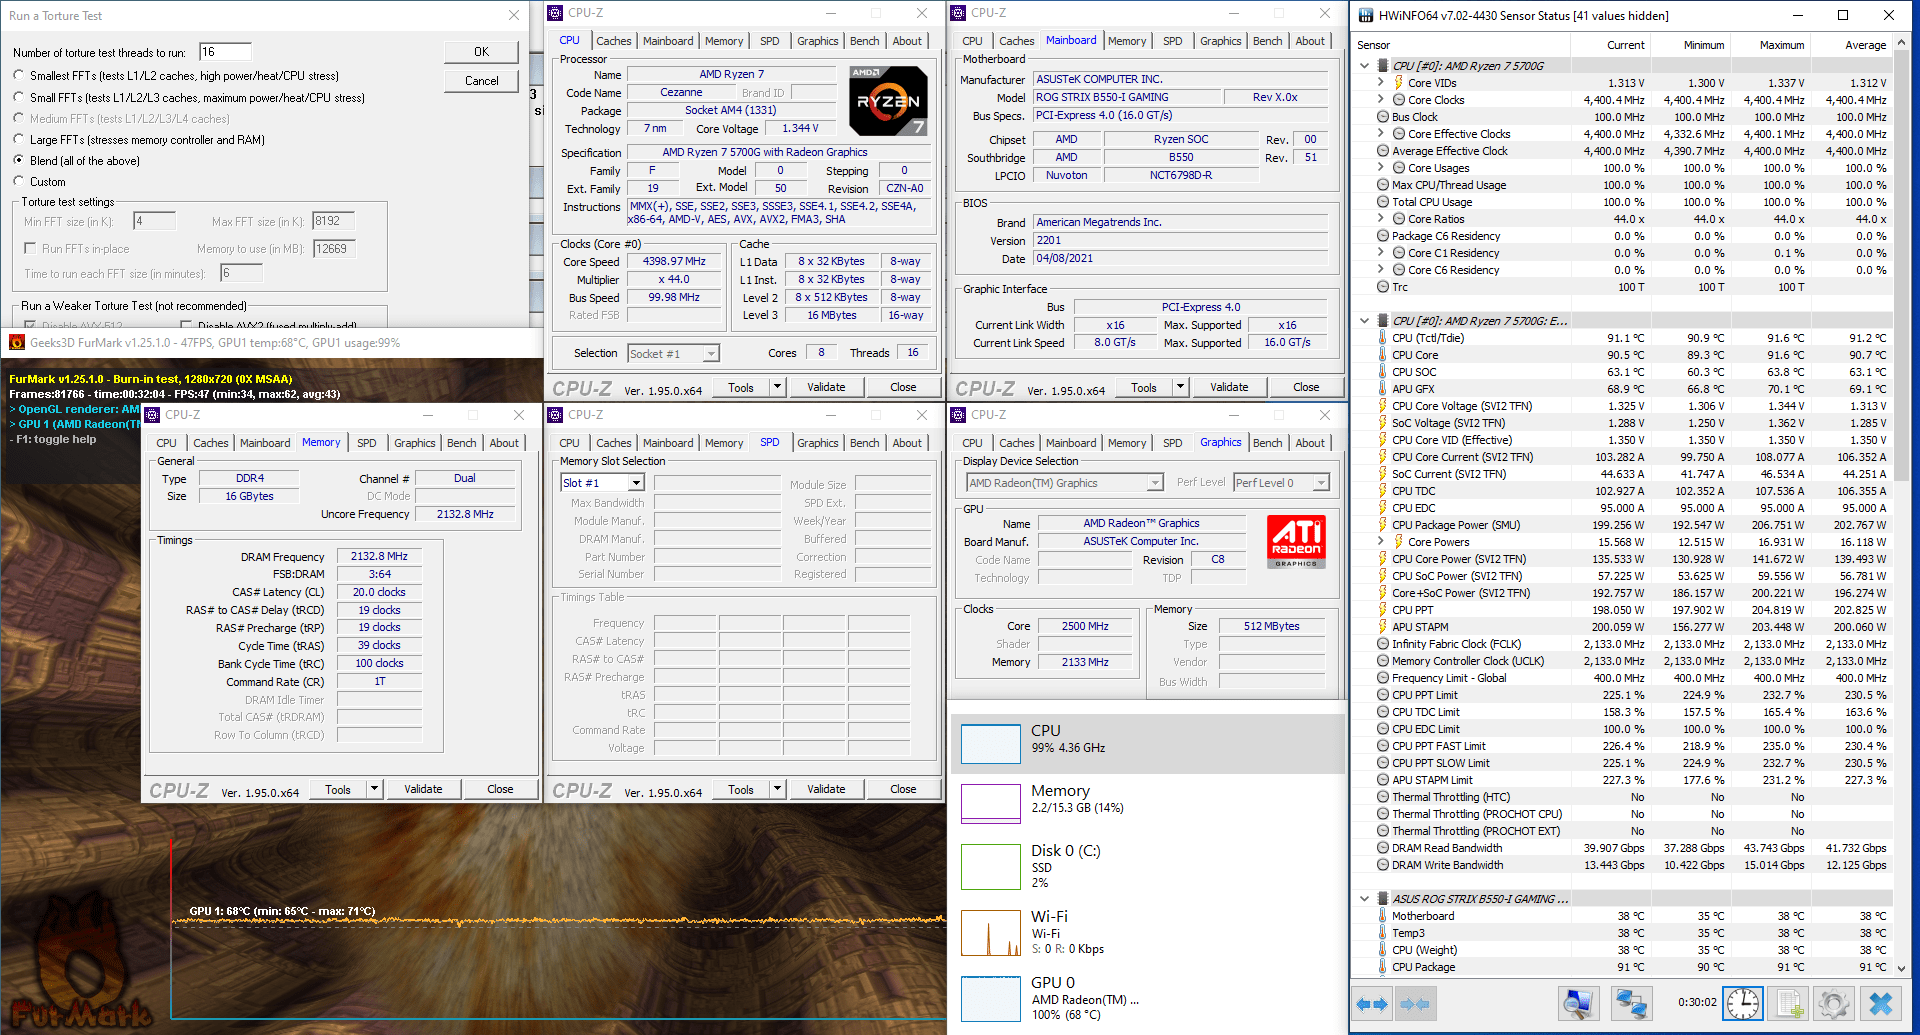
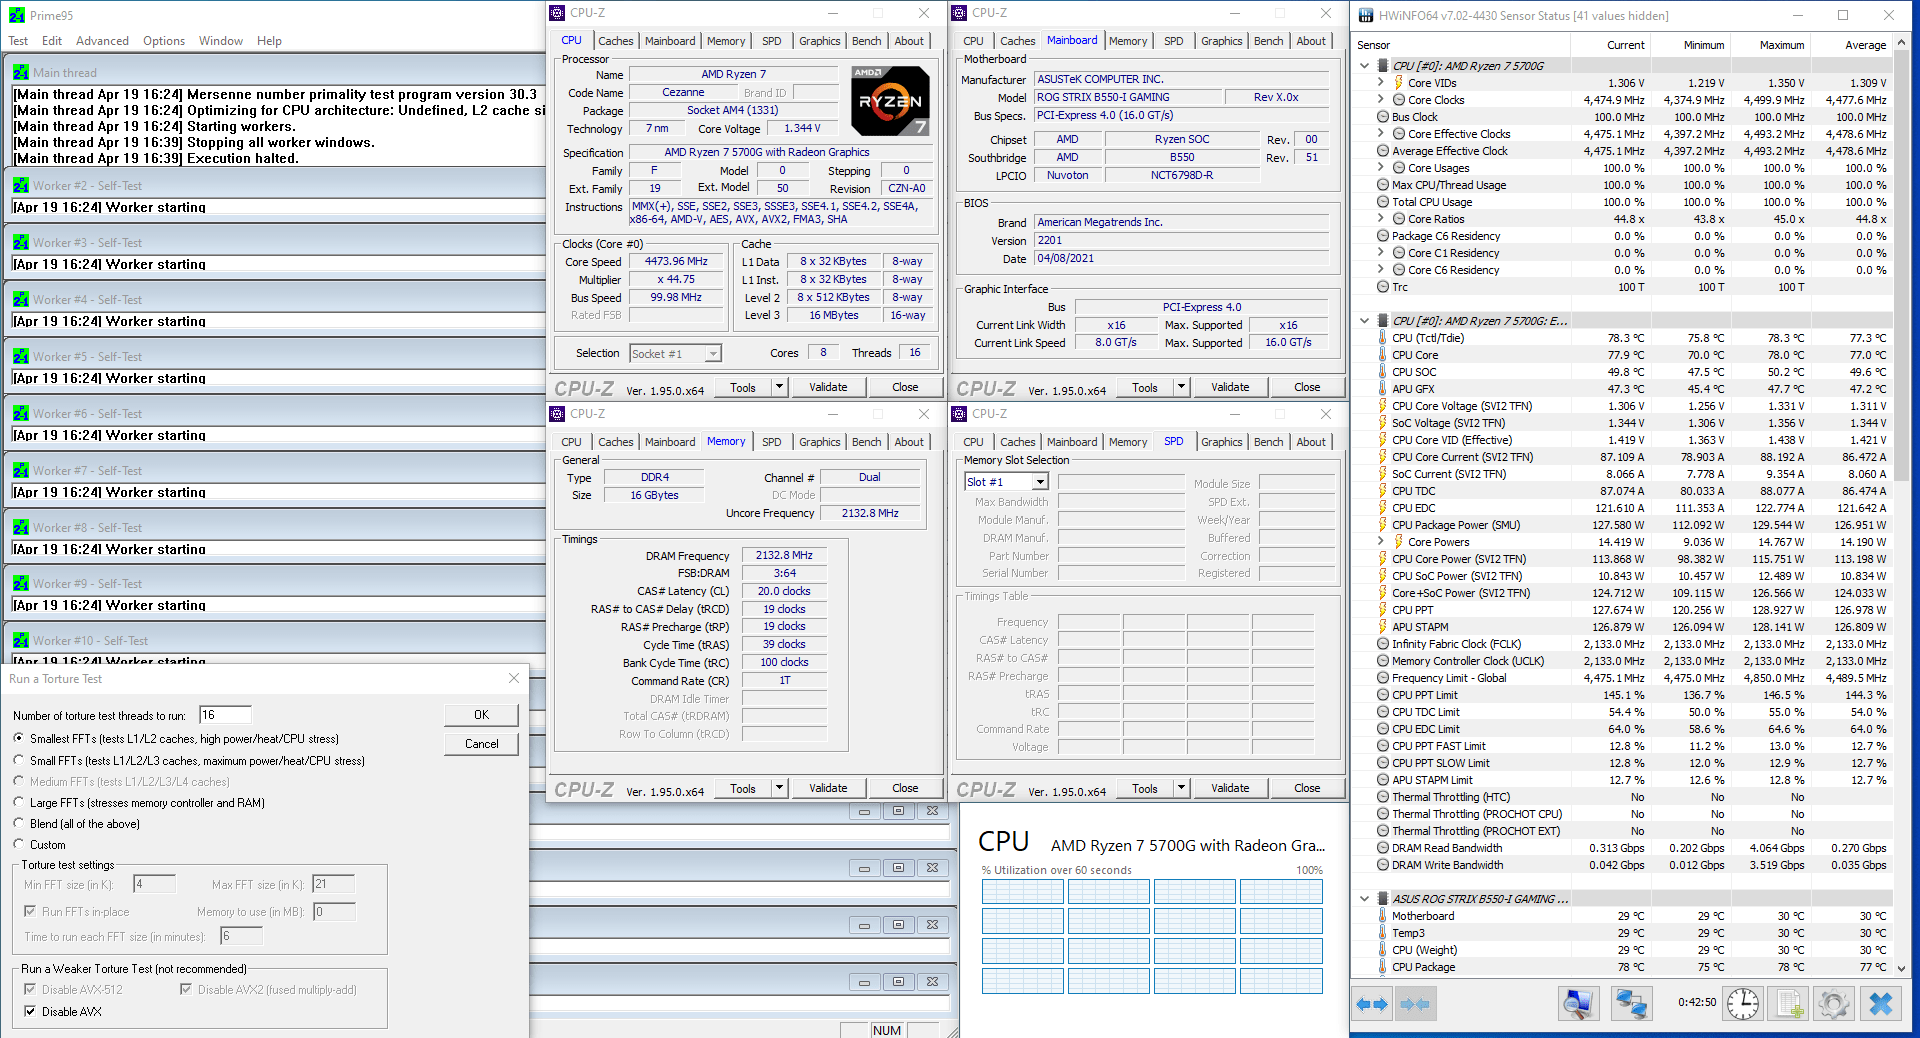
When running Prime 95 Small FFT with AVX enabled and Furmark concurrently, the Ryzen 7 5700G operates stably at 4400 MHz with 1.284 volts. The GPU operates at 2.5 GHz with 1.284v. The average CPU temperature is 91 degrees centigrade; the average GPU temperature is 85 degrees centigrade, and the average water temperature is 33 degrees centigrade. The average CPU package power is 202.6 watts.
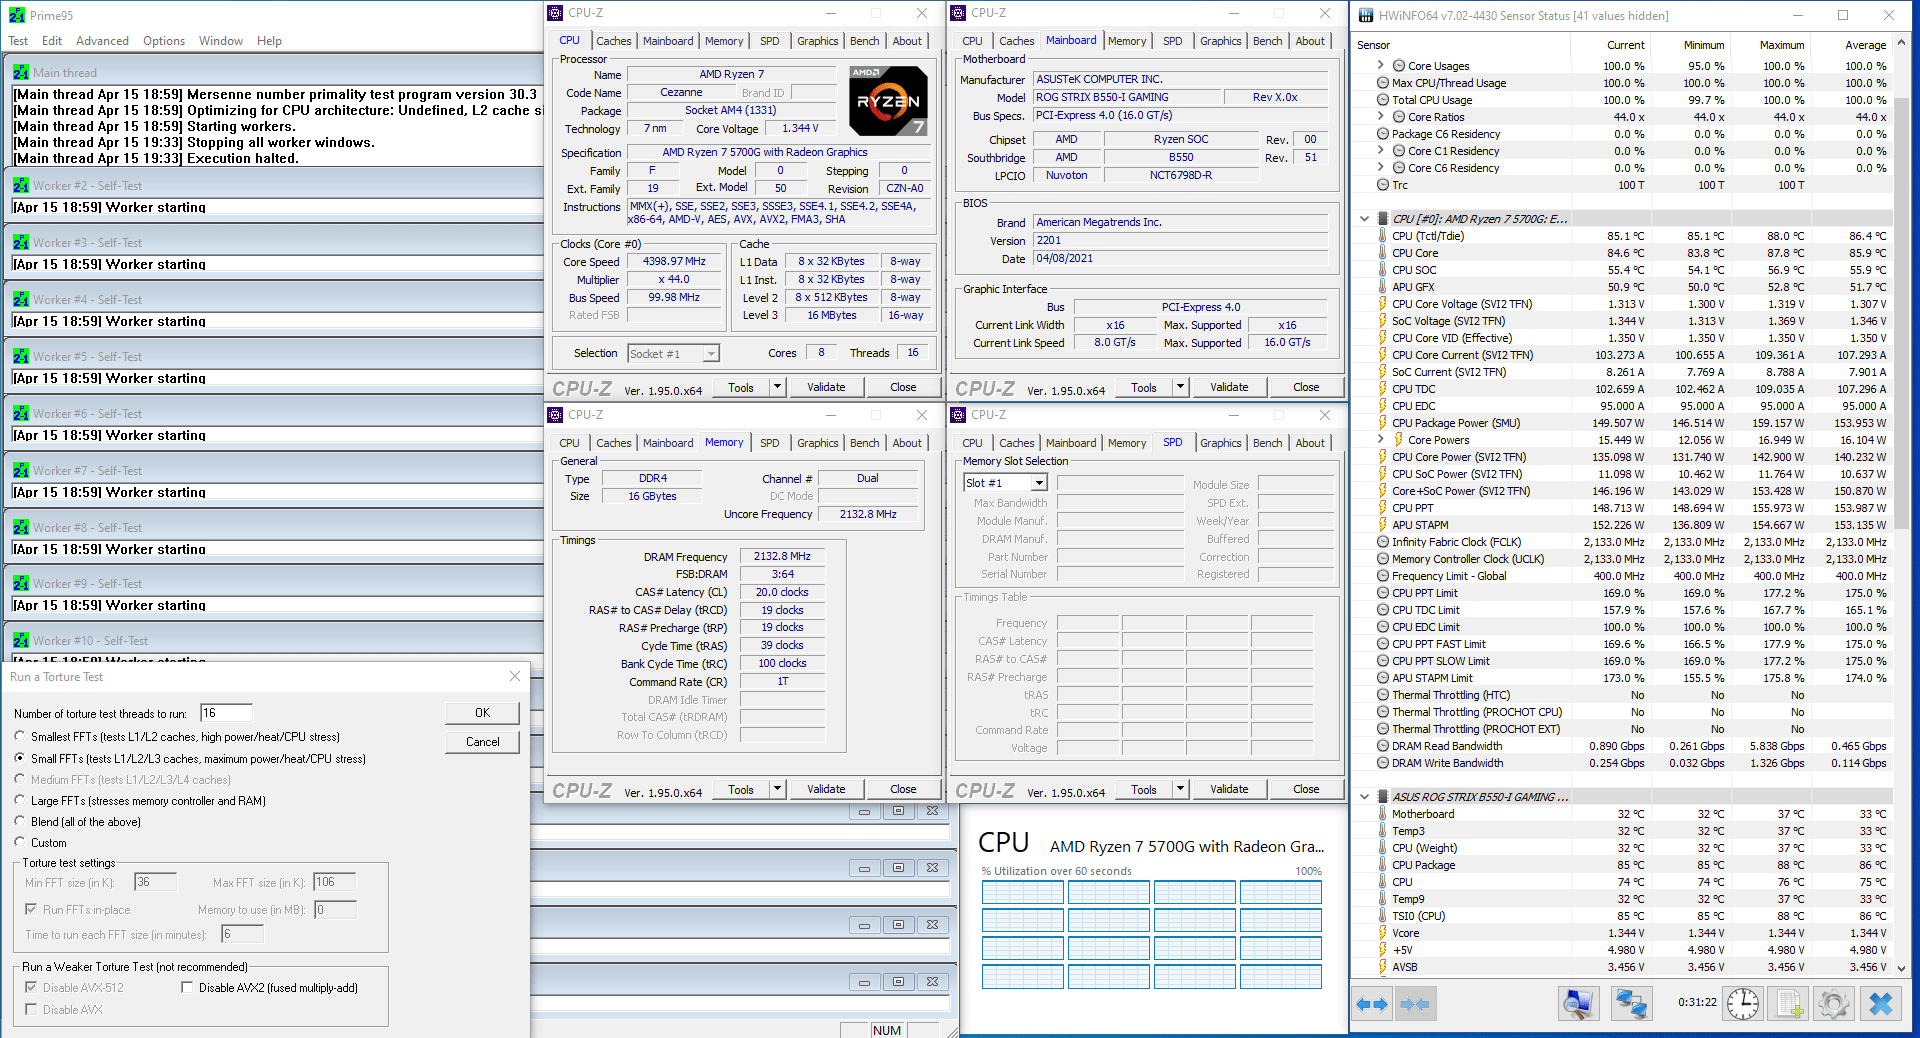
When running Prime 95 Small FFT with AVX disabled, the Ryzen 7 5700G operates stably at 4400 MHz with 1.307 volts. The average CPU temperature is 86 degrees centigrade, and the average water temperature is 32 degrees centigrade. The average CPU package power is 153.8 watts.
Now, for our final overclocking strategy, let us explore Precision Boost Overdrive 2 and Curve Optimizer to extract the maximum performance out of our system.
Exploring Precision Boost Overdrive 2 and Curve Optimizer
As I mentioned earlier in this video, Precision Boost Overdrive is an extension PBO of the Precision Boost technology that is included in all AMD Ryzen CPUs.
Precision Boost allows the CPU to opportunistically increase its clock frequency over base frequency based on the available power and thermal headroom. https://youtu.be/426hLGoXDbM
Precision Boost Overdrive preserves all the automated intelligence and boost built into the Ryzen CPU. So, AMD claims it provides the user with the best of both worlds: on the one hand it provides the user with an ability to leverage superior cooling to achieve higher performance, and on the other hand the algorithm will still aim to maximize the performance in a wide variety of workloads. In fact, a major benefit of Precision Boost Overdrive is that it increases both the single-core and all-core maximum frequency. That is not the case when manual overclocking as typically the user must sacrifice a lot of single-core frequency.
Precision Boost Overdrive uses a proprietary algorithm with inputs from plenty of sensors inside the CPU to determine what is the optimal frequency and voltage at any given time. It is important to mention that using Precision Boost Overdrive is a form of overclocking and is therefore not covered by warranty.
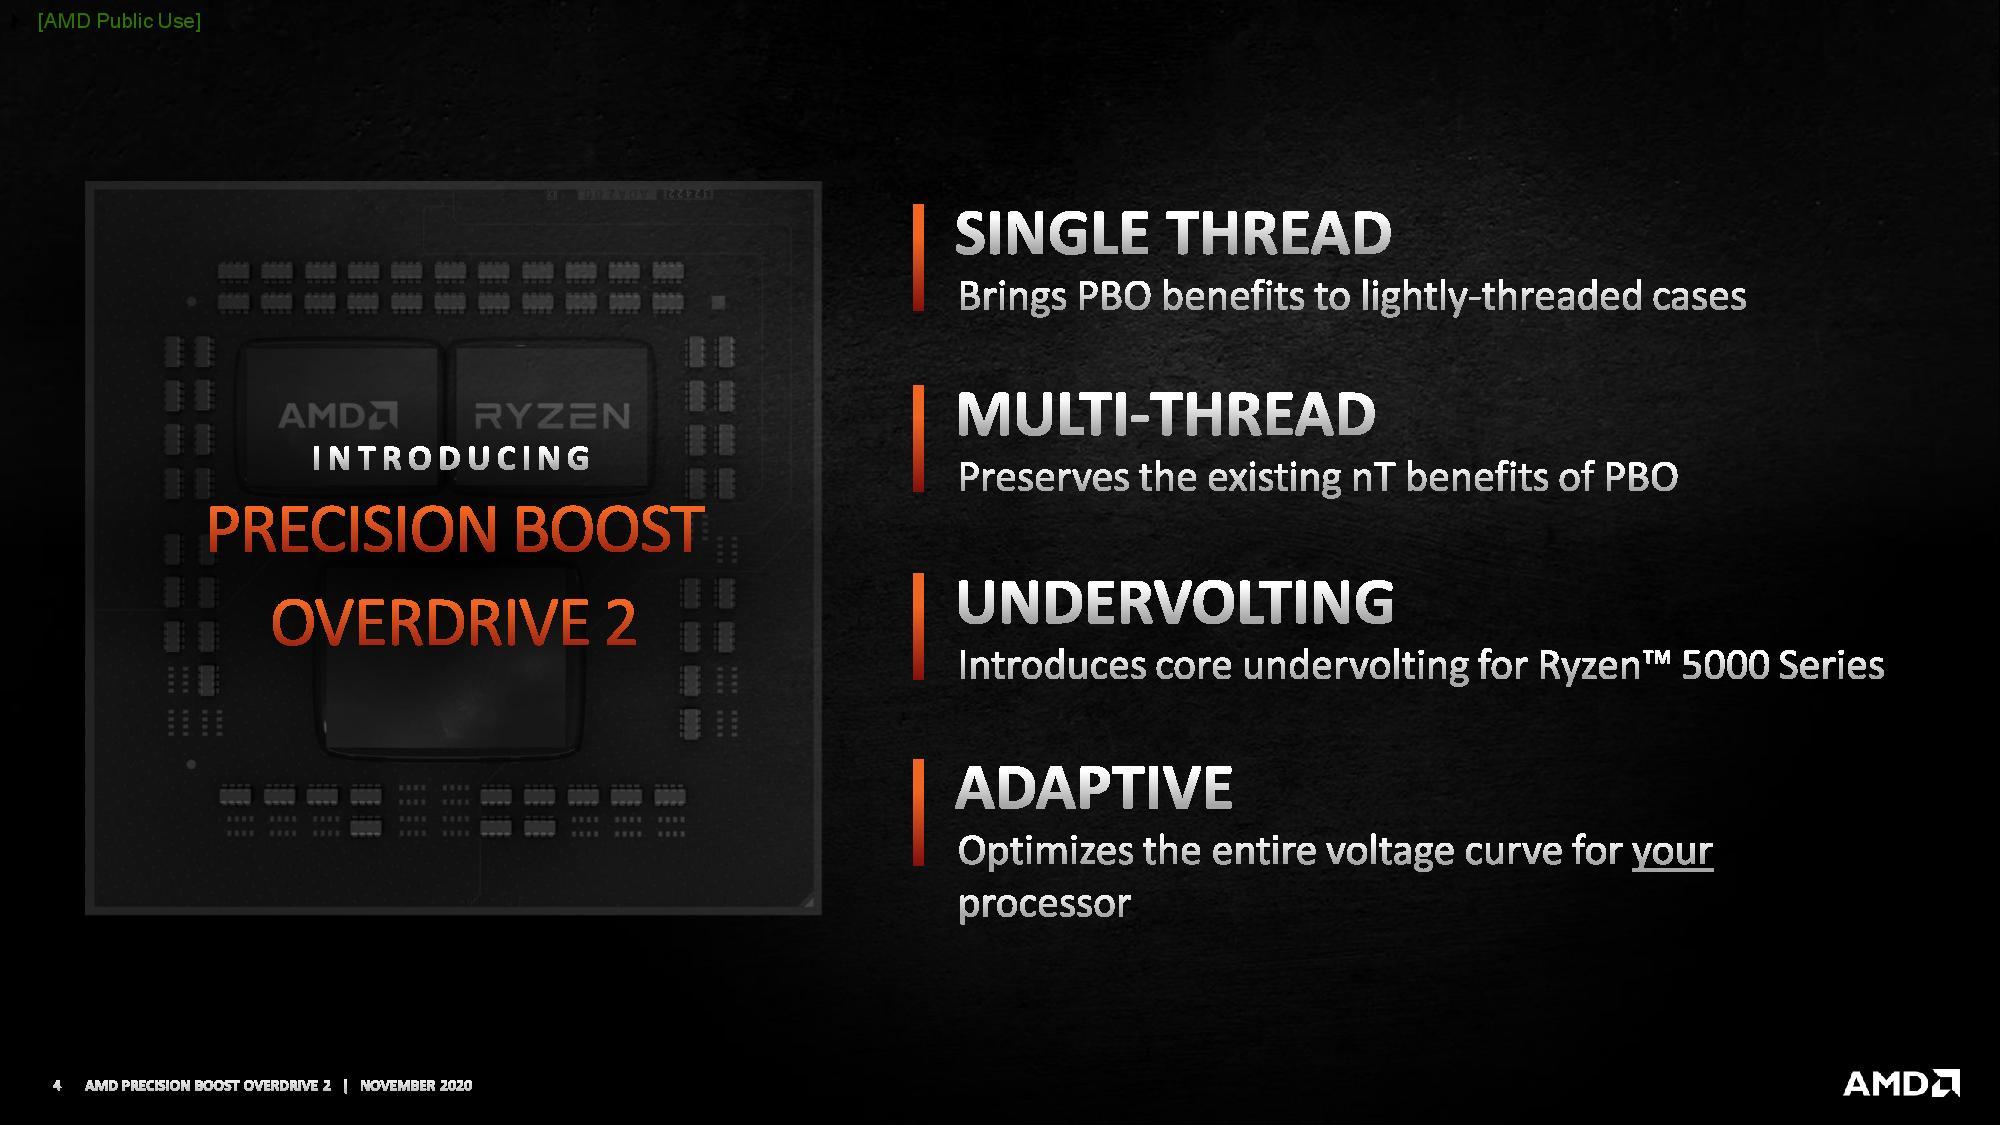
Together with the launch of the Ryzen 5000 desktop processors in November 2020, AMD introduced Precision Boost Overdrive 2. Before we start trying out this feature ourselves, let us first have a quick look at what AMD has to say about it.


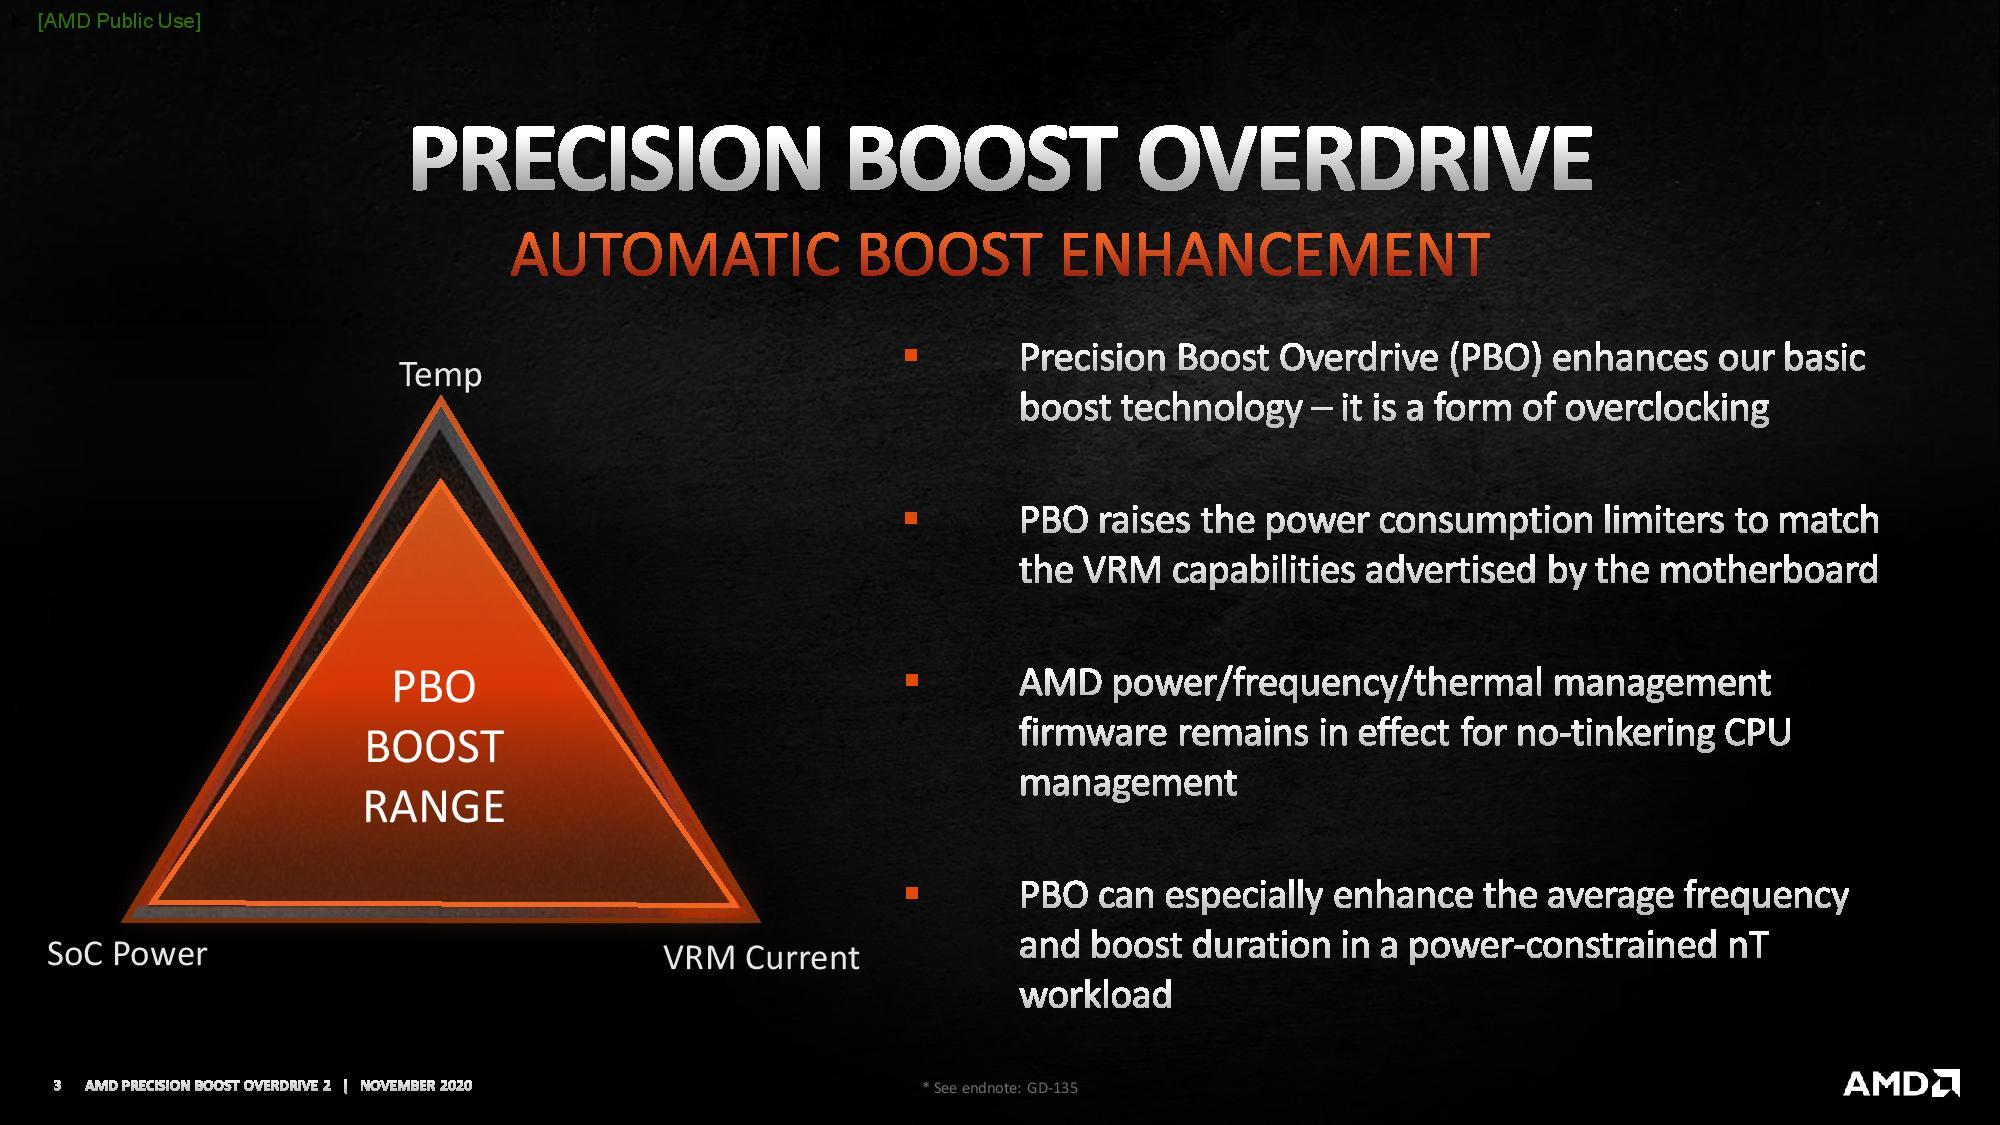
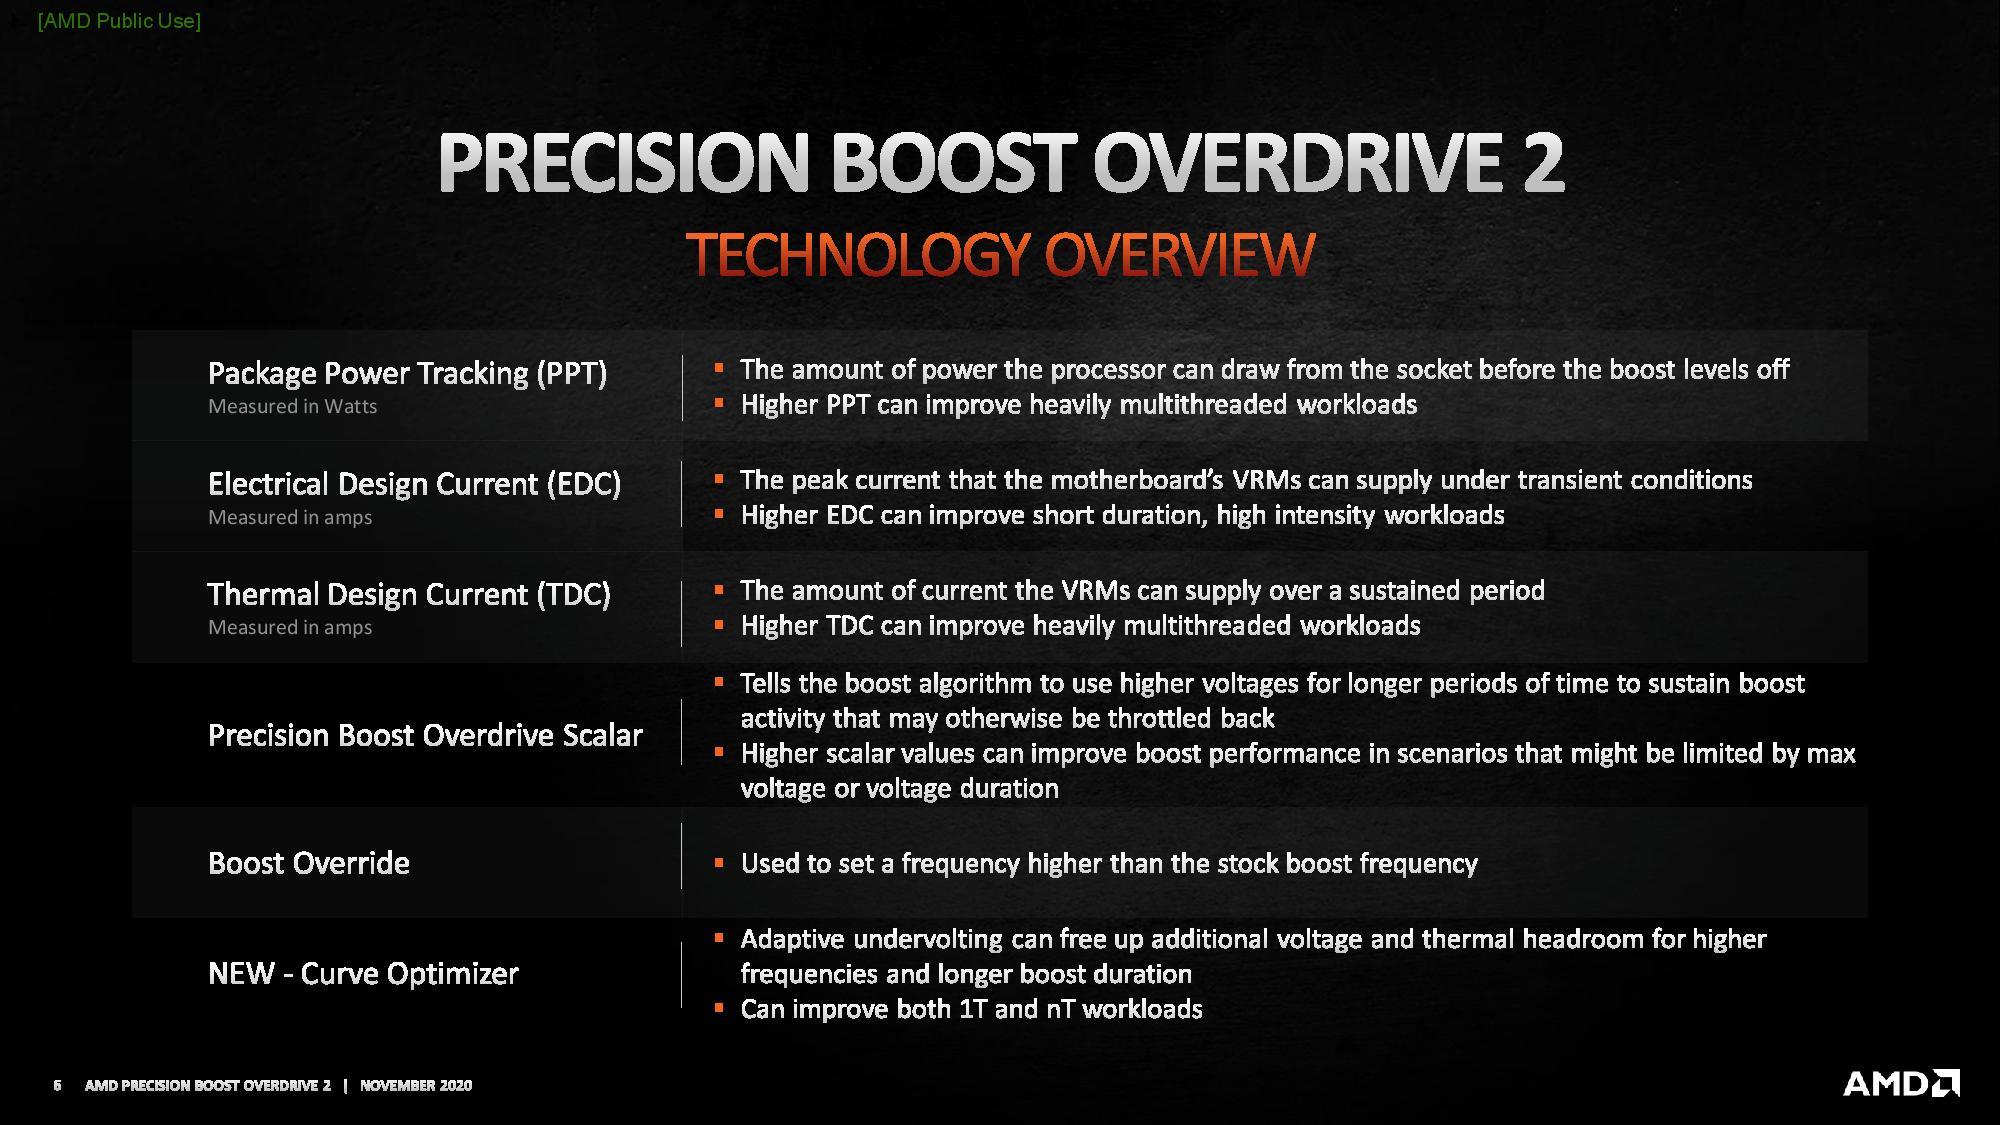


When Precision Boost Overdrive 2 is enabled, the maximum operating frequency is governed by 3 major inputs: total socket power, the motherboard VRM current, and the CPU temperature. The System Management Unit, or SMU, onboard the Ryzen CPU continuously monitors the system and decides to boost more or boost less.
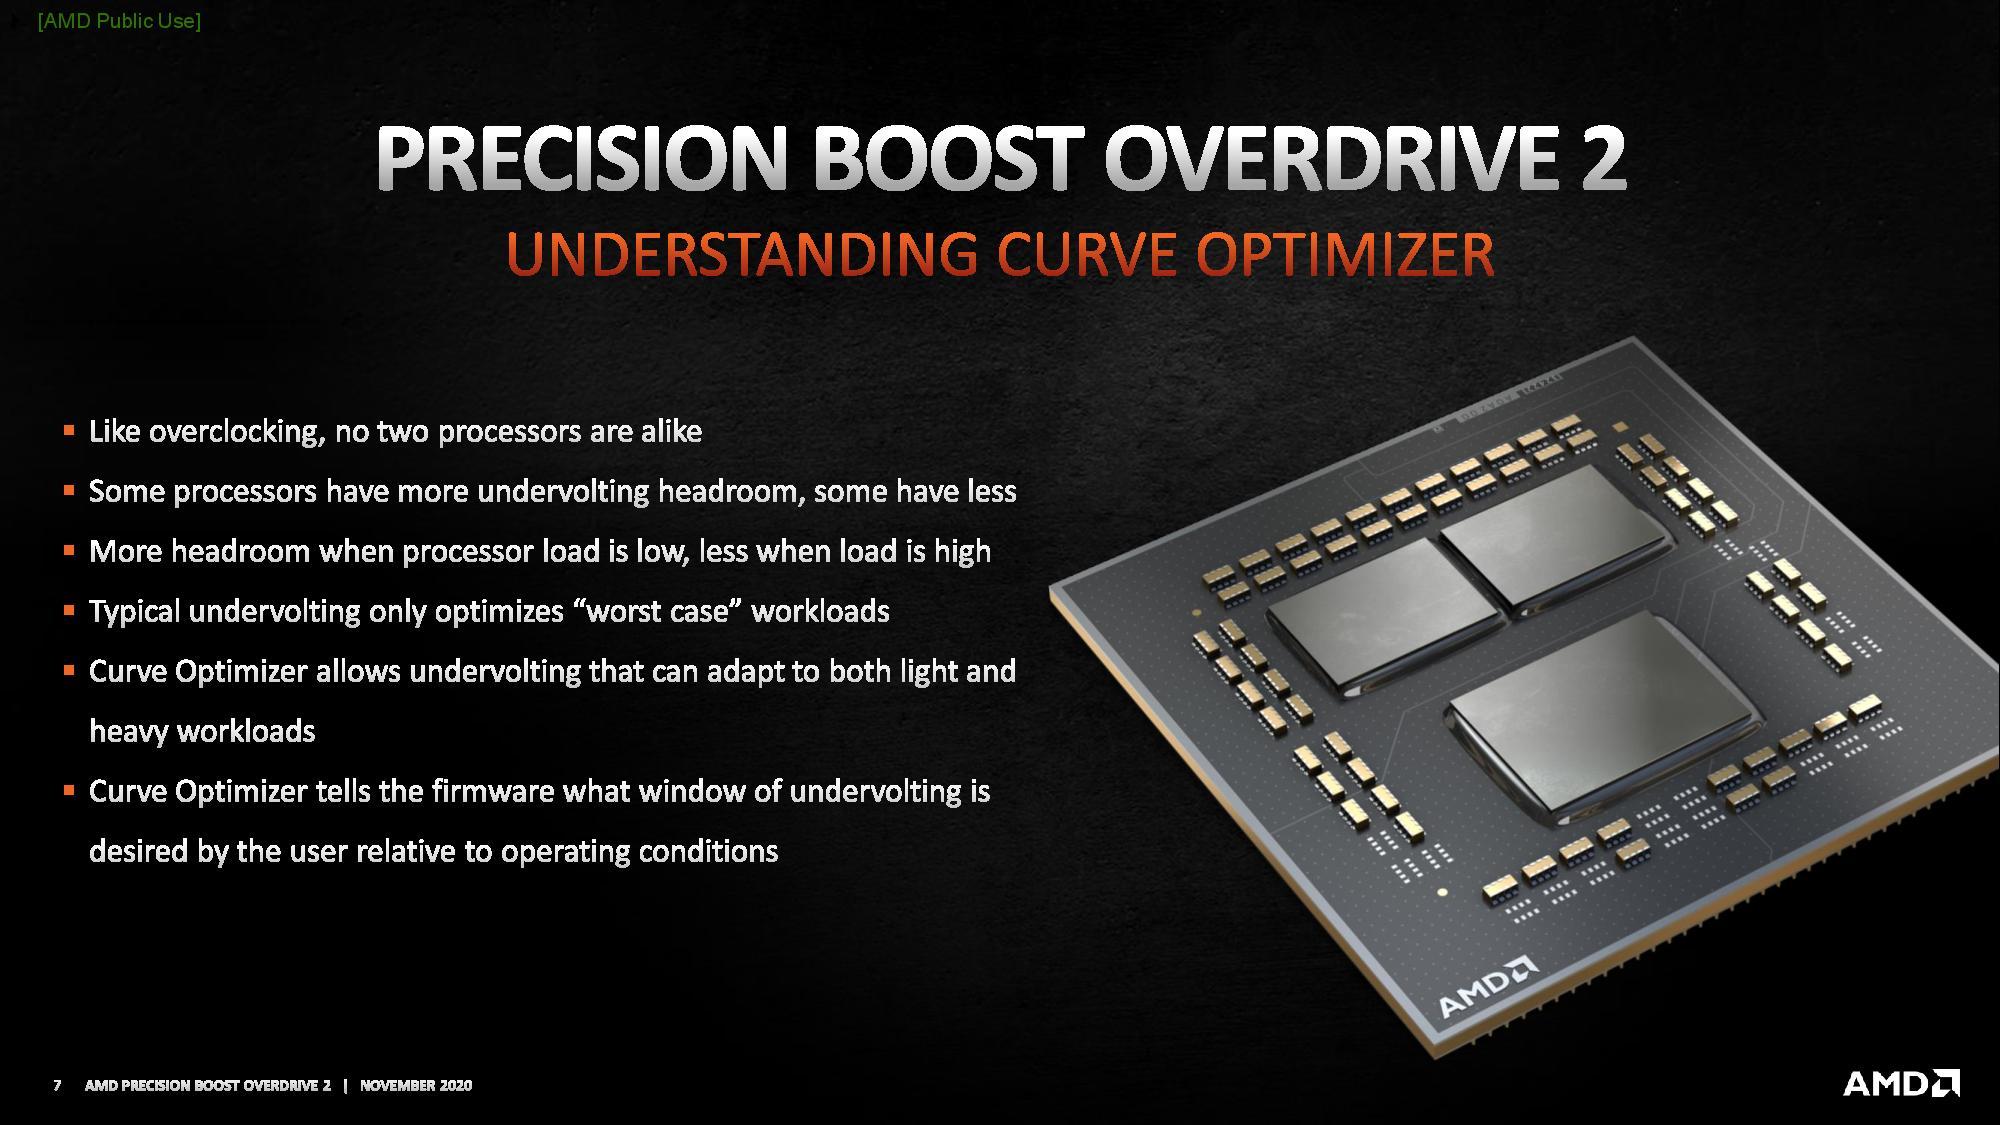
A key new feature of Precision Boost Overdrive 2 is the Curve Optimizer. Curve Optimizer allows the user to customize voltages and frequencies and adjust the default factory-set voltage-frequency curve.
There are 6 key settings important when using Precision Boost Overdrive 2:
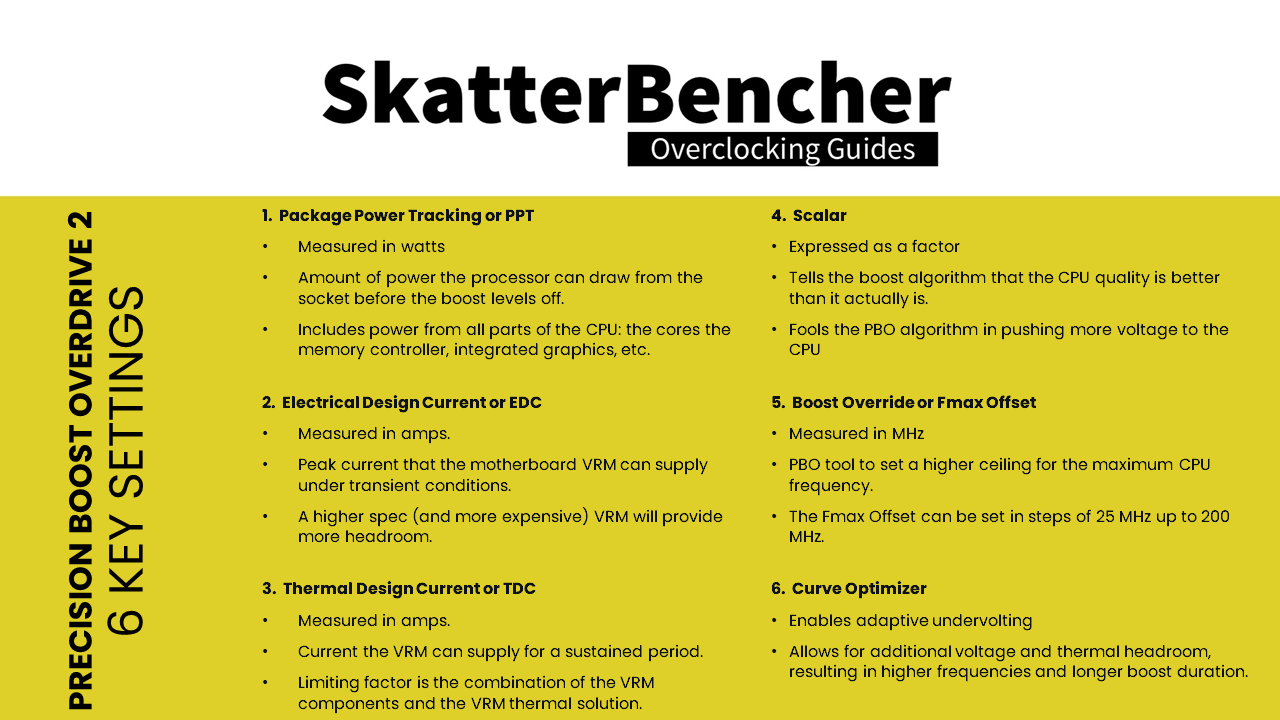
- Package Power Tracking or PPT, measured in watts, is the amount of power the processor can draw from the socket before the boost levels off. It is important to note that this measure includes the power from all parts of the CPU, including the cores but also the memory controller and integrated graphics.
- Electrical Design Current or EDC, measured in amps, is the peak current that the motherboard VRM can supply under transient conditions. A higher spec (and more expensive) VRM will provide more headroom.
- Thermal Design Current or TDC, measured in amps, is the current the VRM can supply for a sustained period of time. Essentially, the limiting factor for this will be the combination of the VRM components and the VRM thermal solution.
- Scalar, expressed as a factor, is a way to tell the boost algorithm that the CPU quality is better than it actually is. A higher-quality CPU can reach higher frequencies at the same voltage or use higher voltages within the same thermal constraints. Effectively, the scalar can fool the PBO algorithm in pushing more voltage to the CPU even if it would normally not do so given the factory-fused silicon quality indicator.
- Boost Override or Fmax Offset, measured in MHz, is a tool to set a higher ceiling for the maximum CPU frequency. The Fmax Offset can be set in steps of 25 MHz up to 200 MHz.
- Curve Optimizer is a tool that enables adaptive undervolting allowing for additional voltage and thermal headroom, resulting in higher frequencies and longer boost duration.
In our last overclocking strategy, we make use of all these settings to maximize the PBO performance. However, before we jump into the data and results, let us first have a quick look at Curve Optimizer.
Robert Hallock, Director of Technical Marketing at AMD, made a great video explaining what Curve Optimizer does. So, I would strongly recommend you to also check out his content on the topic.
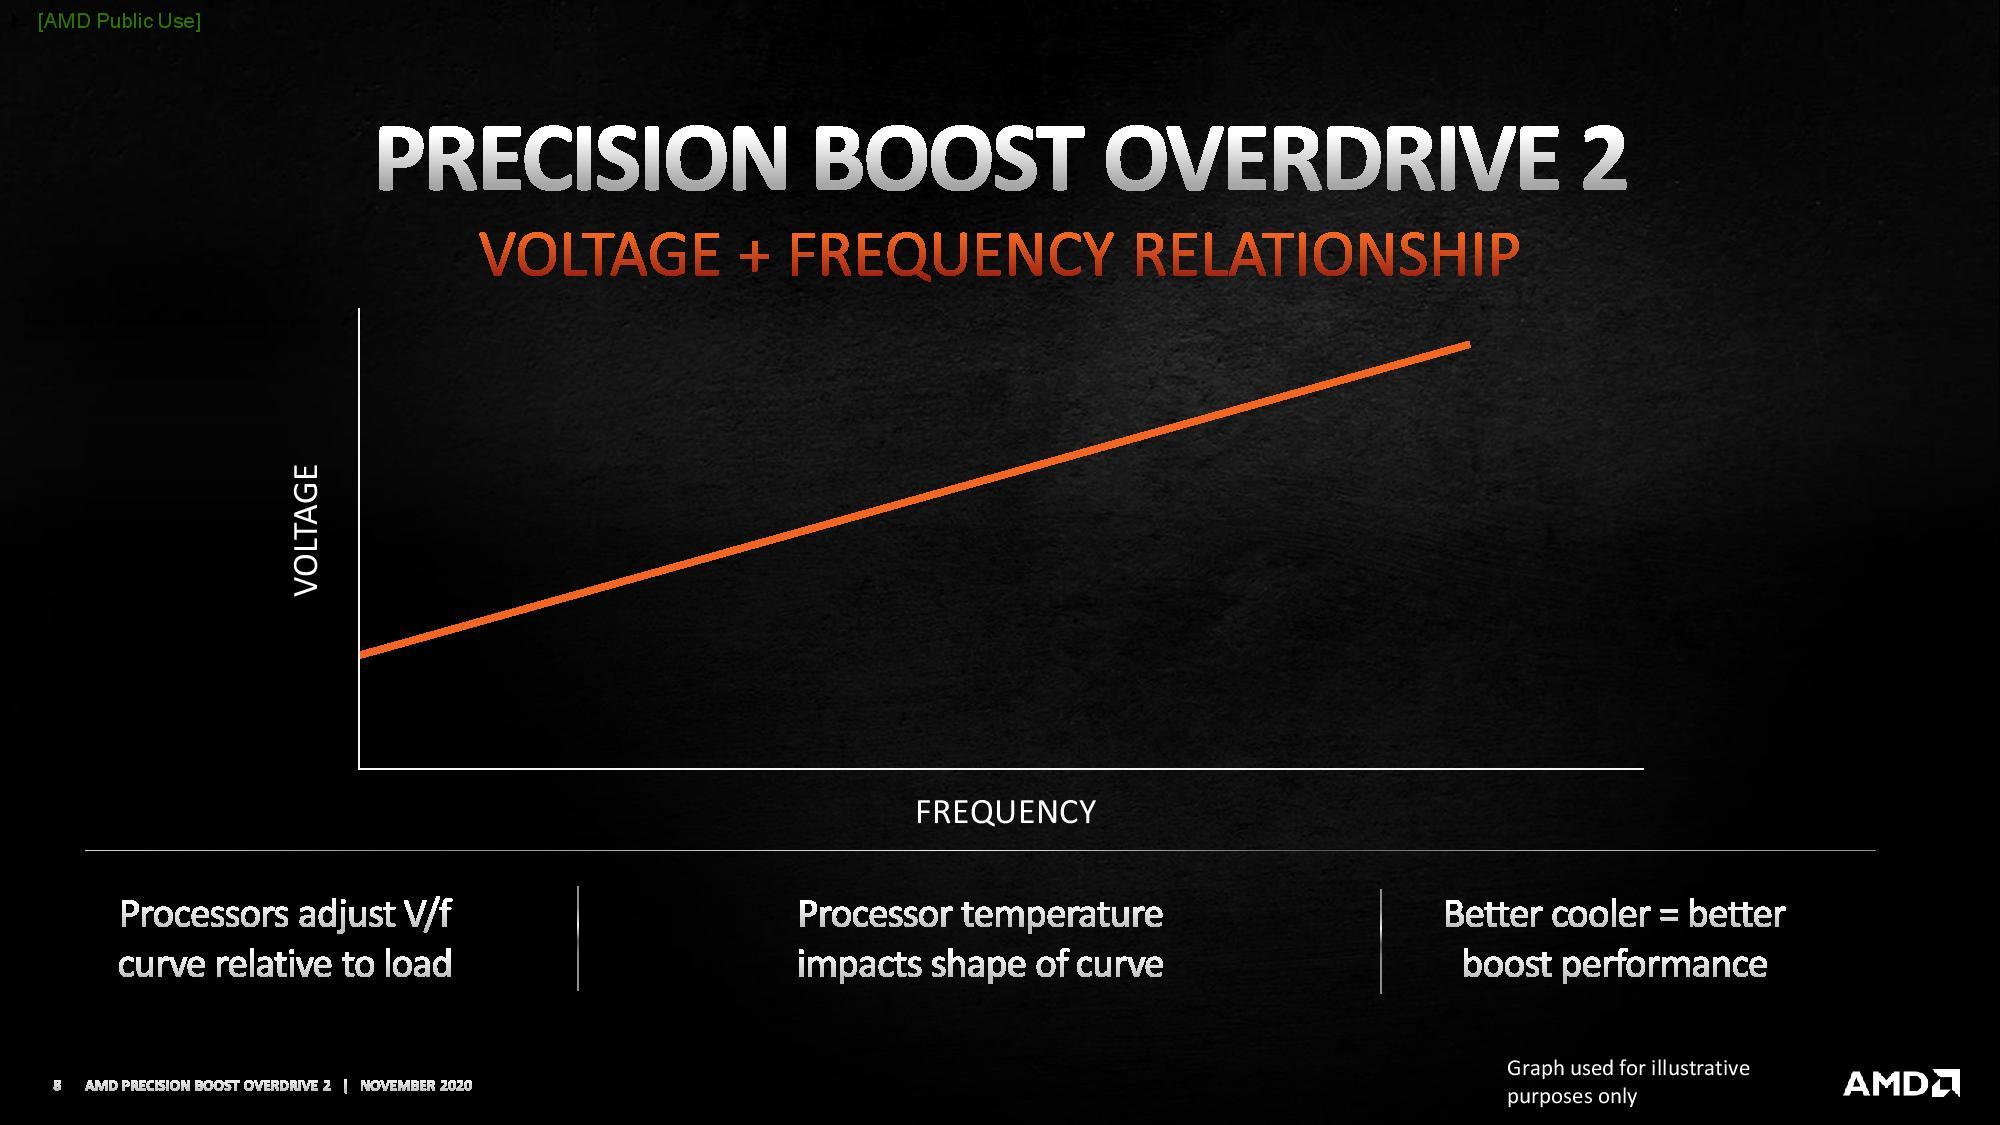
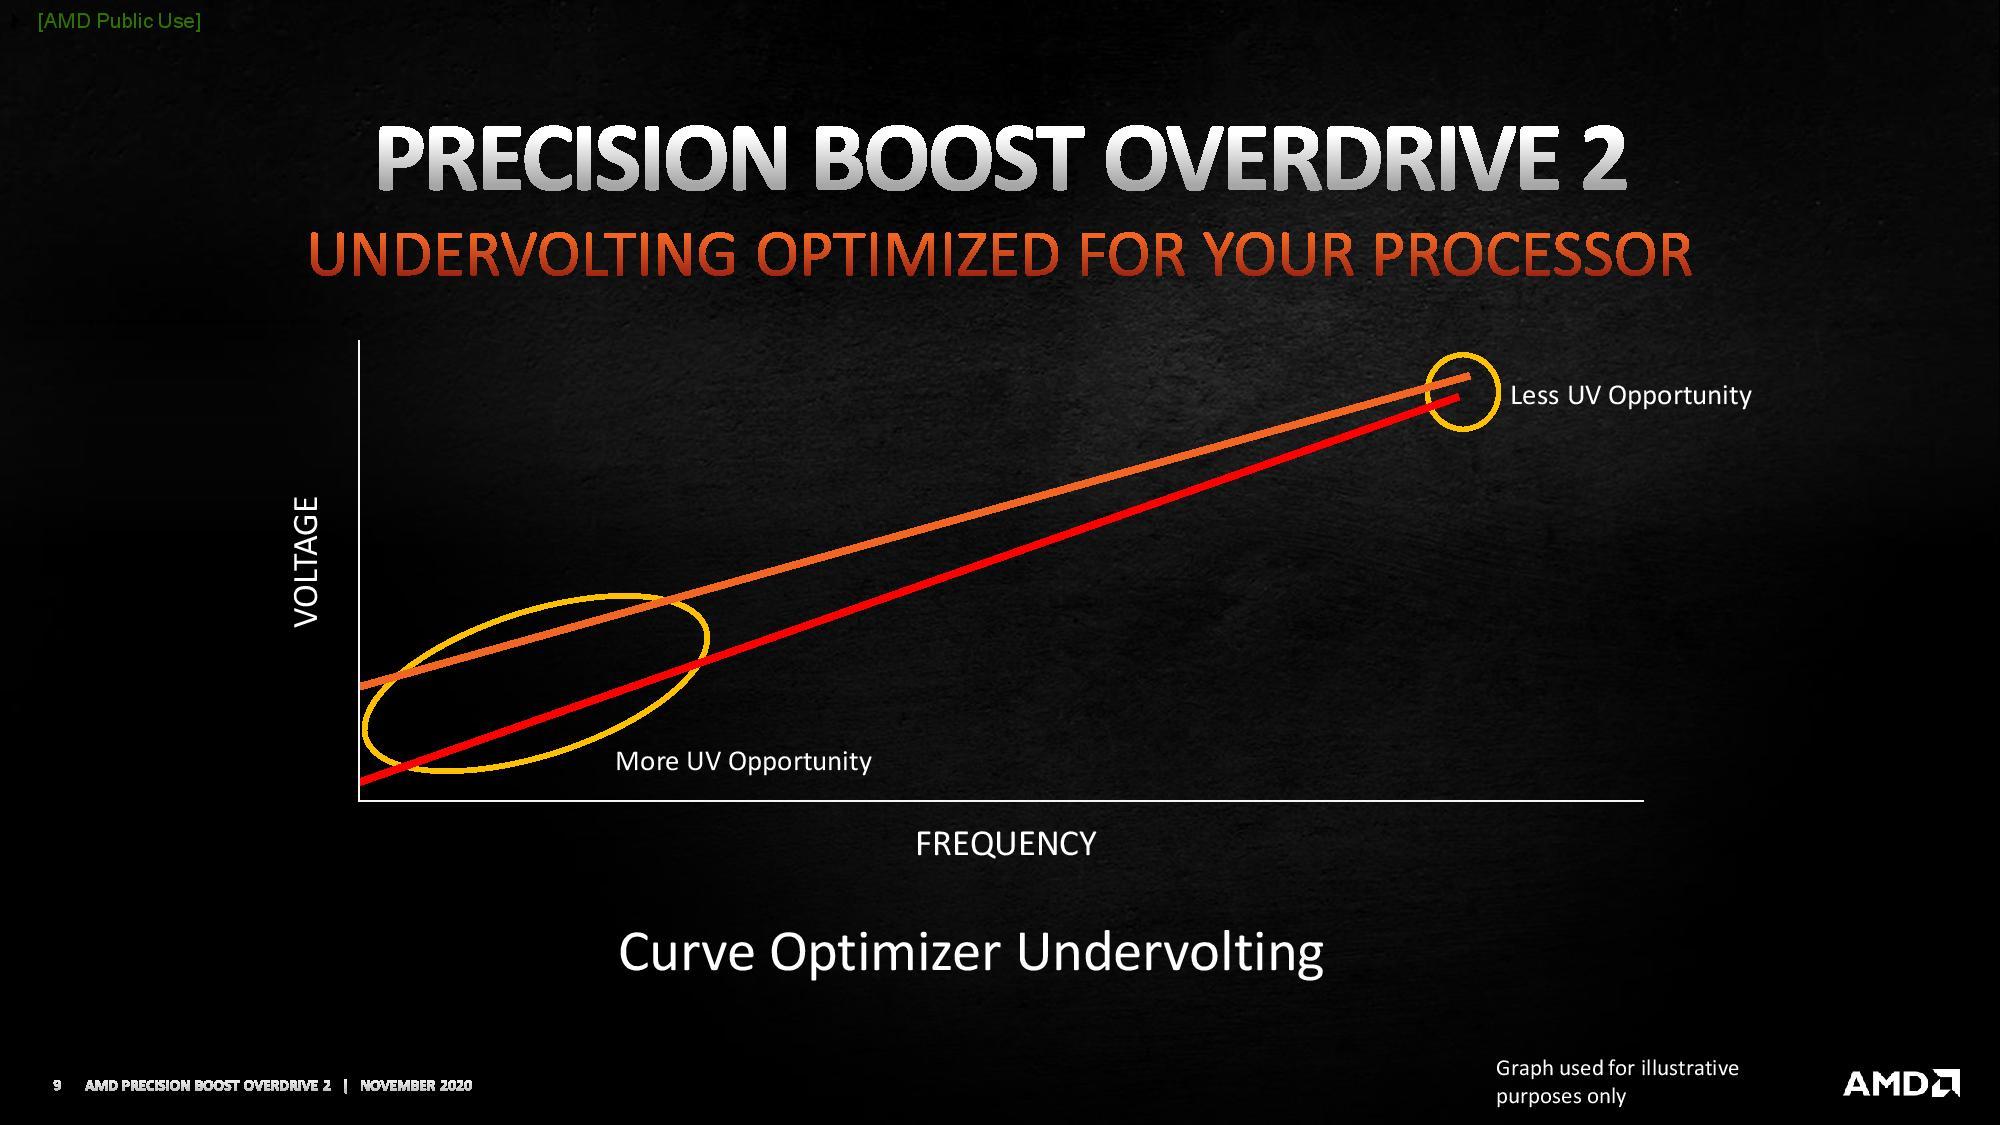
What you need to know is that every CPU core in a Ryzen CPU has a factory-defined voltage-frequency curve. This curve determines the relationship between operating voltage and frequency. Typically, the higher the voltage the higher the frequency and vice versa.
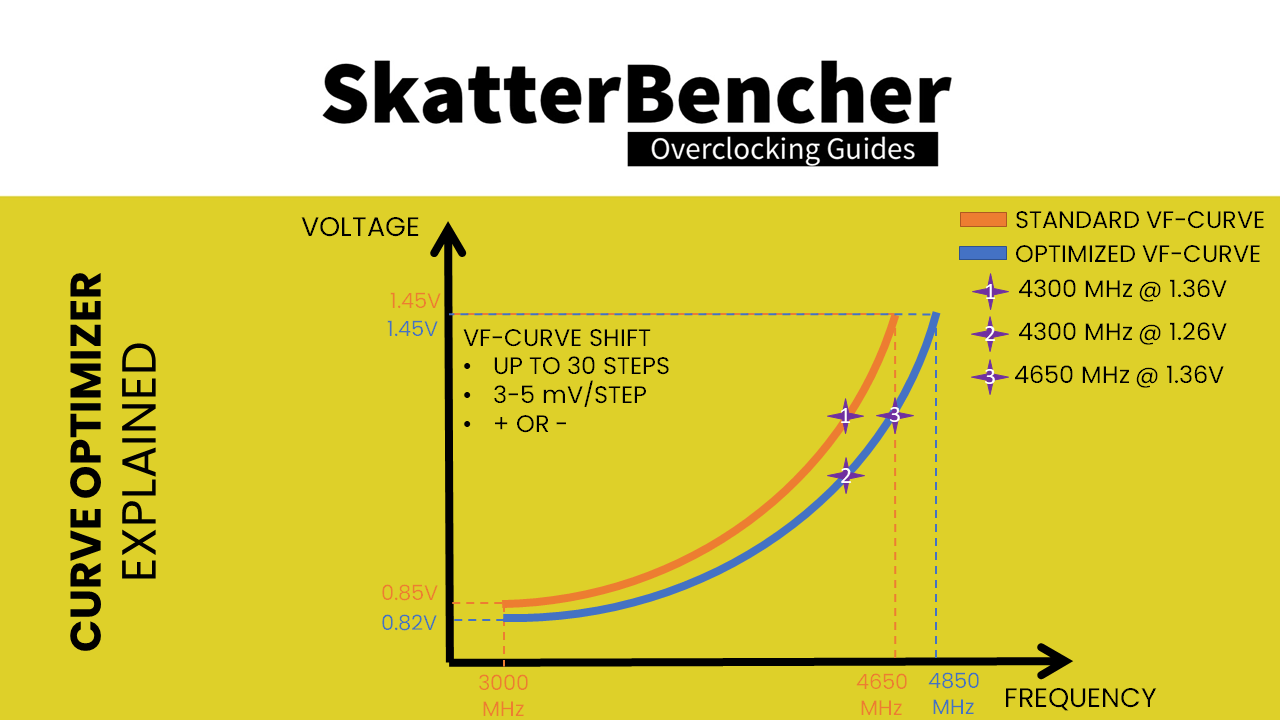
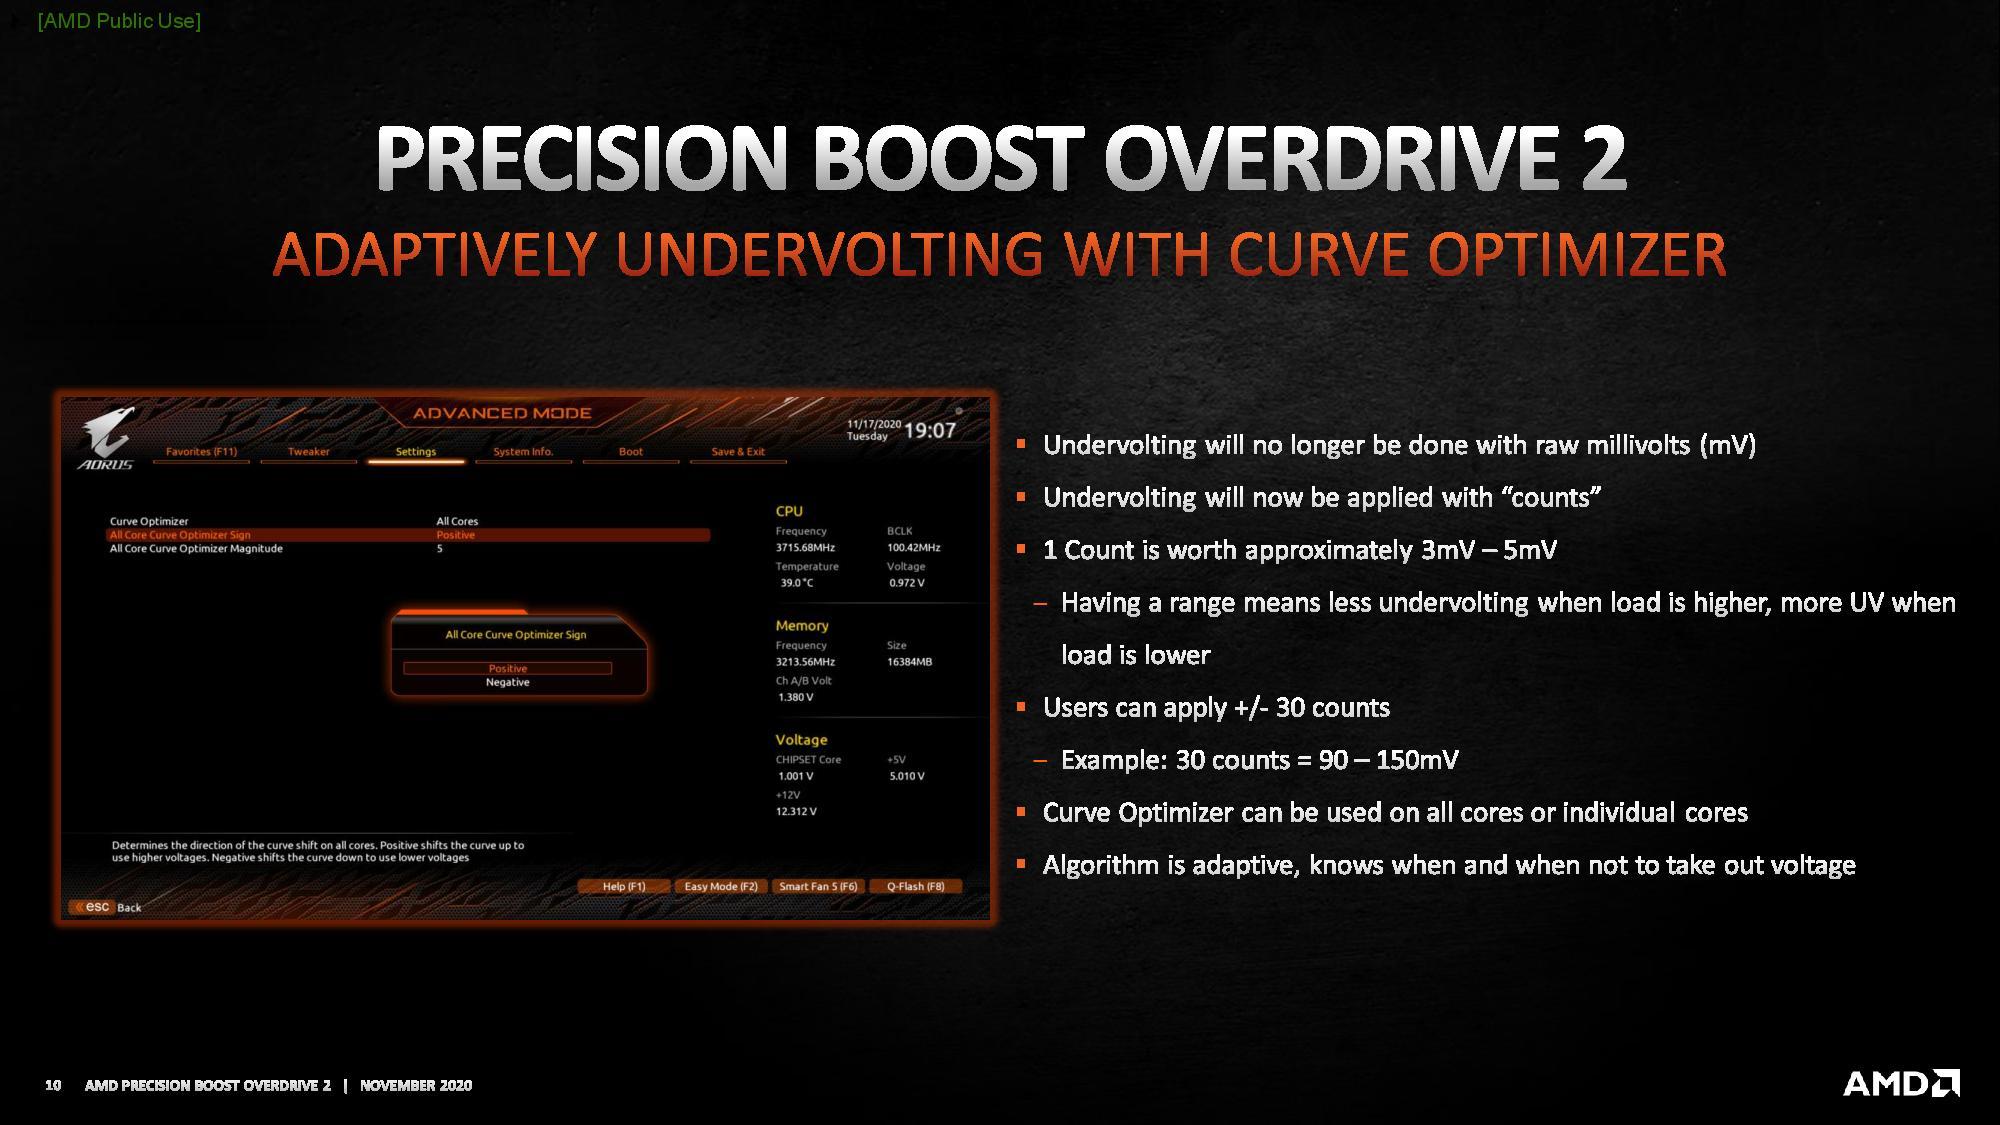
Curve Optimizer allows end-users to adjust this curve for each CPU core individually. You are able to offset the entire curve by up to 30 steps in either positive or negative direction. Each step represents between 3 and 5 mV. So, quick math tells us we can increase or decrease the curve by up to 150 mV.
Two key things happen when you adjust the voltage-frequency curve with a negative point offset.
- You effectively tell the CPU that for a given frequency it needs less voltage. And, as a consequence, at a given voltage it can apply a higher frequency. So, when the Precision Boost Algorithm determines, let us say, there’s sufficient power and temperature headroom to use 1.35V, with the Curve Optimizer it will target a higher frequency.
- Because you use less voltage at a given frequency, the CPU temperature will be lower. That extra thermal headroom will encourage the PBO algorithm to target higher voltages and frequencies.
The main benefit of Curve Optimizer should be to boost the maximum frequency in lightly threaded workloads.
Right, now that we are up to speed on Precision Boost Overdrive 2 and Curve Optimizer, let us put the theory to the test.
Warning: if you are allergic to big Excel spreadsheets outside of work hours, then look away now.
The approach we took to exploring PBO2 is simply trying out every option one by one and monitoring the impact it has on our CPU frequency, voltage, power, and temperature. Our test consists of two back-to-back runs of Geekbench 5. We chose Geekbench 5 because it offers a single test suite that covers a wide variety of workloads including single-core and all-core, AVX and non-AVX, CPU-centric and memory-centric, and so on. We used HWinfo to log the system and then compiled an Excel spreadsheet with all the information.
Here it is … yea I know it is a bit chaotic but let me walk you through it.
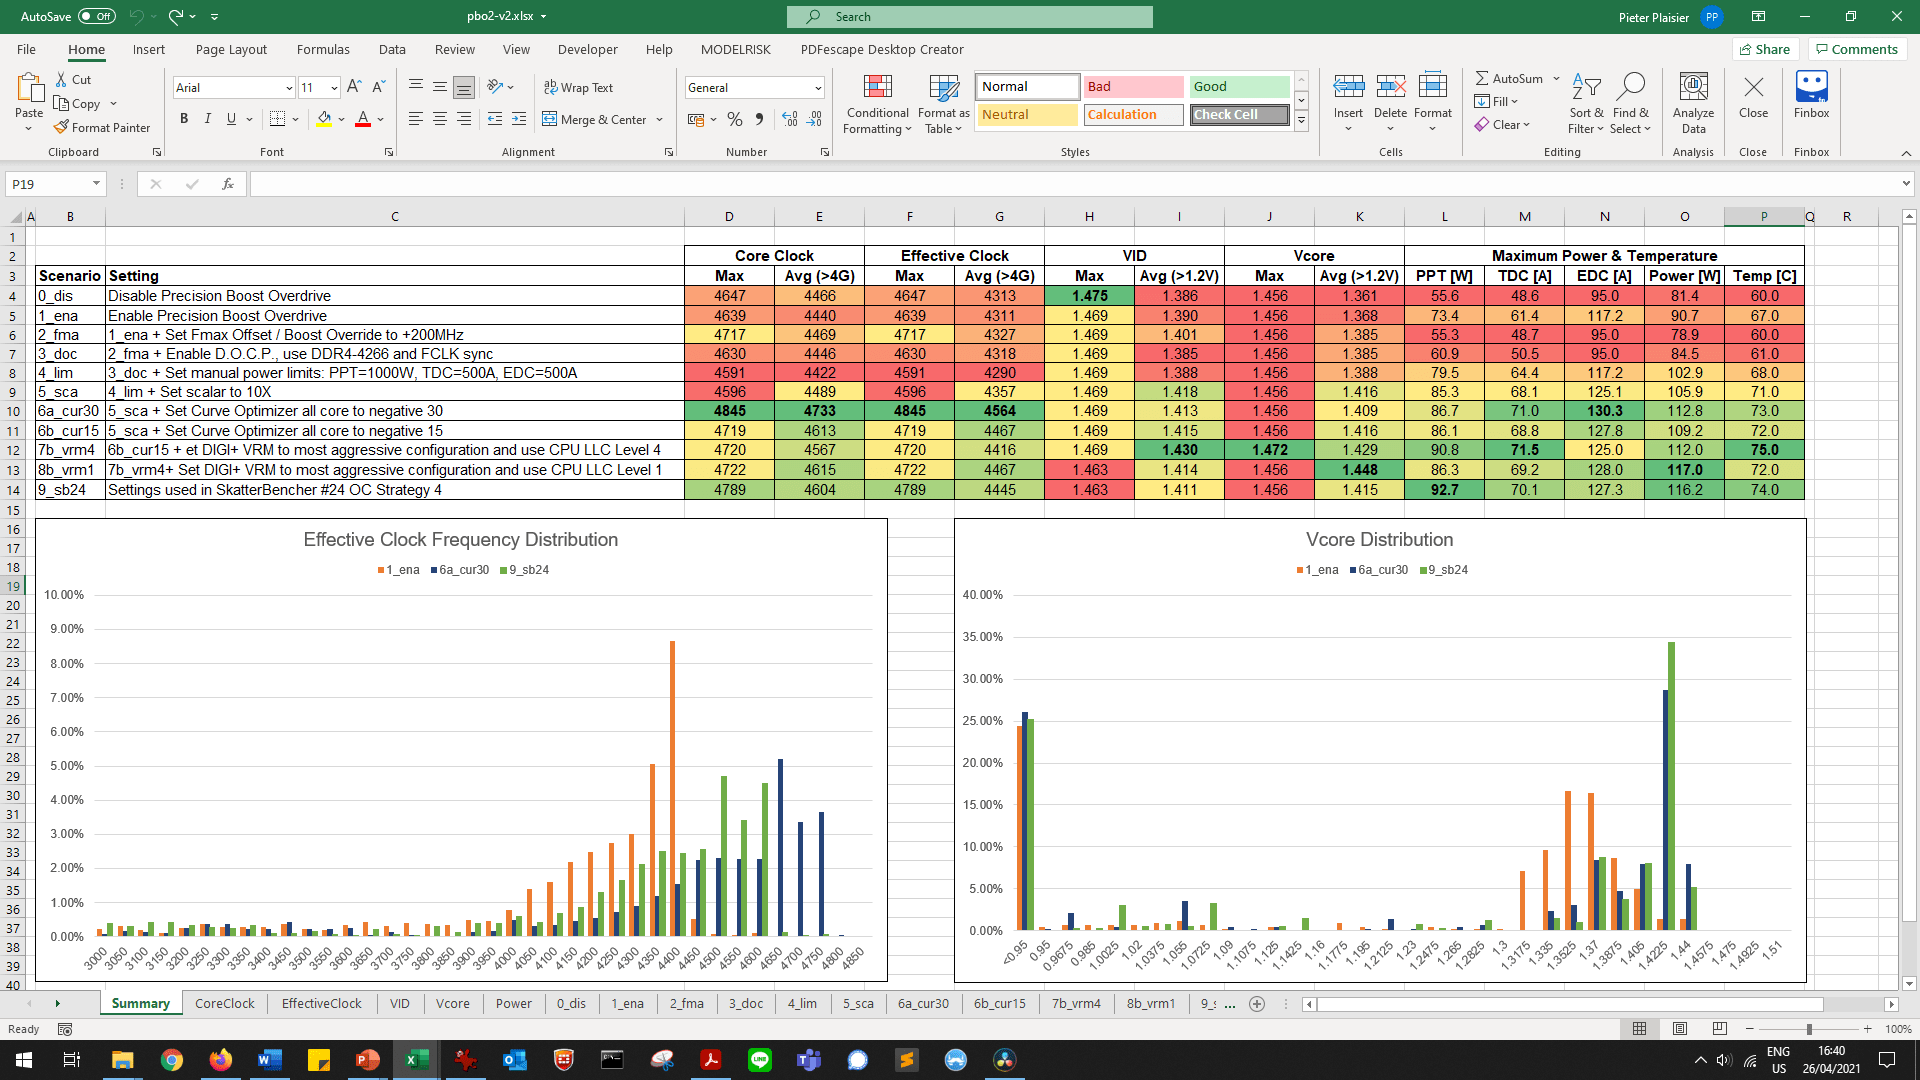
In total, we have 10 test scenarios and tracked 13 measurements. Each scenario builds on top of the previous one.
- In Scenario 1, we leave all BIOS settings by default and disable Precision Boost Overdrive
- In Scenario 2, we leave all BIOS settings by default and enable Precision Boost Overdrive
- In Scenario 3, we keep Precision Boost Overdrive enabled and also set Max CPU Boost Clock Override to +200MHz.
- In Scenario 4, we additionally enable D.O.C.P. and manually enforce FCLK to run in synchronous mode.
- In Scenario 5, we manually set the PPT, TDC, and EDC limits
- In Scenario 6, we set the scalar value to 10X.
- In Scenario 7, we use the Curve Optimizer and try an all-core negative value of 30 and 15. While negative 30 did in fact pass our PBO-2 tests, ultimately it was not stable enough to pass the other benchmarks.
- In Scenario 8, we continue with Curve Optimizer all-core negative 15 and configure the most aggressive VRM settings with CPU load-line calibration level 4.
- In Scenario 9, we use the same settings but just change the load line to level 1.
- Scenario 10 is our SkatterBencher OC Strategy #4 where we tuned the Curve Optimizer for each core individually.
The 13 measurements include:
- Maximum CPU Core Clock Frequency and Average CPU Clock Frequency for frequencies over 4 GHz
- Maximum Effective CPU Clock Frequency and Average Effective Clock Frequency for frequencies over 4 GHz
- Maximum VID and average VID for VIDs over 1.2V
- Maximum Vcore and average Vcore for voltages over 1.2V
- Peak PPT
- Peak TDC
- Peak EDC
- Peak CPU Package Power
- Peak CPU Temperature
We explained the difference between Core Frequency and Effective Clock in a previous AMD Ryzen overclocking guide.
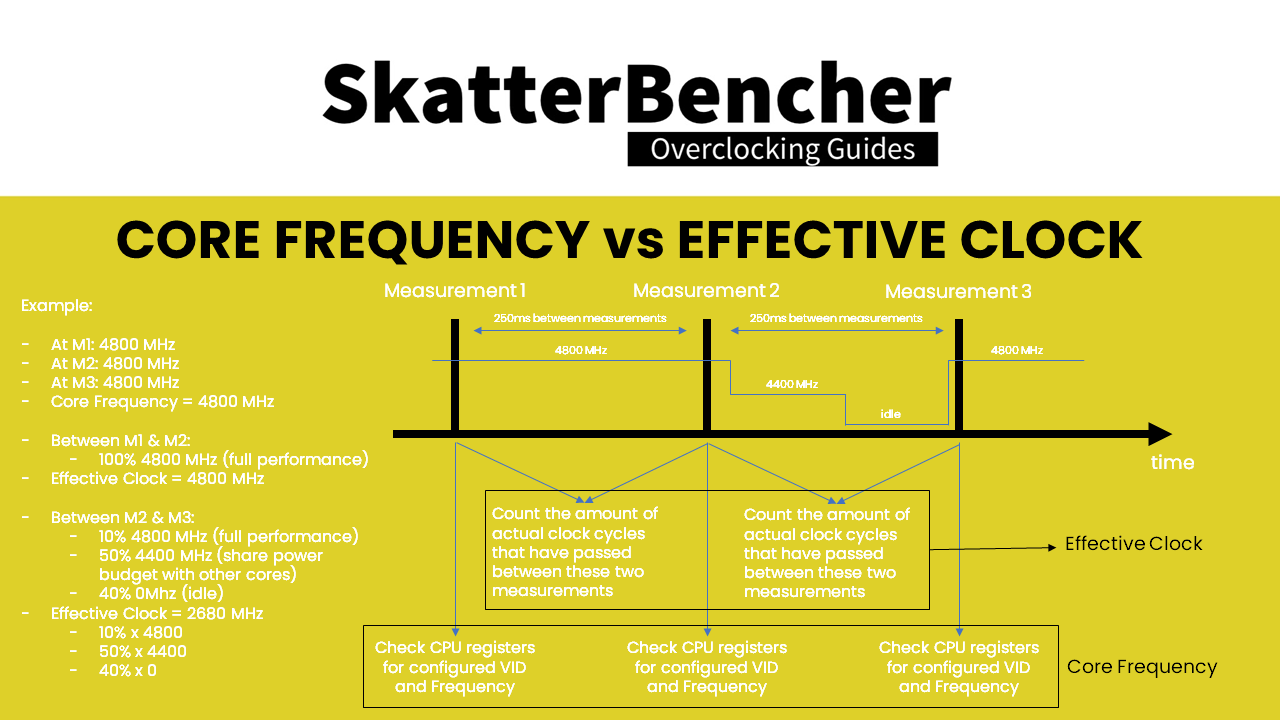
Core Frequency is the frequency that is configured by the CPU and read from the CPU registers. This is the frequency that you will see in CPU-Z for example. Effective Clock measures the average actual clock across a polling interval.
The difference between the two values is that the Core Frequency is the frequency as measured in one moment in time, whereas the Effective Clock measures the total clock cycles between two moments in time.
These two measurements can differ a lot because modern CPUs like the Ryzen 5000 have very advanced power-saving features. When a CPU core has nothing to execute it will quickly go to a low power state. This is great as it opens up more power budget for any of the other cores that do need to execute. So those other cores may boost to a higher frequency.
The effective clock is the more relevant measure of the two when overclocking and performance tuning as it will tell you what the actual frequency is as opposed to what is the configured frequency.
Now let us go over some of the interesting findings.
- The Max Vcore does not really change going from PBO disabled to a fully tuned PBO. There is no way for us to increase the Vcore ceiling, so this will be the limiting factor for the Frequency.
- While the maximum Vcore does not change, the average Vcore when over 1.2V does increase from 1.36 to 1.45 when playing with PBO. So, on average, higher voltages will result in higher frequencies.
- Curve Optimizer has a powerful impact on the maximum clock frequencies that the PBO algorithm will use. With the right cooling and the right CPU, you can effectively reach the upper maximum limit.
- Fmax Offset, or Boost Override, does not have that much of an impact unless you also use the other PBO tools.
- If we look at the Effective Clock Frequency distribution, we can see that even during two back-to-back runs of Geekbench 5, more than 60% of the time the system is effectively idle.
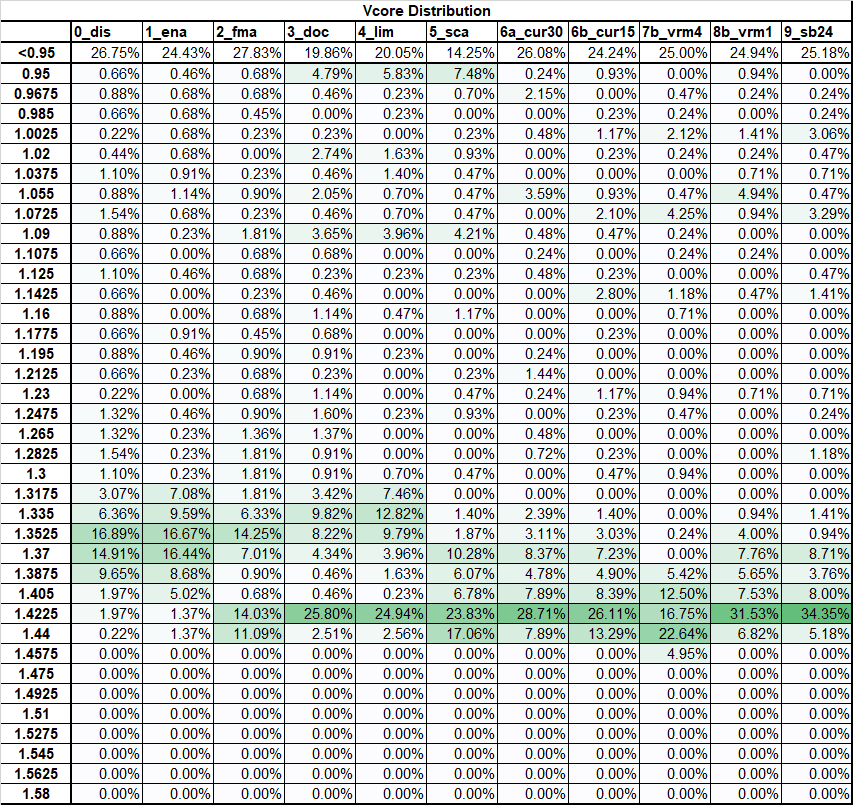
- The Scalar is supposed to force the CPU to pursue higher voltages more aggressively. While a lot of people say the scalar has no impact on their performance, we can actually see its impact when looking at the Vcore distribution. You can see that the range before enabling Scalar is from 1.32v to 1.42v. After enabling the Scalar, the range is from 1.37v to 1.44v. So, it is clear that the CPU is indeed setting higher voltages.
Before we move on to the benchmark results, one last thing. Since Curve Optimizer clearly has a significant impact on the potential overclocking headroom, it makes sense to take the time to find the best setting for each individual core. Even if only a couple of cores can use negative 30, these will be the cores that give you the highest performance in lightly threaded workloads.
There are several approaches how to find the best cores but here is mine.
- First, go in the BIOS and set all cores to negative 30.
- If this boots into the OS, open both HWinfo and Prime 95
- Run the Prime 95 all-core workload and monitor the effective clock frequency. You will find that some cores will operate stably at the highest frequency, some will not.
- Note down which cores are either crashing or suffering from clock stretching.
Clock Stretching is a safety feature that is built into all AMD Ryzen CPUs. When the CPU thinks the actual voltage is too low to sustain a stable system at a given frequency, it will reduce the clock period until the voltage is back at the acceptable level.
The result of clock stretching is that while the system will report the Core Frequency as usual, the effective clock will be lower. So, since a lower amount of clock cycles occur the performance will also be lower.
Clock Stretching has been a major topic among AMD Ryzen enthusiasts. Typically, users would find that setting a higher frequency would result in lower performance. The best way to check if clock stretching is happening is by checking the Effective Clock measurement in HWinfo. If the effective clock is significantly lower than the configured core frequency when the system is under load, then it is likely that clock stretching is happening on your system.
Now back to the Curve Optimizer approach.
- Reboot and go back into the BIOS. For those cores which were not stable, decrease the negative curve offset.
- Then go back in the OS and repeat the same test.
- Repeat this process until you find the setting that is stable for all cores.
You will notice four things:
- Curve Optimizer is a powerful addition to the PBO toolbox and can give enthusiasts quite a bit of extra overclocking headroom.
- There can be a great difference between your cores. In my case, I had 4 cores that could do negative 30 and two cores that could only do negative 13.
- You will find that as you adjust the curve optimizer for the unstable cores, the Prime 95 frequency will decrease. That is of course because there is only 1 frequency and voltage applied to all cores in the CPU die. So, the performance is capped by your worst cores.
- The ideal Curve Optimizer setting also depends on the VRM load-line. So, I suggest that if you are going down the road of Curve Optimizer that you first set your VRM loadline level.
So, now that we fully understand Precision Boost Overdrive 2 and Curve Optimizer, let us have a look at the final performance of our system.
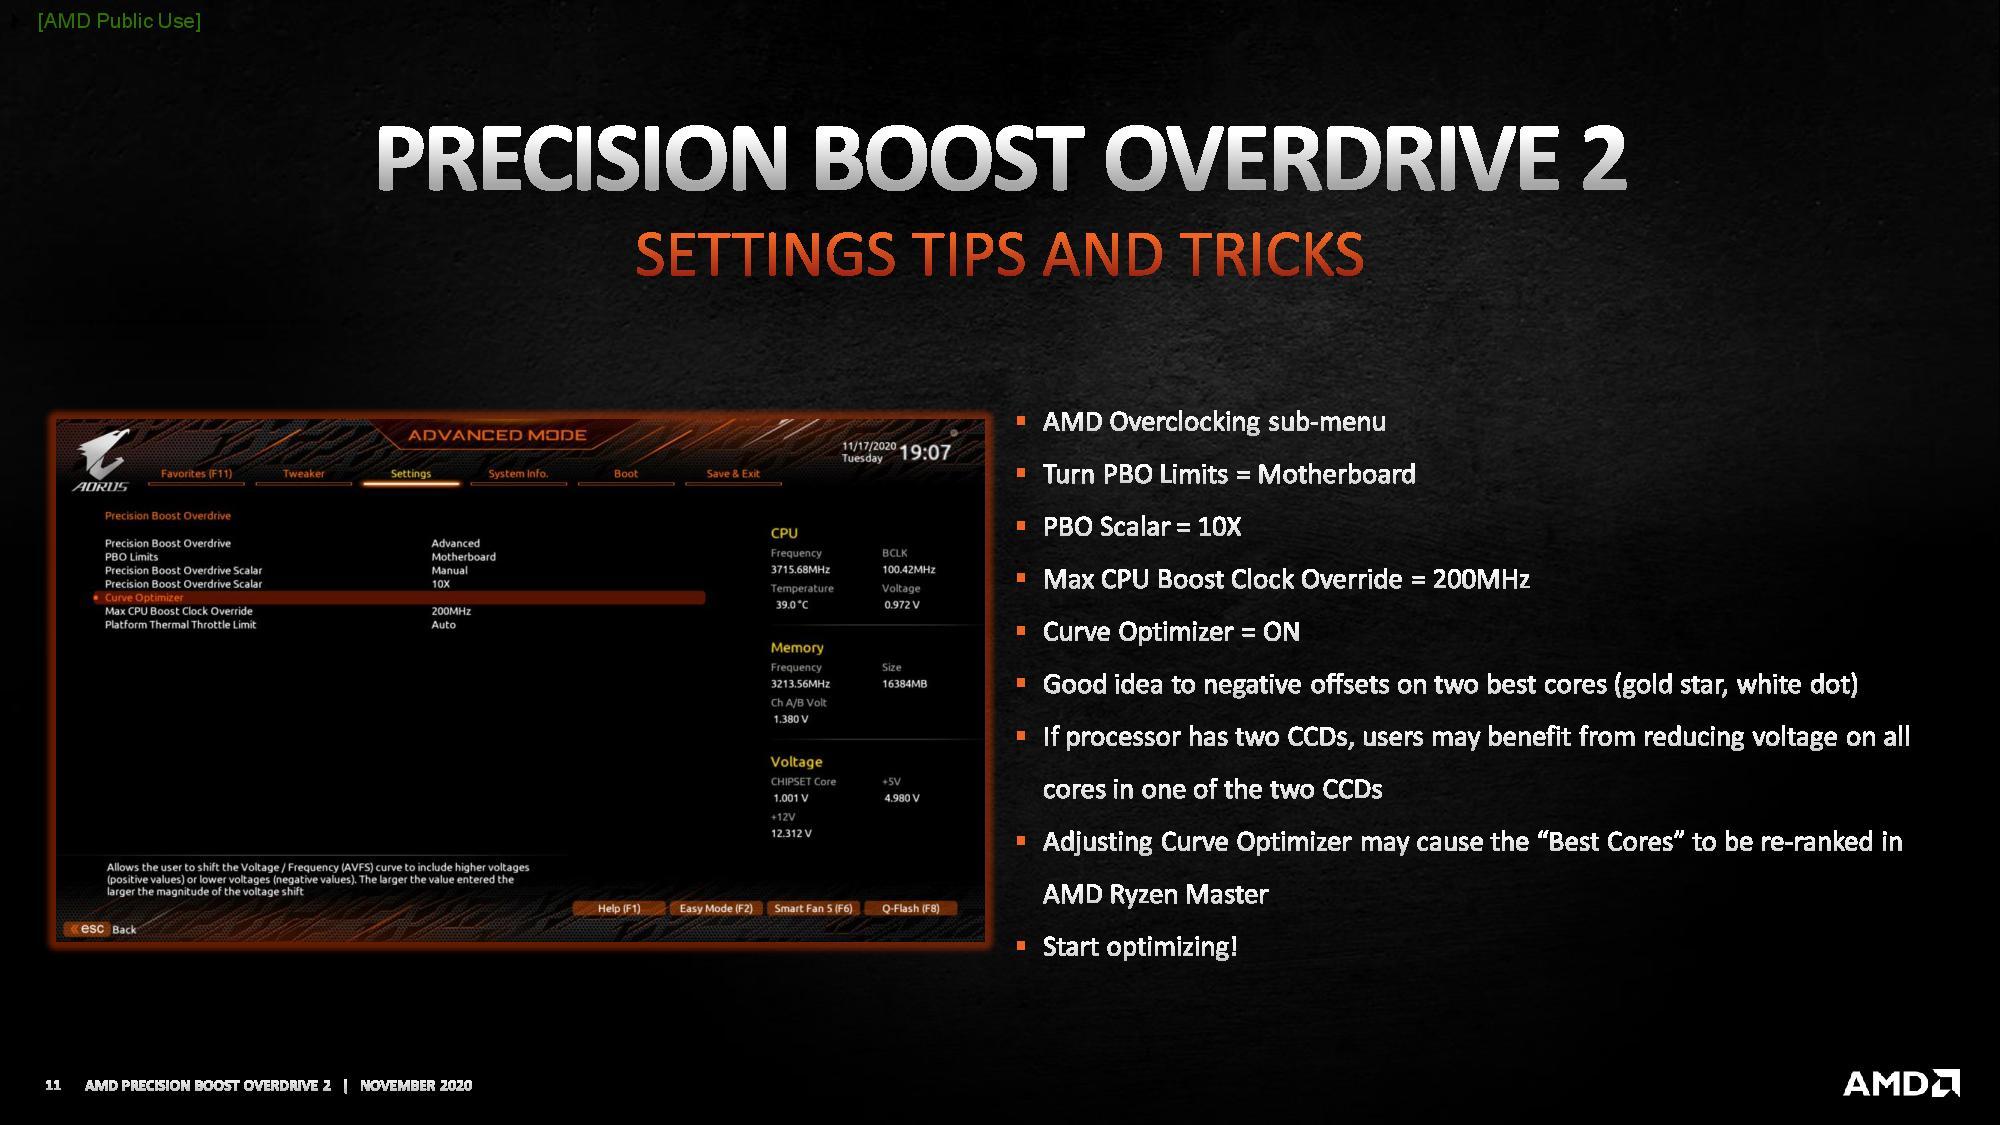
OC Strategy #4: Precision Boost 2 and Curve Optimizer
We combine the settings from Strategy 2 and Strategy 4 to find the highest performance for both the CPU and GPU.
We found the best curve optimizer setting for each CPU Core which allows the single-threaded performance to boost to 4.85 GHz. The GPU is also clocked at 2.5GHz. We have enabled DOCP and run the memory at DDR4-4266 with Fclk in synchronous mode at 2133 MHz.

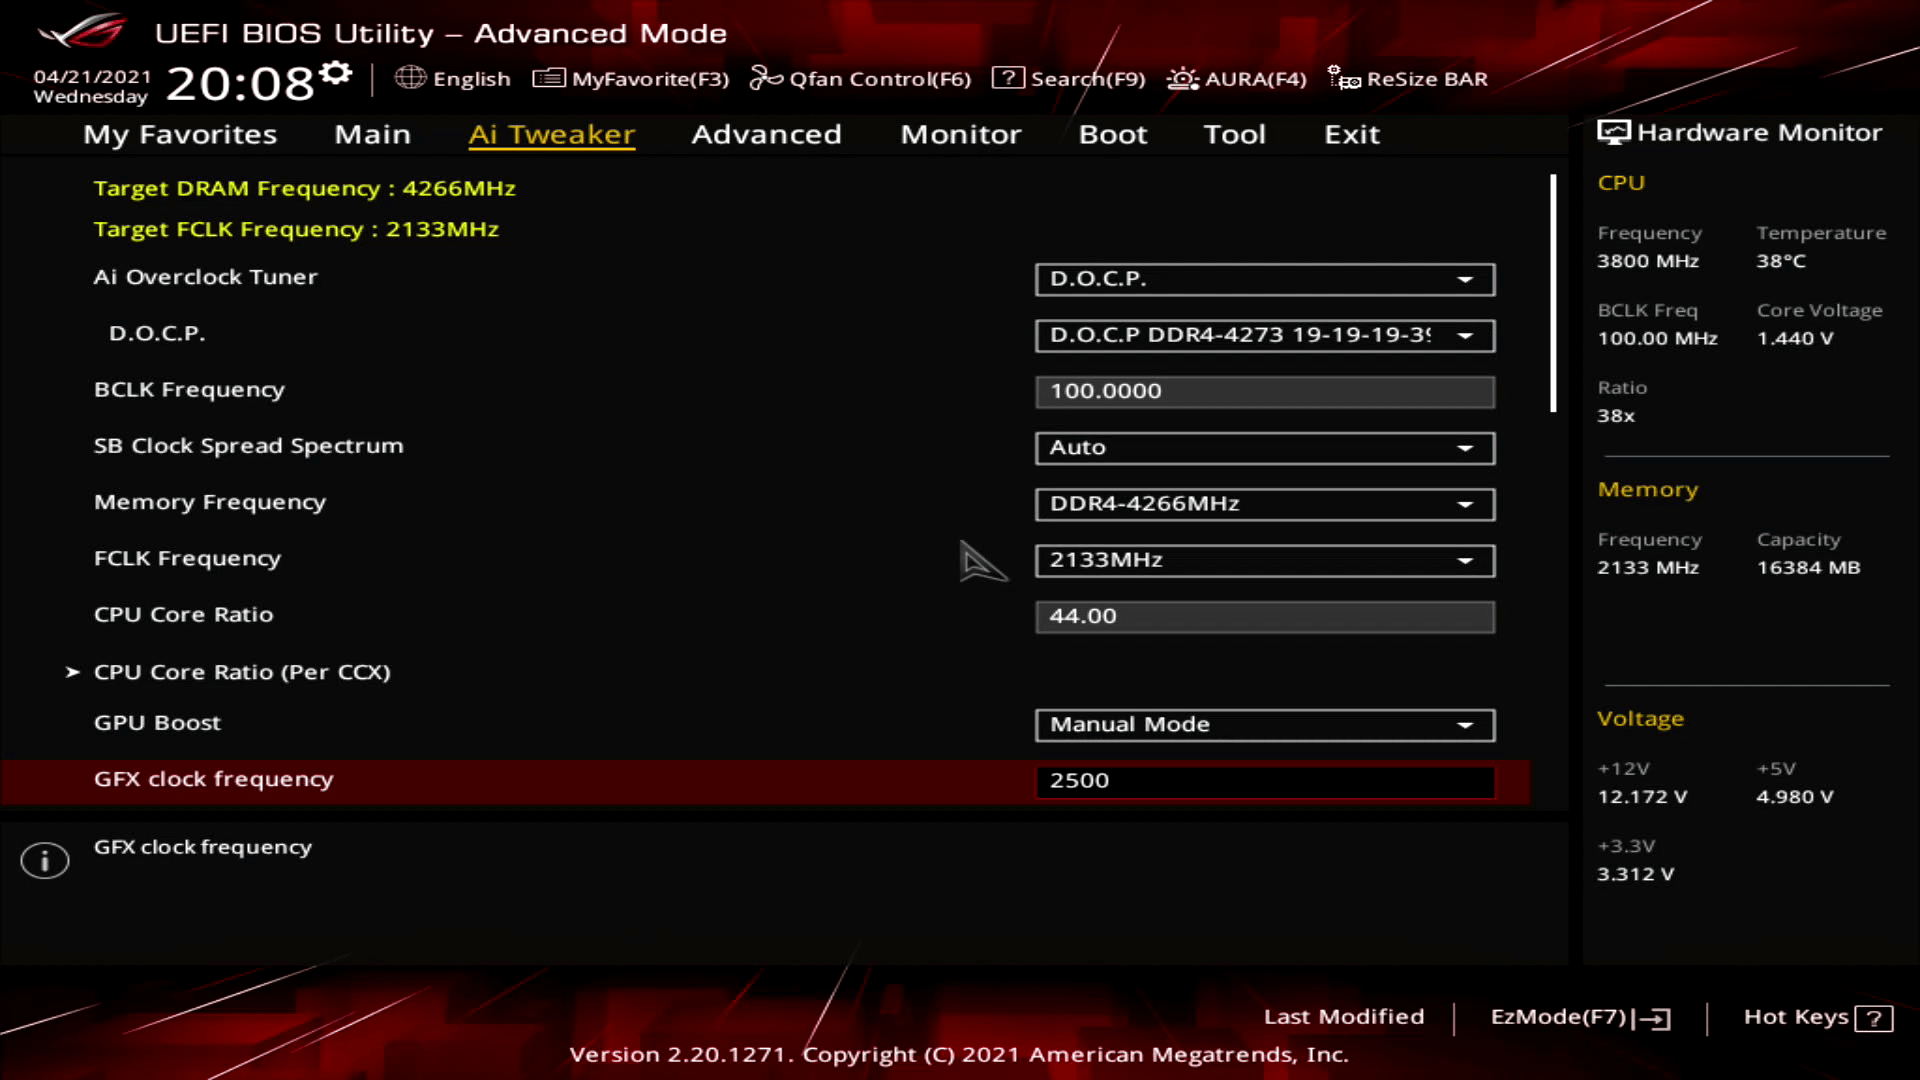

Upon entering the BIOS
- Go to the Ai Tweaker menu
- Set AI Overclock Tuner to D.O.C.P
- Set FCLK Frequency to 2133MHz
- Set GPU Boost to Manual Mode
- Set FGX clock frequency to 2500.
- Enter the DIGI+ VRM submenu.
- Set VDDCR CPU Load Line Calibration to Level 1
- Set VDDCR CPU Current Capability to 130%
- Set VDDCR CPU Power Phase Control to Extreme
- Set VDDCR CPU Power Duty Control to Extreme
- Set VDDCR SOC Load Line Calibration to Level 4
- Exit the DIGI+ VRM submenu.
- Set VDDCR SOC Voltage to Manual
- Set VDDCR SOC Voltage Override to 1.35V
- Go to the Advanced Menu
- Enter the AMD Overclocking submenu
- Enter the Precision Boost Overdrive submenu
- Set Precision Boost Overdrive to Advanced
- Set PBO Limits to Manual
- Set PPT Limit [W) to 1000.
- Set TDC Limit [A] to 500.
- Set EDC Limit [A] to 500.
- Set Precision Boost Overdrive Scalar to 10X
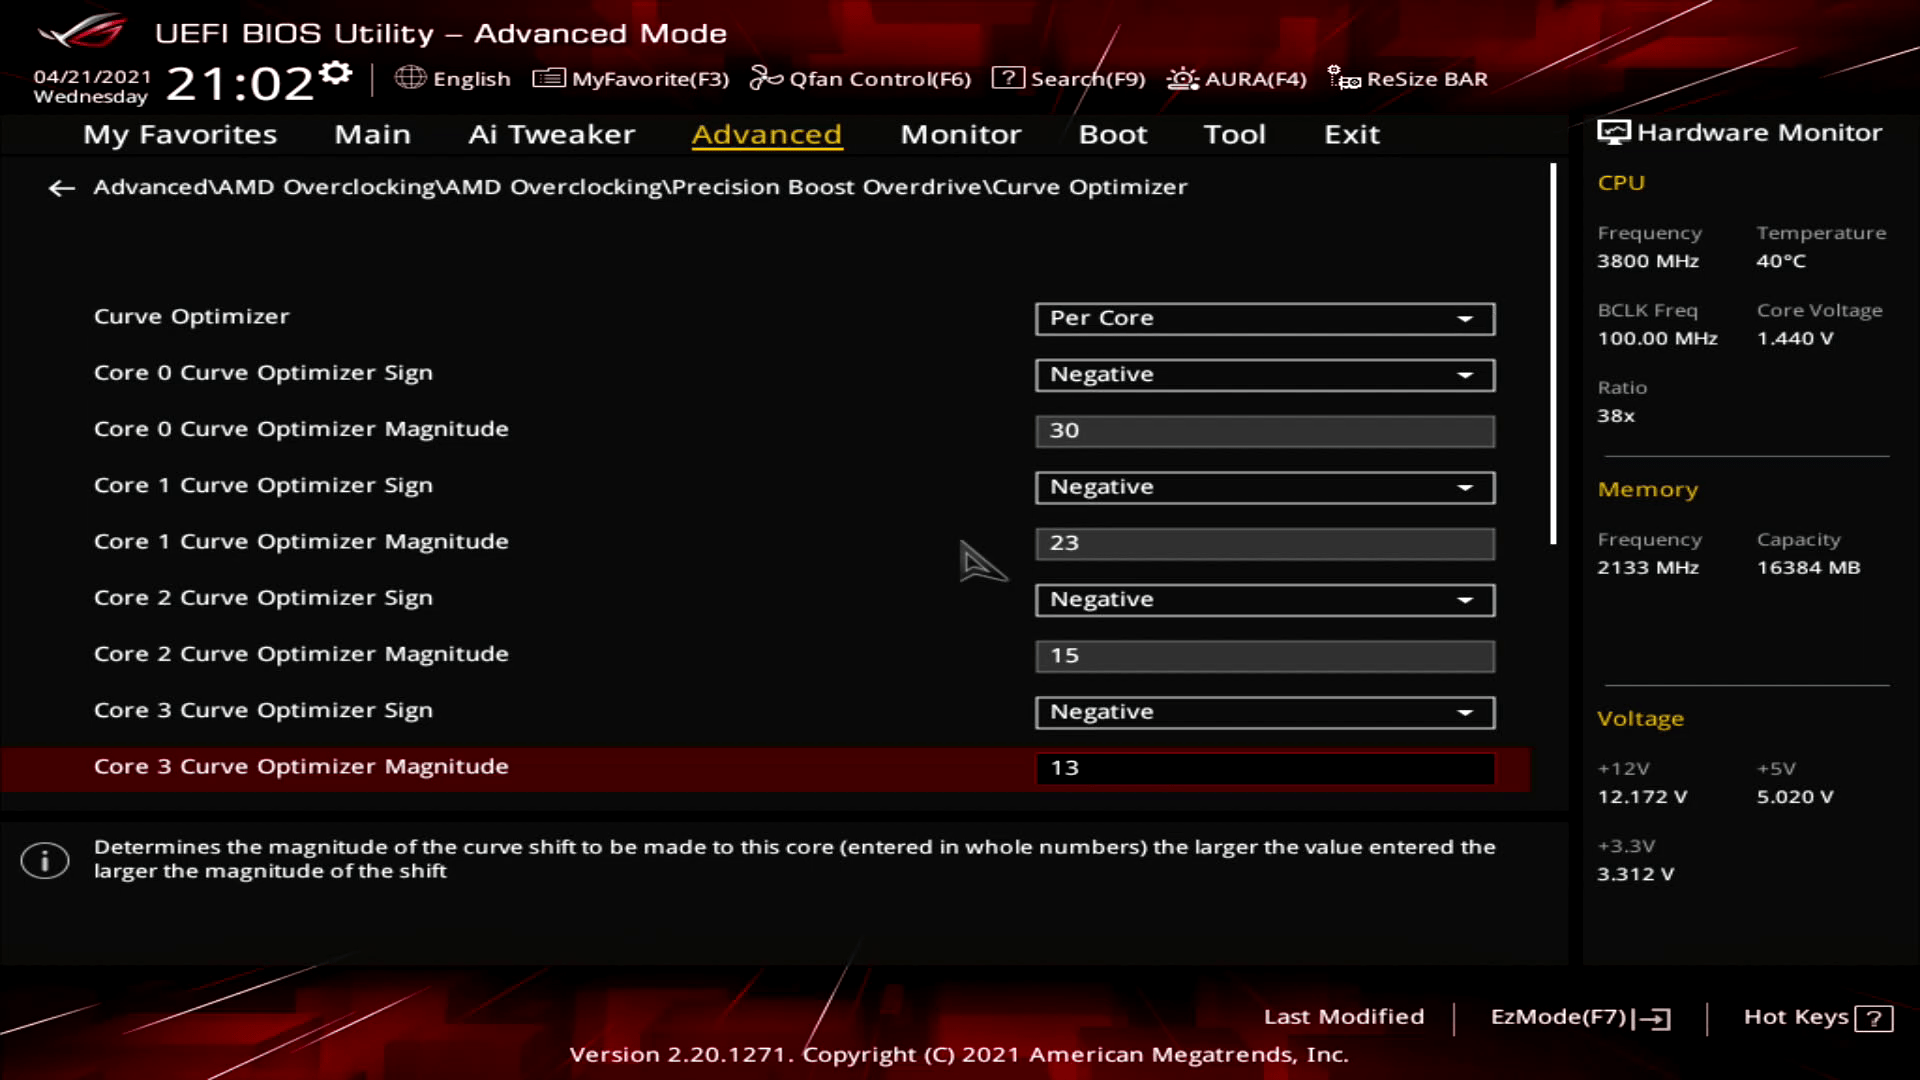
- Enter the Curve Optimizer submenu
- Set Curve Optimizer to Per Core
- Set all Core Curve Optimizer Signs to Negative
- Set Core 0 to Core 7 Curve Optimizer Magnitude to 30, 23, 15, 13, 13, 30, 30, 30.
- Exit the Curve Optimizer submenu
- Set Max CPU Boost Clock Override to 200MHz
Then save and exit the BIOS.
We re-ran the benchmarks and checked the performance increase compared to stock operation.
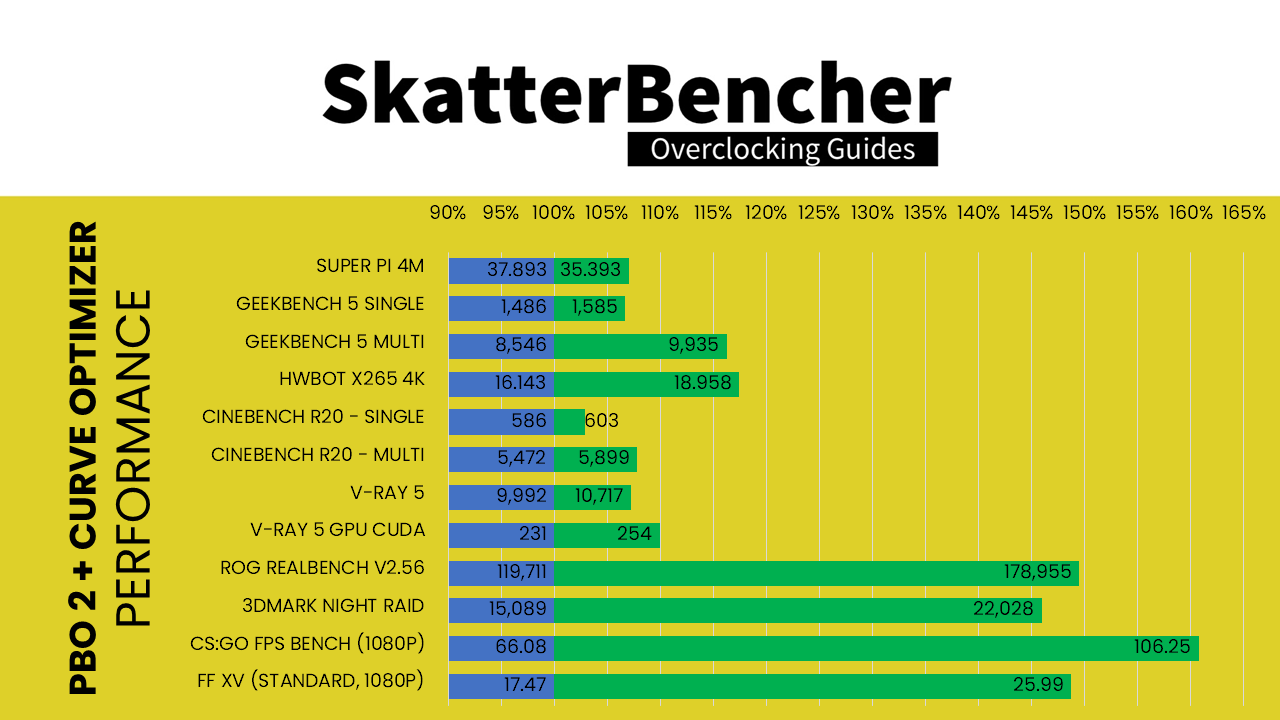
- SuperPI 4M: +7.06%
- Geekbench 5 (single): +6.66%
- Geekbench 5 (multi): +16.25%
- HWBOT X265 4K: +17.44%
- Cinebench R20 Single: +2.90%
- Cinebench R20 Multi: +7.80%
- V-Ray 5: +7.26%
- V-Ray 5 GPU CUDA: +9.96%
- ROG Realbench V2.56: +49.49%
- 3DMark Night Raid: +45.99%
- CS:GO FPS Bench: +60.79%
- Final Fantasy XV: +48.77%
We achieve the highest performance across all benchmarks. Both the single-threaded performance gain of up to 7% and the CPU multi-threaded performance gain of up to 17% are really impressive. But the most impressive performance increase is definitely in the 3D benchmarks where the performance increase hits over 60%!
When running Prime 95 Small FFT with AVX enabled and Furmark concurrently, the Ryzen 7 5700G operates stably at 4375 MHz with 1.257 volts. The GPU operates at 2.5 GHz with 1.284v. The average CPU temperature is 80 degrees centigrade; the average GPU temperature is 74 degrees centigrade, and the average water temperature is 29 degrees centigrade. The average CPU package power is 180.4 watts.
When running Prime 95 Small FFT with AVX disabled, the Ryzen 7 5700G operates stably at 4475 MHz with 1.311 volts. The average CPU temperature is 77 degrees centigrade, and the average water temperature is 30 degrees centigrade. The average CPU package power is 127 watts.
AMD Ryzen 7 5700G: Conclusion
Alright, let us wrap this up.
First, let us address the elephant in the room. Of course, I am fully aware that of all the possible use-cases for an AMD APU, overclocking and pushing it to its limits will not be a very common one. The majority of the desktop APUs are destined to go in small form factor devices with limited cooling capacity.
That said, I always find it interesting to see how much additional performance is hidden behind the doors of power limits and thermal capacity. From that perspective, the AMD Ryzen 7 5700G Cezanne APU was an interesting experience. Achieving up to 60% performance increase in 3D benchmarks is nothing to be shy about. That of course requires a lot more CPU and GPU power and you will need at least a decent AIO to get the job done.
Am I surprised about the overclocking potential of the Ryzen 7 5700G? Not really. The CPU core is the same as on the Ryzen 5000 CPUs and the overclocking behavior and capabilities are similar too. The integrated graphics is the same as on the previous generation AMD APUs and we saw similar overclocking capabilities there.
Now, about Precision Boost Overdrive 2.
I must admit I am genuinely a fan of the Precision Boost Overdrive technology. I think it provides end-users who invest in superior cooling and a motherboard with higher grade VRM a really easy way to increase the performance of their system. Precision Boost Overdrive 2 and its main new feature Curve Optimizer spice up this technology further.
In particular, Curve Optimizer had a big impact in reaching the Ryzen 7 5700G CPU frequency ceiling and increased performance. The Per Core offset allows us to tune the best cores to hit the frequency ceiling while still maintaining stability when all cores are in use. It does require a little bit more work than just flipping a switch, but from an enthusiast’s perspective, the effort versus reward is worth it.
One little point of grievance I do have with PBO is that in the end the frequency and voltages are still determined by the proprietary algorithm. So not only is it still a bit of a magic box that turns our inputs into some output, but it also feels like there is still some performance left on the table. Three of the eight CPU cores had the Curve Optimizer maxed out at 30 steps, so at least one could likely be pushed even further.
SkatterBencher #70: AMD Radeon 780M Overclocked to 3150 MHz - SkatterBencher
[…] in 2021. I overclocked the immediate predecessor of the Ryzen 7 8700G, the Ryzen 7 5700G, in SkatterBencher #24. In that guide, I covered both CPU core and IGP […]
SkatterBencher #69: AMD Ryzen 7 8700G Overclocked to 5350 MHz - SkatterBencher
[…] APU is the successor to the 5700G which I overclocked in SkatterBencher #24, almost 3 years ago. APUs are always interesting because they’ve got reasonably performing […]
SkatterBencher #36: AMD Ryzen Threadripper 3990X Overclocked to 4500 MHz - SkatterBencher
[…] explored the ins and outs of Precision Boost Overdrive 2 in my Ryzen 7 5700G SkatterBencher blog post, so if you want to learn more about the impact of each of these settings, I suggest you check out […]
SkatterBencher #35: AMD Ryzen 3 5300GE Overclocked to 4628 MHz - SkatterBencher
[…] explored the ins and outs of Precision Boost Overdrive 2 in my Ryzen 7 5700G SkatterBencher guide, so if you want to learn more about the impact of each of these settings, I suggest you check […]
Raffa
Hi Pieter, to start I would like to thank you for your in deep articles, I’ve enjoyed reading them, I’ve discovered you on youtube at first, around 3 weeks ago and I’ve started playing with OC on this CPU.
The problem is that with my general ignorance I’m not really able to understand some things, so I wanted to try to ask you directly!
So here are my doubts/considerations:
1. if “the performance is capped by your worst cores”, then what’s the point of finding the best negative magnitude for every core?
Wouldn’t it be the same to just find a value by using the function “all cores”?
2. If to set the magnitudes 1 by 1, what should I do with my best core (I’ve checked it with AMD Ryzen Master software) ?
Should I try to accomplish the maximum negative magnitude or leave it to 0 while trying to set the maximum magnitude on other weaker cores?
(my goal is to have the best performances)
This is my full setup:
MSI B450M PRO-VDH MAX
AMD Ryzen 7 5700G (Noctua NH-D15)
Crucial Ballistix 16gb @3600 (XMP profile activated)
Be quiet! System Power 9 600W
Cooler Master Q300L
Pieter
Hi Raffa,
Thanks for the kind words and happy to hear my work is of use to you! To answer your questions:
1) I should maybe have phrased that differently and said: “the all-core multi-threaded workload performance is capped by your worst cores.” On Ryzen CPUs, while all active cores on a CCD always run the same voltage or frequency, each individual core has its own voltage/frequency curve (and maximum boost frequency) which can be tuned with PBO. Some cores can run higher frequencies than others. If all cores are active in a multi-threaded workload, then the frequency of all cores on the CCD will be the limited by the voltage/frequency curve of the worst core because there can only be 1 frequency and voltage for the entire CCD and all of its cores. If it would boost to the frequency of the best core, then all but the best core would be unstable.
2) With Curve Optimizer, you want to achieve the maximum negative magnitude. The reason is quite simple: through Curve Optimizer settings we tell the CPU that its factory-fused voltage-frequency curve is using too much voltage for the requested frequency. For example: it could use 1.35V for 4.6G. When we use a negative magnitude, we tell the CPU to shift the entire curve to lower voltage. Each step is about 3-5mV. So if we use -10, then the voltage for 4.6G would be between 1.35V-10x3mv=1.32V and 1.35-10x5mV=1.30V. On AMD CPUs, the frequency kind of follows the voltage. So if we say 1.30V for 46X and the CPU determines there’s headroom to apply 1.35V, then with Curve Optimizer we get higher frequency at 1.35V.
I tried to make it a bit more visual in another video when I explained my “PBO Supercharged” https://www.youtube.com/watch?v=bxsDScbQJGA&t=1443s. Maybe this helps clarify the impact of Curve Optimizer better 🙂
SkatterBencher #29: AMD Ryzen 9 5900 B2 Overclocked to 5152 MHz - SkatterBencher
[…] follow the PBO tuning process as outlined in SkatterBencher #24 with the Ryzen 7 5700G. As we have covered Precision Boost Overdrive 2 in detail in another video, I won’t put you […]
Sam-Oslo
Good job and good explanation Pieter. Even an old-timer Intel-overclocker got the point with Precision Boost 2 and Curve Optimizer. That magic box does wonders and I’m going to try it, soon hopefully.
But I’m still in process av R&D for parts. I have already got these 3 parts:
A- 5700G, I got the first batch, hopefully it’s a good one, fingers crossed.
B- CORSAIR iCUE H100i RGB PRO XT , AIO 240mm.
C- My good old Corsair Hx1200, 1200W PSU which served me good in many years.
For now, I have narrowed down motherboard and RAM as flowing:
D- G.Skill Flare X series, 32 GB: 2 x 16 GB, 3200 MHz (PC4-25600), CL14 (14-14-14-34)
E- Asus ProArt B550-CREATOR
Because the RAM is a B-Die and should be OK to overclock, hopefully. And the MB got 2 x Thunderbolt 4 ports which will cover my back when next-gen CPU’s with USB4 hits the marked. I got 2 question for you Pieter:
1- This is not a overclocking MB, and Asus says it is PCI 4.0-ready, 12+2 power stages with high-quality alloy chokes and durable capacitors. Is this enough for a good 24/7 setup with undervaluing & overclocking with that AIO 240mm on top of a good ventilated case?
2- Can the PCIe 3.0 of 5700G run those thunderbolt 4 ports at sustained full speed? The 5700G is on the QVL list of Asus ProArt B550-CREATOR and should be OK, but I couldn’t find any confirmation yet.
What do you think about the my parts so far, generally? Any advise would be propitiated as I’m new to AMD-overclocking.
Pieter
Thanks for the kind words, Sam! To answer your questions:
1) I am not too familiar with the ASUS ProArt series, so I’m not able to comment with much expertise on the quality of this particular product. However, looking at the heatsink design it should be just fine. Also, the 5700G is generally not a very power-hungry chip so you won’t be needed a really beefy VRM to power it. Even when overclocked.
2) I don’t know the answer to this question, sorry.
3) Generally, the parts look like a good match for the Ryzen 7 5700G. Enjoy your new system! 🙂
Michał
Is 1.35V Vsoc actually safe for prolonged periods of time? It seems extremely high. The recommendation for previous gen ryzens has always been to never go over 1.2V.
Pieter
With Precision Boost Overdrive enabled the SOC Voltage is already boosting from the default 1045mV (peak 1095mV) to 1195mV (peak 1275mV). So 1350mV isn’t that much of a stretch in my opinion.
Michał
I see. Thanks for the explanation!
SkatterBencher #26: AMD Ryzen 9 5900X Overclocked to 5223 MHz | SkatterBencher
[…] follow the PBO tuning process as outlined in SkatterBencher #24 with the Ryzen 7 5700G. As we have covered Precision Boost Overdrive 2 in detail in another article, I won’t put you […]
David
I really like the explanation of the overclocking features in this article and the thoroughness of the investigation, thnx!
What I still wonder is whether it makes sense to disable the iGPU and use a discrete GPU. Does that reduce the TPP usage and leave more headroom for CPU overclocking?
Pieter
Thanks for the kind words!
In theory, yes, disabling the IGP will give more room for the CPU to clock higher within a certain PPT budget. However, looking at the results I got I’m not sure it would make a big difference.
The highest power I saw was when manually overclocking the CPU: 202W with Prime95 Small FFTs and AVX enabled + Furmark, with CPU at 4.4GHz 1.284V and hitting about 90C. After PBO tuning, using the same workload scenario (P95 + Furmark) the algorithm still pushes the CPU to 4375 MHz 1.257V and CPU temp of 80C. The PPT is 180.4W despite manually overriding it to allow for up to 1000W.
The main limiting factor for the PBO algorithm is generally temperature. As the CPU temperature increases to 90C, the algorithm becomes increasingly more conservative with the allowed voltage. This in turn will limit the CPU frequency. I think with this CPU, the maximum frequency is limited more by its inherent overclocking capabilities than it is by the available power budget.