SkatterBencher #35: AMD Ryzen 3 5300GE Overclocked to 4628 MHz
We overclock the AMD Ryzen 3 5300GE processor up to 4628 MHz and integrated Vega 8 graphics up to 2450 MHz with the GIGABYTE B550 Aorus Master motherboard.
This was a fun system to play around with in anticipation of the bigger product launches. Hope you enjoy the article!
AMD Ryzen 3 5300GE: Introduction
The AMD Ryzen 3 5300GE is the 35W OEM-exclusive entry model in AMD’s Zen 3 based Cezanne APU lineup. It sits alongside its 65W bigger brother, the 5300G, and is one of the only 2 Ryzen 3 Zen 3 based products for desktop. The only other Zen 3 Ryzen 3 product is the Ryzen 3 5400U for mobile.
Launched back in April 2021, the AMD Ryzen 3 5300GE offers 4 cores and 8 threads with a listed base frequency of 3.6 GHz and a listed boost frequency up to 4.2 GHz. It also features an integrated Radeon Vega 8 GPU with 6 compute units which run at 1.7GHz.
The GIGABYTE B550 Aorus Master is a full-size ATX motherboard featuring the AMD B550 chipset. It offers a feature set usually found in the higher-end X570 line-up such as a 16-phase VRM with 70A power stages, a thermal backplate, dual BIOS, and not one but two temperature sensors.
In this article we will cover four different overclocking strategies:
- First, we enable Precision Boost Overdrive and enable XMP
- Second, we tune the Precision Boost Overdrive parameters and use Curve Optimizer
- Third, we go for a manual overclock on both the CPU cores and integrated graphics
- Lastly, we try to supercharge Precision Boost Overdrive for maximum performance

However, before we jump into the overclocking let us quickly go over the hardware and benchmarks we use in this guide.
AMD Ryzen 3 5300GE: Platform Overview
Along with the AMD Ryzen 3 5300GE processor and GIGABYTE B550 Aorus Master motherboard, in this guide, we will be using a pair of G.SKILL Trident Z DDR4-4266 memory sticks, an 512GB AORUS RGB M.2 NVMe SSD, a 512GB Kingston HC400 SSDNow SSD, a Seasonic Prime 850W Platinum power supply, the ElmorLabs Easy Fan Controller, the ElmorLabs Power Measurement Device, ElmorLabs EVC2, the EK-Quantum Magnitude water block, and EK-Quantum water cooling. All this is mounted on top of our favorite Open Benchtable V2.


The cost of the components should be around $2,292.
- AMD Ryzen 3 5300GE processor: $100
- EK-Quantum Magnitude AM4: $241
- EK-Classic Kit P360 water cooling kit: $578
- GIGABYTE B550 Aorus Master motherboard: $250
- G.SKILL Trident Z DDR4-4266 memory: $170
- AORUS RGB 512 GB M.2-2280 NVME: $90
- Kingston 512B SSDNow SSD: $340
- Seasonic Prime 850W Platinum power supply: $226
- ElmorLabs Easy Fan Controller: $20
- ElmorLabs EVC 2: $32
- ElmorLabs Power Measurement Device: $45
- Open Benchtable V2: $200

I explained how I use ElmorLabs products in SkatterBencher #34. By connecting the EFC and PMD to the EVC2 device I monitor the ambient temperature (EFC), water temperature (EFC), fan duty cycle (EFC), and CPU input power (PMD). I include the measurements in my Prime95 stability test results.
I also use the ElmorLabs EFC to map the radiator fan curve to the water temperature. Without going into too many details, I have attached an external temperature sensor from the water in the loop to the EFC. Then, I use the low/high setting to map the fan curve from 25 to 40 degrees water temperature. This is used for all overclocking strategies.
AMD Ryzen 3 5300GE: Benchmark Software
We use Windows 11 and the following benchmark applications to measure performance and ensure system stability.
- SuperPI 4M https://www.techpowerup.com/download/super-pi/
- Geekbench 5 https://www.geekbench.com/
- Cinebench R23 https://www.maxon.net/en/cinebench/
- AI-Benchmark https://ai-benchmark.com/
- Furmark: https://geeks3d.com/furmark/
- 3DMark Night Raid https://www.3dmark.com/
- Spaceship: https://store.steampowered.com/app/1605230/Spaceship__Visual_Effect_Graph_Demo/
- CS:GO FPS Bench https://steamcommunity.com/sharedfiles/filedetails/?id=500334237
- Final Fantasy XV http://benchmark.finalfantasyxv.com/na/
- Prime 95 https://www.mersenne.org/download/

AMD Ryzen 3 5300GE: Stock Performance
The first thing we must do before we start any overclocking is checking the system performance at default settings.
Please note that the B550 Master enables Precision Boost Overdrive by default. So, to check the performance at default settings you must enter the BIOS and
- Enter Advanced Mode
- Go to the Settings menu
- Enter the AMD Overclocking submenu
- Set Precision Boost Overdrive to Disable
Then save and exit the BIOS.
Here is the benchmark performance at stock:
- SuperPI 4M: 44.418 seconds
- Geekbench 5 (single): 1,274 points
- Geekbench 5 (multi): 5,079 points
- Cinebench R23 Single: 1,248 points
- Cinebench R23 Multi: 6,849 points
- AI Benchmark (CPU): 1,179 points
- AI Benchmark (GPU): 2,775 points
- Furmark 1080P: 683 marks
- 3DMark Night Raid: 12,082 points
- Spaceship: 19.2 FPS
- CS:GO FPS Bench: 60.13 fps
- Final Fantasy XV: 15.63 fps

When running Prime 95 Small FFTs with AVX disabled and Furmark concurrently, the average CPU cores run stably at 3621 MHz with 1.078 volts. The GPU operates at an average frequency of 1024 MHz with 0.767 volts. The average CPU temperature is 40.5 degrees Celsius; the water temperature is 27.6 degrees Celsius, and the average CPU package power is 35 watts.

When running Prime 95 Small FFTs with AVX enabled and Furmark concurrently, the average CPU cores run stably at 3392 MHz with 0.99 volts. The GPU operates at an average frequency of 752 MHz with 0.792 volts. The average CPU temperature is 39.9 degrees Celsius; the water temperature is 27.0 degrees Celsius, and the average CPU package power is 35 watts.

For the different overclocking strategies, I will only report on the non-AVX stability test result.
Now, let us try our first overclocking strategy.
However, before we get going, make sure to locate the Clear CMOS Jumper.
Shorting the Clear CMOS Jumper will reset all your BIOS settings to default. This is useful in case your system does not boot up after overclocking or if you want to start your BIOS configuration from scratch. However, it does not delete any of the BIOS profiles previously saved.

The Clear CMOS Jumper is located in the lower-right corner of your motherboard.
OC Strategy #1: PBO + XMP 2.0
In our first overclocking strategy we simply take advantage of enabling Precision Boost Overdrive and Extreme Memory Profile 2.0.
Precision Boost Overdrive
PBO stands for Precision Boost Overdrive and is an extension of the Precision Boost technology integrated into all AMD Ryzen CPUs.
Precision Boost uses a proprietary algorithm with inputs from a plethora of sensors inside the CPU to determine the optimal frequency and voltage at any given time. Precision Boost allows the CPU to opportunistically increase its clock frequency over base frequency based on the available power and thermal headroom.

Precision Boost Overdrive is the overclocker’s extension of Precision Boost as it provides us with tools to tweak the Precision Boost algorithm and achieve higher frequencies. It is important to mention that using Precision Boost Overdrive is a form of overclocking and is therefore not covered by warranty.
When enabling Precision Boost Overdrive in the BIOS, the default power and current limits are unlocked and set to values that are pre-programmed by the motherboard BIOS. Note that while the power and current limits increase, the CPU operating frequency and voltage is still governed by AMD’s Precision Boost algorithm.

Extreme Memory Profile 2.0
Intel Extreme Memory Profile, or XMP, is an Intel technology that lets you automatically overclock the system memory to improve system performance. It is an extension to the standard JEDEC specification that allows a memory vendor to program different settings onto the memory stick. The settings include the memory frequency, the memory timings as well as the memory voltage.
There are two types of XMP certification:
- XMP ready: the module was programmed with an uncertain, but stable, profile
- XMP Certified: the module was programmed with settings that have passed supplier tests for the CPU and motherboard.
I almost always run XMP on my systems because it is an incredibly easy and safe way to improve system performance. Do note that some motherboards may adjust CPU memory controller voltages to support extremely high-frequency memory.
Upon entering the BIOS
- In Easy Mode
- Set X.M.P. Disabled to X.M.P. Profile1
- Enter Advanced Mode
- Go to the Settings menu
- Enter the AMD Overclocking submenu
- Set Precision Boost Overdrive to Enabled
Then save and exit the BIOS.
We re-ran the benchmarks and checked the performance increase compared to the default operation.
- SuperPI 4M: +4.21%
- Geekbench 5 (single): +5.31%
- Geekbench 5 (multi): +10.28%
- Cinebench R23 Single: +8.97%
- Cinebench R23 Multi: +4.28%
- AI Benchmark (CPU): +20.36%
- AI Benchmark (GPU): +25.05%
- Furmark 1080P: +58.13%
- 3DMark Night Raid: +32.56%
- Spaceship: +34.38%
- CS:GO FPS Bench: +49.08%
- Final Fantasy XV: +38.32%

We see performance improvements in all our benchmarks: from single to multithreaded CPU benchmarks to GPU benchmarks. The GPU benchmarks have the biggest performance increase as the integrated graphics benefit not only from higher power limits but also from the doubling in memory frequency. We see the highest performance increase of +58% in Furmark 1080P.
When running Prime 95 Small FFTs with AVX disabled and Furmark concurrently, the average CPU cores run stably at 4193 MHz with 1.35 volt. The GPU operates at an average frequency of 2000 MHz with 1.408 volts. The average CPU temperature is 63.5 degrees Celsius; the water temperature is 29.1 degrees Celsius, and the average CPU package power is 109 watts.

OC Strategy #2: PBO Tuned + XMP 2.0
In our second overclocking strategy we will make use of the overclocking tools provided by Precision Boost Overdrive 2.
Precision Boost Overdrive 2
Together with the launch of the Ryzen 5000 desktop processors in November 2020, AMD introduced Precision Boost Overdrive 2. Before we start trying out this feature ourselves, let us first have a quick look at what AMD has to say about it.
When Precision Boost Overdrive 2 is enabled, the maximum operating frequency is governed by 3 major inputs: total socket power, the motherboard VRM current, and the CPU temperature. The System Management Unit, or SMU, onboard the Ryzen CPU continuously monitors the system and decides to boost more or boost less.

A key new feature of Precision Boost Overdrive 2 is the Curve Optimizer. Curve Optimizer allows the user to customize voltages and frequencies and adjust the default factory-set voltage-frequency curve.

There are 6 key settings important when using Precision Boost Overdrive 2:
- Package Power Tracking or PPT, measured in watts, is the amount of power the processor can draw from the socket before the boost levels off. It is important to note that this measure includes the power from all parts of the CPU, including the cores but also the memory controller and integrated graphics.
- Electrical Design Current or EDC, measured in amps, is the peak current that the motherboard VRM can supply under transient conditions. A higher spec (and more expensive) VRM will provide more headroom.
- Thermal Design Current or TDC, measured in amps, is the current the VRM can supply for a sustained period. Essentially, the limiting factor for this will be the combination of the VRM components and the VRM thermal solution.
- Scalar, expressed as a factor, is a way to tell the Precision Boost algorithm that the CPU quality is better than it is. A higher-quality CPU can reach higher frequencies at the same voltage or use higher voltages within the same thermal constraints. Effectively, the scalar can fool the PBO algorithm in pushing more voltage to the CPU even if it would normally not do so given the factory-fused silicon quality indicator.
- Boost Override or Fmax Offset, measured in MHz, is a tool to set a higher ceiling for the maximum CPU frequency. The Fmax Offset can be set in steps of 25 MHz up to 200 MHz
- Curve Optimizer is a tool that enables adaptive undervolting allowing for additional voltage and thermal headroom, resulting in higher frequencies and longer boost duration.

I explored the ins and outs of Precision Boost Overdrive 2 in my Ryzen 7 5700G SkatterBencher guide, so if you want to learn more about the impact of each of these settings, I suggest you check out that blog post.
For PPT, EDC, and TDC you can refer to the values shown in HWiNFO for reference. For example, in the Prime95 non-AVX result from our previous strategy, we find that the maximum values for PPT, EDC, and TDC are 116W, 71.7A, and 43.7A. We can use values slightly higher than this to start the tuning process.
For Scalar, I usually set it to 10X as my cooling solution is not restrictive for the temperature increase associated with increased voltage.
The Boost Override I also immediately max out and set to 200MHz.
For Curve Optimizer, I configure a negative value for each core separately. Then I go into the operating system and check the initial core stability with a program called CoreCycler. When the core passes the quick stability test, I increase the negative offset. When the core doesn’t pass, I reduce the negative offset.
I also came across two unfamiliar settings called GFX Curve Optimizer and GPU Boost Clock Override. The latter I also came across when overclocking the Ryzen 7 5700G, but the GFX Curve Optimizer was a new one.
I played around with both the curve optimizer and the boost override, but the result wasn’t very clear. I achieved the same 2 GHz graphics frequency as when simply enabling Precision Boost Overdrive and the voltage was pretty much the same.
At the end of the day, I settled for the following Precision Boost Overdrive values:
- CPU PPT Limit to 135
- CPU TDC Limit to 60
- CPU EDC Limit to 80
- Scalar: 10X
- CPU Boost Override: 200MHz
- Core 0: -25
- Core 1: -30
- Core 2: -25
- Core 3:-30
- SOC TDC Limit to 60
- SOC EDC Limit to 80
- GFX Curve: -30
- GPU Boost Override: 200MHz

Upon entering the BIOS
- In Easy Mode
- Set X.M.P. Disabled to X.M.P. Profile1
- Enter Advanced Mode
- Go to the Settings menu
- Enter the AMD Overclocking submenu
- Set Precision Boost Overdrive to Advanced
- Set PBO Limits to Manual
- Set PPT Limit to 135
- Set TDC Limit to 60
- Set EDC Limit to 80
- Set SOC TDC Limit to 60
- Set SOC EDC Limit to 80
- Set Precision Boost Overdrive Scalar to Manual
- Set Precision Boost Overdrive Scalar to 10X
- Enter the Curve Optimizer submenu
- Set Curve Optimizer to Per Core
- Set Core 0 Curve Optimizer Sign to Negative
- Set Core 0 Curve Optimizer Magnitude to 25
- Set Core 1 Curve Optimizer Sign to Negative
- Set Core 2 Curve Optimizer Magnitude to 30
- Set Core 3 Curve Optimizer Sign to Negative
- Set Core 3 Curve Optimizer Magnitude to 20
- Set Core 4 Curve Optimizer Sign to Negative
- Set Core 4 Curve Optimizer Magnitude to 30
- Leave the Curve Optimizer submenu
- Enter the GFX Curve Optimizer submenu
- Set GFX Curve Optimizer to GFX Curve Optimizer
- GFX Curve Optimizer Sign to Negative
- GFX Curve Optimizer Magnitude to 30
- Leave the GFX Curve Optimizer submenu
- Set Max CPU Boost Clock Override to 200MHz
- Set Max GPU Boost Clock Override to 200MHz
Then save and exit the BIOS.
We re-ran the benchmarks and checked the performance increase compared to the default operation.
- SuperPI 4M: +11.77%
- Geekbench 5 (single): +9.53%
- Geekbench 5 (multi): +14.02%
- Cinebench R23 Single: +13.06%
- Cinebench R23 Multi: +6.85%
- AI Benchmark (CPU): +22.82%
- AI Benchmark (GPU): +29.59%
- Furmark 1080P: +58.27%
- 3DMark Night Raid: +34.26%
- Spaceship: +34.38%
- CS:GO FPS Bench: +49.39%
- Final Fantasy XV: +38.58%

After tuning PBO we get a substantial performance uplift in the CPU benchmarks. That’s mainly the effect of the Boost Clock Override providing an additional 200 MHz for the peak boost frequency as well as the Curve Optimizer. We get the highest performance increase of +58% in Furmark 1080P.
When running Prime 95 Small FFTs with AVX disabled and Furmark concurrently, the average CPU cores run stably at 4397 MHz with 1.296 volts. The GPU operates at an average frequency of 2000 MHz with 1.379 volts. The average CPU temperature is 61.2 degrees Celsius; the water temperature is 28.9 degrees Celsius, and the average CPU package power is 104 watts.

OC Strategy #3: Manual Overclock
In our third overclocking strategy we will pursue a manual overclock. We will focus on a variety of performance vectors: CPU core frequency, GPU frequency, memory frequency, and fabric clock frequency.
Before we start, however, it is important to know that AMD has two overclocking modes: PBO and OC Mode.
The first mode you already know is Precision Boost Overdrive. This mode allows the user to change a limited number of parameters that are included in the PBO algorithm. However, it is still the AMD Precision Boost proprietary algorithm that will eventually determine the performance of the system.
The second overclocking mode is called OC Mode. OC Mode disables all the limiters, voltage controllers, and most protections. A major downside of OC Mode is that all automatic overclocking features are disabled too. That means you lose the benefit of the high single-threaded frequencies that Precision Boost offers.
CPU Core Frequency & Voltage
As mentioned earlier, the Ryzen 3 5300GE is part of AMD’s Cezanne APU line-up. Cezanne is a single-CCD chip that features Zen 3 cores. CCD stands for Core Chiplet Die and is just a die on a Ryzen CPU that has CPU cores. The Zen 3 CPU cores are packed together in what’s called a CCX, or Core Complex. A Zen 3 CCX consists of up to eight individual cores each with its L1 and L2 cache and a shared 16MB of L3 cache.

The 5300GE CPU only has 4 out of the 8 Zen 3 cores enabled and also has half the L3 cache.
The frequency of the CPU cores is driven by a 100 MHz reference clock input. Each CCX has its PLL and thus can run an independent frequency. The cores within a CCX share the same PLL so they’ll run at the same frequency.

The voltage of the CPU cores is provided by the VDDCR_CPU voltage rail. This voltage is shared across all the CCDs so each CPU core will be provided with the same voltage.

That said, AMD extensively uses integrated voltage regulators. The voltage regulators are ultra-high efficiency digital low-dropout or dLDO. Most of the power domains, including the CPU cores, caches, fabric, and so on, have their dLDOs which can be controlled individually. However, on consumer parts, these dLDOs are permanently bypassed. That means the regulators are disabled and the voltage regulation takes place on the motherboard via the VRM.

Choosing the right manual voltage is always a matter of finding the right trade-off between increased overclocking potential, the thermal challenges that come with increased voltage, and of course consideration of CPU lifespan.
For my system, I picked a manual voltage of 1.4V from BIOS, which is about 100mV higher than the CPU voltage the Precision Boost algorithm boosted to in our previous overclocking strategy. Under heavy load, the voltage would drop to 1.38V. This enabled the CPU to overclock to 4.5 GHz.
GPU Frequency & Voltage
AMD Cezanne APUs also come with Vega-based integrated graphics up to 8 compute units. Again, our Ryzen 3 5300GE is slightly cut down from the maximum specification as it only has 6 compute units enabled.
The frequency of the integrated graphics is driven by the same 100 MHz reference clock input as the CPU cores, though obviously has a separate PLL. So, the graphics frequency will not be the same as the CPU core frequency.

The voltage of the GPU core is provided by the VDDCR_GFX voltage rail. However, this is not directly controlled by the motherboard voltage regulation.

The Cezanne APU has two main power domains: one for the CPU and one for the SOC. We covered the CPU power domain in the previous segment and thus know the CPU cores are powered via the VDDCR_CPU voltage rail. The SOC is powered by the VDDCR_SOC voltage rail.
Now, the next part I wasn’t able to fully confirm so note it might not entirely be correct. We know from the Ryzen Master reference guide that the graphics voltage is derived from the SOC voltage. So, what’s possibly happening is that the VDDCR_GFX voltage rail is either controlled via the dLDO integrated voltage regulation or, when dLDO is by-passed, directly derived from the VDDCR_SOC voltage rail. As I already mentioned, on the consumer parts the dLDOs are disabled by default.

The bottom line is that when you want to overclock the integrated graphics, even if you have a separate option to set the graphics voltage, you’ll still be increasing the voltage of the SOC.
When Precision Boost Overdrive is enabled, the voltage is for both the SOC and integrated graphics boosts to 1.4V under load and the integrated graphics boosts from 1.7 GHz to 2.0 GHz. For our manual overclock, we only increase the voltage by 25mV but were able to increase the frequency further to 2.45 GHz.
Memory Frequency & Voltage
Cezanne supports up to two channels of DDR4 memory. While the official specification only warrants up to DDR4-3200, we know that AMD Ryzen APUs are notoriously good at memory overclocking and achieved well over DDR4-6000. Apart from the obvious side note that these overclocking records are performed using liquid nitrogen cooling, there’s another important note on increasing performance through memory overclocking: fabric clock.
To make a long story short, there are 3 relevant frequencies when it comes to system memory performance:
- mClk, or memory clock, is the frequency of your DDR4 memory
- uClk, or memory controller clock, is the frequency of the integrated memory controllers
- fClk, or fabric clock, is the frequency of the infinity fabric.

When the CPU cores want to store data to or retrieve data from the system memory, it does this via the Infinity Fabric and the memory controllers. By default, these three parts are running in sync meaning they all operate at the same frequency. When overclocking the system memory, you can choose to either operate in synchronous mode or asynchronous mode. But more on that in the next segment.

The memory frequency is driven by the same 100 MHz reference clock also used for the CPU cores and integrated graphics.

For our configuration, we continue to use our XMP memory timings but change the memory multiplier and the memory voltage to achieve better performance. My kit is fairly limited in maximum memory frequency, though we’re able to increase from DDR4-4266CL19 at 1.40V to DDR4-4533CL19 at 1.45V.
The extra memory performance will help us not only in CPU benchmarks which rely on fast memory access but also in 3D benchmarks as the integrated graphics uses the system memory.
Fabric Frequency
As mentioned in the previous segment: the infinity fabric connects the CPU cores and dies with other SoC controllers like PCIe, SATA, USB, etc. It also connects the CPU cores with the memory controller which provides access to the system memory.

By default, the fabric, memory controller, and memory frequency operate in “synchronous mode”. That means the CPU will run all frequencies in 1 to 1 ratio. Synchronous mode is relatively taxing for the CPU, so on most Ryzen CPUs, the system will automatically enable “Asynchronous mode” beyond a certain memory frequency.
In asynchronous mode, the memory controller will operate at half the frequency of the system memory and the fabric clock will also run below system memory frequency. This will result in a performance penalty. The size of the performance penalty is application-specific and also depends on the final memory frequency. A sufficiently high memory frequency can overcome the performance penalty from running asynchronously.

In the case of the Cezanne APU, we would prefer to run in synchronous mode since not only do we need to provide the CPU cores with fast access to system memory but also the integrated graphics!
The good news is that our Cezanne APU should be great for running high fabric clock frequencies for two main reasons.
First, as AMD pointed out when launching the Ryzen 5000 series, the Zen 3 architecture should have a slightly improved range for Fabric overclocking. They suggested that DDR4-4000 memory with 2GHz fabric clock is the new standard with the 5000 series, which is a small bump up from DDR4-3800 and 1.8GHz fabric clock on Ryzen 3000 series CPUs.

Second, APUs in particular have a design advantage as well. The CPU cores and cache, the integrated graphics, and the I/O are all integrated into a single die. That’s different from a single-CCD Ryzen 5000 CPU, for example, the Ryzen 5 5600X, which still has a separate I/O die on package. This effectively means the infinity fabric is entirely integrated inside the single die and thus allows for a much higher overclocking range.

Whereas we sometimes struggle running DDR4-4000 in synchronous mode on Ryzen 5000 CPUs, on this APU we can run DDR4-4533 with a synchronous fabric clock of 2267 MHz.
Upon entering the BIOS
- In Easy Mode
- Set X.M.P. Disabled to X.M.P. Profile1
- Enter Advanced Mode
- Set CPU Clock Ratio to 45.00
- Set GFX Clock Frequency to 2450
- Set GFX Core Voltage to 1.425
- Set System Memory Multiplier to 45.33
- Set FCLK Frequency to 2267
- Set CPU Vcore to 1.4
- Set DRAM Voltage to 1.45
- Enter the CPU/VRM Settings submenu
- Set CPU Vcore Loadline Calibration to High
- Set Vcore SOC Loadline Calibration to High
Then save and exit the BIOS.
We re-ran the benchmarks and checked the performance increase compared to the default operation.
- SuperPI 4M: +13.87%
- Geekbench 5 (single): +11.86%
- Geekbench 5 (multi): +17.50%
- Cinebench R23 Single: +16.03%
- Cinebench R23 Multi: +10.79%
- AI Benchmark (CPU): +27.57%
- AI Benchmark (GPU): +51.42%
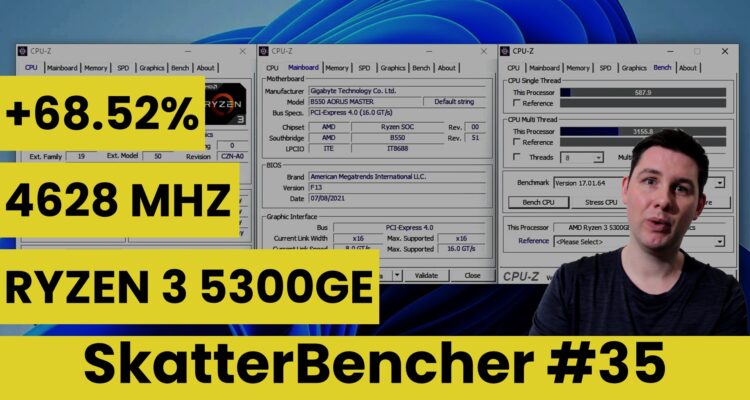
- Furmark 1080P: +68.52%
- 3DMark Night Raid: +47.38%
- Spaceship: +55.73%
- CS:GO FPS Bench: +61.20%
- Final Fantasy XV: +52.08%

Our manual overclock of 4500 MHz is higher than the maximum Precision Boost Overdrive frequency of 4450 MHz, hence we see a performance uplift in all CPU benchmarks. Furthermore, the integrated graphics frequency increase from 2000 MHz to 2450 MHz provides a lot more performance in 3D benchmarks as well. We get the highest performance increase of +69% in Furmark 1080P.
When running Prime 95 Small FFTs with AVX disabled and Furmark concurrently, the average CPU cores run stably at 4460 MHz with 1.38 volt. The GPU operates at an average frequency of 2450 MHz with 1.416 volts. The average CPU temperature is 68.3 degrees Celsius; the water temperature is 29.1 degrees Celsius, and the average CPU package power is 123 watts.

OC Strategy #4: PBO Supercharged
In our fourth and final overclocking strategy we are looking to supercharge the Precision Boost Overdrive algorithm to get even more performance.
Supercharging Precision Boost Overdrive
I explained what I mean by supercharging PBO in three previous SkatterBencher videos: episode #26 with the Ryzen 9 5900X, episode #27 with the Ryzen 9 5950X, and episode #29 with the Ryzen 9 5900 B2. It’s quite a lengthy and detailed overview so I would suggest you check out those videos to learn more.
The long story short is that we’re increasing the base clock frequency and use voltage offsets to manually change the CPU voltage-frequency curve.
The voltage frequency curve, or V/f curve, is a line that describes the relationship between the operating frequency and the voltage required to run stably at that frequency. Every core in your AMD Ryzen CPU has a V/f curve. Better cores which require less voltage for a given frequency will be able to boost to higher frequencies given a certain voltage.

Precision Boost technology uses this V/f curve information to dynamically increase the CPU operating frequency. The boost algorithm determines the maximum allowed voltage for a given set of input parameters. The inputs include not just power, current, and temperature, but also the number of active cores, the core quality, and so on. Once the algorithm has determined the maximum allowed voltage, it applies the corresponding frequency based on the V/f curve.
The Precision Boost algorithm assumes the reference clock is 100MHz and is unaware of any user changes. We can exploit this and use the reference clock to push the core frequency higher than what the algorithm wants to set it at. For example, if the algorithm pushes the frequency to 4500 MHz and we use a base clock frequency of 101 MHz instead of the default 100 MHz, then the actual frequency will be 4500 x 1.01 = 4545 MHz.

While it may sound simple, there are a couple of caveats.
First, the reference clock frequency drives many parts in your system, including the CPU cores but also the system memory, PCIe, and SATA. When increasing the reference clock, you change all associated frequencies as well. While this can result in additional performance, it can also cause instability.
Fortunately, for most parts affected by the reference clock, we can adjust the final frequency using multiplier ratios. Unfortunately, not for all. The main challenge with using reference clock adjustments on Ryzen is the bus interfaces like PCIe, SATA, and NVMe drives. On this particular board, when the reference clock frequency exceeds 104 MHz the NVMe drives are no longer detected. So, we have to use a SATA drive connected to the ASMedia B550 chipset.
Second, as the algorithm is unaware of the increased frequency, it will also not adjust the voltage accordingly. By adding a voltage offset we can look for stability at the highest frequency range. But keep in mind that adding an offset to the entire V/f curve means that you’ll also get higher voltage at lower frequencies. In heavy multi-threaded workloads that means you’ll run out of thermal headroom faster than without the voltage offset.
Third, just like any motherboard, the B550 Aorus Master has a lot of BIOS auto-rules to help with easy overclocking. However, the same auto-rules that help make manual overclocking amazingly easy can sometimes make overclocking with Precision Boost Overdrive trickier.
When increasing the BCLK frequency to over 104 MHz, the auto-rules of the BIOS force the CPU into “OC Mode” and thus has all Precision Boost functionality disabled. So, you’ll end up with a fixed ratio in the Operating System. There are no options in the BIOS to work around this issue, so unfortunately 104 MHz is the maximum base clock frequency for our supercharged Precision Boost Overdrive strategy.
GIGABYTE did provide me with a test BIOS which removed this specific auto-rule and then I could push the CPU to over 104 MHz with Precision Boost enabled. But this introduced some other instabilities and in the end did not help us increase the stable frequency much further.

Now that we have all the information on how to supercharge PBO, let’s get into the BIOS and configure our overclock.
Upon entering the BIOS
Then save and exit the BIOS. We re-ran the benchmarks and checked the performance increase compared to the default operation.
- SuperPI 4M: +17.01%
- Geekbench 5 (single): +15.43%
- Geekbench 5 (multi): +17.70%
- Cinebench R23 Single: +17.15%
- Cinebench R23 Multi: +11.26%
- AI Benchmark (CPU): +24.60%
- AI Benchmark (GPU): +51.35%
- Furmark 1080P: +67.35%
- 3DMark Night Raid: +47.72%
- Spaceship: +56.25%
- CS:GO FPS Bench: +64.23%
- Final Fantasy XV: +49.07%

In most benchmarks, we achieve the best performance thanks to a supercharged Precision Boost algorithm boosting the CPU to higher frequencies. In some benchmarks, the performance is matched by our manual overclocking result. Overall, we see the highest performance improvement of +67.35% in Furmark 1080P.
When running Prime 95 Small FFTs with AVX disabled and Furmark concurrently, the average CPU cores run stably at 4432 MHz with 1.409 volts. The GPU operates at an average frequency of 2444 MHz with 1.38 volt. The average CPU temperature is 68.7 degrees Celsius; the water temperature is 28.5 degrees Celsius, and the average CPU package power is 125 watts.

When running Prime 95 Small FFTs with AVX enabled and Furmark concurrently, the average CPU cores run stably at 4424 MHz with 1.399 volts. The GPU operates at an average frequency of 2444 MHz with 1.38 volt. The average CPU temperature is 75.1 degrees Celsius; the water temperature is 29.3 degrees Celsius, and the average CPU package power is 139 watts.

AMD Ryzen 3 5300GE: Conclusion
All right, let us wrap this up.
I put together this system because I figured it would be interesting to see what the most entry-level Zen 3 processor would be capable of. To maximize our chance for a big, overclock, we combined the 35W CPU with a relatively high-end Aorus B550 motherboard and custom loop water cooling.
In the end, we managed to push the CPU from being limited to 35W out of the box to almost 140W when loading the CPU cores and integrated graphics. That’s quadruple the power!
In terms of CPU overclocking, we managed to increase the single-core boost by almost 400MHz from 4250 MHz to 4628 MHz, and the AVX-enabled multi-threaded frequency by 1 GHz from 3400 MHz to 4424 MHz.
The integrated graphics also overclocked quite nicely as we managed to increase the frequency from 1700 MHz to 2450 MHz.
The infinity fabric was able to run in sync with the memory up to 2267 MHz. We are limited by the capabilities of the memory sticks though, so probably there’s even more margin in the chip.
Overall, it’s always fun to play around with Ryzen APUs. Not only because the single die design allows for easier memory and fabric overclocking, but also because there’s the opportunity to overclock both the CPU cores and integrated graphics.
That said, this Ryzen 3 5300GE felt like the bottom of the barrel when it comes to absolute Ryzen overclocking capabilities. So, I wouldn’t recommend you go out and get one for yourself to play around with. Also, it would probably be quite a challenge considering the 5300GE is only available to AMD’s OEM partners.
Anyway, that’s all for today!
As you may have seen on my Twitter or community posts, I am working on wrapping my head around overclocking the 64 core ThreadRipper 3990X. So, hopefully, I can share my findings soon.
As per usual if you have any questions or comments, feel free to drop them in the comment section below.
See you next time!
5 Minute Overclock: AMD Ryzen 3 5300GE to 4628 MHz - 5 Minute Overclock
[…] I’ll speed run you through the BIOS settings and provide some notes and tips along the way. Please note that this is for entertainment purposes only and most certainly not the whole picture. Please don’t outright copy these settings and apply to your system. If you want to learn how to overclock this system, please check out the longer SkatterBencher article. […]