6 GHz EK-Cooled Ryzen 9 9950X
In this brief follow-up to SkatterBencher #81, I overclock the Ryzen 9 9950X to 6 GHz with EK water cooling.
his particular Ryzen 5 9600X is a surprisingly good overclocker! With the right BIOS settings and finetuning, I could surpass 6 GHz effective clock just like I could with the Ryzen 7 9700X. I’ll first show you the BIOS configuration and highlight the important settings. Then we go into the operating system, and I show you what I do to get to 6 GHz.
I’ve already achieved 6 GHz with the Ryzen 5 9600X and Ryzen 7 9700X. Just like in the previous blog posts, first I’ll show you the BIOS configuration and highlight all the options that are most important for our overclocking attempt. Then I’ll outline all the software tools we’ll be using in the operating system, and finally we’re try to hit the 6GHz mark.
So, let’s jump straight into the BIOS and get started!
BIOS Setup
The first thing that I’ll do is I will load one of the overclocking strategies that I’ve used in SkatterBencher #81. Specifically, I’ll be relying on OC Strategy #2 which leverages Curve Optimizer.
In the Extreme Tweaker menu we have to enable Asynchronous eCLK. That allows us to change the reference clock only for the CPU cores. In the original OC Strategy, we had left BCLK2 frequency to auto but we will change that 102.5. What does this do? In short: every voltage frequency point will be increased by 2.5 percent.

Next, we’ll go to the Precision Boost Overdrive menu. Here, we’ll be a little bit more conservative with the operating frequency. I change the CPU boost clock override from positive to negative and set it to negative 400. That restricts the maximum frequency for CCD0 from the default of 5.75 GHz to 5.35 GHz.
Note though that this is again adjusted with our reference clock. So the Fmax limit will actually be (5750 – 400) x 1.025 = 5483.75 MHz. When we’re in the OS, we’ll do is we’ll change from minus 400 to plus 200 again which will give us a theoretical maximum frequency of (5750 + 200) x 1.025 = an 6098.75 MHz.

The last thing we need to do is adjust the Curve Optimizer settings. Curve optimizer is used to undervolt the processor. We can also do that at runtime, and we will, but I don’t want to undervolt at boot. So I’m just going to disable this from the BIOS.

After saving these settings, I boot into the operating system.
Overclocking Tools
In the operating system, we will use a couple of tools to monitor and validate our overclock:
- HWiNFO: To check effective and core clock frequencies.
- CPU-Z XOC: A special version of CPU-Z that skips the benchmark load during validation and only captures the operating frequency.
- Shamino’s Work Tool: To fine-tune the Precision Boost settings like Fmax Boost Override and Curve Optimizer
- NOPBench: A simple application from ElmorLabs that runs NOP instructions repeatedly, tied to a specific core, to give us an indication of the effective clock.

The difference between the core clock and the effective clock is that the core clock measures what the CPU is configured to, whereas the effective clock measures the actual clock cycles.
I got some questions in the previous 6 GHz overclock how NOPBench relates to gaming workloads or other workloads? The short answer is it doesn’t at all. The only purpose for using NOPBench is that increases the effective clock. That’s the only reason why I use NOPBench. And in fact, it is designed to be very little load on the CPU. We don’t want any stress test to actually impact the maximum frequency.
Overclocking Process
- Open Hardware Info: Here, you will see the core clocks and the effective clock. The core clock shows the frequency the cores are set to, while the effective clock shows the actual clock cycles.
- Launch CPU- Z XOC: This will help create a validation file without running stress tests.
- Run NOPBench: This will provide a real-time look at the effective clock on different cores.
- Overclock with Shamino’s Work Tool: Start by increasing the Fmax Boost Override to 5950 MHz. We immediately see the frequency jump to over 5.9 GHz when idling.
- Undervolt with Shamino’s Work Tool: we will adjust the Curve Optimizer value of our target Core #3. The goal is to undervolt enough such that the VF points above 6 GHz fall under the voltage limit threshold. I start with -5 and ended up increasing it to -14.
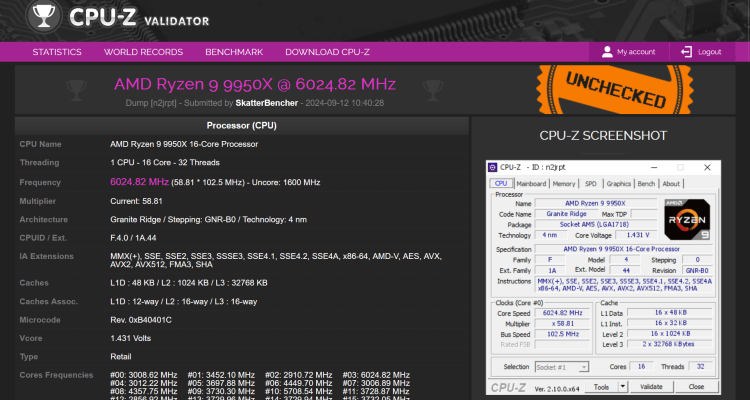
- Validate with CPU-Z: After adjusting the OC settings, validate the frequency using CPU-Z. Pressing F7 will create a validation file which we can later upload to the CPU-Z database.

Fine-Tuning and Validation
After some trial and error, you might hit the 6 GHz mark. Here is a snapshot of the process:
- Initial Adjustments: If you encounter instability (e.g., crashing), revert to the BIOS and fine-tune the reference clock slightly.
- Check Different Cores: You might find that some cores are better at reaching 6 GHz than others.
- Validate multiple times: the CPU-Z software might not always validate at the exact frequency you are seeing in the application. Try validating multiple times to ensure you have captured the highest frequency.
I ended up achieving 6024.82 MHz on Core #3 with 102.5 MHz eCLK and 5950 Fmax boost override. The maximum possible frequency for this eCLK and Fmax configuration would be 5950 x 1.025 = 6098.75 MHz).

Final Thoughts
So there you have it: our 6 GHz Ryzen 9 9950X. Admittedly, it’s just idling in the operating system, but it’s idling at 6 gigahertz.
Thanks for reading, and stay tuned for more overclocking adventures!