SkatterBencher #44: Intel Arc A380 Overclocked to 2900 MHz
We overclock the Intel Arc A380 up to 2900 MHz with Shamino’s Arc OC tool software and custom loop water cooling.
As you can see from the title, this is SkatterBencher #44 and not the successor of SkatterBencher #56. I was supposed to finish the project sometime in August last year. But due to the many challenges with Arc overclocking, I published a blog post titled “Update on my 3.1GHz Intel Arc A380.”
Since then, so much has happened on the overclocking front. I didn’t have time to revisit the project until now. Spoiler alert: Arc overclocking is still troublesome! So, in this blog post, I’ll mostly show my progress and try to highlight the main bottlenecks.
Let’s get started.
Intel Arc A380: Introduction
The Intel Arc A380 is the second-slowest graphics card in Intel’s Alchemist lineup. It was the first ARC discrete graphics released in the market on June 14, 2022, at an MSRP of US$139.
Alchemist is the codename for Intel’s first-generation desktop discrete graphics. It uses the Xe-HPG variant of the Intel Xe GPU Architecture. It supports ray tracing, deep learning accelerated XeSS, and DirectX 12 Ultimate.
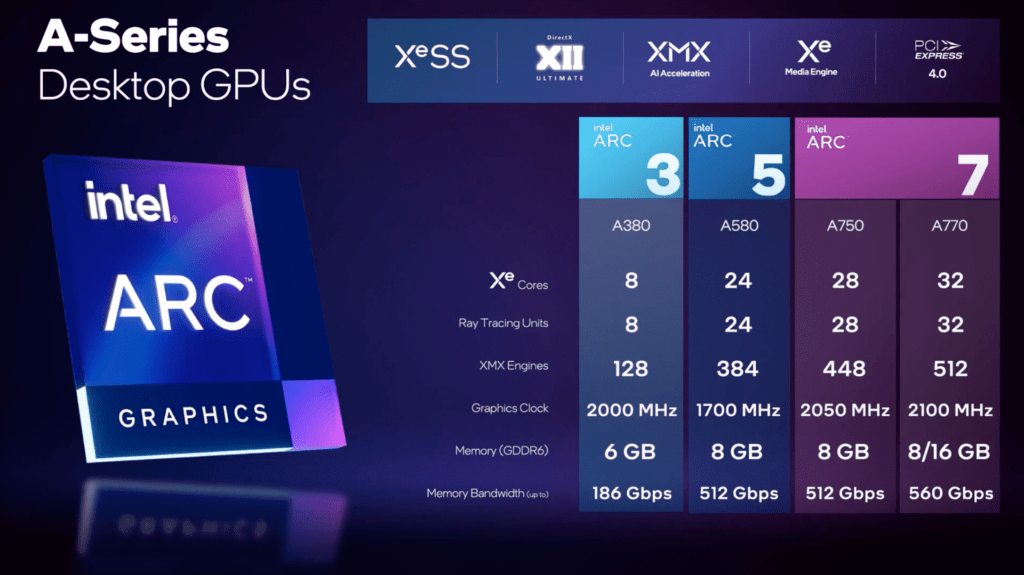
The Arc A380 is built on the TSMC N6 process and houses 8 Xe-cores. It comes with a base clock of 2000 MHz and a boost clock of 2450 MHz. The 6GB GDDR6 memory is clocked at almost 1937 MHz. The graphics card TDP is 75W.
In today’s guide, we cover three overclocking strategies.
- First, we use Arc Control and do basic GPU overclocking with stock cooling
- Second, we use Arc Control and do advanced overclocking with custom loop water cooling
- Third, we maximize the GPU overclock using non-Intel software tools

Before we jump into the overclocking, let us quickly review the hardware and benchmarks used in this overclocking guide.
Intel Arc A380: Platform Overview
The system we’re overclocking today consists of the following hardware.
| Item | SKU | Price (USD) |
| GPU | GUNNIR Intel Arc A380 Photon 6G OC | 150 |
| CPU | Intel Core i9-13900K | 589 |
| Motherboard | ASUS ROG Maximus Z790 Hero | 760 |
| CPU Cooling | Noctua NH-L9i-17xx Chromax.black | 55 |
| GPU Cooling | Bykski I-GNA380-X EK-Pro QDC Kit P360 | 115 777 |
| Fan Controller | ElmorLabs EFC-X9 | 60 |
| Memory | G.SKILL Trident Z DDR5-7800 CL34 32GB | 310 |
| Power Supply | Antec HCP 1000W Platinum | 110 |
| Graphics Card | ASUS ROG Strix RTX 2080 TI | 880 |
| Storage | AORUS RGB 512 GB M.2-2280 NVME | 120 |
| Chassis | Open Benchtable V2 | 200 |
Intel Arc A380: Benchmark Software
We use Windows 11 and the following benchmark applications to measure performance and ensure system stability.
| BENCHMARK | LINK |
| Geekbench 5 (OpenCL, Vulkan) | https://www.geekbench.com/ |
| FurMark (1080P) | https://geeks3d.com/furmark/ |
| FluidMark PhysX (1080P) | https://www.ozone3d.net/benchmarks/physx-fluidmark/ |
| AI Benchmark | https://ai-benchmark.com/ |
| 3DMark Night Raid | https://www.3dmark.com/ |
| Simple Raytracing Benchmark (1080P, Basic) | https://marvizer.itch.io/simple-raytracing-benchmark |
| Unigine Superposition (1080P, DirectX) | https://benchmark.unigine.com/superposition |
| Spaceship (1080P, High) | https://store.steampowered.com/app/1605230/Spaceship__Visual_Effect_Graph_Demo/ |
| Handbrake (QSV, 1080P) | https://handbrake.fr/ |
| Nero Score (GPU) | https://store.steampowered.com/app/1942030/Nero_Score__PC_benchmark__performance_test/ |
| EzBench (1080P) | https://store.steampowered.com/app/770170/EzBench_Benchmark/ |
| CS:GO FPS Bench (1080P) | https://steamcommunity.com/sharedfiles/filedetails/?id=500334237 |
| Final Fantasy XV (Standard, 1080P) | http://benchmark.finalfantasyxv.com/na/ |
The benchmark selection is similar to the one we used in our last GPU SkatterBencher guide.
We rely on the TensorFlow-DirectML plugin for AI Benchmark to run our deep learning workloads. Intel did release an extension for TensorFlow, which has experimental support for Intel Arc A-Series GPUs. However, it’s only available for native Linux and Windows Subsystem for Linux 2, not native Windows.
Intel Arc A380: Stock Performance & V/F Curve
Before starting overclocking, we must check the system performance at default settings.
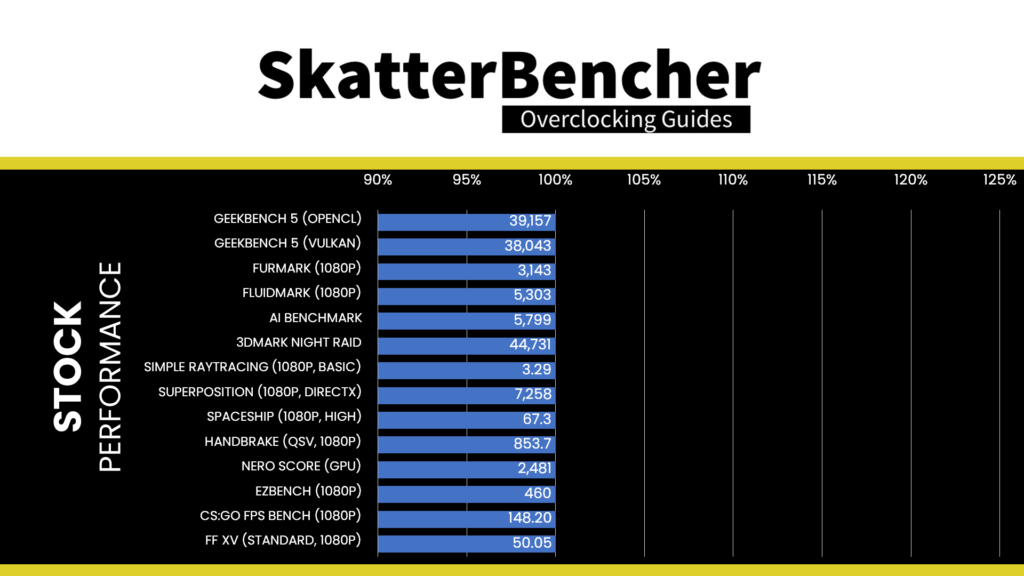
Here is the benchmark performance at stock:
- Geekbench 5 OpenCL: 39,157 points
- Geekbench 5 Vulkan: 38,043 points
- Furmark 1080P: 3,143 points
- FluidMark 1080P: 5,303 points
- AI Benchmark: 5,799 points
- 3DMark Night Raid: 44,731 marks
- Simple RayTracing Benchmark: 3.29 fps
- Unigine Superposition: 7,258 points
- Spaceship: 67.3 fps
- Handbrake: 853.7 fps
- Nero GPU: 2,481 points
- EZBench: 460 frames
- CS:GO FPS Bench: 148.20 fps
- Final Fantasy XV: 50.05 fps
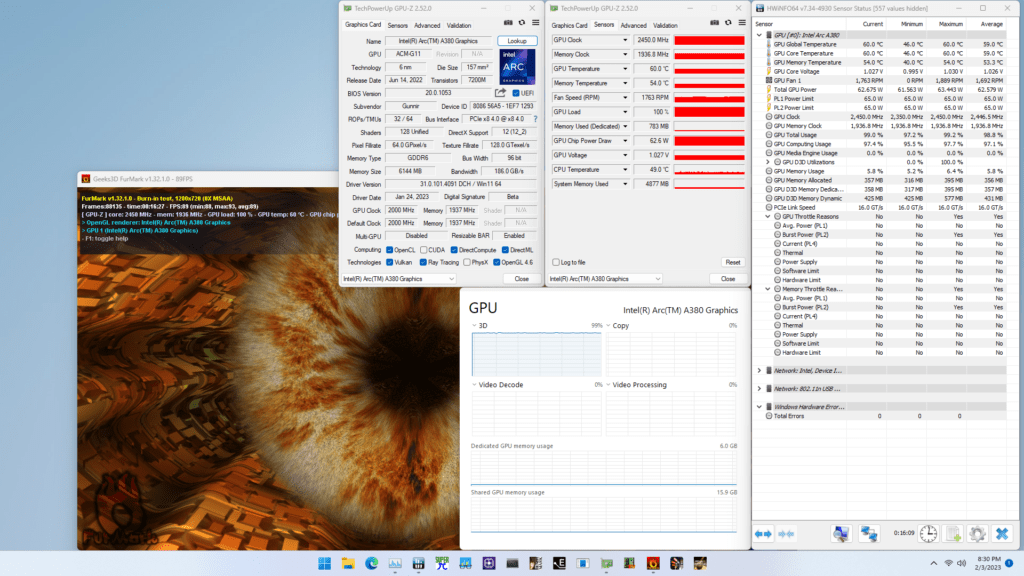
When running Furmark GPU Stress Test, the average GPU clock is 2447 MHz with 1.026 volts, and the GPU Memory clock is 1937 MHz. The average GPU Global temperature is 59.0 degrees Celsius. The average GPU power is 62.579 watts.
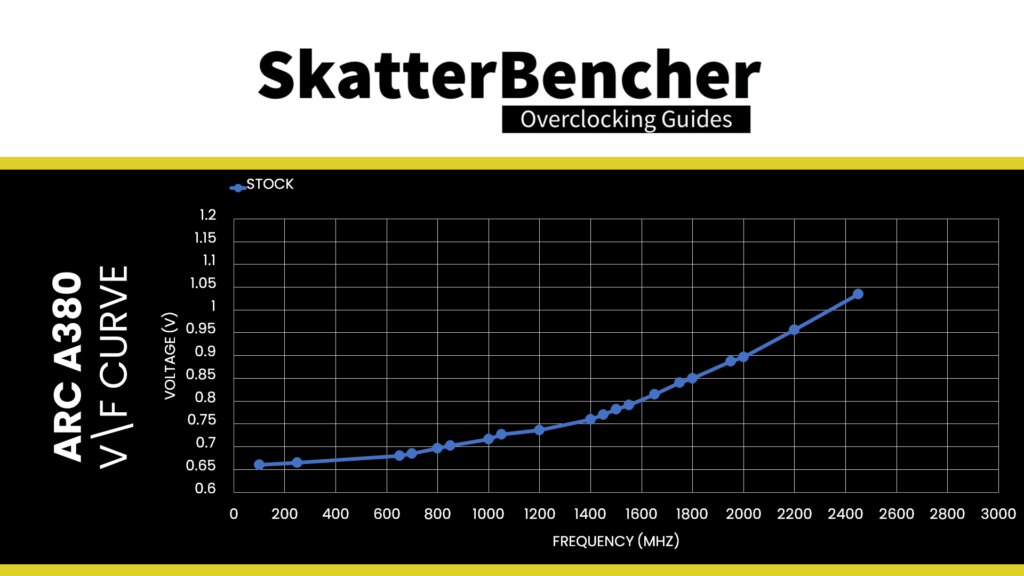
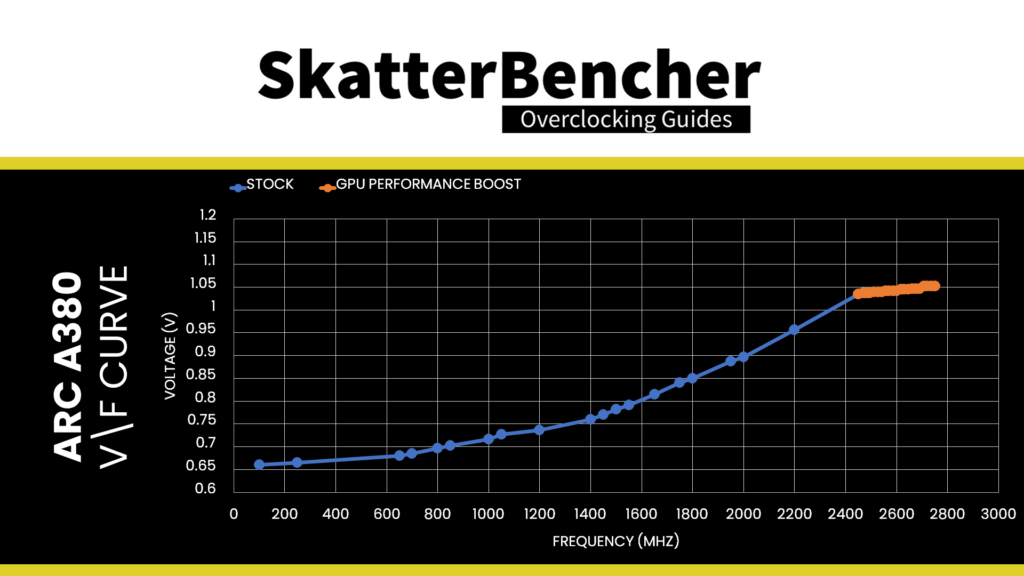
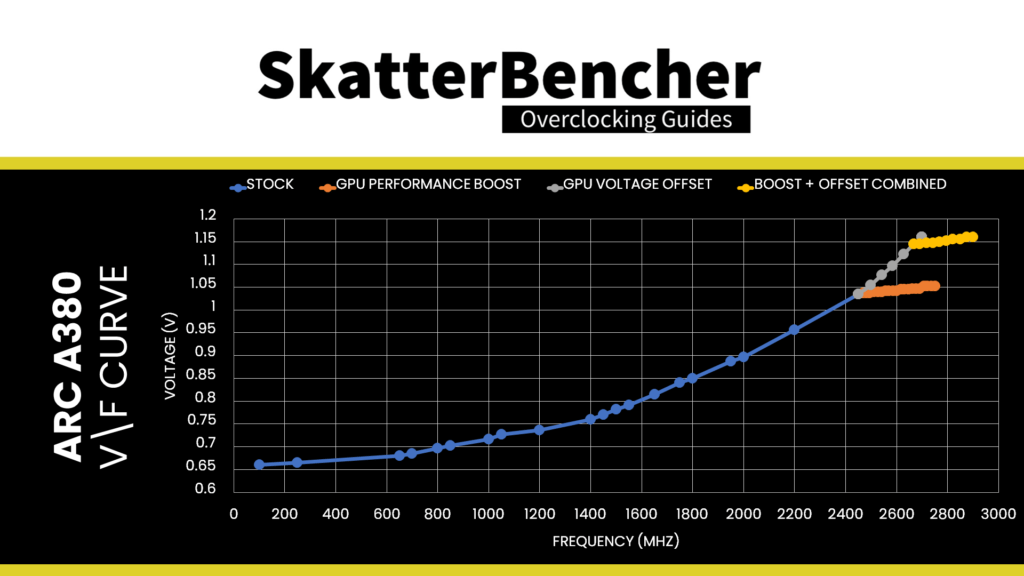
For future reference, I also extracted the default voltage-frequency curve from the A380 GPU. As you can see from the chart, the GPU works from 100 MHz at 0.660V up to 2450 MHz at 1.035V.
OC Strategy #1: Basic OC with Intel Arc Control
In our first overclocking strategy, we take advantage of the overclocking toolkit integrated into the Intel Arc Control software.
Intel Arc Control: Overview
The Arc Control software is arguably one of the most controversial aspects of the Intel discrete graphics product launch. In the beginning, many users complained about the useability and bugs. Recently, Intel launched a standalone desktop mode version of Arc Control software, improving the user experience.
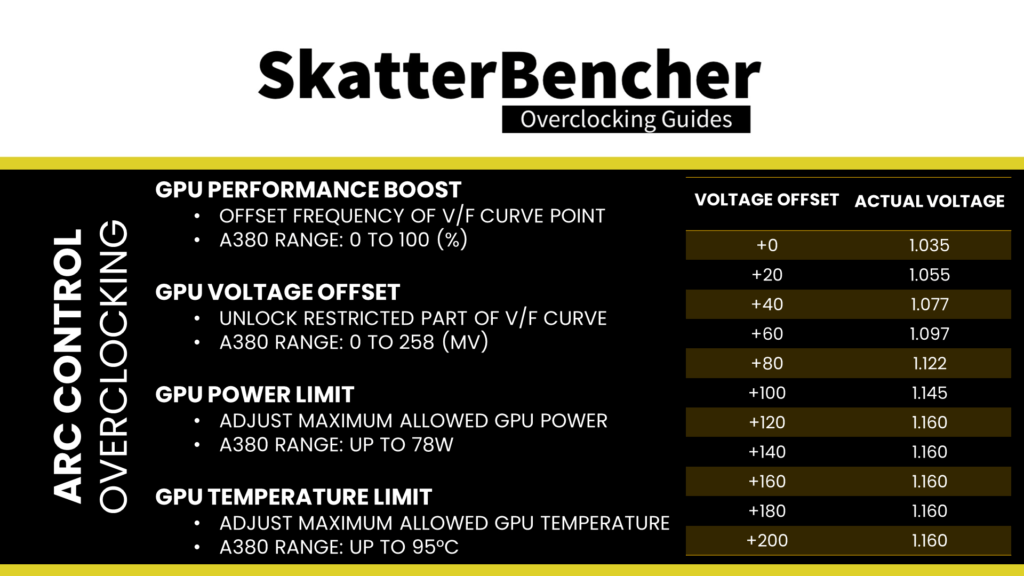
Since the beginning, Arc Control has provided enthusiasts with the tools to overclock their Arc GPU. Today, the tool still provides the same overclocking knobs as at launch. The knobs include:
- GPU Performance Boost
- GPU Voltage Offset
- GPU Power Limit, and
- GPU Temperature Limit
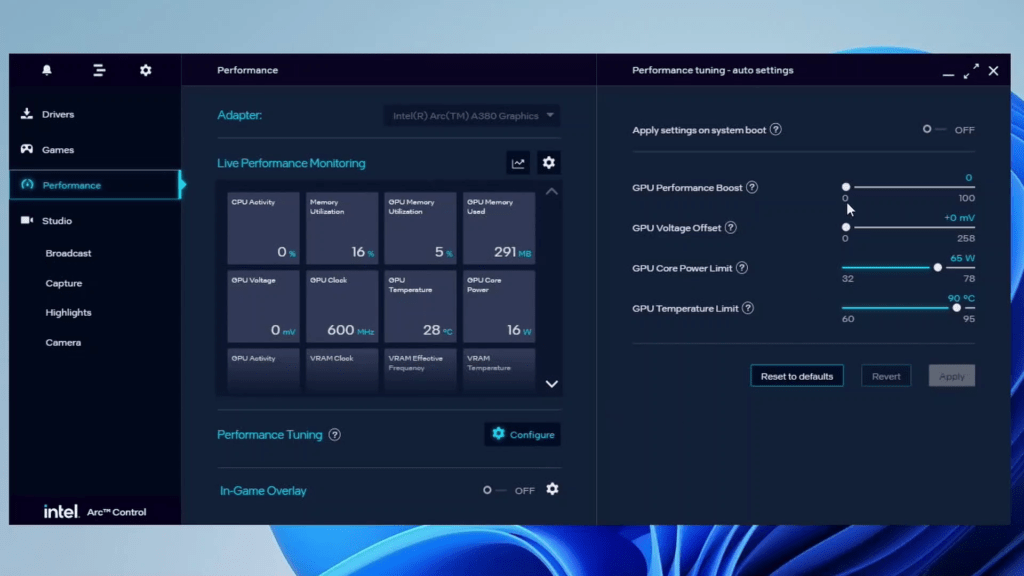
Unfortunately, while it’s evident that these options are supposed to give some degree of manual control over the voltage-frequency curve, it’s not entirely clear from the interface what each option does exactly.
Intel Arc Control: Overclocking Controls
Let’s have a closer look at the function of each of the available overclocking controls in the Intel Arc Control software.
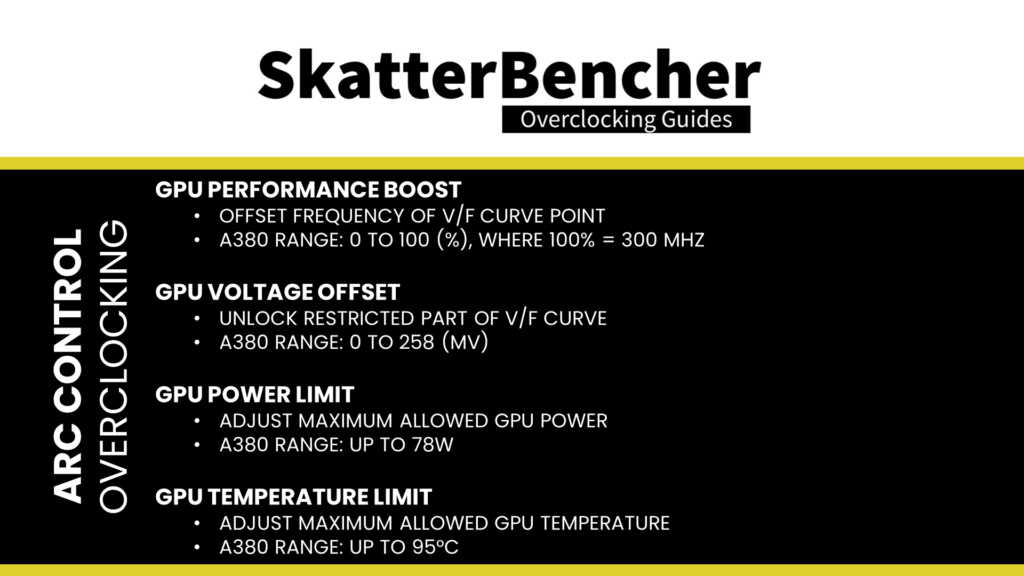
GPU Performance Boost offsets each point on the voltage-frequency curve with a specific frequency. The slider goes from 0 to 100, with 100 presumably reflecting 100% of the maximum allowed frequency offset. At 100%, the GPU frequency is 2750 MHz which is a 300 MHz increase over the default maximum frequency of 2450 MHz.
GPU Voltage Offset enables the restricted parts of the factory-fused voltage frequency curve. In this case, the slider ranges from 0 to 258. That presumably indicates the maximum voltage offset allowed for this GPU. We’ll get back to that later in the article. The empiric evidence aligns with this idea since a +100 offset returns a 110 mV increase in GPU voltage. Note that this isn’t an actual voltage offset but enables higher V/F points. When the GPU boosts to a previously restricted voltage-frequency point, it will boost to that frequency and voltage.
In my original Arc A380 overclocking blog post, I observed that overclocking Arc A380 feels very similar to NVIDIA GPU overclocking. That observation still stands with what we learned about the two overclocking sliders.
When finetuning, we use both sliders to enable a higher voltage range and add extra frequency for each V/F point. However, I will only use the Performance Boost slider in this OC Strategy.
GPU Power Limit allows configuration of the allowed GPU power consumption. The power, in this case, is the estimated GPU power and not the total board power
GPU Temperature Limit enables boosting with higher temperatures, but with this GPU, we never come close to the stock maximum limit of 90 degrees Celsius.
I have a couple of additional notes on these sliders.
- A prominent item missing from the overclocking toolkit is to overclocking the graphics card memory. It seems that Intel has, by design, chosen not to support memory overclocking on their 1st generation Arc discrete graphics cards.
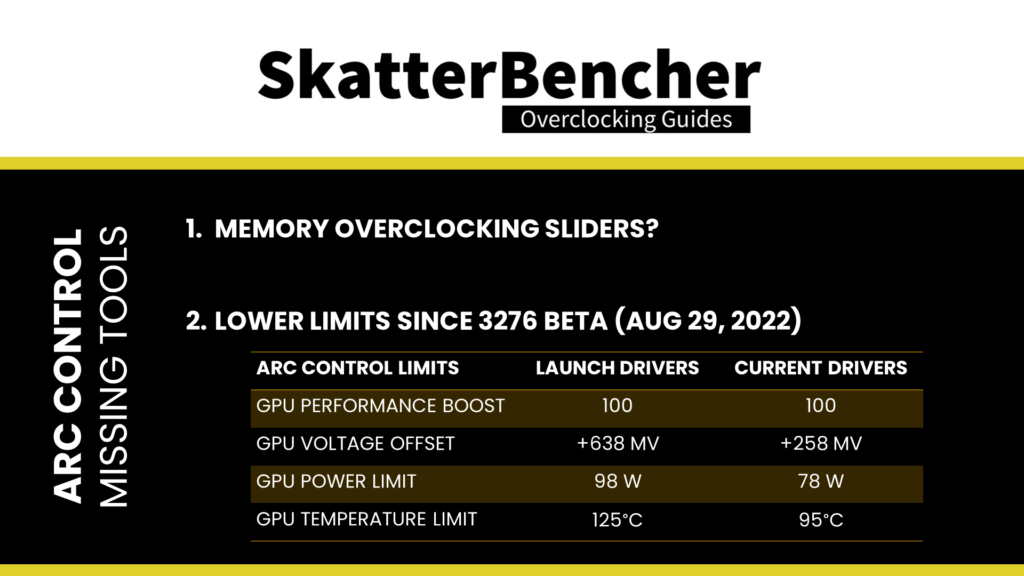
- The slider limits in the current drivers are much lower than those in the launch drivers. The changes coincided with the release of the 3276 beta driver from August 29, 2022, which, ironically, was the driver I was told would fix the PL4 throttling issues I discussed in the Arc A380 update blog post I published on August 22.
For this OC Strategy, I set a GPU Performance Boost of +50, increasing the GPU frequency by 150 MHz to 2600 MHz, the Power Limit to 78W, and the GPU Temperature to 95 degrees Celsius.
OC Settings & Benchmark Results
Upon opening the Intel Arc Control Software:
- Go to the Performance tab
- Under Performance Tuning, click Configure
- Set GPU Performance Boost to 50
- Set GPU Power Limit to 78W
- Set GPU Temperature Limit to 95 degrees Celsius
Then click Apply to confirm the settings.
We re-ran the benchmarks and checked the performance increase compared to the default operation.
- Geekbench 5 OpenCL: +6.13%
- Geekbench 5 Vulkan: +7.75%
- Furmark 1080P: +1.30%
- FluidMark 1080P: +5.36%
- AI Benchmark: +5.16%
- 3DMark Night Raid: +1.13%
- Simple RayTracing Benchmark: +0.30%
- Unigine Superposition: +2.76%
- Spaceship: +3.86%
- Handbrake: +0.44%
- Nero Score: +1.69%
- EZBench: +2.61%
- CS:GO FPS Bench: +1.77%
- Final Fantasy XV: +0.38%
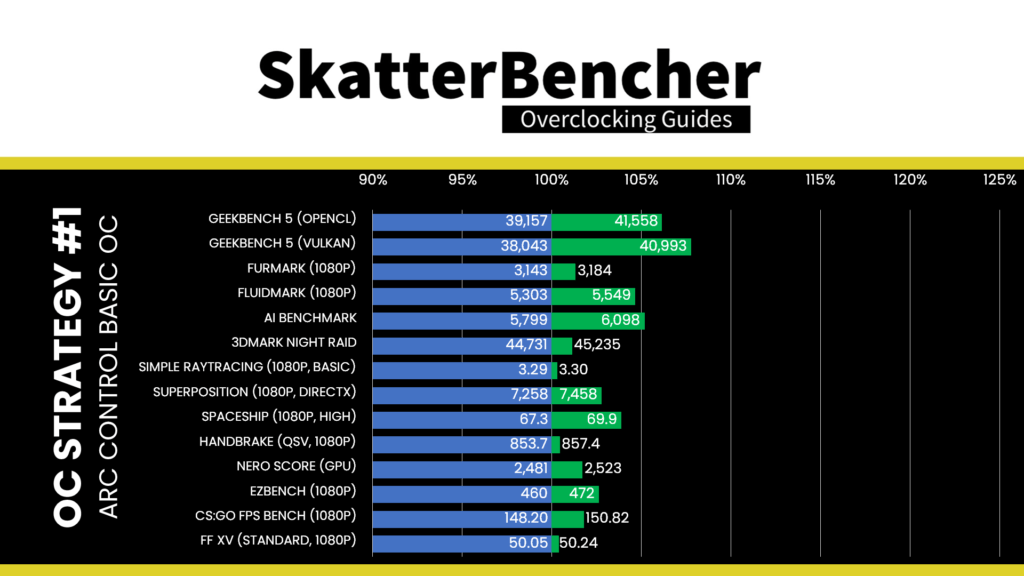
The performance improvement after increasing the GPU clock frequency by about 6% is slightly over the place. We see linear performance scaling in specific benchmarks, whereas in other benchmarks, we see only minor performance improvements.
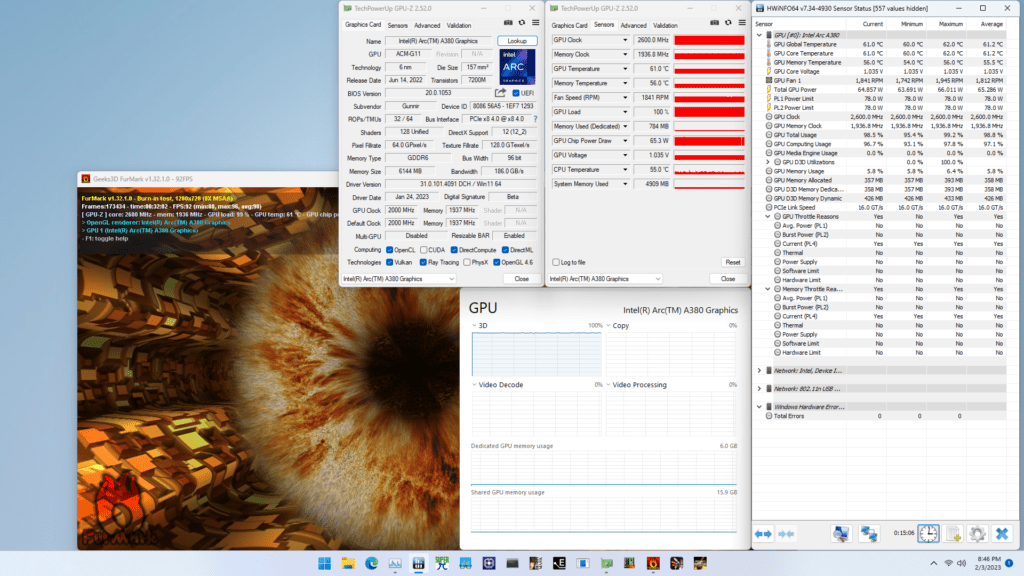
When running Furmark GPU Stress Test, the average GPU clock is 2600 MHz with 1.035 volts, and the GPU Memory clock is 1937 MHz. The average GPU Global temperature is 61.2 degrees Celsius. The average GPU power is 65.286 watts.
OC Strategy #2: Water Cooled OC with Intel Arc Control
In our second overclocking strategy, we switch from the stock air cooling to a full-cover water block solution. In addition, we expand our overclocking approach by increasing the voltage offset.
Bykski I-GNA380-X GPU BLOCK
While I am familiar with Bykski as a company, I never tried one of their GPU water blocks. To my great surprise, they released a water block for the GUNNIR A380 Photon graphics card.
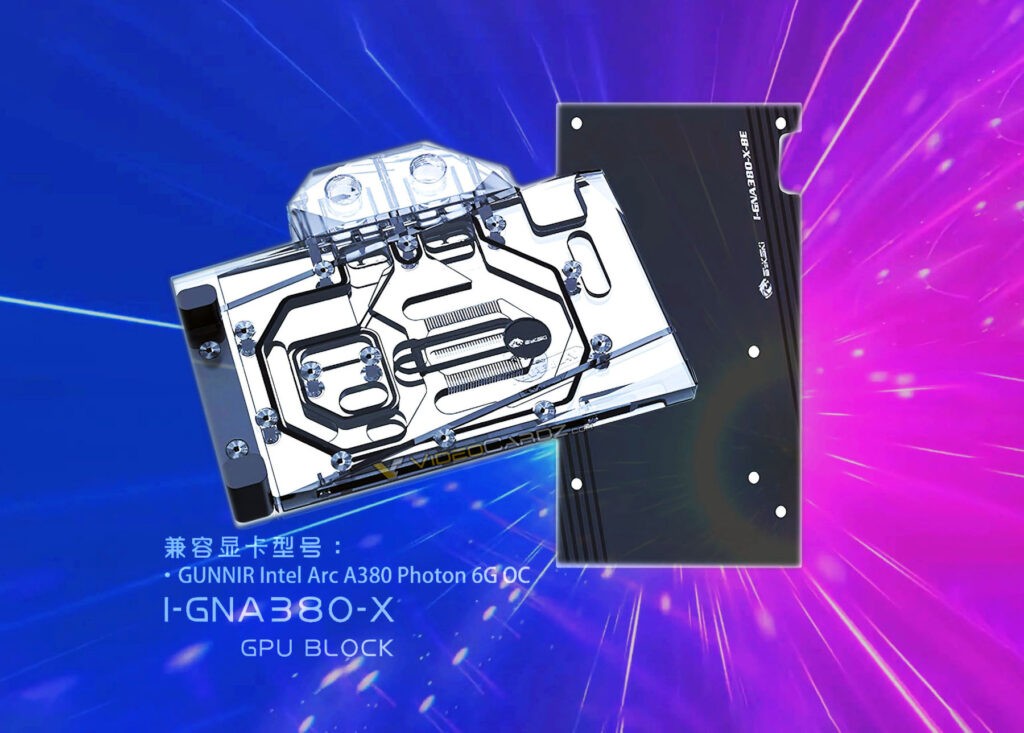
I decided to purchase one for two reasons:
- Because, ehr, for science?
- For VRM cooling
While the stock GUNNIR cooling is more than sufficient to handle the low-end GPU at full load, the same cannot be said about the VRM. The stock thermal solution does not cover the GPU VRM components and has nearly no airflow reaching them. While that certainly suffices for stock operation, as we’ve seen with other low-end GPUs like the GT 1030 and RX 6500 XT we overclocked before, the VRM temperature under load is often the critical bottleneck when overclocking.
The same applies to this A380. When manually increasing the GPU Voltage, the VRM temperature quickly reaches 100 degrees Celsius under heavy load. While that’s fine for regular operation, I want to avoid any bottleneck if possible.
With the full cover water block, the VRM components are now actively cooled, and there should no longer be any concern for the operating temperature when overclocking.
Intel Arc Control: GPU Voltage Offset
As I already mentioned, the GPU Voltage Offset slider enables us to extend the available voltage-frequency curve. While the slider goes up to 258, beyond 120 the voltage stays at 1.16V with a maximum boost frequency of 2700 MHz.
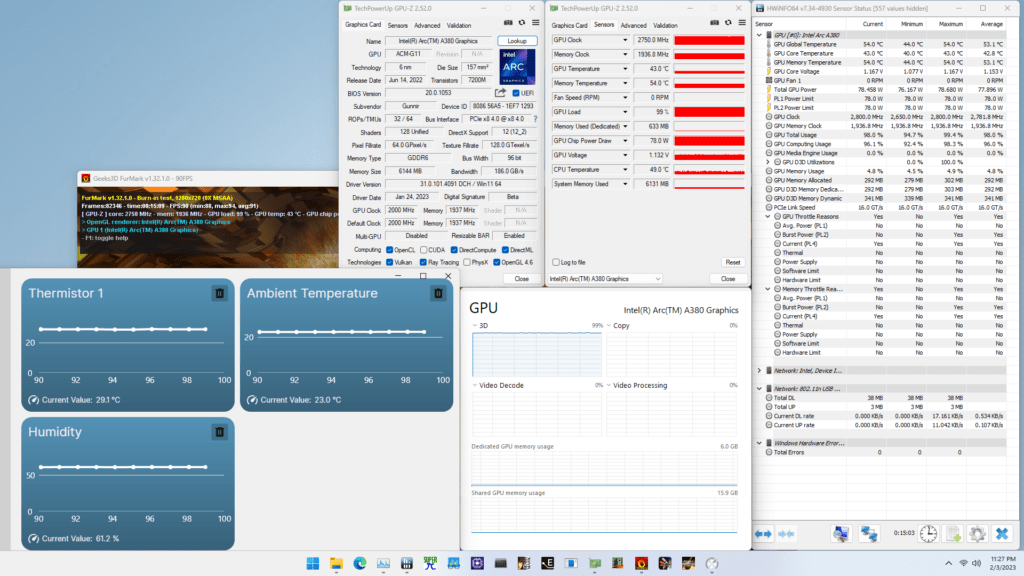
By combining the GPU Voltage Offset with a GPU Performance Boost of +50, we get the GPU frequency up to 2782 MHz, which is about a 340 MHz increase from stock.
OC Settings & Benchmark Results
Upon opening the Intel Arc Control Software
- Go to the Performance tab
- Under Performance Tuning, click Configure
- Set GPU Performance Boost to 50
- Set GPU Voltage Offset to 140
- Set GPU Power Limit to 78W
- Set GPU Temperature Limit to 95 degrees Celsius
Then click Apply to confirm the settings.
We re-ran the benchmarks and checked the performance increase compared to the default operation.
- Geekbench 5 OpenCL: +12.34%
- Geekbench 5 Vulkan: +15.51%
- Furmark 1080P: +2.00%
- FluidMark 1080P: +4.73%
- AI Benchmark: +9.17%
- 3DMark Night Raid: +4.78%
- Simple RayTracing Benchmark: +0.61%
- Unigine Superposition: +6.34%
- Spaceship: +9.21%
- Handbrake: +8.25%
- Nero GPU: +5.56%
- EZBench: +14.13%
- CS:GO FPS Bench: +4.69%
- Final Fantasy XV: +5.49%

Similar to the previous overclocking strategy, the performance improvement after overclocking the GPU by almost 14% is still all over the place. However, we are starting to see performance uplift in most benchmarks
When running Furmark GPU Stress Test, the average GPU clock is 2782 MHz with 1.153 volts, and the GPU Memory clock is 1937 MHz. The average GPU Global temperature is 53.1 degrees Celsius. The average GPU power is 77.896 watts.
OC Strategy #3: Custom Tools
In the third overclocking strategy, we use non-Intel software tools to get the most out of our Arc A380 GPU.
Shamino Arc OC Tool
In the summer of 2022, when the Arc A-Series GPUs had just launched in the market, there weren’t many overclocking tools available. With the help of Shamino, we built a simple user interface that exposes the overclocking controls available via the publicly available Intel Graphics Control Library (IGCL). I recently shared this tool on my blog.
This tool was essential to achieve the first 3 GHz overclock of an Intel Arc graphics card. Next to the four overclocking knobs also available in the Intel Arc Control software, it has a couple of additional benefits.
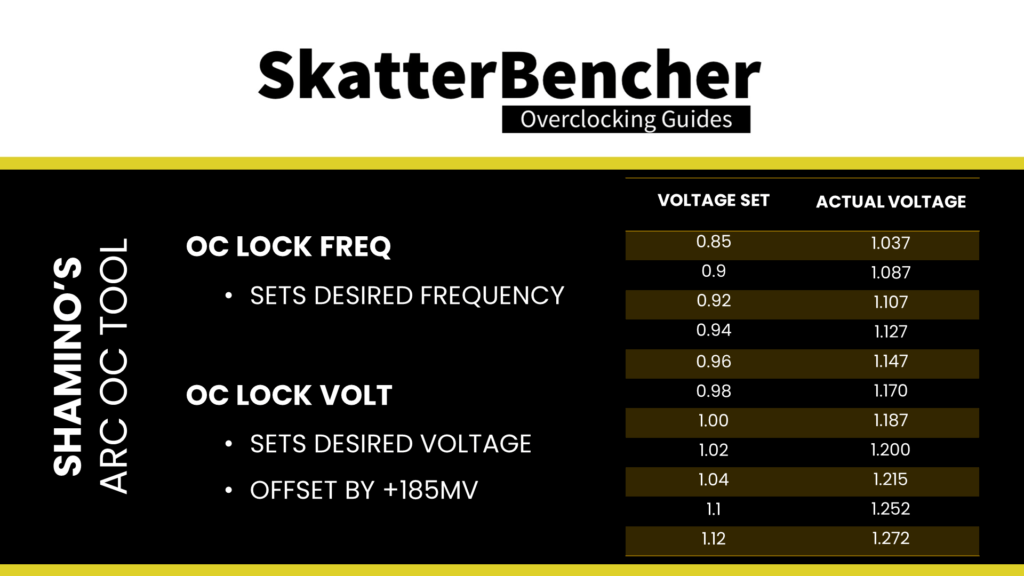
The main benefit is that it exposes the OC Lock feature for overclocking. With OC Lock, you can specify the voltage and frequency of the specific active voltage-frequency point instead of the OC Offset, where you still rely on a dynamic frequency.
Another benefit is that it gives much information about the OC capabilities of the graphics card. For example, we find that the maximum supported GPU Frequency Offset is 300 MHz, so from 2450 MHz to 2750 MHz for the A380, and that VRAM Frequency and Voltage Offset are not supported.

My blog post also explains how the OC Lock function works. While I’m still using the tool in the same way, it seems it functions a little differently with the newer drivers. I will update my blog to reflect this change.
The OC Lock function works as follows:
- Use OC Lock Freq to set the desired GPU frequency for the active V/F point, and
- Use OC Lock Volt: set the desired GPU voltage for the active V/F point
Setting the Lock overrides the voltage and frequency for the highest active V/F point. This is the most effective way of increasing the frequency, though it is still subject to the GPU PCU algorithms.
The OC Lock Freq setting works as expected, so setting a specific target frequency will result in that frequency. The OC Lock Volt doesn’t work as expected as the set voltage is offset by about +185mV. So, if you set 1V in the software, the actual voltage would be around 1.185V.
So, that’s it. I can use this software and overclock the card to the moon! Right?
Not so fast (pun intended). There are still a couple of elements holding us back:
- Power limits
- PL4 throttling
- Maximum voltage
Let’s discuss this.
Acer Predator BiFrost
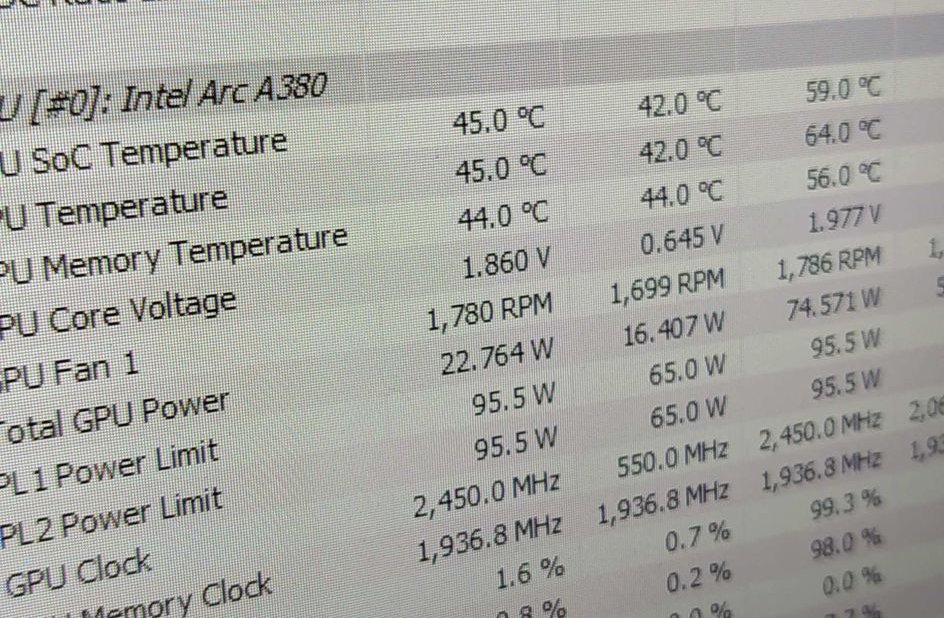
Since the Arc OC tool by Shamino relies on the Intel graphics driver library, it cannot override the power limits imposed by the driver. However, there are other ways to override the power limit. In my 3.1 GHz post, I already said proprietary tools were available to override PL1 and PL2. However, I wasn’t able to share those tools publicly. In the meantime, enthusiasts have found several ways to bypass the power limits.
One method is to mess with Arc Control service as described in a Techpowerup forum post. However, the most convenient method I found was shared with me by an Elmorlabs Discord user named Dyno.
To make a long story short: the Acer Predator BiFrost overclocking software allows users to create a user profile and manually adjust the power limit to any value. The process is as follows.
- Of course, download and install the Acer Predator Bifrost software.
- When installed, open the software, and create a new profile, then close the software
- Now browse to AppData\Roaming\PredatorBifrost\presets and open the settings file
- Now look for your custom profile and change the PowerLimit value to anything you want. Make sure to save the file.
- Open the Acer Predator Bifrost software again and activate your custom profile
- You can verify with HWiNFO that the power limits were set correctly.
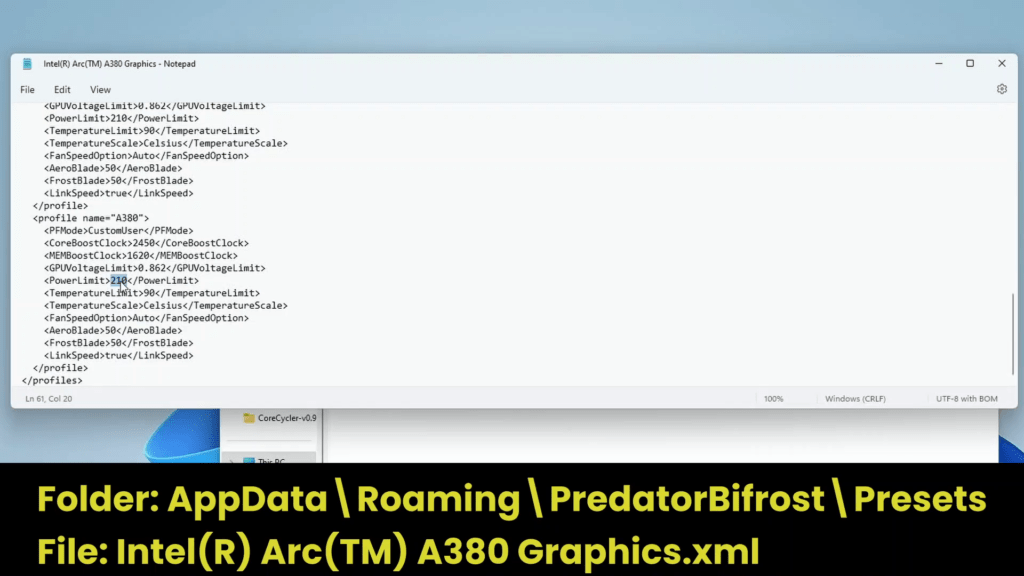
I used this process to create my profile with a 400W power limit, which I’ll be using in this OC Strategy.
So, with unlimited power, we now have unlimited performance. Right? Not quite.
PL4 Power Limit Tweaking
In the 3.1 GHz update post, I discussed the PL4 throttling problem and possible solutions. I would refer you to that blog post to learn more about the specifics of this issue. Here, I’ll keep it short and practical: a throttling mechanism forcibly decreases the GPU frequency beyond the GPU operating voltage of 1.17V.
To illustrate this issue, I tracked the actual GPU frequency during a GPU-Z and Furmark workload with an increasing operating voltage and a fixed set frequency of 2800 MHz. I also set the power limit to 400W and tracked the GPU power to exclude this from causing throttling.
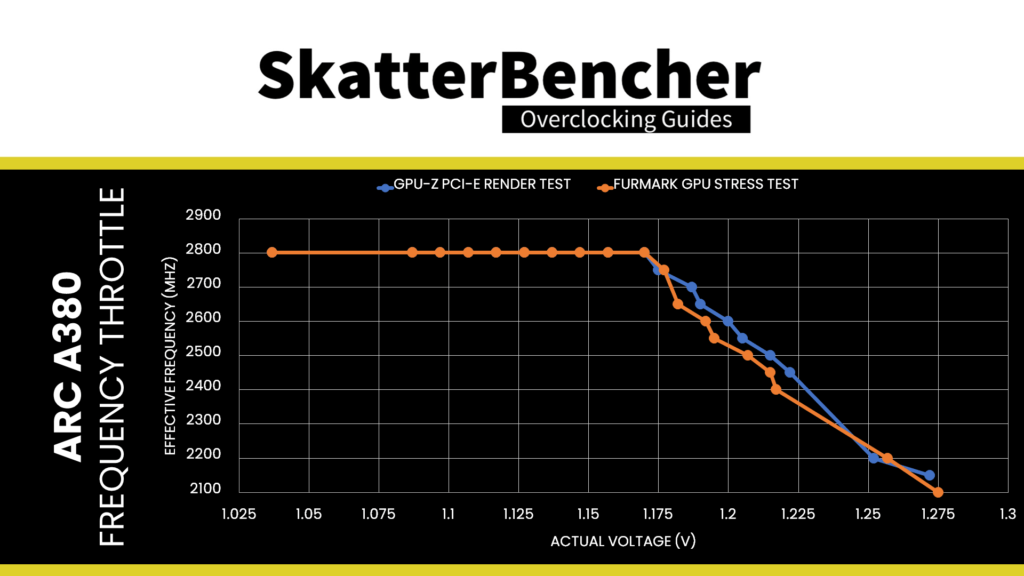
As you can see, until 1.17V, the actual GPU frequency equals the set frequency: 2800 MHz. However, beyond 1.17V, for every 10mV increase, there’s an approximate 50 MHz decrease. The decrease in frequency in GPU-Z and Furmark is the same, indicating it’s not related to power or current limiters.
I refer to this problem as a PL4 throttler because our only indicator is the PL4 throttling flag lighting up HWiNFO. However, I must emphasize that I don’t know the root cause of this throttling behavior, so it may not be PL4 specifically that’s the issue.
Regardless of the root cause of this issue, the practical implication is that we’re still unable to push the GPU to its limits with this voltage limitation. As I explained in the 3.1 GHz update post, I tried several different techniques, and none seemed to work. So, for now, it’s still a work in progress.
GPU Voltage Limit
However, even if we could crack the PL4 throttling issue, there’s still a voltage limiter problem. The problem is simple: any OC Lock Volt value over 1.12V (or 1.275V actual voltage) doesn’t work. So, we’re limited to a maximum voltage of 1.275V.
Now, the voltage limit is, in part, a good thing. As I highlighted in my other A380 blog post: with the launch drivers, it was possible to set a GPU voltage of over 2V, which isn’t very safe. So, I’m glad that got fixed.
OC Settings & Benchmark Results
Open the Acer Predator BiFrost software
- Go to the User Mode tab
- Select your custom-created profile
Close the Acer Predator BiFrost software.
Open the Shamino Work Tool software:
- Under the Intel tab, click on ARC OC
- Set OC Lock Freq to 2900
- Set OC Lock Volt in V to 0.96
- Set OC Temp Limit to 95
Then click Apply to confirm the settings.
We re-ran the benchmarks and checked the performance increase compared to the default operation.
- Geekbench 5 OpenCL: +15.43%
- Geekbench 5 Vulkan: +19.82%
- Furmark 1080P: +4.07%
- FluidMark 1080P: +6.88%
- AI Benchmark: +13.50%
- 3DMark Night Raid: +5.63%
- Simple RayTracing Benchmark: +0.30%
- Unigine Superposition: +9.18%
- Spaceship: +11.74%
- Handbrake: +2.71%
- Nero GPU: +3.35%
- EZBench: +17.39%
- CS:GO FPS Bench: +5.50%
- Final Fantasy XV: +6.55%
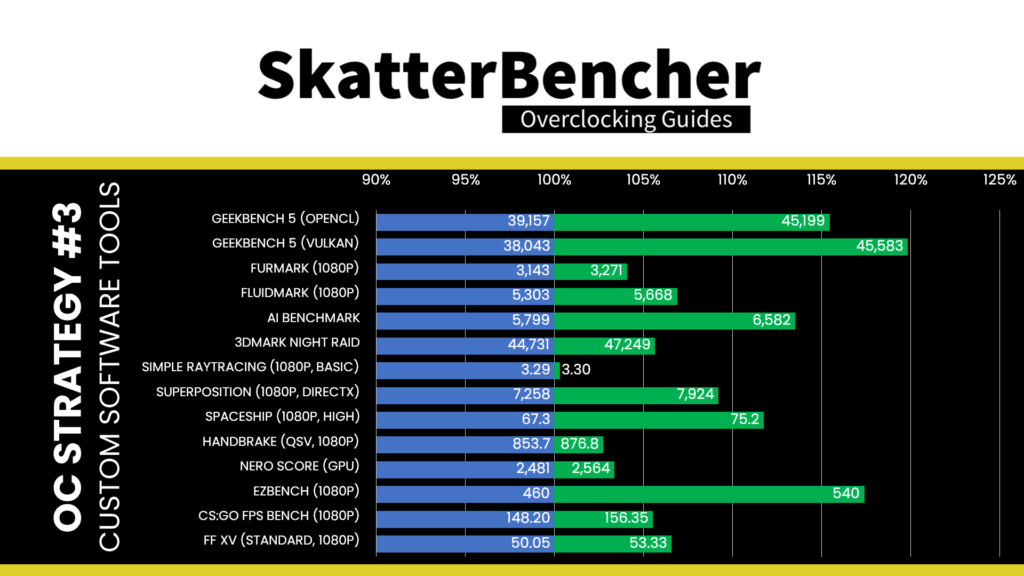
With the GPU frequency further increased, we also see a further improvement in the benchmark performance. We get a maximum performance improvement of +19.82% in Geekbench Vulkan.
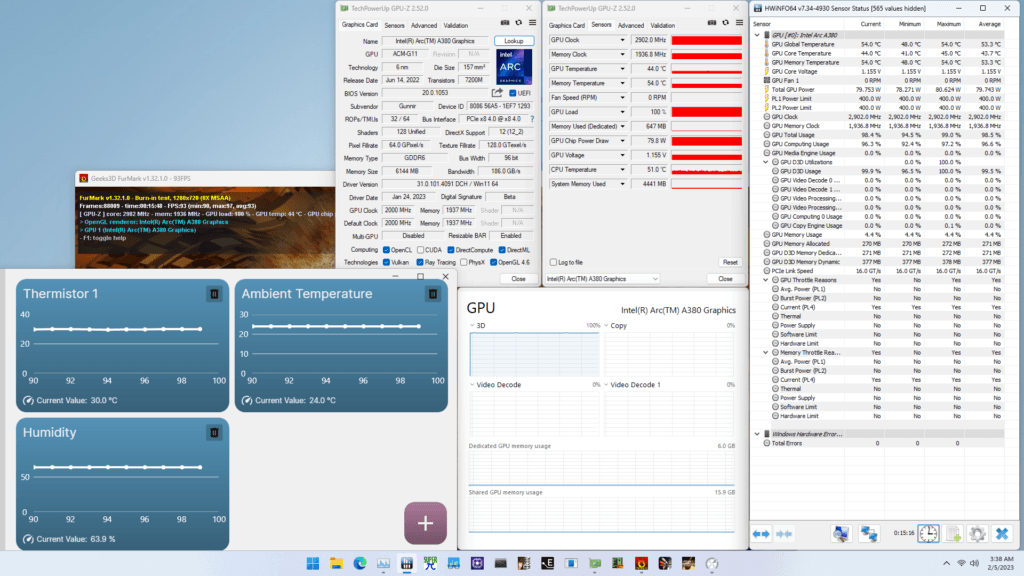
When running Furmark GPU Stress Test, the average GPU clock is 2902 MHz with 1.155 volts, and the GPU Memory clock is 1937 MHz. The average GPU Global temperature is 53.3 degrees Celsius. The average GPU power is 79.743 watts.
Intel Arc A380: Conclusion
Alright, let us wrap this up.
I’m almost relieved to finally wrap up this SkatterBencher project and bring my Arc A380 overclocking journey to a close. At least for now. I’m still hopeful that, someday, we’ll have the tools to push the Intel Alchemist architecture to its limits. Unfortunately, at the moment, we’re not even close to that, even with regular water cooling.
Instead of commenting on the performance gains, I’d like to take this opportunity to talk a little about advocating for overclocking enablement.
Of course, I’m biased regarding advocating for better overclocking support. It’s my hobby, and I want as many tools as possible to enjoy it. But I think there are two other important arguments to be made in favor of enabling overclocking support.
The main argument is that customer preference has shifted towards hyper-customization in today’s PC DIY market. That ranges from the broad aspect of choosing your components and giving your PC a unique aesthetic with custom loop water cooling to the absolute minute details of choosing your custom keyboard keycaps and custom RGB lighting patterns. Overclocking or undervolting falls within the spectrum of hyper-customization as it’s nothing more than customizing your silicon to operate precisely to your needs, whether that’s the highest frequency or the lower power consumption.
The second argument is that overclocking is a matter of device ownership, just like the Right to Repair. Elmor once argued that if we forgo our warranty, we should be allowed to do anything we want with the hardware we buy. In a sense, supporting overclocking enablement is similar to supporting the Right to Repair. It means supporting giving customers the ability to modify and repair their devices as they see fit.
Anyway, that’s all for today!
I want to thank my Patreon supporters for supporting my work. If you have any questions or comments, please drop them in the comment section below.
See you next time!
SkatterBencher #64: Intel Arc A770 Overclocked to 2795 MHz - SkatterBencher
[…] looked at the Arc A380 in a previous video, and with the knowledge from that project, I could more easily pursue overclocking the Arc A770. […]
5 Minute Overclock: Intel Arc A380 to 2900 MHz - 5 Minute Overclock
[…] I’ll speedrun you through the OC settings and provide some notes and tips along the way. Please note that this is for entertainment purposes only and not the whole picture. Please don’t outright copy these settings and apply them to your system. If you want to learn how to overclock this system, please check out the longer SkatterBencher guide. […]