SkatterBencher #64: Intel Arc A770 Overclocked to 2795 MHz

We overclock the Intel Arc A770 up to 2795 MHz with the ElmorLabs EVC2 and EK-Quantum custom loop water cooling.
I looked at the Arc A380 in a previous video, and with the knowledge from that project, I could more easily pursue overclocking the Arc A770. The good news is that – I think – we worked around all the artificial limitations. But unfortunately, that doesn’t mean it can now scale to the moon. In this video, I tell you all about it.
Let’s get started.
Intel Arc A770: Introduction
The Intel Arc A770 is the flagship model of Intel’s Alchemist GPU lineup. It launched three months after the market release of the Arc A380, which we overclocked in SkatterBencher #44. The A770 has two variants: an 8GB and a 16GB model. It’s the 16GB model we’re overclocking today. The MSRP of the A770 16GB is US$349.

Alchemist, previously known as “DG2”, is the codename for Intel’s first-generation desktop discrete graphics. It uses the Xe-HPG variant of the Intel Xe GPU Architecture. It supports ray tracing, deep learning accelerated XeSS, and DirectX 12 Ultimate.
The Arc A770 is built on the TSMC N6 process and houses 32 Xe-cores with 8 render slices and 32 ray tracing units. It comes with a base clock of 2100 MHz and a boost clock of 2400 MHz. The 16GB GDDR6 memory is clocked at 2187 MHz. The graphics card TBP is 225W.

In today’s video, we cover four overclocking strategies.
- First, we use Arc Control and do basic GPU overclocking with stock cooling
- Second, we use Arc OC Tool and slap on water cooling
- Third, we unleash the card’s power limits using the ElmorLabs EVC2
- Fourth, we explore the card’s overclocking limits using OC Lock mode

Before we jump into the overclocking, let us quickly review the hardware and benchmarks used in this article.
Intel Arc A770: Platform Overview
The system we’re overclocking today consists of the following hardware.
| Item | SKU | Price (USD) |
| GPU | Intel Arc A770 Limited Edition 16GB | 350 |
| CPU | Intel Core i9-13900K | 575 |
| Motherboard | ASUS ROG Maximus Z790 Hero | 575 |
| CPU Cooling | Noctua NH-L9i-17xx Chromax.black | 55 |
| GPU Cooling | EK-Quantum Vector² Arc A750/A770 EK-KIT P360 | 240 |
| Fan Controller | ElmorLabs EFC | 20 |
| Memory | G.SKILL Trident Z DDR5-7800 CL34 32GB | 230 |
| Power Supply | Enermax MaxRevo 1500W | 270 |
| Storage | Kingston SSDNow V300 120GB | 75 |
| Chassis | Open Benchtable V2 | 200 |
| Other | ElmorLabs EVC2SE ElmorLabs EVC2SX ElmorLabs PMD | 35 32 45 |
ElmorLabs EFC & EVC2
The Elmorlabs Easy Fan Controller is the base version of the customized EFC-SB I showed on this channel.

I explained how I use the EFC and EFC-SB in a separate article on this blog. Long story short, by connecting the EFC to the EVC2 device, I monitor the ambient temperature (EFC), water temperature (EFC), and fan duty cycle (EFC). I include the measurements in my Prime95 stability test results.
I also use the ElmorLabs EFC to map the radiator fan curve to the water temperature. Without going into too many details: I have attached an external temperature sensor from the water in the loop to the EFC. Then, I use the low/high setting to map the fan curve from 25 to 40 degrees water temperature. I use this configuration for all overclocking strategies.
The main takeaway from this configuration is that it gives us a good indicator of whether the cooling solution is saturated.

Intel Arc A770: Benchmark Software
We use Windows 11 and the following benchmark applications to measure performance and ensure system stability.
Intel Arc A770: Stock Performance & V/F Curve
Before starting overclocking, we must check the system performance at default settings.
Here is the benchmark performance at stock:
- Geekbench 6 OpenCL: 108,311 points
- Geekbench 6 Vulkan: 110,772 points
- Furmark 1080P: 11,671 points
- FluidMark 1080P: 5,128 points
- AI Benchmark: 14,325 points
- 3DMark Night Raid: 72,982 marks
- Simple RayTracing Benchmark: 12.12 fps
- Unigine Superposition: 22,808 points
- Spaceship: 145.2 fps
- Nero GPU: 3,017 points
- EZBench: 94.853 fps
- Tomb Raider: 132 fps
- CS:GO FPS Bench: 403.63 fps
- Final Fantasy XV: 104.90 fps

In a light workload, the GPU clock boosts up to 2400 MHZ with 1.060 volts.

When running 3DMark Speedway Stress Test, the average GPU clock is 2270 MHz with 0.961 volts, and the GPU Memory clock is 2187 MHz. The average GPU Global temperature is 77.9 degrees Celsius. The average GPU power is 189.863 watts.

When running Furmark GPU Stress Test, the average GPU clock is 2400 MHz with 1.010 volts, and the GPU Memory clock is 2187 MHz. The average GPU Global temperature is 71.7 degrees Celsius. The average GPU power is 188.877 watts.

I also extracted the default voltage-frequency curve from the A770 GPU for future reference. As you can see from the chart, the GPU works from 100 MHz at 0.587V up to 2400 MHz at 1.015V.

OC Strategy #1: Basic OC with Intel Arc Control
In our first overclocking strategy, we use the overclocking toolkit integrated into the Intel Arc Control software.
Intel Arc Control: Overview
The Arc Control software is arguably one of the most controversial aspects of the Intel discrete graphics product launch. In the beginning, many users complained about the useability and bugs. A while ago, Intel launched a standalone desktop mode version of Arc Control software, improving the user experience.
Since the beginning, Arc Control has provided enthusiasts with the tools to overclock their Arc GPU. Today, the tool still provides the same overclocking knobs as at launch. The knobs include:
- GPU Performance Boost
- GPU Voltage Offset
- GPU Power Limit, and
- GPU Temperature Limit

Unfortunately, while it’s evident that these options are supposed to give some degree of manual control over the voltage-frequency curve, it’s not entirely clear from the interface what each option does exactly.
Intel Arc Control: Overclocking Controls
Let’s have a closer look at the function of each of the available overclocking controls in the Intel Arc Control software.
GPU Performance Boost offsets each point on the voltage-frequency curve with a specific frequency. The slider goes from 0 to 100, 100 reflecting 100% of the maximum allowed frequency offset. At 100%, the GPU frequency is 2700 MHz, a 300 MHz increase over the default maximum frequency of 2400 MHz.
GPU Voltage Offset enables the restricted parts of the factory-fused voltage frequency curve. By increasing the voltage offset, the GPU will boost to previously restricted points on the voltage frequency curve. In this case, the slider ranges from 0 to 292. That indicates the maximum voltage increase, in millivolts, allowed for this GPU.
Similar to the Arc A380, there’s a maximum voltage limit for the Arc A770. That limit is 1.2V. While the slider goes up to 292, beyond approximately 180 the voltage stays at 1.20V with a maximum boost frequency of 2700 MHz.
GPU Power Limit allows configuration of the allowed GPU power consumption. This value represents the total board power, which includes the GPU, memory, VRM, and other parts of the graphics card. Unlike the Arc A380, this is not an estimated but measured power consumption. We’ll return to this topic when discussing going beyond the power limit.
GPU Temperature Limit theoretically enables boosting to higher GPU temperatures. However, on this A770, the temperature limit is already set to its maximum of 90 degrees Celsius.

When fine-tuning the overclock, we combine the Performance Boost and Voltage Offset sliders to enable both higher voltages and increase the frequency for each voltage frequency point. For this OC Strategy, I set GPU Performance Boost to +35, GPU Voltage Offset to 160, and Power Limit to 228W. That gives us a maximum frequency of 2800 MHz at 1.2V.
OC Settings & Benchmark Results
Upon opening the Intel Arc Control Software
- Go to the Performance tab
- Under Performance Tuning, click Configure
- Set GPU Performance Boost to 35
- Set GPU Voltage Offset to 160
- Set GPU Power Limit to 228W
Then click Apply to confirm the settings.
We re-ran the benchmarks and checked the performance increase compared to the default operation.
- Geekbench 6 OpenCL: +12.39%
- Geekbench 6 Vulkan: +12.43%
- Furmark 1080P: +7.59%
- FluidMark 1080P: +0.06%
- AI Benchmark: +9.38%
- 3DMark Night Raid: +1.51%
- Simple RayTracing Benchmark: +0.33%
- Unigine Superposition: +5.70%
- Spaceship: +9.92%
- Nero GPU: +5.77%
- EZBench: +9.58%
- Tomb Raider: +4.55%
- CS:GO FPS Bench: +4.28%
- Final Fantasy XV: +6.95%

The performance improvement after increasing the GPU clock frequency by about 6% is slightly over the place. We see linear performance scaling in specific benchmarks, whereas, in other benchmarks, we see only minor performance improvements. We get a maximum performance improvement of +12.43% in Geekbench 6 Vulkan.
In a light workload, the GPU clock boosts up to 2750 MHZ with 1.190 volts.

When running 3DMark Speedway Stress Test, the average GPU clock is 2516 MHz with 1.036 volts, and the GPU Memory clock is 2187 MHz. The average GPU Global temperature is 83.0 degrees Celsius. The average GPU power is 227.853 watts.

When running Furmark GPU Stress Test, the average GPU clock is 2545 MHz with 1.054 volts, and the GPU Memory clock is 2187 MHz. The average GPU Global temperature is 78.1 degrees Celsius. The average GPU power is 227.835 watts.

OC Strategy #2: Water Cooling
In our second overclocking strategy, we switch from the stock air cooling to a full-cover EK-Quantum water block solution. As a result, we are forced to use Shamino’s Arc OC Tool.
EK-Quantum Vector² Arc A750/A770
While this is not the first time I’m using an EK GPU water block – I used the EK-Thermosphere in SkatterBencher #40 when overclocking the GeForce GT 1030 – this is the first full cover water block.
The EK-Quantum Vector² Arc A750/A770 is a bit of a rare gem. The product was announced in November last year but has since been put on end-of-life. I had to jump through some hoops to get one, but I wanted a full cover block for the Arc A770 because it cools the GPU, memory, and VRM.

As we’ve seen with several discrete graphics cards I’ve overclocked on this channel, the VRM often becomes the main limitation for squeezing more performance out of the GPU. We saw this on the GT 1030, RX 6500 XT, and Arc A380. And, as we’ll find out, it also applies to the A770. With the full cover water block, the VRM components are actively cooled, and there should be less concern for the operating temperature when overclocking.
EK’s full-cover water block also comes with a backplate that should further help mitigate some VRM-related thermal constraints. Unfortunately, I couldn’t use the backplate because it interfered with the ElmorLabs EVC2 connections. To replace the thermal function of the backplate, I just pointed a fan at the back of the card.
Shamino Arc OC Tool
After swapping the Intel stock cooling for the water block, I tried applying the same settings as in the previous OC strategy. Unfortunately, the software cannot set the values since the fan has been removed. But luckily, we have an alternative: Shamino’s Arc OC Tool.
In the summer of 2022, when the Arc A-Series GPUs had just launched in the market, there weren’t many overclocking tools available. With the help of Shamino, we built a simple user interface that exposes the overclocking controls available via the publicly available Intel Graphics Control Library (IGCL). This tool was essential to achieve the first 3 GHz overclock of an Intel Arc graphics card. Not so long ago, I shared the tool on my blog.
The tool consists of 6 overclocking knobs: OC Frequency and Voltage Offset, OC Frequency and Voltage Lock, temperature limit, and power limit. We already know the offsets, temperature, and power limit from Intel’s Arc Control software. The knobs work the same, except for the Frequency offset, which is expressed as a percentage in the Arc Control software and not as a frequency as in the Shamino Arc OC Tool.
A key benefit of the Shamino Arc OC tool is exposing the OC Lock feature, which is unavailable in the Arc Control software. With OC Lock, you can specify the voltage and frequency of the specific active voltage-frequency point instead of the OC Offset, where you still rely on a dynamic frequency. We’ll get back to that in our final overclocking strategy.
Another benefit is that it gives a lot of information about the OC capabilities of the graphics card. For example, we find that the maximum supported GPU Frequency Offset is 300 MHz, so from 2400 MHz to 2700 MHz for the A770, and that VRAM Frequency and Voltage Offset are not supported.


For this OC Strategy, I set an OC Frequency offset of 125 MHz, an OC Voltage Offset of 135 mV, and a Power Limit of 228W. This yields approximately the same frequency as we achieved on air cooling but with the added benefit of lower temperatures enabled by water cooling.
OC Settings & Benchmark Results
Upon opening the Shamino Work Tool software:
- Under the Intel tab, click on ARC OC
- Set OC Freq Offset to 125
- Set OC Volt Offset in V to 135
- Set OC Power Limit to 228
Then click Apply to confirm the settings.
We re-ran the benchmarks and checked the performance increase compared to the default operation.
- Geekbench 6 OpenCL: +12.47%
- Geekbench 6 Vulkan: +12.85%
- Furmark 1080P: +9.28%
- FluidMark 1080P: +2.05%
- AI Benchmark: +11.50%
- 3DMark Night Raid: +7.65%
- Simple RayTracing Benchmark: +7.43%
- Unigine Superposition: +7.32%
- Spaceship: +12.40%
- Nero GPU: +7.92%
- EZBench: +10.39%
- Tomb Raider: +9.09%
- CS:GO FPS Bench: +4.33%
- Final Fantasy XV: +8.70%

After adding better cooling to the A770, the performance improves further. We now have an average performance gain of about 8%. We get the best improvement of +12.85% in Geekbench 6 Vulkan.
In a light workload, the GPU clock boosts up to 2795 MHZ with 1.202 volts.

When running 3DMark Speedway Stress Test, the average GPU clock is 2566 MHz with 1.070 volts, and the GPU Memory clock is 2187 MHz. The average GPU Global temperature is 56.9 degrees Celsius. The average GPU power is 227.854 watts.

When running Furmark GPU Stress Test, the average GPU clock is 2580 MHz with 1.075 volts, and the GPU Memory clock is 2187 MHz. The average GPU Global temperature is 57.6 degrees Celsius. The average GPU power is 227.875 watts.

OC Strategy #3: ElmorLabs EVC2
In our third strategy, we use the ElmorLabs EVC2 to exceed the maximum allowed total board power.
Acer Predator BiFrost
In my previous Arc overclocking video, I mentioned three methods to work around the power limitation and showed two of those methods publically. One method involved resetting the GPU driver. The other method involved overriding overclocking profiles in the Acer BiFrost software and was shared with me by an Elmorlabs Discord user named Dyno.

To make a long story short: the Acer Predator BiFrost overclocking software allows users to create a user profile and manually adjust the power limit to any value. If you have trouble finding the software, I uploaded a mirror here: Application_Acer_1.0.104.0_W11x64_A.zip.
The process is as follows.
- Open the Predator Bifrost software, create a new profile, then close the software.
- Now browse to AppData\Roaming\PredatorBifrost\Presets and open the settings file
- Now look for your custom profile and change the PowerLimit value to anything you want. Make sure to save the file.
- Open the Acer Predator Bifrost software again and activate your custom profile.
- You can verify with HWiNFO that the power limits were set correctly.

The method still works with the Arc A770. However, it seems that Intel’s added some restrictions in recent drivers. For example, if you change between profiles, it will try to revert to the default 228W maximum power limit. We can avoid this limitation with a few clicks, but that might not be the case in the future.
So, in case this method gets patched, I also tried to find a method using hardware modifications.
Situation Analysis: Power Limitations
The first task at hand is to analyze the current status quo. We start by observing that power consumption is the limiting factor in our overclock. Modern graphics cards have three main methods of imposing a power limit.
- Like on most low-end graphics cards, the GPU can estimate power consumption based on the workload characteristics and the assumed voltage based on the voltage-frequency curve.
- Like on high-end NVIDIA graphics cards, a separate hardware circuit can measure the input power and report it to the GPU.
- Like on AMD graphics cards, the GPU can rely on the voltage controller to report the power consumption.

Or, it can be a combination of these three methods. Depending on when this video goes out, I’ll have covered or will cover this topic more in-depth when overclocking the RTX 3050.
A770 Hardware Modification
To determine the method used on the Arc A770, we must look closer at the voltage regulator design. The VRM design of the Arc A770 consists of the following major components:
The GPU is powered by a 6-phase design managed by Monolithic Power Systems (MPS) MP2979 digital multi-phase voltage controller. This controller drives six (6) Monolithic MP86956 70A Intelli-Phase DrMOS, one for each phase.

DrMOS is a power delivery solution that integrates the MOSFET driver directly on-chip with the power FETs. Funny tidbit: Intel wrote the DrMOS 1.0 specification back in 2004.

The GDDR6 memory is powered by a 2-phase design managed by Monolithic Power Systems (MPS) MP2979 digital multi-phase voltage controller. This controller drives two (2) Monolithic MP86950 50A Intelli-Phase DrMOS, one for each phase. The default voltage is 1.185V.

That same MP2979 voltage controller also manages another two-phase voltage rail, though I’m not certain what it powers. The rail uses the same MP86950 for the 2 power stages, and the default voltage is 0.69V.

We’ll set the memory voltage regulator aside and focus on the MP2979 controlling the GPU voltage. A quick read through the datasheet reveals this controller provides I2C access. This is our starting point for the hardware modification. The hardware modification adds an I2C pin header on the graphics card PCB, allowing us to communicate directly with the onboard digital voltage controllers. We can then connect the EVC2SE device to the I2C pins to directly control the voltage regulators.
Reading through the voltage controller datasheet provides us with a lot of good information.
The monitoring toolkit provides information needed to check the VRM output voltage, current, power, and operating temperatures. The configuration toolkit provides us with several functions, two of which I’ll discuss in this video.
The first function is called Iout Gain. This function allows us to skew the reported output current by a certain factor. So, we can use it to have the voltage controller report to the GPU that it’s using much lower power than it actually uses.
If this works, the Arc A770 uses the third method to manage the power limit.
ElmorLabs EVC2SE
The ElmorLabs EVC2SE is the latest addition to the EVC2 product line, although ElmorLabs recently introduced an EVC2 Mini line as well. The ElmorLabs EVC2 enables digital or analog voltage control using I2C/SMBus/PMBus. The device also has UART and SPI functionality. It can be considered the foundation for the ElmorLabs ecosystem as you can expand the functionality of some ElmorLabs products by connecting it to an EVC2.
In this case, we’re interested in the 2x I2C headers that provide digital voltage control. I’ll try to keep the step-by-step explanation as practical as possible in this video.
Step 1: Identify the digital voltage controllers you want to control with the EVC2SE.
We did this in the previous segment

Step 2: Determine how the hardware modification will work
We did this in the previous segment.
Step 3: Ensure the EVC2SE supports the I2C device
You can refer to the EVC2 Beta Software forum topic for a complete list of the supported I2C devices. You can leave a message in the forum or Discord if your device is not listed. For this video, Elmor was kind enough to prepare an EVC2 profile for the MP2979. The profile consists of two main toolkits: monitoring and configuration.

Step 4: Find the headers near the I2C marking on the EVC2SX PCB
On the EVC2SX, each I2C header has three pins: SCL, SDA, and GND. That stands for Serial Clock, Serial Data, and Ground. Connecting the pins on the EVC2 to the correct pins on the graphics card is essential.

Step 5: Connect the various pins to the relevant points on your graphics card
Since there are only three pins, it should be straightforward. If unsure, use a digital multimeter to locate the ground pin on the graphics card and EVC2 I2C header. Usually, the data pin is always in the middle, and the other pin is the clock. However, this wasn’t the case on the A770, as ground was in the middle.

For those who want to explore the memory voltage controller options, here’s the pinout to connect via I2C.

Step 6: Open the ElmorLabs EVC2 software for voltage monitoring and control
You can find the relevant controls under the I2C submenu items. First, click “Find Devices.” That will check if any supported devices are present on the I2C bus. For this Arc A770, it finds an I2C device on address 0x22.

In our case, it’s unlikely the MP2979 controller will be automatically detected because the vendor and device ID are available on PMBus register Page 0, but the controller defaults to Page 2. However, we can easily add it manually. There are two options:
First, you can select the MP2979 profile, pick the address found during the device scan, then click add. The profile will automatically write the command to address 0x22 to set the PMBus register page to 0.
Alternatively, you can manually write 0x0 to command 00h on address 0x22. This will set the PMBus page register to 0 for the device on address 0x22. Then you can click again on Find Devices, and now the MP2979 will be detected.
We select the voltage controller in the menu and immediately enable the Monitoring function. If the I2C is connected well, you should now see the graphs update. Now you can check if this controller indeed manages the GPU voltage. You can see the Loop 1 Output Voltage jumps between 0.01V and 0.43V. You can also run a 3D workload like GPU-Z Render to verify.
Now, we can adjust the voltage regulator parameters using the dropdown menus. After we adjust the Iout Gain, we can validate by simply checking the power limit in HWiNFO. Luckily, this is indeed the method used for the Arc A770.
While we can be happy we can now exceed the 228W power limit, note that it’s now impossible to know the power used by software readings. Hence why I also connected the ElmorLabs PMD to measure the graphics card input power.
OC Settings & Benchmark Results
Open the Shamino Work Tool software:
- Under the Intel tab, click on ARC OC
- Set OC Freq Offset to 125
- Set OC Volt Offset in V to 135
Then click Apply to confirm the settings.
Open the Elmorlabs EVC2 software,
- Access the I2C1 section.
- Click Find Devices and ensure an MP2979 controller pops up; if not
- Select MP2979 from the Profiles dropdown menu
- Pick the address from the device scan
- Click Add
- Access the MP2979 (22) menu
- Enable the Monitoring function
- Verify that the monitoring is indeed active
- Set Loop 1 Iout Gain to 40
Click Apply Changes to confirm the settings
If you’re uncertain the configuration was set correctly, you can verify that, under load, the power reported is much lower than before.
We re-ran the benchmarks and checked the performance increase compared to the default operation.
- Geekbench 6 OpenCL: +12.83%
- Geekbench 6 Vulkan: +13.12%
- Furmark 1080P: +21.14%
- FluidMark 1080P: +7.25%
- AI Benchmark: +15.61%
- 3DMark Night Raid: +10.78%
- Simple RayTracing Benchmark: +8.83%
- Unigine Superposition: +9.25%
- Spaceship: +12.60%
- Nero GPU: +8.25%
- EZBench: +10.39%
- Tomb Raider: +9.09%
- CS:GO FPS Bench: +5.18%
- Final Fantasy XV: +9.43%

Unleashing the power limits provides a significant performance uplift in power-hungry benchmarks like Furmark, where we see a spectacular performance increase. However, we can also see that most benchmarks were not power limited. We get a maximum performance increase of +21.14% in Furmark 1080P.
In a light workload, the GPU clock boosts up to 2795 MHZ with 1.202 volts.

When running 3DMark Speedway Stress Test, the average GPU clock is 2750 MHz with 1.170 volts, and the GPU Memory clock is 2187 MHz. The average GPU Global temperature is 56.9 degrees Celsius. The average GPU power is 292.169 watts.

When running Furmark GPU Stress Test, the average GPU clock is 2580 MHz with 1.075 volts, and the GPU Memory clock is 2187 MHz. The average GPU Global temperature is 57.6 degrees Celsius. The average GPU power is 320.852 watts.

OC Strategy #4: OC Lock
In our fourth and final overclocking strategy, we try to squeeze the most out of our GPU using the OC Lock mode. We also find several more issues that prevent us from getting the most out of our GPU.
Shamino Arc OC Tool: OC Lock
As I mentioned, a key benefit of the Shamino Arc OC Tool is exposing the OC Lock feature, which allows us to specify the voltage and frequency of the specific active voltage-frequency point. I explained how the OC Lock function works in practice in SkatterBencher #44 when I overclocked the Arc A380.
In short, the OC Lock function works as follows: use OC Lock Freq to set the desired GPU frequency for the active V/F point, and use OC Lock Volt to set the desired GPU voltage for the active V/F point.
Setting the Lock overrides the voltage and frequency for the highest active V/F point. This is the most effective way of increasing the frequency, though it is still subject to the GPU PCU algorithms.
The OC Lock Freq setting works as expected, so setting a specific target frequency will result in that frequency. The OC Lock Volt doesn’t work as expected as the set voltage is offset by about +215mV. So, if you set 1V in the software, the actual voltage would be around 1.215V.

For this OC Strategy, I set an OC Lock frequency of 2700 MHz and an OC Lock voltage of 0.92, resulting in a voltage point of 1.132V. Why so low, I hear you ask? Well, there are a couple of limitations we must discuss.
GPU Voltage Set Limit
In my Arc A380 blog, I already discussed the GPU voltage limit. The problem is simple: any OC Lock Volt value over 1.1V (or 1.295V actual voltage) doesn’t work. So, we’re limited to a maximum voltage of 1.295V. As I said in the A380 article, the voltage limit is partly a good thing. With the launch drivers, setting a GPU voltage of over 2V was possible, which isn’t very safe. So, I’m glad that got fixed.

GPU Voltage Frequency Throttling (Previously: PL4 Throttle)
Unfortunately, that’s not where the voltage limitation story ends.
In my two Arc A380 blog posts, I also discussed a GPU frequency throttling mechanism that kicked in when the set voltage was over 1.17V. I referred to this problem as a PL4 throttler because our only indicator is the PL4 throttling flag lighting up HWiNFO. However, as I pointed out in SkatterBencher #44, I don’t know the root cause of this throttling behavior, so it may not be PL4 specifically that’s the issue.

I was able to get a little more information from this A770 project. The conclusion is that it may be an artificially imposed GPU voltage limiter rather than PL4. I come to this conclusion based on two pieces of information.
First, as I illustrated in the A380 guide, we can see how increasing the GPU voltage beyond a certain point forcibly reduces the GPU frequency by tracking the GPU frequency during a workload. This behavior is also present on the A770 and kicks in at 1.2V, similar to the Arc A380.
Second, we can use the voltage controller access to check whether this is an artificial limitation by switching the voltage controller Vout control mode from SVID to PMBus.
- In SVID mode, the voltage controller adjusts the output voltage based on the GPU request. The GPU relies on its factory-fused voltage-frequency curve to determine the appropriate voltage at any moment.
- In PMBus mode, we program the voltage controller output voltage directly without interference from the GPU. Thus, we can set any voltage over 1.2V.
We run Furmark GPU Stress Test at 50×50 pixels to load the GPU and use HWiNFO to check the GPU frequency.
- In SVID mode, when we change the OC Lock frequency to 2700 MHz and an OC Lock voltage of 1.0V, the resulting effective frequency and voltage is 2400 MHz at 1.25V VID and an effective output voltage of 1.19V.
- In PMBus mode, when we change the OC Lock frequency to 2700 MHz, the OC Lock voltage to 0.8V, and set Vout to 1.250V, the resulting effective frequency and voltage is 2700 MHz at 1.25V.
This provides sufficient evidence that the 1.2V clock throttling is an artificial limitation. On the plus side, the PMBus method now gives us plenty of voltage headroom.
VRM Temperature Limit
Unfortunately, again, having solved the voltage limitation issue isn’t the final fix needed to squeeze the most out of our GPU. There’s another and much bigger problem: the VRM temperature.
I didn’t highlight it in the previous OC Strategy, but the VRM temperature during our Furmark stability test is pretty high. At an input power of 320W, the VRM temperature is 86.6 degrees Celsius.
We can demonstrate the problem more clearly by running FurMark 1080P while monitoring the power consumption, voltage, and VRM temperature. After increasing the voltage by 90mV, from 0.91V to 1.00V, the power consumption increases by 56W, and the peak VRM temperature rises from 89 to 109 degrees Celsius.

My first reaction to the VRM temperature was disbelief. My concern over the VRM temperature is exactly why I installed a full-cover water block. After swapping out the thermal pads and re-installing the water block a couple of times – with no change in thermal behavior – I remembered the blog post I made on the Z690 Torpedo EK X.
In that video, I explored the impact of the EK Liteblock on the VRM temperature. If you missed the video, a Liteblock is like a monoblock because it cools both the CPU and the VRM. However, unlike the traditional monoblocks, the VRM isn’t actively cooled by the liquid. Instead, the water block connects to the stock thermal solution with a thermal pad.
I tested the VRM in various configurations down to 2 phases. In the 2-phase configuration, we saw a maximum VRM temperature exceeding 110 degrees Celsius as we pushed 121 amps per phase, each having two power stages. So about 60 amps per power stage. That gave me a first clue as to why the VRM temperature on our GPU is so high, even with water cooling.

As I mentioned, the GPU is powered by a 6-phase design where each phase has one (1) DrMOS power stage. That differs from the Z690 Torpedo EK X, which has two (2) power stages per phase. During our Furmark stability test from OC Strategy #3, we push 320W at 1V through 6 power stages. That’s over 50A per power stage.
Yes, the full-cover water block provides superior cooling compared to the Liteblock, but on a graphics card, there’s less PCB space for the heat to dissipate. So, all things considered, the high VRM temperature makes sense.
So is there nothing we can do? Well, not quite. Let’s have a look at the VRM configuration again.
The Junction Temperature of the DrMOS power stages is 150 degrees Celsius, and the voltage controller’s over-temperature protection (OTP, F2h) is set accordingly at 150 degrees Celsius. However, the voltage controller’s maximum temperature (F3h) is set to 115 degrees Celsius. When this temperature is reached, the VRHOT# asserts.
VR_HOT# is one of many protections safeguarding your graphics card. It is a required signal from the voltage regulator to the chip, informing the chip that the VRM temperature is too high. In that case, the chip will throttle its frequency to ensure protection.

We can see this in action on the Arc A770. When the VRM temperature hits 110 degrees Celsius, the GPU automatically reduces the clock frequency to 2100 MHz, the base GPU clock. It is also possible to override the VR_HOT limit trigger, but it didn’t provide us with any additional overclocking headroom.
Sidenote: in case you’re wondering why the thermal protection kicks in at 5 degrees Celsius lower than the VR_HOT trigger point. That’s likely because Intel uses an activation trigger as extra protection, just like with PROCHOT.

OC Settings & Benchmark Results
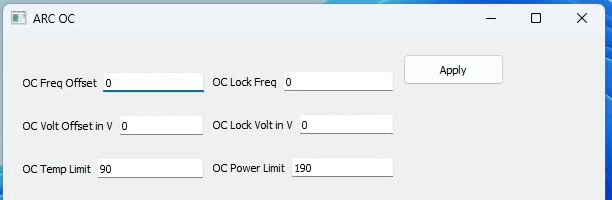
Open the Shamino Work Tool software:
- Under the Intel tab, click on ARC OC
- Set OC Lock Freq to 2700
- Set OC Lock Volt in V to 0.92
Then click Apply to confirm the settings.
Open the Elmorlabs EVC2 software,
- Access the I2C1 section.
- Click Find Devices and ensure an MP2979 controller pops up; if not
- Select MP2979 from the Profiles dropdown menu
- Pick the address from the device scan
- Click Add
- Access the MP2979 (22) menu
- Enable the Monitoring function
- Verify that the monitoring is indeed active
- Set Loop 1 Iout Gain to 40
Click Apply Changes to confirm the settings
We re-ran the benchmarks and checked the performance increase compared to the default operation.
- Geekbench 6 OpenCL: +11.41%
- Geekbench 6 Vulkan: +12.66%
- Furmark 1080P: +21.63%
- FluidMark 1080P: +5.58%
- AI Benchmark: +18.42%
- 3DMark Night Raid: +8.44%
- Simple RayTracing Benchmark: +9.08%
- Unigine Superposition: +9.72%
- Spaceship: +11.98%
- Nero GPU: +8.82%
- EZBench: +10.28%
- Tomb Raider: +9.09%
- CS:GO FPS Bench: +4.79%
- Final Fantasy XV: +9.95%

Increasing the voltage and using the OC lock function doesn’t give us much more headroom, so we get roughly the same performance as in our previous OC Strategy. We get a maximum performance increase of +21.63% in Furmark 1080P.
In a light workload, the GPU clock boosts up to 2702 MHZ with 1.103 volts.

When running 3DMark Speedway Stress Test, the average GPU clock is 2702 MHz with 0.990 effective volt, and the GPU Memory clock is 2187 MHz. The average GPU Global temperature is 60.9 degrees Celsius. The average GPU power is 270.710 watts.

When running Furmark GPU Stress Test, the average GPU clock is 2702 MHz with 0.986 effective volts, and the GPU Memory clock is 2187 MHz. The average GPU Global temperature is 62.5 degrees Celsius. The average GPU power is 321.645 watts.

3G GHz Arc A770?
So what would it take to run the Arc A770 at 3 GHz? As it turns out, with 1.2V we can run the GPU at 3 GHz at 100% load in the lightest of workloads like FurMark GPU Stress Test with 50×50 pixels.

Of course, there’s no way we can run 1.2V in any serious benchmark without exotic cooling so please take this for what it’s worth.
Intel Arc A770: Conclusion
Alright, let us wrap this up.
The Arc A770 is the second Arc graphics card I’ve overclocked on this channel after the Arc A380. While some artificial limitations on the Arc A380 couldn’t be overcome, luckily, that wasn’t the case with the Arc A770. But that’s not to say the card’s performance is now fully unleashed.
The card has 2 limiting factors.
The biggest bottleneck is the VRM design, as 6 power stages are not enough to push the card to its limits when going beyond 330W. It would’ve been cool to see what “enthusiast-grade” VRM designs like the ROG Strix or Aorus could’ve done with this GPU.
The second bottleneck is the seemingly poor voltage scaling. We can get 2700 MHz relatively easily stable at 1V, but 2800 MHz requires at least 100 mV higher. For 3 GHz, it looks like we need over 1.3V. That would also require substantially better cooling.
Overall, I’m delighted with how this project turned out. It took a little longer than I had anticipated, but we ultimately ended up with a card that no longer has any artificial limitations. The only thing left to do is try liquid nitrogen at the ElmorLabs office!
Anyway, that’s all for today!
I want to thank my Patreon supporters for supporting my work. If you have any questions or comments, please drop them in the comment section below.
See you next time!