SkatterBencher #55: AMD Radeon Graphics (Ryzen 7000) Overclocked to 3100 MHz
We overclock the AMD Radeon Graphics integrated in the Ryzen 7000 CPUs up to 3100 MHz with the GIGABYTE B650E Aorus Tachyon motherboard.
While overclocking the Ryzen 7000 integrated graphics was not supported at launch, recently AMD has expanded the overclocker’s toolkit with options to do so. While I wouldn’t say overclocking the integrated graphics provides a viable path to meaningful gaming performance, I wouldn’t be a SkatterBencher if I didn’t try overclocking it anyway.
This should be a relatively short guide and I hope you enjoy what I prepared!
Let’s get started.
AMD Radeon Graphics (Ryzen 7000): Introduction
As I mentioned in my “Raphael Overclocking: What’s New” launch article, brand new for AMD Raphael processors is that the desktop Ryzen CPUs now also have integrated graphics. While that would technically make it an APU, AMD still refers to it as a CPU. There are a couple of crucial differences with APUs.
- First, the graphics cores are integrated into the IO die. That’s a separate chip from the CPU core dies. That’s different from APUs, where everything is integrated into a single die.
- Second, the graphics on Raphael are not meant to run any kind of 3D load. It, of course, can, but it’s abysmal performance.
I also pointed out in the video that there weren’t any options to tune the integrated graphics and that overclocking support would not be likely in the future. Clearly, I was wrong. Since AGESA 1.0.0.4 we have options to tune and overclock the integrated graphics.
The AMD Radeon Graphics (Ryzen 7000) integrated graphics features the reasonably modern RDNA 2.0 architecture in its smallest form. The Ryzen 7000 CPUs get exactly 1 WGP (WorkGroup Processor).

The WGP is the basic unit of shader computation hardware/computing. In RDNA 2.0, one WGP encompasses 2 CUs (Compute Units) as well as 2 ray-tracing accelerators. To give you an idea of how little compute that is: the AMD Radeon RX 6500 XT we overclocked in SkatterBencher #41 has 8 WGP; and that the most low-end RDNA 2 discrete graphics card you can buy in retail! Even the weakest RDNA 2 notebook APU, the Ryzen 5 6600U has 3 WGPs.

Another obvious difference between the RDNA 2 discrete graphics and the Ryzen 7000 integrated graphics is the memory as the latter relies on the system’s DDR5 memory. If you want to learn more about the Ryzen 7000 IGP cache and memory bandwidth limitations, I highly recommend the Chips and Cheese article titled “AMD’s Zen 4, Part 3: System Level Stuff, and iGPU.”
From the perspective of overclocking, the Ryzen 7000 topology is very similar to that of any previous AMD Ryzen APU. We will explain how it works in OC Strategy #2.
In today’s video, we cover three overclocking strategies.
- First, we leverage AMD’s PBO and EXPO technologies
- Second, we manually increase the GPU frequency in the motherboard BIOS
- Third, we maximize the GPU overclock using GFX Curve Optimizer

Before we jump into the overclocking, let us quickly go over the hardware and benchmarks we use in this video.
AMD Radeon Graphics (Ryzen 7000): Platform Overview
The system we’re overclocking today consists of the following hardware.
| Item | SKU | Price (USD) |
| CPU | AMD Ryzen 9 7900 | 450 |
| Motherboard | GIGABYTE B650E Aorus Tachyon | 599 |
| CPU Cooling | EK-Quantum Velocity2 EK-Quantum Power Kit Velocity² 360 | 137 686 |
| Fan Controller | ElmorLabs Easy Fan Controller ElmorLabs EVC2SX | 20 32 |
| Memory | G.SKILL Trident Z5 DDR5-6400 | 370 |
| Power Supply | Enermax MAXREVO 1500W | 370 |
| Graphics Card | ASUS ROG Strix RTX 2080 TI | 880 |
| Storage | AORUS RGB 512 GB M.2-2280 NVME | 120 |
| Chassis | Open Benchtable V2 | 200 |
AMD Radeon Graphics (Ryzen 7000): Benchmark Software
We use Windows 11 and the following benchmark applications to measure performance and ensure system stability.
The benchmark selection is similar to the one we used in our last AMD GPU SkatterBencher, except for the re-introduction of AI Benchmark and Handbrake, and the addition of Nero and EZ Bench. For most of the benchmarks I use the standard settings.
- For AI Benchmark, since AMD ROCm is not available on Windows, I rely on Tensorflow-DirectML. I showed how to set up this benchmark in another article on this website.
- For Handbrake, I use the VCN 1080P setting. VCN stands for Video Core Next and is AMD’s brand for video encoding and decoding hardware.
- Nero Score is a relatively new benchmark available on Steam which measures the CPU and GPU performance. For this guide I rely exclusively on the GPU score which measures AVC and Metaverse performance.
- EzBench is another relatively new benchmark on Steam which measures GPU performance. While it’s still under development, you can still use it to compare the performance before and after overclocking.
AMD Radeon Graphics (Ryzen 7000): Stock Performance
Before starting overclocking, we must check the system performance at default settings. Note that on this motherboard, Precision Boost Overdrive is enabled by default. This could possibly impact the IGP performance as the integrated graphics clock frequency is governed by the same Precision Boost algorithm that manages the CPU core frequencies.
So, to check the performance at default settings, you must enter the BIOS and
- Switch to Advanced Mode
- Enter the Advanced CPU Settings submenu
- Enter the Precision Boost Overdrive submenu
- Set Precision Boost Overdrive to Disabled
- Enter the Precision Boost Overdrive submenu
Then save and exit the BIOS.
Here is the benchmark performance at stock:
- Geekbench 5 OpenCL: 8,173 points
- Geekbench 5 Vulkan: 8,713 points
- Furmark 1080P: 691 points
- FluidMark 1080P: 1,047 points
- AI Benchmark: 2,037 points
- 3DMark Night Raid: 11,162 marks
- Simple RayTracing Benchmark: 0 fps
- Unigine Superposition: 1,294 points
- Spaceship: 13.3 fps
- Handbrake: 469.3 fps
- Nero GPU: 1,889 points
- EZBench: 235 frames
- Shadow of the Tomb Raider: 12 fps
- CS:GO FPS Bench: 57.87 fps
- Final Fantasy XV: 11.43 fps

While the Simple RayTracing Benchmark starts, by design it stops if you’re under 2.5 frames per second for too long. Hence, we don’t get a score.
When running Furmark GPU Stress Test, the average GPU effective clock is 2190 MHz with 0.997 volts, and the GPU Memory clock is 2400 MHz. The average GPU temperature is 38.4 degrees Celsius. The average GPU+SOC power is 38.543 watts.

Adaptive Voltage Frequency Scaling & Voltage Adaptive Operation
A quick word on the difference between the GPU Clock and GPU Effective Clock.
Since Carrizo in 2015, AMD employs a couple of proprietary clocking technologies including Adaptive Voltage Frequency Scaling (AVFS) and Voltage Adaptive Operation (VAO). I covered these technologies in depth in my Raphael launch article.


The long story short is that the combination of AVFS and VAO will dynamically adjust the frequency based on the effective voltage. The advantage is that in case of a sudden voltage droop, the CPU will not crash because the effective frequency is tied to the effective voltage. The disadvantage is that the frequency is not deterministic and may fluctuate.
That’s why I report on the effective clock frequency instead of the set clock frequency.
OC Strategy #1: PBO 2 + EXPO
In our first overclocking strategy, we take advantage of AMD exclusive features Precision Boost Overdrive 2 and Extended Profiles for Overclocking.
PBO 2 – Precision Boost Overdrive 2
With the launch of Zen 3, AMD introduced an improved version of the Precision Boost Overdrive toolkit (shockingly called Precision Boost Overdrive 2), allowing for more advanced finetuning of the parameters affecting the Precision Boost frequency boost algorithm.
Precision Boost Overdrive 2 builds on the PBO implementation of Zen 2. In addition to the platform overclocking knobs from Zen+ (PPT, TDC, EDC) and processor overclocking knobs from Zen 2 (Boost Override and Scalar), Precision Boost Overdrive 2 introduces Curve Optimizer.

While most people know Curve Optimizer as a way to undervolt the CPU cores, there’s also a GFX Curve Optimizer to undervolt the integrated graphics. We’ll get back to that in OC Strategy #3.
There are essentially 3 levels of Precision Boost Overdrive
- AMD’s stock values, which can be set by disabling PBO
- The motherboard vendor values, which are programmed into the BIOS to match the motherboard VRM specification and can be set by enabling PBO
- Custom values, which can be programmed by the end-user
We rely on the motherboard pre-programmed PBO parameters by enabling Precision Boost Overdrive. We find that the following values have changed:

The parameter relevant for our overclock is the PPT limit which is the total power the processor can draw from the socket before the boost levels off. Note that there are SOC specific limits for TDC and EDC. Unfortunately I was not able to find its programmed limits with this CPU.
The Precision Boost algorithm monitors all aspects of your processor, including the integrated graphics. On APUs with powerful integrated graphics, it’s possible that the graphics performance is constrained by the default Precision Boost parameters. However, since the integrated graphics in the Ryzen 7000 are so weak, we don’t expect expanding the power budget to have a significant effect on the overall performance.
EXPO – Extended Profiles for Overclocking
EXPO stands for AMD Extended Profiles for Overclocking. It is an AMD technology that enables ubiquitous memory overclocking profiles for AMD platforms supporting DDR5 memory. EXPO allows memory vendors such as G.SKILL to program higher performance settings onto the memory sticks. If the motherboard supports EXPO, you can enable higher performance with a single BIOS setting. So, it saves you lots of manual configuration.

BIOS Settings & Benchmark Results
Upon entering the BIOS
- Click the XMP/EXPO Disabled button
- Switch to Advanced Mode
- Enter the Advanced CPU Settings submenu
- Enter the Precision Boost Overdrive submenu
- Set Precision Boost Overdrive to Enabled
- Enter the Precision Boost Overdrive submenu
Then save and exit the BIOS.
We re-ran the benchmarks and checked the performance increase compared to the default operation.
- Geekbench 5 OpenCL: +1.25%
- Geekbench 5 Vulkan: +4.50%
- Furmark 1080P: +0.72%
- FluidMark 1080P: +0.86%
- AI Benchmark: +0.98%
- 3DMark Night Raid: +5.76%
- Simple RayTracing Benchmark: /
- Unigine Superposition: +3.79%
- Spaceship: +3.76%
- Handbrake: +0.87%
- Nero Score: +12.12%
- EZBench: +0.85%
- Shadow of the Tomb Raider: +8.33%
- CS:GO FPS Bench: +5.89%
- Final Fantasy XV: +5.86%

While enabling Precision Boost Overdrive doesn’t do much to increase the GPU frequency – we were already running at the maximum frequency – enabling EXPO to improve the memory bandwidth and latency does help a little. Unfortunately, the additional performance still doesn’t allow us to complete a run of Simple RayTracing Benchmark. We see a maximum performance improvement of +12.12% in Nero Score.
When running Furmark GPU Stress Test, the average GPU effective clock is 2192 MHz with 1.000 volts, and the GPU Memory clock is 3200 MHz. The average GPU temperature is 41.0 degrees Celsius. The average GPU+SOC power is 54.087 watts.

OC Strategy #2: Manual Overclock
In our second overclocking strategy, we will manually overclock the integrated graphics. By manual I mean we set the GPU frequency in the BIOS as high as possible. However, before we get to that, let briefly look at the Ryzen 7000 clocking and voltage topology to understand how it impacts graphics overclocking.
AMD Radeon Graphics (Ryzen 7000) Clocking Topology
The clocking of AMD Raphael is similar to the previous generation of Zen 3 Vermeer desktop CPUs.
The standard Raphael platform has a 48 MHz crystal input to the integrated CGPLL clock generator. The CGPLL then generates a 48 MHz clock for the USB PLL and a 100 MHz reference clock for the FCH, which contains the CCLK PLL for the CPU cores and several SOC PLLs.
The SOC PLLs includes a wide range of PLLs present on the IO die, including the GFXCLK for the integrated graphics. At stock, the graphics frequency will go up to 2.2 GHz during a 3D load. If you want to overclock the integrated graphics, since AGESA 1.0.0.4, you can set the desired frequency in the BIOS directly. Alternatively, but this is not recommended, you can increase the reference clock frequency when it’s in iCLK or eCLK0 mode.

iCLK refers to using the standard internal CGPLL. However, in addition to the standard internal CGPLL, Raphael supports up to two external clock modes. They’re called eCLK0 Mode and eCLK1 Mode.
In eCLK0 Mode, also referred to as synchronous mode, an external 100MHz reference clock is used for both the CPU PLL and SOC PLLs. In other words, it’s a reference clock that affects the CPU core clocks as well as the PCIe and SATA clocks. The USB PLL is still driven by the 48 MHz crystal via the CGPLL.
In addition to the graphics core frequency, there’s two additional frequencies related to the integrated graphics: SOC frequency and VCN frequency. They run standard at 1200 MHz. Unfortunately there’s no way to adjust these frequencies which will limit our performance improvements in, for example, Handbrake.
AMD Radeon Graphics (Ryzen 7000) Voltage Topology
From the voltage topology perspective, there are a few minor changes. Like Vermeer, the processor still relies on an internal and external power supply to generate the processor voltages.
There are four primary power supplies from the motherboard VRM to the processor: VDDCR, VDDCR_SOC, VDDCR_MISC, and VDDIO_MEM_S3. I have covered the details extensively in my Raphael overclocking launch video.
The VDDCR_SOC voltage rail provides the external power for multiple internal voltage regulators on SOC for the various IP blocks, including but not limited to the memory controller, SMU, PSP, graphics, etc. It is essential to know that the VDDCR_SOC voltage must always be lower than VDDIO_MEM_S3 + 100mV. The default VDDCR_SOC voltage is 1.05V.
VDDCR_GFX provides the voltage for the GPU cores on the IO die. The voltage rails can work in either regular mode or bypass mode. In regular mode, the voltage is managed by the integrated voltage regulator and derived from the VDDCR_SOC voltage rail. If the integrated VR is disabled and set to bypass mode, the voltage is equal to the VDDCR_SOC voltage rail.

In the past, the VDDCR_GFX voltage rail would automatically switch to bypass mode when you manually adjust the graphics frequency. However, as we’ll find out soon, that’s not quite the case with the Ryzen 7000 integrated graphics.
AMD Radeon Graphics (Ryzen 7000) Manual Overclocking
To manually overclock the Ryzen 7000 integrated graphics, we can adjust the GFX Clock Frequency in the BIOS. Simply input the desired frequency, save and reboot, then stress test the GPU to see if it’s stable.

Note that the integrated graphics has its own factory-fused voltage-frequency curve which scales up to 2600 MHz at 1.25V. When you adjust the frequency, it will automatically adjust the voltage as well. Beyond 2600 MHz the voltage remains at 1.25V.

From my testing, I was able to reach 2975 MHz at 1.25V.
BIOS Settings & Benchmark Results
Upon entering the BIOS.
- Click the XMP/EXPO Disabled button
- Switch to Advanced Mode
- Enter the Advanced CPU Settings submenu
- Enter the Precision Boost Overdrive submenu
- Set Precision Boost Overdrive to Enabled
- Leave the Precision Boost Overdrive submenu
- Enter the Precision Boost Overdrive submenu
- Leave the Advanced CPU Settings submenu
- Set GFX Clock Frequency to 2975
Then save and exit the BIOS.
We re-ran the benchmarks and checked the performance increase compared to the default operation.
- Geekbench 5 OpenCL: +31.24%
- Geekbench 5 Vulkan: +31.58%
- Furmark 1080P: +30.54%
- FluidMark 1080P: +34.96%
- AI Benchmark: +28.72%
- 3DMark Night Raid: +29.33%
- Simple RayTracing Benchmark: +∞%
- Unigine Superposition: +31.76%
- Spaceship: +33.08%
- Handbrake: +0.97%
- Nero GPU: +19.96%
- EZBench: +2.98%
- Shadow of the Tomb Raider: +33.33%
- CS:GO FPS Bench: +33.11%
- Final Fantasy XV: +28.35%

With an GPU frequency increase of about 35%, we expect the performance to increase substantially as well. That’s precisely what we see as most benchmarks scale nearly linearly with GPU frequency. We get a maximum performance increase of +34.96% in FluidMark. Notably, we can now complete a run of Simple RayTracing Benchmark and put some numbers on the board.
When running Furmark GPU Stress Test, the average GPU effective clock is 2949 MHz with 1.245 volts, and the GPU Memory clock is 3200 MHz. The average GPU temperature is 47.1 degrees Celsius. The average GPU+SOC power is 63.517 watts.

OC Strategy #3: GFX Curve Optimizer
In our third overclocking strategy, we rely on GFX Curve Optimizer to further increase the GPU frequency.
To be frank, this strategy is a last-minute addition to this video. As I was putting the final touches on the guide, I realized that, unlike with previous APUs I overclocked, the integrated graphics voltage was not in bypass mode. If it were, the graphics voltage would be equal to the SoC voltage. But the SoC voltage is 1.4V and the graphics voltage is only 1.25V.
With this insight, I figured the graphics voltage is still regulated by the Precision Boost algorithm and therefore tuning Precision Boost Overdrive may open opportunities for higher voltage and higher frequency.
PBO 2: Curve Optimizer
As I mentioned earlier in this video, Curve Optimizer is an important new feature of Precision Boost Overdrive 2.
While Curve Optimizer is designed for tuning the CPU cores, there’s also an option called GFX Curve Optimizer which is designed specifically for tuning the integrated graphics. The function works identically: adding a positive offset increases the voltage and adding a negative offset reduces the voltage.

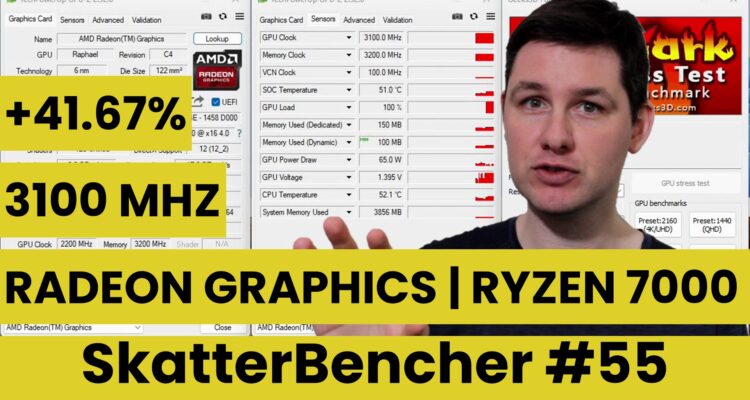
In this chart you can see the voltage behavior with a negative and positive offset. As you can see from the chart, with a GFX Curve Optimizer of +30 we can increase the graphics voltage to 1.4V, equal to the SOC voltage. That extra voltage enables use to further increase the graphics frequency to 3100 MHz.

BIOS Settings & Benchmark Results
Upon entering the BIOS.
- Click the XMP/EXPO Disabled button
- Switch to Advanced Mode
- Set GFX Clock Frequency to 3100MHz
- Enter the Advanced CPU Settings submenu
- Enter the Precision Boost Overdrive submenu
- Set Precision Boost Overdrive to Advanced
- Set PBO Limits to Motherboard
- Enter the GFX Curve Optimizer submenu
- Set GFX Curve Optimizer to GFX Curve Optimizer
- Set GFX Curve Optimizer Sign to Positive
- Set GFX Curve Optimizer Magnitude to 30
- Enter the Precision Boost Overdrive submenu
Then save and exit the BIOS.
We re-ran the benchmarks and checked the performance increase compared to the default operation.
- Geekbench 5 OpenCL: +35.53%
- Geekbench 5 Vulkan: +34.10%
- Furmark 1080P: +34.88%
- FluidMark 1080P: +39.64%
- AI Benchmark: +29.85%
- 3DMark Night Raid: +30.61%
- Simple RayTracing Benchmark: +∞%
- Unigine Superposition: +35.47%
- Spaceship: +36.84%
- Handbrake: +0.96%
- Nero GPU: +13.29%
- EZBench: +3.40%
- Shadow of the Tomb Raider: +41.67%
- CS:GO FPS Bench: +37.69%
- Final Fantasy XV: +31.32%

With a graphics frequency running now 40% higher than stock, we get a significant performance improvement in most benchmark applications. We see a maximum performance improvement of +41.67% in Tomb Raider.
When running Furmark GPU Stress Test, the average GPU effective clock is 3100 MHz with 1.395 volts, and the GPU Memory clock is 3200 MHz. The average GPU temperature is 52.8 degrees Celsius. The average GPU+SOC power is 60.689 watts.

AMD Radeon Graphics (Ryzen 7000): Conclusion
Alright, let us wrap this up.
I am fully aware that the Radeon Graphics integrated in the Ryzen 7000 CPUs is far from a capable gaming solution. Therefore, few people will bother looking into overclocking it to get better performance. But as an overclocking enthusiast I am compelled to overclock anything, including the slowest possible RDNA 2 integrated graphics.
And honestly, it was kind of fun! 3.1 GHz is nearly a 1 GHz increase in clock frequency from the default of 2.2 GHz. Also, the performance scales nearly linearly with the GPU frequency. But what I found most fun was discovering the use for the GFX Curve Optimizer, an option that I had never previously used.
The irony of Radeon overclocking is that the overclocking experience of the integrated graphics on desktop is miles better than that the experience of the discrete graphics. If you’re a Ryzen 7000 owner and in for cheap, simple overclocking, I’d suggest taking its integrated graphics for a spin!
Anyway, that’s all for today!
I want to thank my Patreon supporters for supporting my work. As per usual, if you have any questions or comments, feel free to drop them in the comment section below.
See you next time!
SkatterBencher #70: AMD Radeon 780M Overclocked to 3150 MHz - SkatterBencher
[…] to APU, as the integrated graphics for the Ryzen 7000 processors (which I overclocked in SkatterBencher #55) was still the RDNA 2.0 architecture. This will be the first time I’m overclocking RDNA 3.0, […]
AMD Ryzen 7000’s Tiny RDNA2 GPU Overclocked to 3.1 GHz | Tom’s Hardware | Sounds Nerdy
[…] processing unit inside their I/O die (IOD). This GPU is hardly meant for gaming, but as SkatterBencher discovered, it can still be overclocked, which improves its performance by around 42% in case of […]
AMD Ryzen 7000’s Tiny RDNA2 GPU Overclocked to 3.1 GHz – Brukida
[…] graphics processing unit inside their I/O die (IOD). This GPU is hardly meant for gaming, but as SkatterBencher discovered, it can still be overclocked, which improves its performance by around 42% in case of […]
5 Minute Overclock: AMD Radeon Graphics (Ryzen 7000) to 3100 MHz - 5 Minute Overclock
[…] I’ll speed run you through the OC settings and provide some notes and tips along the way. Please note that this is for entertainment purposes only and not the whole picture. Please don’t outright copy these settings and apply them to your system. If you want to learn how to overclock this system, please check out the longer SkatterBencher article. […]
GreenReaper
Thanks for the guide. Got my 7600 this weekend and managed to bump it up 30% to 2860 MHz with a -4 curve, for +20% FurMark FPS (and hopefully a better experience in real games).
Was able to go a bit higher with a positive offset, but it took a lot more and it wasn’t worth it, especially in the donut-less mode. I suspect having 5600 MHz RAM meant it was the ‘right’ speed. Interestingly it ended up at the max all-core CPU voltage, 1.245V.
Honestly, the Wraith Stealth is liable to be the limiting factor, but I only have 200W to play with in the Chopin Max case – may not be worth upgrading! Running it full-tilt – optionally with OCCT in the background – maybe isn’t representative of most games anyway.
Pieter
It’s always nice to read this kind of story. Happy it worked for you!
GreenReaper
An update from six months later – after further tweaks I’m at 2780 Mhz +14 GFX CO (older settings showed errors with OCCT and corruption during video testing at higher summer temperatures), along with -28/-26/-28/-28/-24/-28 CO on the 7600.
The interesting thing is on my B650E-I’s current BIOS (1654 with AGESA 1.0.0.7c), all-core CPU seems to fall to ~2.7 GHz (70%) when GFX is overclocked anywhere above 2.2 GHz and non-trivial D3D usage is present – it’s not hitting temperature or power limits, yet there’s still a global frequency limit.
It’s a bit annoying; I now have the cooling to go higher (NH-L9a-AM5 + duct + extra fan) and I like to run BOINC in the background, but even 4K videos can cause all-core CPU workloads to drop well below the advertised base clock of 3.6 Ghz @ 80 C / 65 W – while t’ll gladly boost to 4.2-4.8 Ghz and 95 C / 85 W when D3D usage is minimal.
Pieter
Interesting observation. Was this also the case with older BIOSes?
Jose
I tríed this on my 7950x and got 2800 with 30+ in the Curve.
Using 2900 got me artifacts….
Do i need to turn off Expo to get as high as you?
Does it make a difference if I have a PPT limit at 125watt ?
Pieter
I don’t think the PPT limit is affecting your overclock. Artifacts are typically a result of not enough voltage. If you already maxed out the GFX Curve Optimizer, I don’t think there’s much left to do unfortunately.
AMD Ryzen 9 7900 iGPU gets impressive performance boost when overclocked to 3.1GHz | KitGuru
[…] so, that didn't stop SkatterBencher (via Wccftech) from trying it on a few games and synthetic graphics benchmarks. The overclocker […]
Overclocker Manages To Gain 42% More Performance With AMD Ryzen 7000 Series iGPU | eTeknix
[…] Overclocker from SkatterBencher, a site known for overclocking attempts, has managed to overclock the Ryzen 7900 IGPU up to 3100MHz […]
2023 - AMD Ryzen 7000 „RDNA 2“ iGPU auf 3,1 GHz übertaktet, liefert bis zu 42 % Leistungssteigerung
[…] Diagnose zu helfen, aber er kann wie jeder andere Teil der Ryzen 7000-CPUs und übertaktet werden Skatterbencher hat gezeigt, was dieser Chip […]
AMD Ryzen 7000'in Minik RDNA2 GPU'su 3,1 GHz'e Hız Aşırtıldı - Dünyadan Güncel Teknoloji Haberleri | Teknomers
[…] RDNA tabanlı grafik işleme birimi içerir. Bu GPU, oyun oynamak için tasarlanmamıştır, ancak SkatterBencher AMD’nin Ryzen 7900 işlemcisi durumunda performansını yaklaşık %42 artıran (üzerinden […]
2023 - AMD Ryzen 7000's Tiny RDNA2 GPU auf 3,1 GHz übertaktet
[…] Grafikverarbeitungseinheit in ihrem I/O-Die (IOD). Diese GPU ist kaum für Spiele gedacht, aber als SkatterBencher entdeckt, kann er immer noch übertaktet werden, was seine Leistung im Falle von AMDs Ryzen […]
AMD Ryzen 7000’s Tiny RDNA2 GPU Overclocked to 3.1 GHz – Techno Ghost
[…] graphics processing unit inside their I/O die (IOD). This GPU is hardly meant for gaming, but as SkatterBencher discovered, it can still be overclocked, which improves its performance by around 42% in case of […]
AMD Ryzen 7000’s Tiny RDNA2 GPU Overclocked to three.1 GHz – Blog
[…] processing unit inside their I/O die (IOD). This GPU is hardly meant for gaming, however as SkatterBencher found, it may well nonetheless be overclocked, which improves its efficiency by round 42% in case […]
AMD Ryzen 7000’s Tiny RDNA2 GPU Overclocked to 3.1 GHz – HW-CH.COM
[…] processing unit inside their I/O die (IOD). This GPU just isn’t designed for gaming, however SkatterBencher Within the case of AMD’s Ryzen 7900 processor, which improves its efficiency by about 42% (by […]
AMD Ryzen 7000’s Tiny RDNA2 GPU Overclocked to 3.1 GHz – Mist Vista
[…] graphics processing unit inside their I/O die (IOD). This GPU is hardly meant for gaming, but as SkatterBencher discovered, it can still be overclocked, which improves its performance by around 42% in case of […]
AMD Ryzen 7000's Tiny RDNA2 GPU Overclocked to 3.1 GHz - Softs Geek
[…] graphics processing unit inside their I/O die (IOD). This GPU is hardly meant for gaming, but as SkatterBencher discovered, it can still be overclocked, which improves its performance by around 42% in case of […]
AMD Ryzen 7000 "RDNA 2" iGPU con overclocking a 3,1 GHz proporciona una mejora del rendimiento de hasta un 42 %
[…] diagnóstico, pero se puede overclockear como cualquier otra parte de los procesadores Ryzen 7000 y Banco de dispersión: mostró de lo que es capaz este […]
GPU RDNA2 integrada AMD Ryzen 7000 con overclocking a 3,1 GHz, hasta un 42 % de aumento del rendimiento – Liukin
[…] patinador conocido por sus intentos extremos de overclocking, pone la CPU de escritorio de AMD bajo el microscopio. […]