SkatterBencher #96: NOX RGB DDR5-6800 4x16GB Tuned
Today, we tune the performance of the Apacer NOX RGB DDR5-6800 4x16GB memory kit with the Ryzen 9 9900X and ROG Crosshair X870E Hero.
Since I’m not a memory expert like Buildzoid or the folks chasing memory frequency records, I approach tuning memory from a layperson’s perspective. That means trying to get the most extra performance in the fewest steps possible.
In this video, I break down the Apacer NOX RGB 4x16GB tuning process into four unique tuning strategies for beginner and advanced overclockers.
- First, we enable DOCP II,
- Second, we switch to DOCP Tweaked,
- Third, we use ASUS Memory Presets to tune the sub-timings,
- And, finally, we chase for maximum performance at DDR5-6000,
However, before we jump into overclocking, let us quickly review the hardware and benchmarks used in this video.
Apacer NOX RGB DDR5-6800 4x16GB: Introduction
The Apacer NOX RGB kits I’m using today is part of a broader memory line-up with speeds up to DDR5-8000 . It’s basically a pair of the same kit I used in SkatterBencher #95, so rated at DDR5-6800 1.4V (Part: AH5U32G68C642NWAA-2; EAN: 4712389933737).
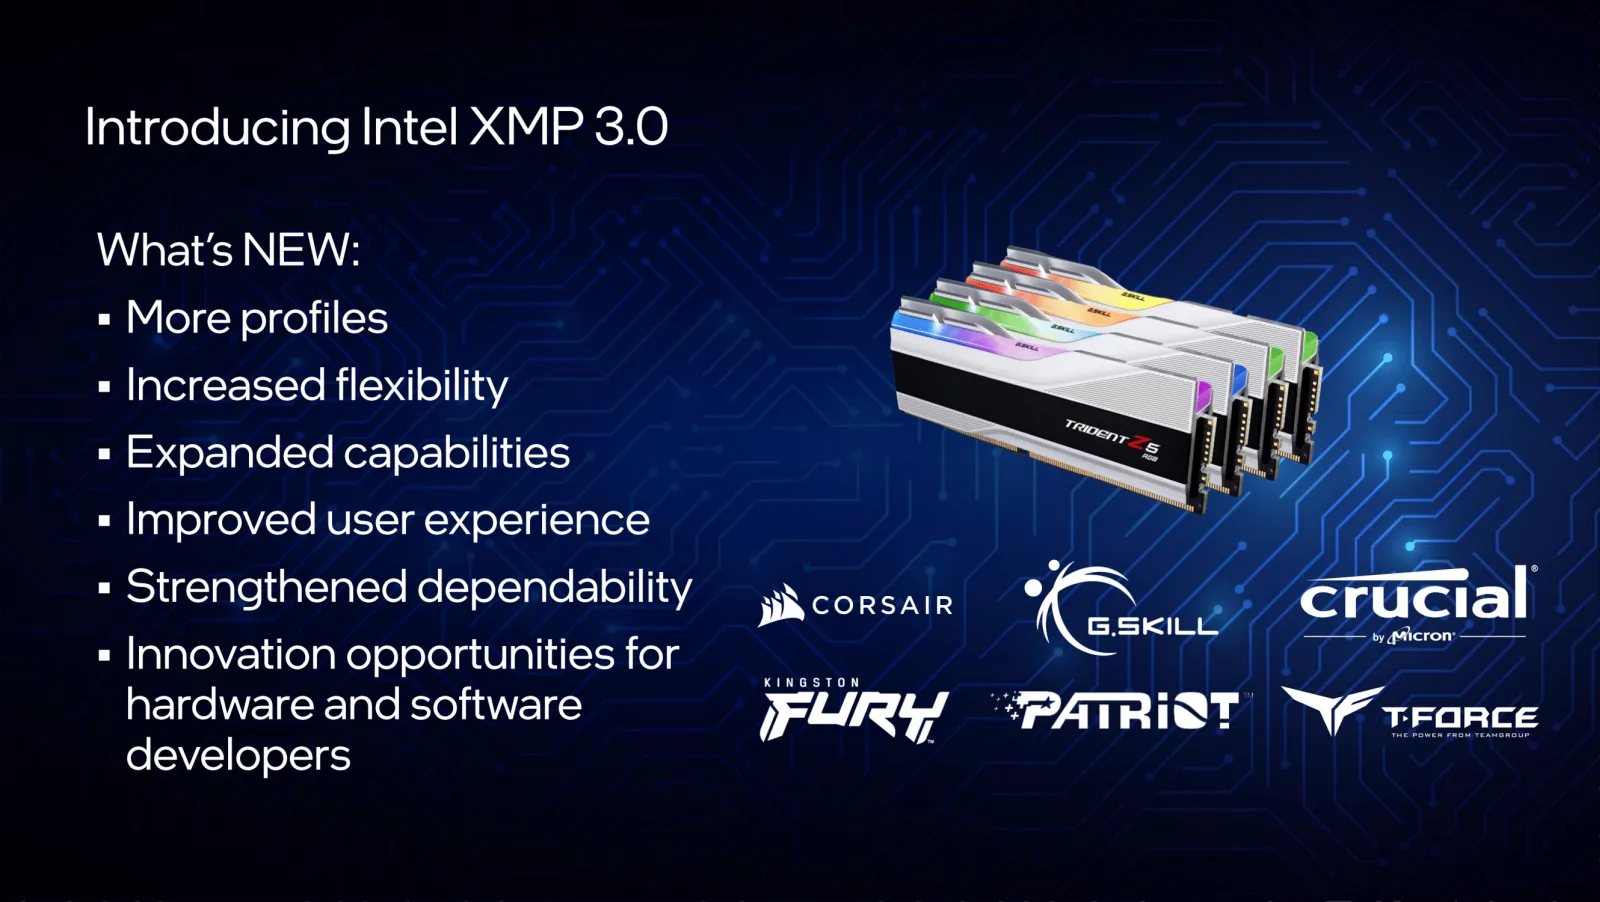
The kit has an XMP 3.0 profile to enable higher performance. We’ll get back to that in a minute when trying out the profile in OC Strategy #1.
Platform Overview
The system we’re overclocking today consists of the following hardware.
| Item | SKU |
|---|---|
| CPU | AMD Ryzen 9 9900X |
| Motherboard | ASUS ROG Crosshair X870E Hero |
| CPU Cooling | Enermax LIQMAXFLO 420 |
| Memory | Apacer Nox RGB DDR5-6800 2x16GB Apacer Nox RGB DDR5-6800 2x16GB |
| Power Supply | XPG Fusion 1600W Titanium |
| Graphics Card | GALAX GeForce RTX 4090 HOF |
| Storage | AORUS RGB NVMe M.2 512GB Gen4 AGI 512GB NVMe M.2 Gen3 |
| Chassis | Open Benchtable V2 |
| Telemetry | BENCHLAB |

Benchmarks, Games & Tools
We use Windows 11 and the following benchmark applications and games to measure performance and ensure system stability.
| Benchmarks | Link |
|---|---|
| Pyprime 2.0 | https://github.com/mbntr/PYPrime-2.x |
| AI-Benchmark | https://ai-benchmark.com/ |
| Y-Cruncher 5B | http://www.numberworld.org/y-cruncher/ |
| LocalScore | https://www.localscore.ai/ |
| Counter Strike 2 | https://store.steampowered.com/app/730/CounterStrike_2/ |
| Shadow of the Tomb Raider | https://store.steampowered.com/app/750920/Shadow_of_the_Tomb_Raider_Definitive_Edition/ |
| Homeworld 3 | https://store.steampowered.com/app/1840080/Homeworld_3/ |
| AIDA64 | https://www.aida64.com/ |
| OCCT Memory Stress Test | https://www.ocbase.com/ |
Apacer NOX RGB DDR5-6800 4x16GB: Stock Performance
Before we start tuning, we must check the system performance at default settings. That means changing nothing to the system configuration, apart from enabling PBO for the Ryzen 9 9900X.
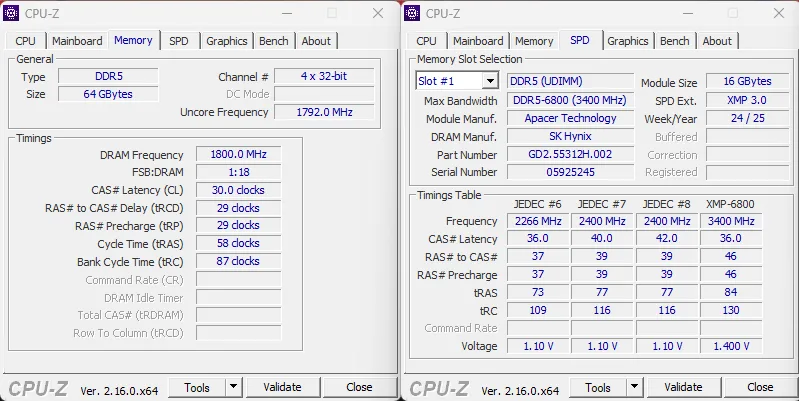
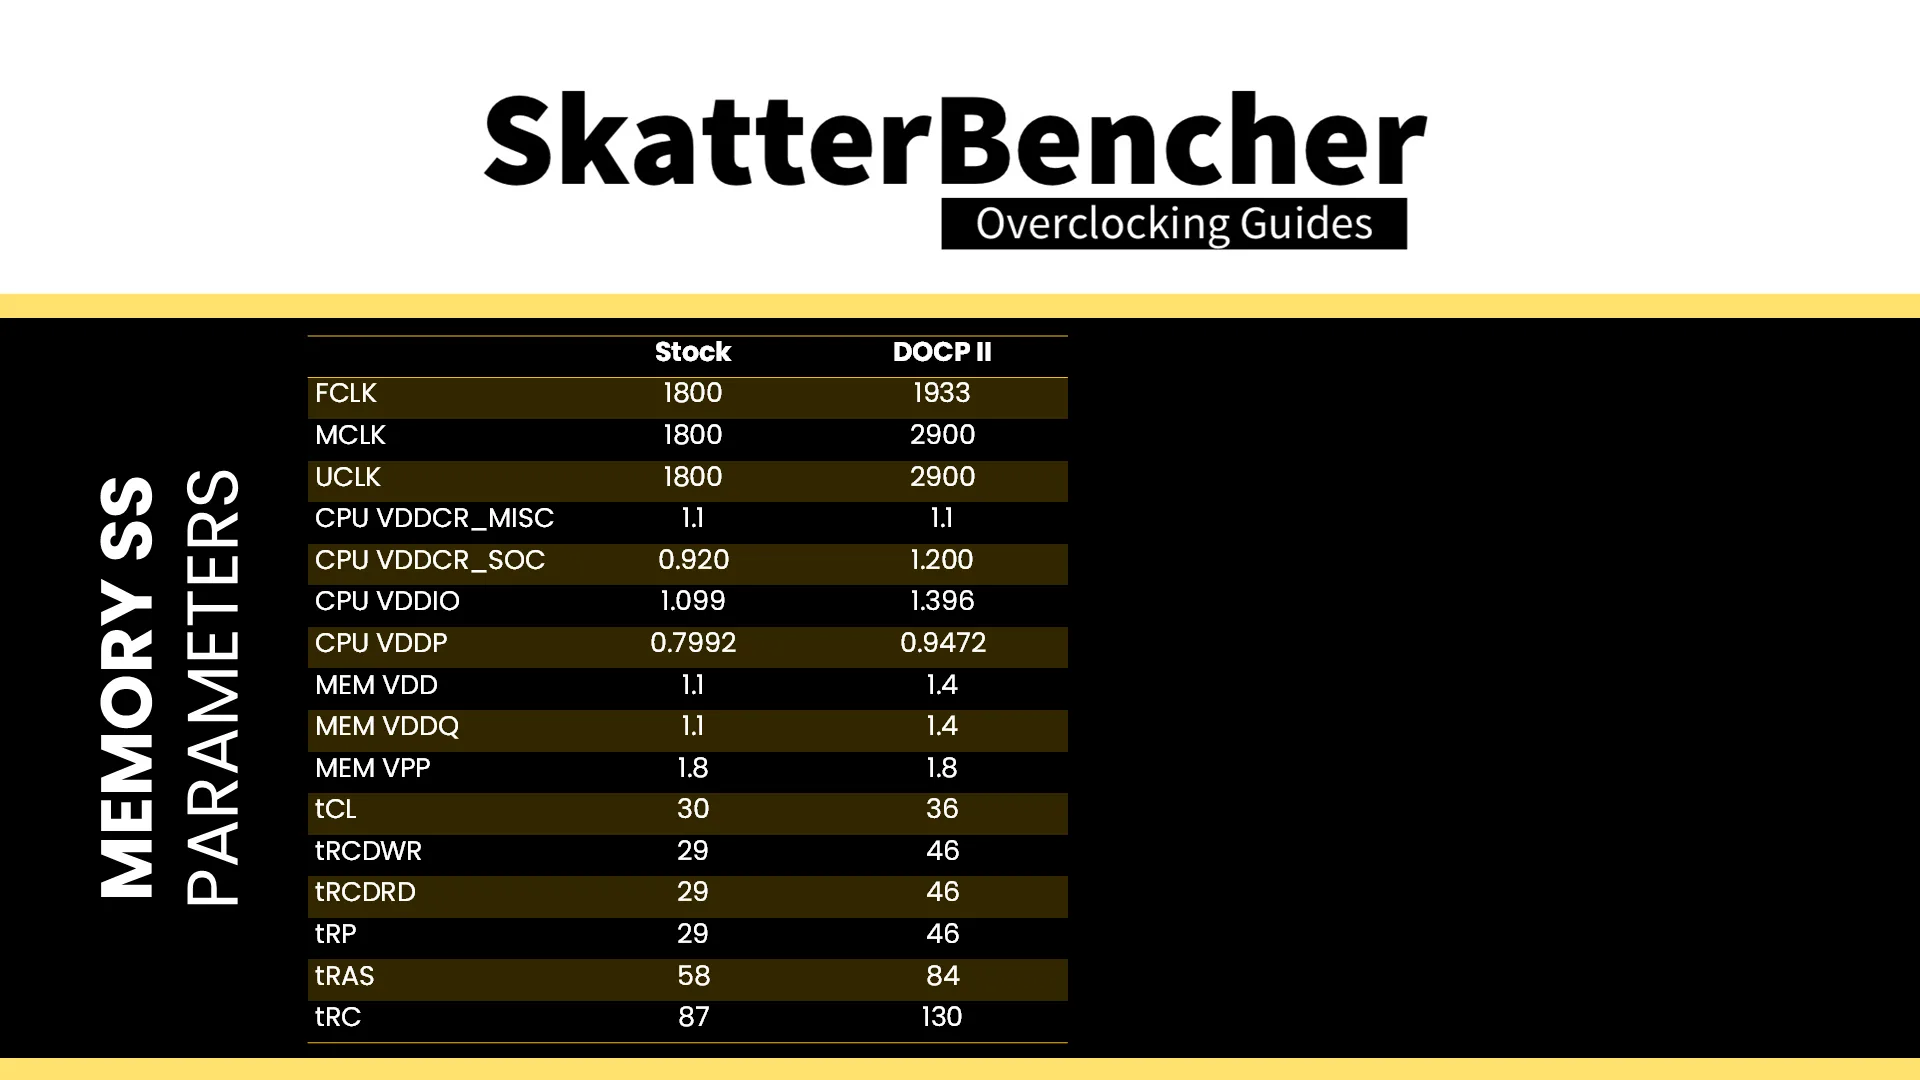
The default memory subsystem configuration parameters for this system are as follows:

Note that the default memory frequency is not DDR5-6800 as you’d expect from installing a pair of DDR5-6800 memory kits. That’s because running the memory above AMD’s validated and warranted speeds is technically overclocking.
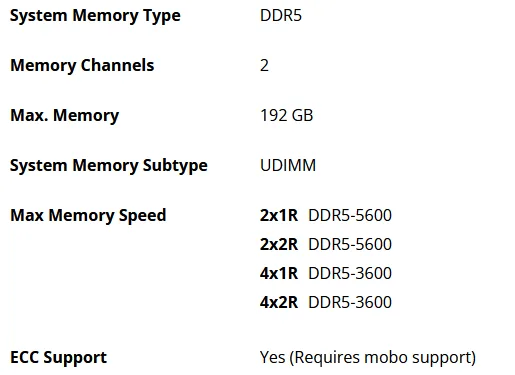
AMD Ryzen 9000’s plan-of-record (“POR”) defines the maximum memory frequency up to DDR5-5600 for 1 DIMM per channel (“DPC”) and only up to DDR5-3600 for 2 DIMM per channel configurations! (3600 … is this DDR4?)
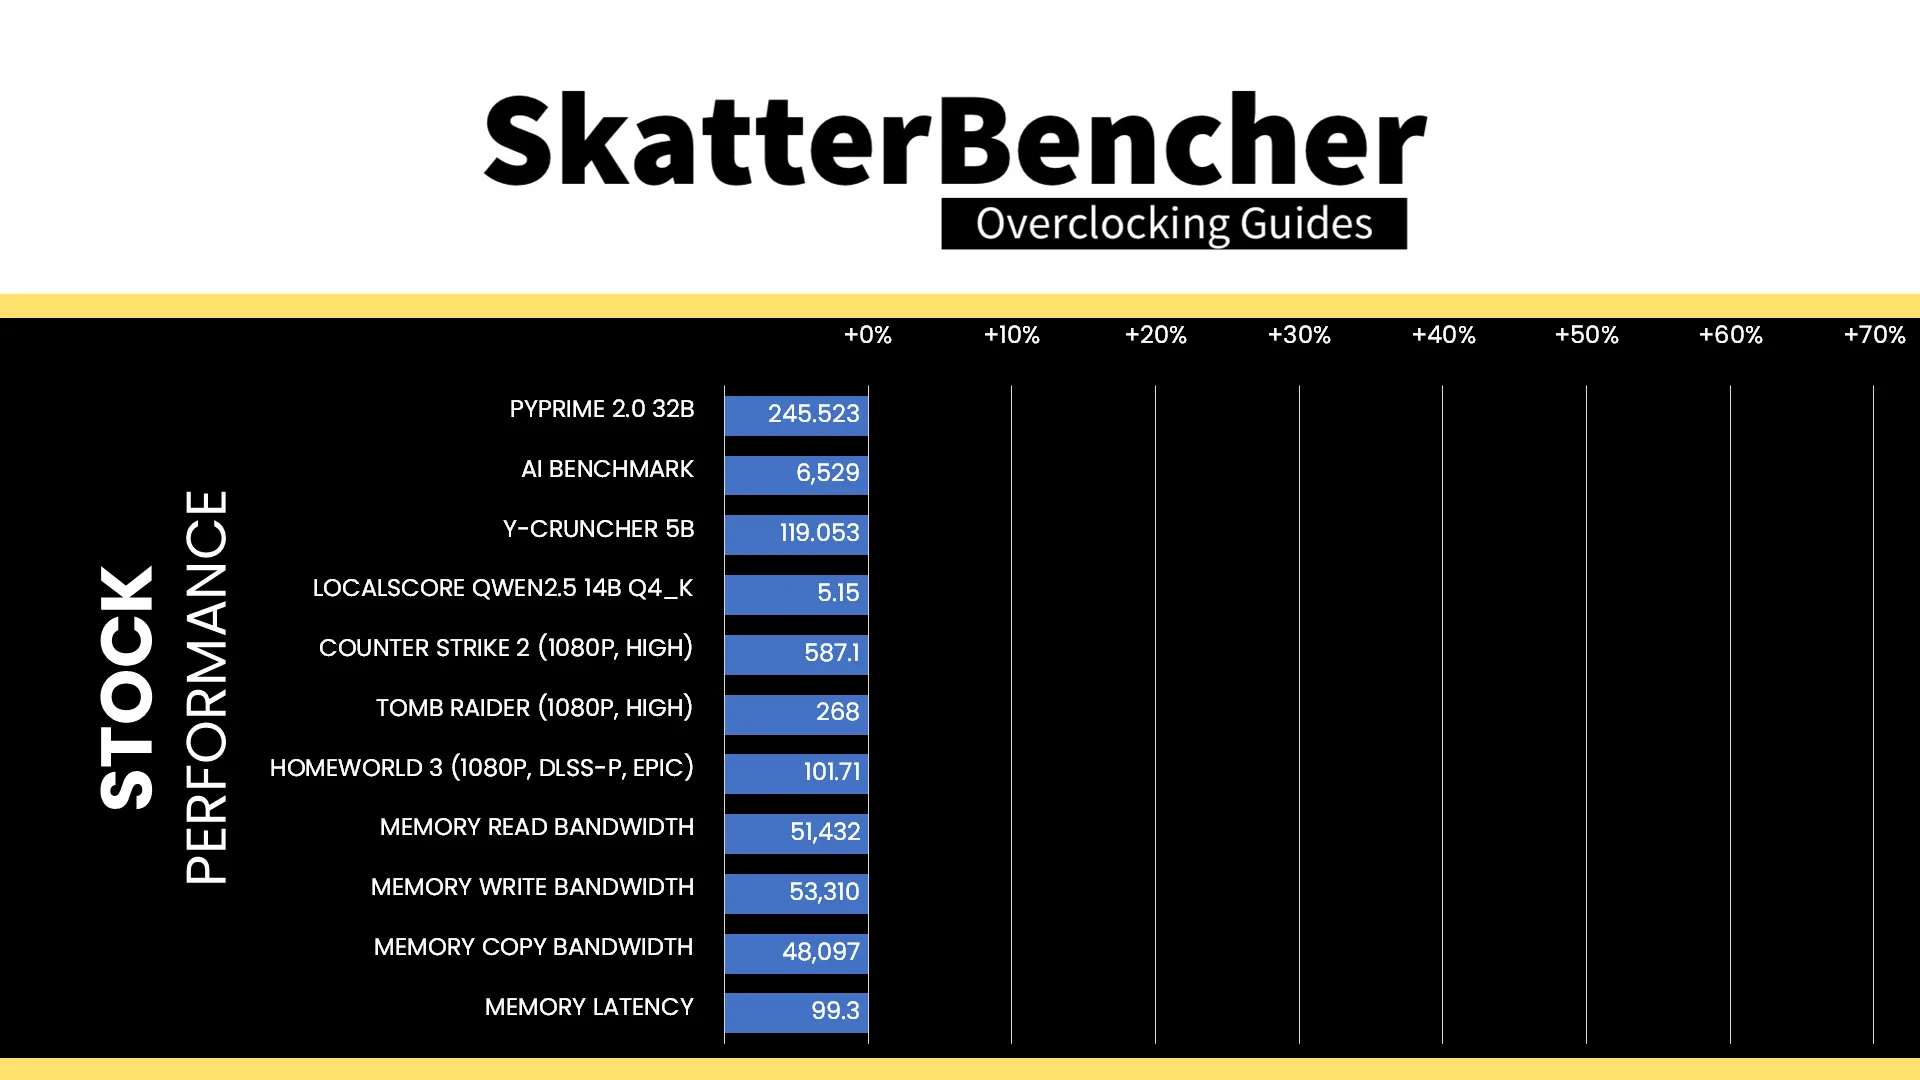
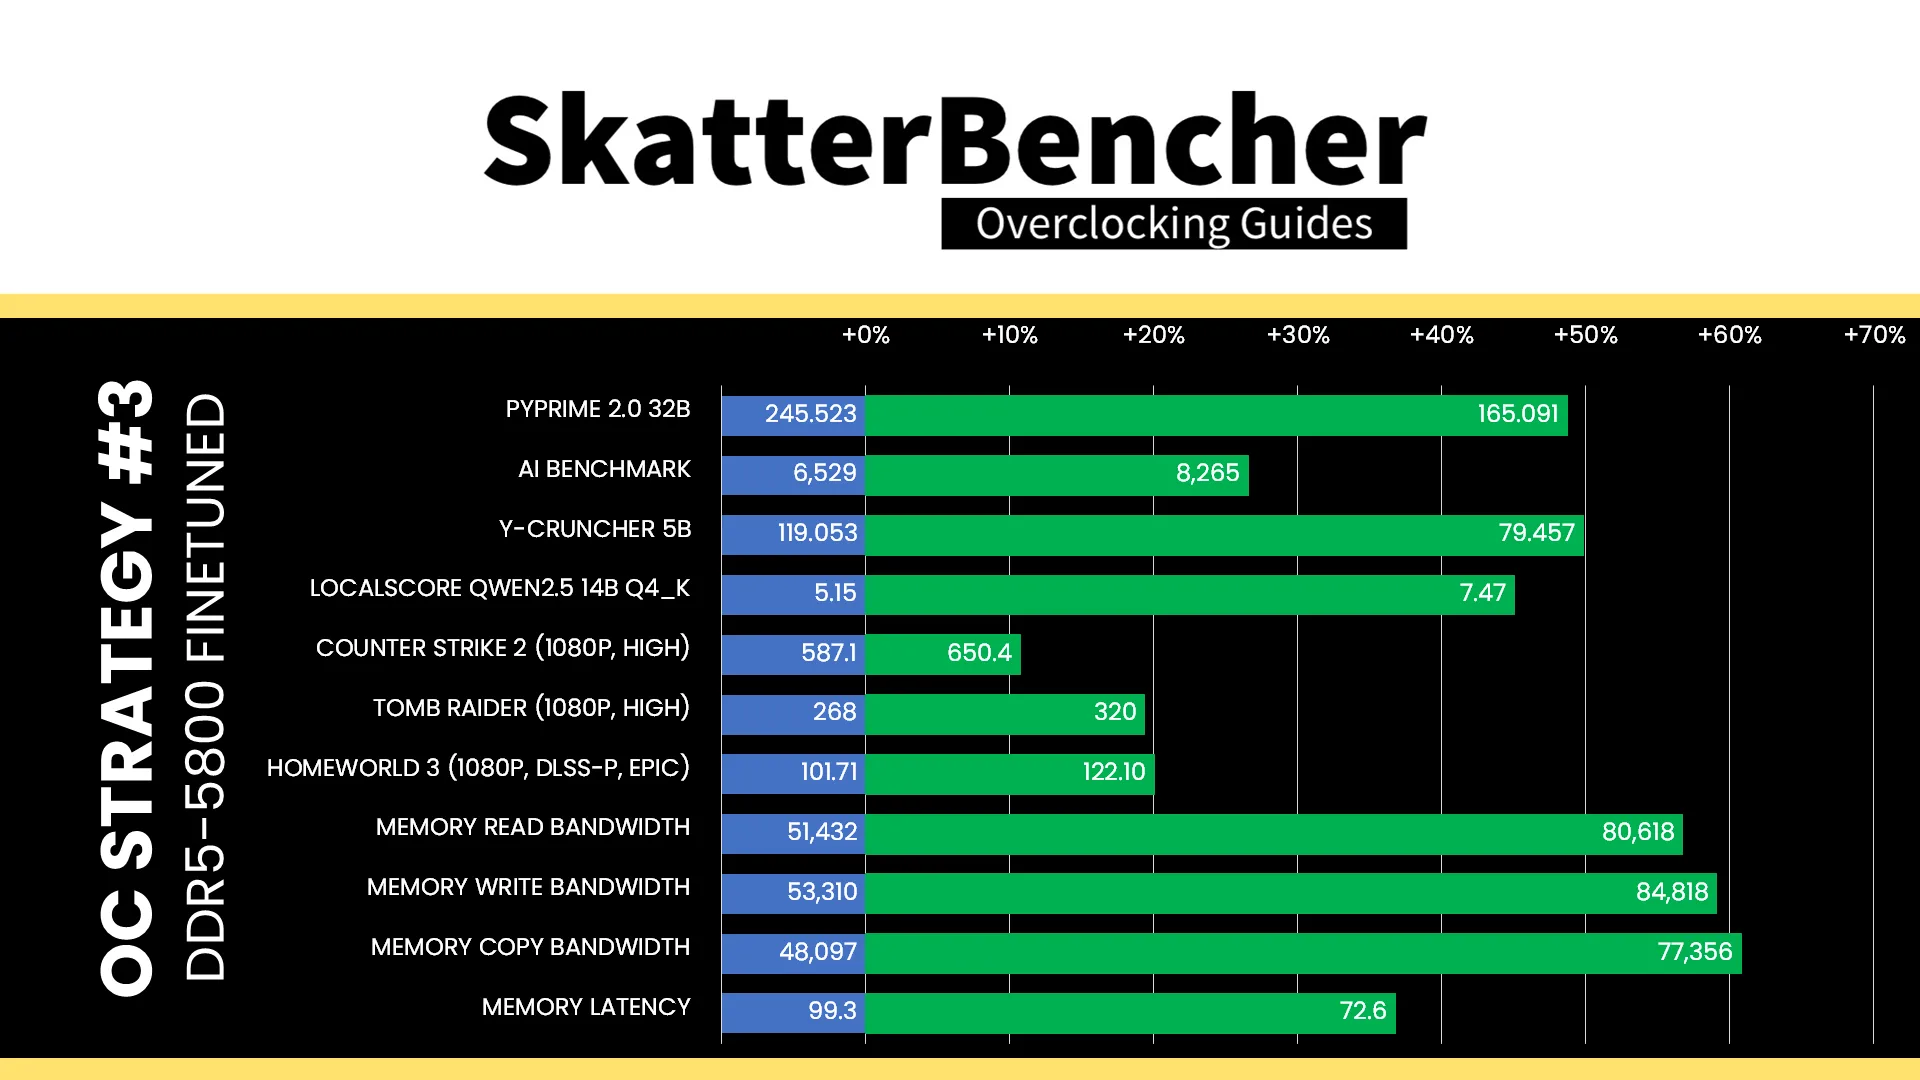
Here is the benchmark performance at stock:
- PyPrime 2.0 32B: 245.523 sec
- AI Benchmark: 6,529 points
- Y-Cruncher 5B: 119.053 sec
- LocalScore Medium 14B: 5.15 tokens/sec
- Counter Strike 2 (1080P, High): 587.1 fps
- Tomb Raider (1080P, High): 268 fps
- Homeworld 3 (1080P, DLSS P, Epic): 101.71 fps
- Memory Read Bandwidth: 51,432 MB/s
- Memory Write Bandwidth: 53,310 MB/s
- Memory Copy Bandwidth: 48,097 MB/s
- Memory Latency: 99.3 ns
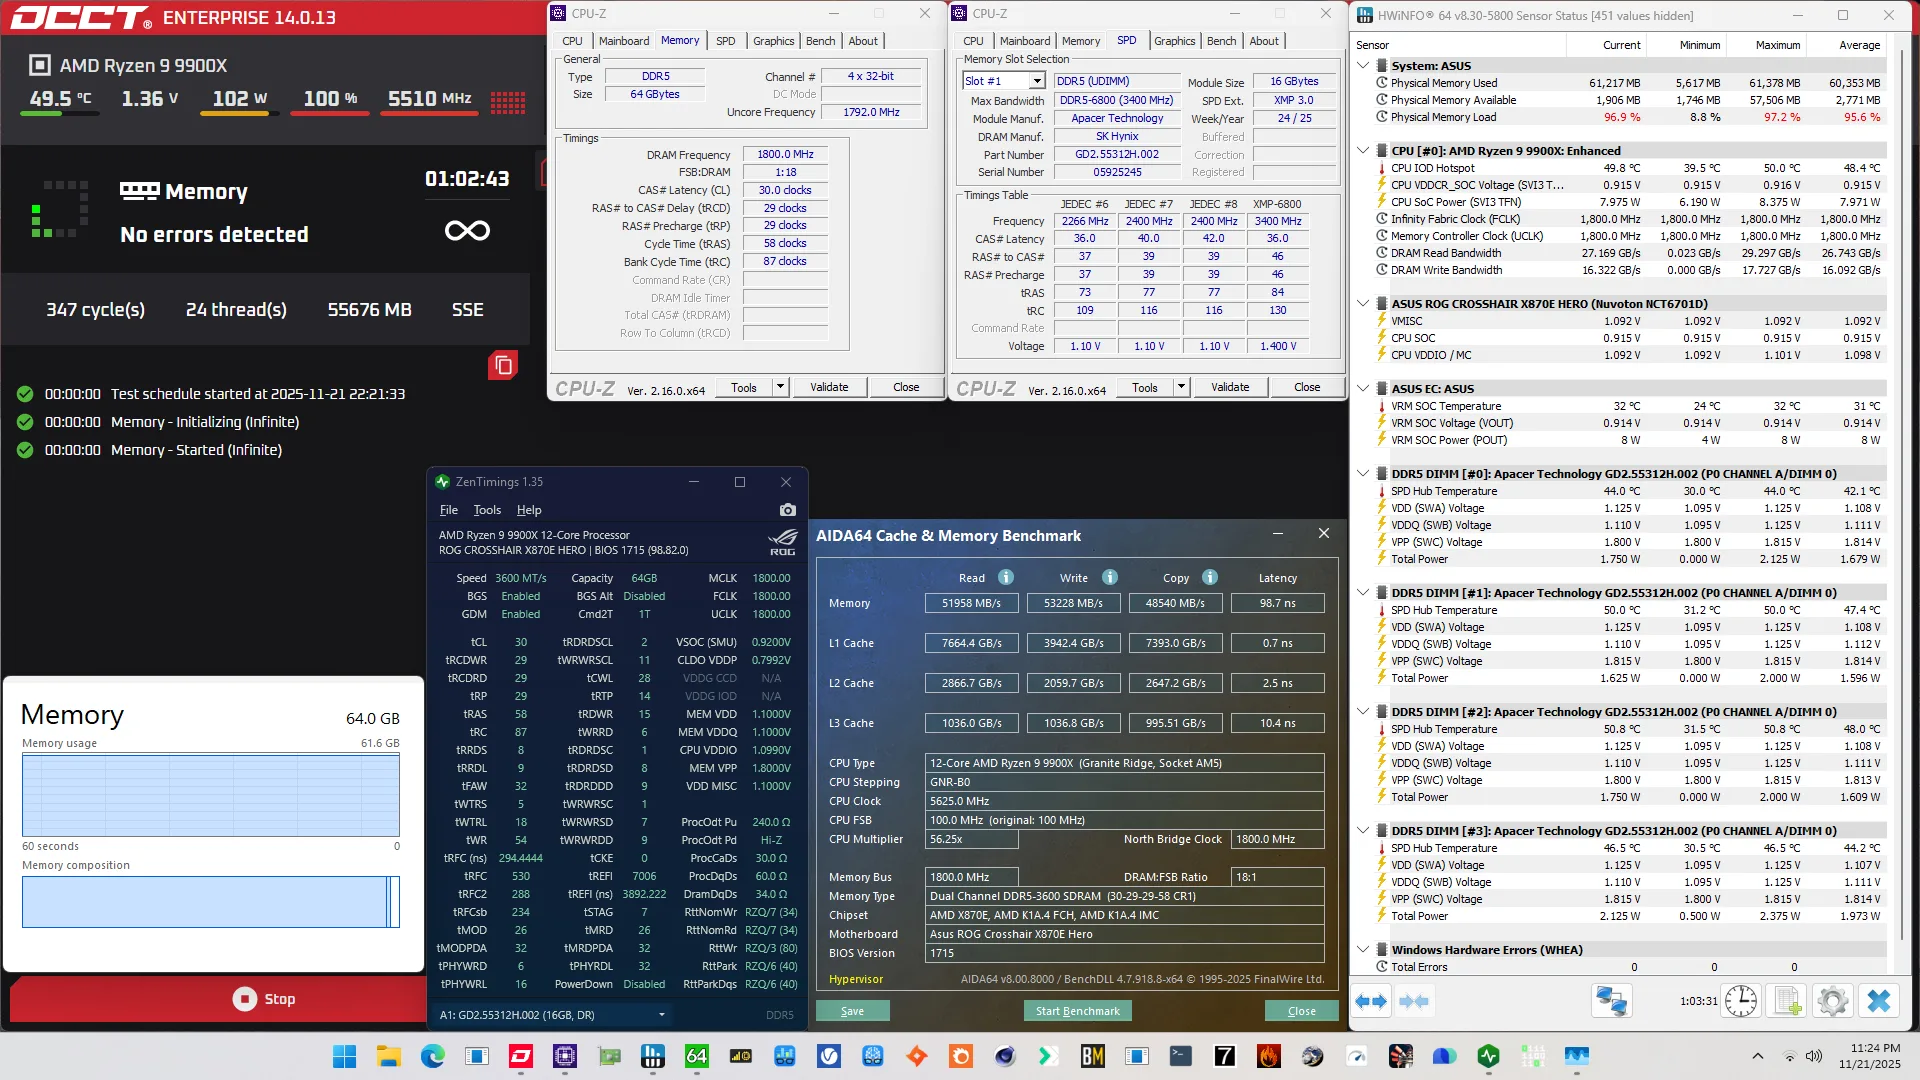
When running the OCCT Memory Stress Test , the average DIMM temperature ranges from 42.1 to 48.0 degrees Celsius. The average DIMM voltage is 1.108V and the total DIMM power consumption is 6.9 watts.
Of course, we can increase the memory subsystem performance by leveraging this kit’s XMP-6800 profile and that’s what we’ll do in our first overclocking strategy.
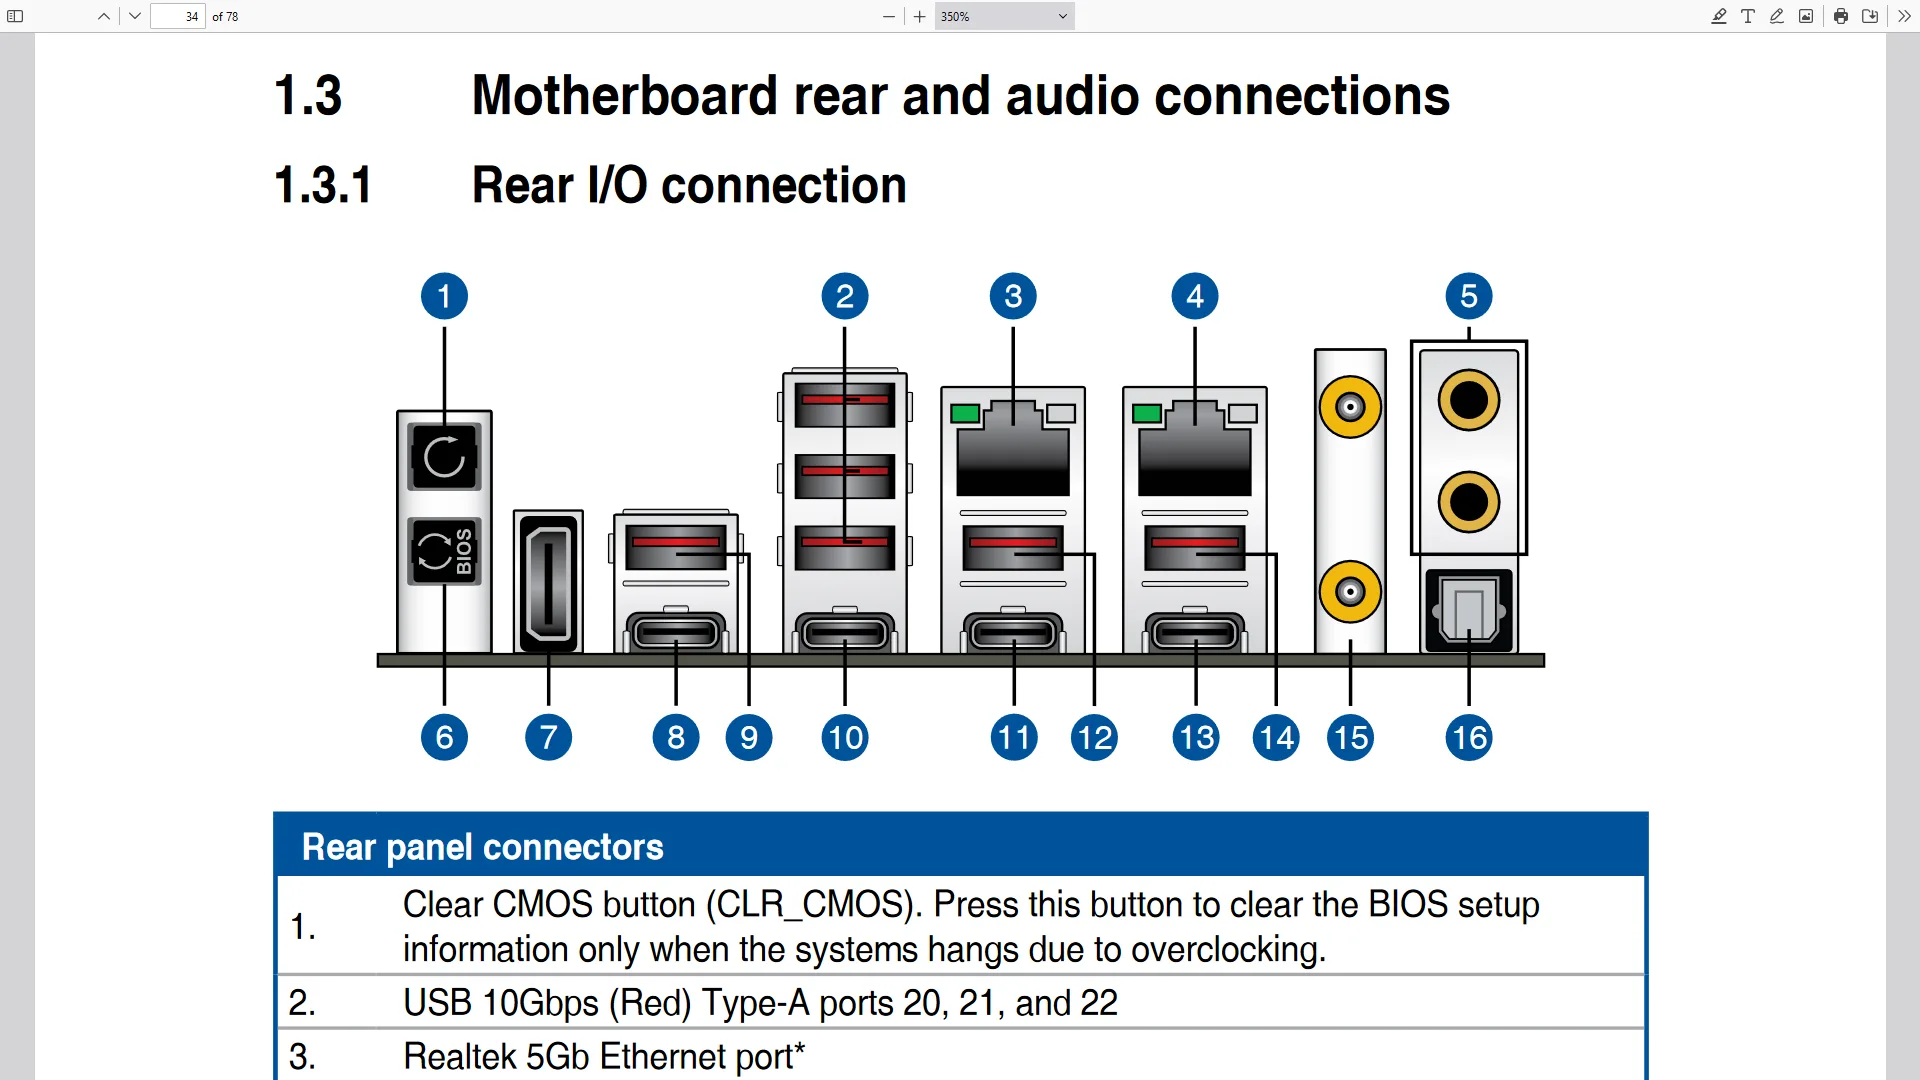
However, before we get going, make sure to locate the CMOS Clear button. Pressing the Clear CMOS button will reset all your BIOS settings to default, which is helpful if you want to start your BIOS configuration from scratch. The Clear CMOS button is located on the back I/O of the motherboard.
OC Strategy #1: DOCP II
In our first overclocking strategy, we simply take advantage of enabling ASUS DOCP II to leverage this kit’s XMP-6800 profile.
ASUS DOCP – Direct OverClock Profile
ASUS Direct OverClock Profile is an ASUS technology that aims to replicate the AMD EXPO and Intel XMP technologies. It’s extremely useful in case the memory kit doesn’t have an EXPO or XMP compatible profile because you can still load the settings and apply them with a single setting in the BIOS. It’s also useful in situations like we have right now: you have an AMD Ryzen system but a kit with an Intel XMP profile.
Technologies like XMP allow memory vendors such as Apacer to program higher performance settings onto the memory sticks. If the motherboard supports XMP, you can enable higher performance with a single BIOS setting. So, it saves you from manually typing the settings.
Note that we have three DOCP options: DOCP I, DOCP II, and DOCP Tweaked. Only DOCP II loads the memory profile as programmed onto the SPD whereas DOCP I and DOCP Tweaked relies on motherboard auto-rules to improve compatibility and/or performance.

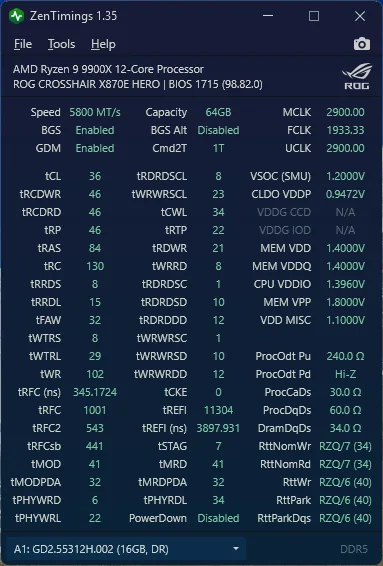
For this overclocking strategy, we’re simply loading DOCP II and stick to the memory profile as much as we can. Unfortunately, this was not stable out of the box. In fact, we had to lower the memory frequency to DDR5-5800 to pass our stability stress tests!
We find that pretty much everything of the memory configuration has changed compared to our stock configuration.
BIOS Settings & Benchmark Results
Upon entering the BIOS
- Go to the Extreme Tweaker menu
- Set Ai Overclock Tuner to DOCP II
- Set Memory Frequency to DDR5-5800
- Enter the Precision Boost Overdrive submenu
- Set Precision Boost Overdrive to enabled
Then save and exit the BIOS.
We re-ran the benchmarks and checked the performance increase compared to the default operation.
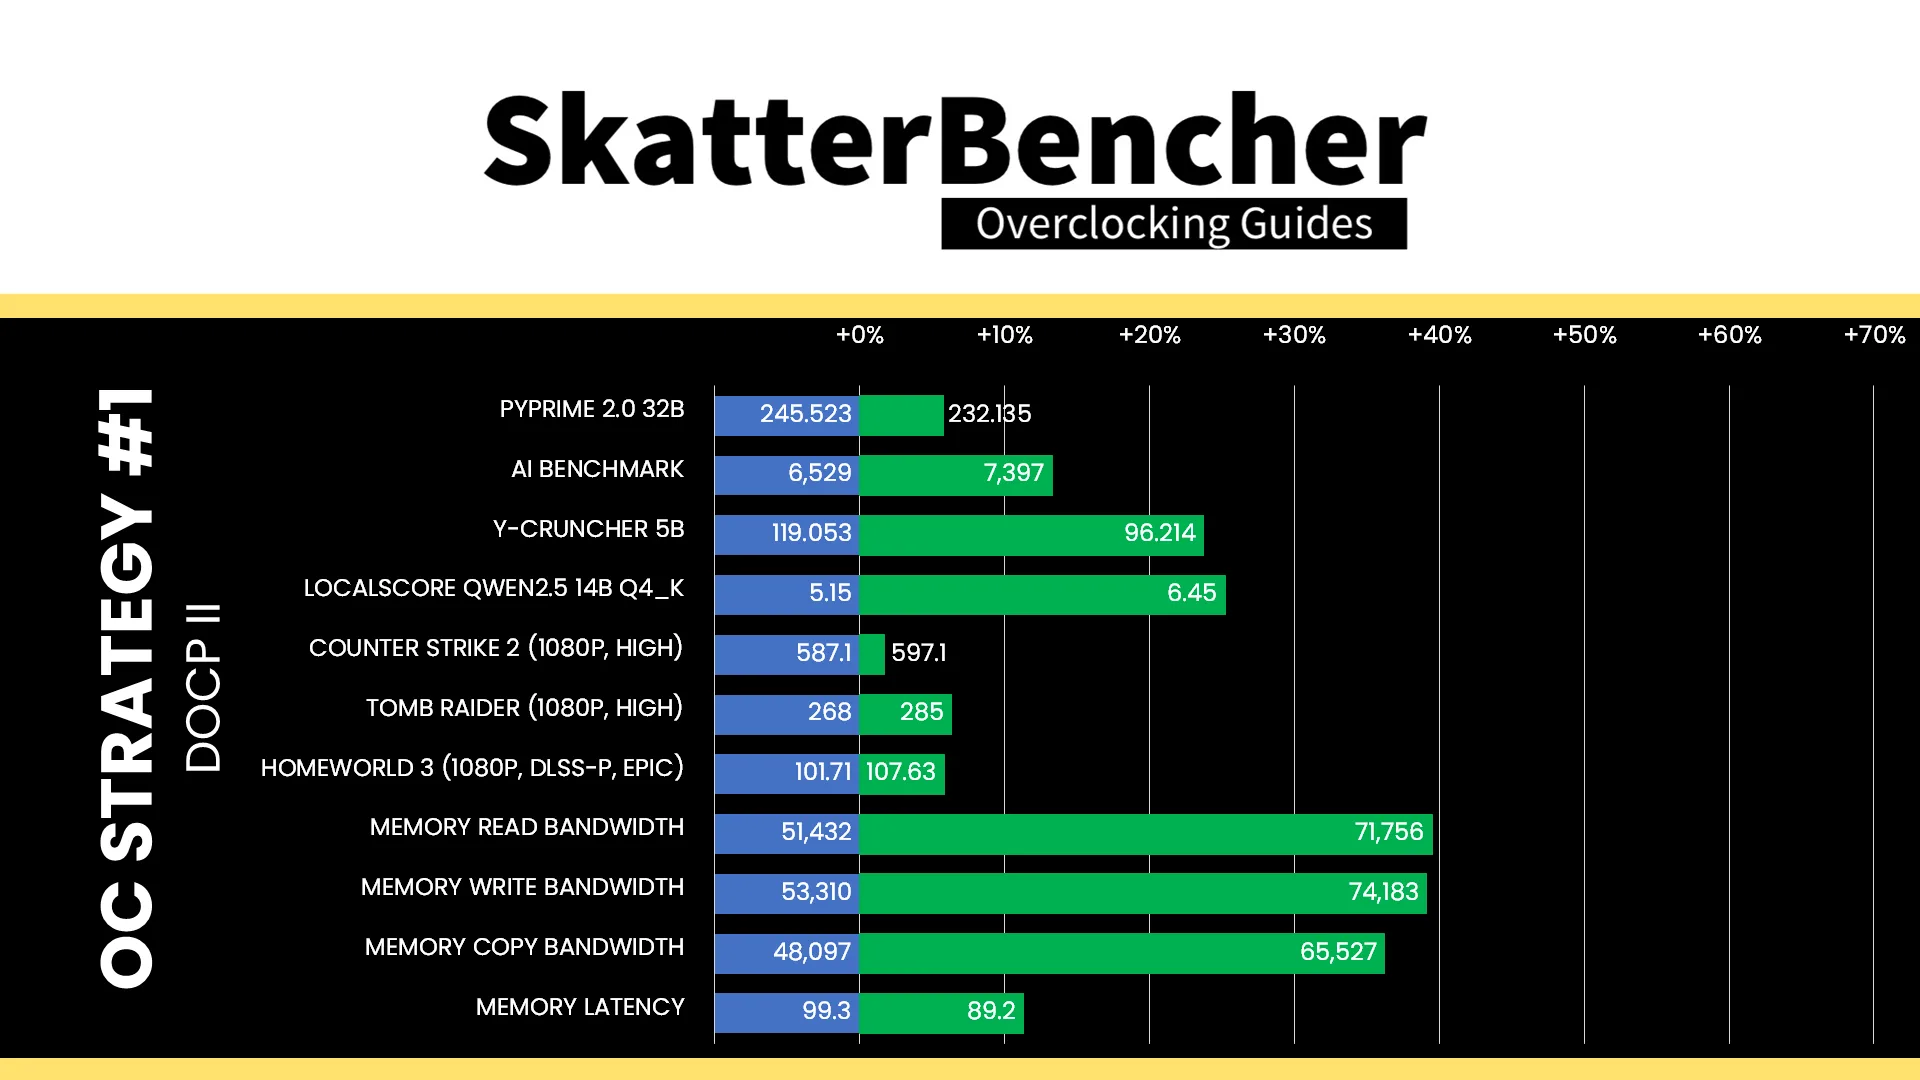
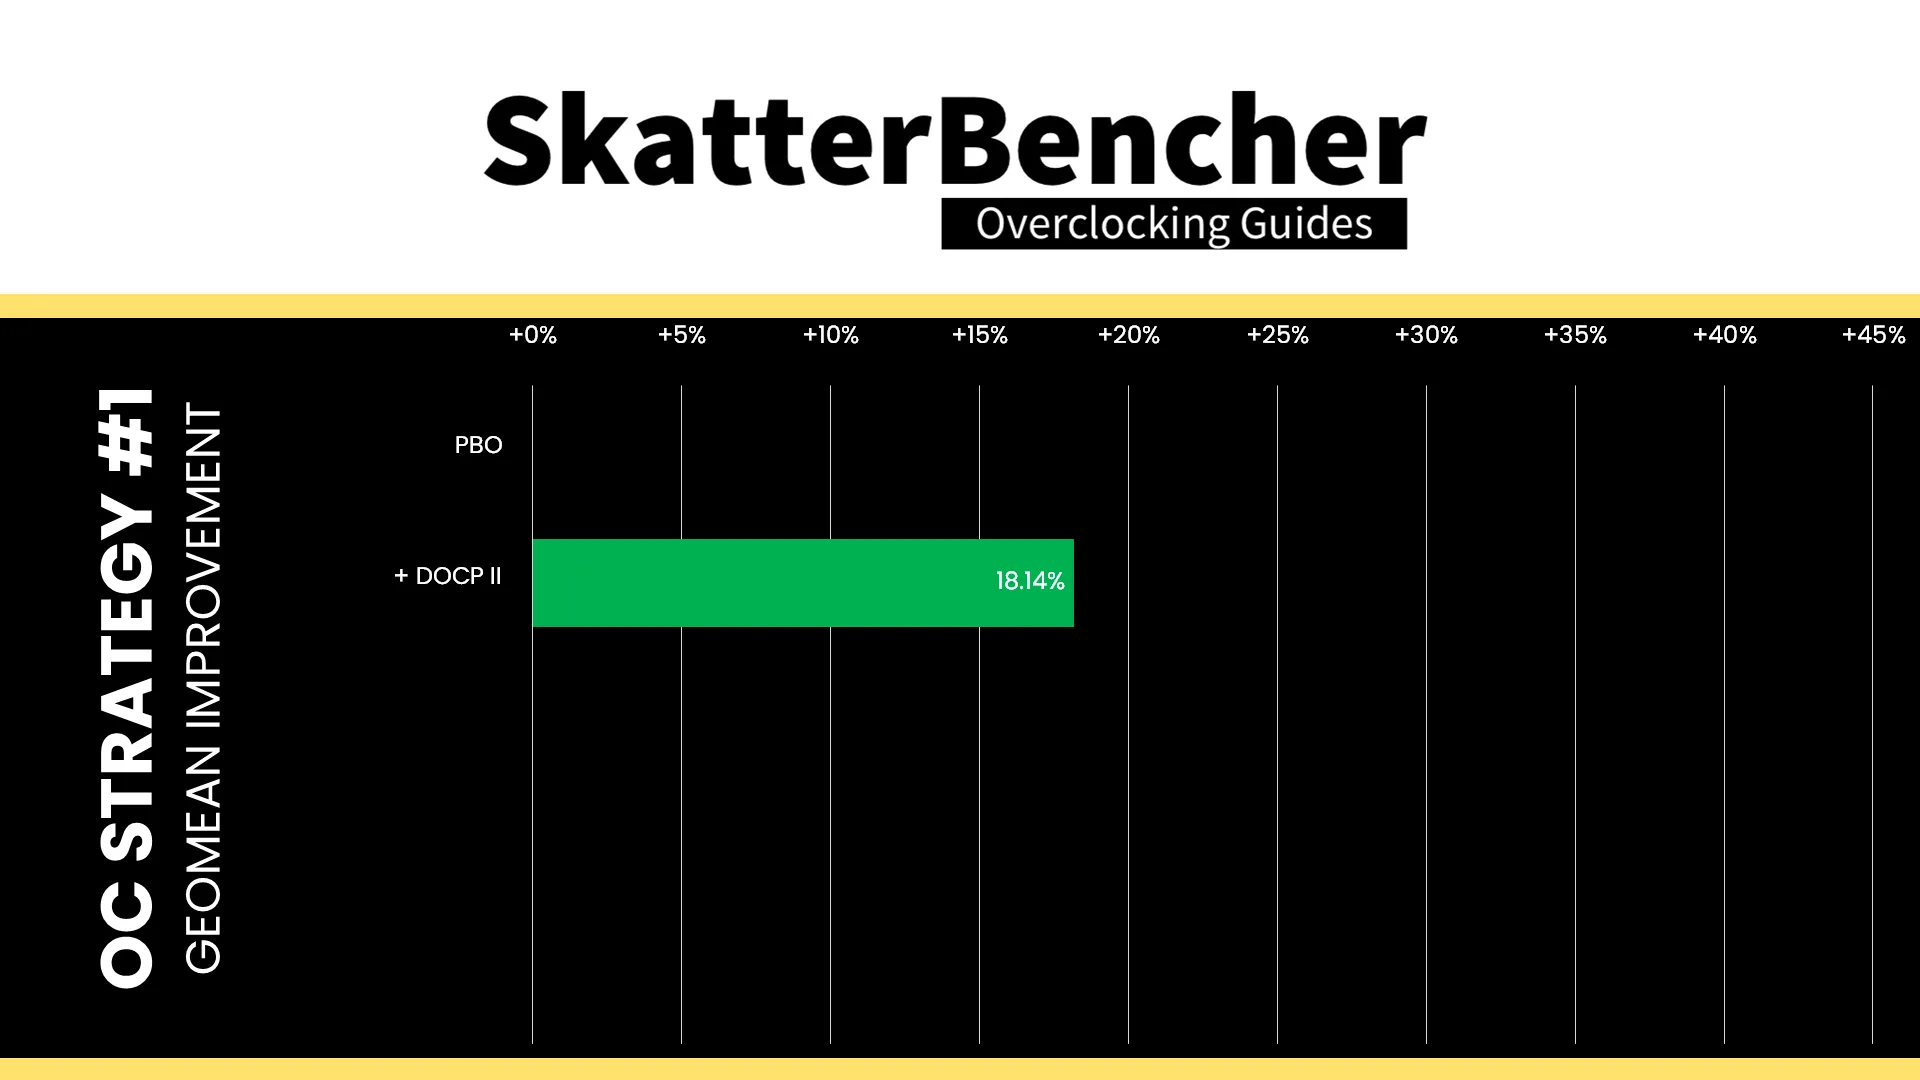
Despite not being able to run at the XMP-rated DDR5-6800, we’re still running much faster than at stock. So, we expect the performance to improve significantly. And that’s exactly what we see across our benchmark suite. Generally, synthetic benchmarks benefit more but we also see a decent uplift in compute, however gaming workloads not so much. The Geomean performance speedup is +18.14%, and we get a maximum benchmark improvement of +25.24% in LocalScore.
When running the OCCT Memory Stress Test , the average DIMM temperature ranges from 50.8 to 61.2 degrees Celsius. The average DIMM voltage is 1.407V and the total DIMM power consumption is 12.5 watts.

OC Strategy #2: DOCP Tweaked
In the second overclocking strategy, we start tuning the memory with the ASUS Ai Overclock Tuner options.
DOCP II vs DOCP Tweaked
In theory, we can choose between two options: DOCP I and DOCP Tweaked. They function similarly in the sense that they partially load the memory profile and then let motherboard auto-rules finetune other parameters to improve compatibility or performance.
In SkatterBencher #95 we found slight differences between DOCP I and DOCP Tweaked, but for our 4-DIMM configuration they apply the same adjustments.
- Increase the tRC timing from 130 to 140, which presumably helps with stability in certain scenarios.
- Decrease tWR (Write Recovery) from 102 to 90, which shortens the wait time for issuing a row precharge command following a write activity.
- Decrease tRFC, tRFC2, and tRFCsb, which shortens the time memory cells are inaccessible after a forced refresh.

Since DOCP I and DOCP Tweaked give the same result, I opted to enable DOCP Tweaked because it sounds faster.
BIOS Settings & Benchmark Results
Upon entering the BIOS
- Go to the Extreme Tweaker menu
- Set Ai Overclock Tuner to DOCP Tweaked
- Set Memory Frequency to DDR5-5800
- Enter the Precision Boost Overdrive submenu
- Set Precision Boost Overdrive to enabled
Then save and exit the BIOS.
We re-ran the benchmarks and checked the performance increase compared to the default operation.
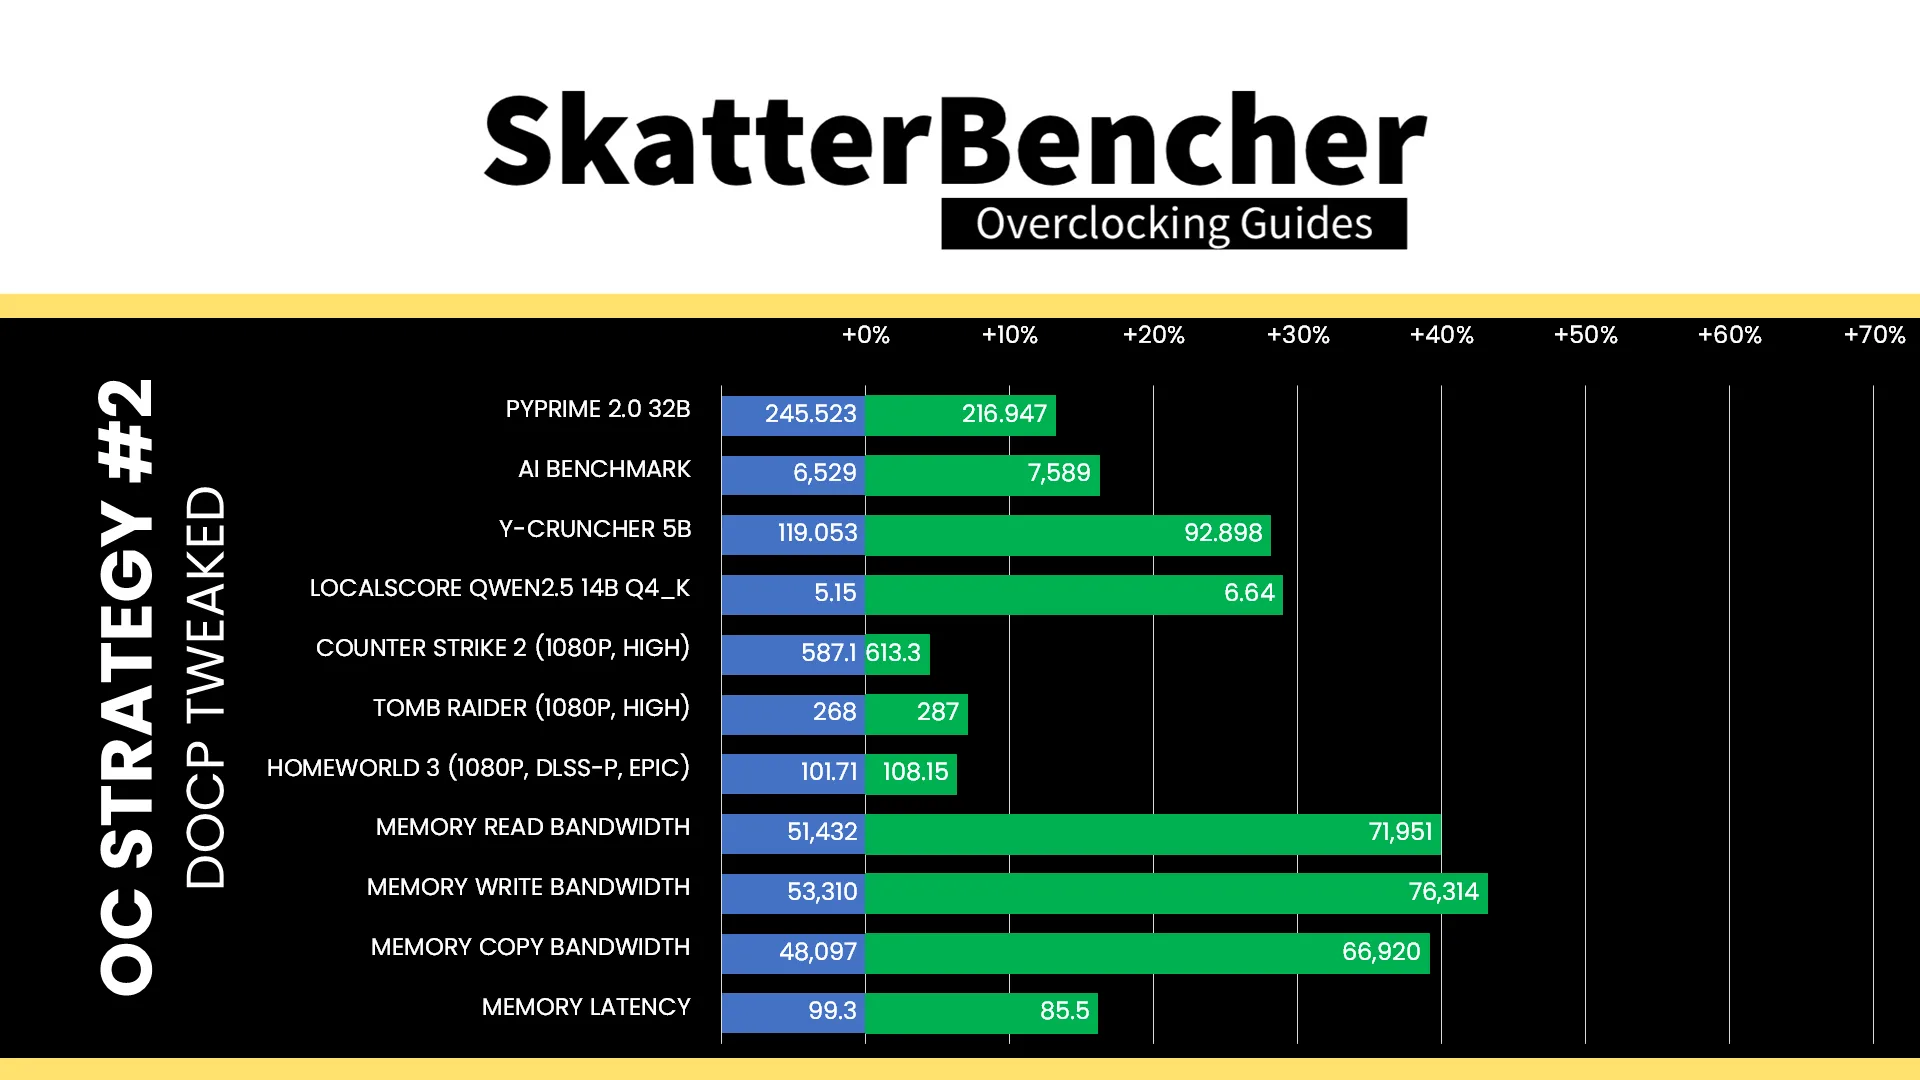
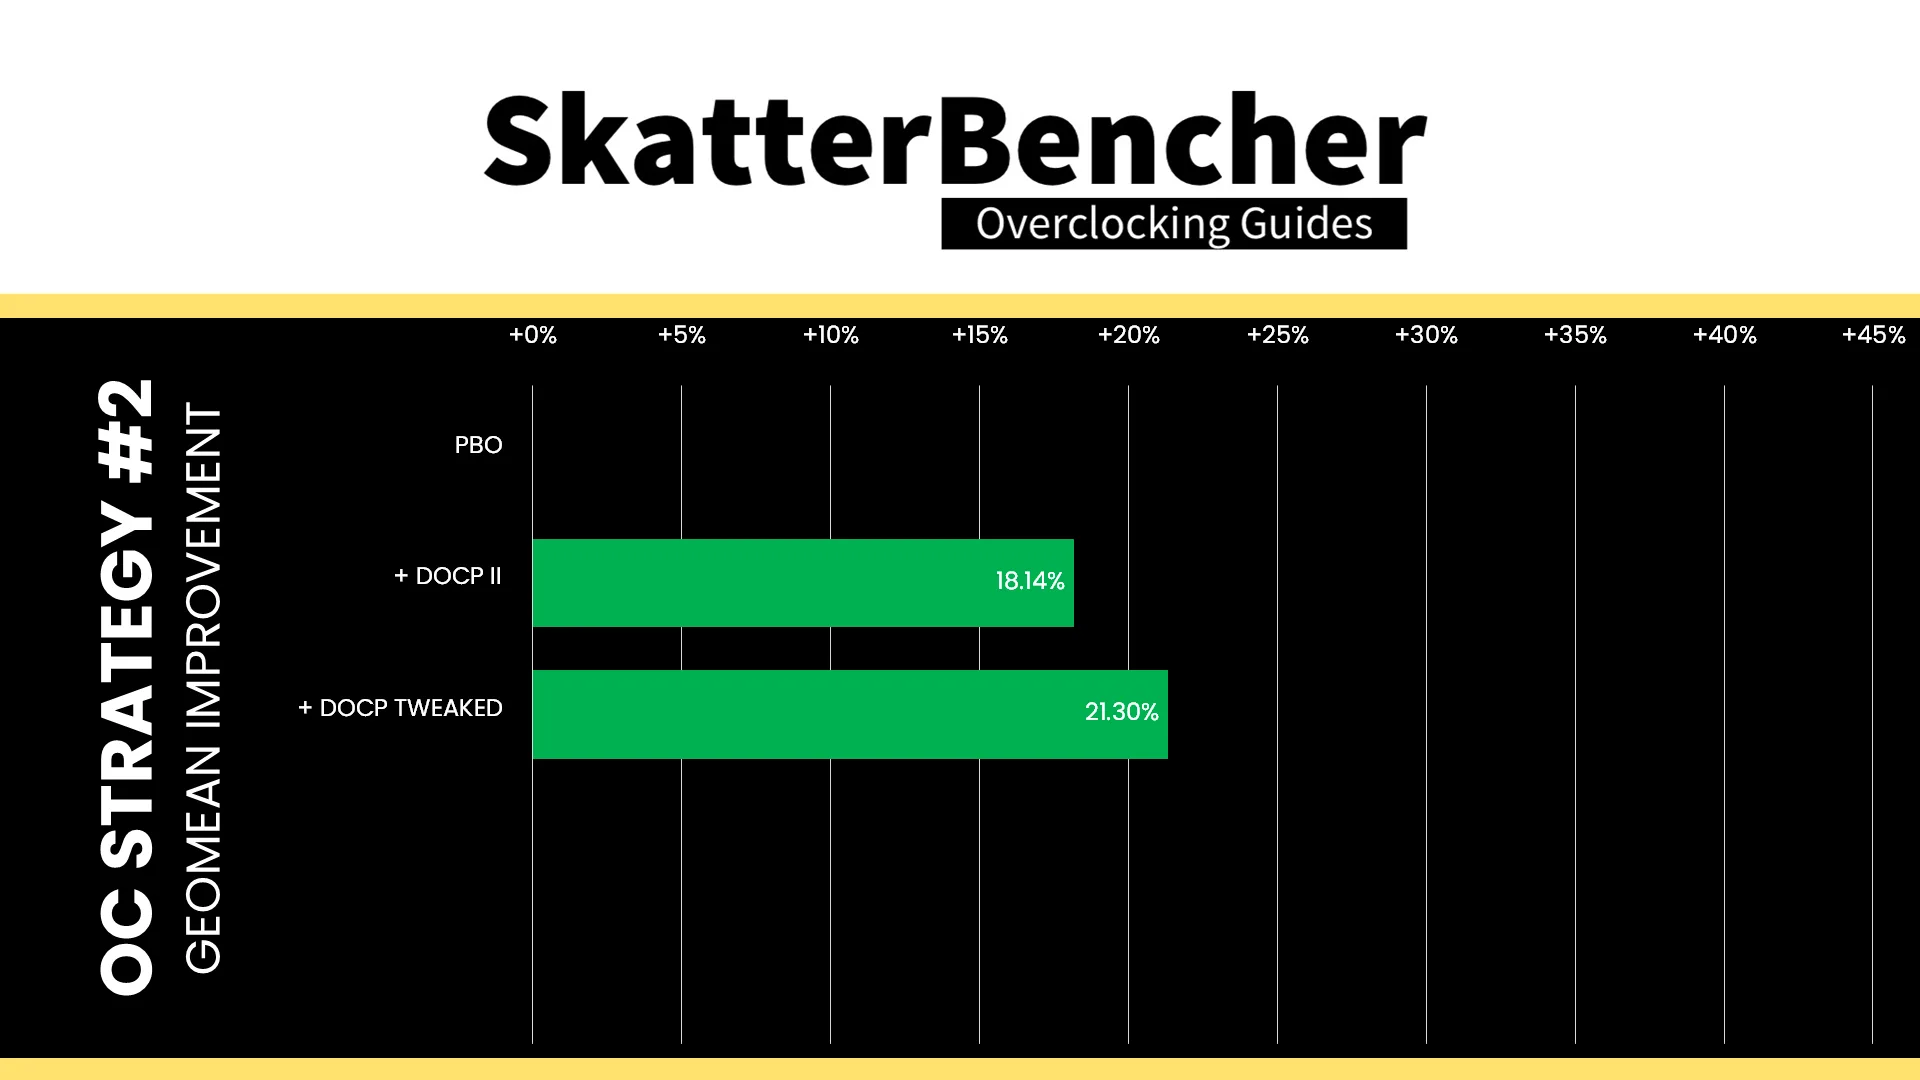
The motherboard auto-rules for DOCP I and DOCP Tweaked don’t make a big change to the memory timings, so we don’t expect a huge change in performance, though reducing waiting times to issue commands and access refreshed memory cells does help a bit. The Geomean performance speedup improves by another three percentage points, and we get a maximum benchmark improvement of +28.93% in LocalScore.
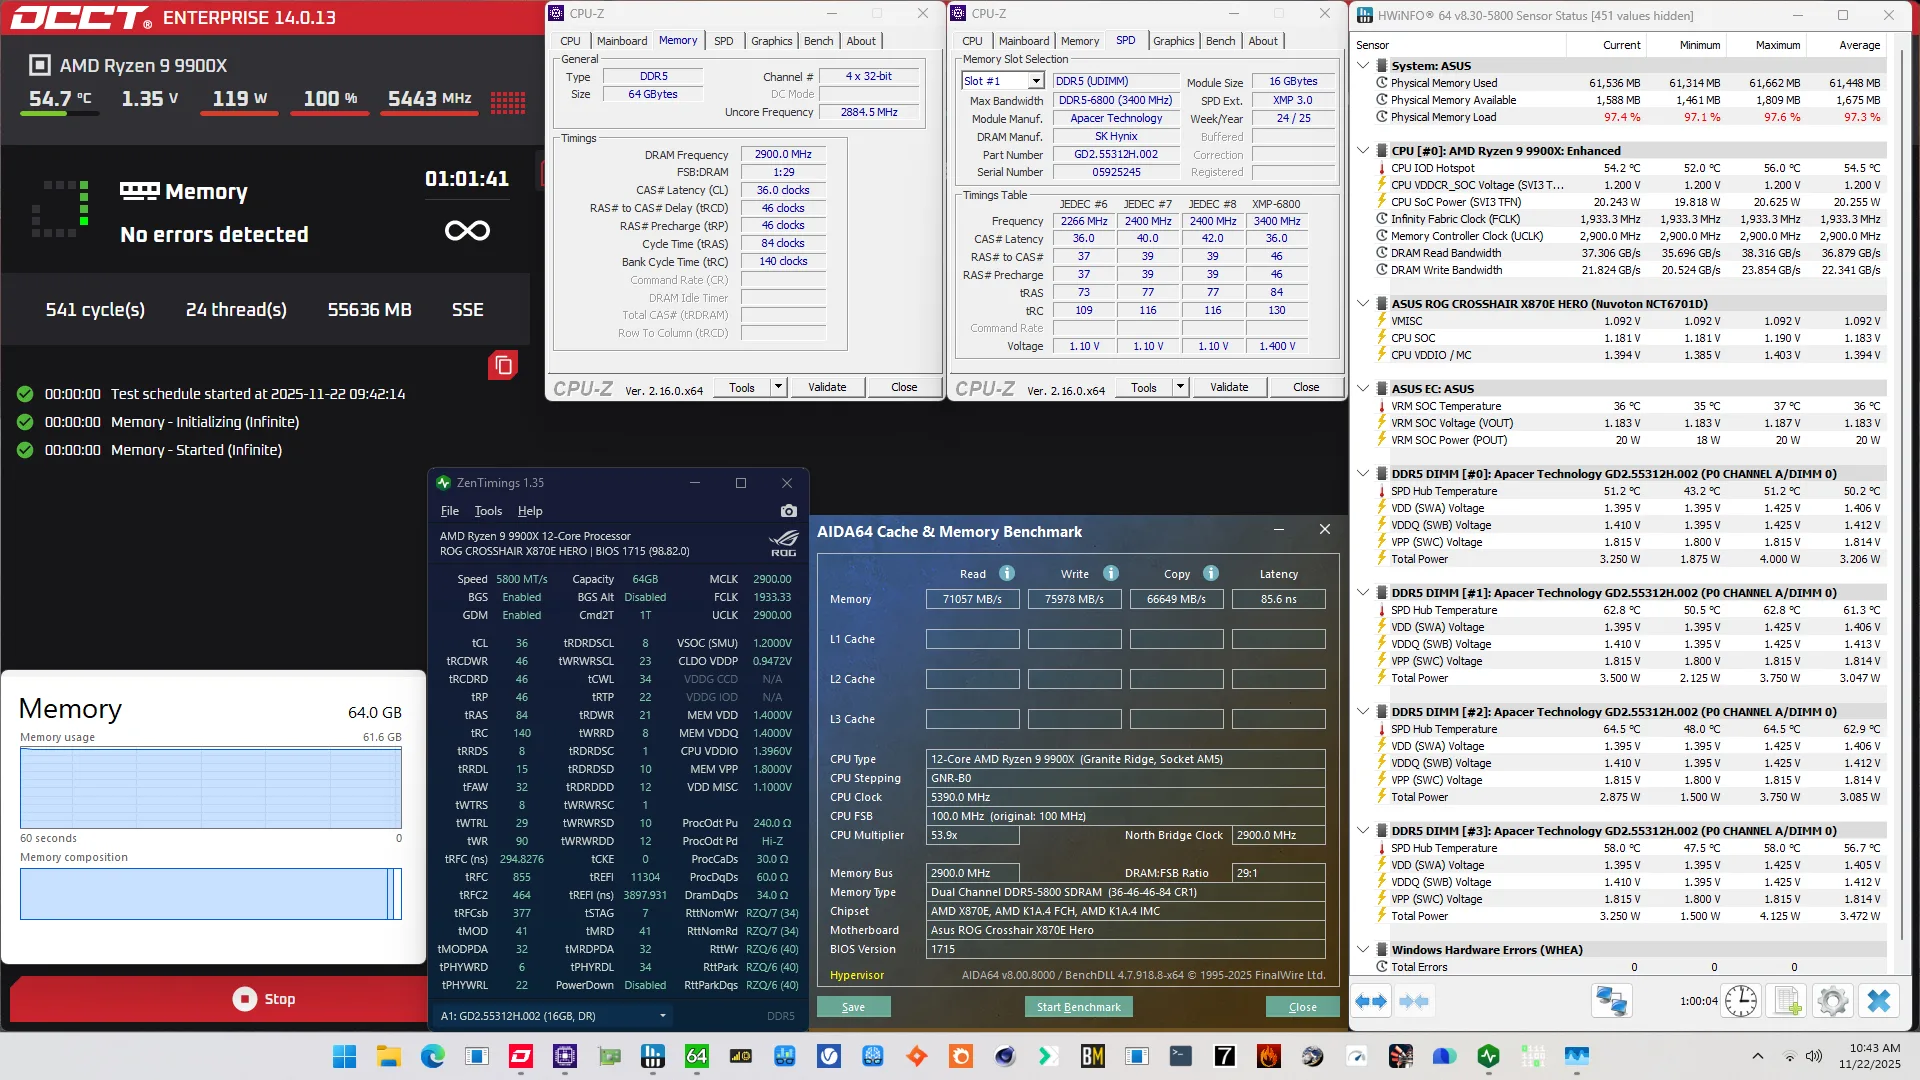
When running the OCCT Memory Stress Test , the average DIMM temperature ranges from 50.2 to 62.9 degrees Celsius. The average DIMM voltage is 1.406V and the total DIMM power consumption is 12.8 watts.
OC Strategy #3: DDR5-5800 Memory Tuned
In our third overclocking strategy, we leverage the ASUS Memory Presets to optimize the performance of our DDR5-5800 configuration.
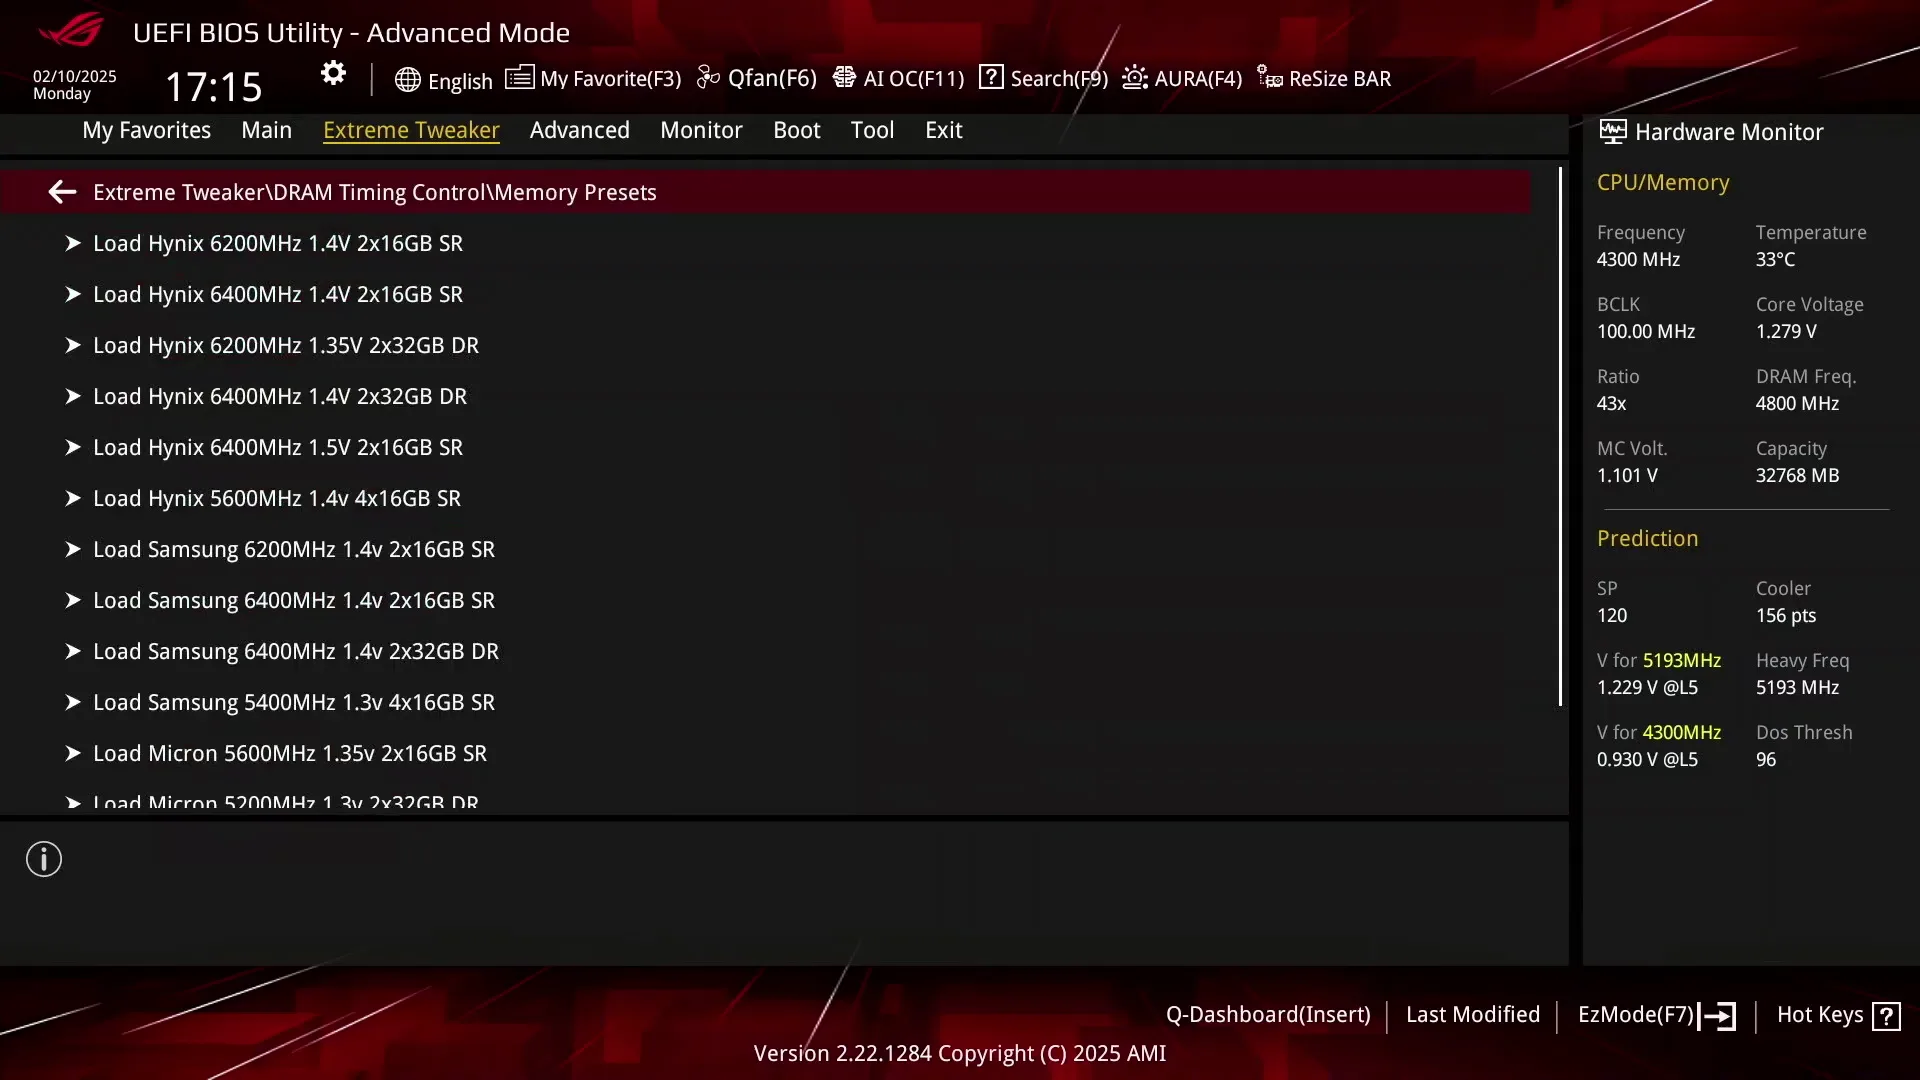
ASUS Memory Preset: Hynix 5600MHz 1.4V 4x16GB SR
ASUS Memory Presets is an ASUS overclocking technology that provides a selection of memory-tuning presets for specific memory ICs. The presets will adjust the memory timings and voltages.
The ROG Crosshair X870E Hero motherboard sports fourteen memory profiles for a variety of memory ICs and configurations. Unfortunately, there’s only 1 preset available for Hynix 4x16GB configuration so that’s what we’ll have to go with.
Compared to the DOCP Tweaked configuration, we find that many parameters have changed, especially the secondary memory timings. However, people who watched my previous memory overclocking video will notice that the sub-timings are not as tight as when we used only two sticks of memory. That’s a side-effect of running multiple DIMMs per channel.


BIOS Settings & Benchmark Results
Upon entering the BIOS
- Go to the Extreme Tweaker menu
- Set Ai Overclock Tuner to DOCP Tweaked
- Set Memory Frequency to DDR5-5800
- Enter the DRAM Timing Control submenu
- Enter the Memory Presets submenu
- Select Load Hynix 5600MHz 1.4V 4x16GB SR and click OK
- Leave the Memory Presets submenu
- Enter the Memory Presets submenu
- Leave the DRAM Timing Control submenu
- Enter the Precision Boost Overdrive submenu
- Set Precision Boost Overdrive to enabled
Then save and exit the BIOS.
We re-ran the benchmarks and checked the performance increase compared to the default operation.
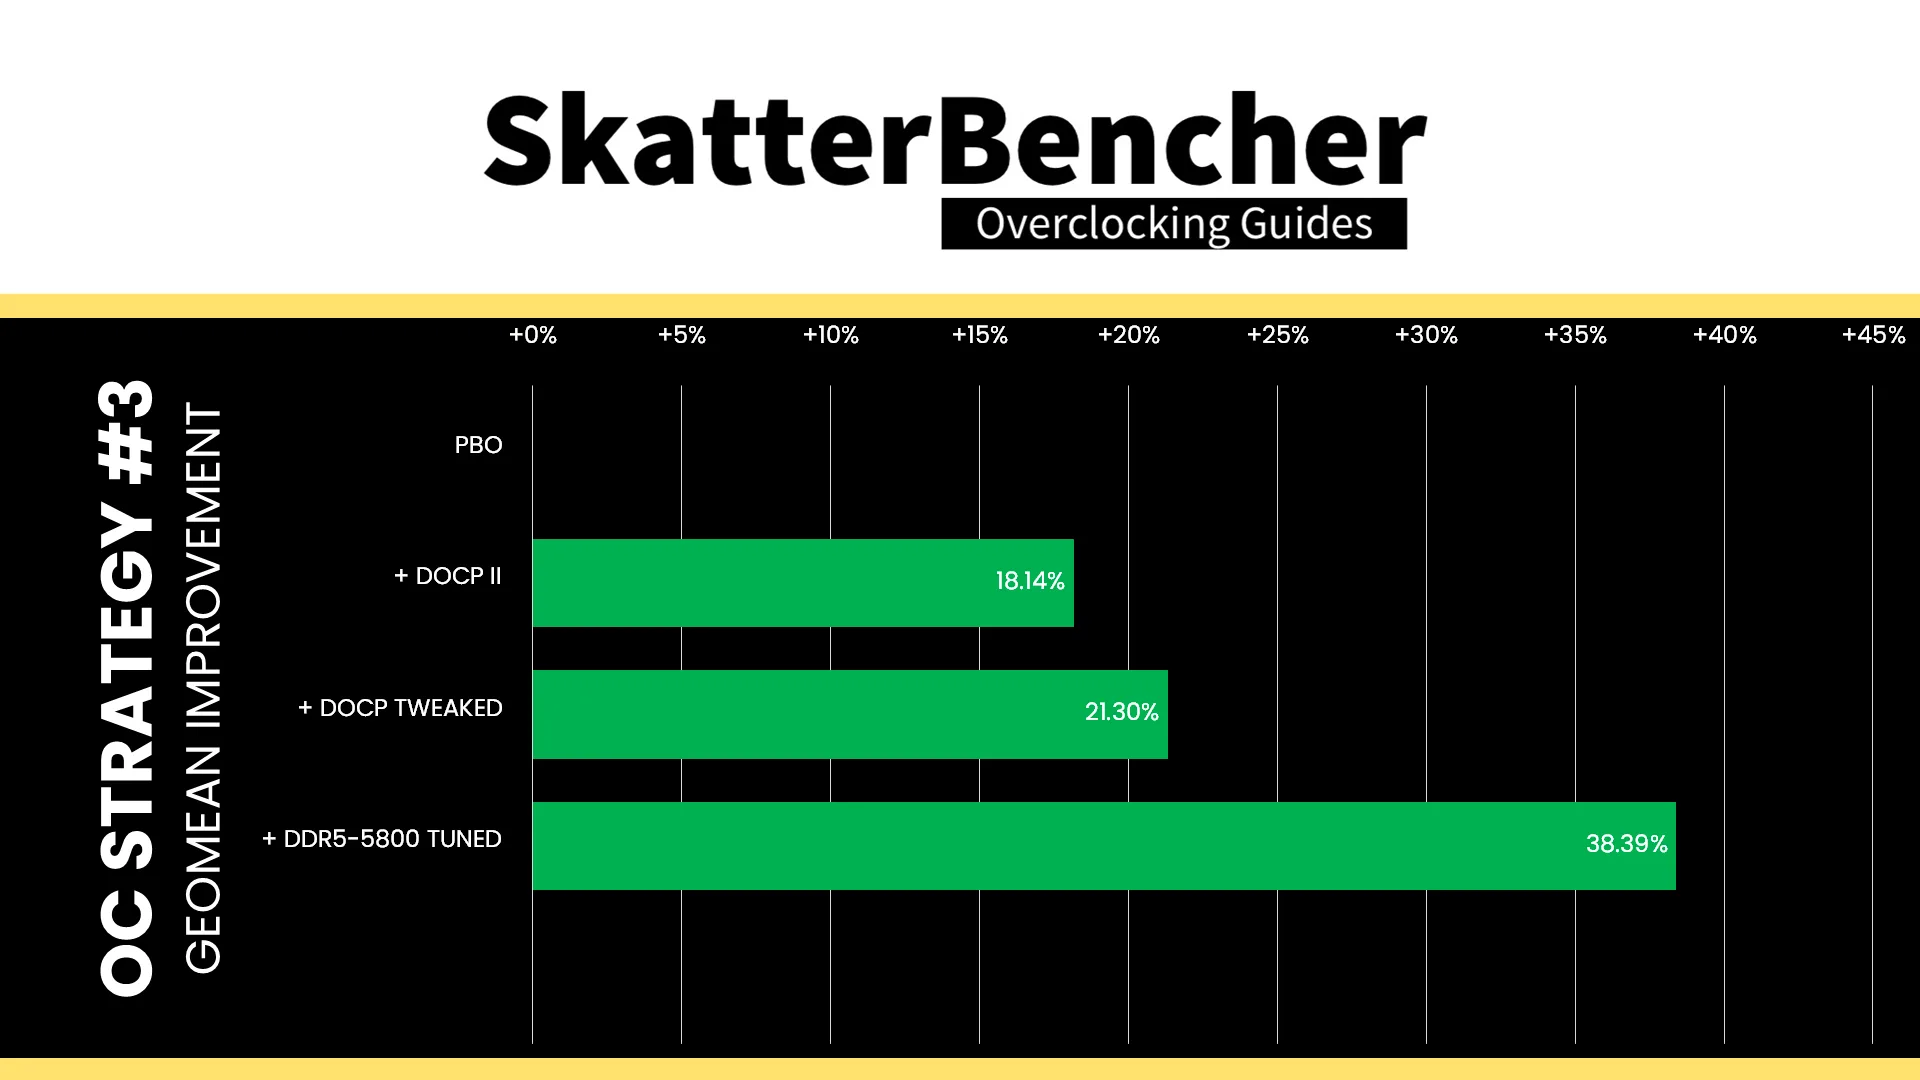
Tuning the memory timings might not seem like a big change in our overall system configuration, but it can have a big impact on performance as we’ve seen in previous SkatterBencher guides. The Geomean performance speedup improves an incredible seventeen percentage points, and we get a maximum benchmark improvement of +49.83% in Y-Cruncher.
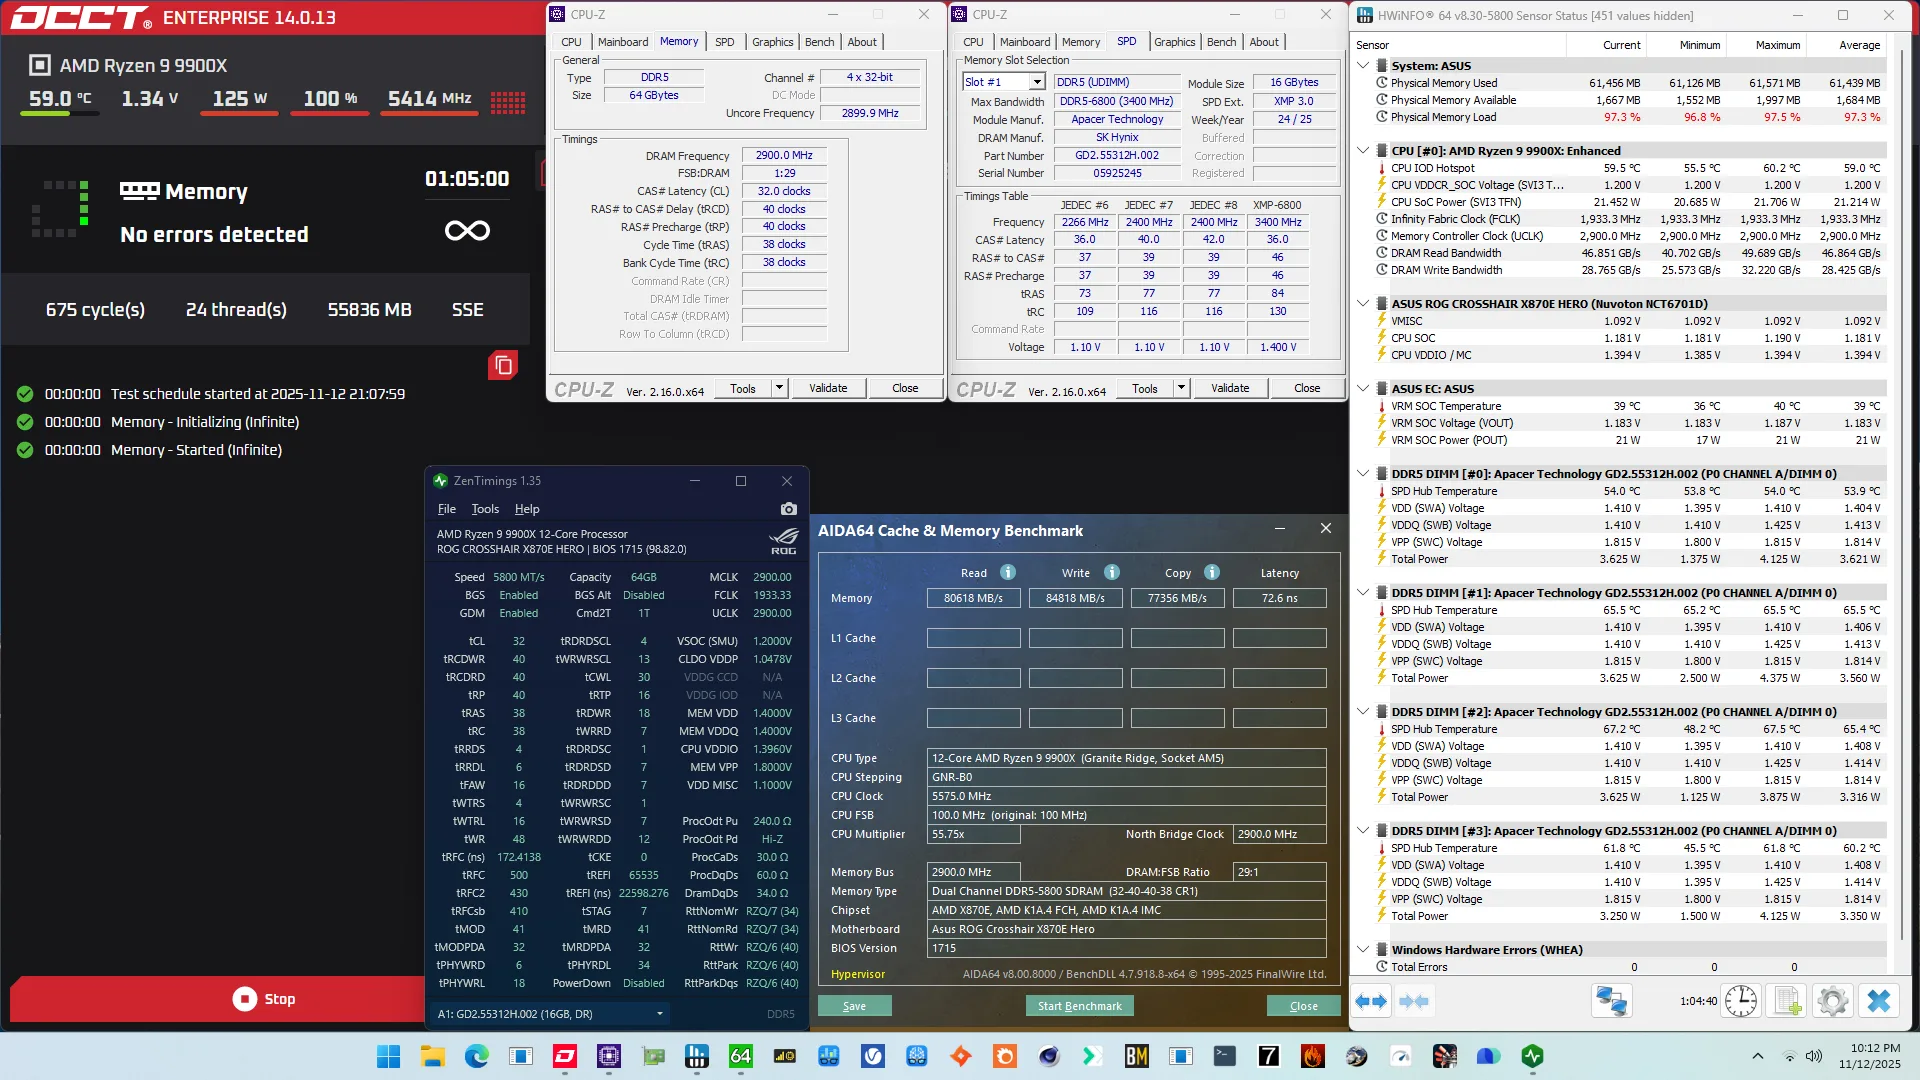
When running the OCCT Memory Stress Test , the average DIMM temperature ranges from 53.9 to 65.5 degrees Celsius. The average DIMM voltage is 1.407V and the total DIMM power consumption is 13.8 watts.
OC Strategy #4: DDR5-6000 Manual Tuning
My original plan for the final overclocking strategy was to run the memory controller at half the frequency of the memory, and push the memory frequency up as high as possible. But that turned out to be very challenging, so instead I focused on manually optimizing the memory timings.
High-Speed 4-DIMM Challenges
With 2-DIMM Ryzen configurations, it’s standard practice to chase high-speed memory by simply running the memory controller at half the memory frequency using an option called UCLK Div1 Mode. That’s what I demonstrated in SkatterBencher #95 and what you’ll find me do in many other Ryzen SkatterBencher guides.
However, things are not as simple with 4-DIMM configurations. And that was already clear from OC Strategy #1 as we had to run the memory well below its XMP-rated DDR5-6800 speed despite the memory controller already running half the speed of the memory.
Truth be told, I spent a lot of time trying to figure out how to run DDR5-7000 and above with 4 DIMMs. At some point, I could boot at that speed but only with maxed out memory timings available. And even then it crashes out after a couple of seconds. Tightening the timings by even 10% would result in an unstable system.
At some point I did manage to get MemTest86 to run for over 1 hour without errors but that was a fluke.

Based on my extremely limited experience tuning memory subsystems, the issue seems to lie with the command/address bus. Perhaps not physically (as in the memory traces) but on the memory controller side. Disabling bank swap mode made things a little more stable but it would’ve been nice to have a BIOS option to change the command rate and see if that would help.
Either way, the long story short is that high-speed memory isn’t an option for our system and so we have to focus on performance around DDR5-6000. So, I set out to do exactly that: performance and stability at DDR5-6000.
System Memory Timings Tuning
Manually tuning memory timings is a matter of trial and error – at least, it is for me. So, while we could go in depth and talk about each timing, the truth is that I just tried lowering them one by one.
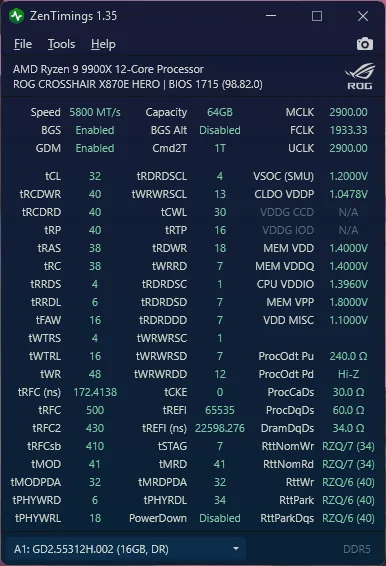
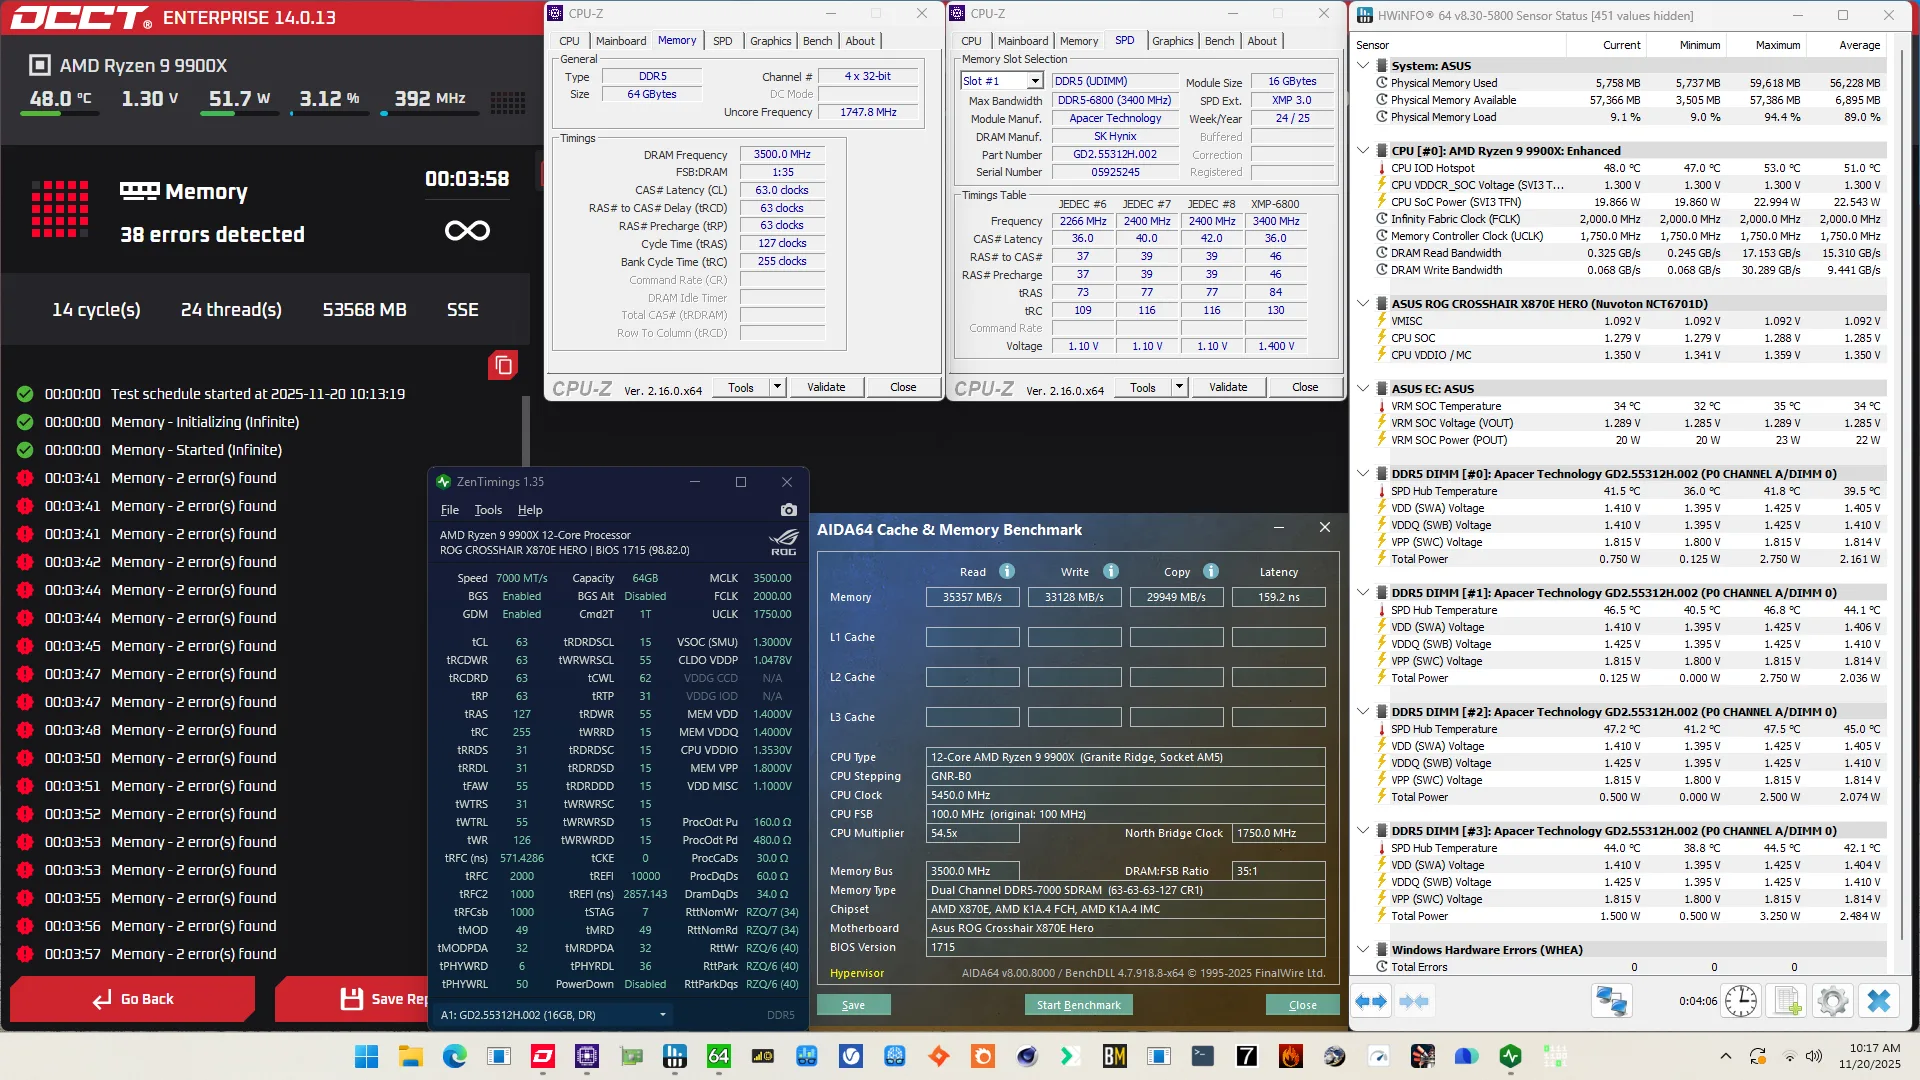
Here’s my finetuned timings for DDR5-6000.

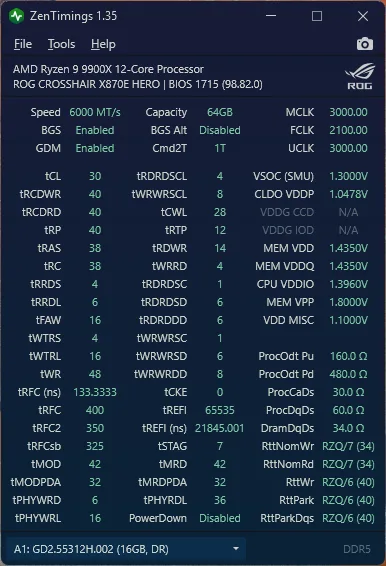
As you can see, the main difference is in the refresh and secondary timings. Also important to note is that I increased the memory voltage slightly from 1.4V to 1.435V.
Then, to improve the change of the memory controller to run in sync with the memory at 3000 MHz, I also increased the SOC voltage from 1.2V to the maximum allowed 1.3V.
Infinity Fabric Tuning
Lastly, I also looked at increasing the Infinity Fabric frequency.
The Fabric frequency, or FCLK, is generated by the SOC PLL, derived from a 100 MHz reference clock input. The reference clock is multiplied by the FCLK ratio, which you can configure in the BIOS.

The standard operating frequency of the infinity fabric is 1800 MHz, but on many boards, you’ll find it runs at a higher frequency when using high-speed memory. For example, with DOCP Tweaked enabled it’s running at 1933 MHz.
In SkatterBencher #95, DOCP Tweaked would run it at 2100 MHz in a 2-DIMM configuration. And, as it turns out, it’s also perfectly fine for a 4-DIMM configuration.
BIOS Settings & Benchmark Results
Upon entering the BIOS
- Go to the Extreme Tweaker menu
- Set Ai Overclock Tuner to DOCP Tweaked
- Set Memory Frequency to DDR5-6000
- Set FCLK Frequency to 2100 MHz
- Enter the DRAM Timing Control submenu
- Enter the Memory Presets submenu
- Select Load Hynix 5600MHz 1.4V 4x16GB SR and click OK
- Leave the Memory Presets submenu
- Set Refresh Interval to 65535
- Set tRFC to 400
- Set tRFC2 to 350
- Set tRFCsb to 325
- Set tRTP to 12
- Set tRDRDSD to 6
- Set tRDRDDD to 6
- Set tWRWRSCL to 8
- Set tWRWRSD to 6
- Set tWRWRDD to 8
- Set tWRRD to 4
- Set tRDWR to 14
- Enter the Memory Presets submenu
- Leave the DRAM Timing Control submenu
- Enter the Precision Boost Overdrive submenu
- Set Precision Boost Overdrive to enabled
- Switch to the Advanced menu
- Enter the AMD Overclocking submenu and click Accept
- Enter the SoC Voltage submenu
- Set SoC Voltage to 1300
- Enter the SoC Voltage submenu
Then save and exit the BIOS.
We re-ran the benchmarks and checked the performance increase compared to the default operation.
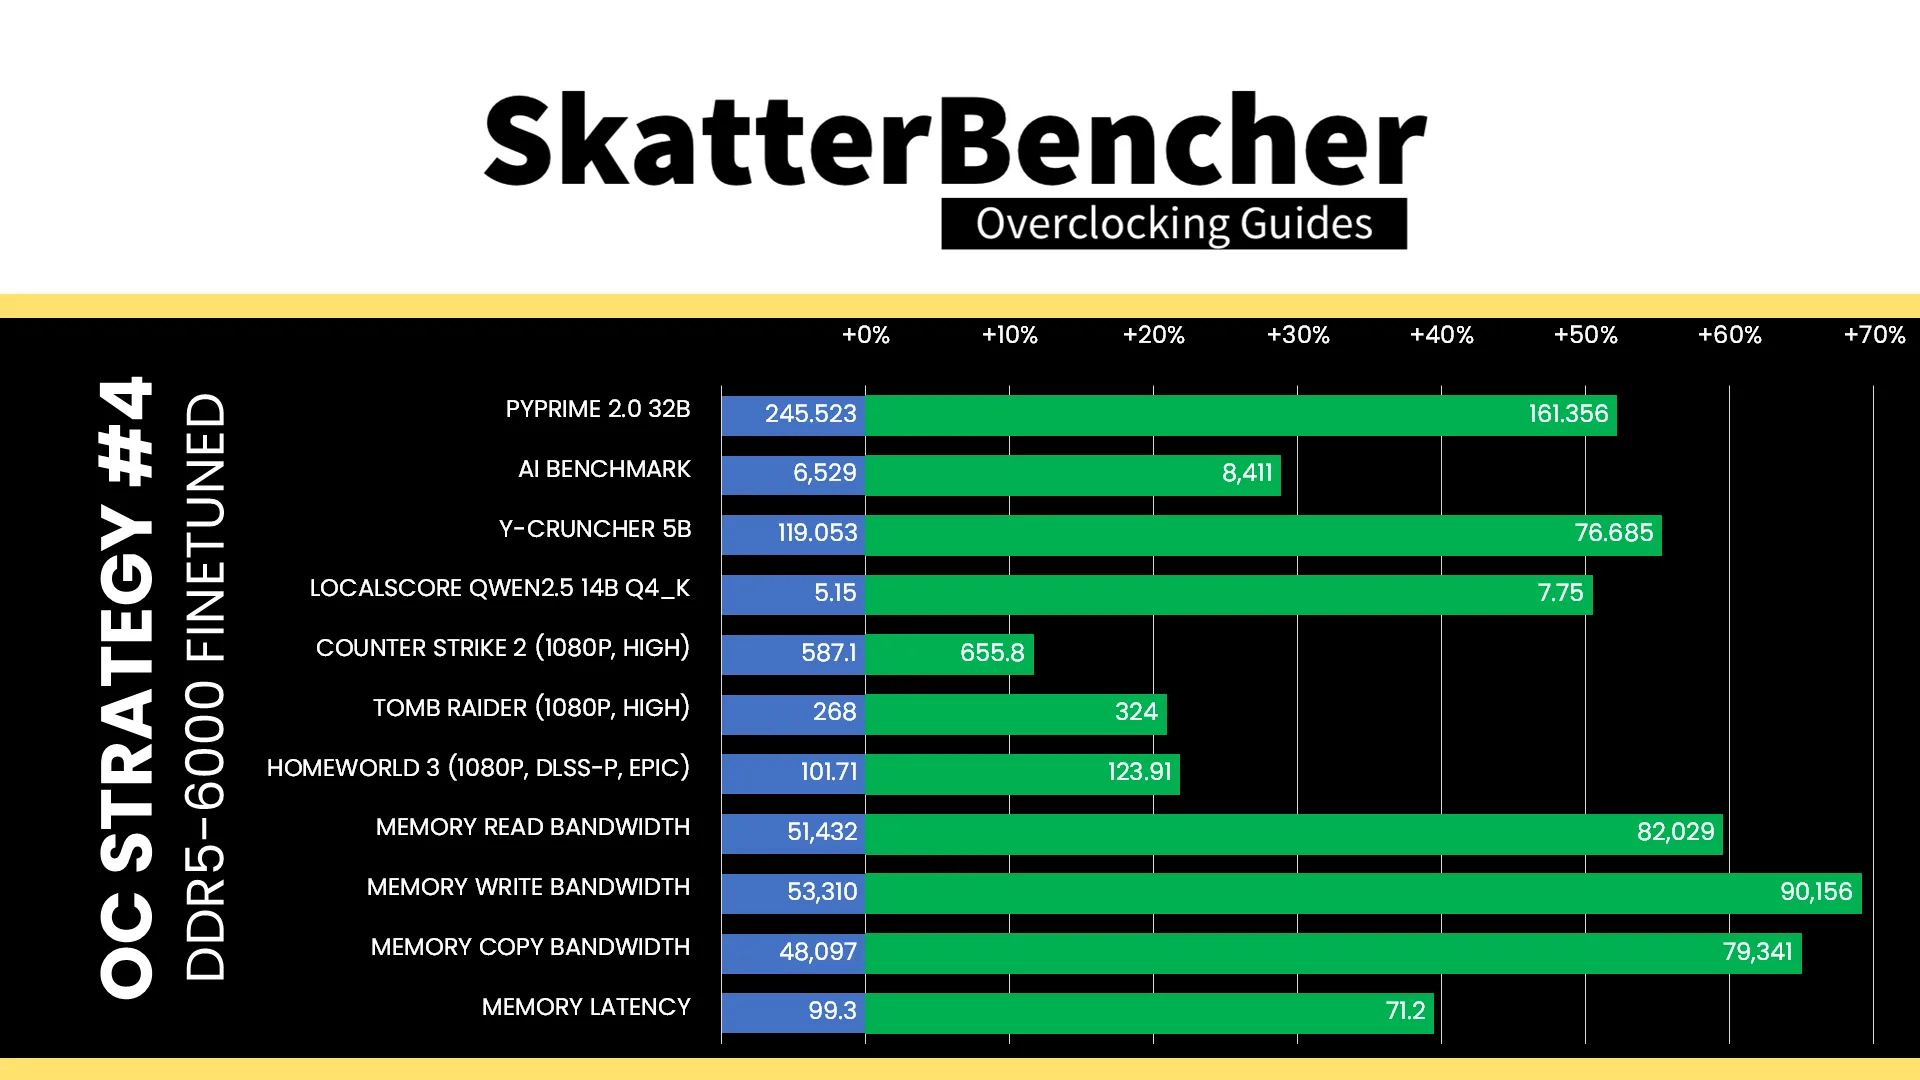
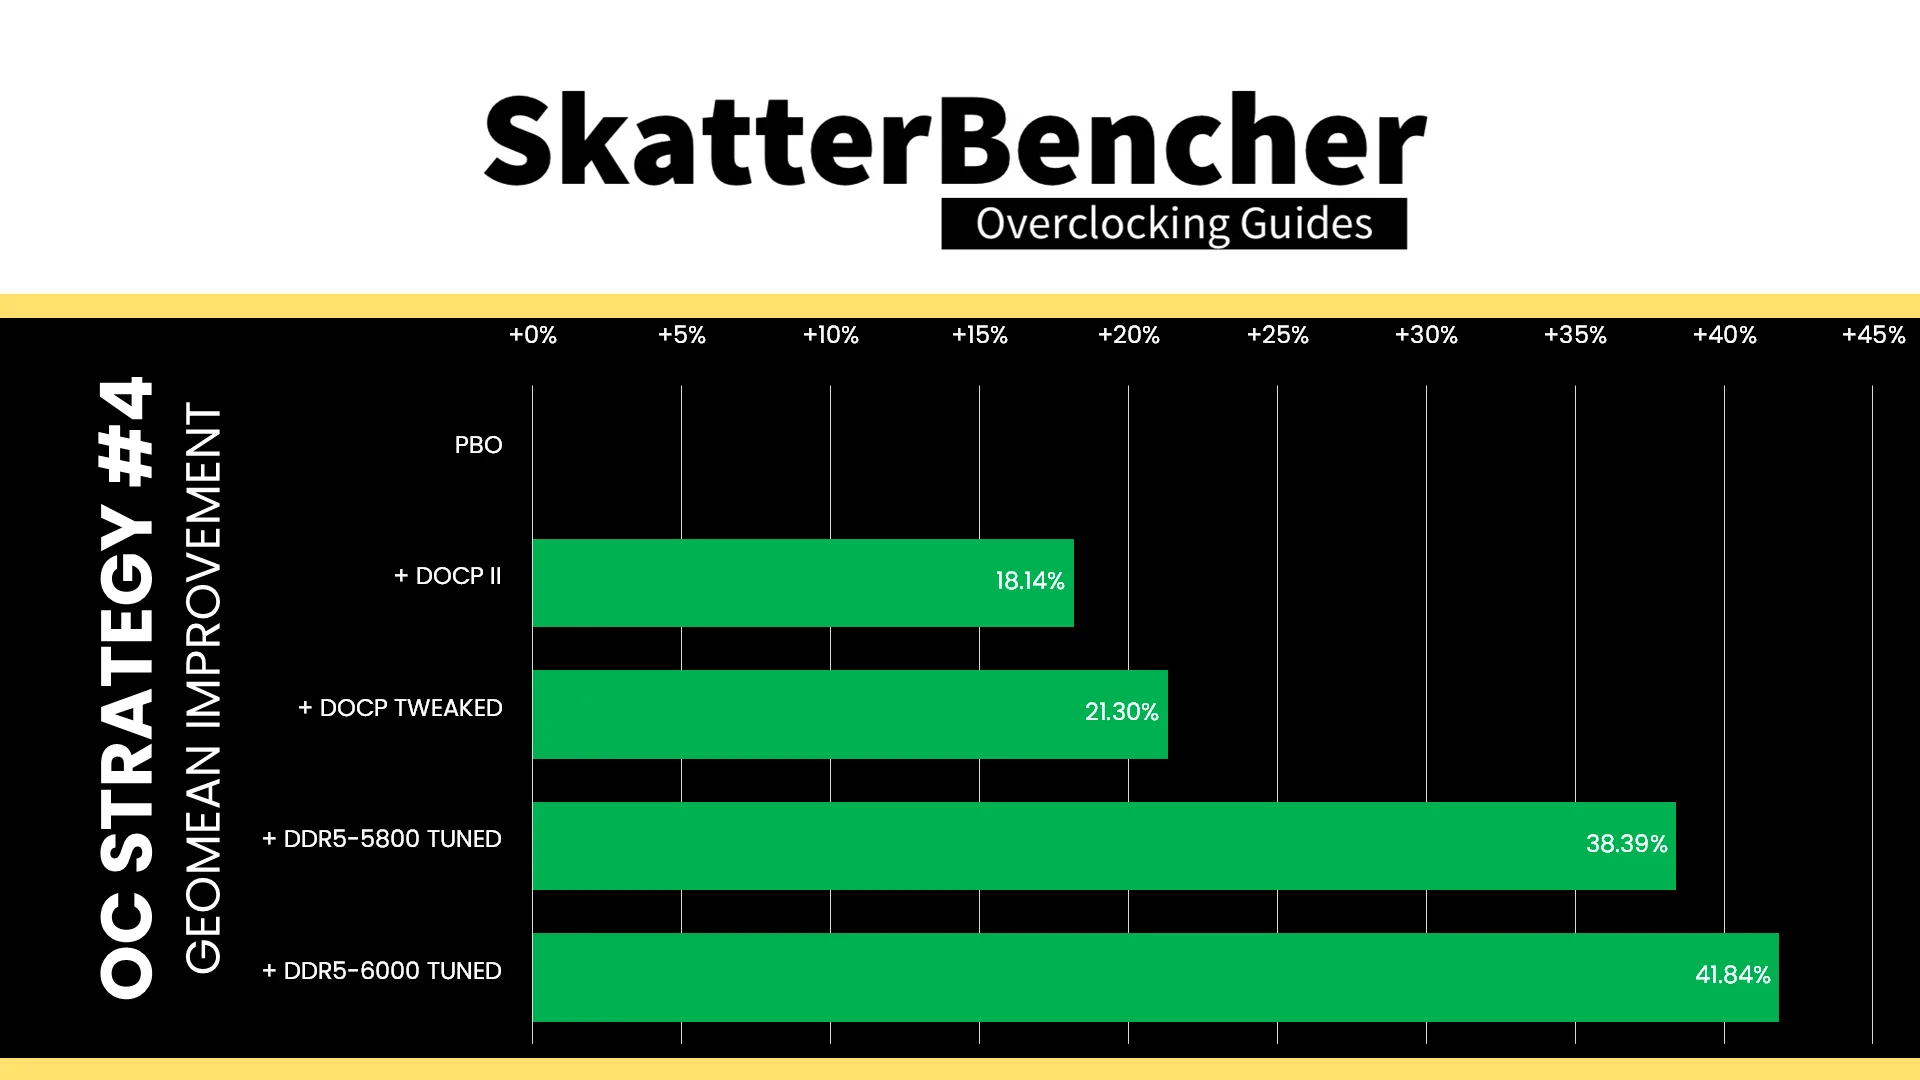
Finetuning the memory timings should, in theory, provide additional performance. However, the changes are so minor that we shouldn’t expect big swings. And, that’s what we see in our benchmark results. The Geomean performance speedup improves another three percentage points, and we get a maximum benchmark improvement of +55.25% in Y-Cruncher.
When running the OCCT Memory Stress Test , the average DIMM temperature ranges from 54.9 to 67.7 degrees Celsius. The average DIMM voltage is 1.441V and the total DIMM power consumption is 14.3 watts.

Apacer NOX RGB DDR5-6800 4x16GB: Conclusion
Alright, let’s wrap this up.
Tuning a 4-DIMM configuration on AMD Ryzen CPUs is very challenging, especially if you want high frequency too. I didn’t find a way to run DDR5-7000 stably and thus had to settle for DDR5-6000 with the memory controller in sync.
That said, I’m not at all disappointed with the performance improvement from tuning the memory. Just like in SkatterBencher #95, it’s clear that there’s lots of performance to be unlocked from tuning the memory sub-timings.
Further manual changes to the memory timings will continue to help improve performance but you might not like the time spent versus performance pay-off ratio.
Anyway, that’s it for this video.
I want to thank the Patreon supporters and YouTube members for supporting my work. If you have any questions or comments, please drop them in the comment section below.
See you next time!