SkatterBencher #95: NOX RGB DDR5-6800 2x16GB Tuned
Today, we tune the performance of the Apacer NOX RGB DDR5-6800 2x16GB memory kit with the Ryzen 9 9900X and ROG Crosshair X870E Hero.
Since I’m not a memory expert like Buildzoid or the folks chasing memory frequency records, I approach tuning memory from a layman’s perspective. That means trying to get the most extra performance in the fewest steps possible. In this blog post, I break down the Apacer NOX RGB tuning process into five unique tuning strategies for beginner and advanced overclockers.
- First, we enable DOCP II,
- Second, we switch to DOCP Tweaked,
- Third, we chase performance at DDR5-6000+ 1:1,
- Fourth, we chase performance at DDR5-7000+ 1:2,
- And, finally, we push performance beyond stability.
However, before we jump into overclocking, let us quickly review the hardware and benchmarks used in this guide.
But before that, full disclosure: Apacer is paying me to make a video (not this specific post) with their memory kit. Initially, I rejected the request since I don’t do product reviews but they were more than happy to let me look at tuning performance under the same deal conditions so that’s pretty cool.
Apacer NOX RGB DDR5-6800 2x16GB: Introduction
The Apacer NOX RGB kit I’m using today is part of a broader memory line-up with speeds up to DDR5-8000 . The exact part number I’m using is a 2x16GB DDR5-6800 36-46-46-84 1.4V rated kit with white heatsink design (Part: AH5U32G68C642NWAA-2; EAN: 4712389933737).
This particular kit also features RGB LED lighting which is compatible with five major RGB lighting control software programs supporting ASUS Aura Sync, MSI Mystic Light Sync, Gigabyte RGB Fusion, ASRock Polychrome Sync, and Razer Chroma lighting synchronization.
The kit has an XMP 3.0 profile to enable higher performance. We’ll get back to that in a minute when trying out the profile in OC Strategy #1.
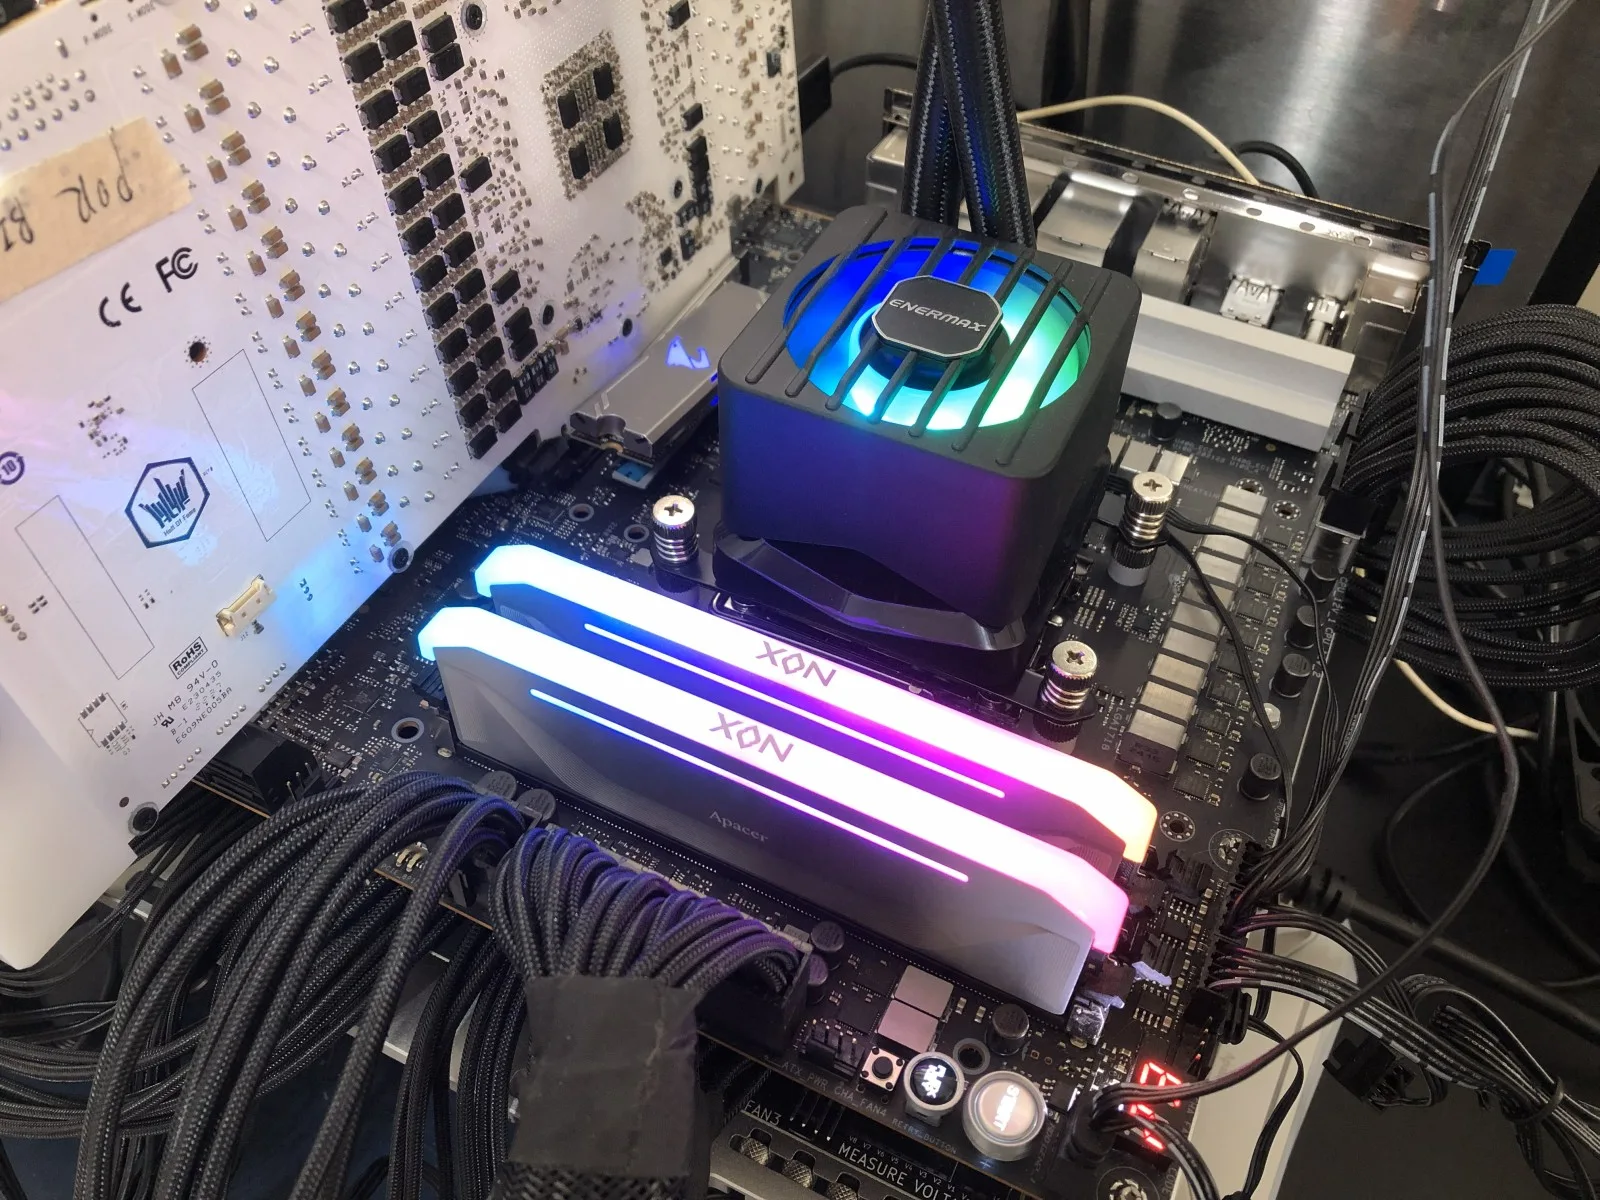
Platform Overview
This system we’re overclocking today consists of the following hardware.
| Item | SKU |
|---|---|
| CPU | AMD Ryzen 9 9900X |
| Motherboard | ASUS ROG Crosshair X870E Hero |
| CPU Cooling | Enermax LIQMAXFLO 420 |
| Memory | Apacer Nox RGB DDR5-6800 2x16GB |
| Power Supply | XPG Fusion 1600W Titanium |
| Graphics Card | GALAX GeForce RTX 4090 HOF |
| Storage | AORUS RGB NVMe M.2 512GB Gen4 AGI 512GB NVMe M.2 Gen3 |
| Chassis | Open Benchtable V2 |
| Telemetry | BENCHLAB |
Benchmarks, Games & Tools
We use Windows 11 and the following benchmark applications and games to measure performance and ensure system stability.
| BENCHLABS | LINK |
|---|---|
| Pyprime 2.0 | https://github.com/mbntr/PYPrime-2.x |
| AI-Benchmark | https://ai-benchmark.com/ |
| Y-Cruncher 5B | http://www.numberworld.org/y-cruncher/ |
| LocalScore | https://www.localscore.ai/ |
| Counter Strike 2 | https://store.steampowered.com/app/730/CounterStrike_2/ |
| Shadow of the Tomb Raider | https://store.steampowered.com/app/750920/Shadow_of_the_Tomb_Raider_Definitive_Edition/ |
| Homeworld 3 | https://store.steampowered.com/app/1840080/Homeworld_3/ |
| AIDA64 | https://www.aida64.com/ |
| OCCT Memory Stress Test | https://www.ocbase.com/ |
Apacer NOX RGB DDR5-6800 2x16GB: Stock Performance
Before we start tuning, we must check the system performance at default settings. That means changing nothing to the system configuration, apart from enabling PBO for the Ryzen 9 9900X.
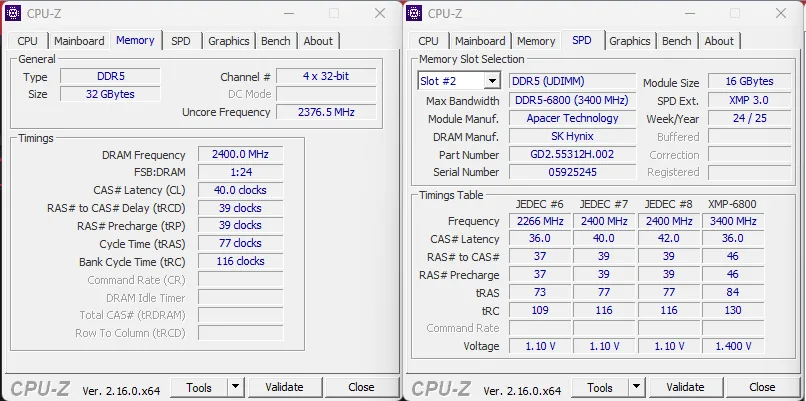
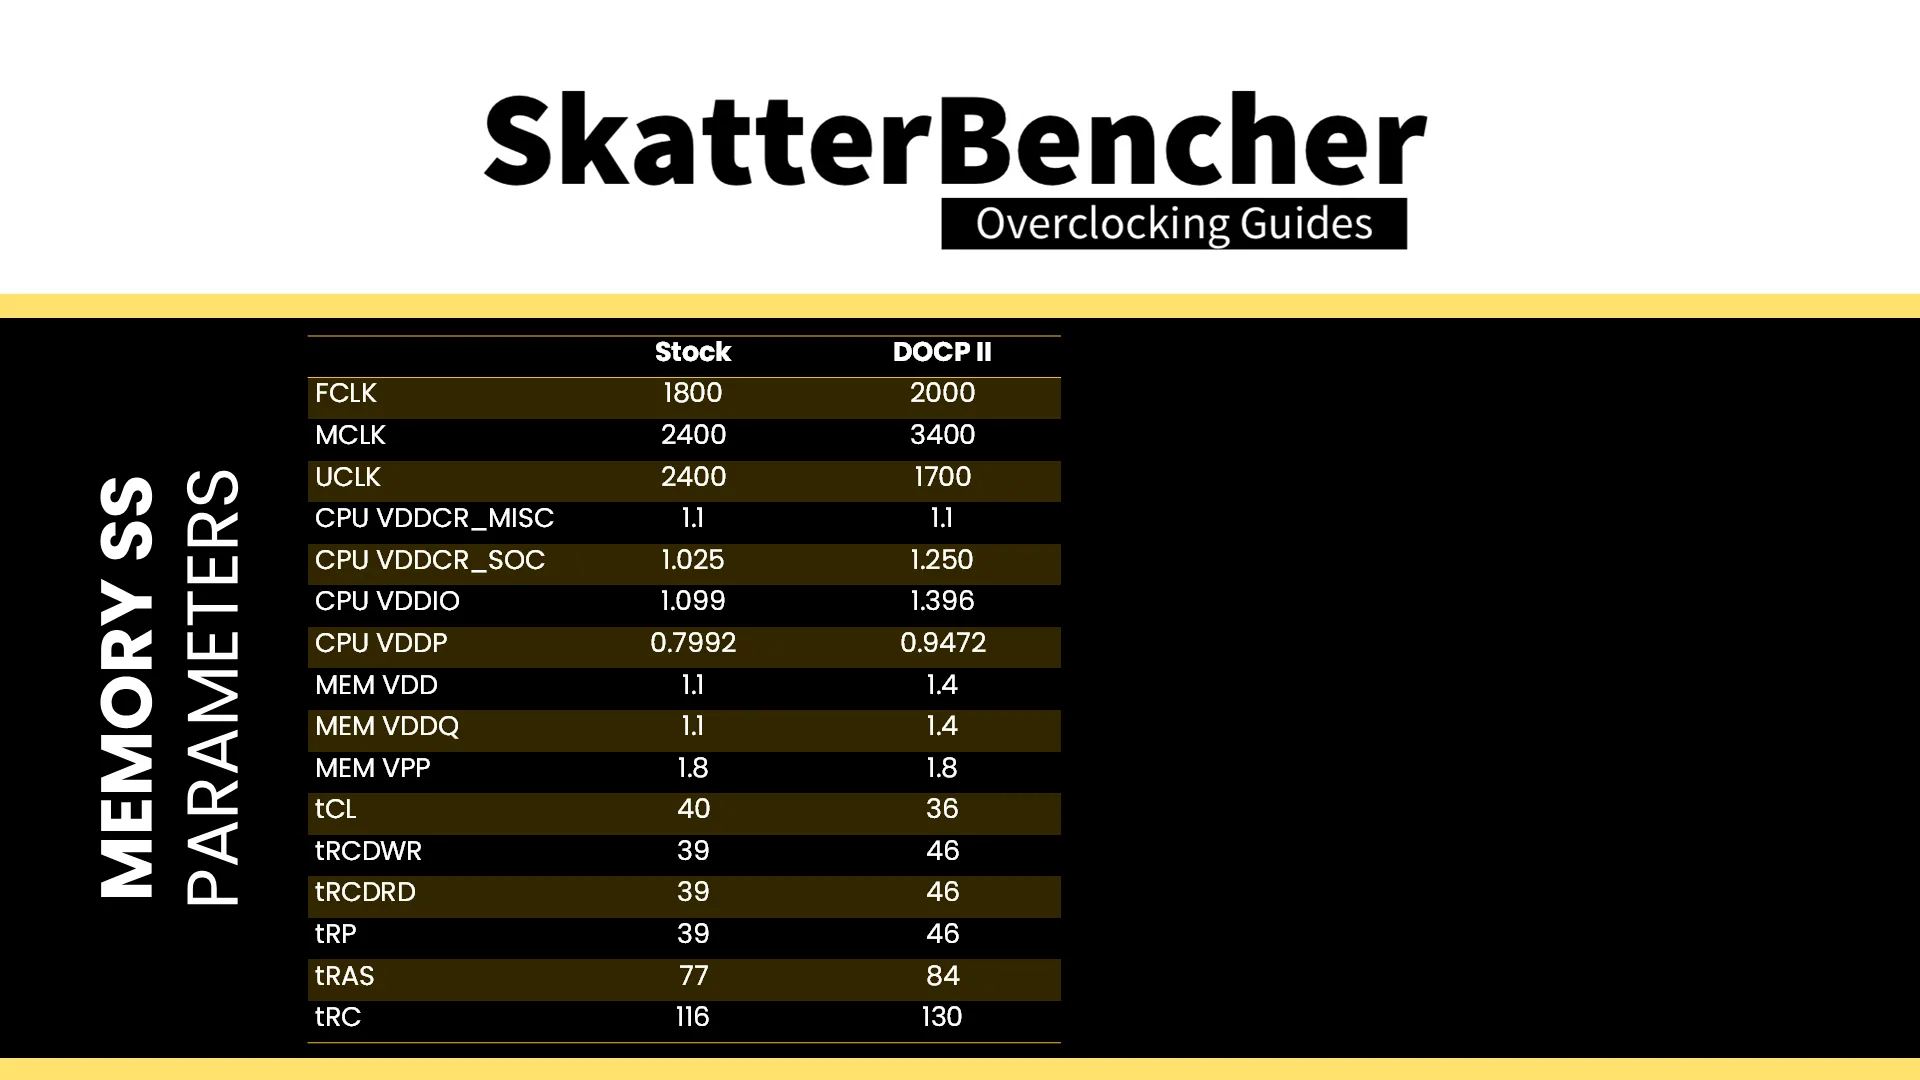
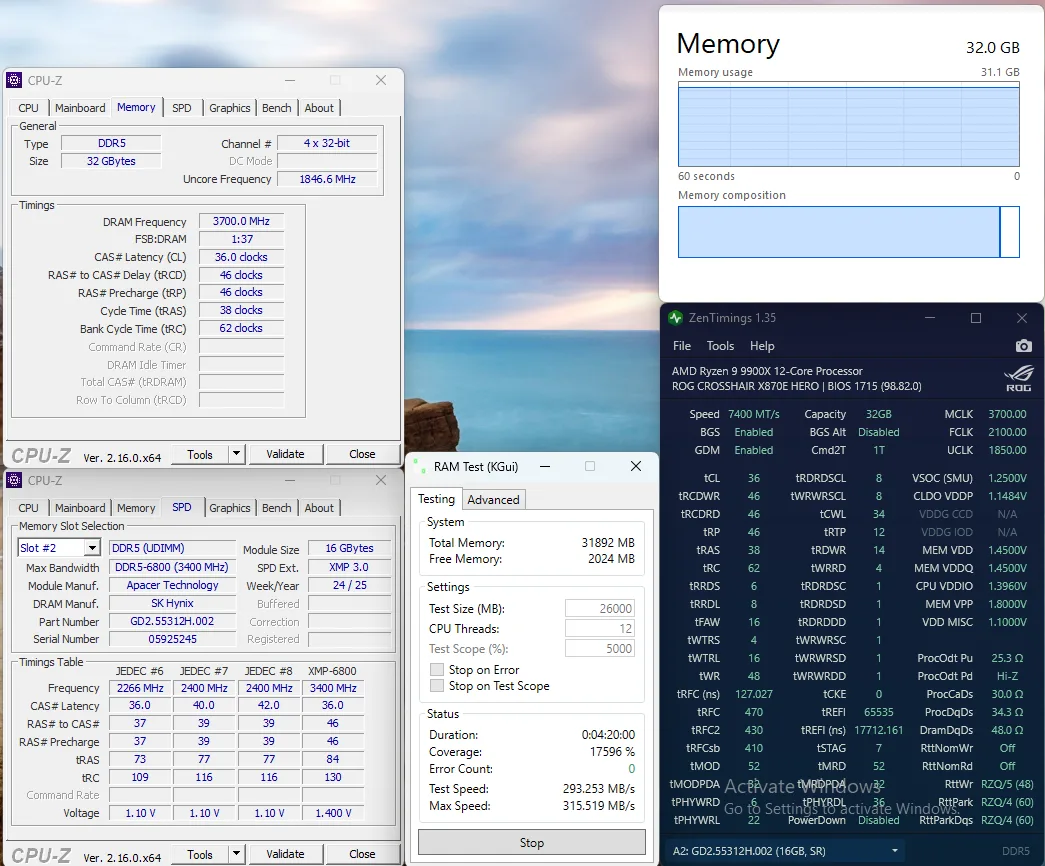
The default memory subsystem configuration parameters for this system are as follows:
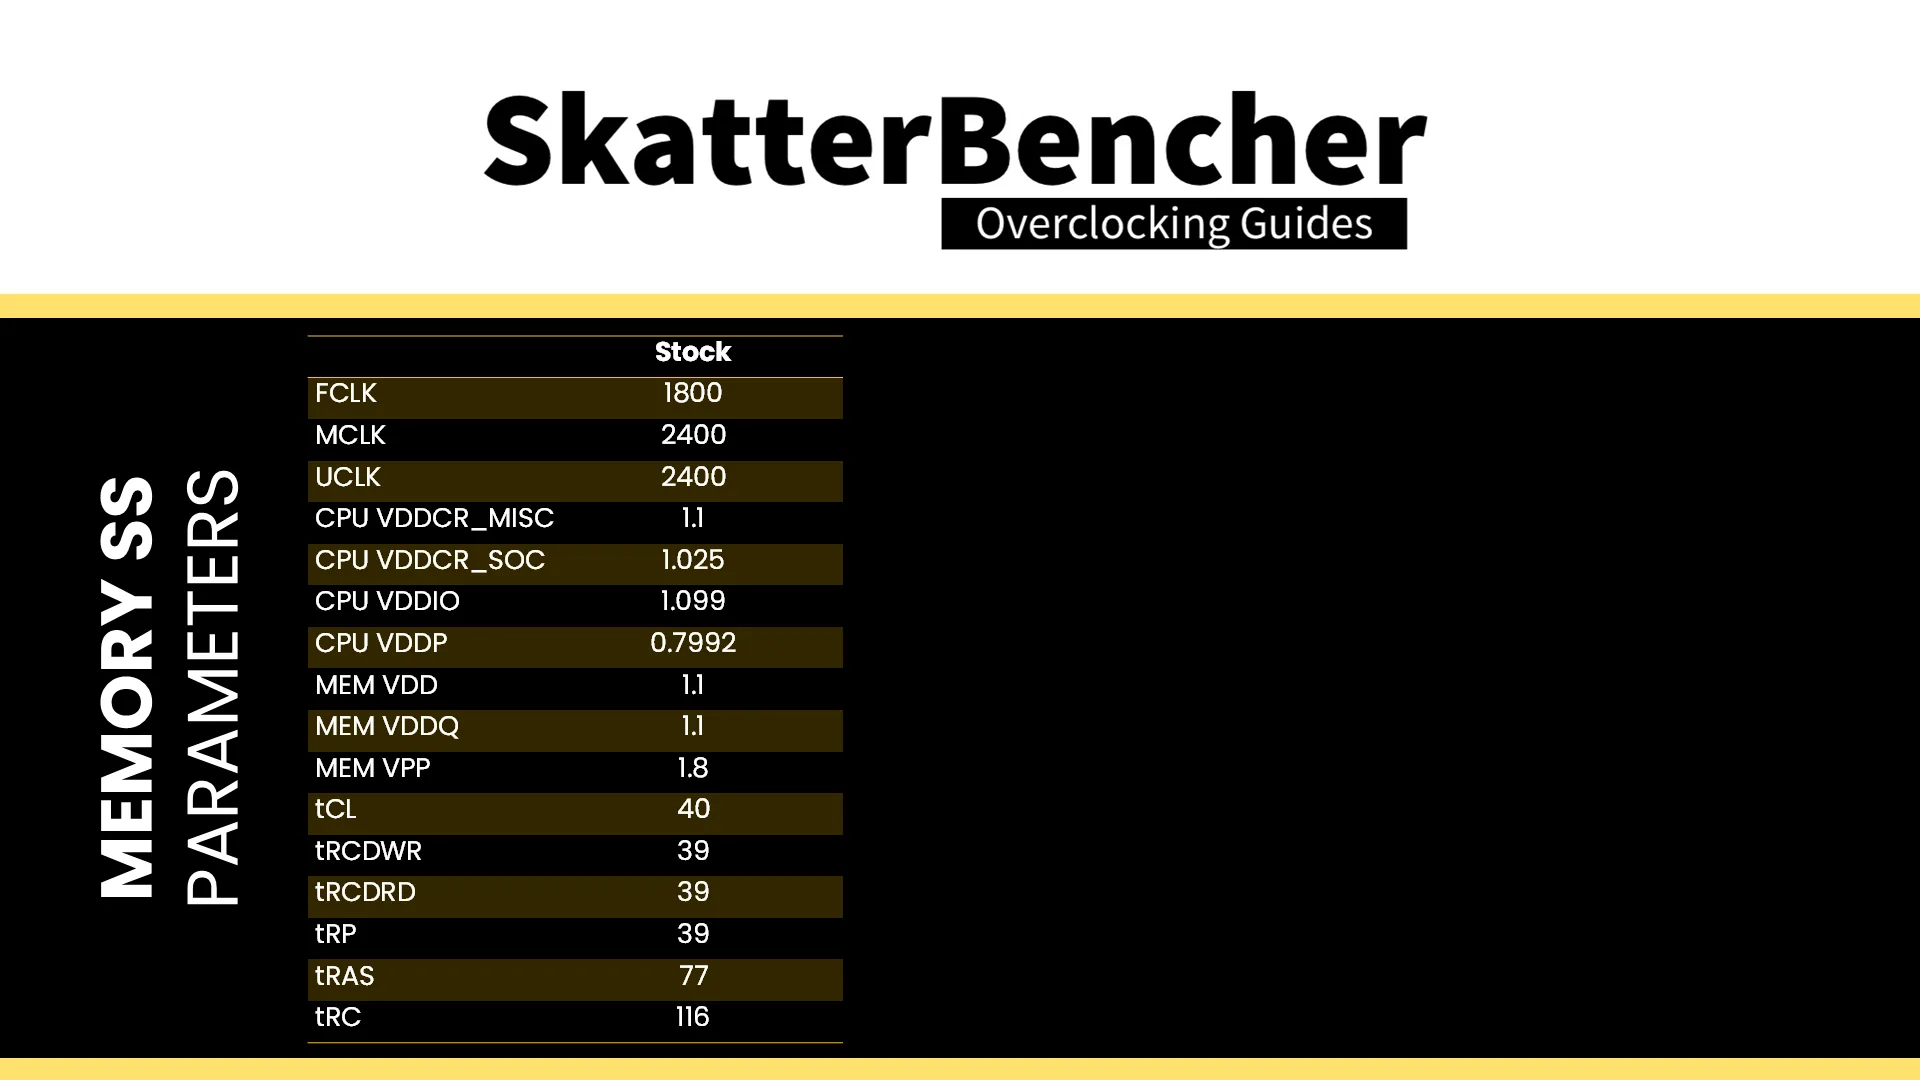
Note that the default memory frequency is not DDR5-6800 as you’d expect from installing a DDR5-6800 memory kit. That’s because running the memory above AMD’s validated and warranted speeds is technically overclocking.
AMD Ryzen 9000’s plan-of-record (“POR”) defines the maximum memory frequency up to DDR5-5600 for 1 DIMM per channel (“DPC”) and up to DDR5-3600 for 2 DIMM per channel configurations.
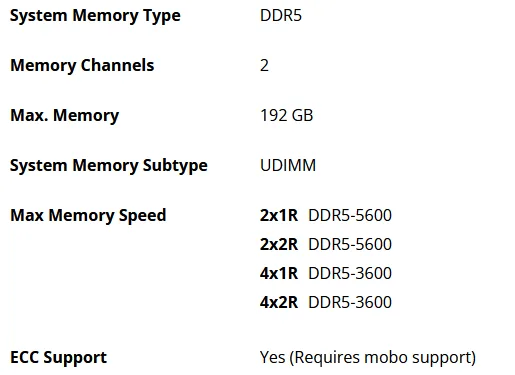
That “up to” is doing the heavy lifting here because you’d still need the memory kit to have a validated JEDEC spec at that speed. For example, this kit has only has a validated JEDEC spec of DDR5-4800 and thus the CPU memory controller, motherboard BIOS, and memory SPD negotiate an operating speed of DDR5-4800 unless told otherwise.
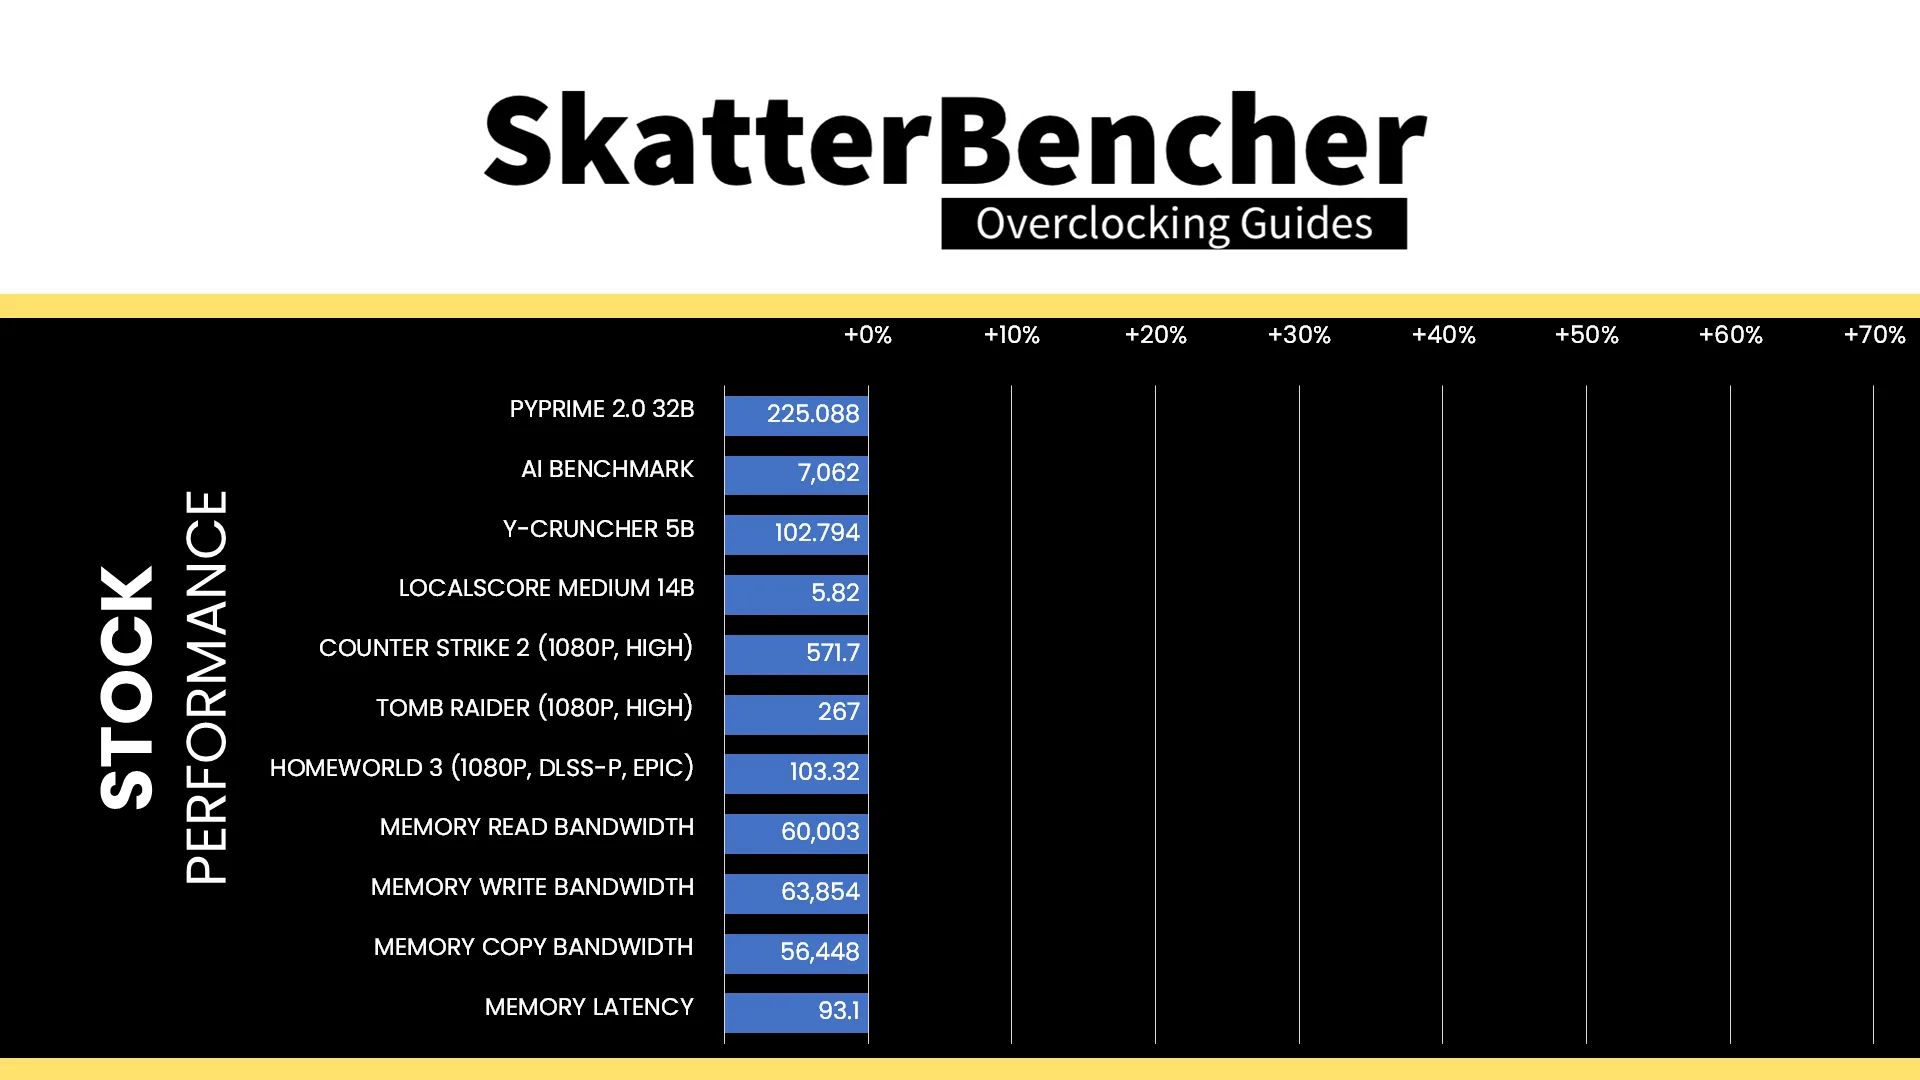
Here is the benchmark performance at stock:
- PyPrime 2.0 32B: 225.088 sec
- AI Benchmark: 7,062 points
- Y-Cruncher 5B: 102.794 sec
- LocalScore Medium 14B: 5.82 tokens/sec
- Counter Strike 2 (1080P, High): 571.7 fps
- Tomb Raider (1080P, High): 267 fps
- Homeworld 3 (1080P, DLSS P, Epic): 103.32 fps
- Memory Read Bandwidth: 60,003 MB/s
- Memory Write Bandwidth: 63,854 MB/s
- Memory Copy Bandwidth: 56,448 MB/s
- Memory Latency: 93.1 ns
This configuration also passed our 1-hour OCCT Memory Stress Test.

Of course, we can increase the memory subsystem performance by leveraging this kit’s XMP-6800 profile and that’s what we’ll do in our first overclocking strategy.
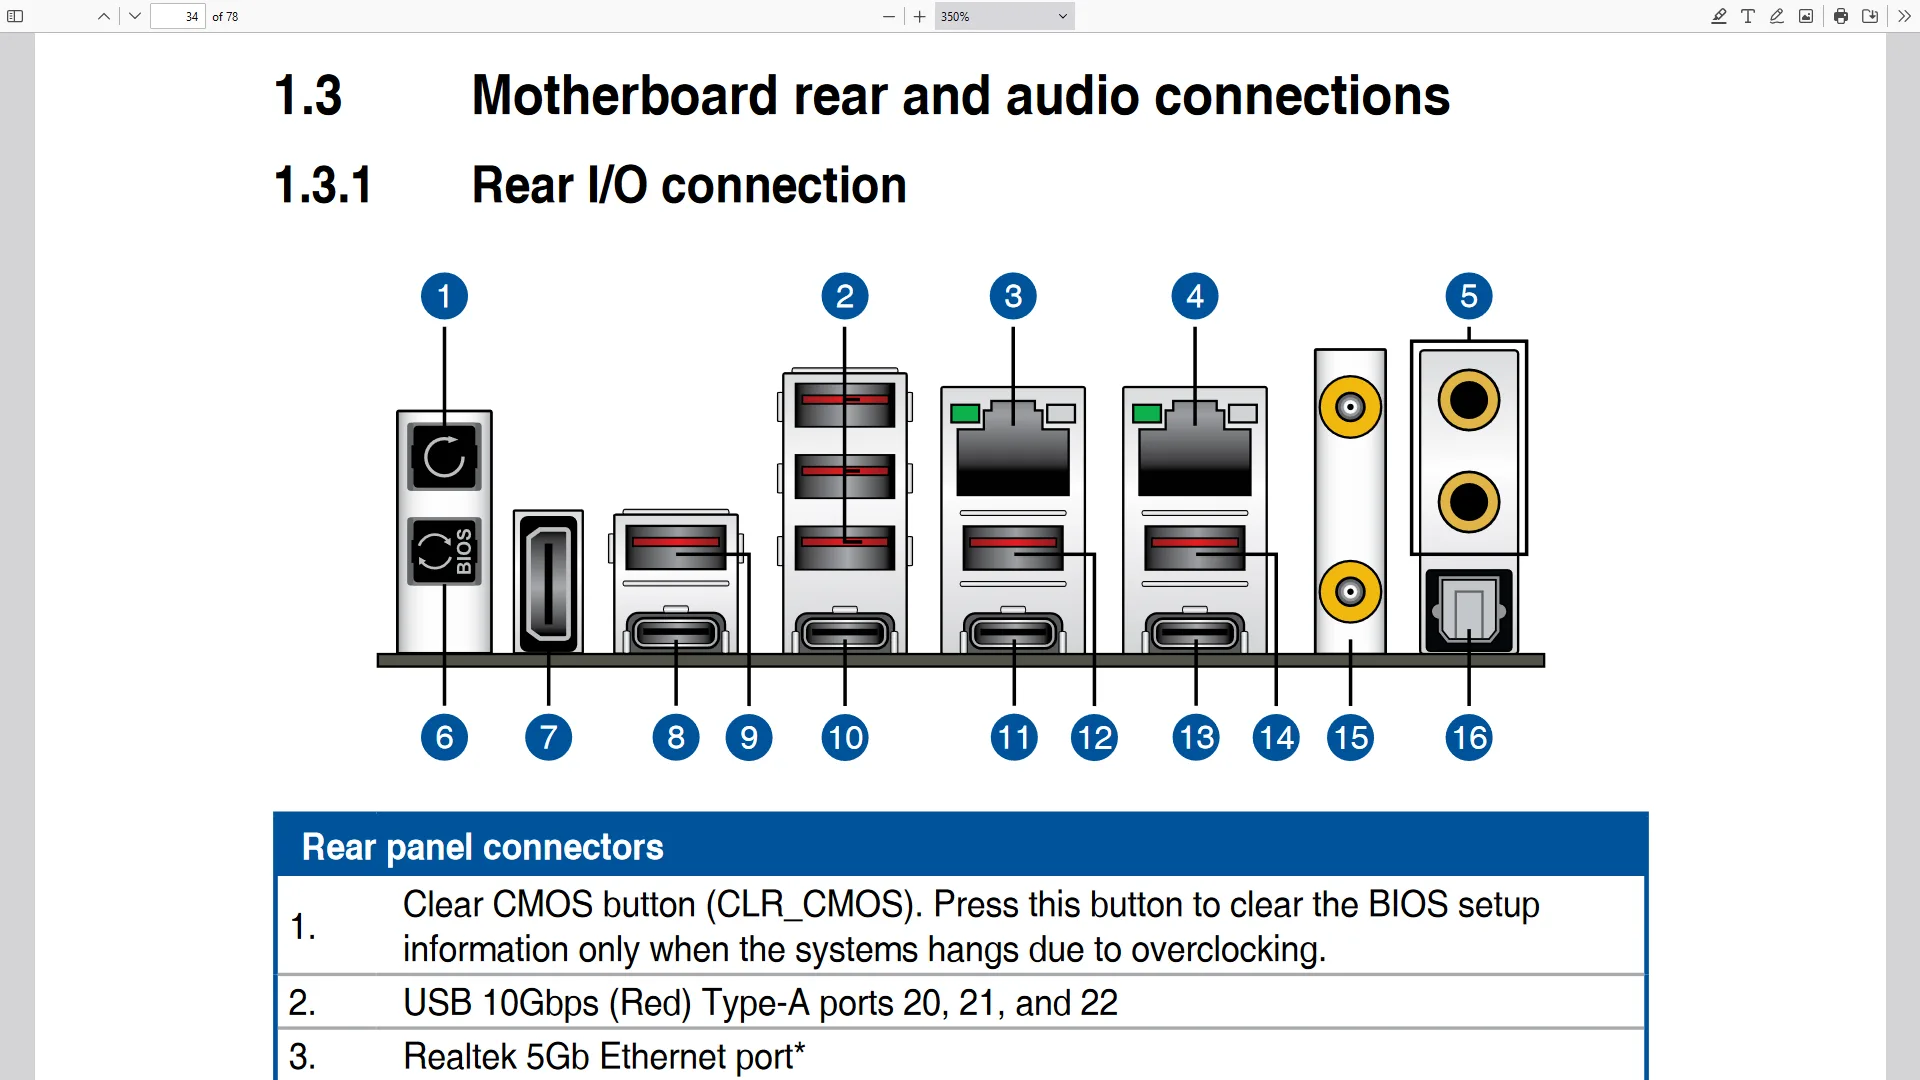
However, before we get going, make sure to locate the CMOS Clear button. Pressing the Clear CMOS button will reset all your BIOS settings to default, which is helpful if you want to start your BIOS configuration from scratch. The Clear CMOS button is located on the back I/O of the motherboard.
OC Strategy #1: DOCP II
In our first overclocking strategy, we simply take advantage of enabling ASUS DOCP to leverage this kit’s XMP-6800 profile.
ASUS DOCP – Direct OverClock Profile
ASUS Direct OverClock Profile is an ASUS technology that aims to replicate the AMD EXPO and Intel XMP technologies. It’s extremely useful in case the memory kit doesn’t have an EXPO or XMP compatible profile because you can still load the settings and apply them with a single setting in the BIOS. It’s also useful in situations like we have right now: you have an AMD Ryzen system but a kit with an Intel XMP profile.
Technologies like XMP allow memory vendors such as Apacer to program higher performance settings onto the memory sticks. If the motherboard supports XMP, you can enable higher performance with a single BIOS setting. So, it saves you lots of manual configuration.
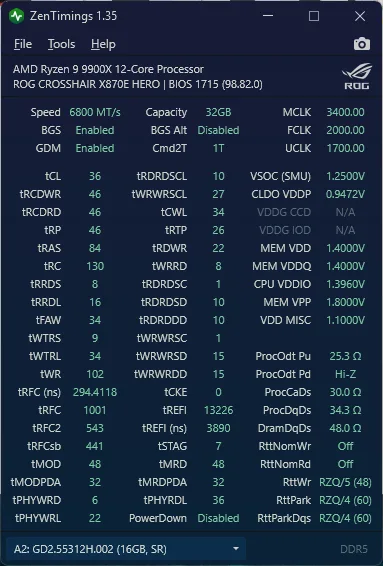
Note that we have three DOCP options: DOCP I, DOCP II, and DOCP Tweaked. Only DOCP II loads the memory profile as programmed onto the SPD whereas DOCP I and DOCP Tweaked relies on motherboard auto-rules to improve compatibility and/or performance.

For this overclocking strategy, we’re simply loading DOCP II and stick to the memory profile as much as we can. We find that pretty much everything of the memory configuration has changed: frequencies, voltages, and timings.
BIOS Settings & Benchmark Results
Upon entering the BIOS
- Go to the Extreme Tweaker menu
- Set Ai Overclock Tuner to DOCP II
- Enter the Precision Boost Overdrive submenu
- Set Precision Boost Overdrive to enabled
Then save and exit the BIOS.
We re-ran the benchmarks and checked the performance increase compared to the default operation.
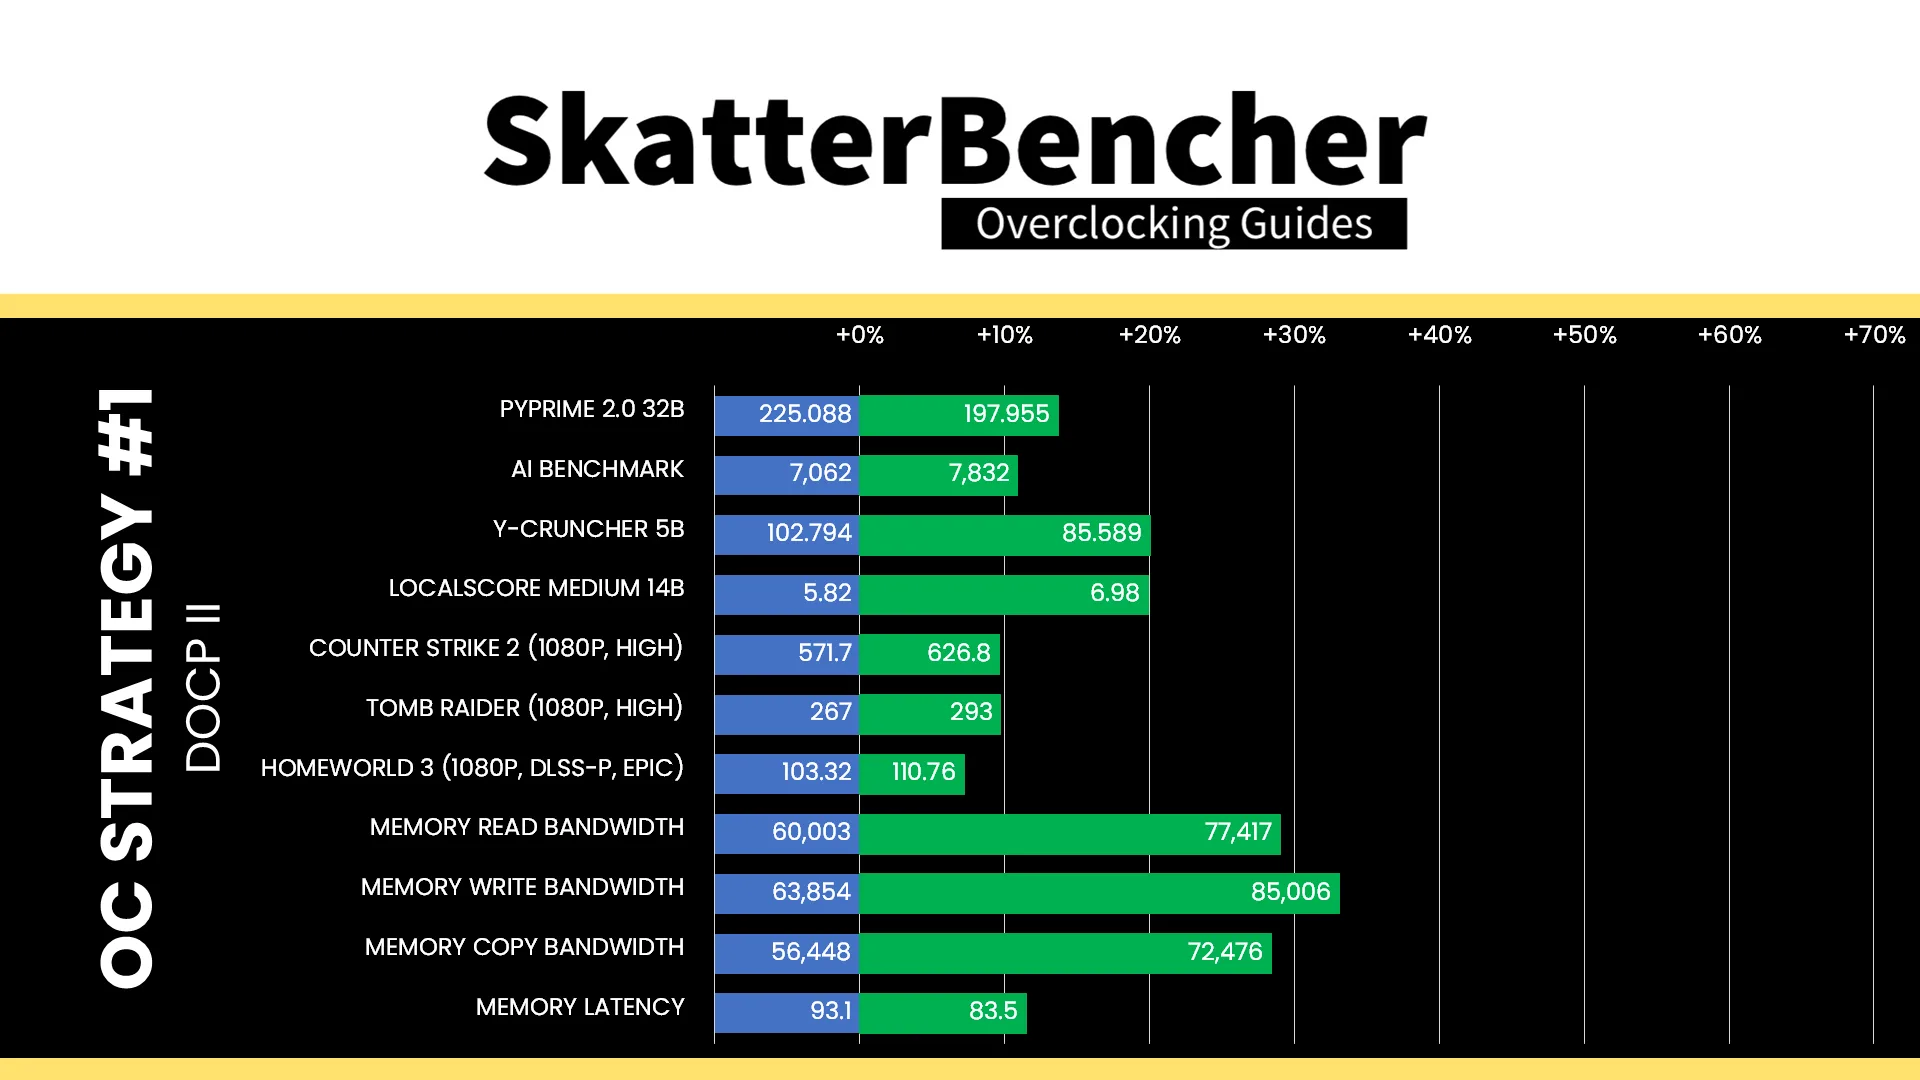
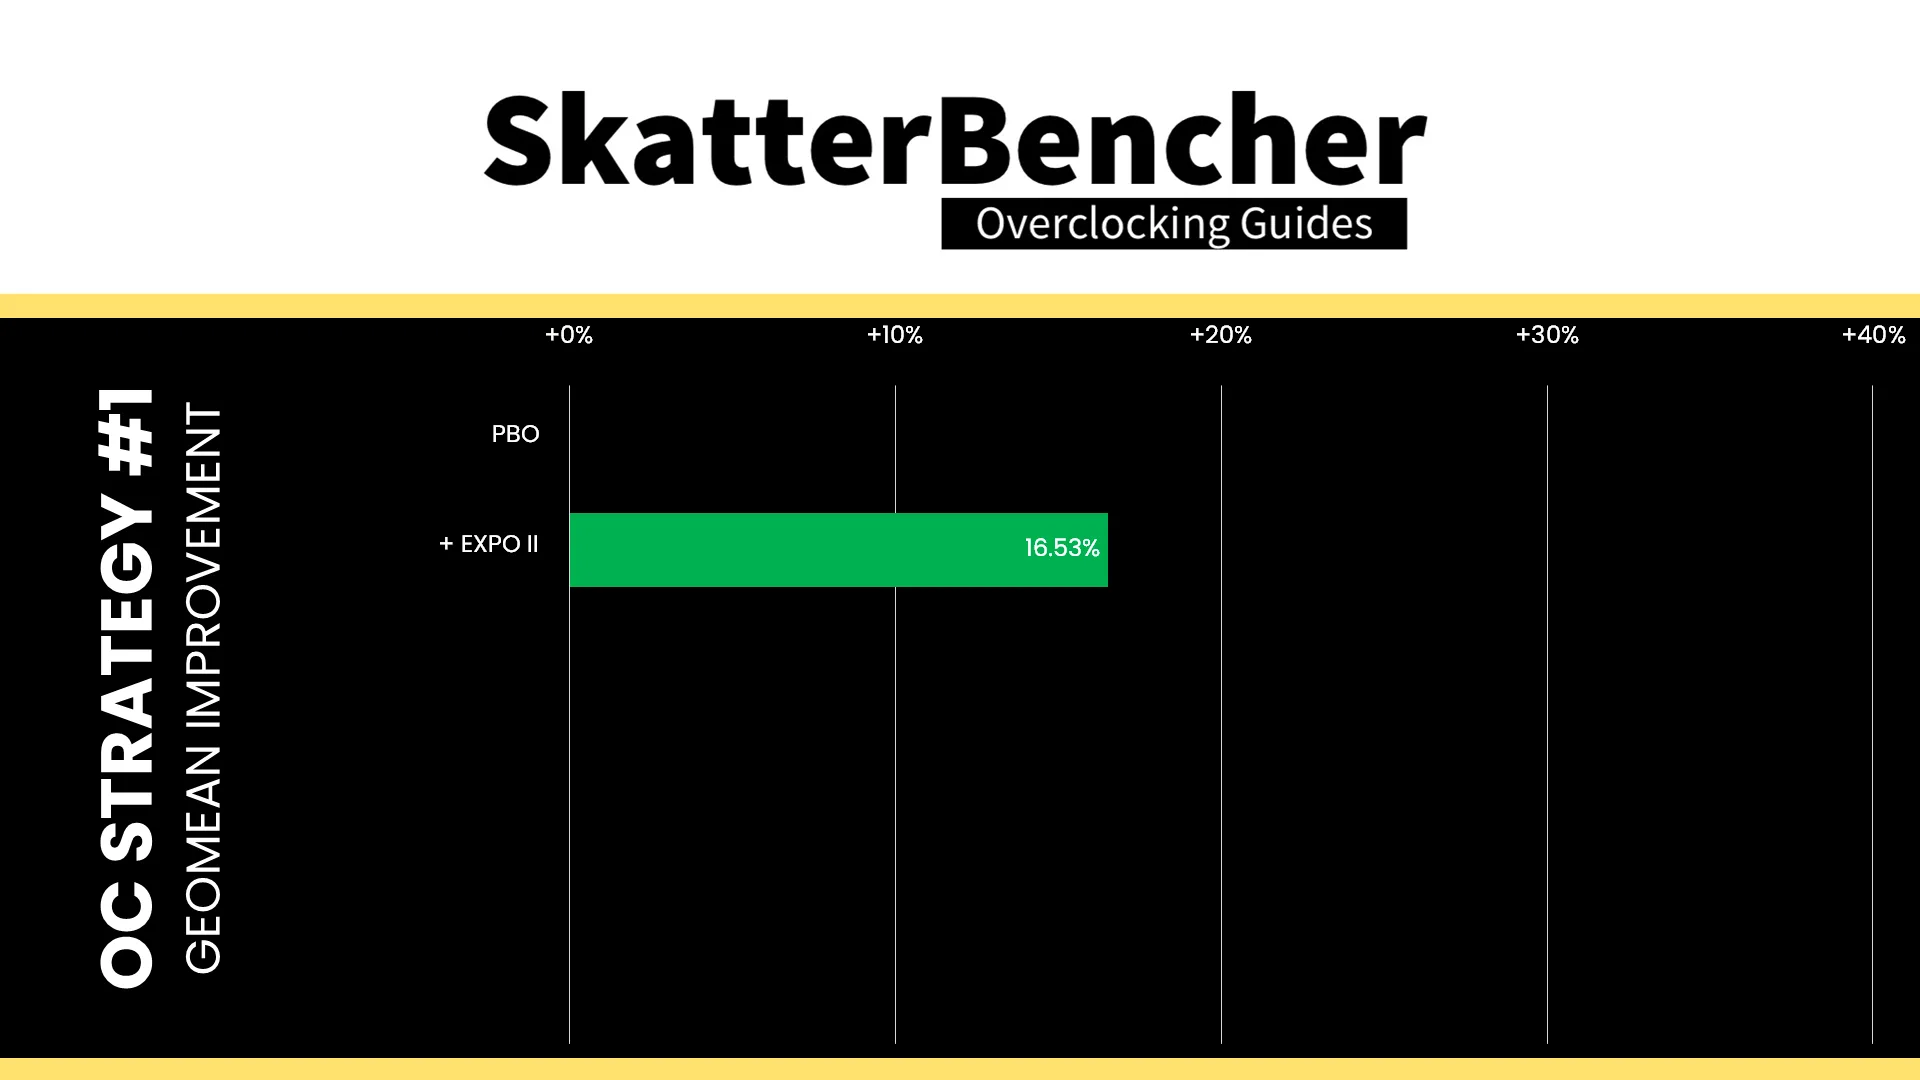
Running everything faster and tighter should have a decent impact on the performance and that’s exactly what we see across our benchmark suite. Generally, synthetic benchmarks benefit more but we also see a decent uplift in compute and gaming workloads. The Geomean performance speedup is +16.53%, and we get a maximum benchmark improvement of +20.10% in Y-Cruncher.
This configuration also passed our 1-hour OCCT Memory Stress Test.
OC Strategy #2: DOCP Tweaked
In the second overclocking strategy, we start tuning the memory with the ASUS Ai Overclock Tuner options.
DOCP II vs DOCP Tweaked: tREFI timing
In theory, we can choose between two options: DOCP I and DOCP Tweaked. They function similarly in the sense that they partially load the memory profile and then let motherboard auto-rules finetune other parameters to improve compatibility or performance.
I found that the difference between DOCP I, DOCP II, and DOCP Tweaked is pretty minor.
- DOCP I increases the tRC timing from 130 to 163, which presumably helps with stability in certain scenarios.
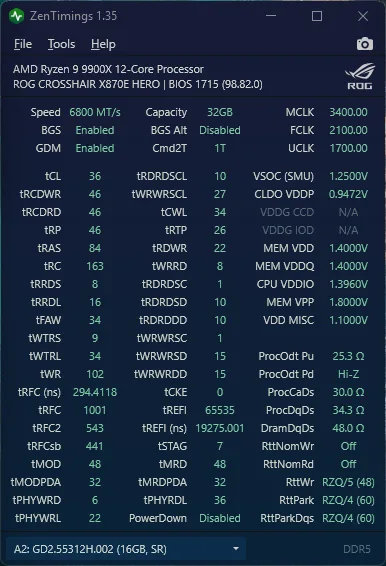
- DOCP Tweaked also increases the tRC timing to 163, but does a couple more things. It increases the FCLK frequency to 2100 MHz and increases the tREFI timing from 13226 to 65535.
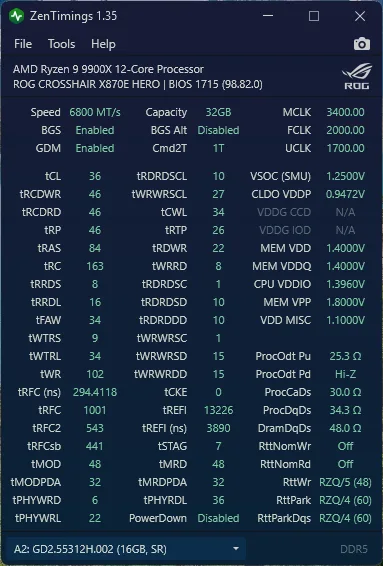
The tREFI timing specifies the period between REFRESH commands in DRAM.
Refreshes are necessary because idle memory cells gradually lose their charge over time which may lead to data corruption. A REFRESH command restores the charge of the cell, ensuring the stored data remains intact.
During a REFRESH, the memory bank must remain active and cannot be used for read or write activity. The duration of this inactivity is specified by the tRFC timing. That’s why refreshes can impact performance: it makes the memory cells temporarily unavailable.
There are multiple types of refresh in DDR5 (tRFC, tRFC2, tRFC4, tRFCsb) which can be used to shorten the downtime. Nevertheless, the general principle remains: more frequent refreshes increase the fraction of time memory is unavailable for read/write operations.
Just like other timing parameters, tREFI is expressed in memory clock cycles. For our DDR5-6800 memory kit, which operates at 3400 MHz, the stock tREFI is 13,226 cycles. That translates into a refresh interval of 3890 ns. In other words, every 3890 ns, each memory row is refreshed to maintain data integrity.
But here’s the thing: the rate at which memory cells lose their charge is not uniform. It depends on silicon quality (the “silicon lottery”), operating temperature, and the fact that normal memory reads and writes also refreshes the cells. Consequently, in many real-world scenarios, it is possible to safely extend the refresh interval beyond the JEDEC specification.
DOCP Tweaked extends the refresh interval from 3.89 to 19.275 microseconds, significantly reducing the time memory cells are unavailable and thereby improving overall memory performance.
BIOS Settings & Benchmark Results
Upon entering the BIOS
- Go to the Extreme Tweaker menu
- Set Ai Overclock Tuner to DOCP Tweaked
- Enter the Precision Boost Overdrive submenu
- Set Precision Boost Overdrive to enabled
Then save and exit the BIOS.
We re-ran the benchmarks and checked the performance increase compared to the default operation.
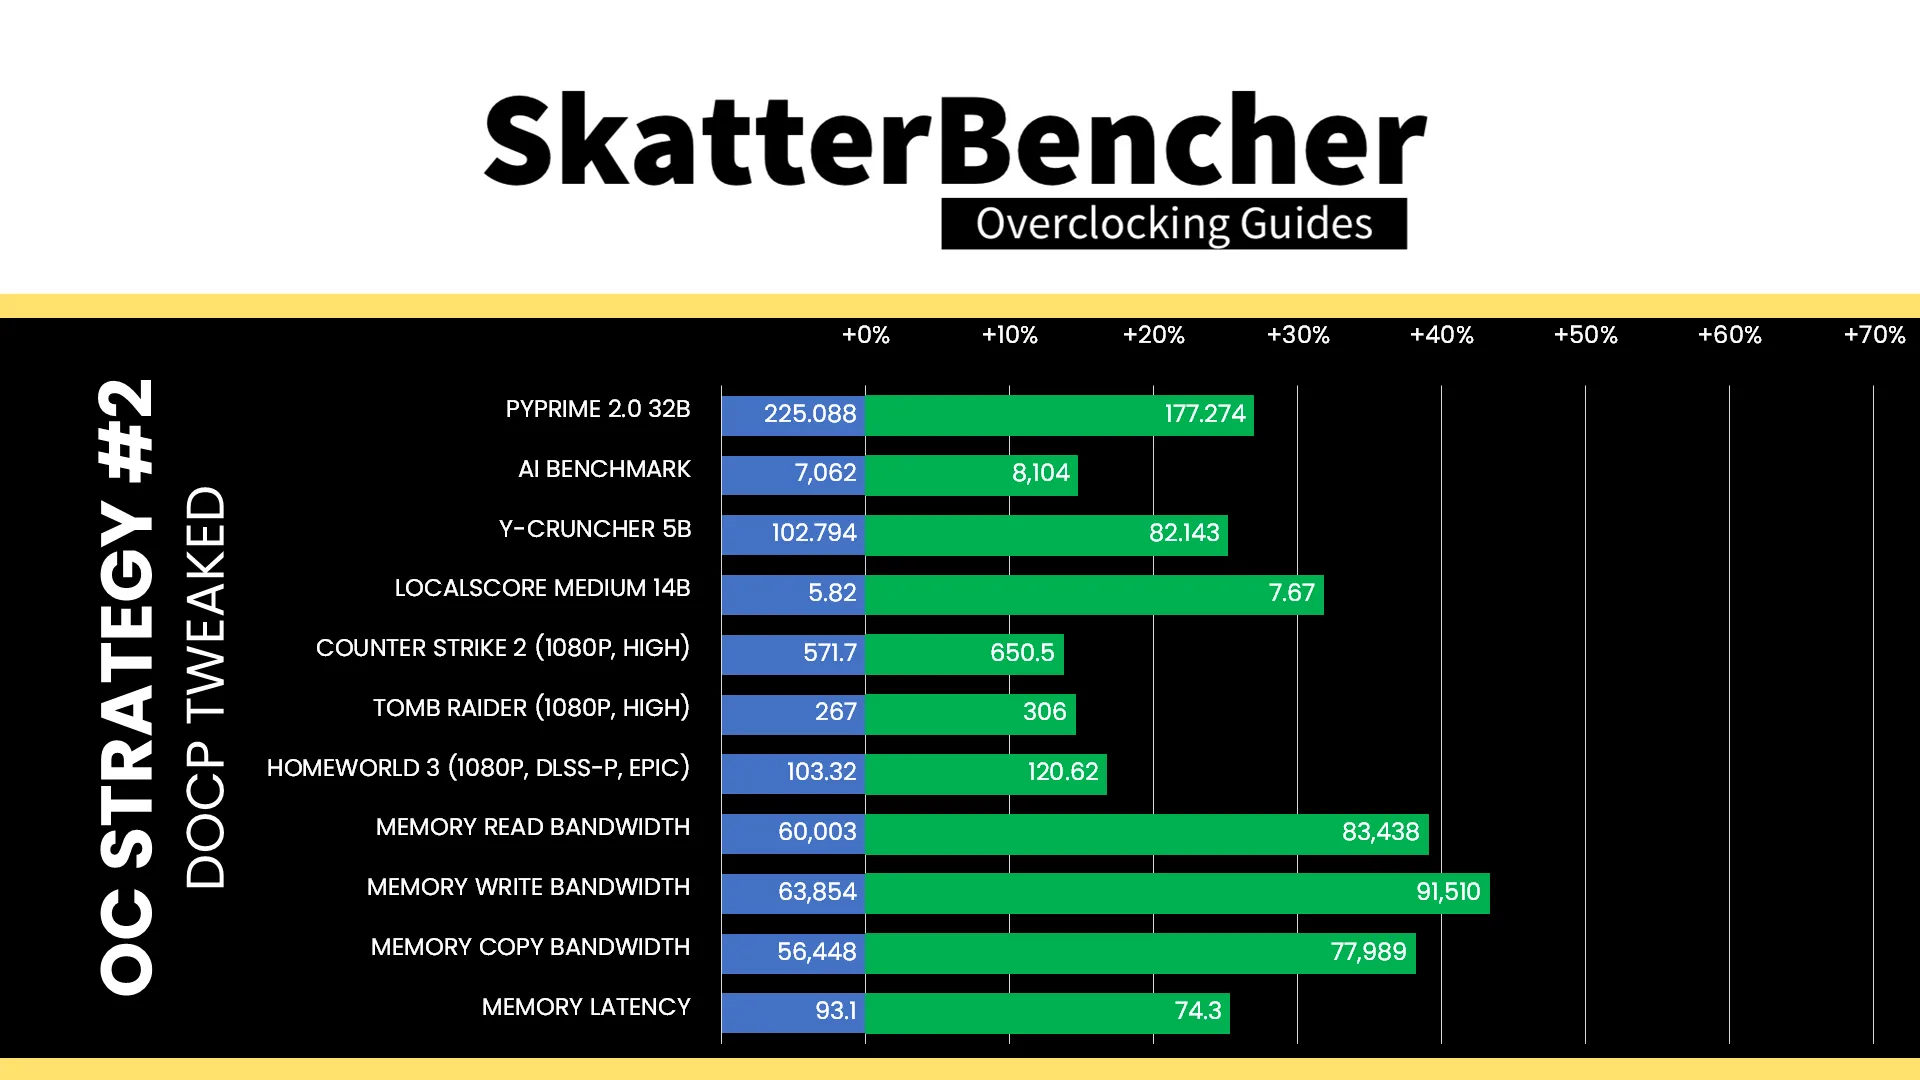
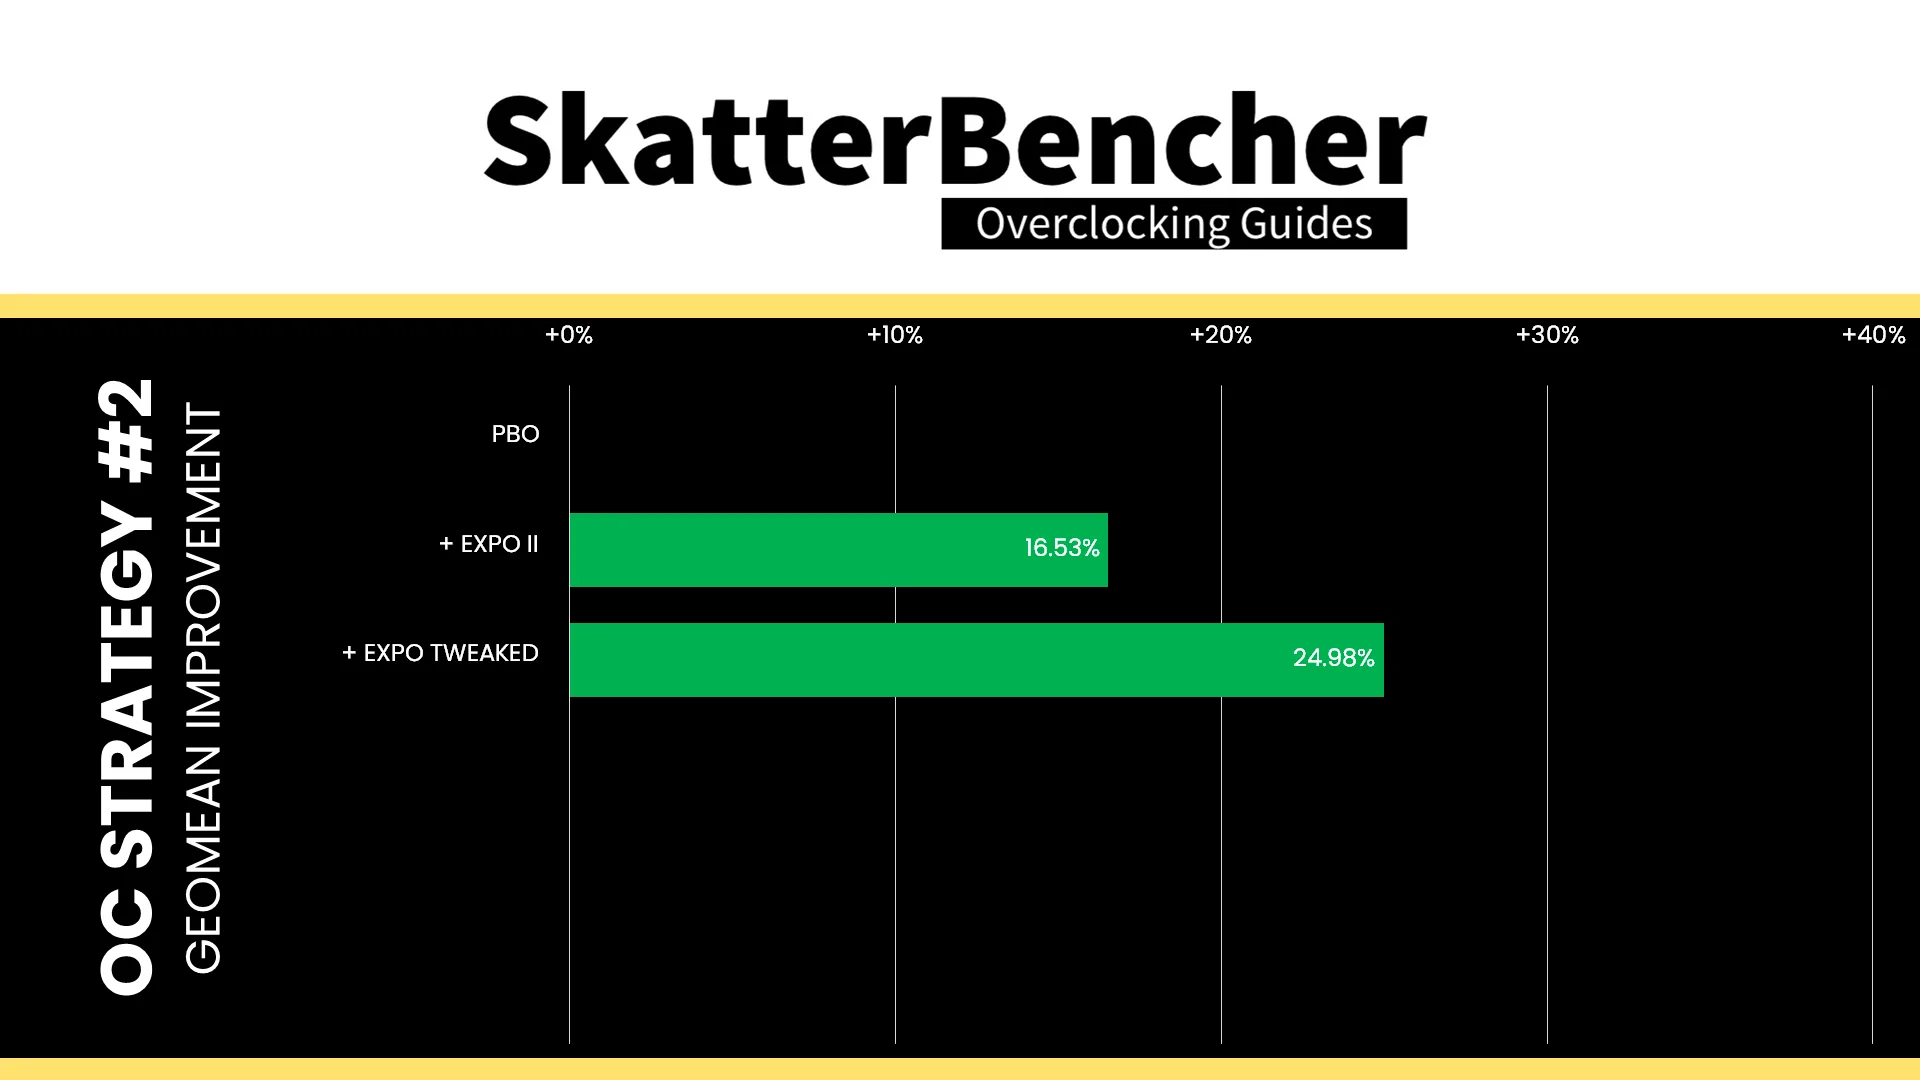
We don’t expect the FCLK to impact our benchmark performance too much, but extending the interval between refreshes by a factor of five clearly improves the performance of our memory subsystem. The Geomean performance speedup improves by another eight and half percentage points, and we get a maximum benchmark improvement of +26.97% in PyPrime.
This configuration also passed our 1-hour OCCT Memory Stress Test.

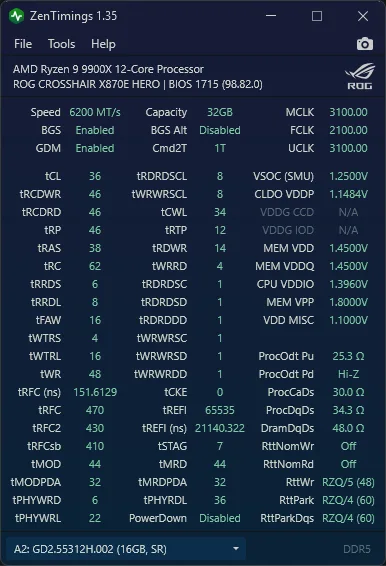
OC Strategy #3: DDR5-6200 Memory Tuned
In our third overclocking strategy, we take a step back and look at holistically tuning the memory subsystem performance of the Ryzen 9 9900X.
On AMD Granite Ridge processors, the memory subsystem consists of three major parts: the infinity fabric, the unified memory controller, and the system memory. They’re more commonly referred to as FCLK, UCLK, and MCLK. First-generation Ryzen overclockers know that these parts used to be tightly coupled together, but on modern Ryzen processors like the Ryzen 9 9900X, we can tune them independently.
Infinity Fabric Tuning
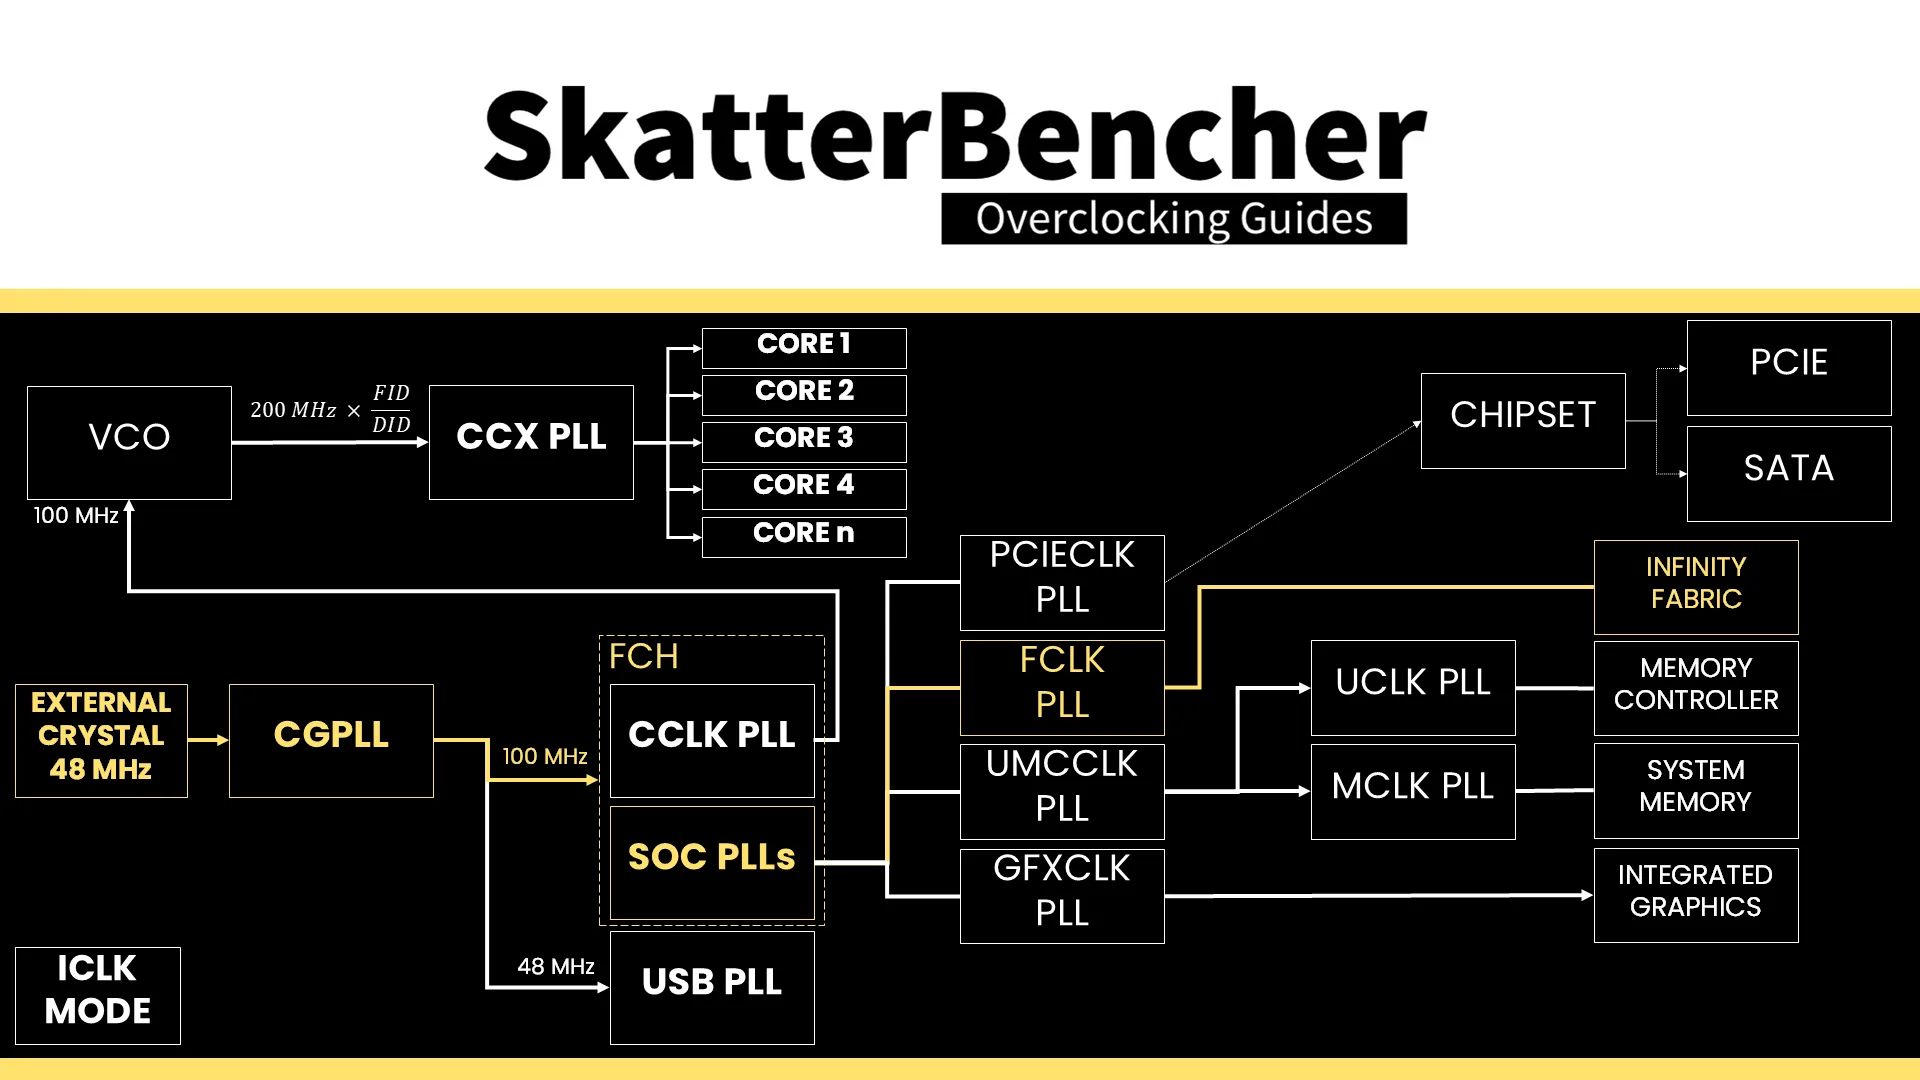
The Fabric frequency, or FCLK, is generated by the SOC PLL, derived from a 100 MHz reference clock input. The reference clock is multiplied by the FCLK ratio, which you can configure in the BIOS.
The standard operating frequency of the infinity fabric is 1800 MHz, but on many boards, you’ll find it runs at 2 GHz or higher when EXPO is enabled. In fact, with DOCP Tweaked it’s even running at 2.1 GHz.
Since we’re focused on tuning the memory, I didn’t bother to check if I could further improve the performance, however in SkatterBencher #92 I demonstrated this CPU can run the FCLK up to 2.2 GHz.
Memory Controller Tuning
AMD Granite Ridge has two DDR5 Unified Memory Controllers, or UMC in short, and each provides two 32-bit memory channels. The memory controllers are located in the IO die and are identical to the memory controllers on Ryzen 7000 “Raphael” processors.
The Unified Memory Controller frequency, or UCLK, is derived from the UMCCLK, one of the SOC PLLs. The UMCCLK is driven by a 100 MHz reference clock derived from either an internal or external clock generator.
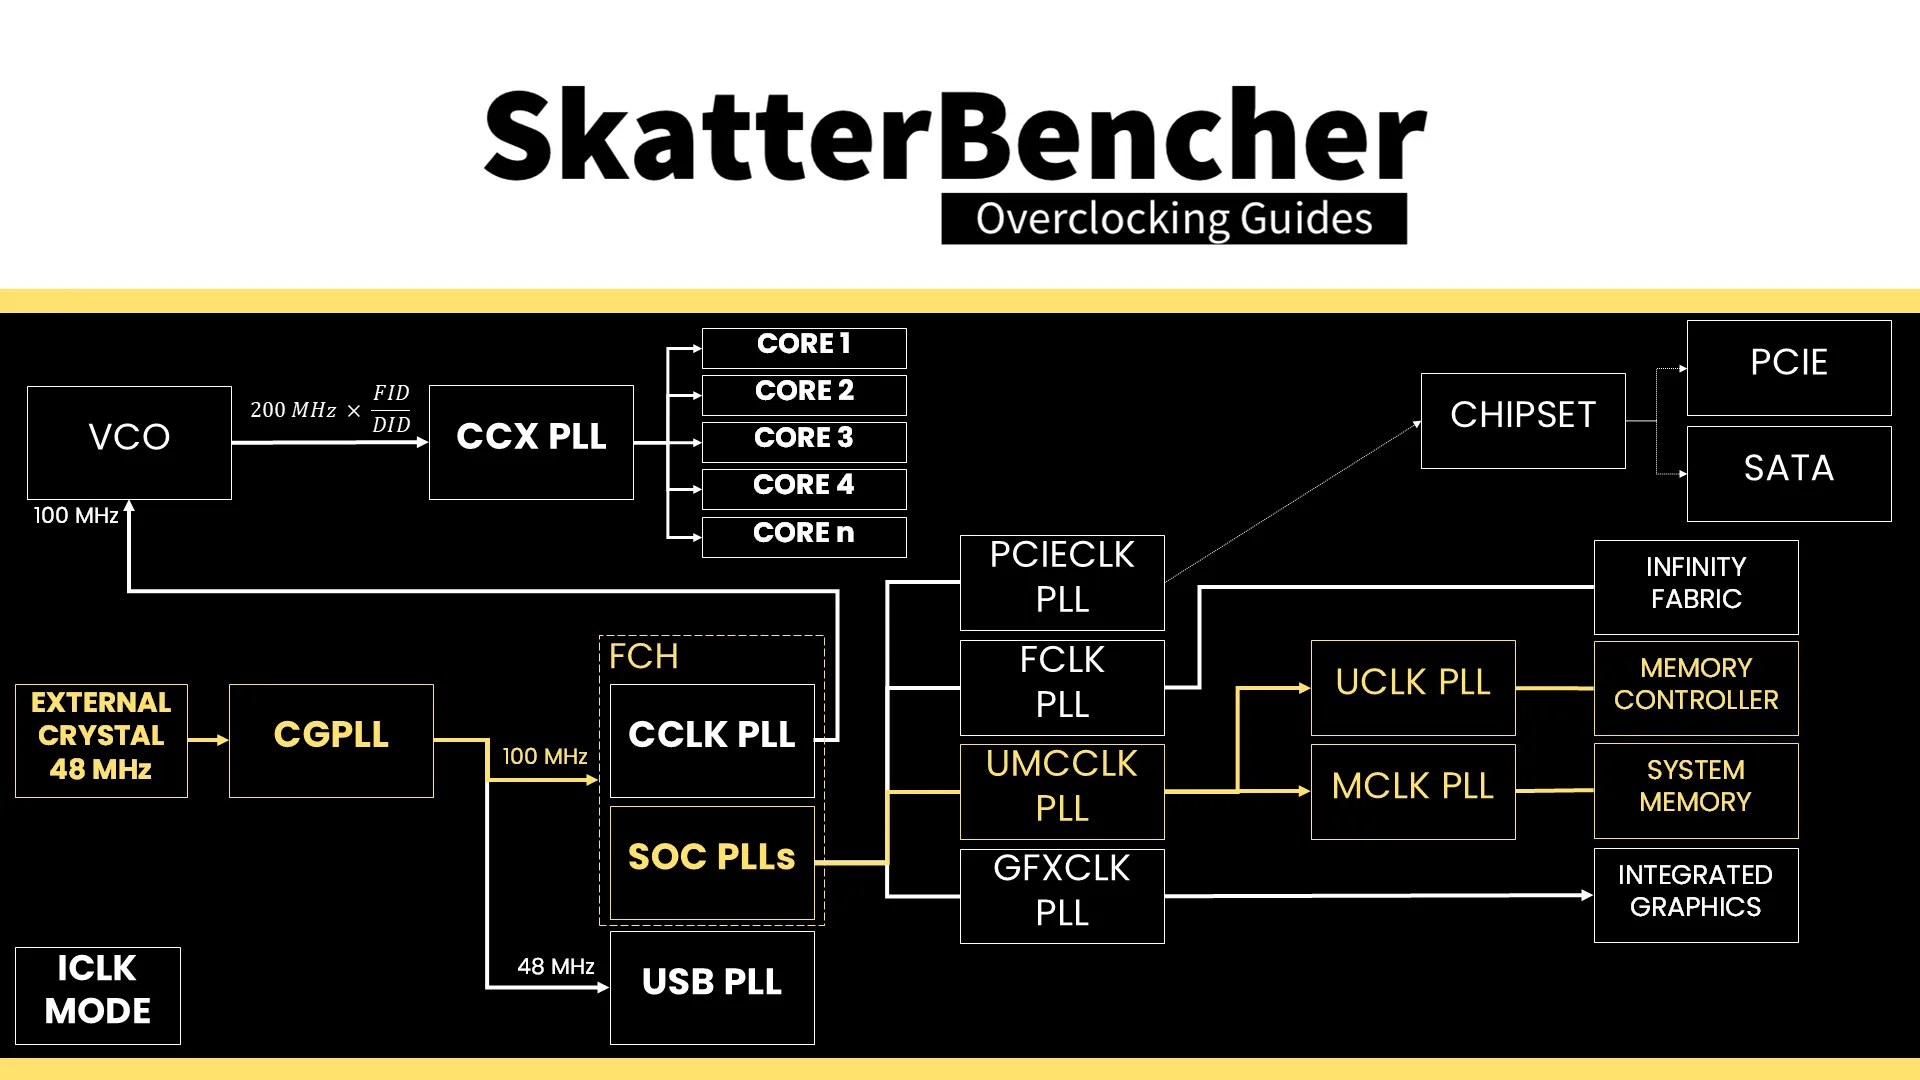
The memory controller frequency is tied directly to the system memory frequency. It can run either at the same or half its frequency. At default, the memory controller runs at the same frequency as the system memory at 2400 MHz. However, we find that when enabling DOCP, the motherboard auto-rules drops the memory controller frequency to half the memory frequency.
We can easily force the memory controller to run at the same frequency as the system memory by setting UCLK DIV1 Mode to UCLK=MEMCLK. However, that’s only possible if we run the memory at around DDR5-6000 which is what we’ll try in this overclocking strategy.
The VDDCR_SOC voltage rail provides the external power for multiple internal voltage regulators on SOC for the various IP blocks, including the memory controller. The VDDIO_MEM voltage rail is related as it provides the external power for the VDDP DDR5 bus signaling.
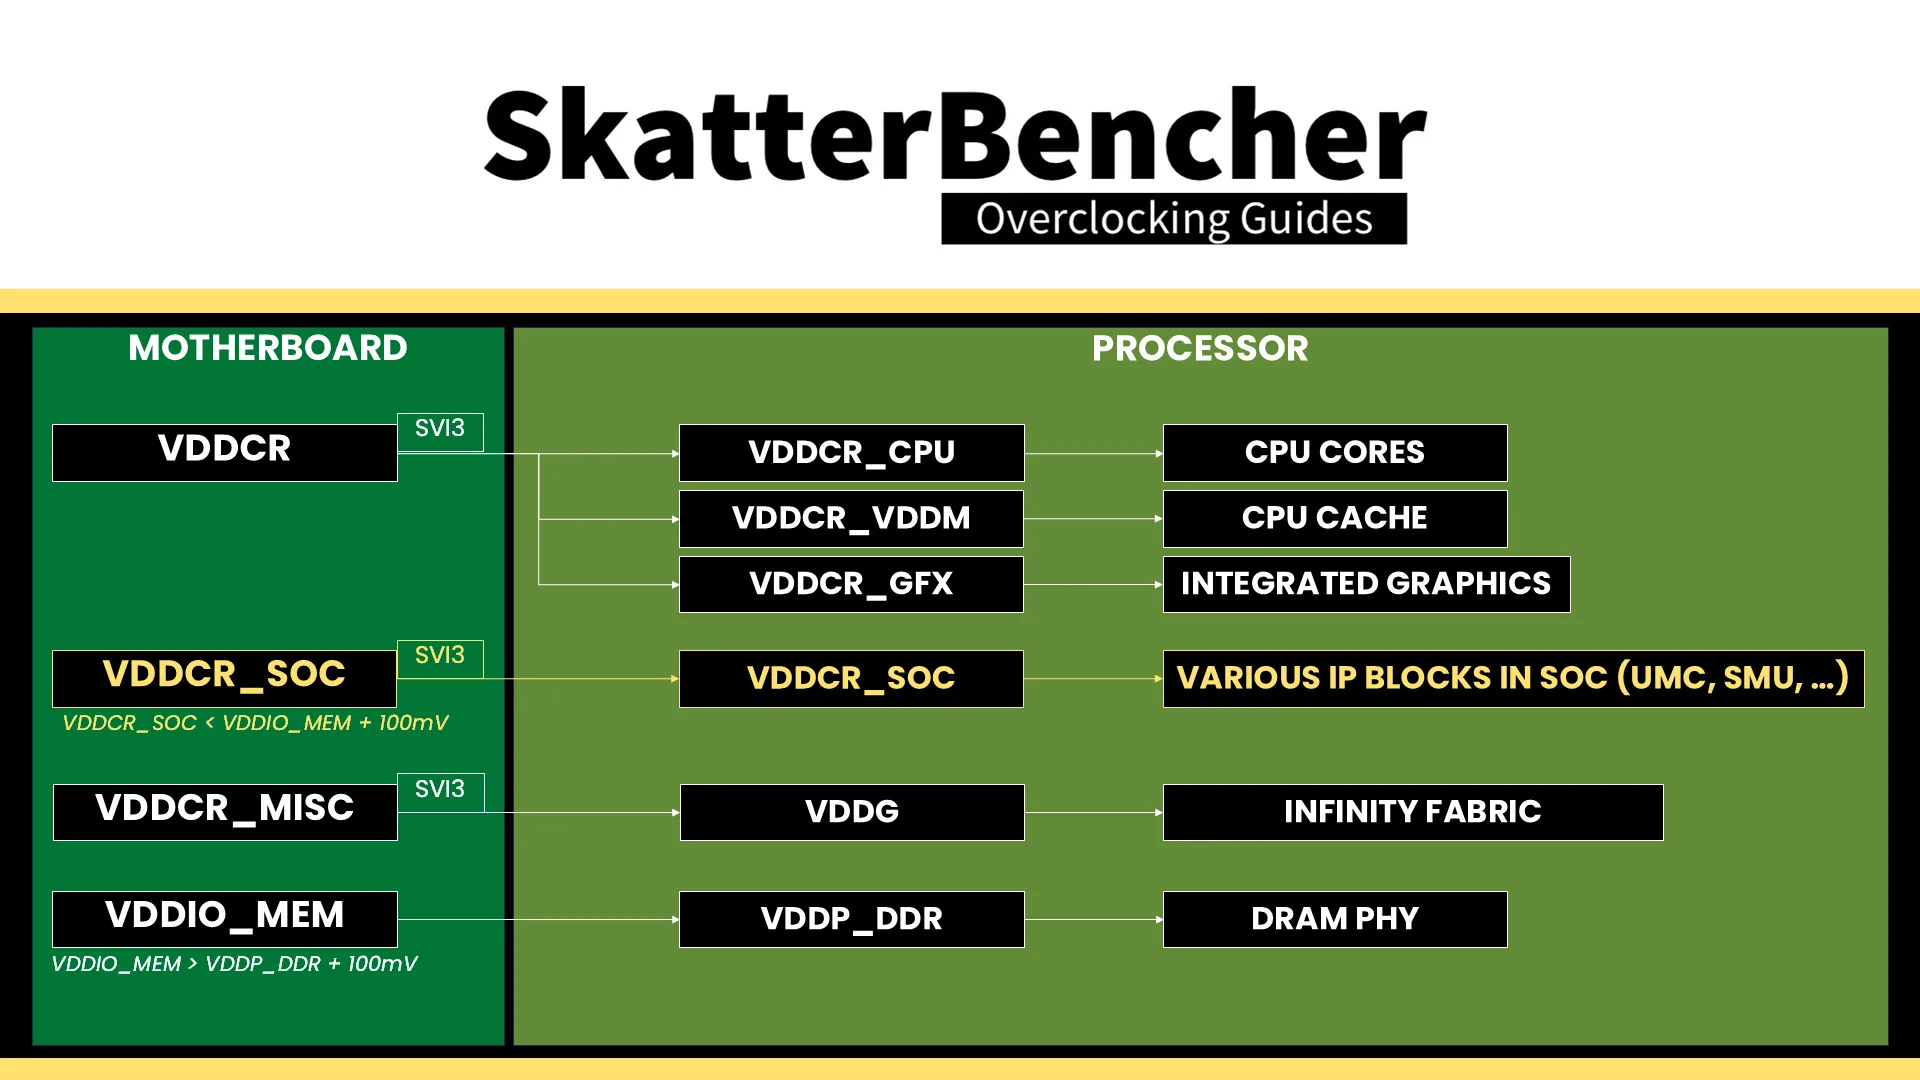
It is essential to know that the VDDCR_SOC voltage must always be lower than VDDIO_MEM_S3 + 100mV. The default VDDCR_SOC voltage is 1.05V and can be set to 1.30V under ambient conditions. That’s typically required for running the memory controller in sync with the memory at DDR5-6400. However, we need LN2 mode enabled for higher voltages.
System Memory Timings Tuning
The last piece of the memory subsystem performance tuning is tuning the memory timings. For this, I rely in part on ASUS’ Memory Presets technology.
ASUS Memory Preset: Hynix 7600MHz 1.45V 2x16GB SR
ASUS Memory Presets is an ASUS overclocking technology that provides a selection of memory-tuning presets for specific memory ICs. The presets will adjust the memory timings and voltages.
The ROG Crosshair X870E Hero motherboard sports fourteen memory profiles for a variety of memory ICs and configurations. At first, I thought I’d try the Hynix 6200 or 6400 1.4V profiles but these turned out not to be stable. So, just like I do in many SkatterBencher guides, I settled for the Hynix 7600MHz 1.45V 2x16GB SR preset.
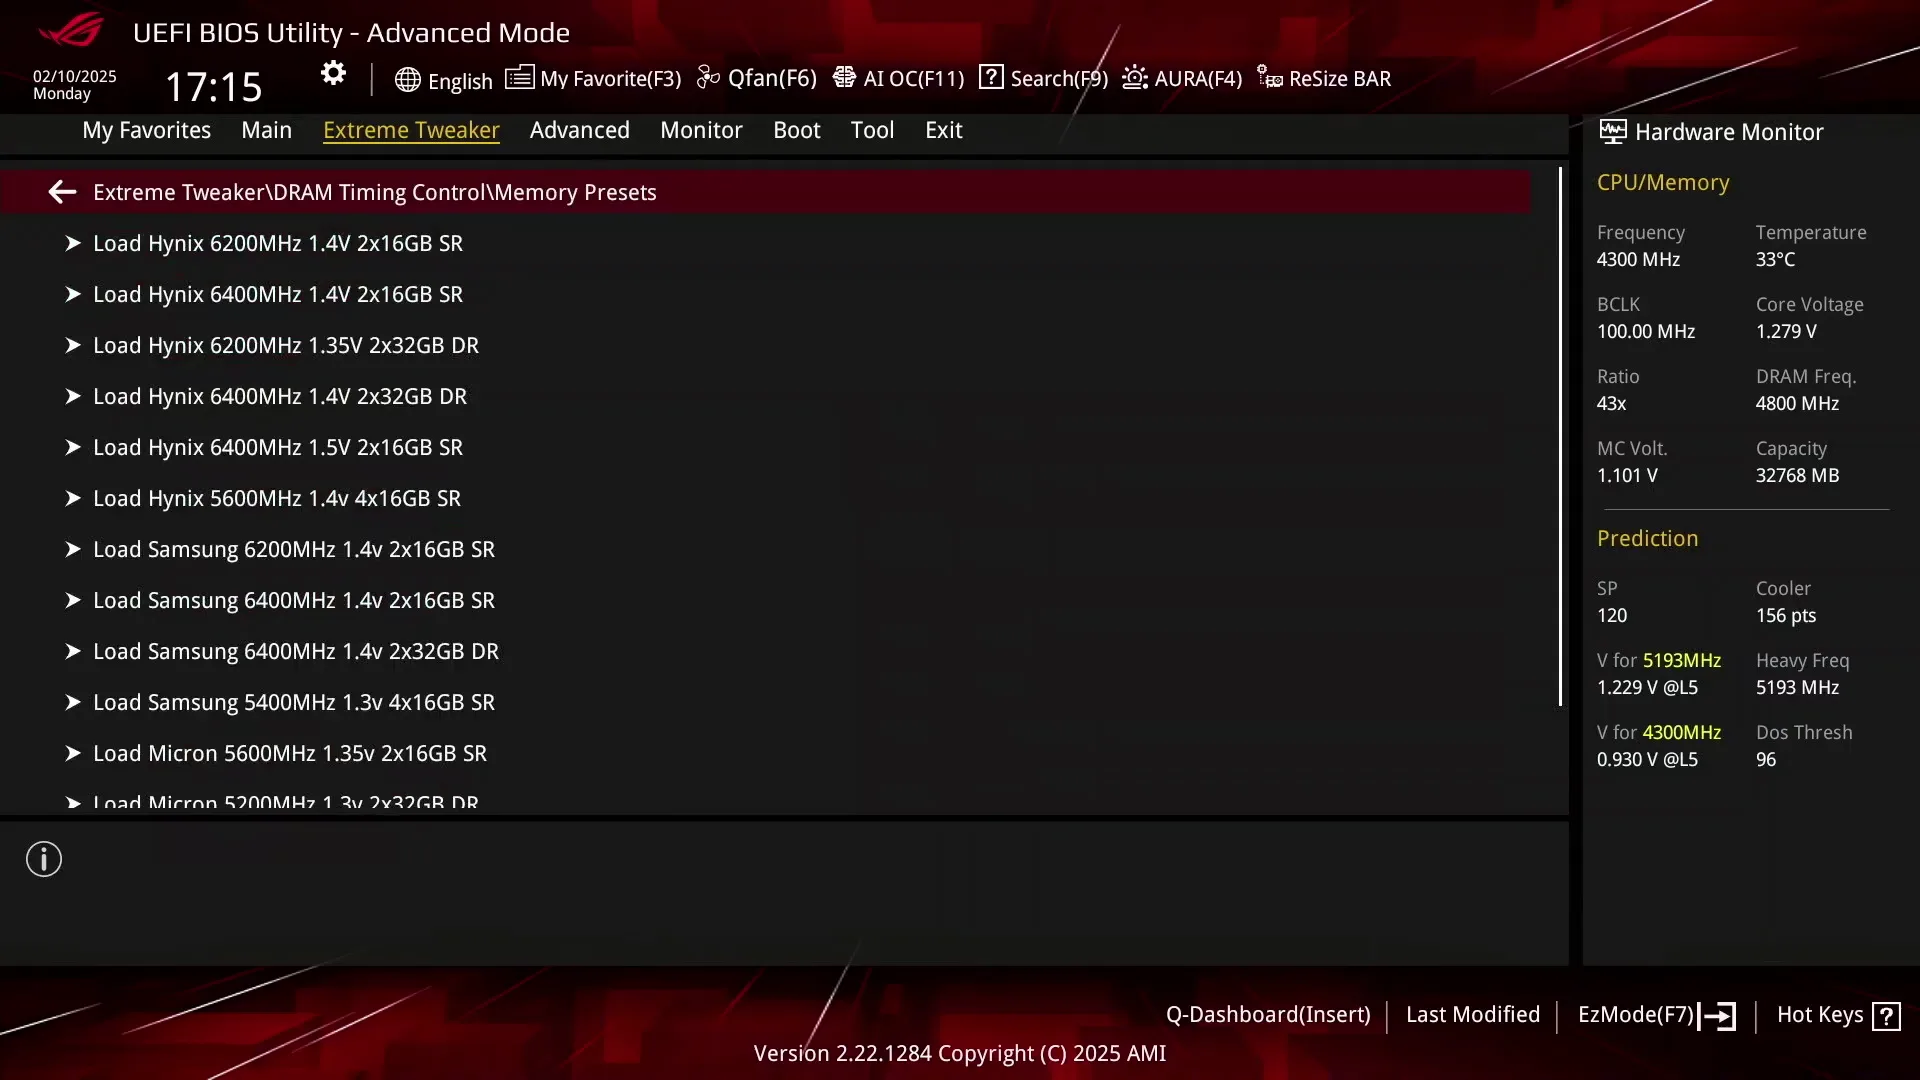
This turned out to be stable out of the box but only up to DDR5-6200. That’s not so surprising as not every CPU has memory controllers capable of running DDR5-6400. I could have tried to increase the VDDCR_SOC voltage, but didn’t bother.
Compared to the DOCP Tweaked configuration, we find that many parameters have changed, especially the secondary and tertiary memory timings. At first sight it might seem a little weird that I’d prefer DDR5-6200 over DDR5-6800 since the memory frequency is about 9% lower. But what we lose in memory frequency we gain back in memory controller frequency and memory latency.


Take for example the tWRWRSD and -DD timings which specify delays between successive writes in the same and different DIMMs respectively. In DOCP Tweaked, the delay is 4.41 nanoseconds but with our tuned configuration it’s only 0.32 nanoseconds!
BIOS Settings & Benchmark Results
Upon entering the BIOS
- Go to the Extreme Tweaker menu
- Set Ai Overclock Tuner to DOCP Tweaked
- Set Memory Frequency to DDR5-6200
- Enter the DRAM Timing Control submenu
- Enter the Memory Presets submenu
- Select Load Hynix 7600MHz 1.45V 2x16GB SR and click OK
- Leave the Memory Presets submenu
- Set UCLK DIV1 Mode to UCLK = MEMCLK
- Enter the Memory Presets submenu
- Leave the DRAM Timing Control submenu
- Enter the Precision Boost Overdrive submenu
- Set Precision Boost Overdrive to enabled
Then save and exit the BIOS.
We re-ran the benchmarks and checked the performance increase compared to the default operation.
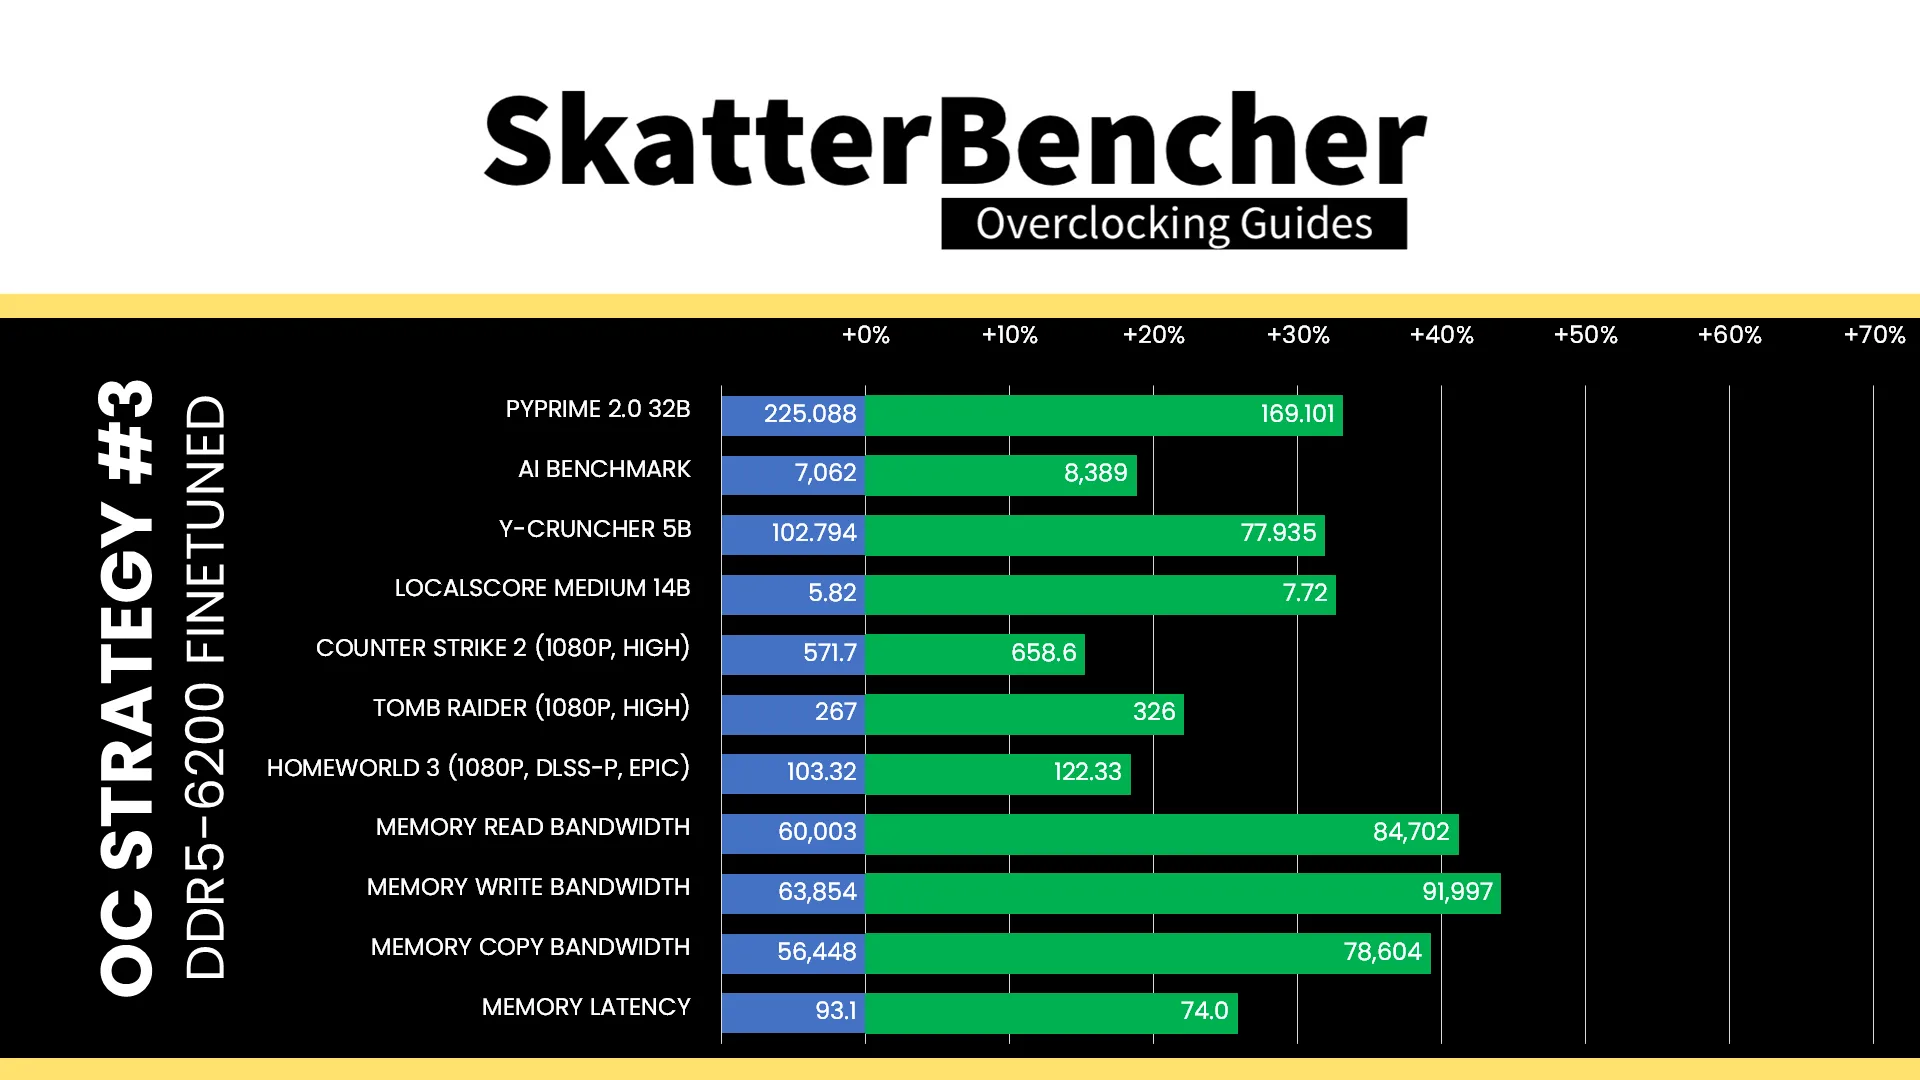
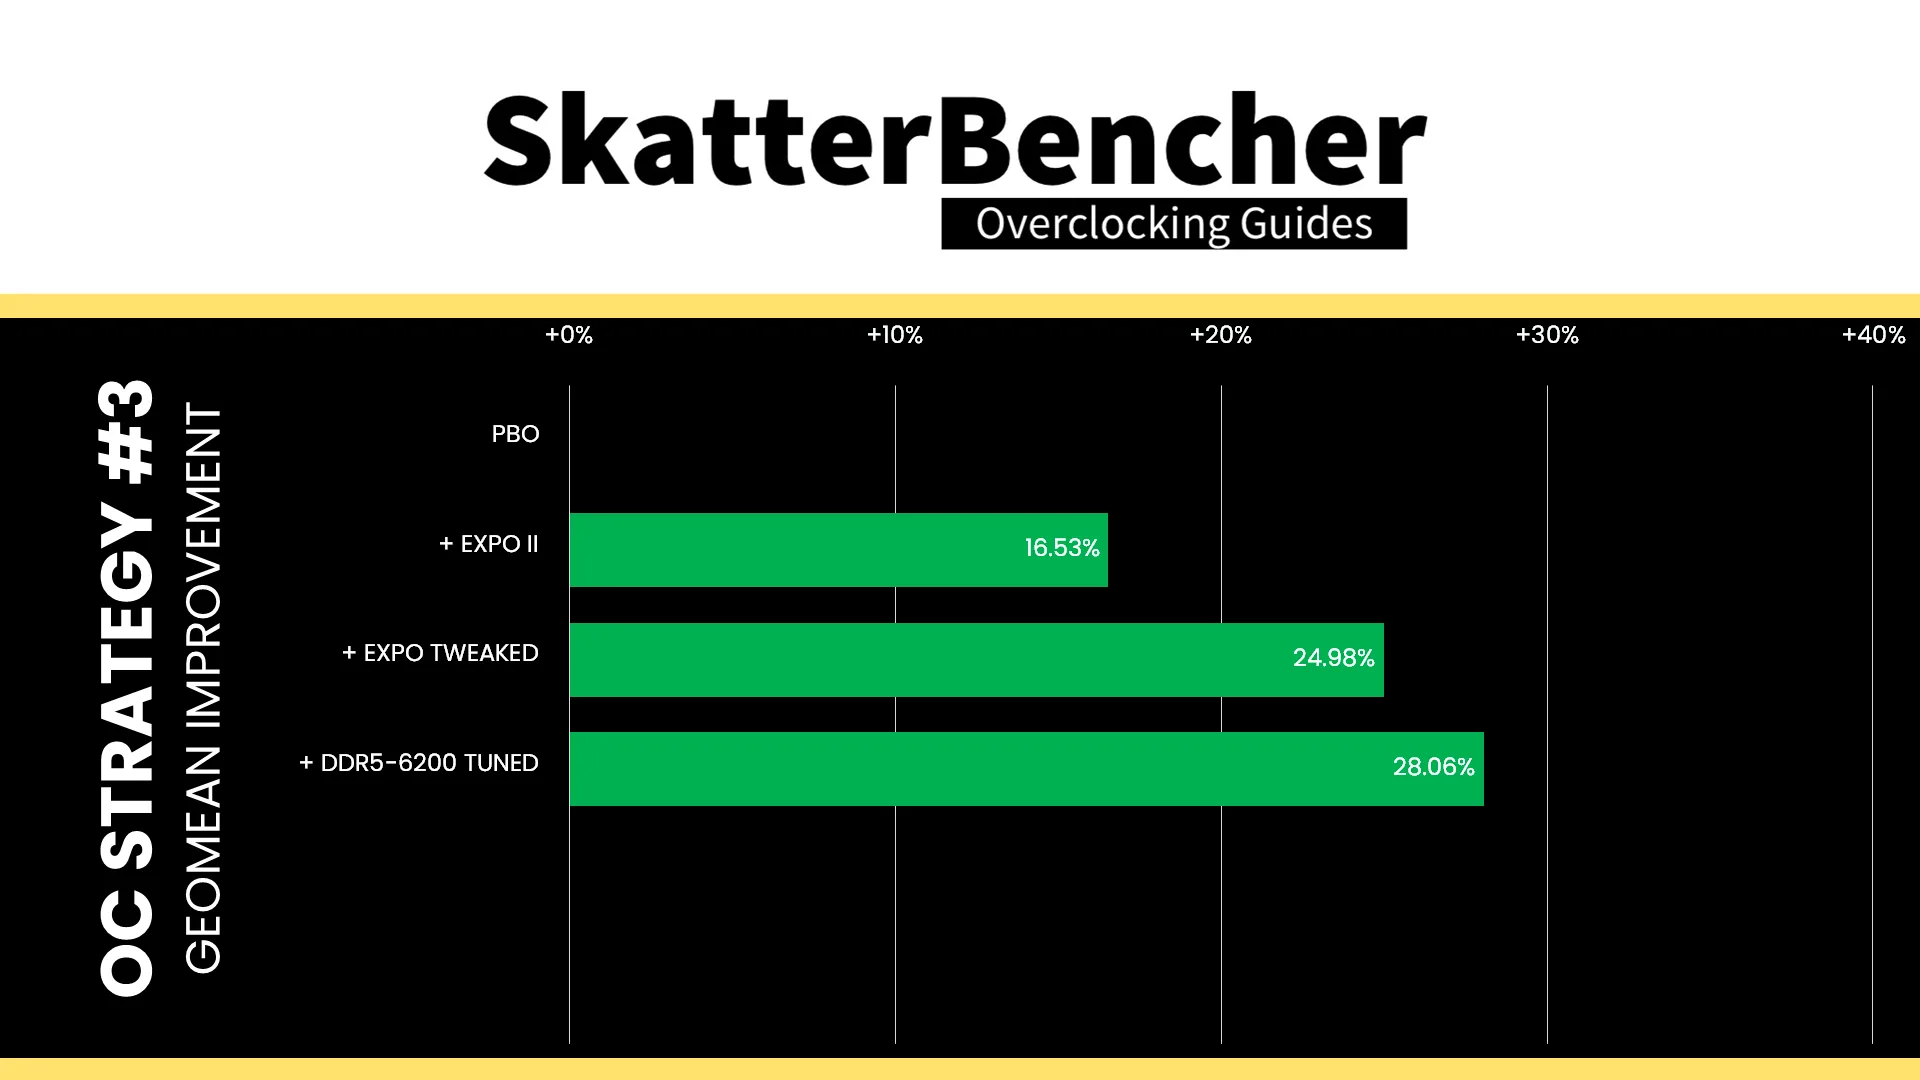
Despite reducing the memory frequency by 9% to DDR5-6200, we can see a significant uplift from finetuning the memory timings and the increased memory controller frequency. And more so in real workloads than in synthetic workloads. The Geomean performance speedup improves another three percentage points, and we get a maximum benchmark improvement of +33.11% in PyPrime.
This configuration also passed our 1-hour OCCT Memory Stress Test.

OC Strategy #4: DDR5-7400 Memory Tuned
In our fourth overclocking strategy, we switch back to running the UCLK at half the speed of the MCLK and try to push the memory frequency for maximum performance. We keep everything else the same, meaning we also use the Hynix 7600 MHz memory preset and don’t make any changes to the voltages.
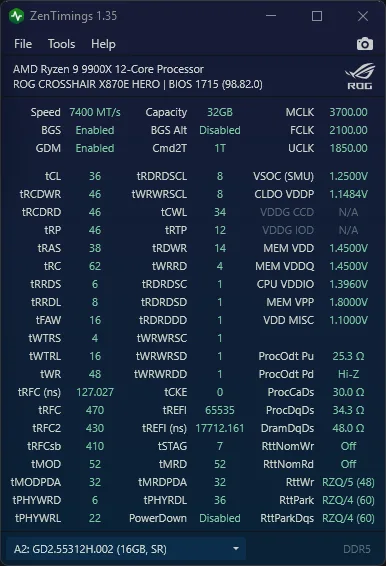
The only downside of this strategy is that we’re losing significant memory controller frequency but that’s more than compensated for with the roughly 20% faster memory.
BIOS Settings & Benchmark Results
Upon entering the BIOS
- Go to the Extreme Tweaker menu
- Set Ai Overclock Tuner to DOCP Tweaked
- Set Memory Frequency to DDR5-7400
- Enter the DRAM Timing Control submenu
- Enter the Memory Presets submenu
- Select Load Hynix 7600MHz 1.45V 2x16GB SR and click OK
- Leave the Memory Presets submenu
- Set UCLK DIV1 Mode to UCLK = MEMCLK/2
- Enter the Memory Presets submenu
- Leave the DRAM Timing Control submenu
- Enter the Precision Boost Overdrive submenu
- Set Precision Boost Overdrive to enabled
Then save and exit the BIOS.
We re-ran the benchmarks and checked the performance increase compared to the default operation.
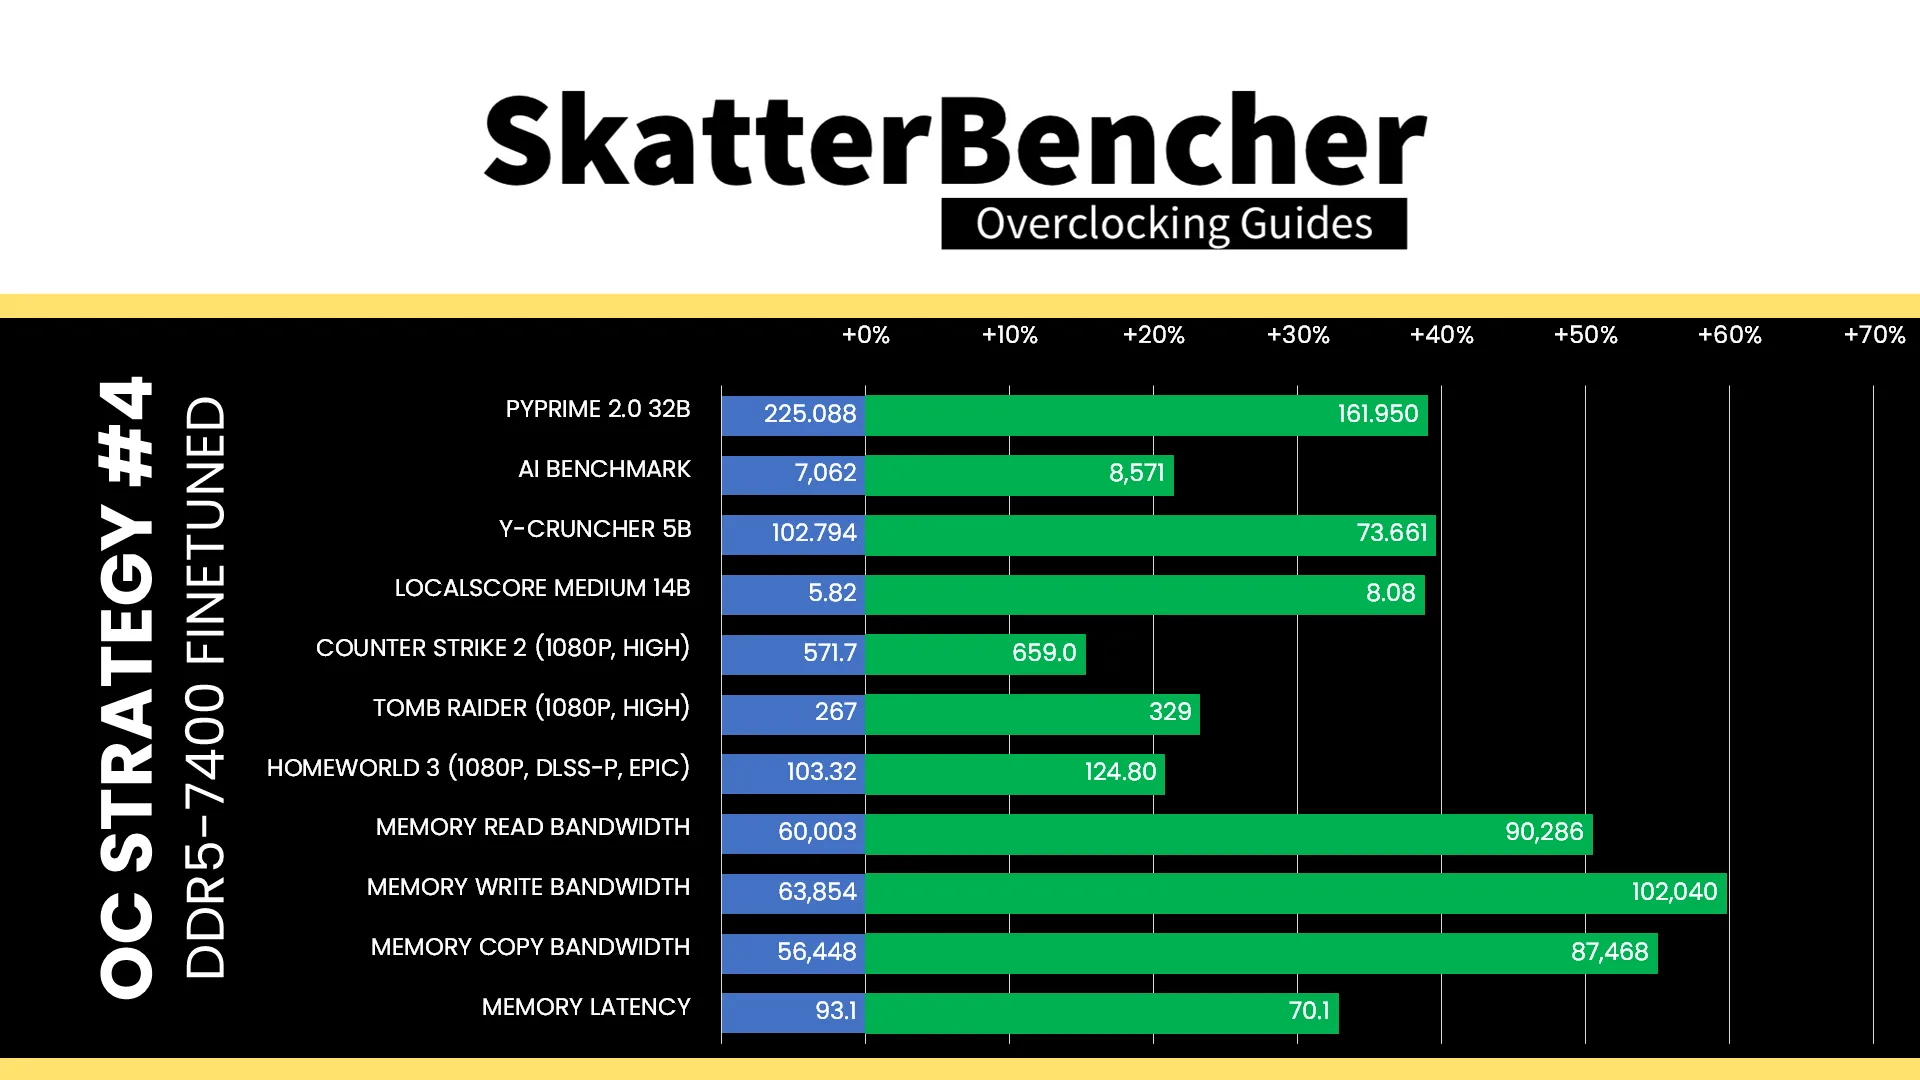
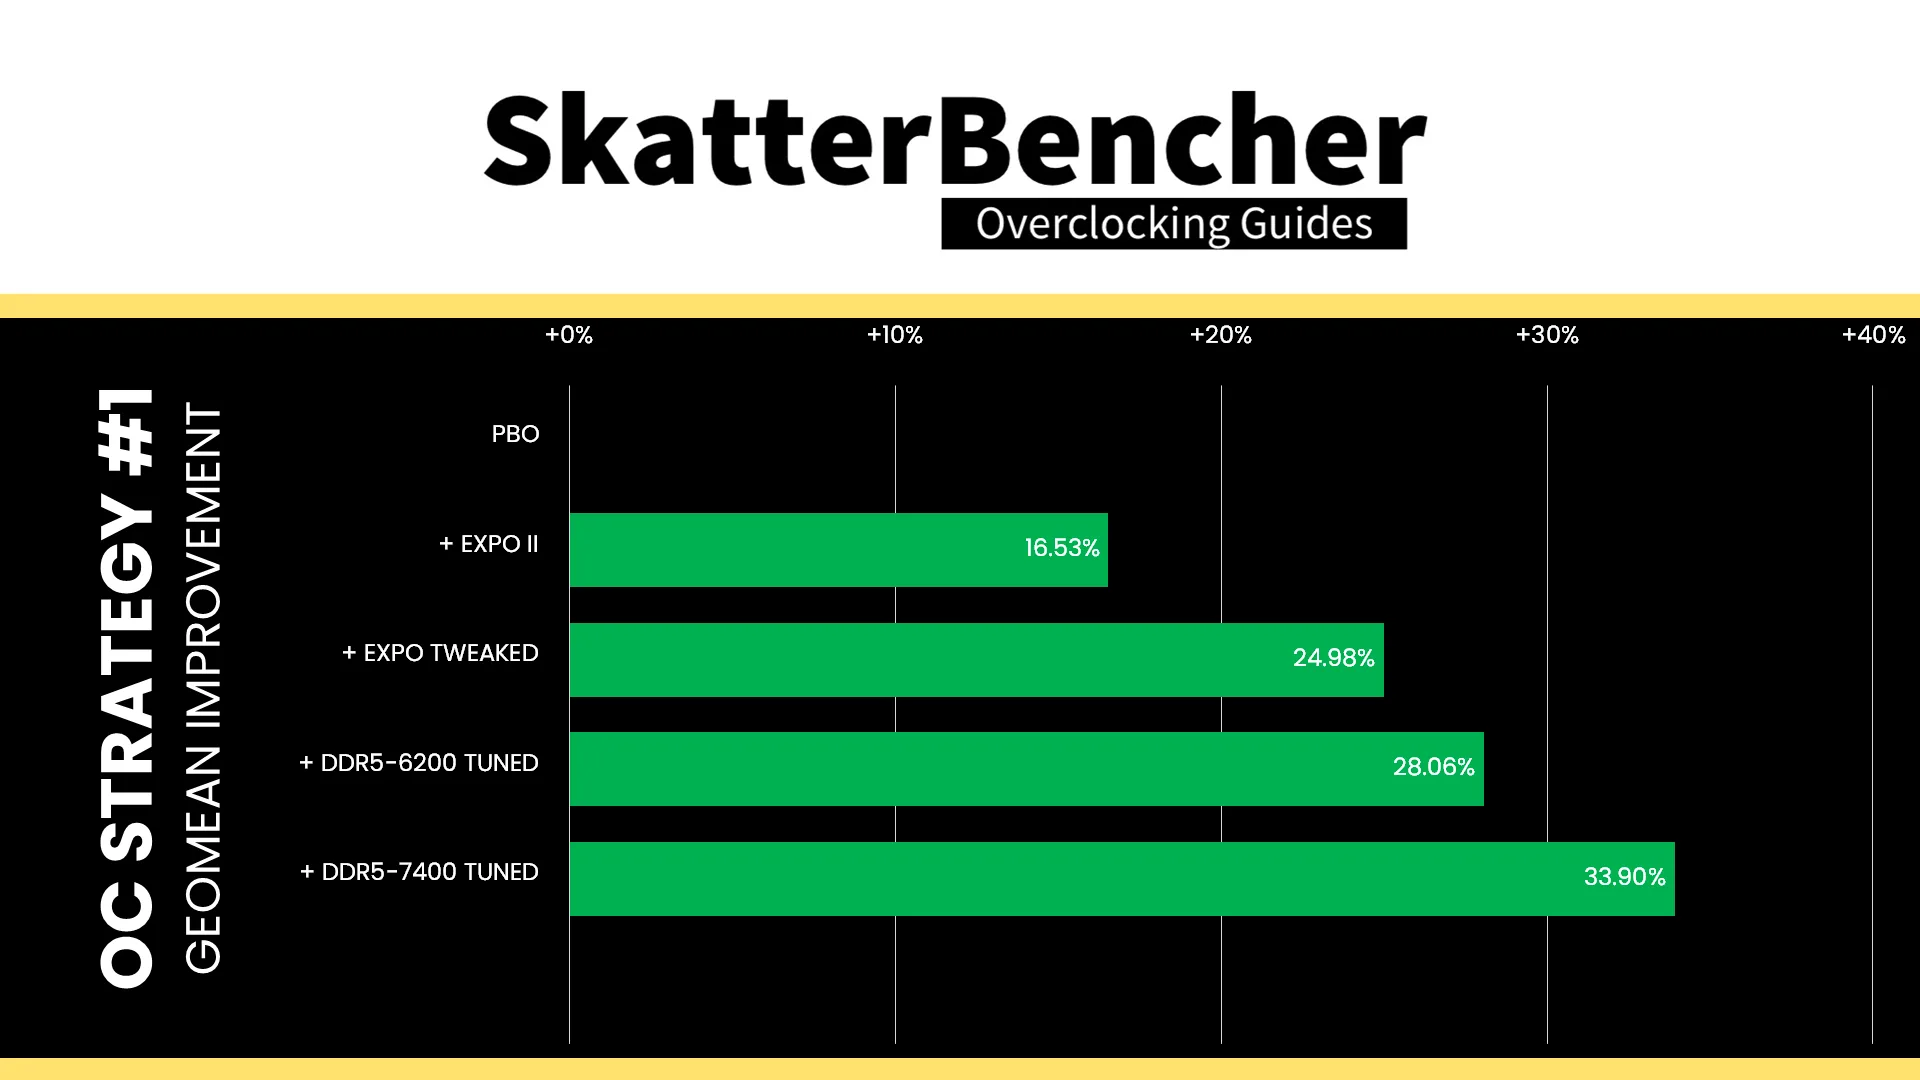
The increased memory frequency helps improve performance primarily in the synthetic workloads, but we see similar performance in gaming workloads where slower memory with a faster memory controller performs pretty much the same. The Geomean performance speedup improves another six percentage points, and we get a maximum benchmark improvement of +39.55% in Y-Cruncher.
This configuration not only passed our 1-hour OCCT Memory Stress test but we also obtained an OCCT Memory Platinum Certificate which takes 12 hours to complete.

And if you’re more of a Karhu fan, then also good news because there’s 0 errors after 4 hours and 17,500% coverage.
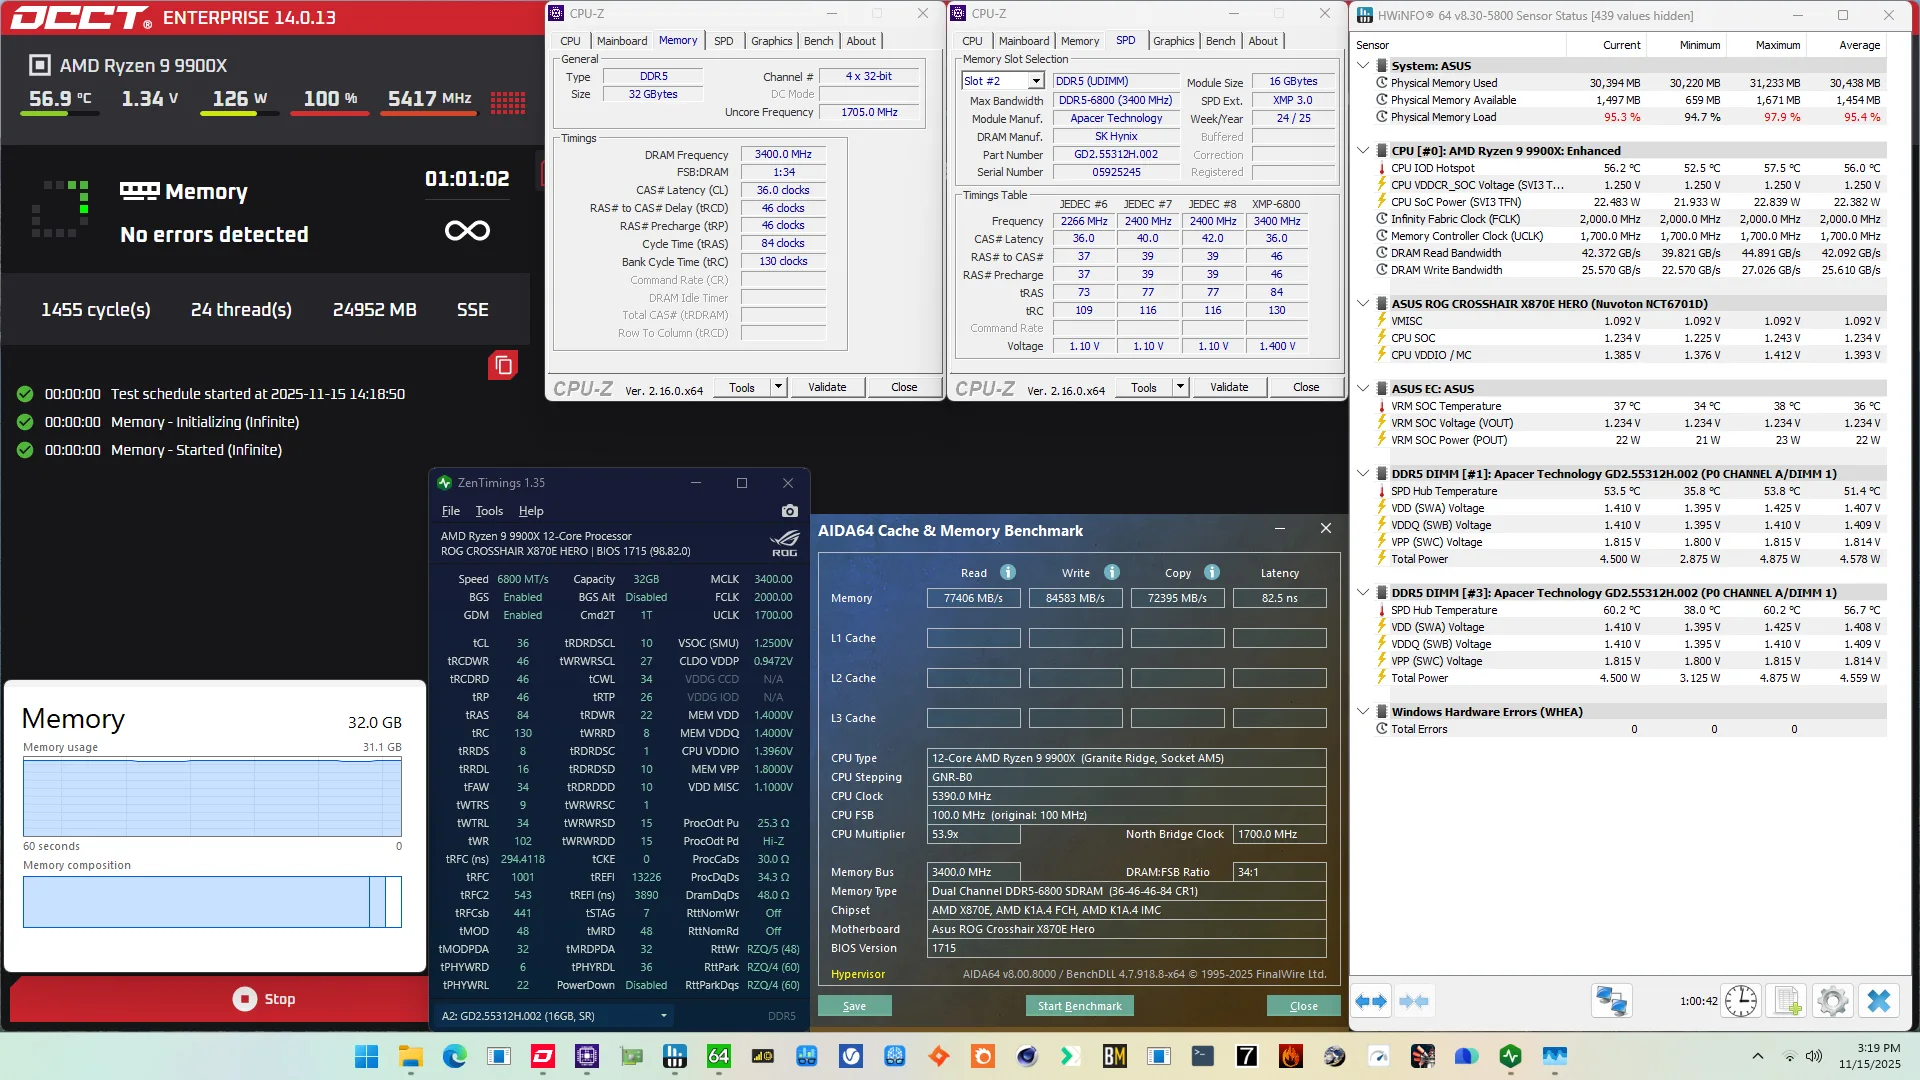
OC Strategy #5: DDR5-7600 Unstable Performance
In our final overclocking strategy, I tried to increase the performance by lifting the frequency even further but found it to be unstable.
Memory Stability Testing
So far I haven’t said much about memory stress testing apart from using the OCCT Memory Stress Test as validation that our configuration is stable. Testing for memory stability is a bit of a hot topic in the enthusiast community as there are several yardsticks used by different communities.
For this guide, I decided to test a bunch of stress tests with a definitely unstable configuration of DDR5-7800, and found it more confusing than clarifying.
| Stress Test | Result |
|---|---|
| OCCT Memory Test | 1min 15sec FAIL |
| TestMem5 Extreme @ anta777 | 2min 5sec FAIL |
| Karhu | 6min 16sec FAIL |
| RAM Test Pro | 16min 57sec FAIL |
| Memory Check | PASS |
| AIDA64 Memory Stress Test | PASS |
| PassMark MemTest86 | PASS |
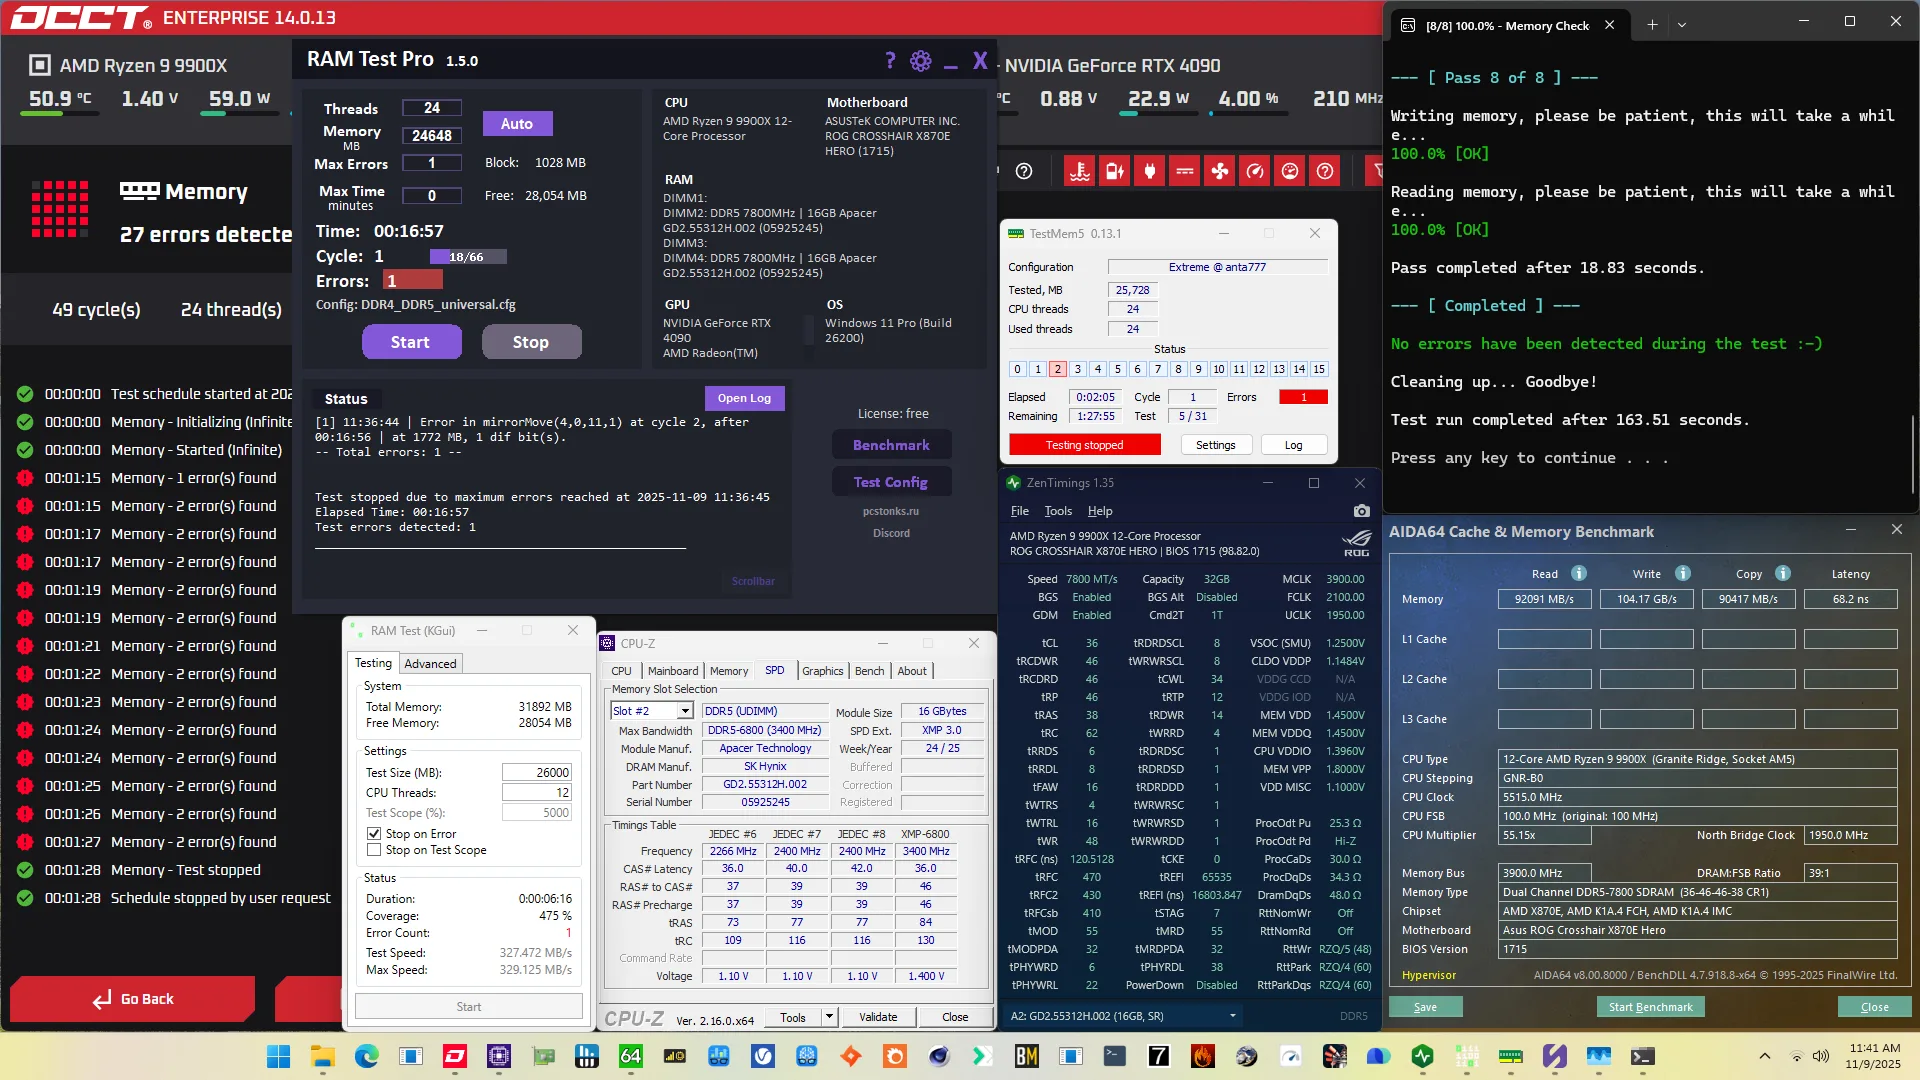

The point I’m trying to make is not that some software is better than others, but rather that stress testing the memory subsystem is not straight-forward.
First, there’s the many actors in data transfer with multiple memory controllers and billions of memory cells. Then, there’s various ways of using the available memory ranks and banks to access data as quickly as possible. And, finally, we’re trying to access the data as fast as possible without errors. There’s just so much that can go wrong.
And, unfortunately, it’s really hard to figure out what’s the root cause of a reported memory testing error. Is it a DRAM IC? If yes, which one? Is it the memory controller? Which one? Is it a particular sequence of ICs? Is it writing, reading, or refreshing? We can’t tell for sure and so we have to rely on heuristics to come up with ideas to improve performance and stability.
BIOS Settings & Benchmark Results
Upon entering the BIOS
- Go to the Extreme Tweaker menu
- Set Ai Overclock Tuner to DOCP Tweaked
- Set Memory Frequency to DDR5-7600
- Enter the DRAM Timing Control submenu
- Enter the Memory Presets submenu
- Select Load Hynix 7600MHz 1.45V 2x16GB SR and click OK
- Leave the Memory Presets submenu
- Set UCLK DIV1 Mode to UCLK = MEMCLK/2
- Enter the Memory Presets submenu
- Leave the DRAM Timing Control submenu
- Enter the Precision Boost Overdrive submenu
- Set Precision Boost Overdrive to enabled
Then save and exit the BIOS.
We re-ran the benchmarks and checked the performance increase compared to the default operation.
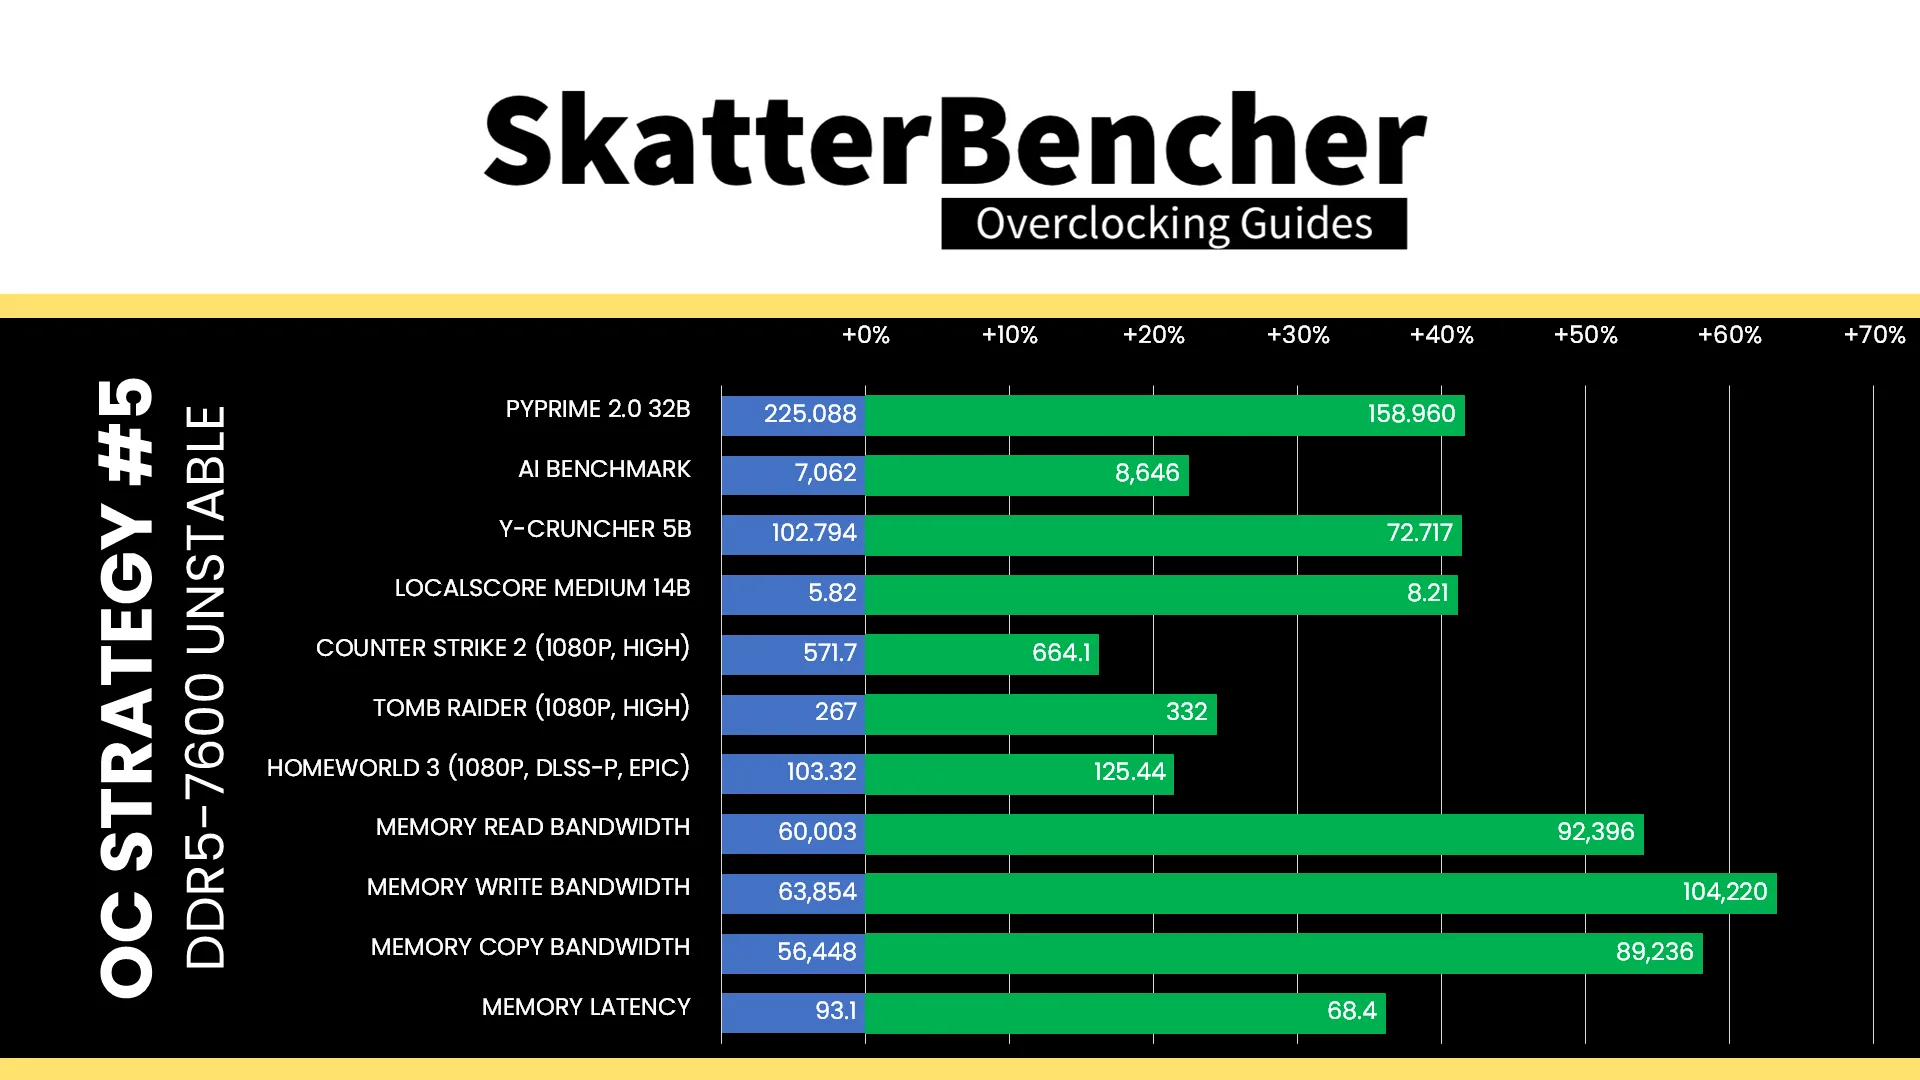
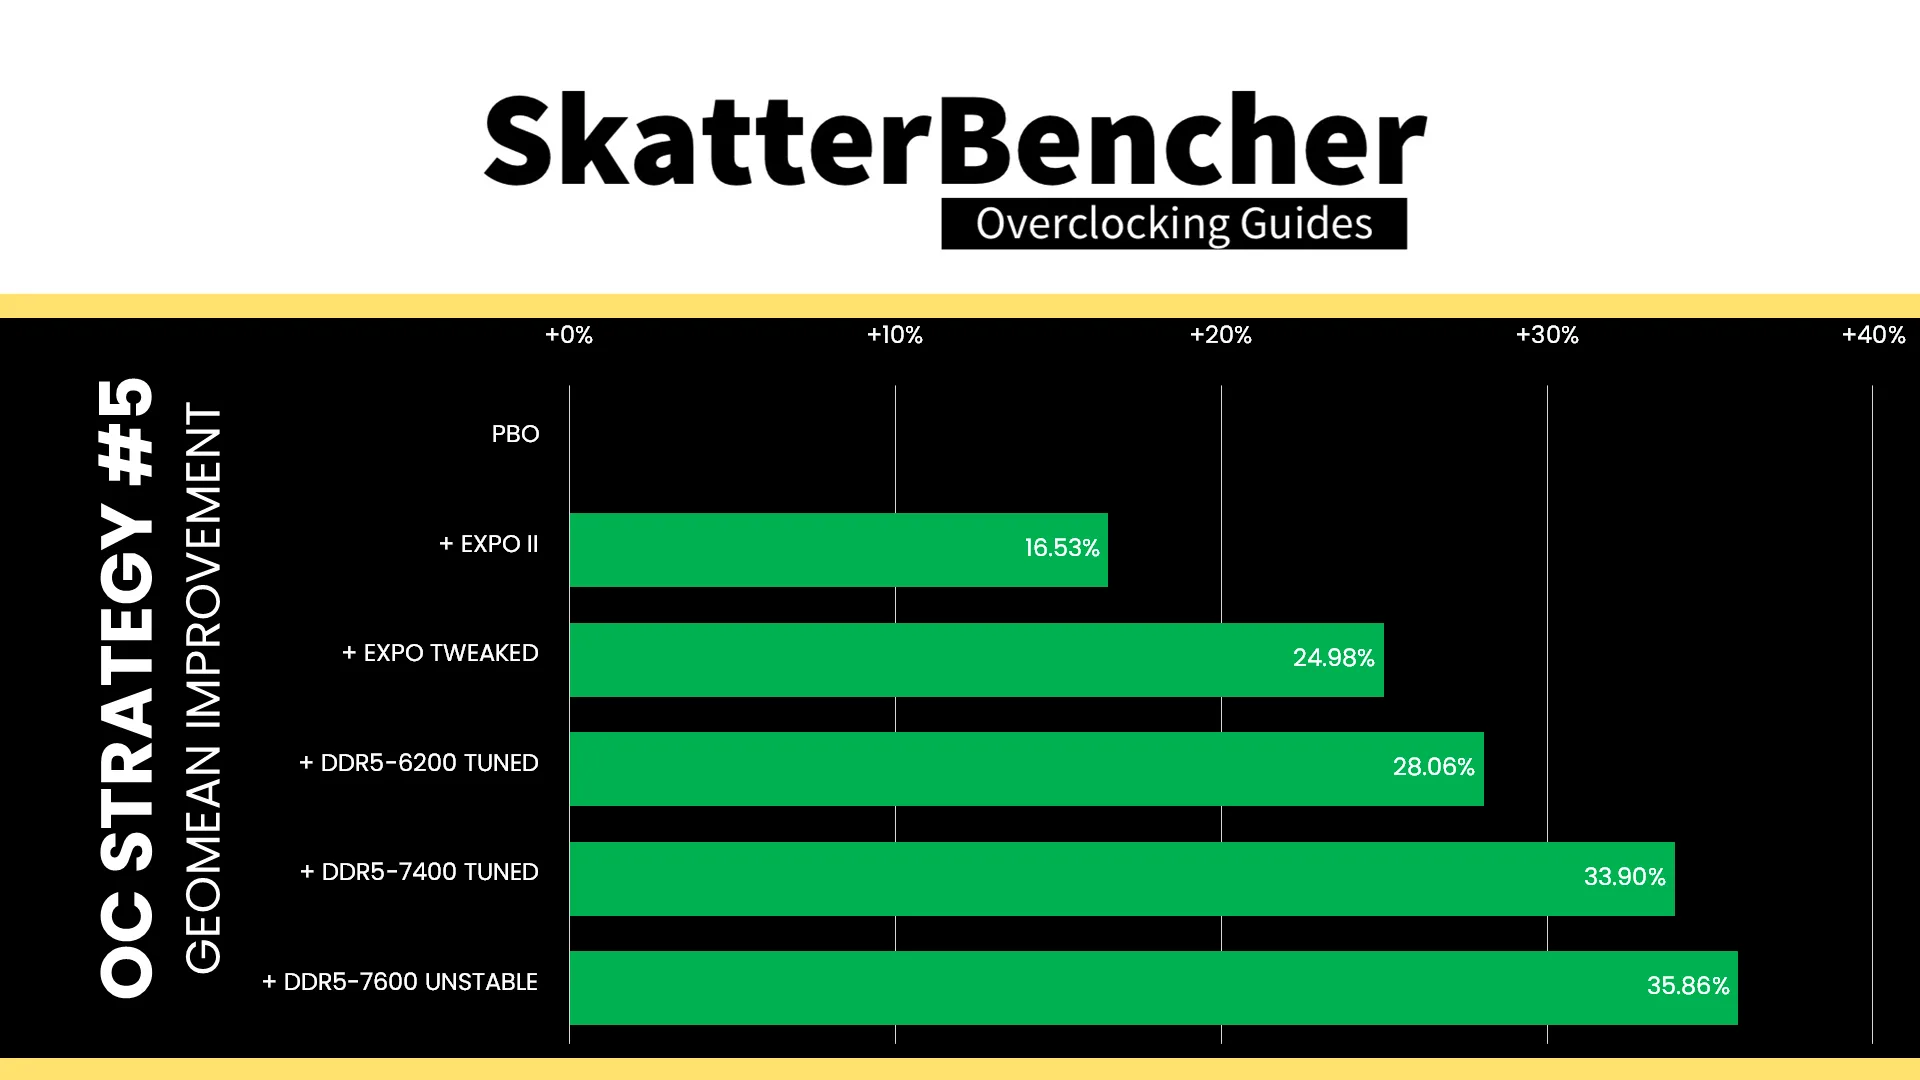
Going from DDR5-7400 to 7600 is not an incredibly large increase in memory frequency but by keeping the memory timings the same, we see an improvement in performance across the board. The Geomean performance speedup increases by another two percentage points to +35.86%, and we get a maximum benchmark improvement of +41.60% in PyPrime.
Apacer NOX RGB DDR5-6800 2x16GB: Conclusion
Alright, let’s wrap this up.
I initially planned to make this a short, 10-minute video about tuning memory but it turned out to be a much longer guide. There’s just so much to cover when it comes to tuning memory performance.
There are three main takeaways from this blog post.
- First, it’s clear that memory performance is a key bottleneck in modern systems with extremely fast compute cores. Therefore, optimizing memory performance can significantly impact system performance.
- Second, you don’t need the highest-speed kits to squeeze more performance. This kit’s DDR5-6800C36 spec is far from the highest performance kits available on the market but with a little bit of effort we could still squeeze out lots of extra performance.
- Lastly, much of the performance is locked in the secondary and tertiary sub-timings. So don’t go chasing high frequency but rather think of operating frequency as one of the means to navigate balancing stability and performance.
Anyway, that’s it for this guide.
I want to thank Apacer for sponsoring this SkatterBencher guide, my Patreon supporters and YouTube members for supporting my work. I’m also tempted to try this particular kit a 4-DIMM configuration as a non-sponsored blog post so let me know in the comments if that’s something you’d like to see,
If you have any questions or comments, please drop them in the comment section below.
See you next time!