SkatterBencher #27: AMD Ryzen 9 5950X Overclocked to 5117 MHz
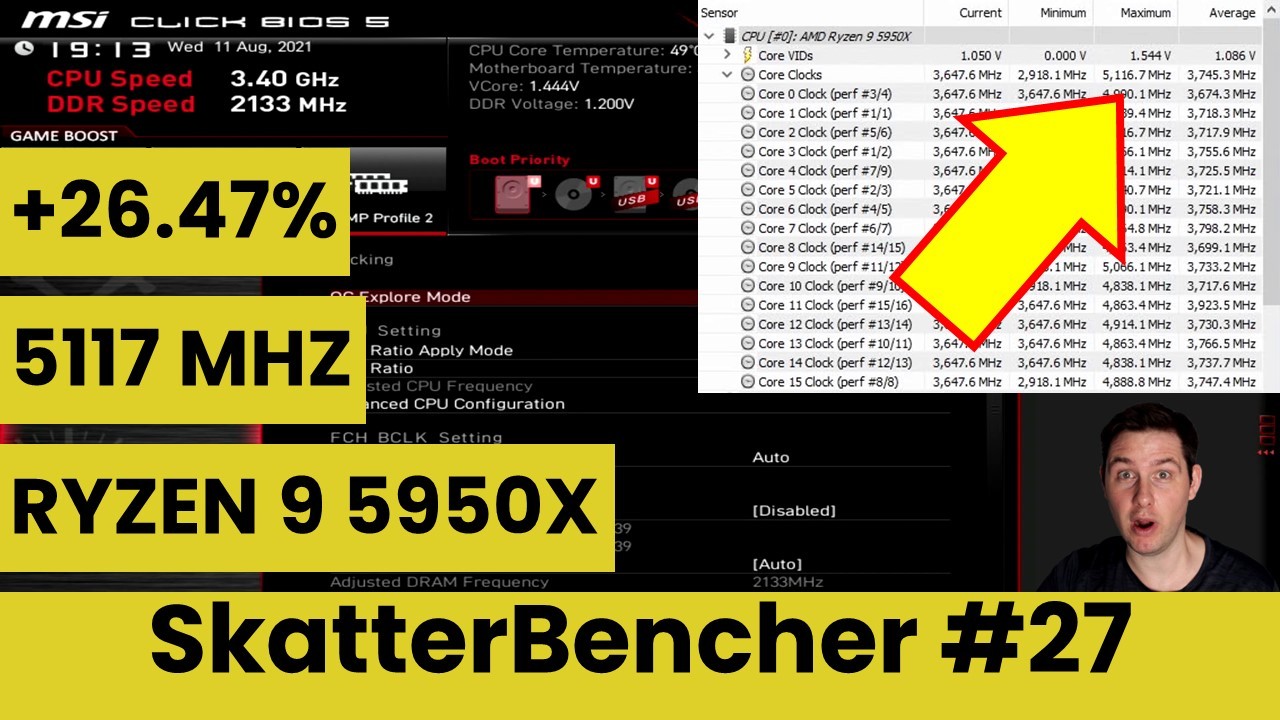
We overclock the AMD Ryzen 9 5950X processor up to 5117 MHz with the EK-Quantum MSI MPG X570S Carbon EK X motherboard and a Supercharged PBO.
In today’s article we have a look at overclocking the Ryzen 9 5950X up to 5117 MHz with a supercharged PBO and we learn that higher peak frequency doesn’t always mean a faster system.
We also use the X570S Carbon EK X motherboard which is the first AMD variant of the Carbon EK X series by MSI and EK. The Carbon EK X comes with an EK monoblock cooling the CPU as well as the VRM components.
Alright, there’s lots of information and data to get through so let’s get this going.
Introduction
The AMD Ryzen 9 5950X CPU launched back in November alongside its smaller brothers the 5990X, 5800X, and the 5600X. The 7nm 16-core Ryzen 9 5950X has a base clock frequency of 3400 MHz and a maximum listed boost frequency of up to 4900 MHz
In today’s video we are pairing the Ryzen 9 5950X with the EK-Quantum MSI MPG X570S Carbon EK X motherboard. The X570S Carbon EK X is the latest arrival in the EK x MSI collaboration range, after the Z490 and Z590 variants. It is thus the first offer for AMD platform. Given the success of AMD in the PC DIY enthusiast space, it makes sense for the Carbon EK X to also get a Team Red variant.

The X570S motherboards feature an improved X570 chipset and are now able to run a silent passive cooling solution. So, S stands for Silent. MSI also took this refresh opportunity to significantly upgrade the spec of their motherboard lineup. The parts we are particularly concerned with in this video is the upgraded VRM and the improved PCB.


If you want to learn more … sorry, no, everything about the MSI X570S motherboard lineup you can re-watch the 3 hour MSI X570S launch livestream on the MSI Gaming channel.
In this video we will cover four different overclocking strategies.
- First, we increase the performance headroom by enabling Precision Boost Overdrive and A-XMP
- Second, we manually overclock the CPU to 4450 MHz Prime 95 AVX and 4588 MHz Prime 95 non-AVX stable
- Third, we tune the Precision Boost Overdrive algorithm with Curve Optimizer
- Lastly, we achieve 5117 MHz by supercharging Precision Boost Overdrive

However, before we jump into the overclocking let us quickly go over the hardware and benchmarks we use in this article.
AMD Ryzen 9 5950X X570S: Platform Overview
Along with the AMD Ryzen 9 5950X processor and EK-Quantum MSI X570S Carbon EK X motherboard, in this guide, we will be using a pair of G.SKILL Trident Z DDR4-4266 memory sticks, an NVIDIA RTX 2080TI graphics card, an 512GB M.2 NVMe SSD, a Seasonic Prime 850W Platinum power supply, the ElmorLabs Easy Fan Controller, the ElmorLabs P80DB2 debug card, and EK-Quantum water cooling. All this is mounted on top of our favorite Open Benchtable.


The cost of the components should be around $4,100.
- AMD Ryzen 9 5950X processor: $800
- EK-Quantum P360 water cooling kit: $550
- EK-Quantum MSI MPG X570S Carbon EK X motherboard: $550
- NVIDIA RTX 2080 TI graphics card: $1,500
- G.SKILL Trident Z DDR4-4266 memory: $140
- AORUS RGB 512 GB M.2-2280 NVME: $110
- Seasonic Prime 850W Platinum power supply: $200
- ElmorLabs Easy Fan Controller: $20
- ElmorLabs P80DB2 Debug Card: $30
- Open Benchtable: $200
I covered the ElmorLabs EFC in a separate article on this website.
Without going into too many details, I have attached an external temperature sensor from the water in the loop to the EFC. Then, I use the low/high setting to map the fan curve from 25 to 40 degrees water temperature. This is used for all overclocking strategies.
AMD Ryzen 9 5950X X570S: Benchmark Software
We use the following benchmark applications to measure performance and ensure system stability.
- SuperPI 4M https://www.techpowerup.com/download/super-pi/
- Geekbench 5 https://www.geekbench.com/
- HWBOT X265 https://hwbot.org/benchmark/hwbot_x265_benchmark_-_4k/
- Cinebench R23 https://www.maxon.net/en/cinebench/
- V-Ray 5 https://www.chaosgroup.com/vray/benchmark
- 3DMark CPU Profile https://www.3dmark.com/
- 3DMark Night Raid https://www.3dmark.com/
- CS:GO FPS Bench https://steamcommunity.com/sharedfiles/filedetails/?id=500334237
- Final Fantasy XV http://benchmark.finalfantasyxv.com/na/
- Prime 95 https://www.mersenne.org/download/
AMD Ryzen 9 5950X X570S: Stock Performance
The first thing we must do before we start any overclocking is check the system performance at default settings.
Please note that out of the box, the X570S Carbon EK X enables Precision Boost Overdrive. So, to check the performance at default settings you must
- Go to the OC menu
- Enter the Advanced CPU Configuration submenu
- Enter the AMD Overclocking submenu
- Set Precision Boost Overdrive to Disabled
- Enter the AMD Overclocking submenu
Then save and exit the BIOS.
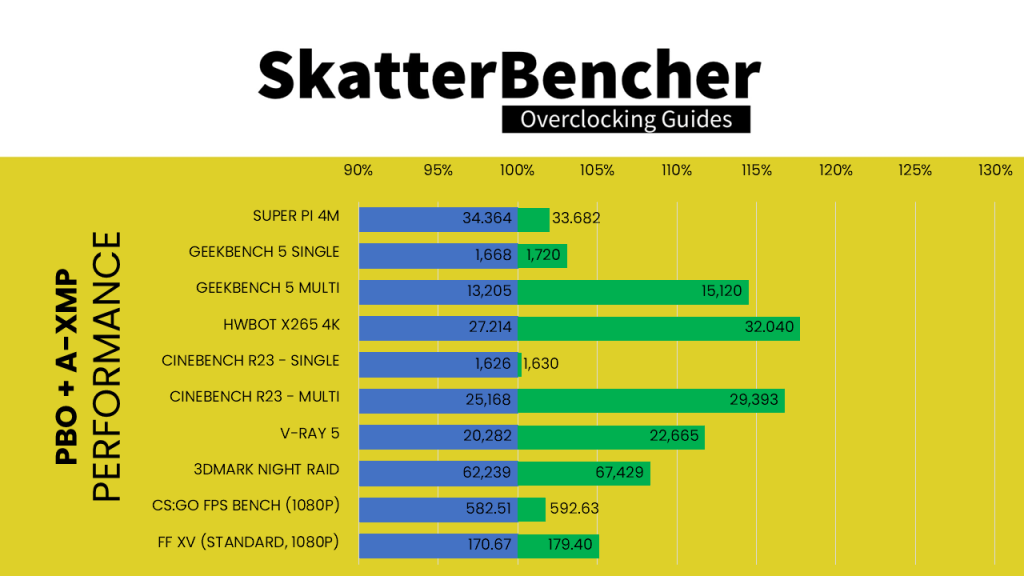
Here is the benchmark performance at stock:
- SuperPI 4M: 34.364 seconds
- Geekbench 5 (single): 1,668 points
- Geekbench 5 (multi): 13,205 points
- HWBOT X265 4K: 27.214 fps
- Cinebench R23 Single: 1,630 points
- Cinebench R23 Multi: 25,168 points
- V-Ray 5: 20,282 vsamples
- 3DMark Night Raid: 62,239 points
- CS:GO FPS Bench: 582.51 fps
- Final Fantasy XV: 170.67 fps

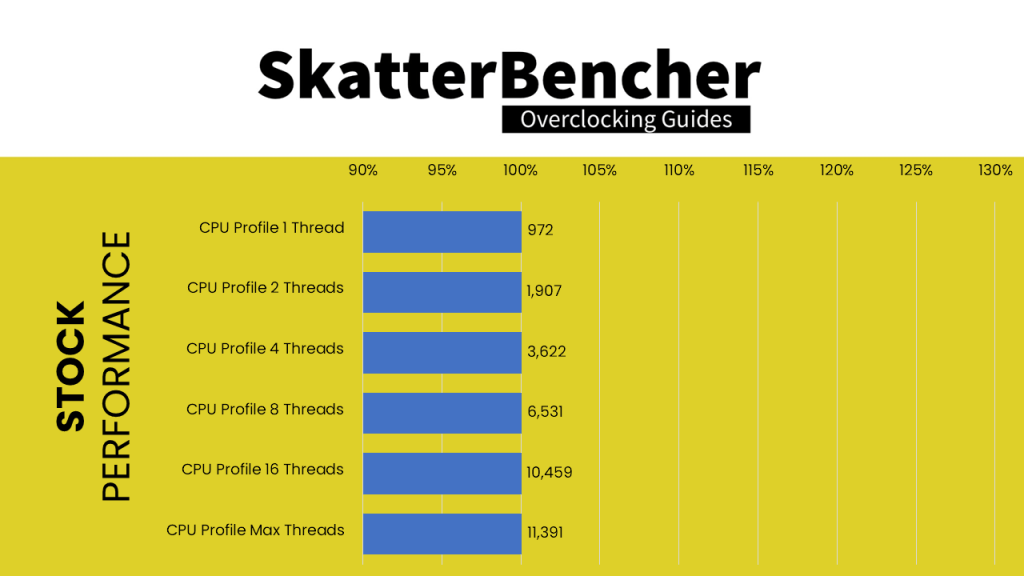
Here are the 3DMark CPU Profile scores at stock
- CPU Profile 1 Thread: 972
- CPU Profile 2 Threads: 1,907
- CPU Profile 4 Threads: 3,622
- CPU Profile 8 Threads: 6,531
- CPU Profile 16 Threads: 10,459
- CPU Profile Max Threads: 11,391
When running Prime 95 Small FFTs with AVX enabled, the average effective CPU clock is 2972 MHz with 0.942 volts. The average CPU temperature is 50 degrees Celsius and the average VRM temperature is 41 degrees Celsius. The average CPU package power is 120 watts.

When running Prime 95 Small FFTs with AVX disabled, the average effective CPU clock is 3526 MHz with 0.957 volts. The average CPU temperature is 51 degrees Celsius and the average VRM temperature is 42 degrees Celsius. The average CPU package power is 113 watts.

Now, let us try our first overclocking strategy.
However, before we get going, make sure to locate the CMOS Clear button on the back IO panel of your motherboard. In case your system fails to boot up after you configured your settings, pressing this button will force the system to reset the BIOS settings. So, you can return to the BIOS easily and make the necessary adjustments.
OC Strategy #1: PBO + A-XMP
In our first overclocking strategy we simply take advantage of AMD’s Precision Boost Overdrive and XMP.
We covered both overclocking technologies at length in previous videos, so any aspiring AMD overclocker should be familiar with both already.
PBO stands for Precision Boost Overdrive. It is an extension of the Precision Boost technology integrated in all AMD Ryzen CPUs. Precision Boost allows the CPU to opportunistically increase its clock frequency over base frequency based on the available power and thermal headroom.

Precision Boost Overdrive preserves all the automated intelligence and boost built into the Ryzen CPU. So, AMD claims it provides the user with the best of both worlds: on the one hand it provides the user with an ability to leverage superior cooling to achieve higher performance, and on the other hand the algorithm will still aim to maximize the performance in a wide variety of workloads.

Precision Boost Overdrive uses a proprietary algorithm with inputs from a plethora of sensors inside the CPU to determine what is the optimal frequency and voltage at any given time. It is important to mention that using Precision Boost Overdrive is a form of overclocking and is therefore not covered by warranty.
A-XMP is MSI’s name for their implementation of XMP on AMD platforms.
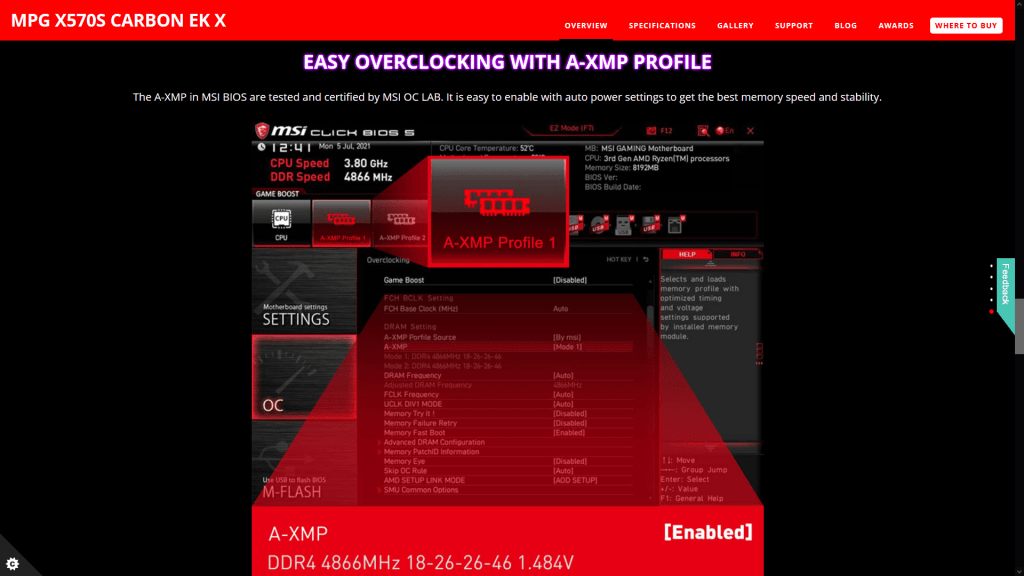
XMP is an Intel technology that lets you automatically overclock the system memory to improve system performance. XMP is an extension to the standard JEDEC specification that allows a memory vendor to program different settings onto the memory stick. The settings include the memory frequency, the memory timings as well as the memory voltage.
In our case the XMP rating of our memory is DDR4-4266. By enabling XMP we not only increase the memory frequency, but also change the infinity fabric to run in asynchronous mode.
By default, the infinity fabric, memory controller, and memory frequency operate in “synchronous mode.” That means the CPU will run all frequencies in 1 to 1 ratio. Synchronous mode is taxing for the CPU, so on most Ryzen CPUs, the system will automatically enable “Asynchronous mode” beyond a certain memory frequency. In asynchronous mode, the memory controller will operate at half the frequency of the system memory. The fabric clock will also run below system memory frequency. So, you will have a performance penalty. However, with enough memory speed you can overcome that performance penalty.

Most Ryzen 5000 CPUs will not run synchronous mode over DDR4-4000. Since our memory is rated at DDR4-4266, the system will automatically enable asynchronous mode.
Upon entering the BIOS
- Go to the OC menu
- Enter the Advanced CPU Configuration submenu
- Enter the AMD Overclocking submenu
- Set Precision Boost Overdrive to Enabled
- Leave the AMD Overclocking submenu
- Enter the AMD Overclocking submenu
- Leave the Advanced CPU Configuration submenu
- Set A-XMP to Profile 1
Then save and exit the BIOS.
We re-ran the benchmarks and checked the performance increase compared to the default operation.
- SuperPI 4M: +2.02%
- Geekbench 5 (single): +3.12%
- Geekbench 5 (multi): +14.50%
- HWBOT X265 4K: +17.73%
- Cinebench R23 Single: +0.25%
- Cinebench R23 Multi: +16.79%
- V-Ray 5: +11.75%
- 3DMark Night Raid: +8.34%
- CS:GO FPS Bench: +1.74%
- Final Fantasy XV: +5.12%
We also check the 3DMark CPU profile improvement:
- CPU Profile 1 Thread: +0.41%
- CPU Profile 2 Threads: +0.42%
- CPU Profile 4 Threads: +1.44%
- CPU Profile 8 Threads: +4.90%
- CPU Profile 16 Threads: +9.09%
- CPU Profile Max Threads: +20.98%

Enabling Precision Boost Overdrive allows the CPU to run at higher power consumption. So, we expect to see the largest performance gains in multithreaded applications. And that is in fact what we see with up to +17.73% benchmark performance increase and up to +20.98% increase in 3DMark CPU Profile.
When running Prime 95 Small FFTs with AVX enabled, the average effective CPU clock is 4085 MHz with 1.115 volts. The average CPU temperature is 79 degrees Celsius and the average VRM temperature is 63 degrees Celsius. The average CPU package power is 220 watts.

When running Prime 95 Small FFTs with AVX disabled, the average effective CPU clock is 4295 MHz with 1.184 volts. The average CPU temperature is 80 degrees Celsius and the average VRM temperature is 63 degrees Celsius. The average CPU package power is 228 watts.

OC Strategy #2: Manual OC
Our second overclocking strategy covers two sub-strategies. We want to configure the Ryzen 9 5950X CPU frequency manually but to judge stability we will use two approaches. Let us call them Strategy 2A and Strategy 2B

Strategy #2A: Manual OC (P95 AVX)
The first approach is to check the stability in an ultimate worst-case scenario. For me, that’s Prime95 Small FFTs with AVX enabled. Generally speaking, passing this test means that your CPU will be able to withstand any workload, no matter how tough.
We also tune the frequency for each CCD. CCD stands for Core Chiplet Die and is one of the chips on the AMD CPU. While a CCD used to consist of two CCXs paired together, on Zen 3 a CCD consists of a single CCX with 8 cores. While there is only 1 CPU Core voltage plane for a Ryzen 5000 CPU, so all CCDs run at the same voltage, each CCD can be configured with its own fine grain frequency. That means we can maximize the frequency for each CCD individually.
The difference between Strategy 2A and 2B is about 150 MHz for CCD0 and 125 MHz for CCD1.
For Strategy 2A, upon entering the BIOS
- Go to the OC menu
- Set CPU Ratio Apply Mode to Per CCX
- Set CCD0 CCX0 Ratio to 44.50
- Set CCD1 CCX0 Ratio to 44.50
- Set A-XMP to Profile 1
- Set CPU Core Voltage to Override Mode
- Set Override CPU Core Voltage to 1.1750 V
Then save and exit the BIOS.
We re-ran the benchmarks and checked the performance increase compared to the default operation.
- SuperPI 4M: -10.15%
- Geekbench 5 (single): -5.70%
- Geekbench 5 (multi): +14.66%
- HWBOT X265 4K: +18.51%
- Cinebench R23 Single: -9.41%
- Cinebench R23 Multi: +18.51%
- V-Ray 5: +11.58%
- 3DMark Night Raid: +6.78%
- CS:GO FPS Bench: +2.32%
- Final Fantasy XV: +4.54%

We also check the 3DMark CPU profile improvement:
- CPU Profile 1 Thread: -8.64%
- CPU Profile 2 Threads: -7.18%
- CPU Profile 4 Threads: -4.17%
- CPU Profile 8 Threads: +1.71%
- CPU Profile 16 Threads: +8.17%
- CPU Profile Max Threads: +22.34%

We see the biggest performance gains of up to 22.34% in multithreaded benchmark applications. Sadly, we also see significant performance losses up to -10.15% in single and low-threaded benchmark applications. That is because at default the Precision Boost technology enables frequencies up to 4900 MHz whereas our manual overclock is limited to 4450 MHz.
When running Prime 95 Small FFTs with AVX enabled, the average effective CPU clock is 4450 MHz with 1.182 volts. The average CPU temperature is 97 degrees Celsius and the average VRM temperature is 78 degrees Celsius. The average CPU package power is 274 watts.

When running Prime 95 Small FFTs with AVX disabled, the average effective CPU clock is 4450 MHz with 1.180 volts. The average CPU temperature is 83 degrees Celsius and the average VRM temperature is 66 degrees Celsius. The average CPU package power is 234 watts.

Strategy #2B: Manual OC (P95 non-AVX)
The second approach is to the check the stability in a more common scenario. For this video, this means passing Prime95 Small FFTs with AVX disabled as well as passing all the benchmarks we use to measure system performance.
For Strategy 2B, upon entering the BIOS
- Go to the OC menu
- Set CPU Ratio Apply Mode to Per CCX
- Set CCD0 CCX0 Ratio to 46.00
- Set CCD1 CCX0 Ratio to 45.75
- Set A-XMP to Profile 1
- Set CPU Core Voltage to Override Mode
- Set Override CPU Core Voltage to 1.2375 V
Then save and exit the BIOS.
We re-ran the benchmarks and checked the performance increase compared to the default operation.
- SuperPI 4M: -7.23%
- Geekbench 5 (single): -2.70%
- Geekbench 5 (multi): +16.47%
- HWBOT X265 4K: +19.68%
- Cinebench R23 Single: -6.15%
- Cinebench R23 Multi: +21.80%
- V-Ray 5: +14.56%
- 3DMark Night Raid: +9.77%
- CS:GO FPS Bench: +2.98%
- Final Fantasy XV: +4.90%

We also check the 3DMark CPU profile improvement:
- CPU Profile 1 Thread: -5.66%
- CPU Profile 2 Threads: -3.99%
- CPU Profile 4 Threads: -0.17%
- CPU Profile 8 Threads: +5.05%
- CPU Profile 16 Threads: +11.71%
- CPU Profile Max Threads: +26.47%

We see the same result in Strategy 2B as we saw with Strategy 2A: significant performance gains up to +26.47% in multi-threaded benchmark applications, but performance losses up to -7.23% in low-threaded benchmarks.
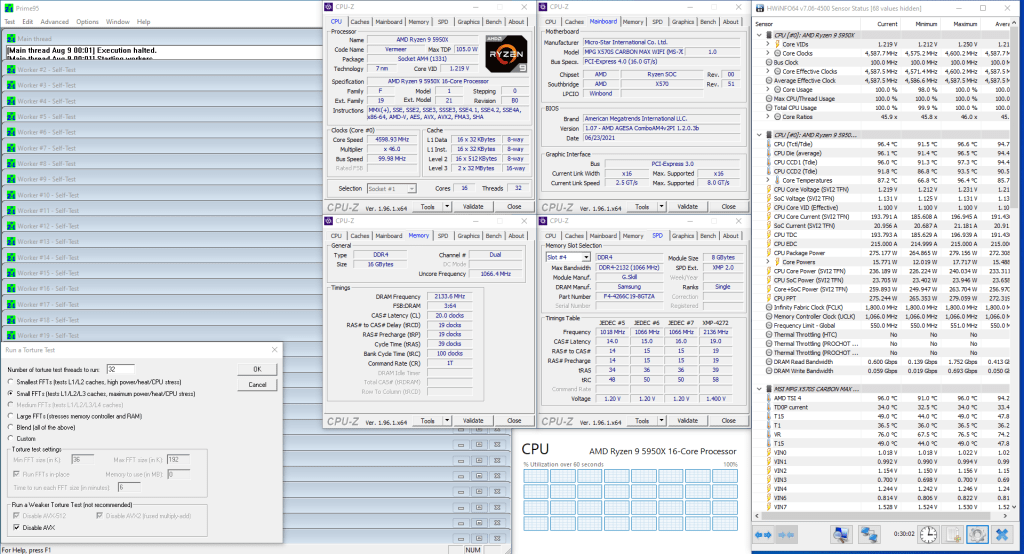
When running Prime 95 Small FFTs with AVX enabled, the system does not pass the stability test even though it could run all our other benchmarks.
When running Prime 95 Small FFTs with AVX disabled, the average effective CPU clock is 4588 MHz with 1.244 volts. The average CPU temperature is 95 degrees Celsius and the average VRM temperature is 74 degrees Celsius. The average CPU package power is 272 watts.
OC Strategy #3: PBO Tuned
In our third overclocking strategy we return to Precision Boost Overdrive 2 and make use of the tools provided by AMD to further tune the algorithm.
We follow the PBO tuning process as outlined in SkatterBencher #24 with the Ryzen 7 5700G. As we have covered Precision Boost Overdrive 2 in detail in another video, I won’t put you through the same theory again.
Practically, we follow the same process. That means we choose a fixed CPU Vcore Loadline, manually increase the PBO power and current limits, increase the maximum CPU Boost Clock Override by 200 MHz, and use Curve Optimizer to tune each CPU core individually.

The result is that the PBO algorithm much more aggressively pursues higher voltages, which in turn provide us with higher overclocking frequencies.
Upon entering the BIOS
- Go to the OC menu
- Enter the Advanced CPU Configuration submenu
- Enter the AMD Overclocking submenu
- Set Precision Boost Overdrive to Advanced
- Set PBO Limits to Manual
- Set PPT Limit [W] to 500
- Set TDC Limit [A] to 500
- Set EDC Limit [A] to 500
- Set Precision Boost Overdrive Scalar to Manual
- Set Precision Boost Overdrive Scalar to 10X
- Set Max CPU Boost Clock Override to 200 MHz
- Enter the Curve Optimizer submenu
- Set Curve Optimizer to Per Core
- Set Core 0 to Core 15 Optimizer Sign to Negative
- Set all Curve Optimizer Magnitude for all Cores except Core 1, Core 3, and Core 15 to 30
- Set Core 1 Curve Optimizer Magnitude to 10
- Set Core 3 Curve Optimizer Magnitude to 20
- Set Core 15 Curve Optimizer Magnitude to 25
- Leave the Curve Optimizer submenu
- Leave the AMD Overclocking submenu
- Enter the AMD Overclocking submenu
- Leave the Advanced CPU Configuration submenu
- Set A-XMP to Profile 1
Then save and exit the BIOS.
We re-ran the benchmarks and checked the performance increase compared to the default operation.
- SuperPI 4M: +3.94%
- Geekbench 5 (single): +4.32%
- Geekbench 5 (multi): +15.14%
- HWBOT X265 4K: +19.53%
- Cinebench R23 Single: +1.17%
- Cinebench R23 Multi: +17.51%
- V-Ray 5: +12.55%
- 3DMark Night Raid: +9.28%
- CS:GO FPS Bench: +2.34%
- Final Fantasy XV: +4.36%

We also check the 3DMark CPU profile improvement:
- CPU Profile 1 Thread: +1.65%
- CPU Profile 2 Threads: +1.47%
- CPU Profile 4 Threads: +2.43%
- CPU Profile 8 Threads: +6.29%
- CPU Profile 16 Threads: +11.16%
- CPU Profile Max Threads: +26.17%

Our benchmark performance gains over stock settings range from +1.17% in Cinebench R23 single to +26.17% in 3DMark CPU Profile Max Threads.
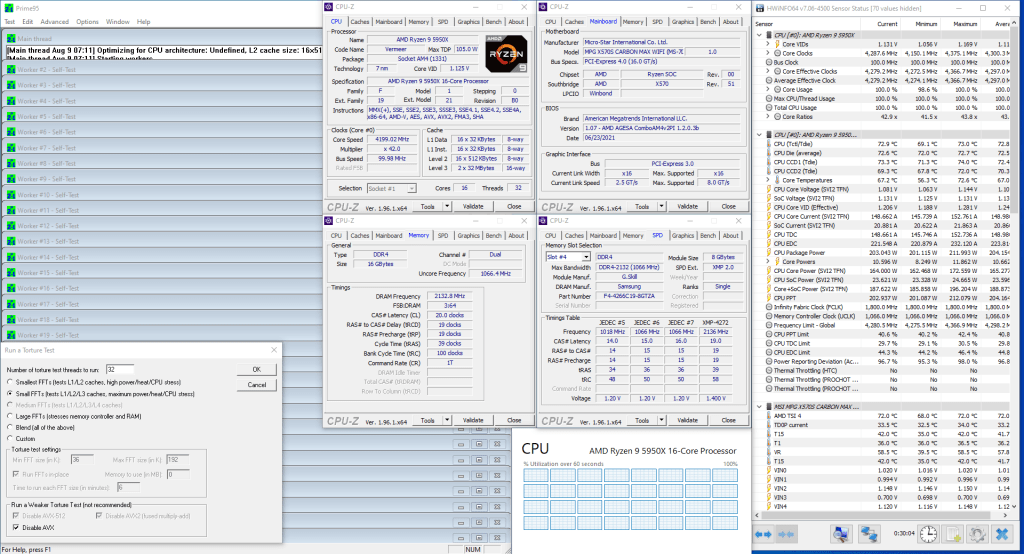
When running Prime 95 Small FFTs with AVX enabled, the average effective CPU clock is 4214 MHz with 1.089 volts. The average CPU temperature is 79 degrees Celsius and the average VRM temperature is 63 degrees Celsius. The average CPU package power is 217 watts.

When running Prime 95 Small FFTs with AVX disabled, the average effective CPU clock is 4297 MHz with 1.125 volts. The average CPU temperature is 73 degrees Celsius and the average VRM temperature is 58 degrees Celsius. The average CPU package power is 204 watts.
OC Strategy #4: PBO Supercharged
In our final overclocking strategy we are looking to supercharge the Precision Boost Overdrive algorithm to get even more performance.
I went through the process of explaining what I mean by supercharging PBO in my previous SkatterBencher article with the Ryzen 9 5900X. The whole explanation took quite some time so I’ll try to keep it short here.

PBO supercharged sits at the very top of the Ryzen overclocking pyramid which starts at the CPU base frequency. The listed base frequency for the Ryzen 9 5950X is 3400 MHz
For Ryzen 5000 CPUs, right above the base frequency is Precision Boost 2. Precision Boost allows the processor cores to run faster than the base frequency and thus improve the system performance. When enabled, the actual frequency is determined by a wide range of onboard sensors which analyze the system and processor health many times per second.
Precision Boost 2 employs a proprietary algorithm that brings together all the different inputs, then calculates what is the highest allowed voltage that can be set. While there’s no detailed information available on how the algorithm works exactly, what we do know is that generally speaking the more thermal, current, and power headroom there’s available, the higher your CPU will boost. For the Ryzen 9 5950X the listed maximum boost frequency is 4.9 GHz.
The key word in that last sentence is “listed”.
For the Ryzen CPUs, there is actually three kinds of boost limits: the advertised maximum boost frequency, the firmware programmed maximum boost frequency, and the actual real world maximum boost frequency. The advertised boost is the number you find on the box, the firmware boost is as programmed in the AGESA, and the actual boost is what you see in software applications like CPU-Z.
At stock, on my Ryzen 9 5950X the maximum boost frequency ranges from 4826 MHz to 5001 MHz.

But that’s still not all …
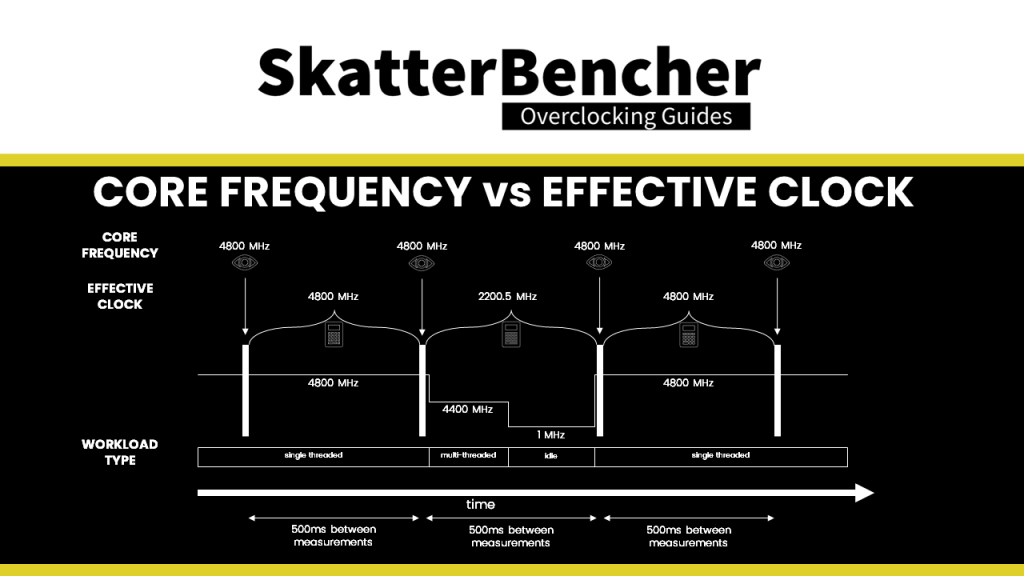
The next important thing to understand is that there’s a big difference between the “Core Frequency” and the “Effective Clock”. Everything I’ve discussed up to this point relates to the Core Frequency.
Core Frequency is the frequency that is configured by the CPU and read by software tools from the CPU registers. It is the frequency that you’ll see reported in CPU-Z for example. Effective Clock measures the average actual clock cycles across a polling interval.
The difference between the two values is that the Core Frequency is the frequency as measured at a specific moment in time, whereas the Effective Clock measures the total clock cycles between two moments in time.
These two measurements can differ a lot because modern CPUs like the Ryzen 5000 have very advanced power saving features. When a CPU core has nothing to execute it will quickly go to a low power state.
Another reason why it can differ is because of Clock Stretching. Clock Stretching is a safety feature that is built into all AMD Ryzen CPUs. When the CPU figures the actual voltage is too low to sustain a stable system at a given frequency, it will suspend the execution of tasks until stability is regained.
For users like you and I, what matters most is the effective clock as this relates directly to the compute performance of your system. So, while it’s nice to talk about base clocks, listed max boost clocks, programmed max boost clocks, or actual max boost clocks … none of those matter unless it means the effective clock is also higher.
The result of clock stretching is that while the system will report the Core Clock as normal, the Effective Clock will be lower because there are fewer amount of clock cycles. Obviously, the performance will also be lower.
At stock, on my Ryzen 9 5950X the maximum effective clock frequency ranges from 4674 MHz on core 8 to 4975 MHz on Core 1.

Along with the Precision Boost technology, AMD also developed a Precision Boost Overdrive technology designed for overclockers.
Precision Boost Overdrive preserves all the automated intelligence and boost that comes with the Precision Boost algorithm. However, it provides overclockers with some additional tools and options to manipulate the algorithm so it would boost higher in both single threaded and multi-threaded workload situations.
There are six tools to highlight: PPT Limit, EDC Limit, TDC Limit52, Scalar, Boost Override, and Curve Optimizer. I covered these extensively in SkatterBencher #24 and SkatterBencher #26, so I won’t cover them in detail here.

When enabling PBO on my Ryzen 9 5950X, the maximum boost frequency ranges from 4650 MHz on cores 8 to 4975 MHz on cores 1 and 3. The maximum effective clock ranges from 4652 MHz on Core 8 to 4975 MHz on Core 1.

When enabling Precision Boost Overdrive in the BIOS, typically you’ll get values that are suggested by AMD or which are programmed by the motherboard vendor. However, you can also override those settings and manually tune each to your liking.
We went through the manual tuning process in our previous overclocking strategy.
When manually tuning PBO on my Ryzen 9 5950X, the maximum boost frequency ranges from 4700 MHz on cores 0, 2, and 5 to 5025 MHz on core 3. The maximum effective clock ranges from 4781 MHz on Core 8 to 5012 MHz on Core 1.

After PBO tuned comes PBO supercharged.
To best explain what it means to supercharge PBO, let’s look at the V/f curves again.
The voltage frequency curve, or V/f curve, is a line that describes the relationship between the operating frequency and the voltage required to run stably at that frequency. Each individual core in your AMD Ryzen CPU has a V/f curve. Better cores which require less voltage for a given frequency will be able to boost to higher frequencies given a certain voltage.

Precision Boost technology and its extension Precision Boost Overdrive use this V/f curve information to dynamically increase the CPU operating frequency. The boost algorithm determines the maximum allowed voltage for a given set of input parameters like power and thermal. Based on this maximum voltage, it then applies the according frequency based on the V/f curve.

Let’s take a simplified example assuming all cores have the same V/f curve and we’re using a single threaded benchmark application.
If the load is very light, the maximum allowed voltage might be 1.30V in which case the frequency will be the associated 4900 MHz. If the load is very heavy, then the maximum allowed voltage might only be 1.1V and then the associated frequency is 4475 MHz.

One of the most powerful tools included in Precision Boost Overdrive is the Curve Optimizer. Curve Optimizer allows us to adjust the V/f curve for each individual core positively or negatively up to 30 steps of 3 to 5 mV. So maximum -150mV or +150mV.
Returning to our example, if our CPU is really good and we can offset the entire curve by negative 30 steps, the voltage required for a given frequency is much lower. So, if we have a heavy workload and the maximum allowed voltage is 1.1V, the associated frequency is now 4825 MHz instead of 4475 MHz. However, our maximum frequency is still limited to 5025 MHz which will be run at 1.25V instead of 1.40V.

To solve this frequency ceiling we can use another PBO tool called Maximum Boost Override. AMD allows for up to 200 MHz higher frequency ceiling than default. In our case, that would open up the frequency to 5225 MHz. However, that doesn’t mean the frequency will also boost that high as we are still limited by a maximum voltage of 1.5V.

Let’s assume that our CPU could boost to even higher than 5225 MHz if the voltage could go over 1.50V. With the available PBO tools, we can’t get this done. So that’s where PBO supercharged comes into action.
While the Precision Boost algorithm is incredibly smart, there are still ways to outsmart it as a user. There are two important options that will help us in particular: reference clock and voltage offsets.
The reference clock frequency is the reference clock frequency for many parts in your system, including the CPU cores but also the system memory, PCIe, and SATA. When increasing the base clock frequency you change all the frequencies that use the reference clock. While this can result in additional performance, it can also cause instability so be careful.

For example, on this platform, I must use an M.2 drive connected to CPU PCIe lanes to use over 100.5 MHz base clock frequency as my SATA drives are no longer showing up.
When increasing the reference clock from 100 MHz to 101.5 MHz, the frequency associated with a given voltage will increase by the same amount. So, at 1.1V we’re now getting 4897 MHz. Or, at 1.30V we’re now getting 5151 MHz. This is of course a nice frequency bump but without additional voltage this won’t be stable.

By adding an additional voltage offset we can look for stability at the highest frequency range. But, also keep in mind that adding an offset to the entire V/f curve means that you’ll also get higher voltage at lower frequencies. In heavy multi-threaded workloads that means you’ll run out of thermal headroom faster than without the voltage offset.

In our example V/f curve, we started out with 1.1V giving 4475 MHz, and a maximum frequency of 5025 MHz at 1.4V. After “supercharging” PBO, our 1.1V now gives us 4796 MHz and our maximum frequency is 5253 MHz at 1.56V.

Now that we have all the information how to supercharge PBO, let’s get into the BIOS and configure our overclock.
Before I forget, I also used MSI’s Memory Try It! feature to tune the memory a little further.
Memory Try It! is a memory overclocking feature unique to MSI and has been on MSI motherboards since the Z97 platform launched in May 2014 together with the Haswell refresh processors. It aims to provide a step up from XMP when it comes to overclocking the system memory and offers an incredible range of overclocking profiles tuned for all popular memory chips on the market.

I’ve already explored how to use Memory Try It! when overclocking the Core i9-10850K, so check that one out if you want more information. I went through the process outlined in that video and in the end settled for the DDR4-4400 CL18 setting. This is a slightly increased frequency compared to our XMP and with slightly better memory timings.
Upon entering the BIOS
- Go to the OC menu
- Enter the Advanced CPU Configuration submenu
- Enter the AMD Overclocking submenu
- Set Precision Boost Overdrive to Advanced
- Set PBO Limits to Manual
- Set PPT Limit [W] to 1000
- Set TDC Limit [A] to 500
- Set EDC Limit [A] to 500
- Set Precision Boost Overdrive Scalar to Manual
- Set Precision Boost Overdrive Scalar to 10X
- Set Max CPU Boost Clock Override to 200 MHz
- Enter the Curve Optimizer submenu
- Set Curve Optimizer to Per Core
- Set Core 0 to Core 15 Optimizer Sign to Negative
- Set Core 1 Curve Optimizer Magnitude to 4
- Set Core 3 Curve Optimizer Magnitude to 11
- Set Core 10, Core 13, and Core 14 Curve Optimizer Magnitude to 20
- Set Core 15 Curve Optimizer Magnitude to 10
- Set Curve Optimizer Magnitude for all remaining cores to 26
- Leave the Curve Optimizer submenu
- Set LCLK DPM Enhanced PCIe Detection to Disabled
- Leave the AMD Overclocking submenu
- Enter the AMD Overclocking submenu
- Leave the Advanced CPU Configuration submenu
- Set FCH Base Clock (MHz) to 101.3125
- Set A-XMP to Profile 1
- Set Memory Try It ! to DDR4-4400 18-22-22-22-42 FCLK-1800MHz
- Enter the DigitALL Power submenu
- Set CPU Loadline Calibration Control to Mode 3
- Leave the DigitALL Power submenu
- Set CPU Core Voltage to Offset Mode
- Set CPU Offset Mode Mark to +
- Set CPU Offset Voltage to 0.0625 V
Then save and exit the BIOS.
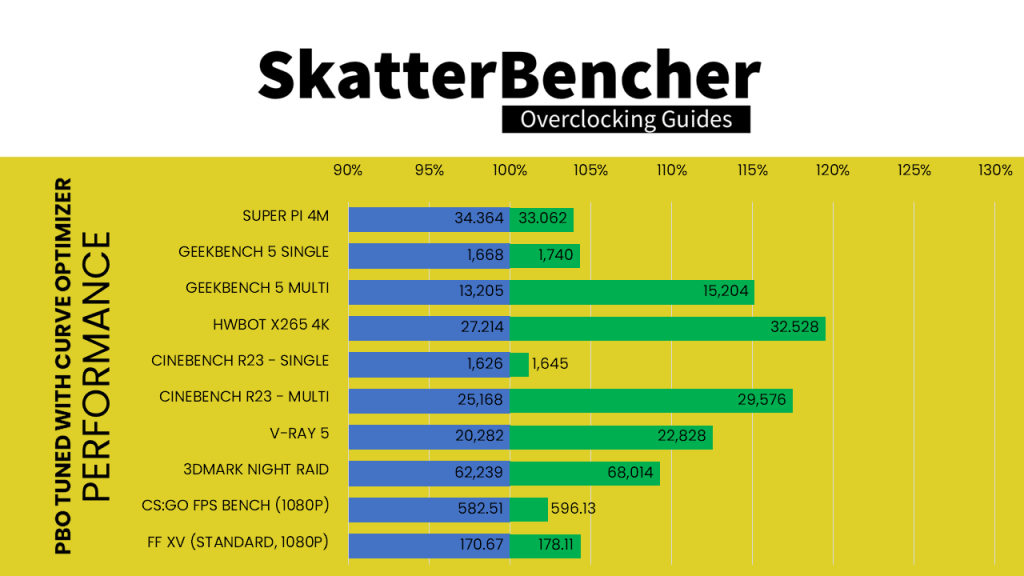
We re-ran the benchmarks and checked the performance increase compared to the default operation.
- SuperPI 4M: +4.77%
- Geekbench 5 (single): +5.46%
- Geekbench 5 (multi): +12.67%
- HWBOT X265 4K: +15.91%
- Cinebench R23 Single: +1.97%
- Cinebench R23 Multi: +11.88%
- V-Ray 5: +7.47%
- 3DMark Night Raid: +9.87%
- CS:GO FPS Bench: +4.02%
- Final Fantasy XV: +4.72%
We also check the 3DMark CPU profile improvement:
- CPU Profile 1 Thread: +1.75%
- CPU Profile 2 Threads: +0.21%
- CPU Profile 4 Threads: +1.13%
- CPU Profile 8 Threads: +5.36%
- CPU Profile 16 Threads: +7.81%
- CPU Profile Max Threads: +20.61%

We see steady improvement in all benchmark applications and we see the highest performance numbers in single threaded benchmarks like SuperPI, Geekbench 5, Cinebench R23, 3DMark Night Raid, and CS:GO.
When running Prime 95 Small FFTs with AVX enabled, the average effective CPU clock is 3901 MHz with 1.197 volts. The average CPU temperature is 90 degrees Celsius and the average VRM temperature is 70 degrees Celsius. The average CPU package power is 257 watts.

When running Prime 95 Small FFTs with AVX disabled, the average effective CPU clock is 4053 MHz with 1.242 volts. The average CPU temperature is 86 degrees Celsius and the average VRM temperature is 66 degrees Celsius. The average CPU package power is 248 watts.
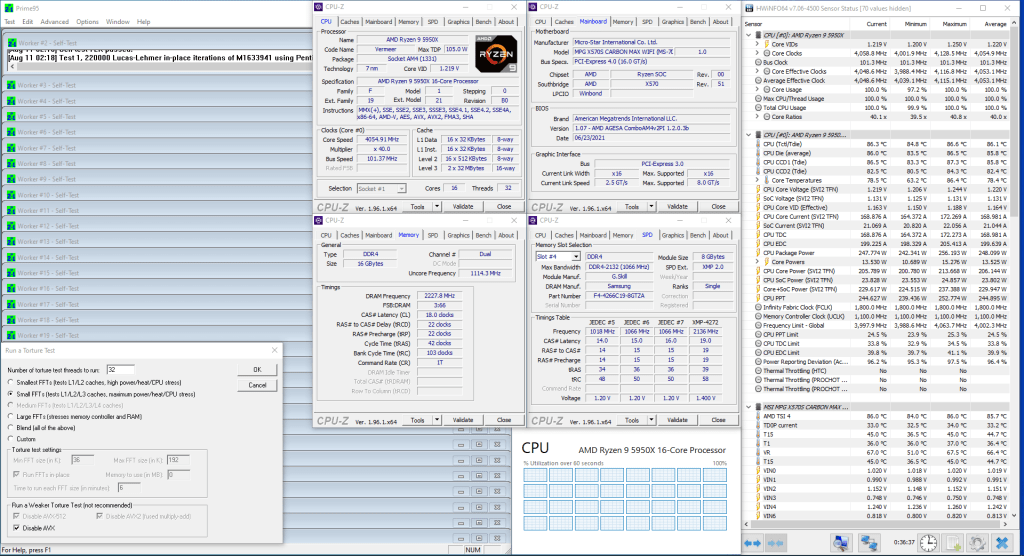
Before we wrap up this video, let’s have a closer look at the supercharged PBO results as there’s a couple of things I want to highlight.
Firstly, as I mentioned before supercharging PBO by adding an additional voltage offset means we get a higher effective voltage not only for low load and high frequency, but also high load and low frequency. In heavy multi-threaded workloads that means you’ll run out of thermal headroom faster than without the voltage offset.
That is exactly what we see with our PBO supercharged versus the PBO tuned. While our top end frequency marginally increases resulting in slightly higher performance, we lose a lot of frequency in heavy multi-threaded applications resulting in lower performance.
After supercharging PBO, our biggest performance gain is in CS:GO with +1.65% better performance compared to PBO tuned. Our biggest performance loss is -4.8% in Cinebench R23.
Furthermore, in Prime 95 our frequency for Small FFTs AVX and non-AVX drops from 4214 and 4297 MHz to 3901 and 4053 MHz.

I’d like to say this result shocked and surprised me. But let’s be honest, the writing was on the wall that this would happen.
The main purpose of supercharging PBO is to overcome the frequency ceiling limitation set by AMD. In this case, not even a single core of our CPU was reaching the maximum ceiling of 5225 MHz after tuning PBO. So, there was limited headroom at the top end. By increasing the reference clock and voltage offset, we managed to get the peak frequency closer to the ceiling … but still not 5225 MHz.
In addition, a small increase in voltage is amplified by the fact that the Ryzen 9 5950X has 16 cores. In heavy multi-threaded workloads we much quicker see the downside of extra voltage on 16 cores than on 12 or 8 cores.
After supercharging PBO, the maximum boost frequency ranges from 4838 MHz on cores 10 and 14 to 5117 MHz on core 2. The maximum effective clock ranges from 4800 MHz on Core 8 to 5046 MHz on Core 3.

Ryzen 9 5950X X570S Conclusion
Alright, let us wrap this up.
I had two objectives in mind when playing around with this system. First, I wanted to see how the X570S Carbon EK X holds up with an overclocked Ryzen 9 5950X. Second, I also wanted to see if the PBO supercharged methodology laid out in SkatterBencher #26 also could help get more performance with the Ryzen 9 5950X.
The X570S Carbon EK X held up pretty well handling the Ryzen 9 5950X. In our worst-case scenario manual overclock, our 4.45 GHz 274W 16 core Ryzen 9 5950X was kept stabily at a CPU temperature of 97 degrees Celsius and a VRM temperature of 78 degrees Celsius.
This particular CPU didn’t seem to be the best overclocker out there so it’s a pity we weren’t able to push the frequency higher when manually overclocking.
The silicon lottery aspect of overclocking also returned when trying to supercharge PBO. We ultimately reached a maximum overclock of 5117 MHz for a single core and an average of 4942 MHz across all cores. This is still 100 MHz short of what the Precision Boost algorithm should be able to boost at after adjusting the maximum boost limit to 5225 MHz.
As I said, Supercharging PBO did help us reach higher frequencies in single threaded applications: 30 MHz higher peak effective clock and 150 MHz higher average effective clock.
However, this additional performance comes at the cost of lower multi-threaded performance. Don’t get me wrong, PBO supercharged still provides up to 21% performance uplift over stock configuration. It’s just that in multithreaded applications PBO tuned offers up to 26% uplift.
The root cause is that in order to squeeze more voltage on the top end, we use a voltage offset that is applied in all workload scenarios. Including the multi-threaded workloads. Having 16 cores use slightly more voltage in a heavy workload will very quickly result in the Precision Boost algorithm limiting the frequency.
While our PBO supercharged strategy wasn’t a particularly great success, I still want to end on a positive note. The main lesson to be learned from this video is that blindly chasing higher frequency is usually not the right approach to maximize performance. Instead, you want to focus on the things that matter: the effective clock frequency in a wide range of workloads.
That’s how we determine that PBO tuned is the OC strategy that gives us the most performance and the settings we’ll use for our system.
I do hope you enjoyed the article despite a bummer of a last strategy. I do have a couple more articles in the planning with both AMD and Intel platforms in the coming months.
As per usual if you have any questions or comments, feel free to drop them in the comment section below.
‘Till the next time.
5 Minute Overclock: AMD Ryzen 9 5950X to 5117 MHz - 5 Minute Overclock
[…] Please note that this is for entertainment purposes only and most certainly not the whole picture. Please don’t outright copy these settings and apply to your system. If you want to learn how to overclock this system, please check out the longer SkatterBencher article. […]
SkatterBencher #35: AMD Ryzen 3 5300GE Overclocked to 4628 MHz - SkatterBencher
[…] by supercharging PBO in three previous SkatterBencher videos: episode #26 with the Ryzen 9 5900X, episode #27 with the Ryzen 9 5950X, and episode #29 with the Ryzen 9 5900 B2. It’s quite a lengthy and detailed overview so I would […]
Thanks
Appreciate the write up! Didn’t find anyone looking to break the PBO barrier just yet, but here you are. I’ve also been trying but found the thermal limitations (custom wc) still too much.
Only thing in this guide that doesn’t mean much for others are your per-core offsets, as they are sillicon-based, so my 5950X has other good/bad cores.
Cheers!
SkatterBencher #29: AMD Ryzen 9 5900 B2 Overclocked to 5152 MHz - SkatterBencher
[…] I mean by supercharging PBO in two previous articles: SkatterBencher #26 with the Ryzen 9 5900X and SkatterBencher #27 with the Ryzen 9 5950X. It’s quite a lengthy and detailed overview so I would suggest you check out those videos to […]