SkatterBencher #21: Intel Core i9-11900K Overclocked to 5500 MHz

We overclock the Intel Core i9-11900K processor up to 5.5 GHz with the GIGABYTE Z590 Aorus Tachyon motherboard and EK water cooling.
Introduction
The Intel Core i9-11900K is the flagship processor of Intel’s 11th generation Core CPUs for desktop codenamed Rocket Lake. It is the successor of the Core i9-10900K which we overclocked twice before: once with water cooling and once with TEC cooling.
The 11900K offers 8 cores and 16 threads with a listed base frequency of 3.5 GHz and a listed boost frequency up to 5.3 GHz. It is rated at 125W TDP and should retail at an MSRP of $599.


The GIGABYTE Z590 Aorus Tachyon is a much anticipated overclocking-oriented motherboard featuring a 12+1-phase digital power design with phases rated for up to 100 Amps each. It also features an exclusive overclocking kit with robust overclocking buttons and detection features designed to help overclockers break limits with ease. The persistence of GIGABYTE’s R&D team makes the Z590 Aorus Tachyon the spiritual successor of the renowned GIGABYTE OC and SOC series.
In this guide we cover the basic overclocking steps to get your CPU all the way to 5.5 GHz using custom loop water cooling.
We will dig into four overclocking strategies.
- First, we will unlock all the power limits and enable XMP
- Second, we take a traditional approach to overclocking with fixed CPU ratio and override voltage mode.
- Third, we explore the modern approach to overclocking with a dynamic CPU ratio and adaptive voltage mode.
- Lastly, we explore the “Rocket Lake” approach to overclocking with a dynamic CPU ratio and adaptive voltage mode
Before we jump into the overclocking, let’s talk a little bit more about Rocket Lake, Tachyon, and the hardware we’ll be using in this guide.
Intel Rocket Lake
Intel’s 11th generation Core products for desktop, codenamed Rocket Lake, were officially introduced by Intel during the CES 2021 tradeshow in January and arrived to the market in March 2021.
Rocket Lake is the successor to Intel’s 10th generation Comet Lake processors. Rocket Lake sports a brand new CPU core architecture while still on the vastly improved 14nm process node. The CPU core is built with the Cypress Cove architecture which is the backported version of Sunny Cove, a core designed for 10nm Ice Lake, with some additional performance improvements.
Due to the increased core size, the flagship Core i9-11900K offers up to 8 cores and 16 threads compared to its Core i9-10900K predecessor’s 10 cores and 20 threads. The Rocket Lake Core i5 offer is still 6 cores and 12 threads. Rocket Lake CPUs gain support for deep learning boost and AVX-512 instruction sets, a new and improved cache hierarchy, and up to 19% instructions per clock improvement.

Compared to the 10900K, the 11900K has a 200MHz lower base frequency of 3.5GHz and an identical maximum boost frequency of 5.3 GHz. The long-term TDP is still 125W while the Core i9-11900K can boost to 250W temporarily if sufficient turbo budget is available.
Other new features include slightly elevated default memory support up to DDR4-3200, 20 PCIe 4.0 lanes from the CPU, doubled bandwidth of the DMI link, and moving the integrated graphics to the new Xe graphics architecture.
Rocket Lake CPUs work on both 500 series and 400 series motherboards, though not on B460 or H410. Obviously that means Rocket Lake fits in the LGA1200 socket.
GIGABYTE Z590 AORUS Tachyon
The Z590 AORUS Tachyon is the spiritual successor to the OC and SOC motherboards from GIGABYTE. Let’s make a trip down memory lane.
Well over a decade ago, GIGABYTE was heavily involved in the overclocking community. GIGABYTE was among the first motherboard vendors to host international overclocking competitions. They did so under the GO OC brand. GO OC stands for Gigabyte Open Overclocking Championship. From 2007 to 2010, overclockers from around the world competed for the title of GO OC World Champion.


The winners include:
- 2007: Andre X_X and Zolkorn
- 2008: Elmor (ElmorLabs) and SF3D
- 2009: Fugger (XtremeSystems) and Vapor
- 2010: Matose (Lab501)


Yours truly was active as competitive overclocker as well. While I didn’t win any of the world titles, I was lucky enough to win the European championship back to back in 2009 and 2010.
At the height of the competitive overclocking boom, motherboard vendors understood that a well-engineered motherboard was a must-have to break overclocking records.
GIGABYTE’s in-house resident overclocker at the time, Hicookie, set out to design a motherboard which could help him and fellow overclockers push the CPU and memory to the limit.


In March 2011, GIGABYTE’s very first OC motherboard was announced. The X58A-OC was a radical no-compromise design as it eliminated costly non-overclocking features in favor of adding specific overclocking functionality. Under the tagline Designed By Overclockers, For Overclockers, the board launched at an MSRP of USD $299.
The features you see on the X58A-OC are similar to what we still expect from an overclocking motherboard today:
- Over-powered VRM
- Easy to insulate for extreme overclocking
- Hardware buttons to increase CPU ratio and base clock
- Physical voltage measurement points
- Debug LED
- Additional power inputs
- High-performance VRM thermal design
- Dual BIOS for redundancy
Over the years, GIGABYTE has launched numerous OC motherboards.
In 2013, GIGABYTE launched the Z87X-OC and Z87X-OC Force.

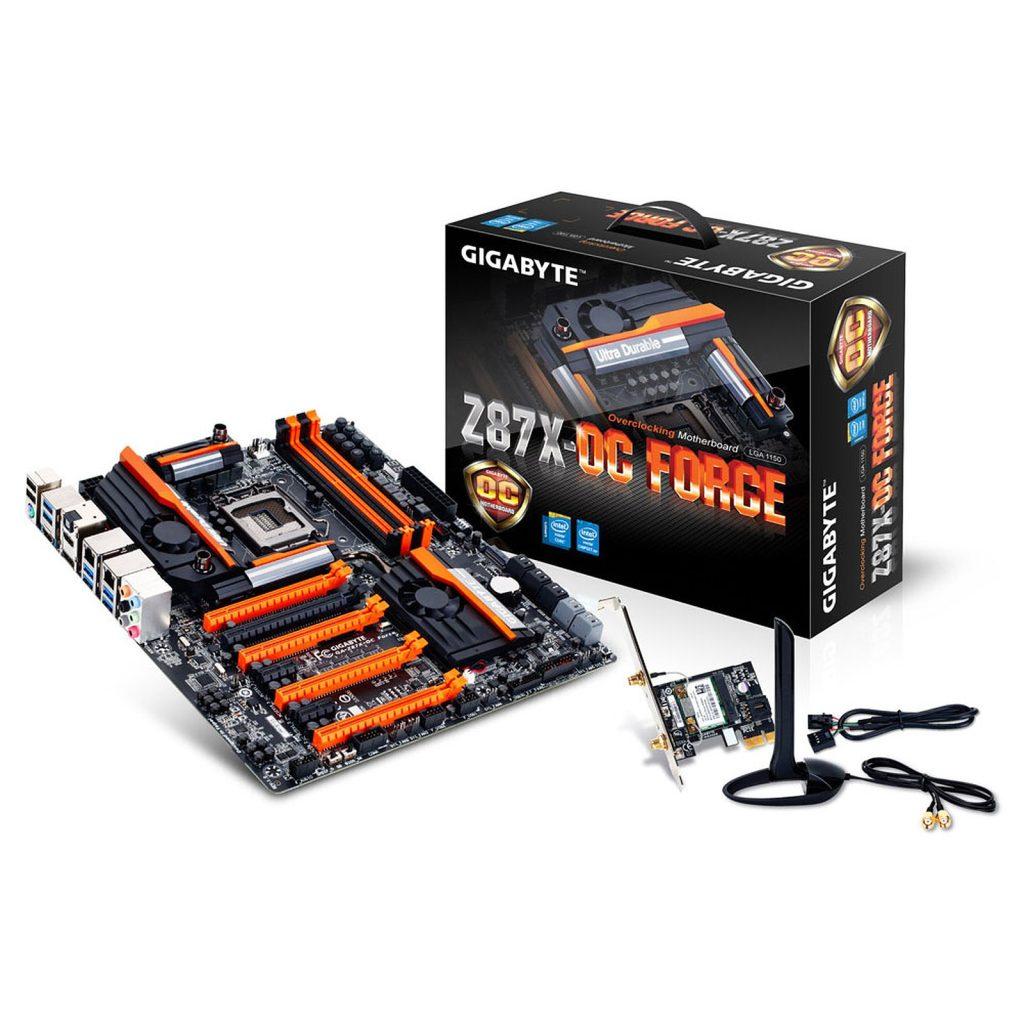
In 2014, GIGABYTE launched the Z97X-SOC, Z97X-SOC Force, and Z97X-SOC Force LN2.


The Z97X-SOC Force LN2 motherboard is a special variant of the regular SOC Force as it only had 2 memory slots as opposed to 4 memory slots on the regular version. This may very well be GIGABYTE’s most successful overclocking motherboard.


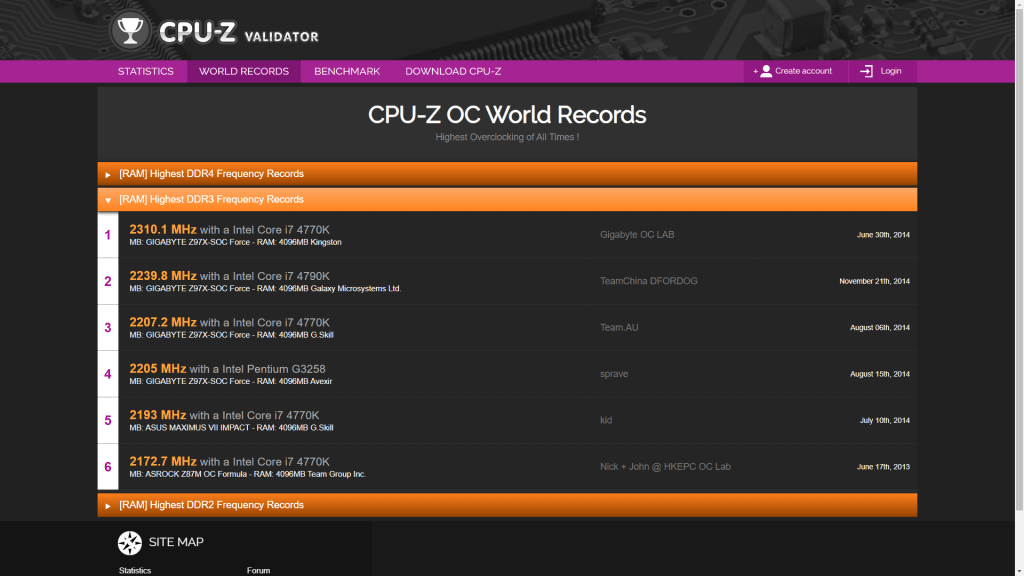


Designed for breaking memory overclocking world records, the board broke the DDR3 Frequency record live during its unveiling at Computex 2014. To this date, the record stands and moreover, it is the only board to ever surpass DDR3-4600.


In 2015, GIGABYTE launched the X99-SOC Force and the X99-SOC Champion motherboards. The key difference between the boards was that the SOC Force had 8 DIMM slots and the SOC Champion had 4 DIMM slots. So, it’s fair to say that the Champion was the more overclocking-targeted of the two.
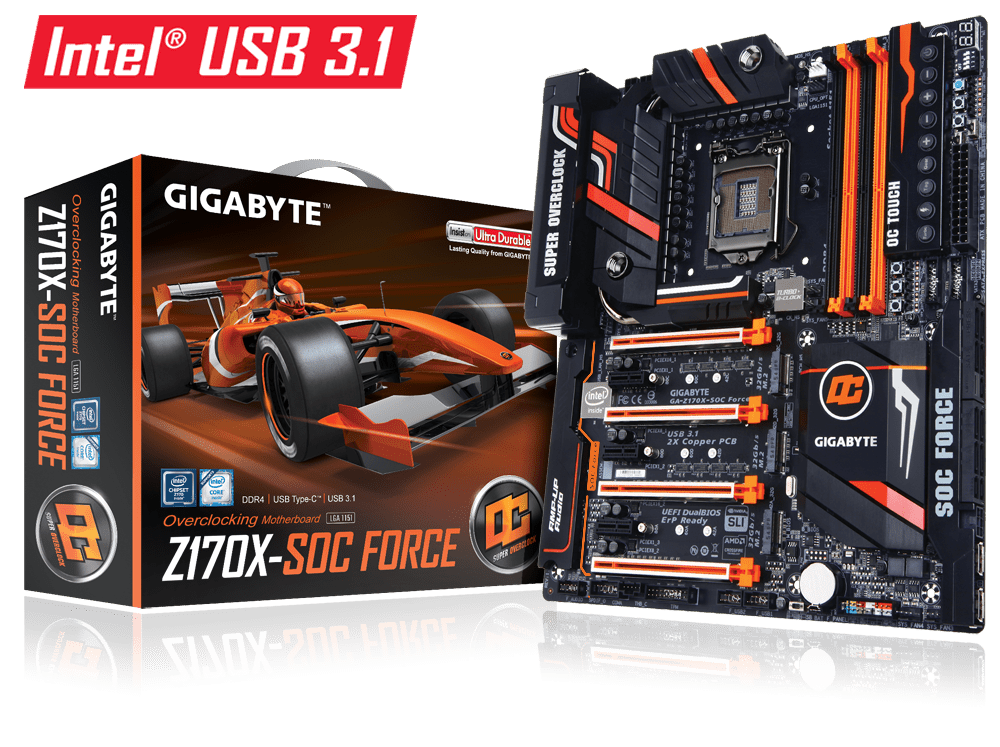


Later that year, GIGABYTE also launched the Z170X-SOC Force for Skylake processors. While an LN2 version of the board also exists, it never made it to market. The limited amount of samples were handed out to extreme overclockers to break records.
Launched in January 2017, the last SOC motherboard available to the general public was the Z270X-Gaming SOC. While still sporting the distinct orange color scheme that became synonymous with the GIGABYTE OC Series, and carrying the SOC brand, the board was targeting the lucrative gaming customer audience much more than the overclocking or performance enthusiast audience. It lacked many of the OC features that made the original X58A-OC and successors so revered among enthusiasts.
The very last SOC branded motherboard is the Z370X-SOC Force LN2. This motherboard was the spiritual successor to the Z170X-SOC Force LN2 and like its older brother never was available to the general public. However, here and there you can find videos and pictures on the internet of the board.
Arguably, as GIGABYTE’s overclocking and maximum performance oriented motherboard, the Z590 Aorus Tachyon is positioned as the successor of the Z270X-Gaming SOC.
However, named after a hypothetical particle that travels faster than light, looking at the design, features and the board’s focus I’d say this board is much more the spiritual successor of the Z97X-SOC Force LN2 as it features:
- The distinct orange Gigabyte overclocking color scheme
- An overpowered VRM
- Two memory slot topology for maximum memory overclocking
- Two BIOS ICs
- Debug LED
- BIOS Switches and BIOS LED Indicators
- Power On, Reset, and Clear CMOS buttons
- GIABYTE’s OC Buttons including
- Retry switch
- Ratio up and down buttons
- OC Trigger switch
- LN2 Mode switch
- Enhanced LN2 Mode switch
- Protection Mode button called LIMP mode
- Voltage Measurement Points
- Water cooling pump and fan headers
- 2 Temperature Sensor headers
- Water flow rate detector
- BCLK overclocking up to 500 MHz
- OC Ignition button
It’s a guarantee that this video will not do the board justice when it comes to its overclocking capabilities, so I strongly suggest you to be on the lookout for any content and overclocking results with this board. I very much suspect that GIGABYTE’s in-house overclockers and supporting power users are working on overclocking results as we’re recording this video.
Intel Core i9-11900K: Platform Overview
Along with the Intel Core i9-11900K processor and GIGABYTE Z590 Aorus Tachyon motherboard, in this guide we will be using an NVIDIA RTX 2080 Ti, a pair of G.SKILL Trident Z DDR4-4266 memory sticks, a Seasonic Prime 850W Platinum power supply, and of course EK-Quantum water cooling.
All this is mounted on top of our favorite Open Benchtable.
The cost of the components should be around $3,580
- Core i9-11900K: $599
- EK-Quantum Cooling: $400 + $200
- GIGABYTE Z590 Aorus Tachyon: $499
- NVIDIA RTX 2080 Ti: $1300
- G.SKILL Trident Z DDR4-4266: $180
- Seasonic Prime 850W: $200
- Open Benchtable: $200
With all this in mind, let’s jump into the benchmarks and overclocking.
Benchmarking Software
Here’s a list of the benchmarks and used in this guide:
- SuperPI 4M https://www.techpowerup.com/download/super-pi/
- Geekbench 5 https://www.geekbench.com/
- HWBOT X265 https://hwbot.org/benchmark/hwbot_x265_benchmark_-_4k/
- Cinebench R23 https://www.maxon.net/en/cinebench
- V-Ray 5 https://www.chaosgroup.com/vray/benchmark
- 3DMark Night Raid https://www.3dmark.com/
- Final Fantasy XIV https://na.finalfantasyxiv.com/benchmark/
- Prime 95 Small FFT with AVX https://www.mersenne.org/download/
Intel Core i9-11900K: Stock Performance
Before we get started with pushing the performance of the Intel Core i9-11900K processor, let’s first take a look at the scoring at stock settings:
Note that by default the Tachyon will unlock the Core i9-11900K power limits. In order to obtain the performance result at stock settings you need to enter the BIOS and
- Press F2 to enter Advanced Mode
- In the Tweaker menu, enter the Advanced CPU Settings sub-menu
- Set Turbo Power Limits to Enabled
- Set Package Power Limit 1 to 125
- Set Package Power Limit 1 time to 56
- Set Package Power Limit 2 to 250
- Set Package Power Limit 2 time to 56
The save and exit the BIOS.
The performance at stock settings is:


When running Prime 95 Small FFT with AVX enabled, the Core i9-11900K operates stably at 3.5 GHz with 1.035 volt. The average CPU temperature is 53 degrees centigrade, the average VRM temperature is 39 degrees centigrade, and the average water temperature is 32 degrees centigrade. The average CPU package power is 125 watt.
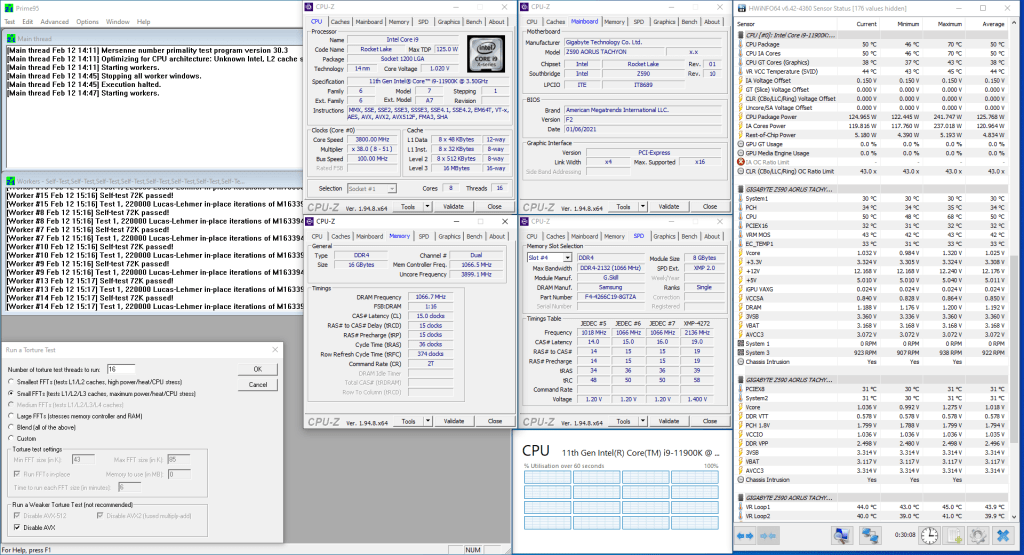
When running Prime 95 Small FFT with AVX disabled, the Core i9-11900K operates stably at 3.8 GHz with 1.108 volt. The average CPU temperature is 50 degrees centigrade, the average VRM temperature is 42 degrees centigrade, and the average water temperature is 31 degrees centigrade. The average CPU package power is 126 watt.
Strategy #1: Unlocked the Power Limits & XMP
Any aspiring overclocker should be aware of the Intel Turbo Boost 2.0. Turbo Boost 2.0 enables higher CPU performance in situations where there is sufficient current, power, and temperature headroom.
The long story short is that Turbo Boost 2.0 allows the processor to increase the power consumption temporarily above the TDP rating to achieve higher performance. It manages this by accumulating “energy budget” during periods of idle time that can be deployed when necessary during periods of high load.
We discussed the Intel Turbo Boost 2.0 Technology at length in a previous video titled “Intel Turbo Boost 2.0 & Intel Turbo Boost Max 3.0 Explored”. While we use a different CPU, the Turbo Boost principles explained in that video also apply to our configuration.
By unlocking all the power limits, we effectively tell the Core i9-11900K to run at the highest possible turbo boost settings all the time.
As the Tachyon is a board designed for enthusiasts and overclockers, it is only obvious that the power limits are unlocked by default. So all we need to do is load the optimized defaults and the power limits are unlocked.
We also enable XMP.
XMP stands for Extreme Memory Profile. It allows memory vendors such as Gskill to program higher performance settings onto the memory sticks. If the motherboard supports XMP, then you can enable the higher performance with a single BIOS setting. So it saves you from lots of manual configuration.
We discussed the Intel XMP Technology at length in a previous video titled “Intel Extreme Memory Profile Explained”. Check it out if you want additional information.
Upon entering the BIOS
- Press F7 to Load Optimized Defaults
- Click X.M.P Disabled and change it to X.M.P Profile1
Then save and exit the BIOS.
We re-ran the benchmarks and checked the performance increase compared to default operation.

The performance uplift is most notable in multi-threaded benchmark applications which would typically be more constraint by the default power limits.

When running Prime 95 Small FFT with AVX enabled, the Core i9-11900K operates stably at 4.7 GHz with 1.265 volt. The average CPU temperature is 93 degrees centigrade, the average VRM temperature is 60 degrees centigrade, and the average water temperature is 32 degrees centigrade. The average CPU package power is 322 watt.

When running Prime 95 Small FFT with AVX disabled, the Core i9-11900K operates stably at 4.7 GHz with 1.283 volt. The average CPU temperature is 72 degrees centigrade, the average VRM temperature is 51 degrees centigrade, and the average water temperature is 31 degrees centigrade. The average CPU package power is 270 watt.
Anyway, let’s do manual overclocking.
However, before we get started make sure to find the LIMP_MODE button.
Limp mode allows the system to automatically reboot with safe settings while retaining your manual BIOS settings. This is very helpful in case you’re unable to boot up and want to make small adjustments to your settings.
I found it extremely useful when going through the overclocking motions.
Strategy #2: Traditional Approach
Our first overclocking approach is very traditional: we will set a single ratio for all cores, with an offset for AVX, and set a fixed voltage using the override voltage mode.
As you know from the previous segment, the Core i9-11900K is already running quite hot with all power limits enabled. Increasing the voltage much further than the 1.26v would definitely result in overheating. So that will be the limiting factor in our overclock.
In the end, we could reach 5.1 GHz for all cores stable with 1.3v and an AVX512 offset of 5.
Upon entering the BIOS
- Press F7 to load optimized defaults
- Change X.M.P Disabled to X.M.P Profile1
- Press F2 to enter Advanced Mode
- In the Tweaker menu,
- Set Enhanced Multi-Core Performance to Enabled
- Set CPU Clock Ratio to 51
- Set Ring Ratio to 43
- Set AVX Offset to 5
- Set AVX512 Offset to 5
- Enter the Advanced CPU Settings sub-menu
- Set Ring to Core offset (Down Bin) to Disabled
- Set Frequency Clipping TVB to Disabled
- Leave the Advanced CPU Settings sub-menu
- Set Vcore Voltage Mode to Override Vcore
- Set Internal CPU Vcore to 1.3
Then save the settings and exit the BIOS.
We re-ran the benchmarks and checked the performance increase compared to stock operation.

As you can see, we lose performance against the default configuration in single threaded benchmarks. That is of course because the stock configuration would boost the Core i9-11900K frequency to 5.3 GHz in ideal conditions whereas our overclock sets 5.1 GHz across all cores.
In the multi-threaded benchmarks the performance uplift is quite significant.

When running Prime 95 Small FFT with AVX enabled, the Core i9-11900K operates stably at 4.6 GHz with 1.281 volt. The average CPU temperature is 93 degrees centigrade and the average VRM temperature is 58 degrees centigrade. The average CPU package power is 332 watt.
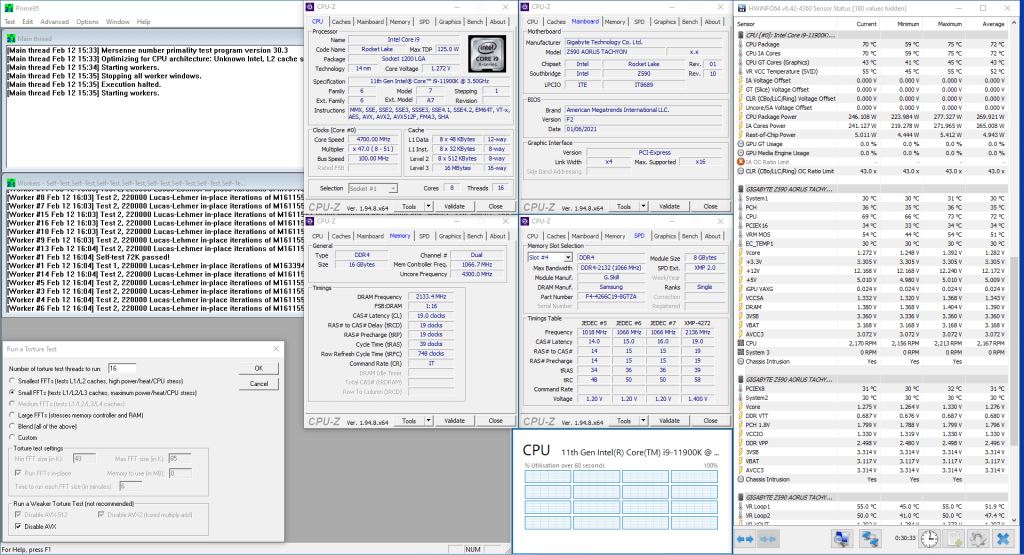
When running Prime 95 Small FFT with AVX disabled, the Core i9-11900K operates stably at 5.1 GHz with 1.277 volt. The average CPU temperature is 74 degrees centigrade and the average VRM temperature is 54 degrees centigrade. The average CPU package power is 293 watt.
Strategy #3: Modern Approach
Our second overclocking strategy is a more modern approach. We use the by core usage configuration and adaptive voltage mode to configure a dynamic overclock.
To configure the CPU ratio we rely on by core usage. This is the same strategy we have followed in numerous other SkatterBenchers. You can check out the segment on by core usage in the 10900K Cryo video for example
Unlike fixing a single ratio for all cores, by core usage will set the CPU frequency based on the amount of cores that are in use at a particular moment in time. This allows us to increase the frequency when few cores are active and reduce the frequency when many cores are active.
In our case, we are able to add an additional 100MHz on top of the two favored cores, so 5.4GHz; and an additional 100MHz for up to 4 active cores, so up to 5.2 GHz.
For the voltage we use adaptive voltage mode.
We discussed the Intel adaptive voltage mode at length in a previous video titled “Intel Adaptive Voltage Explored: Load-line, V/f Curve, V/f Point Offset”. While we use a different CPU, the Turbo Boost principles explained in that video also apply to our configuration.
The long story short is that Adaptive Voltage mode utilizes the CPU’s default voltage frequency curve to set the right voltage for a certain frequency. For frequencies that are below the maximum default turbo ratio, in this case 53x, we can rely on this default curve to set the appropriate voltage. For frequencies higher than the maximum default turbo ratio we can either set an specific voltage or set an offset.
Upon entering the BIOS
- Press F7 to load optimized defaults
- Change X.M.P Disabled to X.M.P Profile1
- Press F2 to enter Advanced Mode
- In the Tweaker menu,
- Set Ring Ratio to 43
- Set AVX Offset to 5
- Set AVX512 Offset to 6
- Enter the Advanced CPU Settings sub-menu
- Set Frequency Clipping TVB to Disabled
- Set Active Turbo Ratios to Manual
- Set Turbo Ratio (1-Core Active) to 54
- Set Turbo Ratio (2-Core Active) to 54
- Set Turbo Ratio (3-Core Active) to 52
- Set Turbo Ratio (4-Core Active) to 52
- Set Turbo Ratio (5-Core Active) to 52
- Set Turbo Ratio (6-Core Active) to 51
- Set Turbo Ratio (7-Core Active) to 51
- Set Turbo Ratio (8-Core Active) to 51
- Leave the Advanced CPU Settings sub-menu
- Set Vcore Voltage Mode to Adaptive Vcore
- Set VF Offset Mode to Selection
- Set VF Point 6 Offset to 0.050v
- Set VF Point 7 Offset to 0.050v
- Set VF Point 8 Offset to 0.050v
Then save the settings and exit the BIOS.
We re-ran the benchmarks and checked the performance increase compared to stock operation.

As you can see, the performance increases across the board. Also note that we don’t have a performance loss in single threaded benchmarks like we did with the traditional overclocking approach.
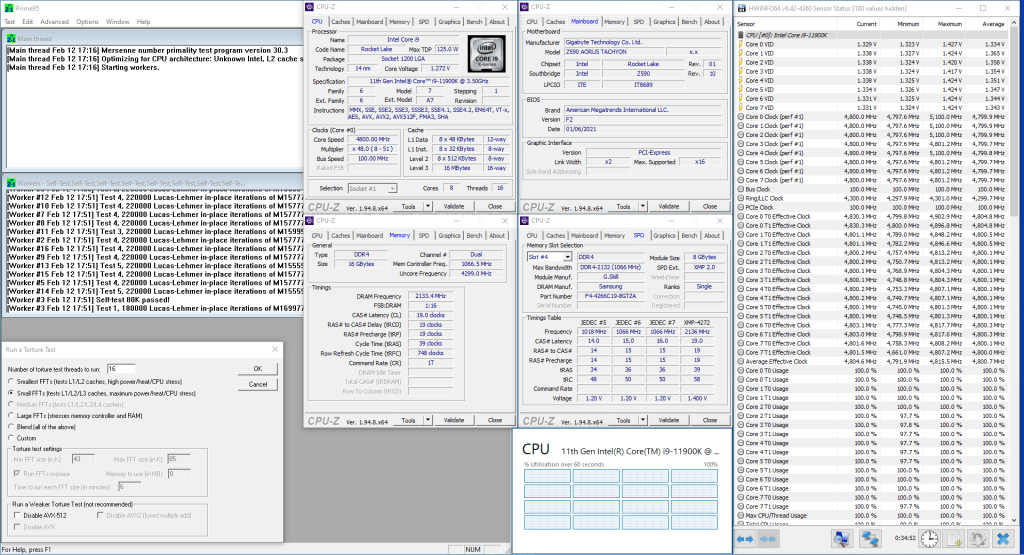
When running Prime 95 Small FFT with AVX enabled, the Core i9-11900K operates stably at 4.8 GHz with 1.271 volt. The average CPU temperature is 93 degrees centigrade, the average VRM temperature is 60 degrees centigrade, and the average water temperature is 31 degrees centigrade. The average CPU package power is 324 watt.

When running Prime 95 Small FFT with AVX disabled, the Core i9-11900K operates stably at 5.1 GHz with 1.282 volt. The average CPU temperature is 76 degrees centigrade, the average VRM temperature is 57 degrees centigrade, and the average water temperature is 30 degrees centigrade. The average CPU package power is 289 watt.
Strategy #4: Rocket Lake Approach
One of the new overclocking features that Rocket Lake brings to the table is the Per Core Ratio Limit. This feature allows setting a maximum ratio for each physical core.
We can combine this feature with the by core usage strategy from the previous segment and the favored cores from the Intel Turbo Boost Max 3.0 Technology.
We discussed the Intel Turbo Boost Max 3.0 technology at length in a previous video titled “Intel Turbo Boost 2.0 & Intel Turbo Boost Max 3.0 Explored”. While we use a different CPU, the Turbo Boost principles explained in that video also apply to our configuration.
The long story short is that Turbo Boost Max 3.0 leverages the fact that not all cores in your CPU are created equally, and that some have better overclocking range. In Rocket Lake CPUs, 2 out of the 8 cores are considered better or “favored” cores. These cores will reach the highest boost frequencies and will be prioritized when the operating system assigns workloads.
You can find out which are the favored cores on your CPU by either checking Intel Extreme Tuning Utility or the CPU ratios in the BIOS.
In our case, we found that one of the two favored cores is slightly better than the other. So we are able to run it at 5.5 GHz. By setting a per core limit ratio, we ensure that in the situation that 1 core is active and the 55x CPU ratio should be applied, it is applied only to our best core and not any of the others.
Upon entering the BIOS
- Press F2 to enter Advanced Mode
- In the Tweaker menu,
- Set Ring Ratio to 43
- Set AVX Offset to 5
- Set AVX512 Offset to 6
- Enter the Advanced CPU Settings sub-menu
- Set Ring to Core offset (down bin) to Disabled
- Set Frequency Clipping TVB to Disabled
- Set Active Turbo Ratios to Manual
- Set Turbo Ratio (1-Core Active) to 55
- Set Turbo Ratio (2-Core Active) to 54
- Set Turbo Ratio (3-Core Active) to 52
- Set Turbo Ratio (4-Core Active) to 52
- Set Turbo Ratio (5-Core Active) to 51
- Set Turbo Ratio (6-Core Active) to 51
- Set Turbo Ratio (7-Core Active) to 51
- Set Turbo Ratio (8-Core Active) to 51
- Set Turbo Per Core Limit Control to Manual
- Set Turbo Core 1 Ratio Limit to 54
- Set Turbo Core 2 Ratio Limit to 54
- Set Turbo Core 3 Ratio Limit to 55
- Set Turbo Core 4 Ratio Limit to 54
- Set Turbo Core 5 Ratio Limit to 54
- Set Turbo Core 6 Ratio Limit to 54
- Set Turbo Core 7 Ratio Limit to 54
- Set Turbo Core 8 Ratio Limit to 54
- Leave the Advanced CPU Settings sub-menu
- Set Extreme Memory Profile to Profile1
- Set Vcore Voltage Mode to Adaptive Vcore
- Set VF Offset Mode to Selection
- Set VF Point 6 Offset to 0.050v
- Set VF Point 7 Offset to 0.050v
- Set VF Point 8 Offset to 0.125v
Then save the settings and exit the BIOS.
We re-ran the benchmarks and checked the performance increase compared to stock operation.

As you can see, we are reaching the highest performance we’ve seen in any of our single threaded benchmark workloads so far.

When running Prime 95 Small FFT with AVX enabled, the Core i9-11900K operates stably at 4.8 GHz with 1.268 volt. The average CPU temperature is 91 degrees centigrade, the average VRM temperature is 60 degrees centigrade, and the average water temperature is 30 degrees centigrade. The average CPU package power is 325 watt.
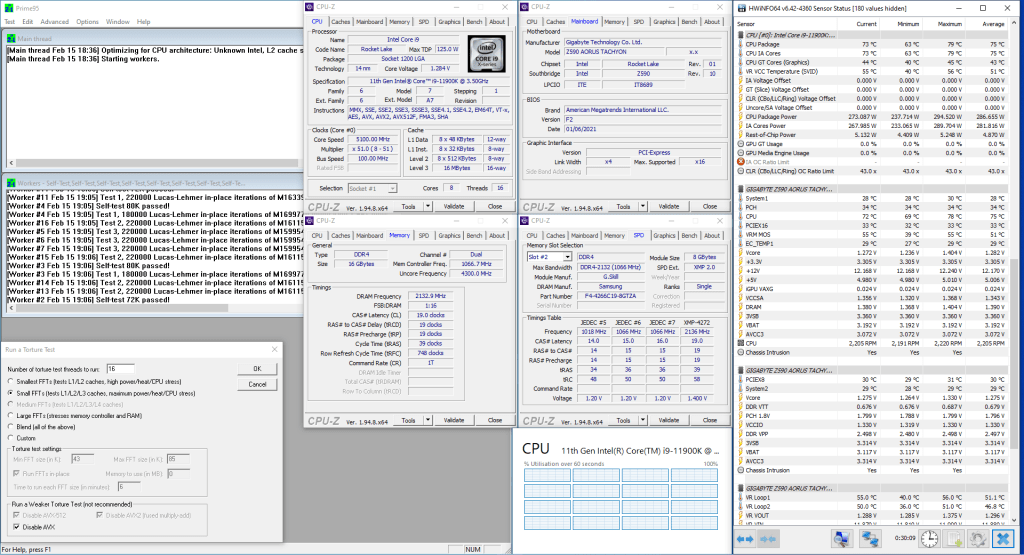
When running Prime 95 Small FFT with AVX disabled, the Core i9-11900K operates stably at 5.1 GHz with 1.275 volt. The average CPU temperature is 75 degrees centigrade, the average VRM temperature is 51 degrees centigrade, and the average water temperature is 29 degrees centigrade. The average CPU package power is 287 watt.
Intel Core i9-11900K Overclocking: Conclusion
Alright let’s wrap this up.
There are two things I want to talk about: the Core i9-11900K overclocking results and the Tachyon unlocked power limits.
First of all, I’m very happy with reaching 5.5 GHz in a stable configuration for the first time. The new Rocket Lake overclocking feature of Per Core Ratio Limit did the trick as it allowed me to restrict the highest frequency to only be set on my best core.
Overclocking the Rocket Lake Core i9-11900K feels very similar to overclocking the Comet Lake CPUs. Over the years, Intel has expanded its overclocking features but its foundations remain in place. That allows board vendors to more quickly get their boards ready for overclocking.
Generally speaking, it looks like the Rocket Lake CPUs run slightly hotter than their Comet Lake counterparts while not necessarily consuming more power. Therefore, solid cooling will be a great asset to have when trying to squeeze more performance out of your system. So, the broad expectation for Rocket Lake should be that the maximum stable frequency will be 100MHz to 200MHz lower than a similar part on Comet Lake.
The Z590 Aorus Tachyon certainly is an overclocker’s motherboard. While I could talk hours about its heritage and all its overclocking featu11900K prime95 traditional oc avxores, I want to focus the attention on unlocking the power limits by default.
For years, hardware reviewers and consumers alike have been very outspoken against motherboard vendors unlocking the power limits by default. Their key argument is that the CPU is supposedly running out of spec. While I understand this argument, I disagree with it.
As a performance enthusiast, I think it’s great that motherboard vendors provide customers with additional out of the box performance. In the case of the 11900K, unlocking the power limits brings up to 25% extra performance in benchmarks like Cinebench R23.
In my opinion, unlocking the power limits has been mischaracterized for years as running out of specification. Rather than thinking of unlocked power limits out of spec, I think we should think of the Turbo Boost default constraints as the minimum performance Intel offers with their CPUs.
The Turbo Boost constraints are defined such that consumers with the minimum specification air cooler and the minimum specification motherboard will have a stable system. However, high-end cooling solutions and high-end motherboards offer the customer with so much more performance headroom than the minimum specification.
As a performance enthusiast, I say as long as the CPU is running the factory-defined frequencies at the factory defined V/f curve, and below the factory defined TjMax, we are running within spec. Whether that’s at 125W or 350W is a matter of the customer choosing the right cooling and the right motherboard.
If Intel can provide CPUs that can deliver more performance at higher power, I say bring it on. Intel, you make the chip, and I’ll find the cooling and motherboard to power it.
Bill Motzing
I have 11700k on an Aorus Master. Could you please tell me how I can find (or determine) the By Core settings? Thank you for the great videos.
Tony
This is a great guide!
Is there any guide like this one for the MSI MEG Ace boards? I’ve tried to replicate your settings but there’s a lot of settings that don’t appear to have the same name as on the MSI boards.
Thank you though! This has been a big help in getting my 11900k happy
Pieter
Hi Tony,
I don’t have a guide specifically for the 11900K and MSI MEG Ace, however I did make a guide with the 11700K and the MPG Carbon EK X. I think the settings and overclocking process should be quite similar so hopefully it’s of help to you: https://skatterbencher.com/2021/04/06/skatterbencher-22-intel-core-i7-11700k-overclocked-to-5300-mhz/.
Thanks for the kind words!
Have a nice weekend,
Pieter.
Tony
Wow! Thank you so much for the fast reply!!
I’m doing that right now. Keep up the great work.
My weekend in lockdown just got much better. Thanks Pieter
Tony
Pieter
No worries. Stay safe Tony!
SkatterBencher #25: Intel Core i9-11900K Cryo Overclocked to 5600 MHz | SkatterBencher
[…] Once in our Rocket Lake Overclocking: What’s New article together with the Apex, and once in SkatterBencher #21 using the Aorus Z590 Tachyon motherboard. If you want more information on the CPU and the Rocket Lake overclocking features, I […]