SkatterBencher #94: Radeon Graphics (Ryzen 9000) Extreme Overclock to 3595 MHZ
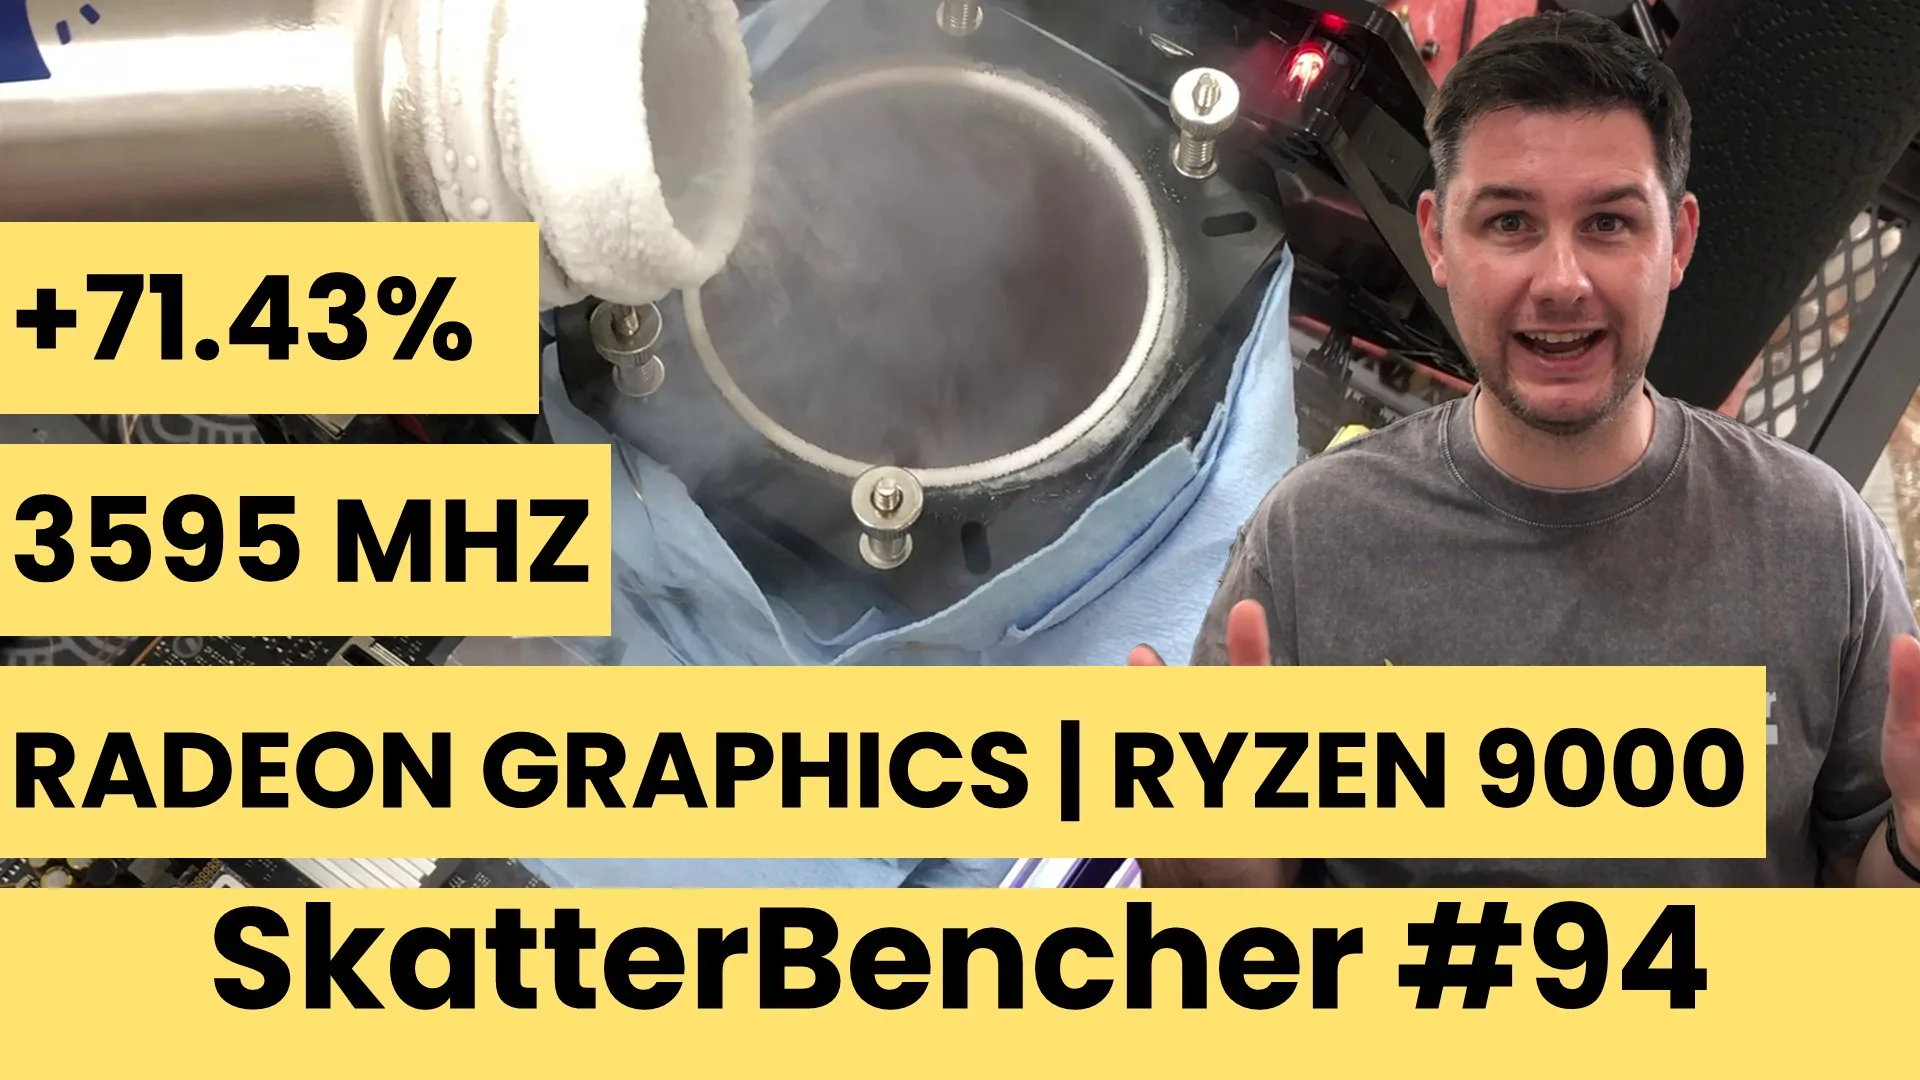
We extreme overclock the AMD Radeon Graphics integrated in the Ryzen 9 9900X processor up to 3595 MHz with liquid nitrogen.
First, we’ll explore leveraging the lowest possible operating temperature to squeeze more GPU frequency. However straight-forward that might sound, it’s already quite a challenge. Then, we’ll use every means possible to squeeze the highest possible frequency.
AMD Radeon Graphics (Granite Ridge) Extreme: Introduction
However, before we jump into overclocking, let us quickly review the hardware and the benchmarks, as well as get back up to speed on the final overclocking strategy from SkatterBencher #93.
Platform Overview
The system we’re overclocking today consists of the following hardware.
| ITEM | SKU |
|---|---|
| CPU | AMD Ryzen 9 9900X |
| Motherboard | ASUS ROG Crosshair X870E Hero |
| CPU Cooling | AI 3D Printed LN2 Pot ElmorLabs HOT300 Heater Controller ElmorLabs HOT300 Heater CPU Backplate |
| Memory | G.SKILL Trident Z5 Neo DDR5-8000 32GB |
| Power Supply | Enermax Revolution ATX 3.0 1200W |
| Storage | AGI 512GB NVMe M.2 Gen3 AORUS RGB NVMe M.2 512GB Gen4 |
| Chassis | Open Benchtable V2 |
| Telemetry | BENCHLAB ElmorLabs OC Panel |
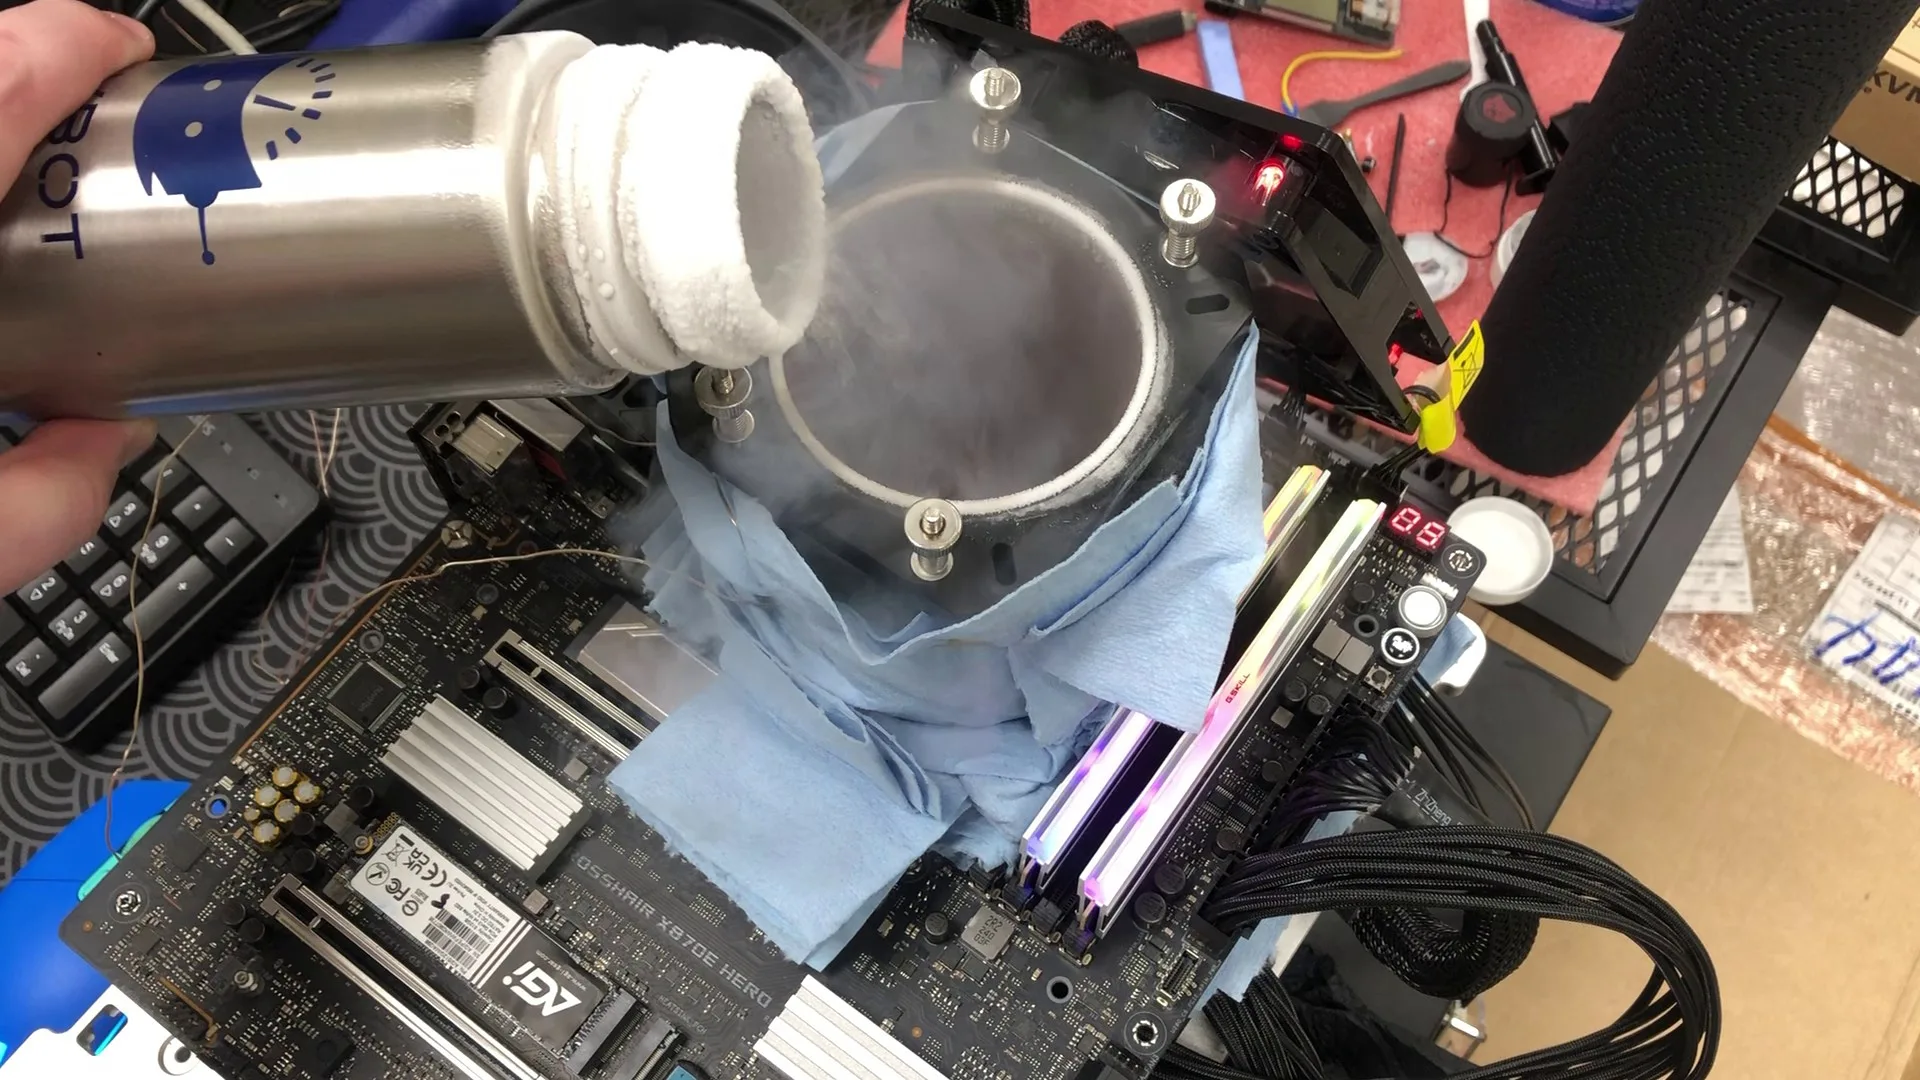
Hardware for Extreme Cooling
An effective setup for extreme cooling with liquid nitrogen consists of two key elements: the LN2 container in which we pour the nitrogen, and a backplate heater to help with condensation.
For this guide, I use the AI 3D-Printed LN2 container and the ElmorLabs HOT300 heater controller and CPU backplate. Then, we also need to keep track of the temperature. For this I use the ElmorLabs OC Panel.
Benchmarks, Games & Tools
We use the same Windows 11 and benchmarks and games to measure performance, ensure system stability, and gather telemetry like we did in SkatterBencher #93.
| BENCHMARKS | LINK |
|---|---|
| Geekbench 6 | https://www.geekbench.com/ |
| Geekbench AI | https://www.geekbench.com/ai/ |
| Novabench | https://novabench.com/ |
| AI-Benchmark | https://ai-benchmark.com/ |
| MLPerf Client 1.0 | https://mlcommons.org/benchmarks/client/ |
| Furmark 2.9 | https://geeks3d.com/furmark/ |
| GravityMark | https://gravitymark.tellusim.com/ |
| 3DMark FSR Feature Test | https://www.3dmark.com/ |
| Superposition | https://benchmark.unigine.com/superposition |
| Spaceship | https://store.steampowered.com/app/1605230/Spaceship__Visual_Effect_Graph_Demo/ |
| Evolve | https://store.steampowered.com/app/2717790/Evolve_Benchmark/ |
| AIDA64 | https://www.aida64.com/ |
| Memtest Vulkan | https://github.com/GpuZelenograd/memtest_vulkan |
| GAMES | LINK |
|---|---|
| Counter Strike 2 | https://store.steampowered.com/app/730/CounterStrike_2/ |
| Returnal | https://store.steampowered.com/app/1649240/Returnal/ |
| Shadow of the Tomb Raider | https://store.steampowered.com/app/750920/Shadow_of_the_Tomb_Raider_Definitive_Edition/ |
| Monster Hunter Wilds | https://www.monsterhunter.com/wilds/en-us/benchmark/ |
| Age of Mythology Retold | https://store.steampowered.com/app/1934680/Age_of_Mythology_Retold/ |
| Forza Motorsport | https://store.steampowered.com/app/2440510/Forza_Motorsport/ |
| Homeworld 3 | https://store.steampowered.com/app/1840080/Homeworld_3/ |
AMD Radeon Graphics (Granite Ridge) Extreme: Baseline Performance
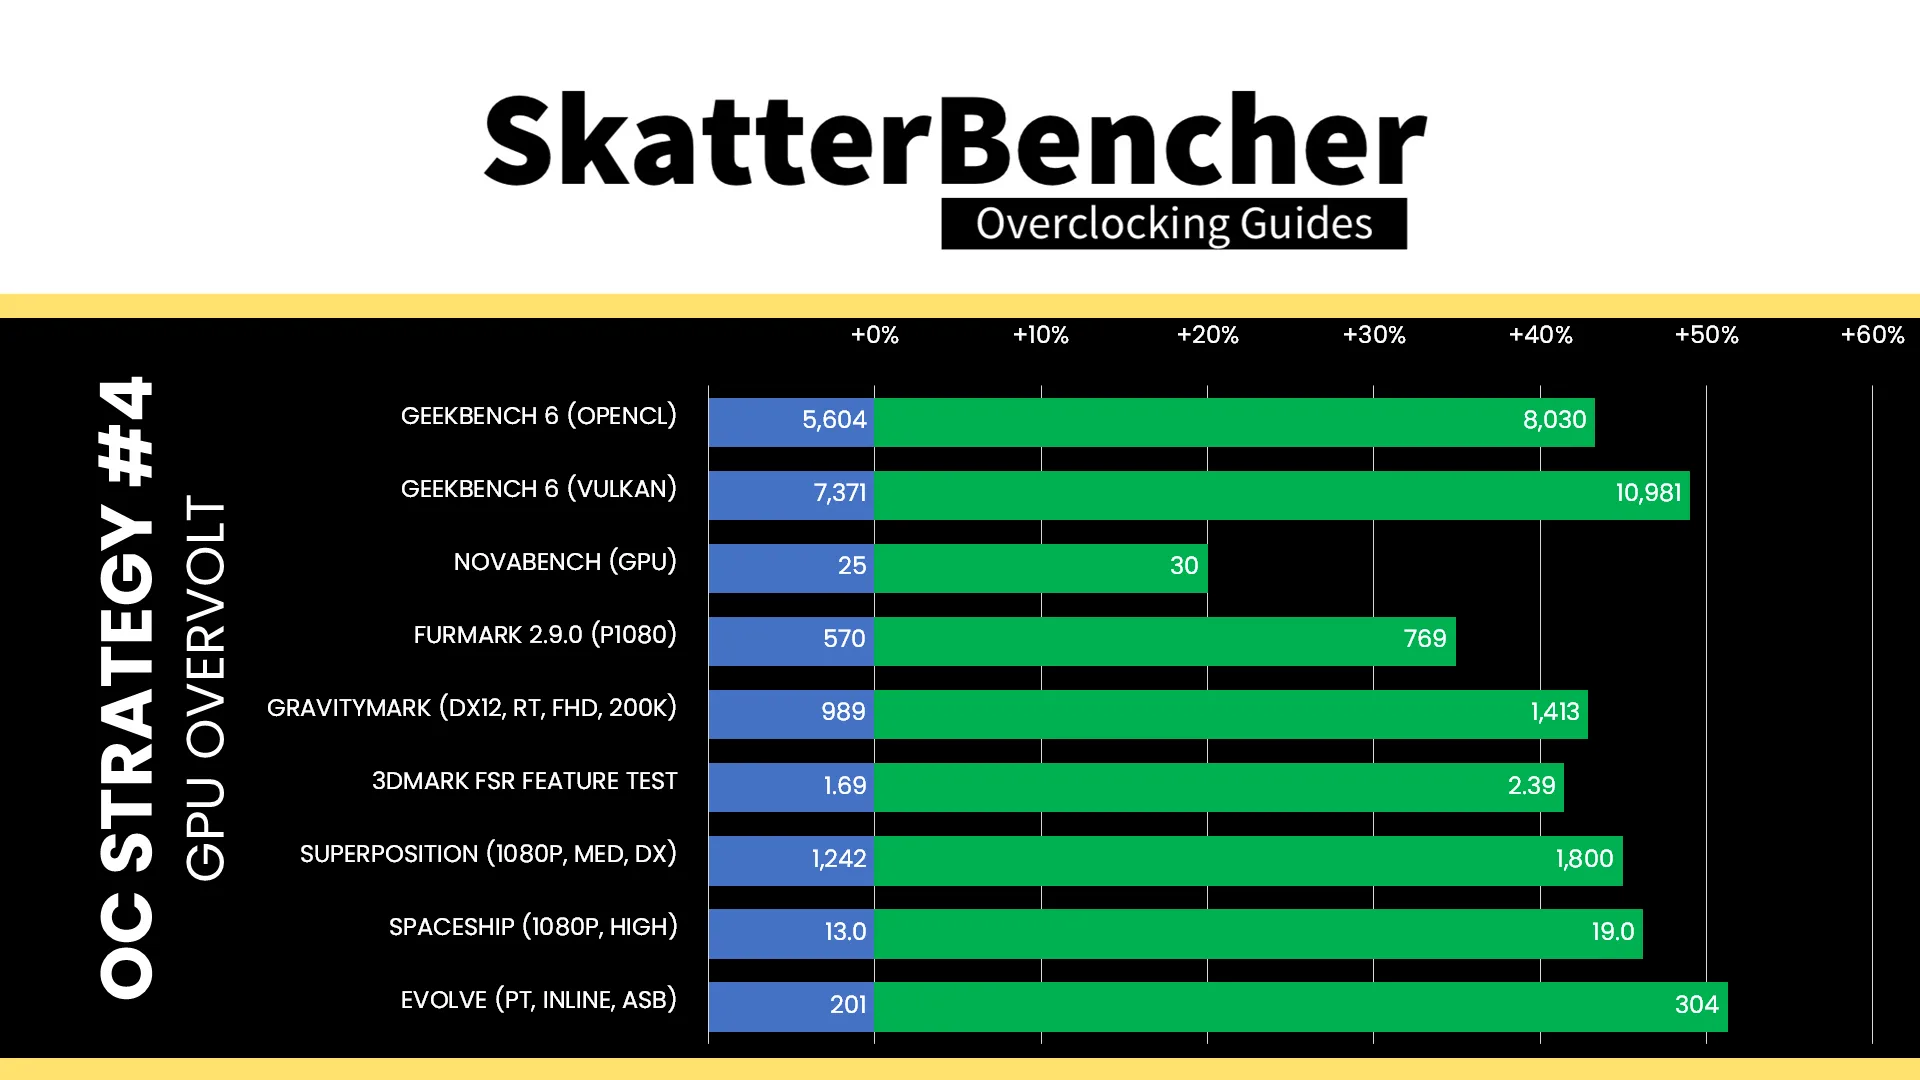
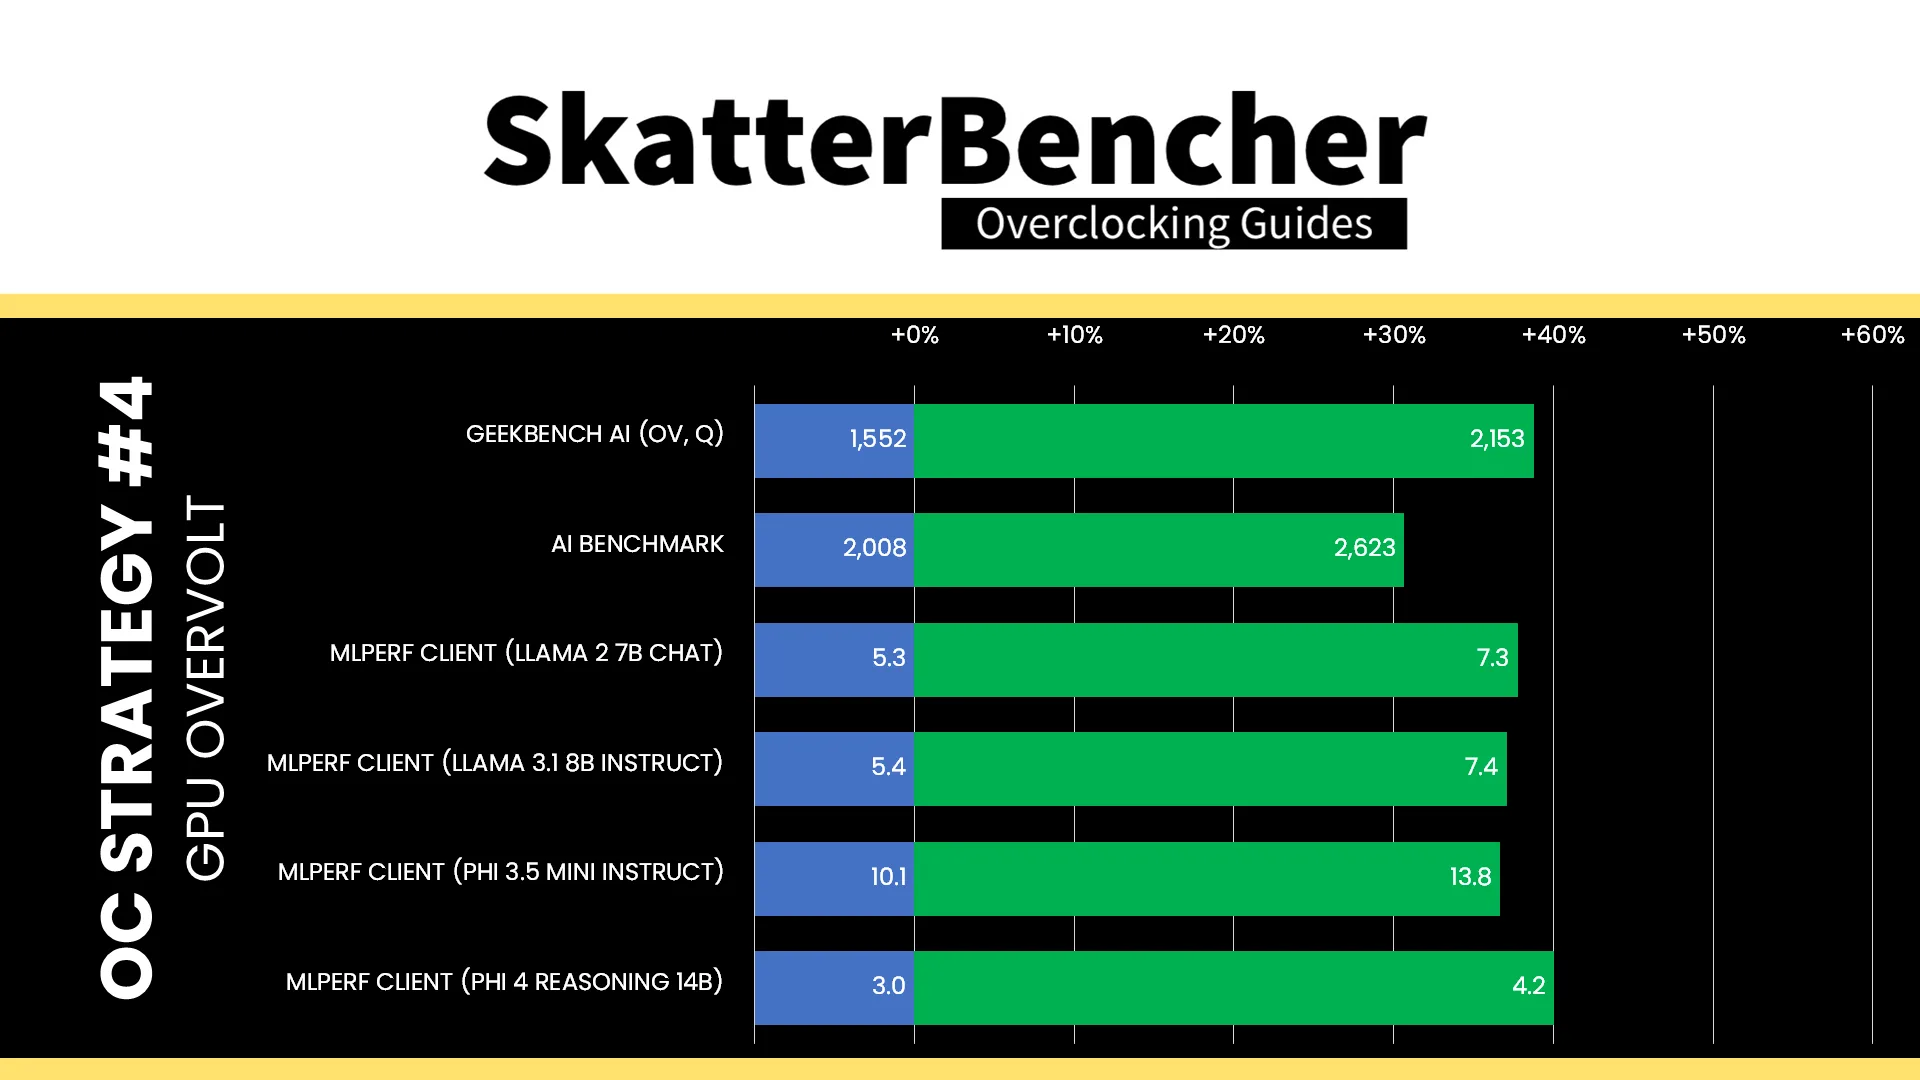
Before we head down to negative temperatures, let’s review the performance improvement when overclocking the Radeon Graphics with AIO cooling in SkatterBencher #93. Here are the Precision Boost 2 parameters we used in OC Strategy #4:
- TDP: 120 W
- PCC: 416 W
- THM: 95 C
- PPT: 1000 W
- TDC CPU: 1000 A
- EDC CPU: 1000 A
- CPU FIT: 6017.8 (1X)
- GPU VID LIMIT: 1.250
- GFX FMAX: 3000 MHz
- ECLK: 100.0 MHz
- FCLK: 2200 MHz
- UCLK: 2000 MHz
- MCLK: 4000 MHz
- GFX Curve Optimizer: +20
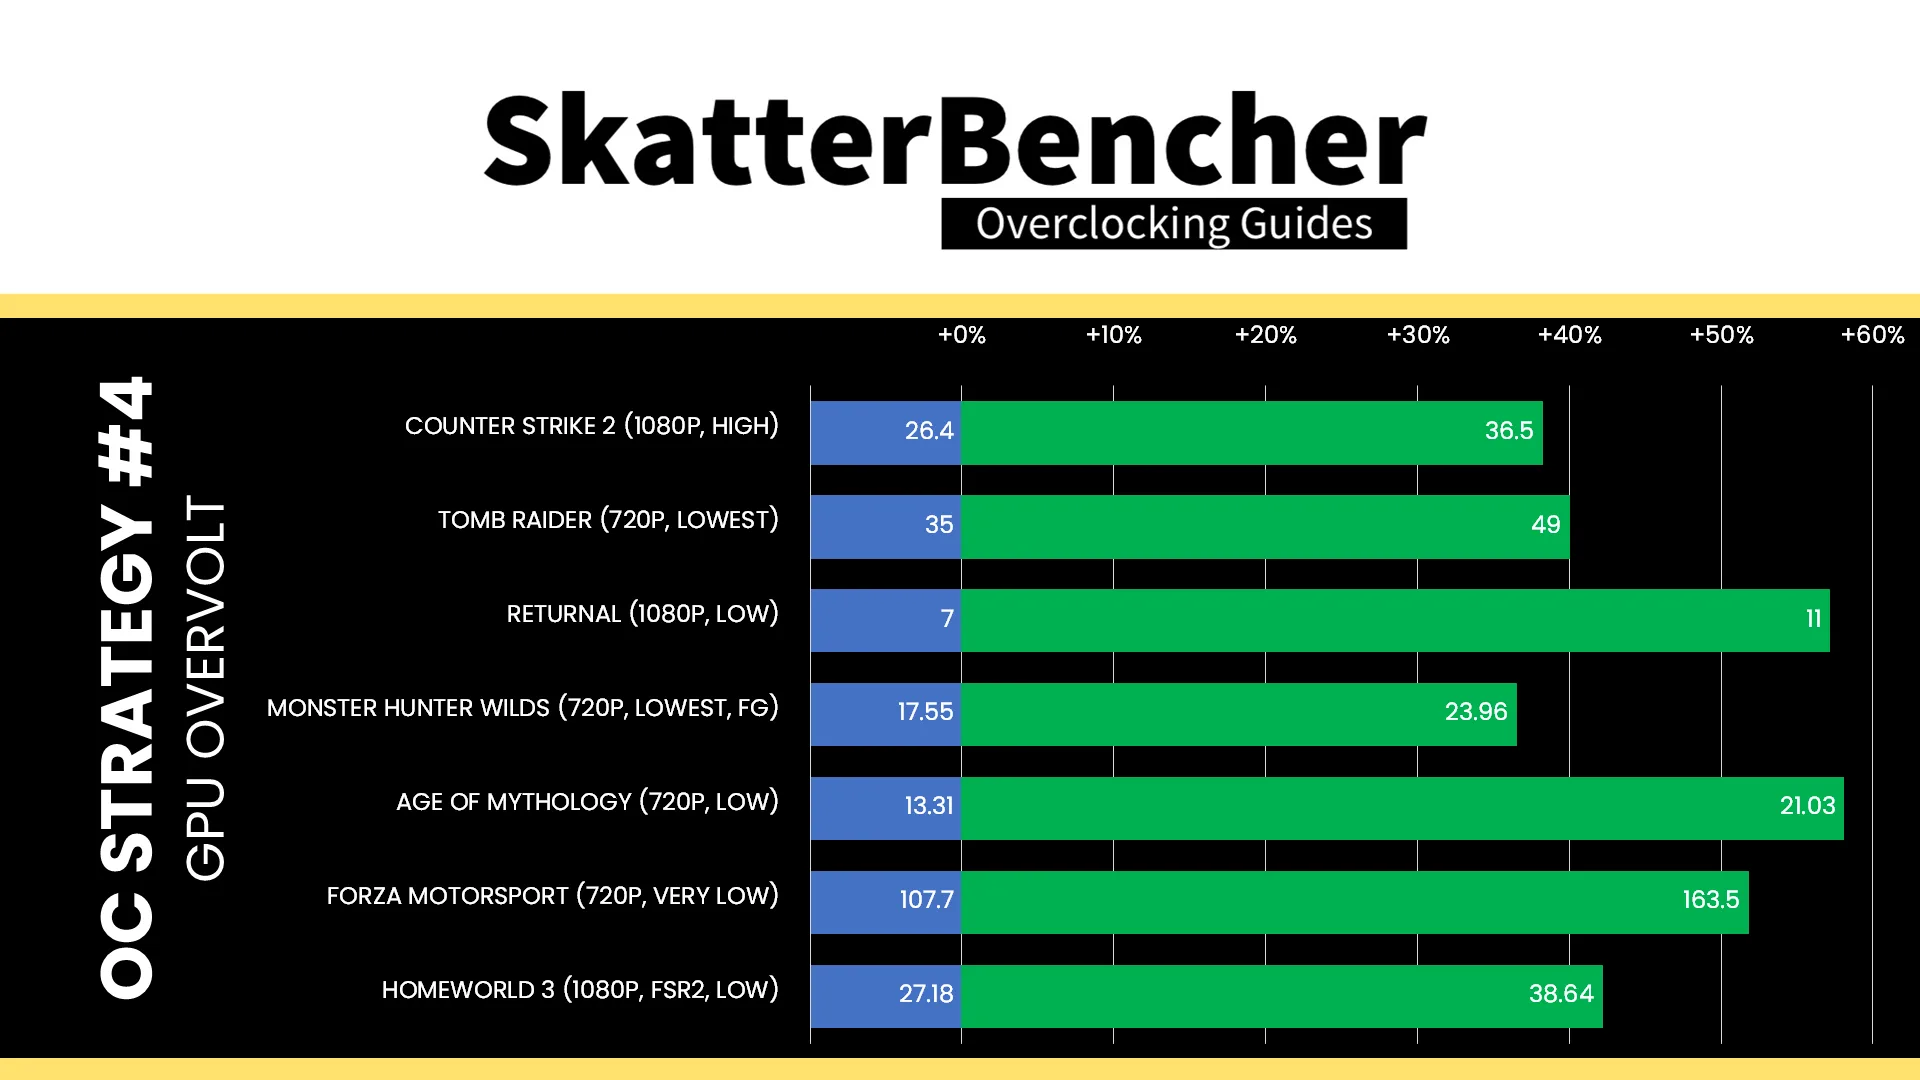
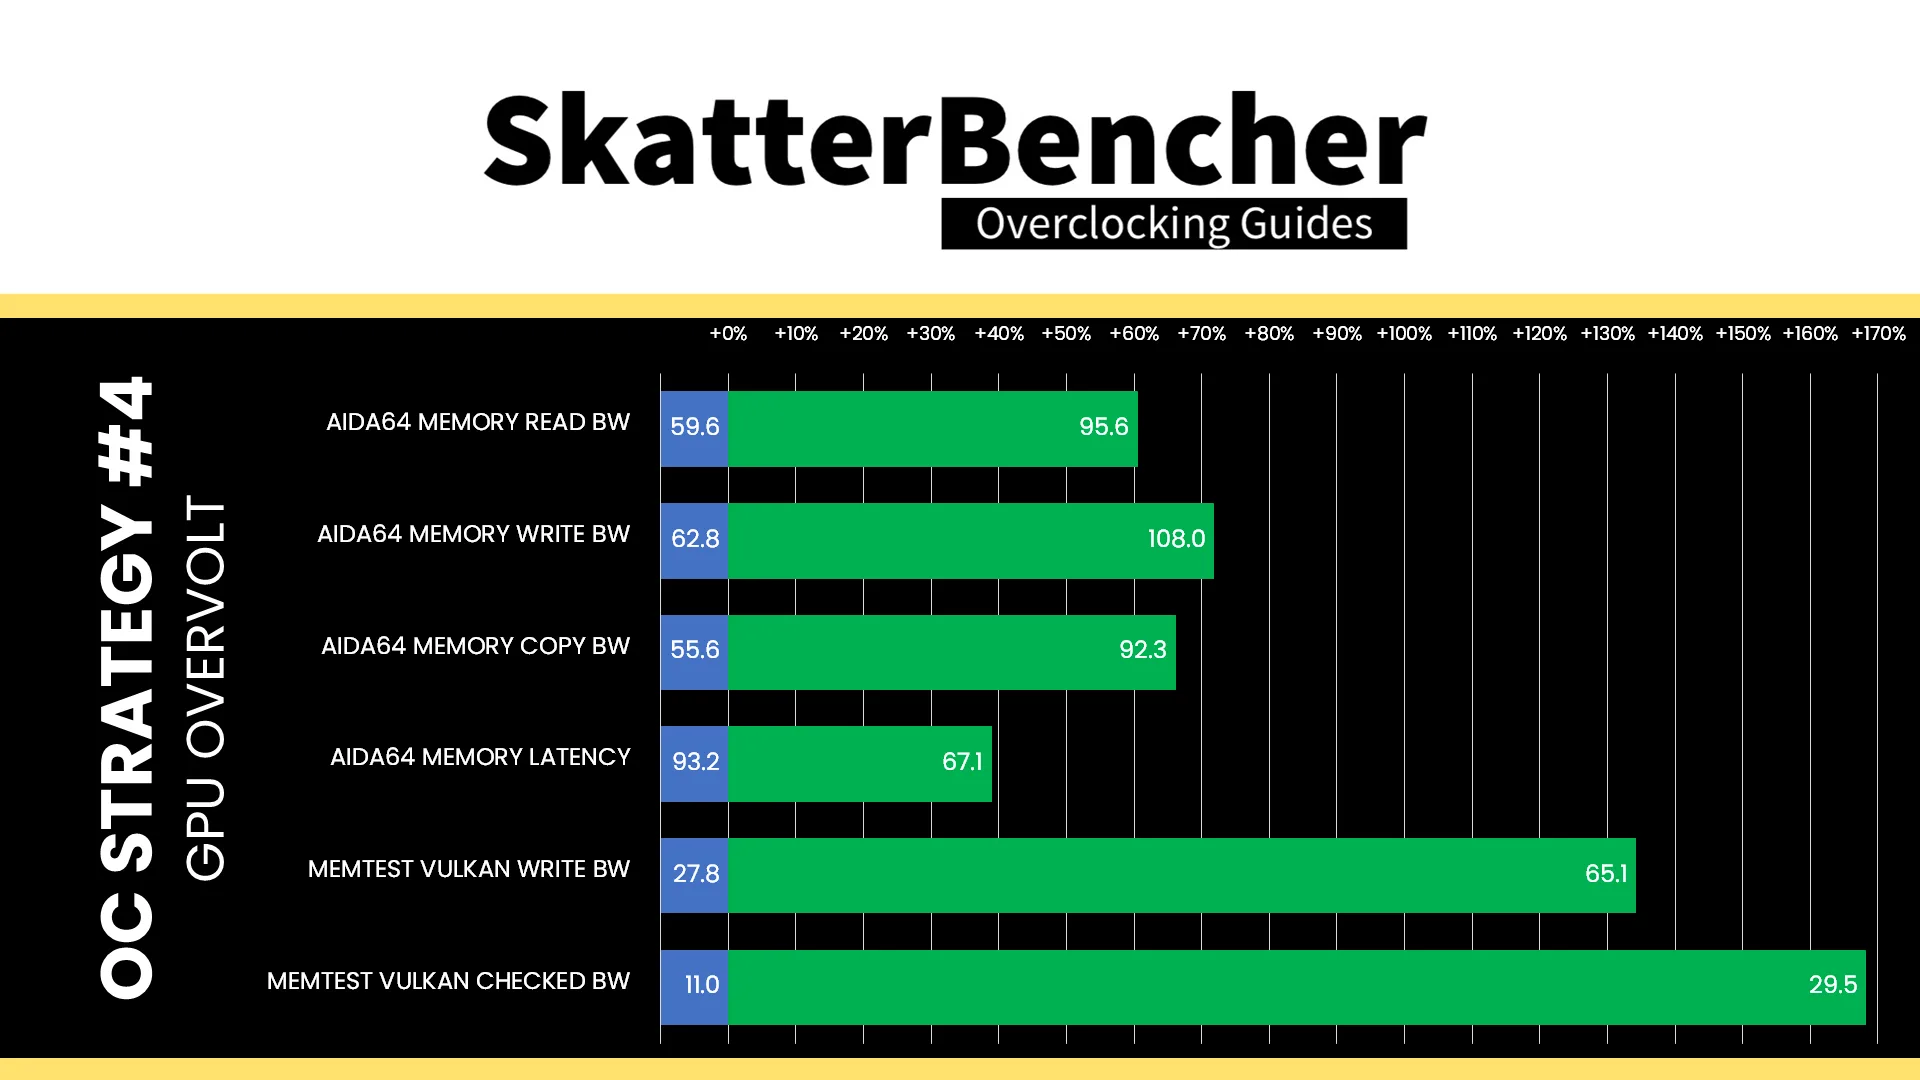
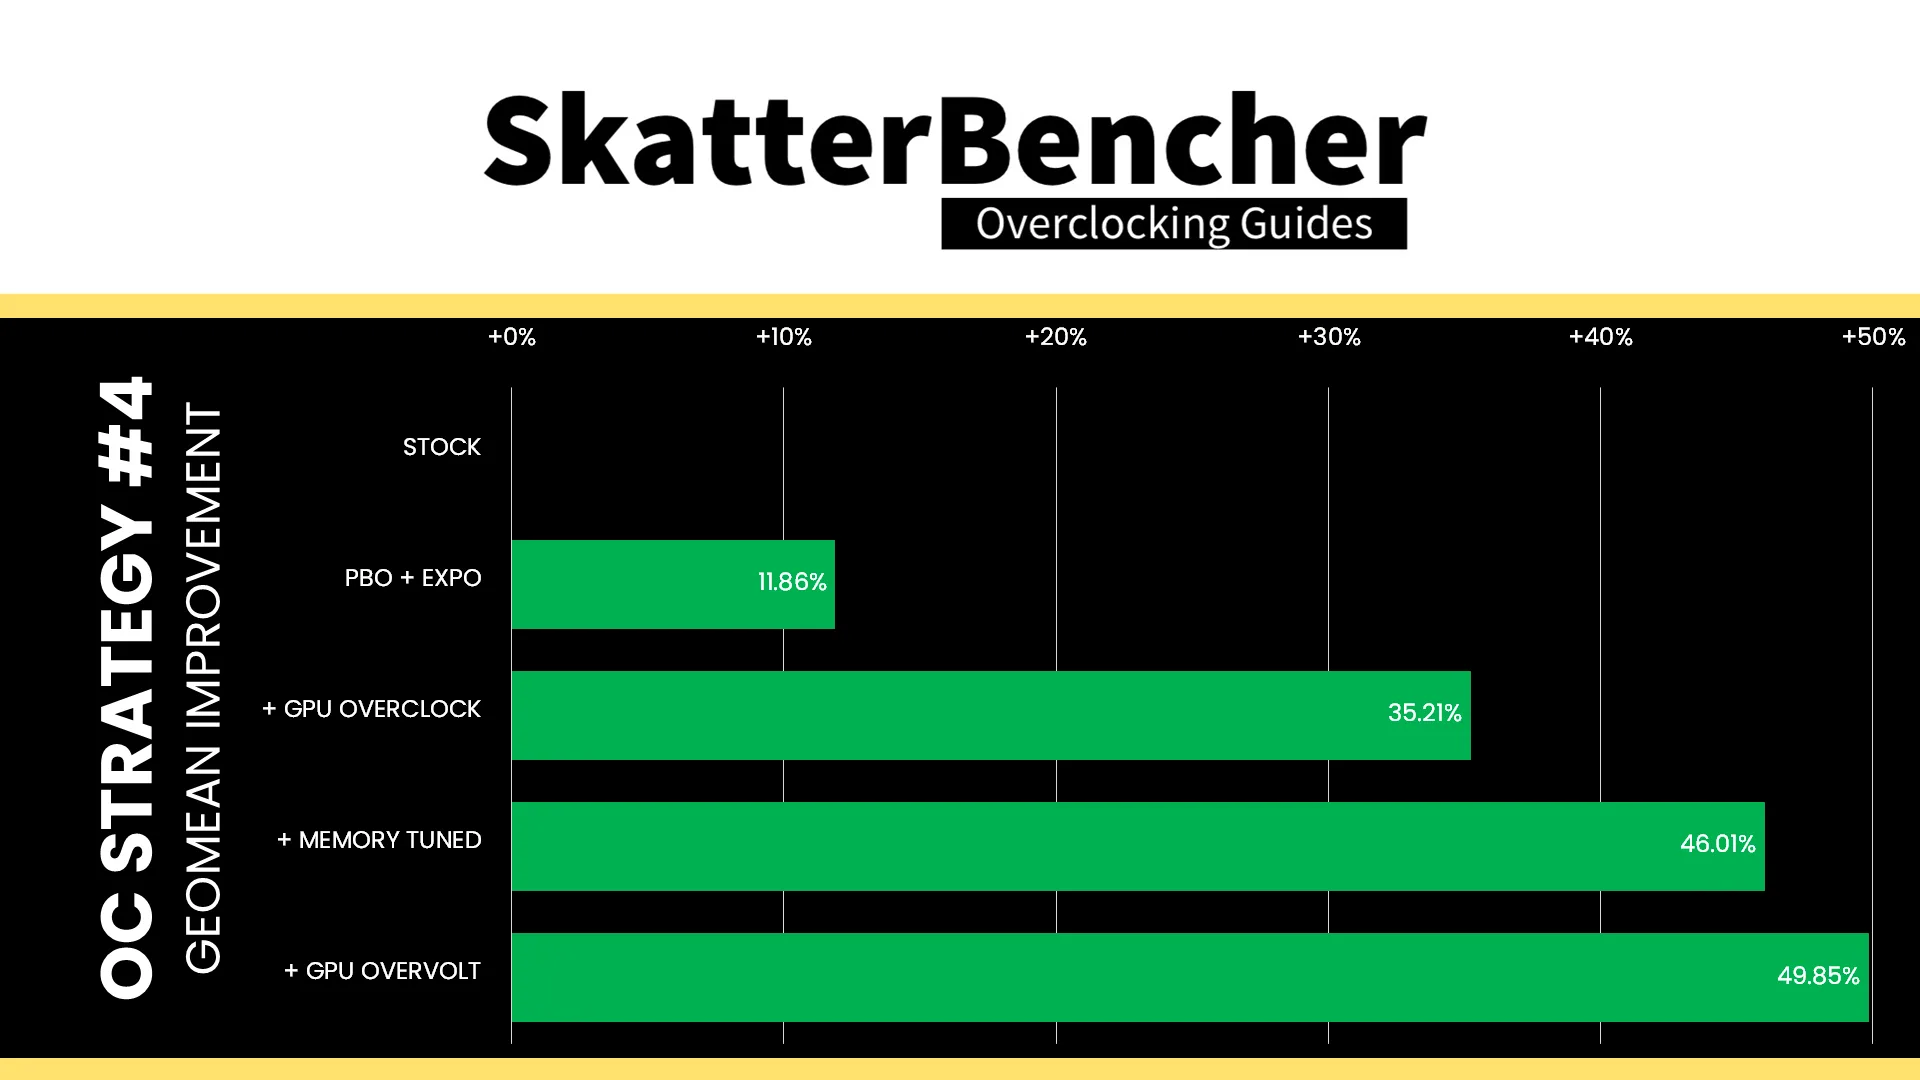
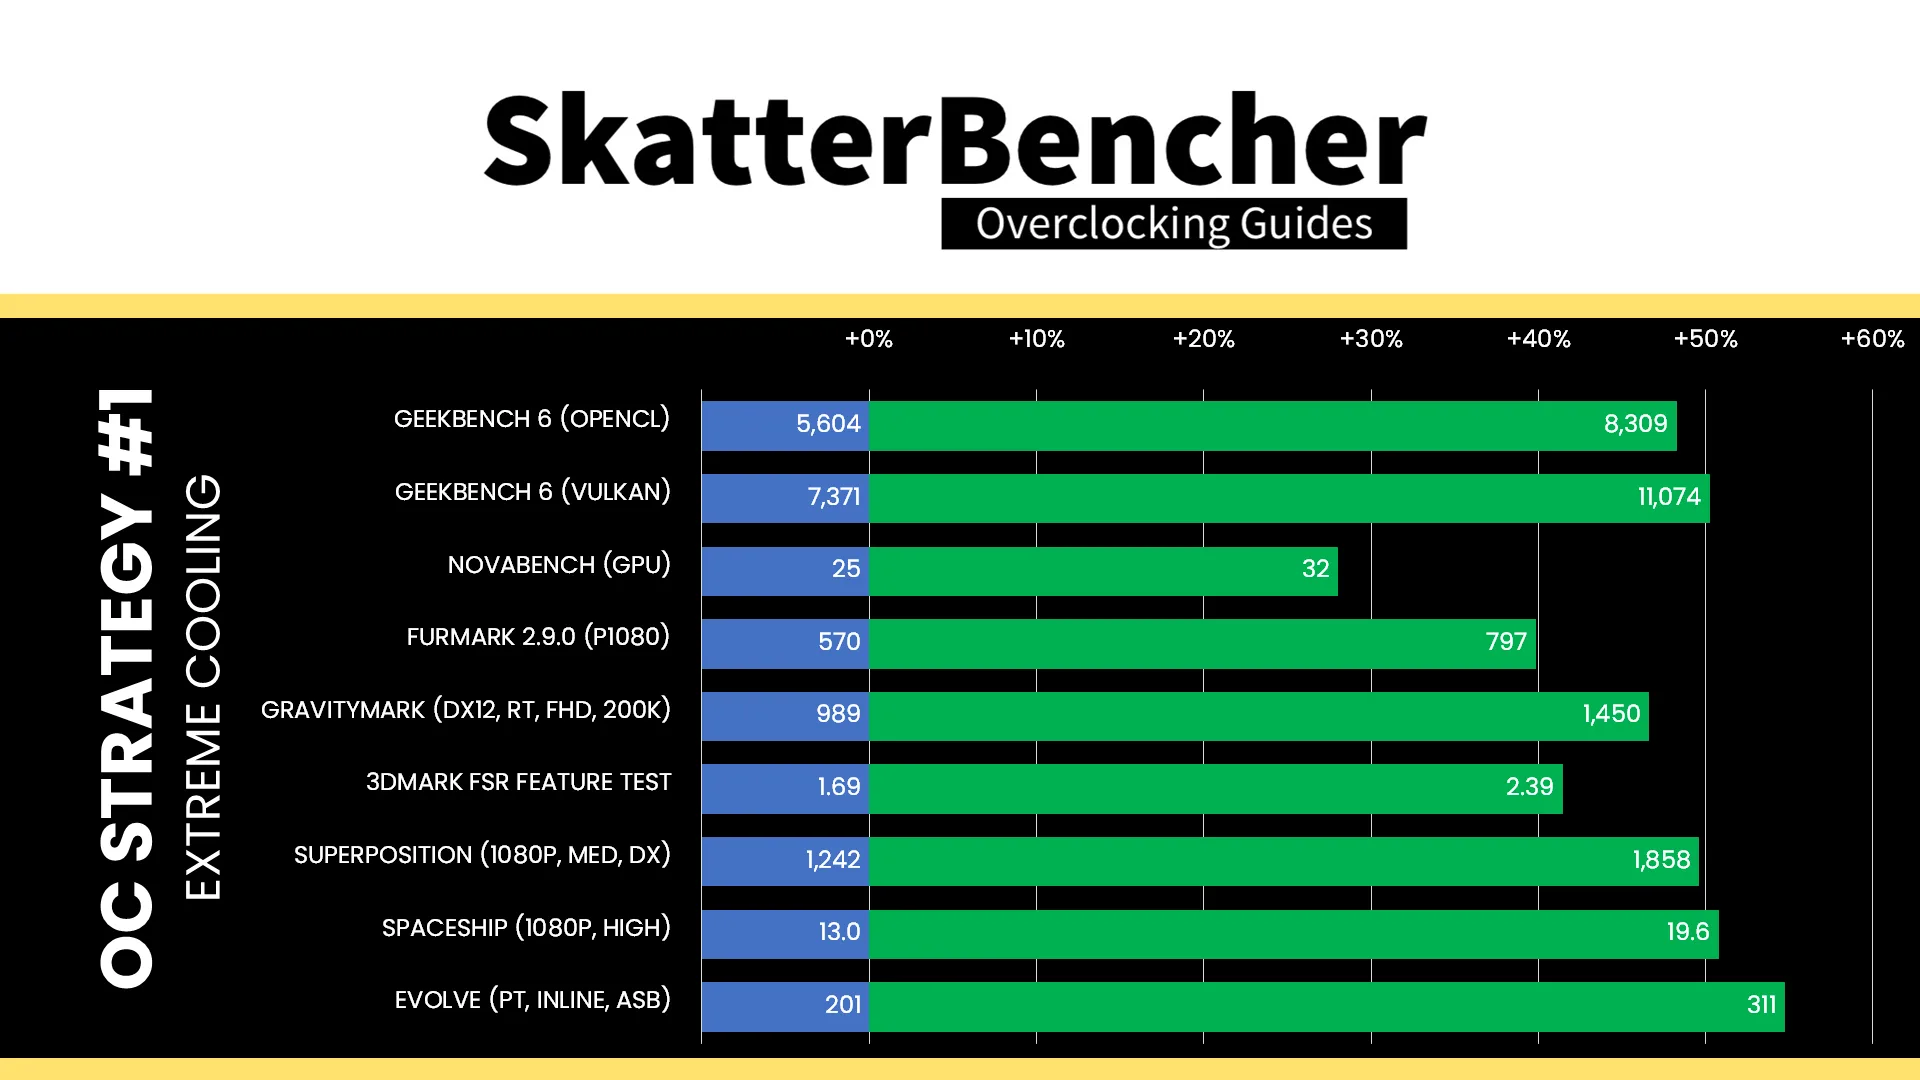
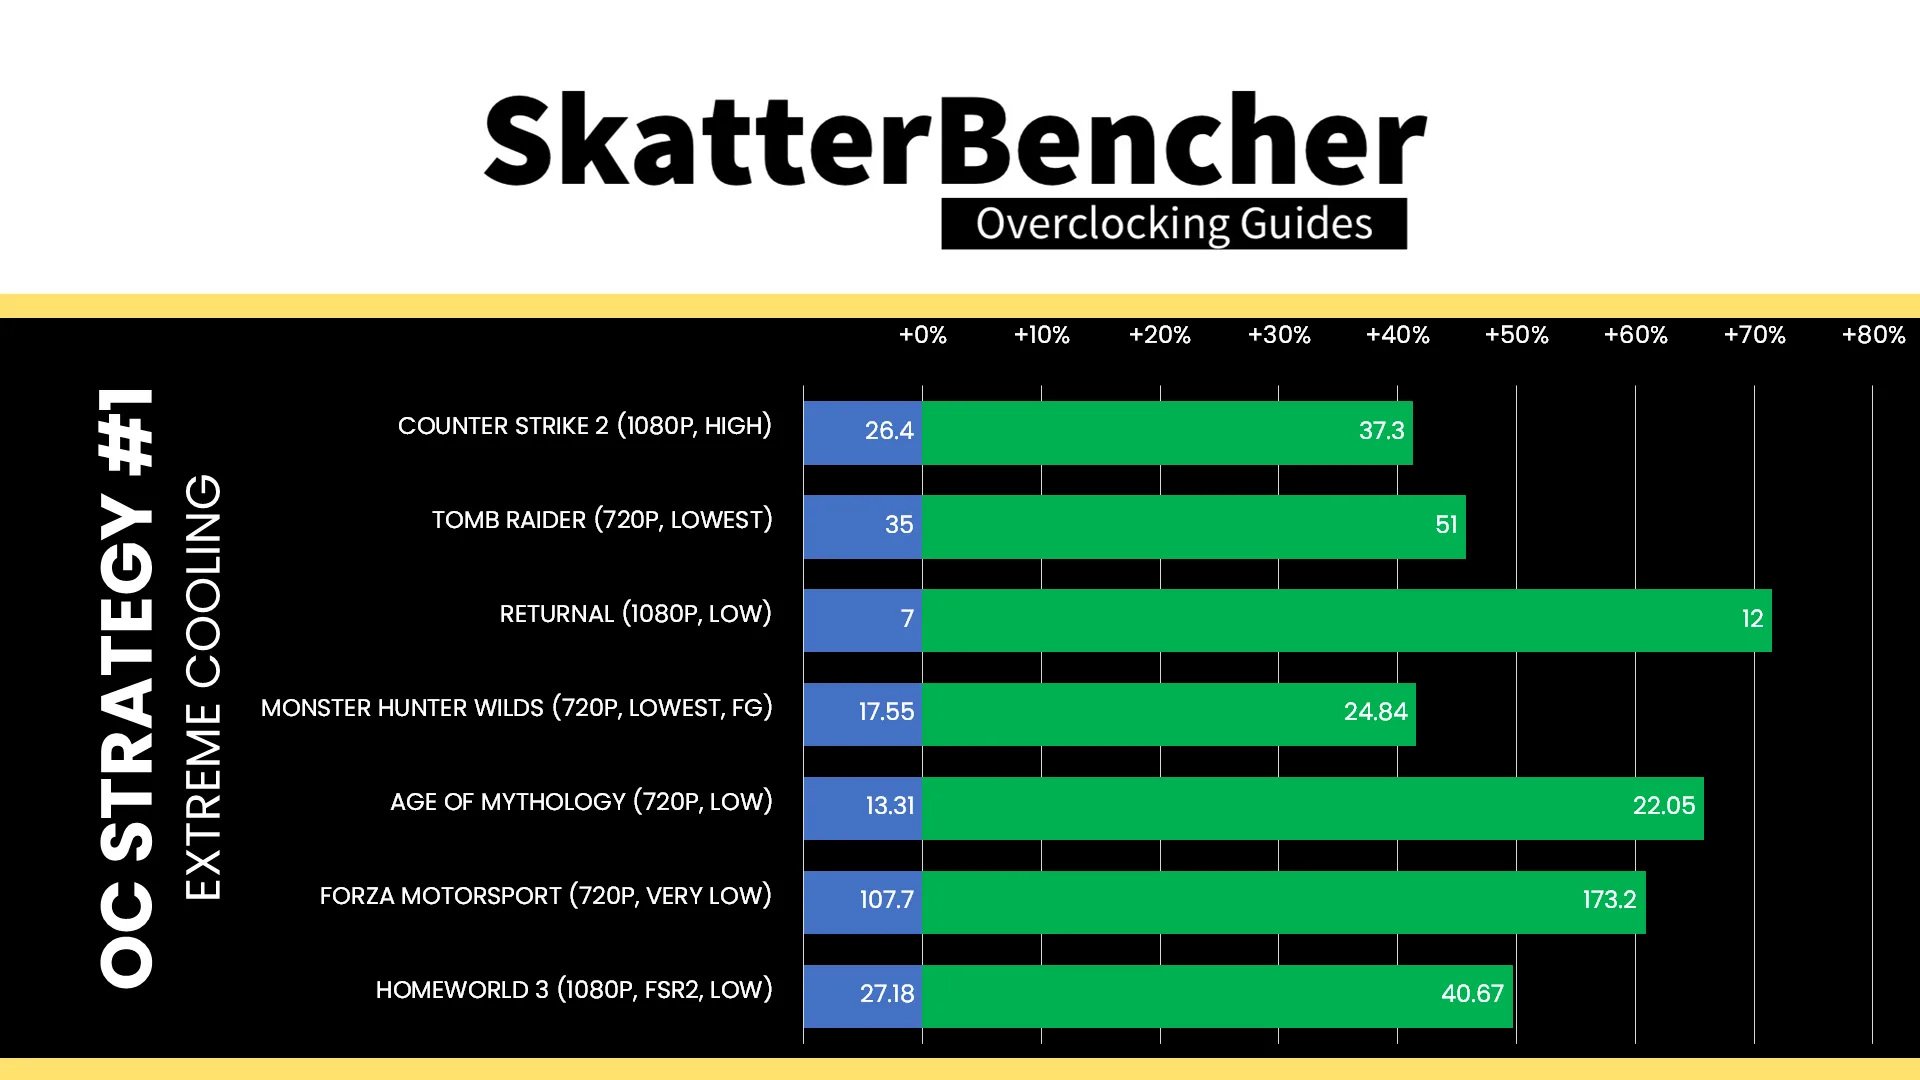
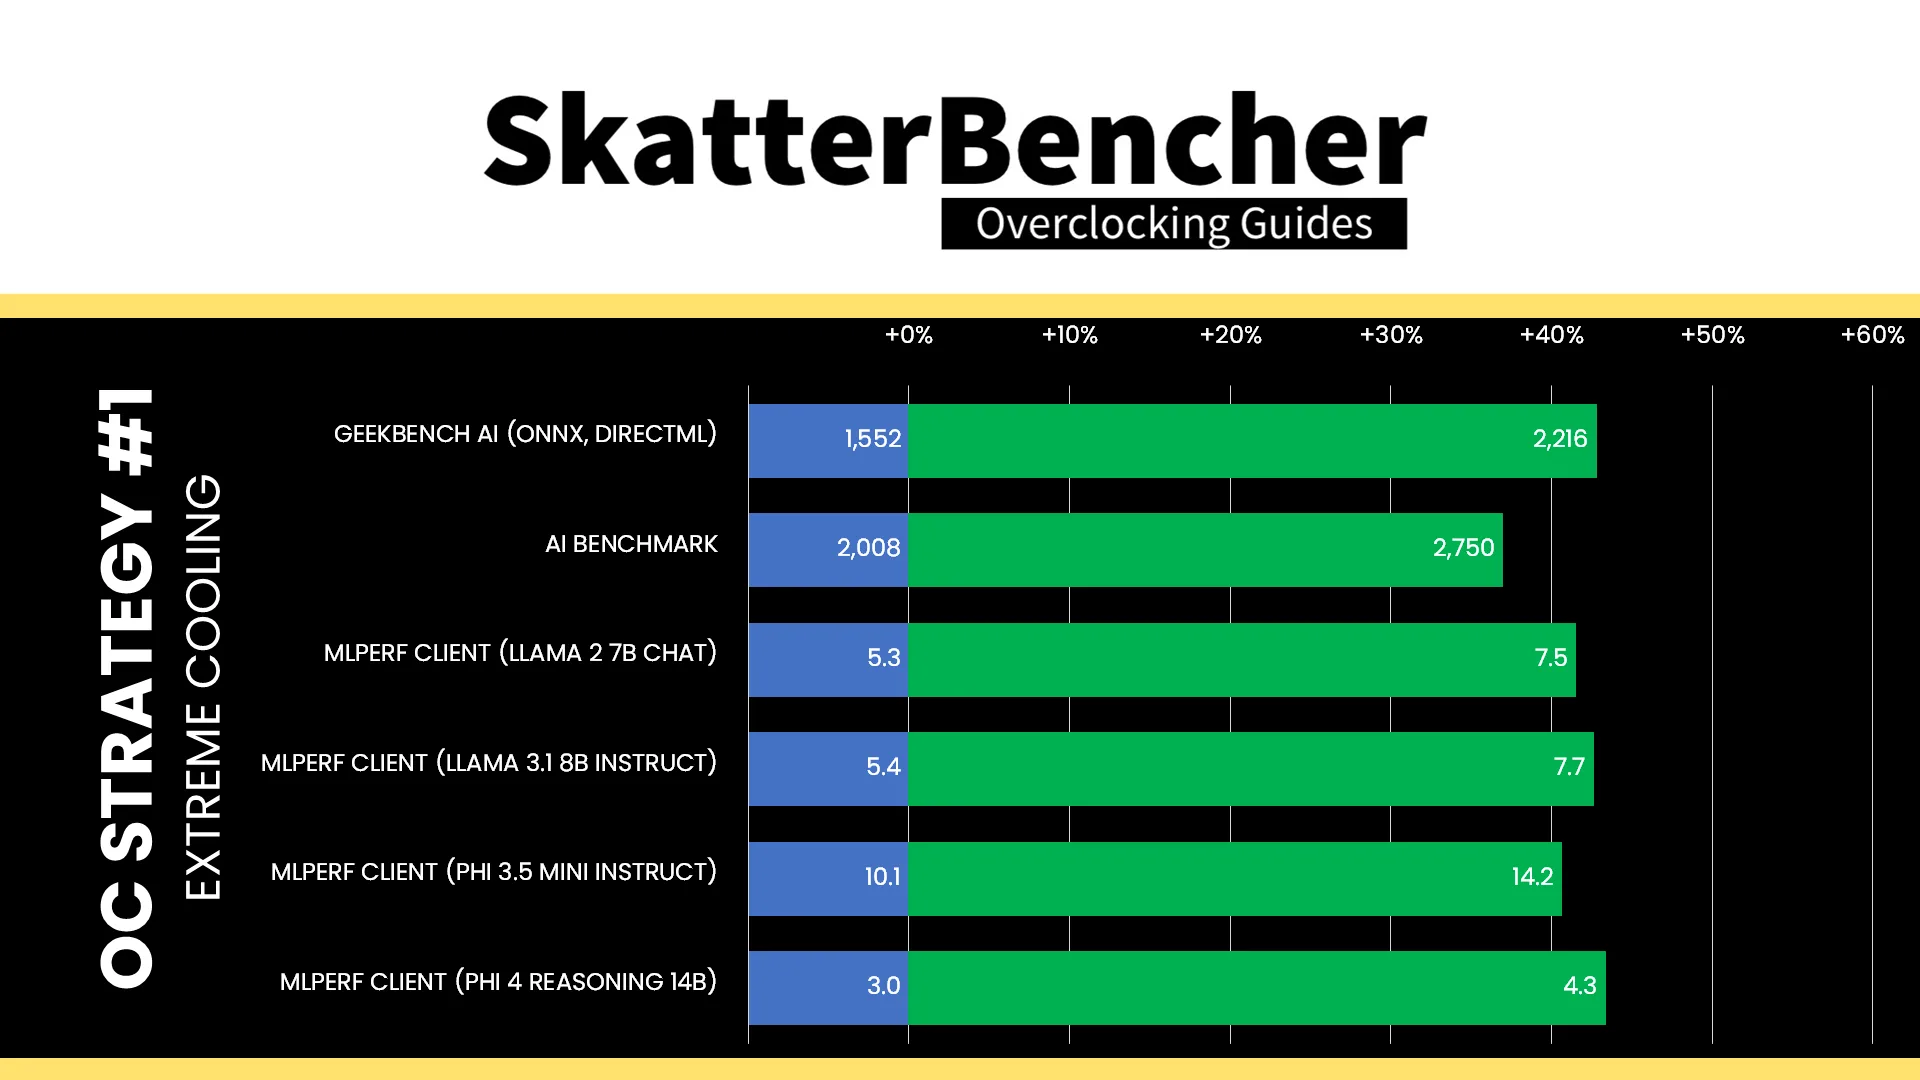
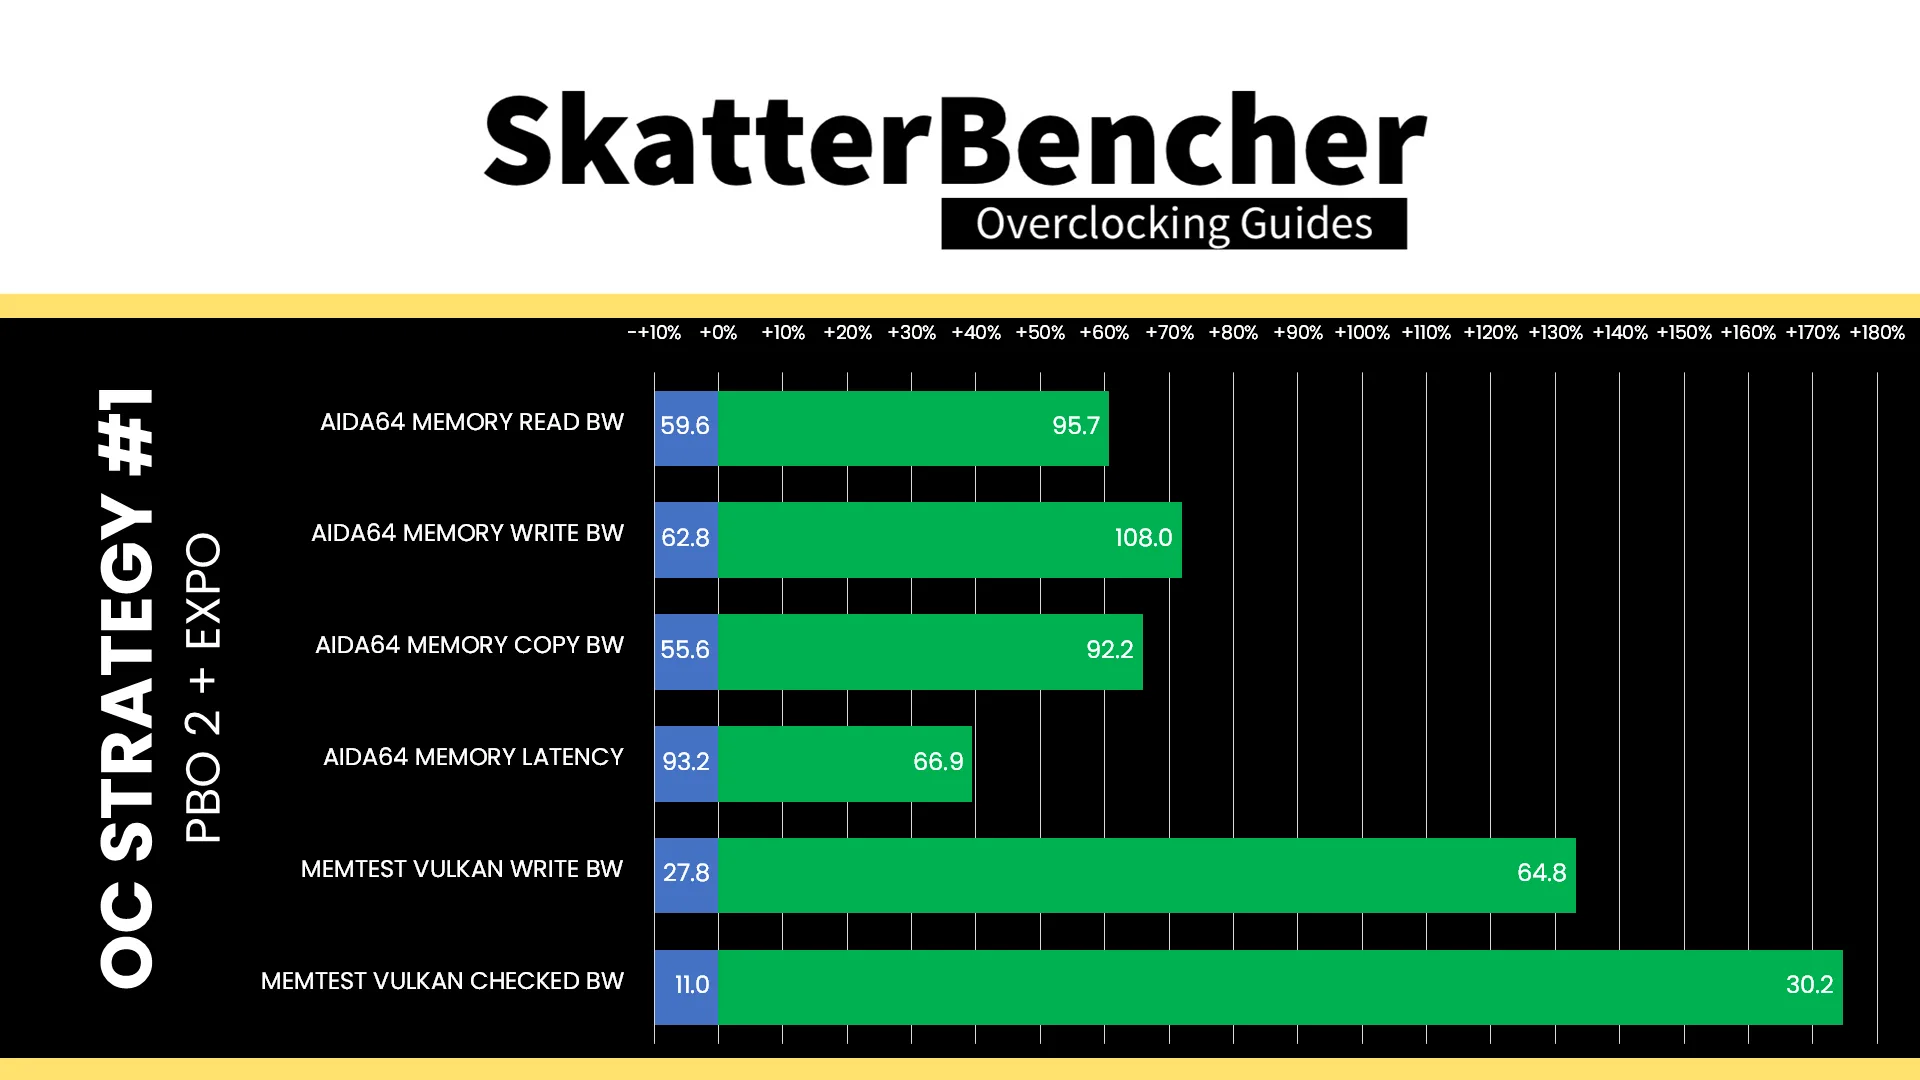
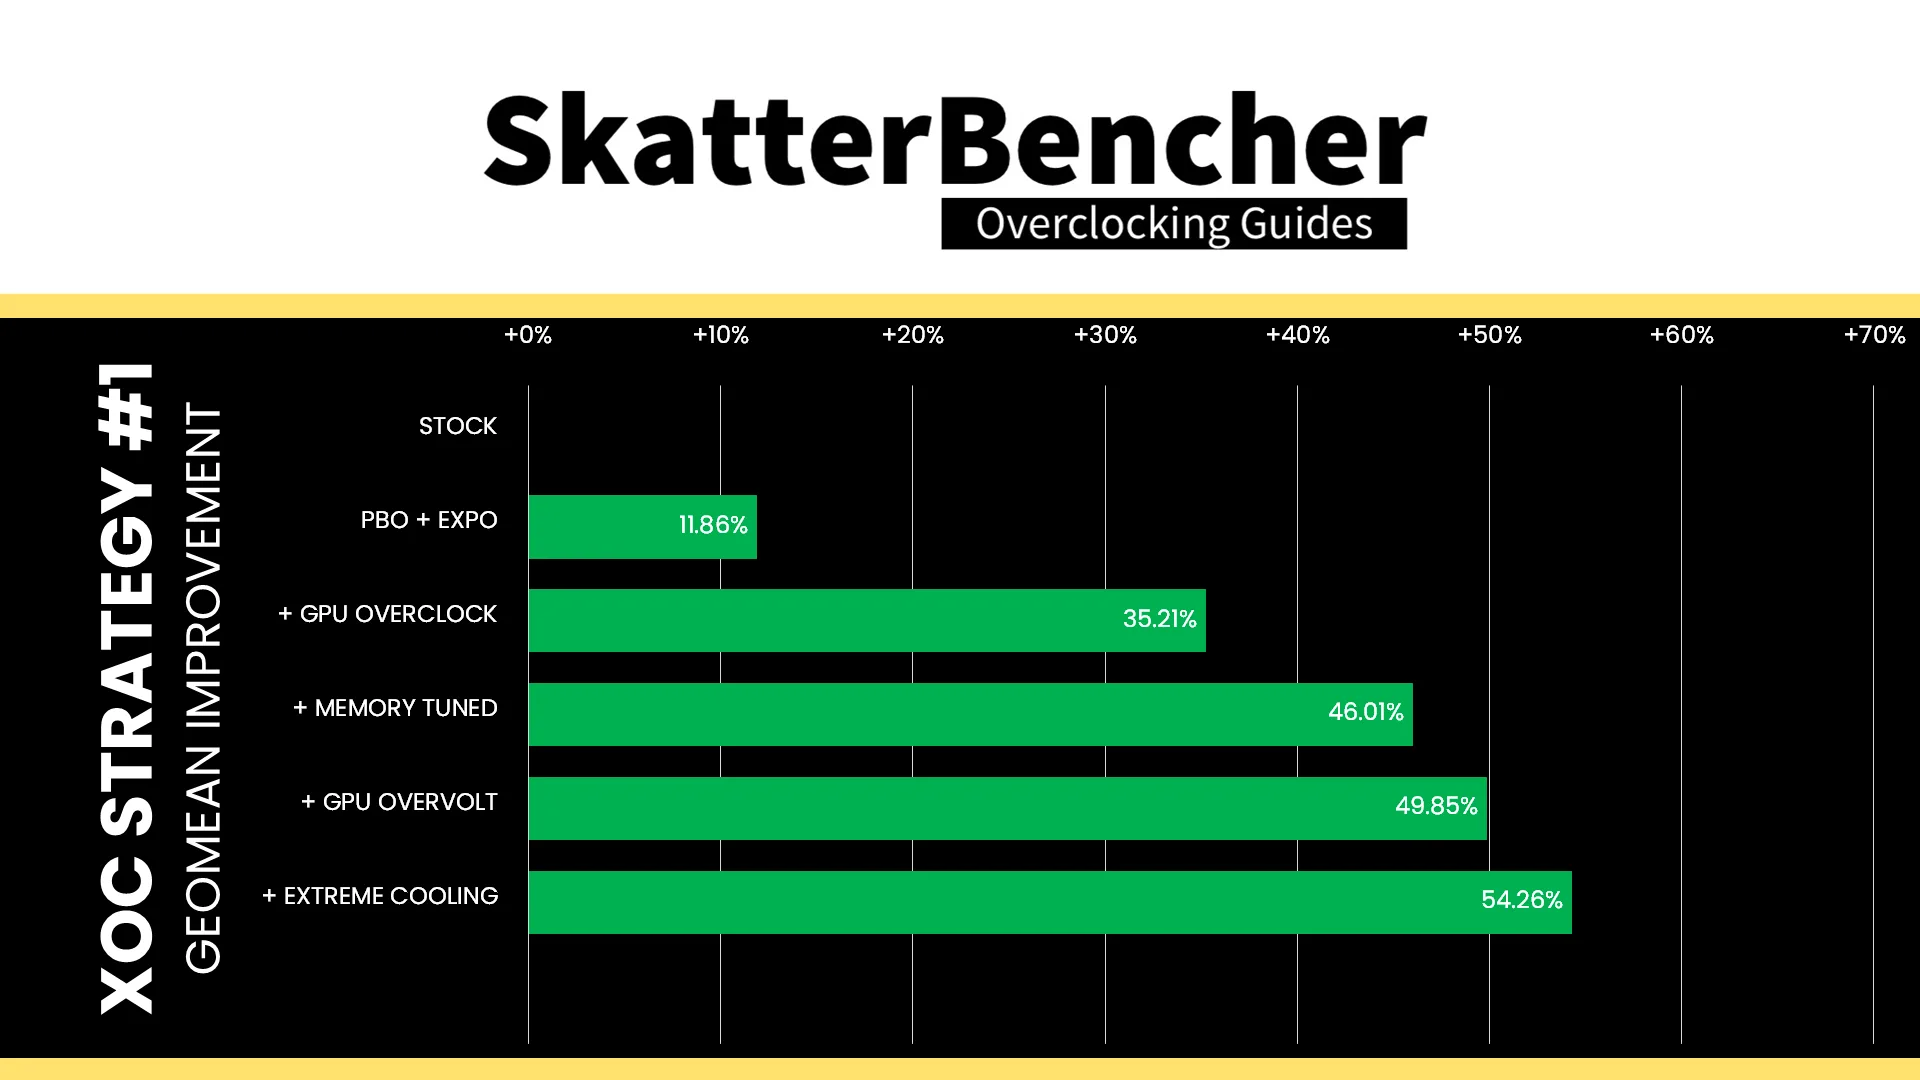
Here’s the performance improvement over stock.
With the increase in graphics and memory performance, the performance increases quite substantially across the board. The Geomean performance speedup over stock is +49.85%, and we get a maximum benchmark speedup of +58.08% in Age of Mythology.
When running the OCCT 3D Adaptive and VRAM Combined Stress Test , the average GPU effective clock is 2915 MHz with 1.269 volts. The average GPU temperature is 53.8 degrees Celsius. The average GPU core power is 37.9 watts.

XOC Strategy #1: Extreme Cooling
In our first overclocking strategy, we’re simply lowering the temperature as much as possible and try to increase the GPU frequency will keeping the same settings as OC Strategy #4 from SkatterBencher #93.
Temperature Fail-Safe Issue
However, almost immediately we run into a strange issue where the GPU frequency is stuck at 600 MHz when booting below -20 degrees Celsius.
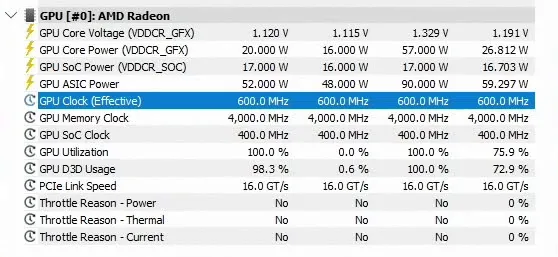
While I don’t have access to very advanced debugging tools, what seems to happen is that if the SMU (System Management Unit) detects too low a temperature at boot, it sets the GPU to a fail-safe state. Then, in the operating system, the driver doesn’t engage the GPU in high frequency due to that fail-safe state.
In the next XOC Strategy I’ll show how we can still work around this limitation for record attempts, but unfortunately it’s not possible to put together an “easy’ XOC Strategy. So, ultimately, our XOC Strategy ends at about -15 degrees Celsius. With the additional temperature headroom, I could further increase the graphics frequency by 180 MHz to 3180 MHz.
BIOS Settings & Benchmark Results
Upon entering the BIOS
- Go to the Extreme Tweaker menu
- Set Ai Overclock Tuner to EXPO I
- Enter the DRAM Timing Control submenu
- Enter the Memory Presets submenu
- Select Load Hynix 7600MHz 1.45V 2x16GB SR and click OK
- Leave the Memory Presets submenu
- Set tCL to 38
- Set tRCD WR to 48
- Set tRCD RD to 48
- Set tRP to 48
- Set tRRDL to 12
- Set tRDDS to 8
- Set tWRTL to 20
- Set tWRTS to 8
- Enter the Memory Presets submenu
- Leave the DRAM Timing Control submenu
- Set GPU Boost to Manual mode
- Set GPU clock frequency to 3180
- Switch to the Advanced Menu
- Enter the NB Configuration submenu
- Set Primary Video Device to IGFX Video
- Set UMA Frame Buffer Size to 16G
- Leave the NB Configuration submenu
- Enter the AMD Overclocking submenu and click accept
- Enter the DDR and Infinity Fabric Frequency/Timings submenu
- Enter the Infinity Fabric Frequency and Dividers submenu
- Set Infinity Fabric Frequency and Dividers to 2200 MHz
- Leave the Infinity Fabric Frequency and Dividers submenu
- Enter the Infinity Fabric Frequency and Dividers submenu
- Leave the DDR and Infinity Fabric Frequency/Timings submenu
- Enter the Precision Boost Overdrive submenu
- Set Precision Boost Overdrive to Advanced
- Set PBO Limits to Motherboard
- Enter the GFX Curve Optimizer submenu
- Set GFX Curve Optimizer to GFX Curve Optimizer
- Set GFX Curve Optimizer Sign to Positive
- Set GFX Curve Optimizer Magnitude to 20
- Set GFX Curve Optimizer to GFX Curve Optimizer
- Enter the DDR and Infinity Fabric Frequency/Timings submenu
Then save and exit the BIOS.
We re-ran the benchmarks and checked the performance increase compared to the default operation.
Further increasing the GPU frequency of course helps further improve the GPU performance across the board. The Geomean performance speedup is +54.26%, which is about five percentage points higher than what we got at ambient, and we get a maximum benchmark speedup of +71.43% in Returnal.
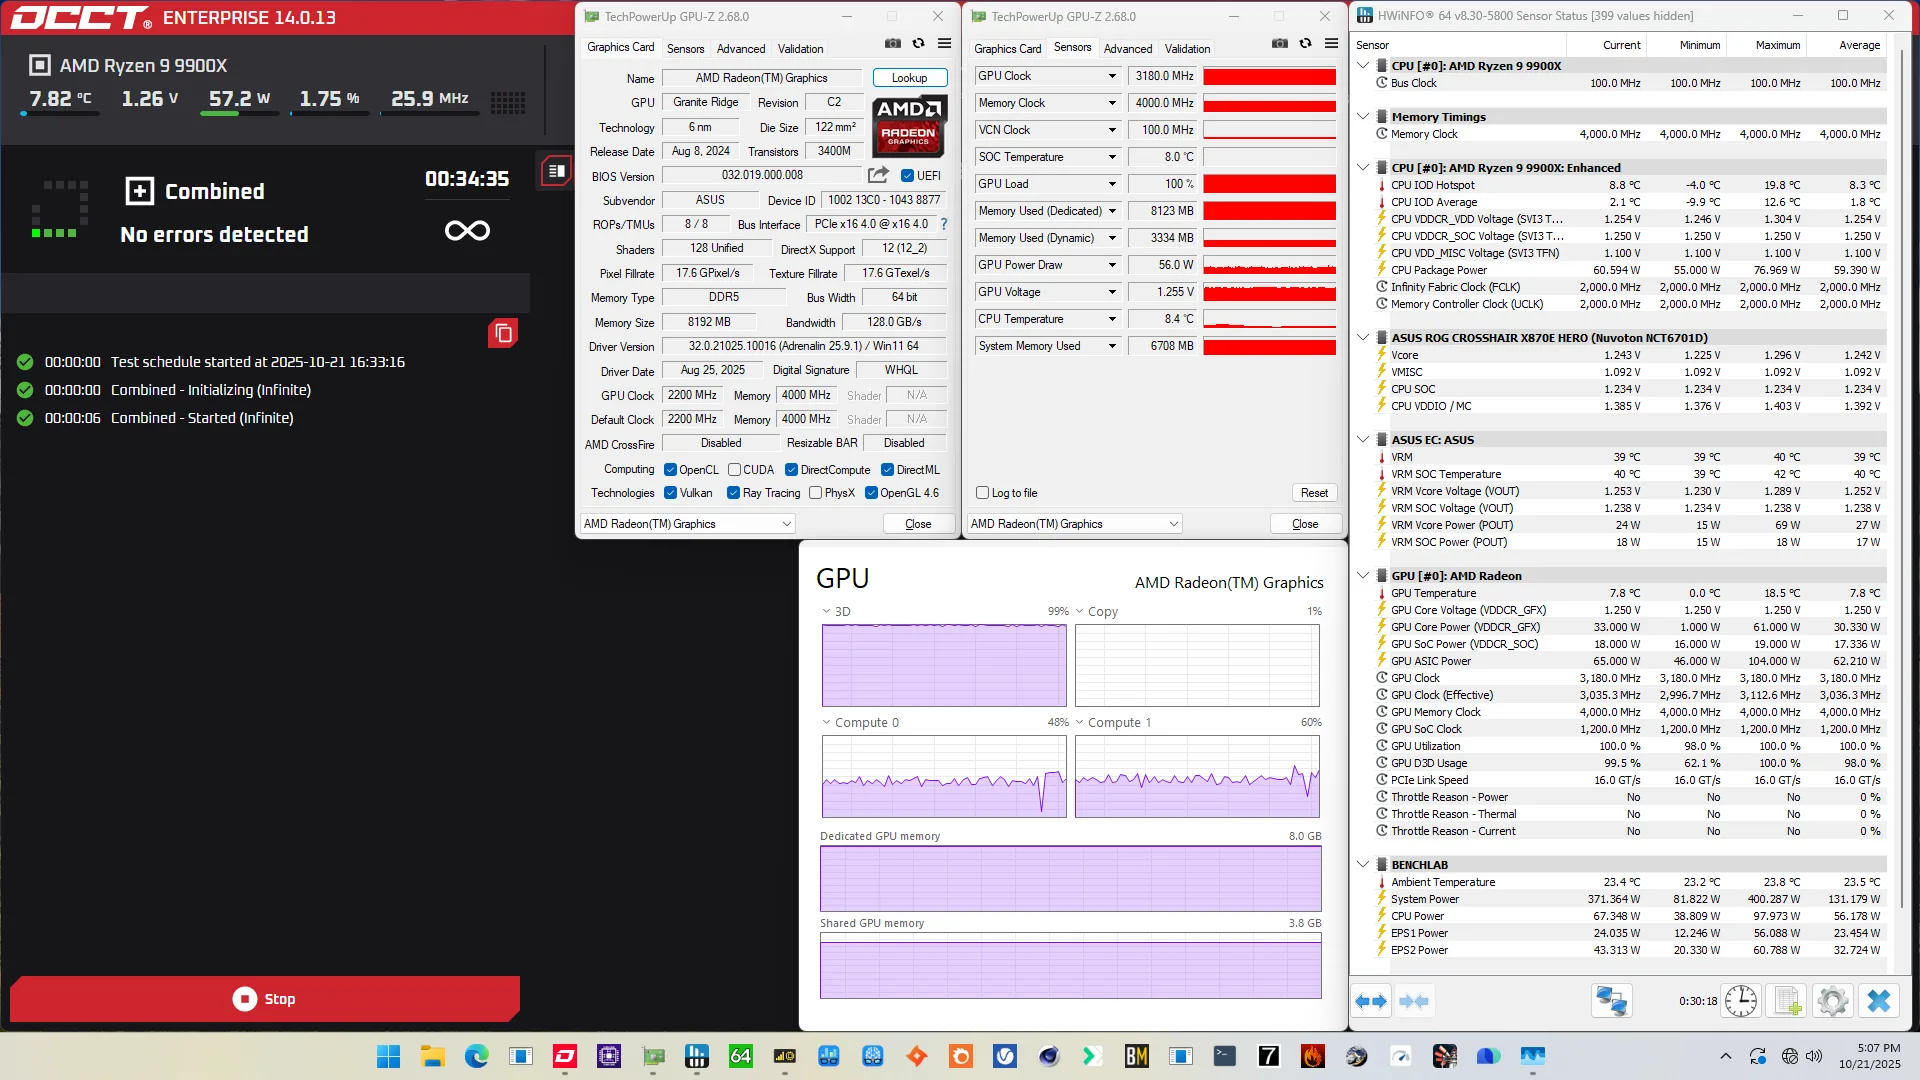
When running the OCCT 3D Adaptive and VRAM Combined Stress Test , the average GPU effective clock is 3036 MHz with 1.242 volts. The average GPU temperature is 7.8 degrees Celsius. The average GPU core power is 30.3 watts.
Maximum Power Consumption
In SkatterBencher #93 I also mentioned that the graphics voltage would cause the CPU frequency to throttle in all-load scenarios (so with both CPU cores and integrated graphics active) due to the shared voltage rail.
In a worst-case scenario, we found the CPU running at over 260W and at the maximum allowed temperature of 95 degrees Celsius. That triggered the Precision Boost 2 algorithm to reduce the CPU frequency by almost 1.2 GHz compared to when we’re not loading the integrated graphics.
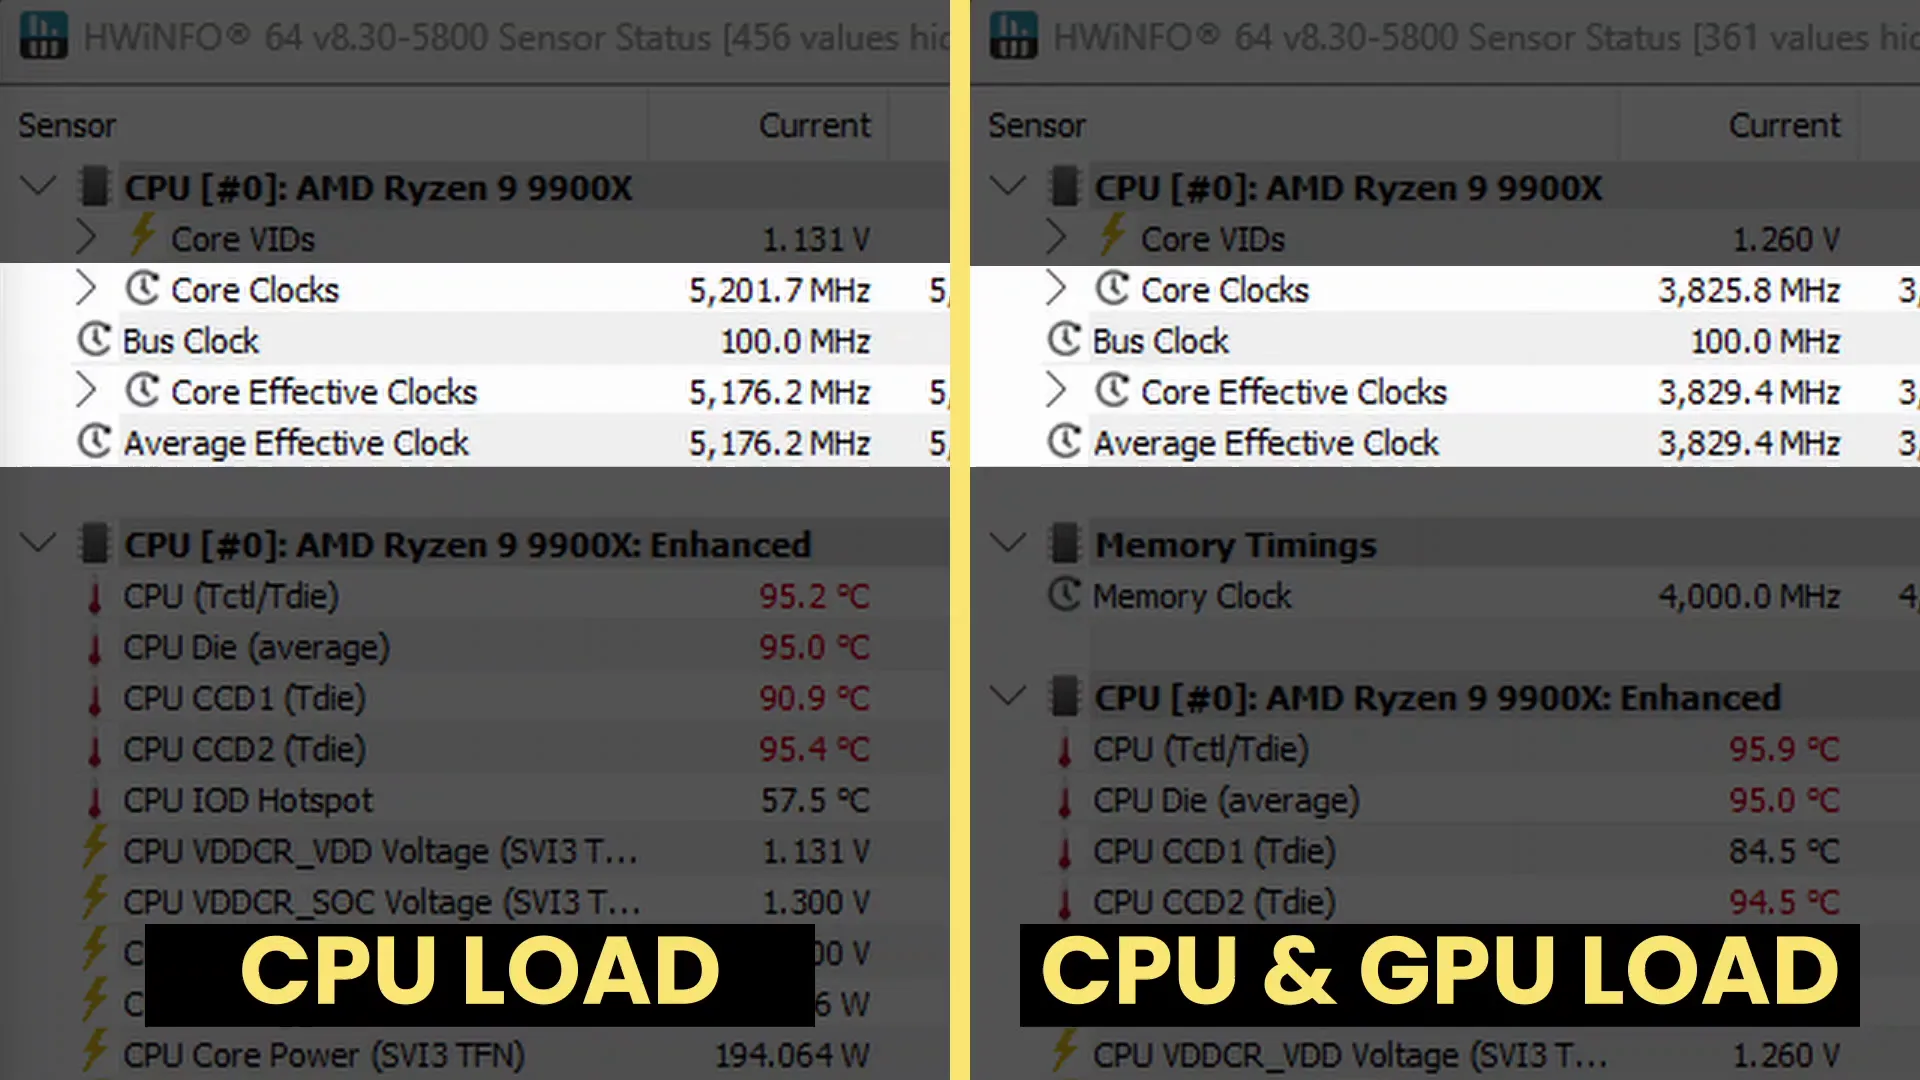
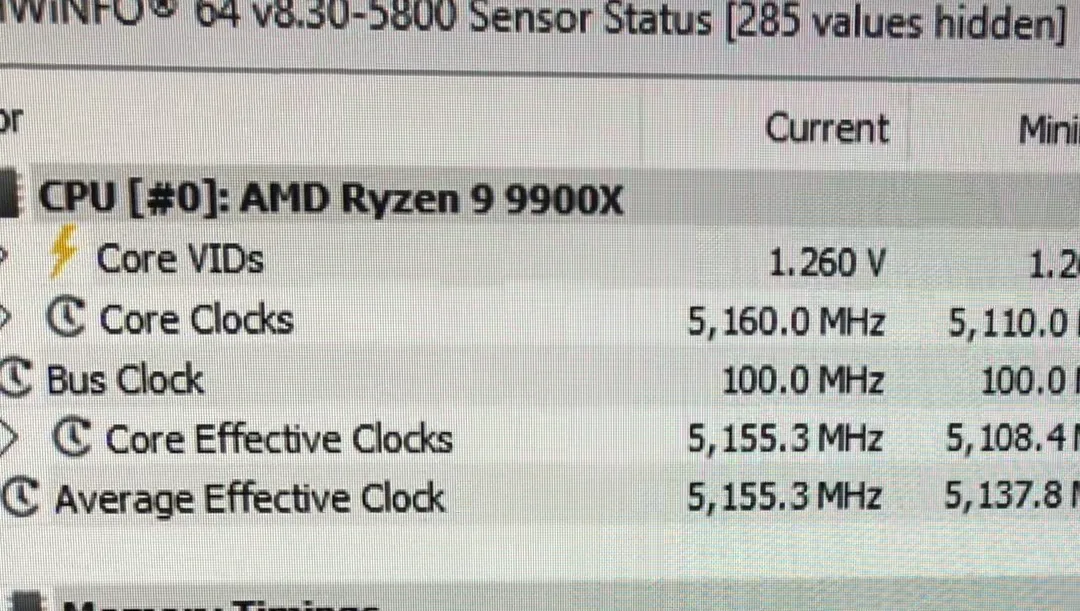
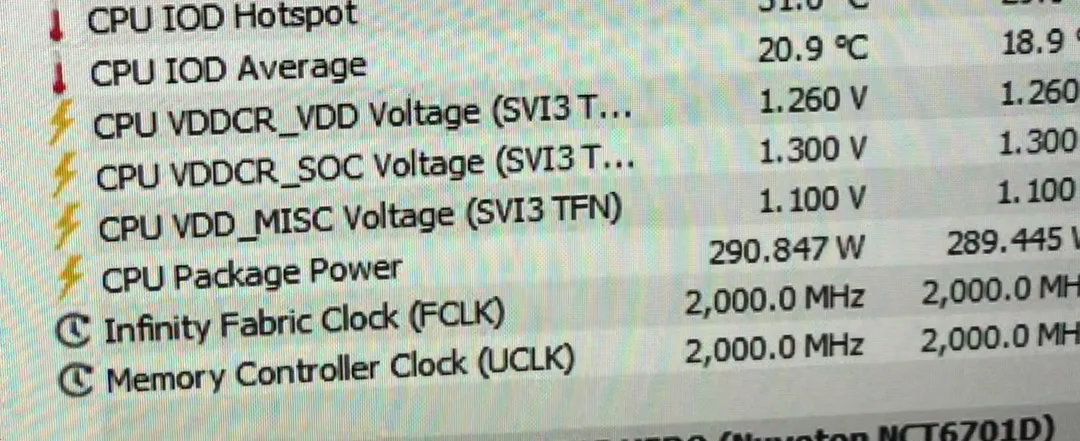
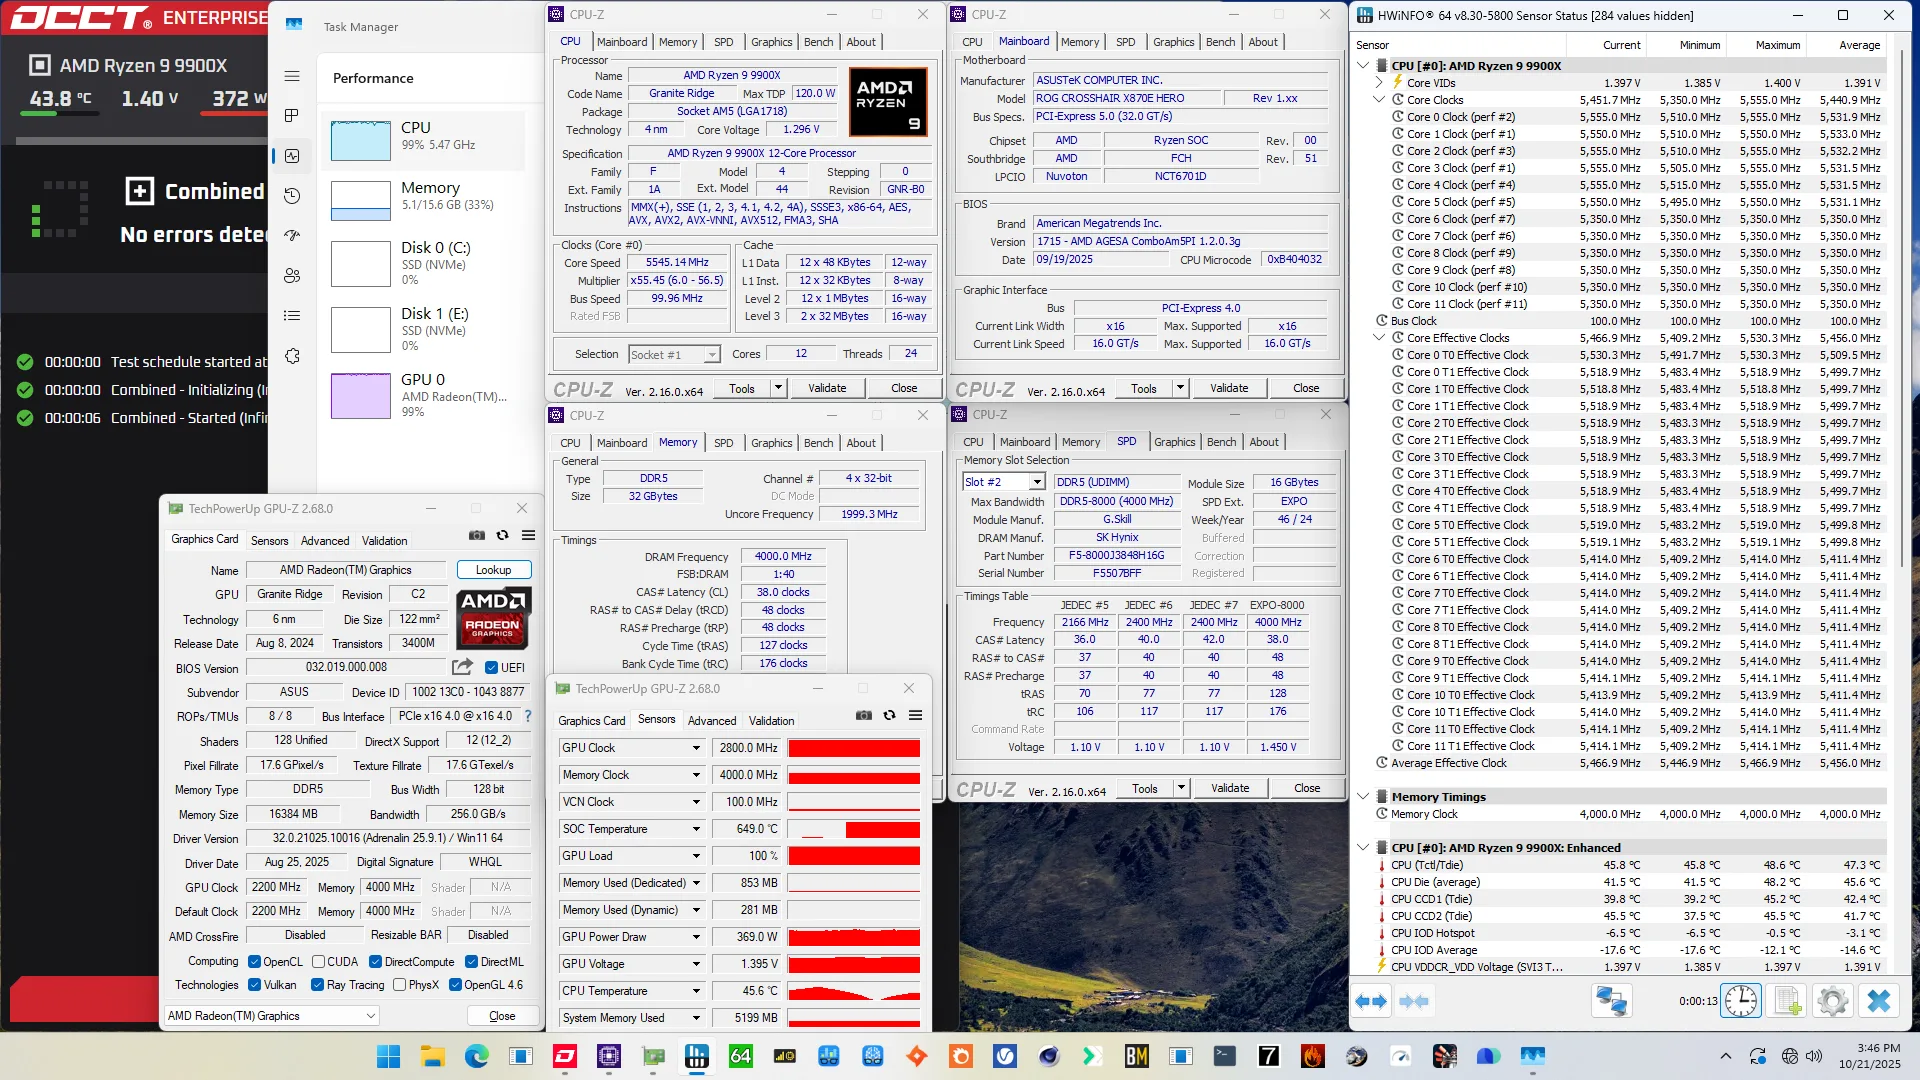
With the help of liquid nitrogen, we can see how much power we could push the chip if we managed the temperature a little better than the AIO. With PBO enabled and the graphics voltage at 1.25V, the maximum power consumption is 290W. But, most importantly, the frequency is above 5.1 GHz.
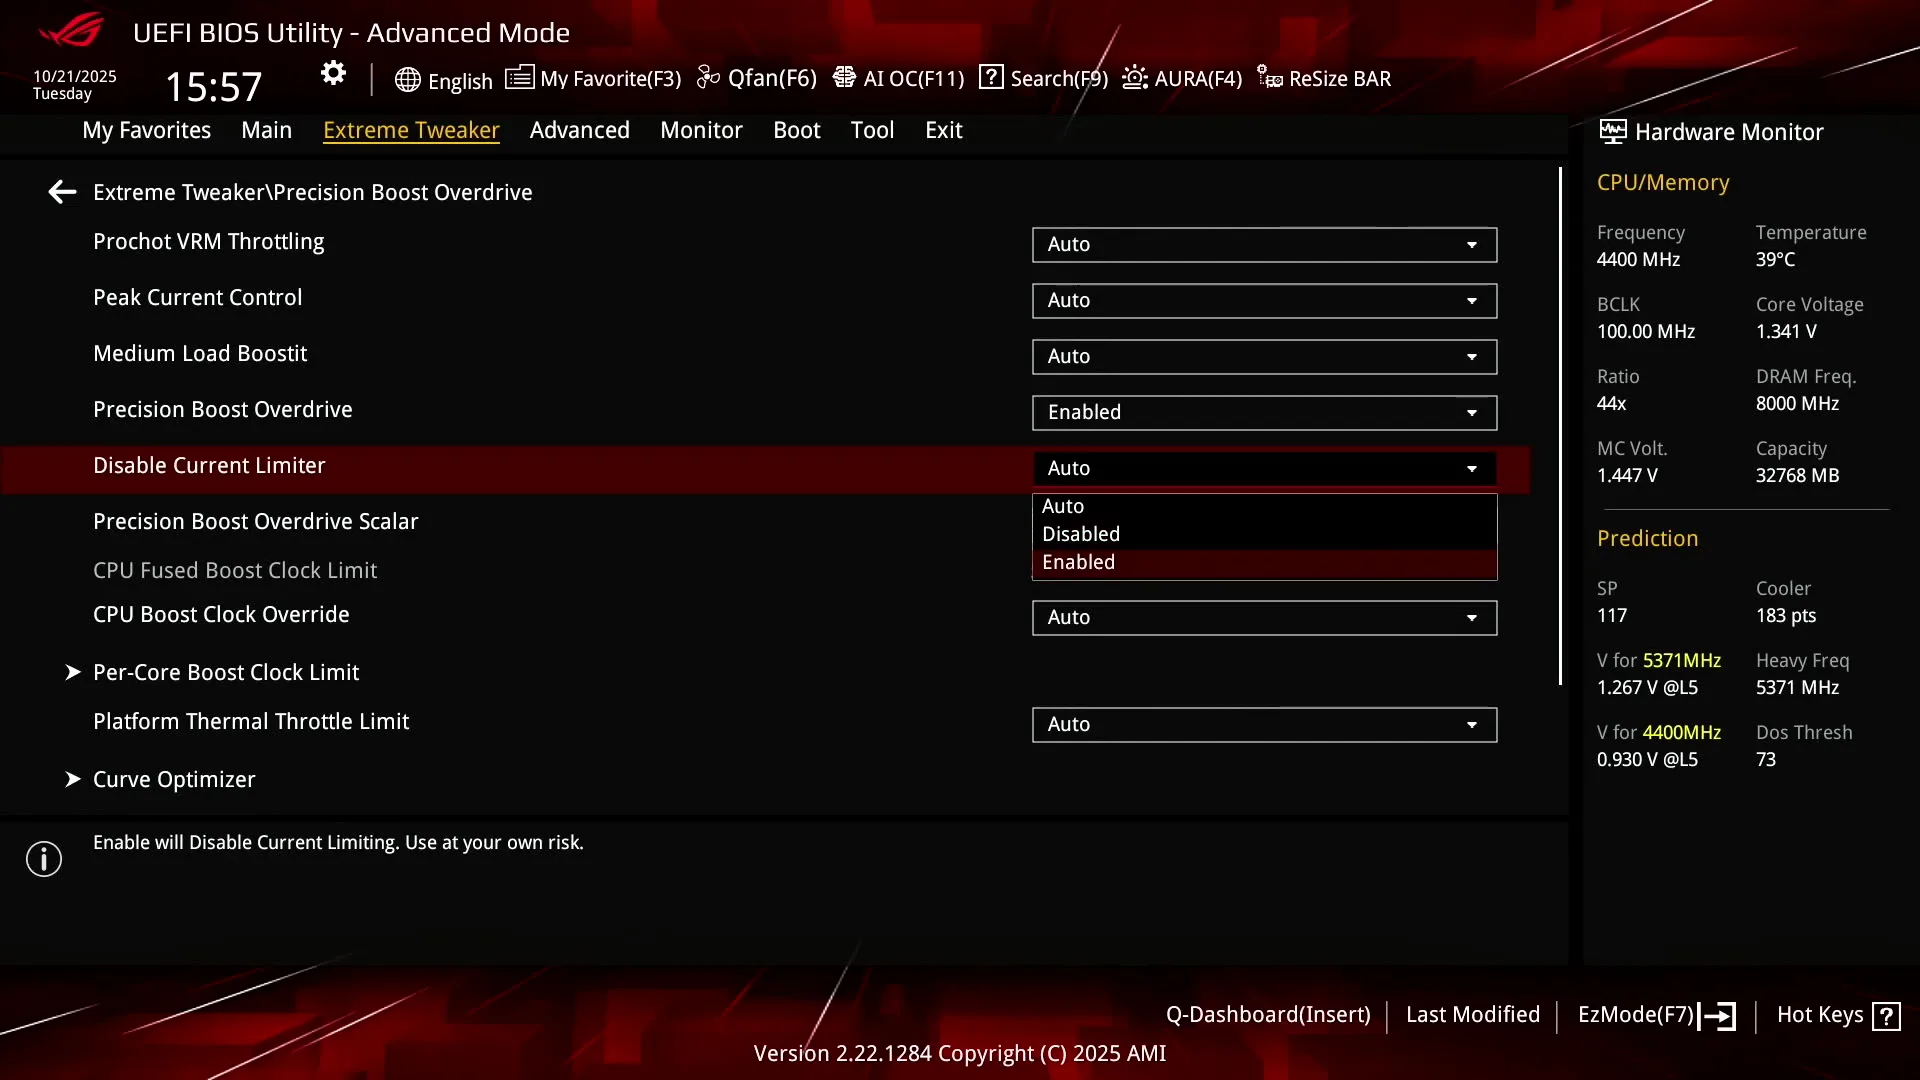
However, we can push that even further with a high-risk BIOS option called “Disable current limit”. If we “enable the disable”, the voltage and frequency in AVX workloads goes up much higher!
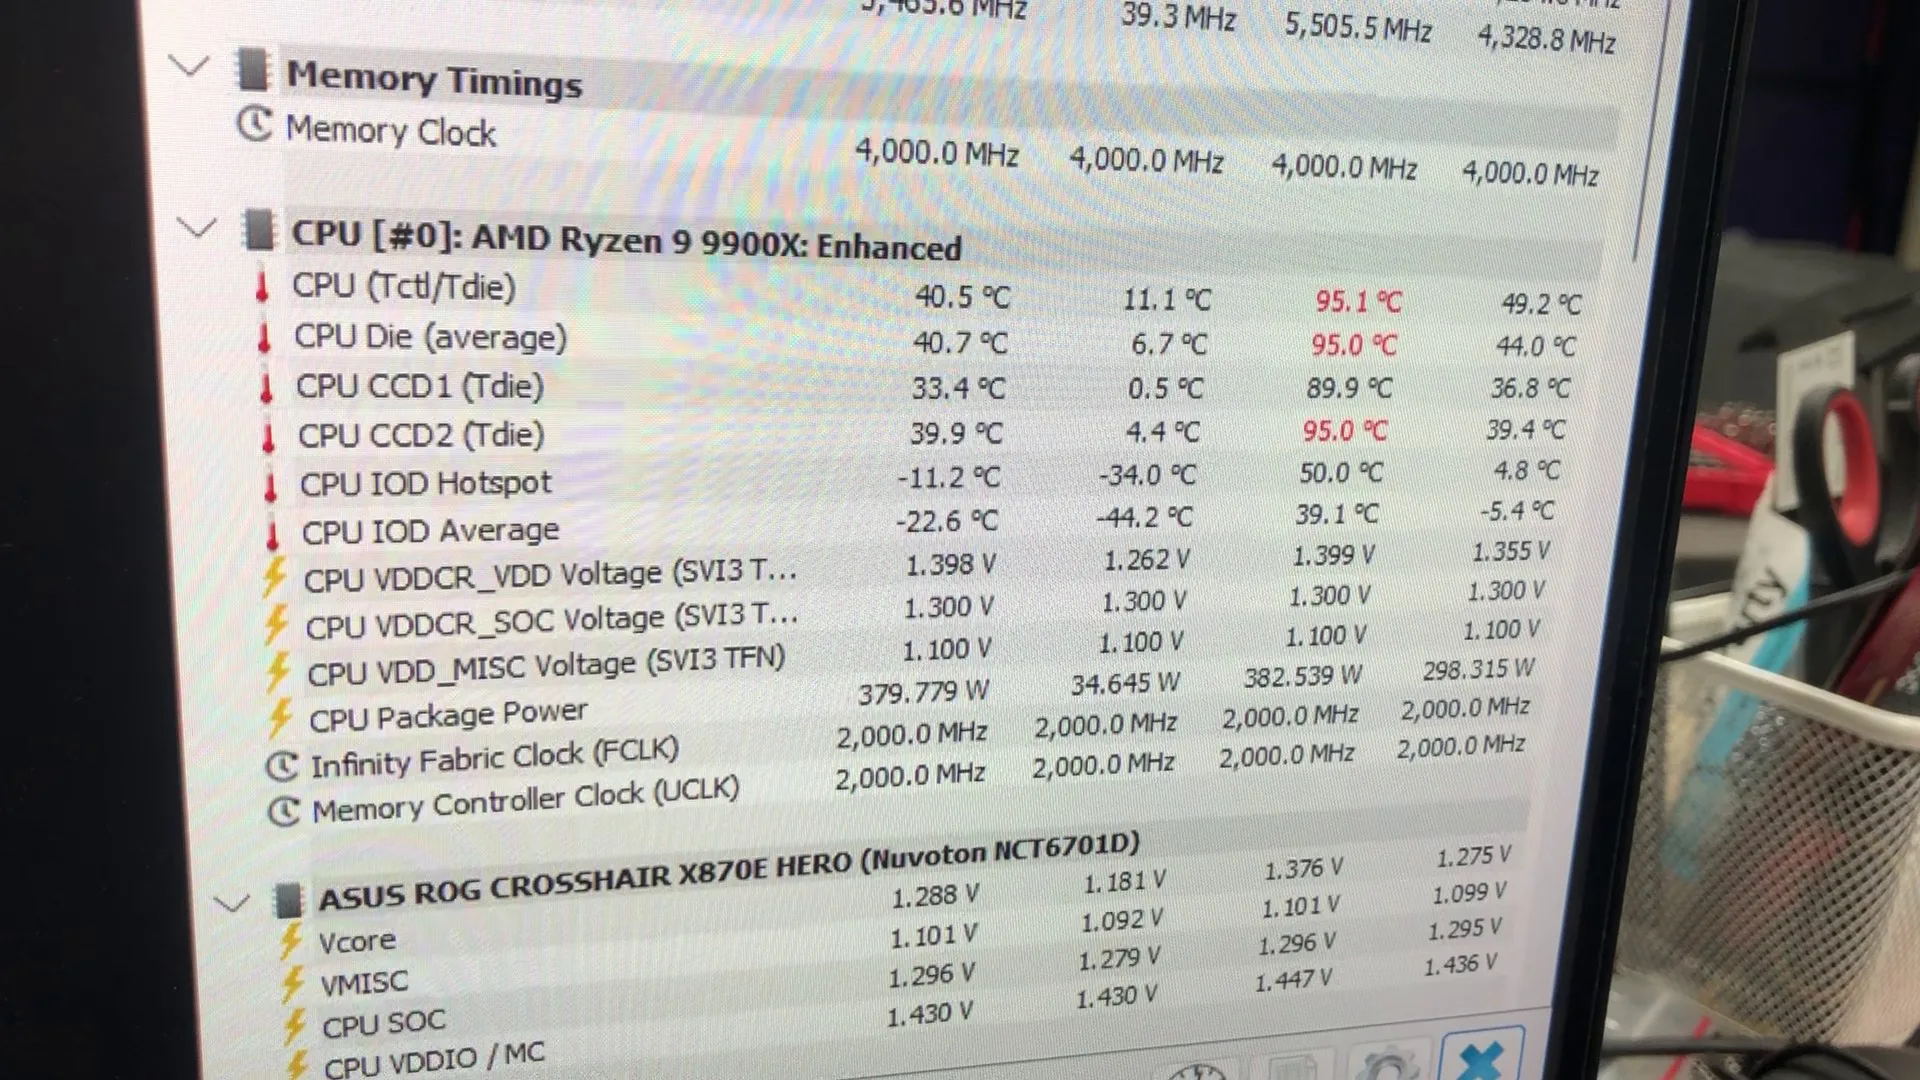
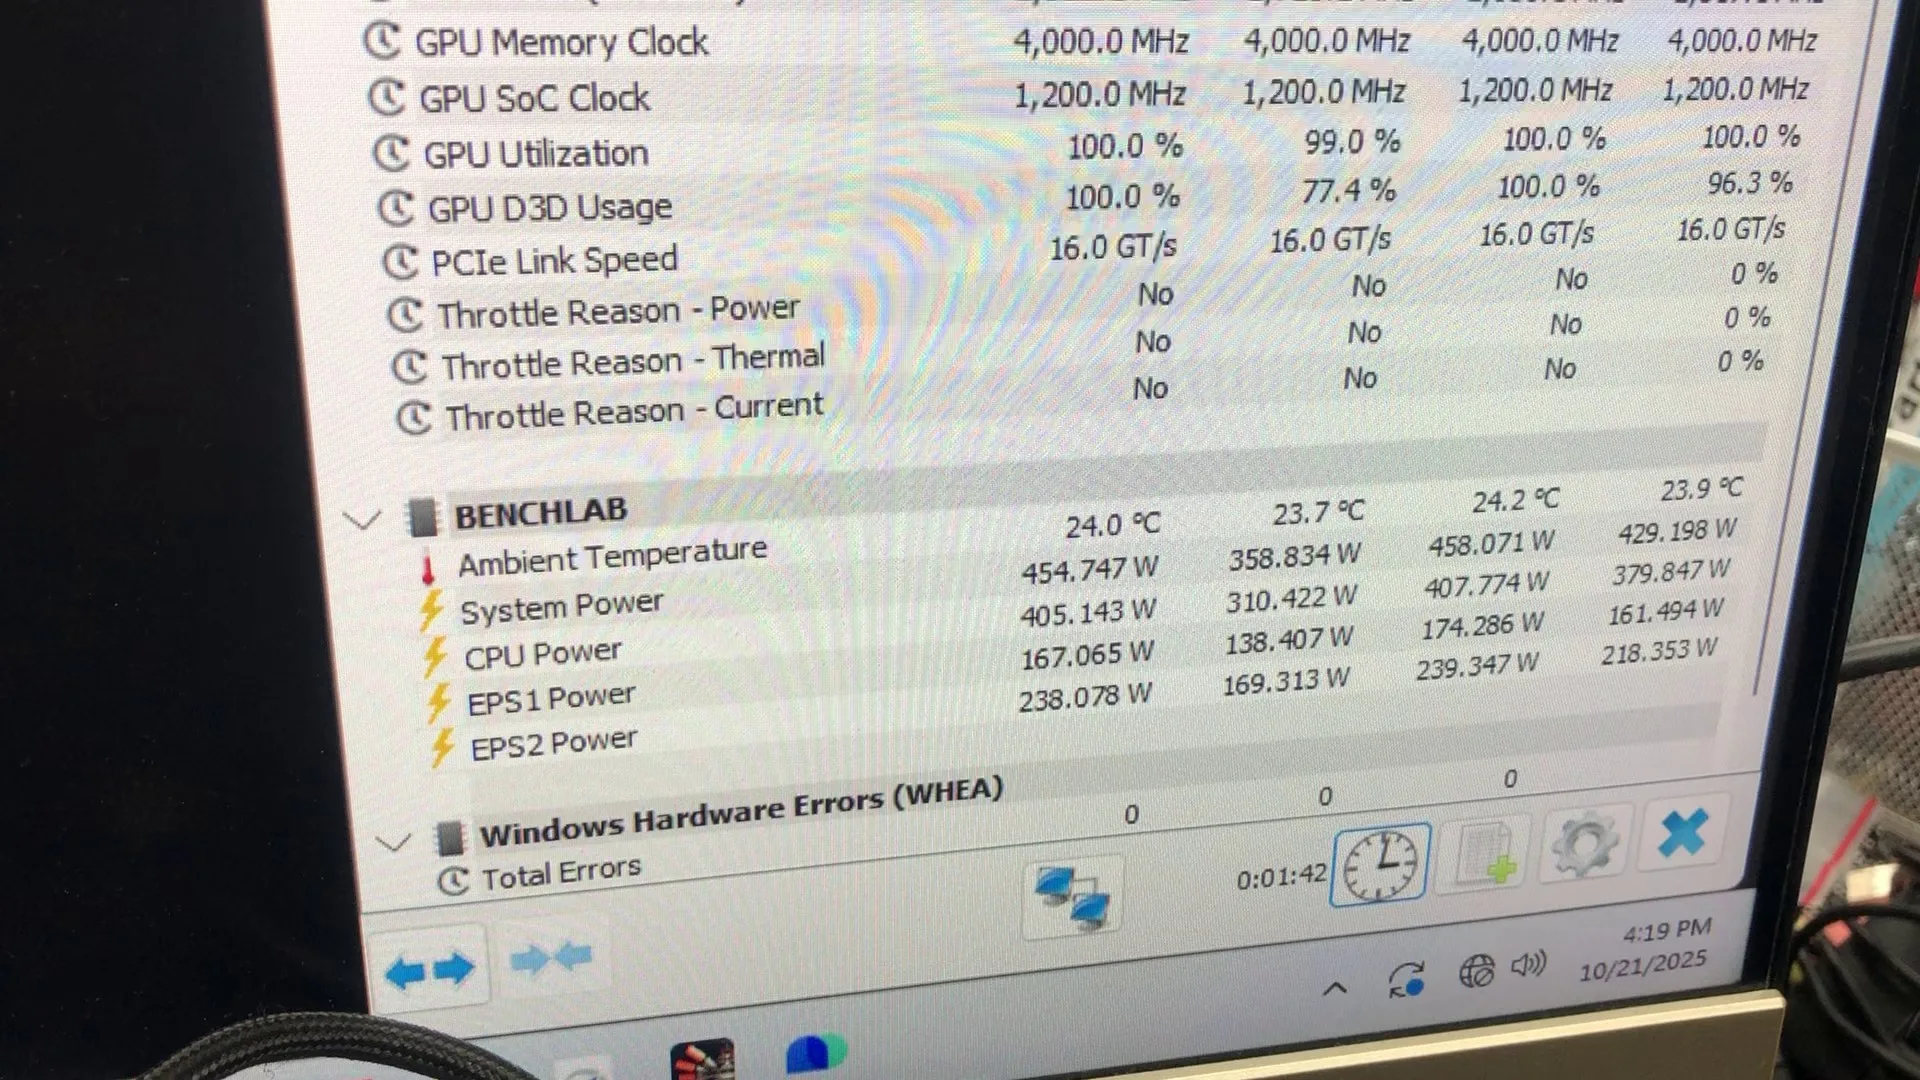
If we keep the LN2 container temperature at -30 degrees Celsius, the CPU cores sit at around +30 degrees Celsius. The CPU cores are running at 5.5 GHz and 5.4 GHz … but also, the maximum power draw is 380W!
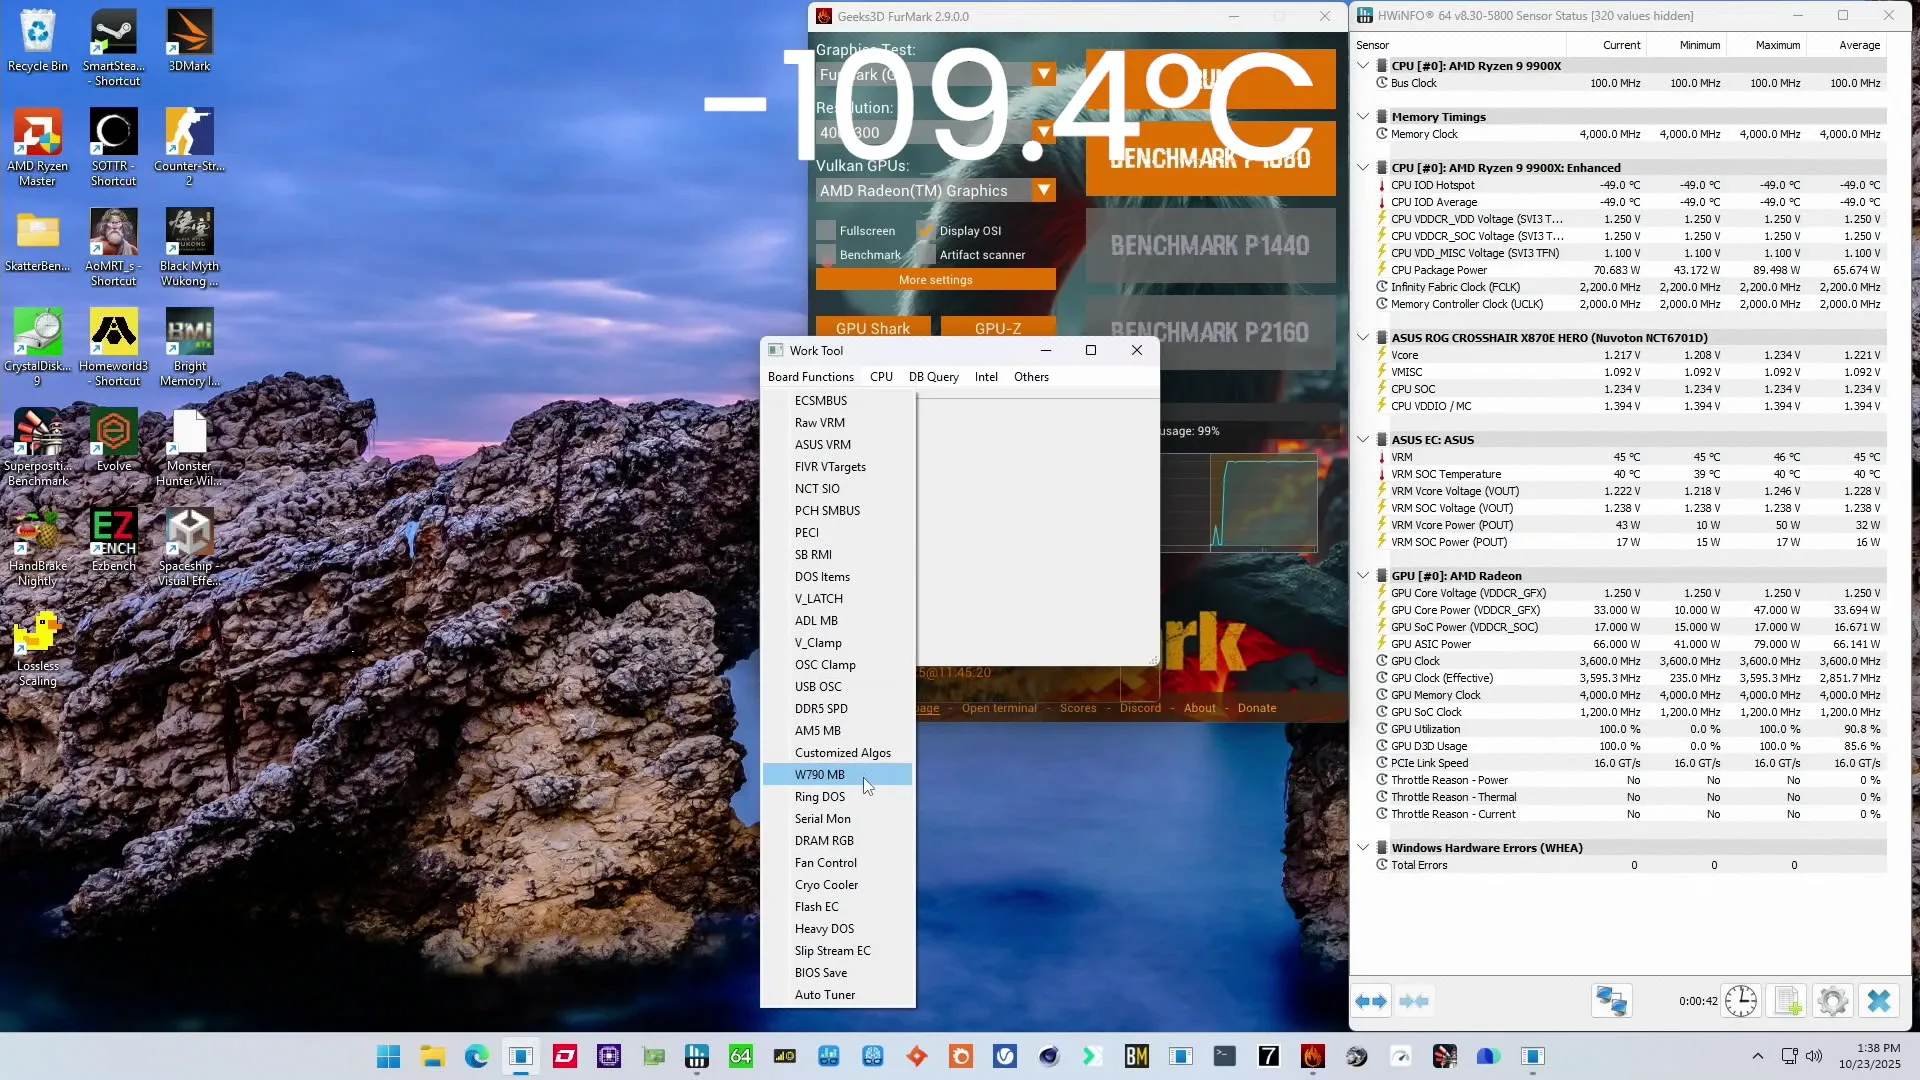
XOC Strategy #2: Maximum Frequency
In the second overclocking strategy, we work around the temperature fail-safe problem and push the voltage as high as possible.
Temperature Fail-Safe Workaround
In the previous XOC Strategy I mentioned that the temperature fail-safe state gets triggered by booting at too low a temperature. We know this because we can boot at a safe temperature (e.g. -10C) into the BIOS, pull down the temperature to -100C before entering the operating system, and the graphics frequency stays at a high frequency.
Unfortunately, we don’t have the tools to increase the graphics frequency in the operating system. So, we have to boot with our target overclock. Furthermore, if the system is unstable at our target frequency and we have to reboot at too low a temperature, we’re back stuck at 600 MHz.
But this is the way to push the integrated graphics to its limit:
- Configure the target overclocking in the BIOS.
- Save and boot at a safe temperature (> -20C).
- Idle in BIOS and pull down to the required temperature for the target overclock (e.g. -100C).
- Boot into OS at target temperature.
- Praying the target frequency is stable to pass benchmarks.
Let’s now turn our attention to pushing the graphics clock frequency.
AMD Radeon Graphics (Granite Ridge) XOC: Clocking & Voltage
I covered the Radeon Graphics clocking and voltage topologies at length in SkatterBencher #93. For those who didn’t watch that guide: there are essentially three levers at our disposal for tuning the graphics clock frequency:
- Graphics Clock Fmax Override
- Graphics Curve Optimizer
- VDDCR Voltage
These levers will affect two distinct parameters related to the graphics frequency: the set GPU clock frequency and the effective GPU clock frequency. The set frequency is what you’ll see reported in most applications as the operating frequency, however the effective clock frequency is what actually determines the GPU performance. And these two settings can diverge quite substantially. For example, in XOC Strategy #1 we set the target frequency to 3180 MHz but the effective frequency in our stress test is only 3036 MHz. That’s a difference of 150 MHz!
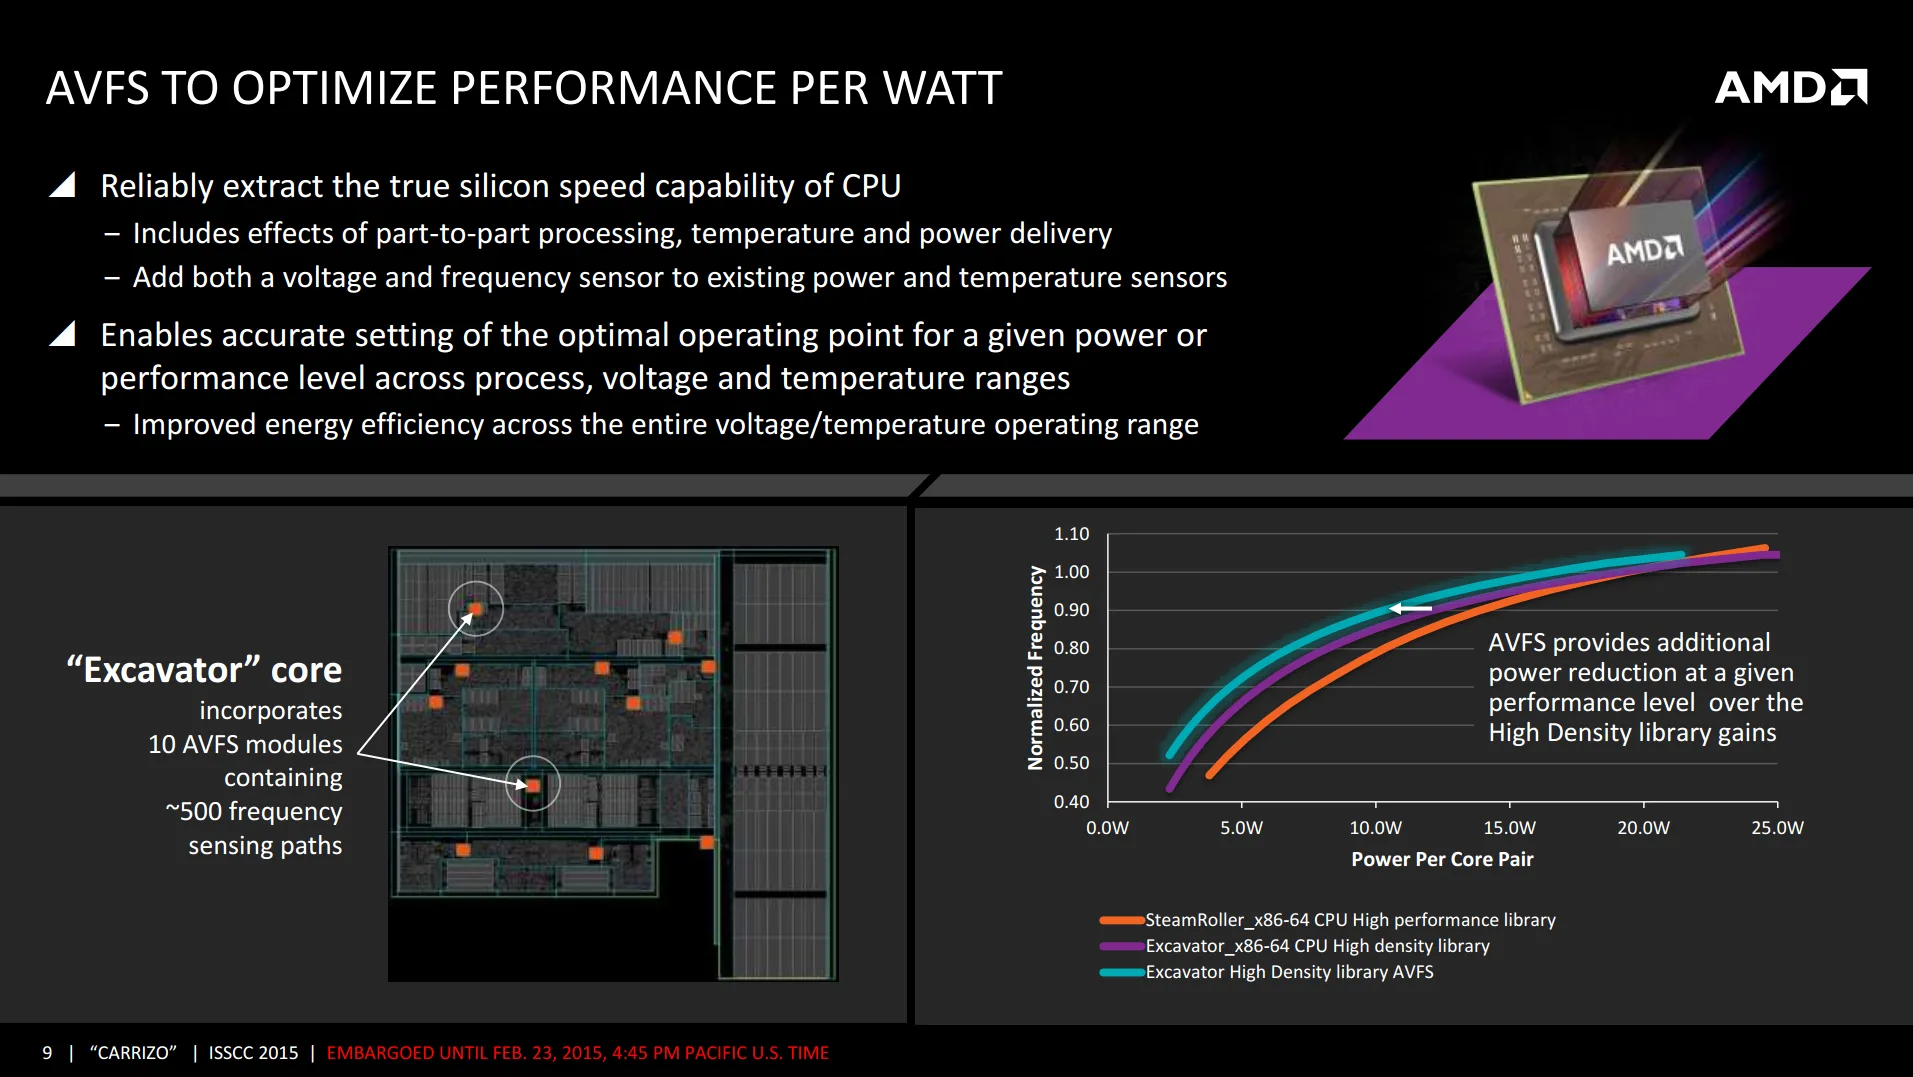
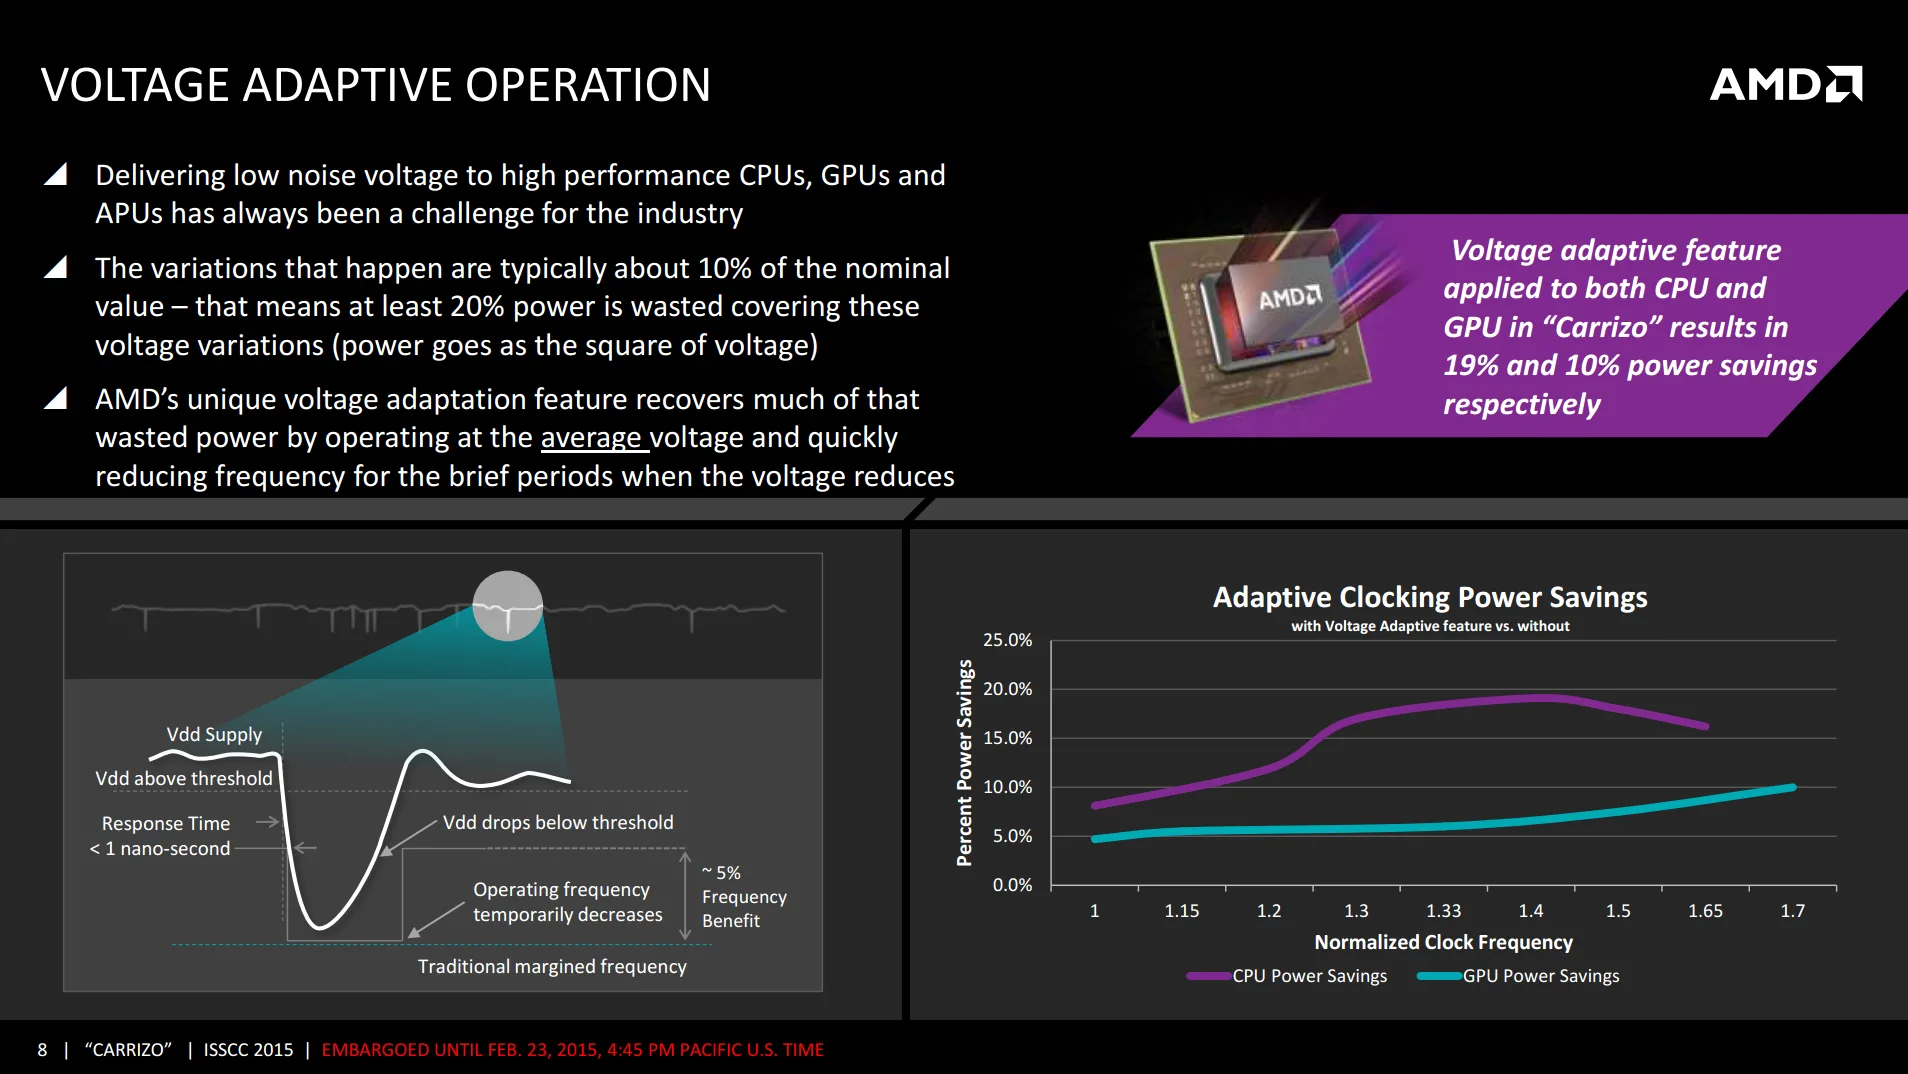
The reason for this difference is rooted in AMD’s Adaptive Voltage Frequency Scaling and Voltage Adaptive Operation technologies which adapt the clock frequency to workload and voltage load-line conditions. In simple terms: the effective clock changes depending on the type of workload and how much the voltage droops under load.
Unlike the CPU cores, where changing the operating temperature impacts the operating voltage and frequency (as I demonstrated in SkatterBencher #80), the temperature doesn’t impact the graphics frequency at all.
To control the VDDCR output voltage, we’ll switch the CPU cores from Precision Boost to so-called “OC Mode” where we use a static voltage and frequency for the CPU cores. Note that there’s two ways to kind of take control over the VDDCR voltage rail:
- We can program the AMD SMU to set a target frequency and voltage. In that case, the CPU will program the voltage regulator with the desired output voltage using the SVI3 bus.
- We can program the voltage regulator directly and override any configuration by the AMD CPU.
As it turns out, if we use option 2 we again get stuck with the integrated graphics in fail-safe at the 600 MHz. However, if we configure the VID instead, we get our high frequency.
There are two places in the BIOS where we can configure this: in the Extreme Tweaker menu or in the AMD Overclocking submenu. Luckily, in the operating system we can directly take control over the voltage regulator without the frequency dropping to the fail-safe.
AMD Radeon Graphics (Granite Ridge) XOC: Summary
Before we dive into the BIOS, let’s summarize what we learned about pushing the integrated graphics:
- The graphics clock we configure in the BIOS defines the maximum allowed graphics frequency. This frequency doesn’t get applied until we’re in the operating system. Unfortunately, we cannot change the maximum frequency in the operating system
- The effective graphics clock is defined in part by our configured Fmax and in part by the effective operating voltage.
- We can use the Graphics Curve Optimizer to reduce the effective clock for a given max clock.
- The integrated graphics share the VDDCR voltage rail with the CPU cores.
- This voltage rail can adjust dynamically when Precision Boost 2 is enabled or statically if we switch the CPU cores to OC mode.
- We can configure static voltage either by configuring the SMU using a VID or programming the voltage regulator directly.
- The integrated graphics have a fail-safe state that gets set at boot. This effectively forces a low clock of the integrated graphics. The fail-safe is triggered by:
- Temperature: if the CPU temperature is below -20 degrees Celsius
- Voltage: if we program the static VDDCR voltage directly to the voltage regulator.
- However, the fail-safe will not kick in at runtime. That means: if the boot configuration passes the fail-safe test and we get a high clock in the operating system we can go as low as we can in temperature and program the voltage regulator directly.
AMD Radeon Graphics (Granite Ridge) XOC: Results
Therefore, we now have a clear path to squeezing the maximum out of the integrated graphics:
- First program safe boot values and boot at safe temperature
- Static CPU OC using VID
- High Graphics Fmax
- +30 Graphics Curve Optimizer
- Idle in the BIOS and reduce to the appropriate target temperature for the target frequency
- Enter the OS from BIOS without rebooting
- Increase the VDDCR effective operating voltage to increase the effective graphics clock frequency
My starting point configuration is:
- CPU Voltage: 1.2V
- CPU Frequency: 5000 MHz
- GFX Fmax: 3500 MHz
- GFX CO: +30
- Boot Phase 1 Temp: -15C
Of course, I also load all the other configuration parameters from the previous OC Strategy.
Then, I reduce the temperature in the BIOS:
- Boot Phase 2 Temp: -100C
Then, in the OS:
- CPU Voltage: up to 1.45V
- OS Phase 3 Temp: as low as -125C
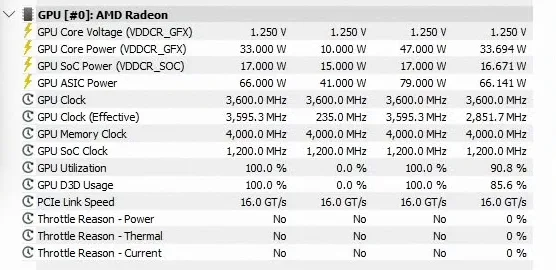
After trying for two days, I found that the maximum effective clock I could reach was 3595 MHz. I also managed to run at 3450 to 3500 MHz in a couple of benchmarks.
BIOS Settings & Benchmark Results
Upon entering the BIOS
- Go to the Extreme Tweaker menu
- Set Ai Overclock Tuner to EXPO I
- Enter the DRAM Timing Control submenu
- Enter the Memory Presets submenu
- Select Load Hynix 7600MHz 1.45V 2x16GB SR and click OK
- Leave the Memory Presets submenu
- Set tCL to 38
- Set tRCD WR to 48
- Set tRCD RD to 48
- Set tRP to 48
- Set tRRDL to 12
- Set tRDDS to 8
- Set tWRTL to 20
- Set tWRTS to 8
- Enter the Memory Presets submenu
- Leave the DRAM Timing Control submenu
- Set CPU Core Ratio to CPU Core Ratio
- Set CPU Core Ratio to 50.00
- Set GPU Boost to Manual mode
- Set GPU clock frequency to 3600
- Set Core VID 1.200
- Switch to the Advanced Menu
- Enter the NB Configuration submenu
- Set Primary Video Device to IGFX Video
- Set UMA Frame Buffer Size to 16G
- Leave the NB Configuration submenu
- Enter the AMD Overclocking submenu and click accept
- Enter the DDR and Infinity Fabric Frequency/Timings submenu
- Enter the Infinity Fabric Frequency and Dividers submenu
- Set Infinity Fabric Frequency and Dividers to 2200 MHz
- Leave the Infinity Fabric Frequency and Dividers submenu
- Enter the Infinity Fabric Frequency and Dividers submenu
- Leave the DDR and Infinity Fabric Frequency/Timings submenu
- Enter the Precision Boost Overdrive submenu
- Set Precision Boost Overdrive to Advanced
- Set PBO Limits to Motherboard
- Enter the GFX Curve Optimizer submenu
- Set GFX Curve Optimizer to GFX Curve Optimizer
- Set GFX Curve Optimizer Sign to Positive
- Set GFX Curve Optimizer Magnitude to 30
- Set GFX Curve Optimizer to GFX Curve Optimizer
- Enter the DDR and Infinity Fabric Frequency/Timings submenu
Then save and exit the BIOS.
I ran out of time (and energy) so we re-ran only some of benchmarks to check the performance increase compared to the default operation.
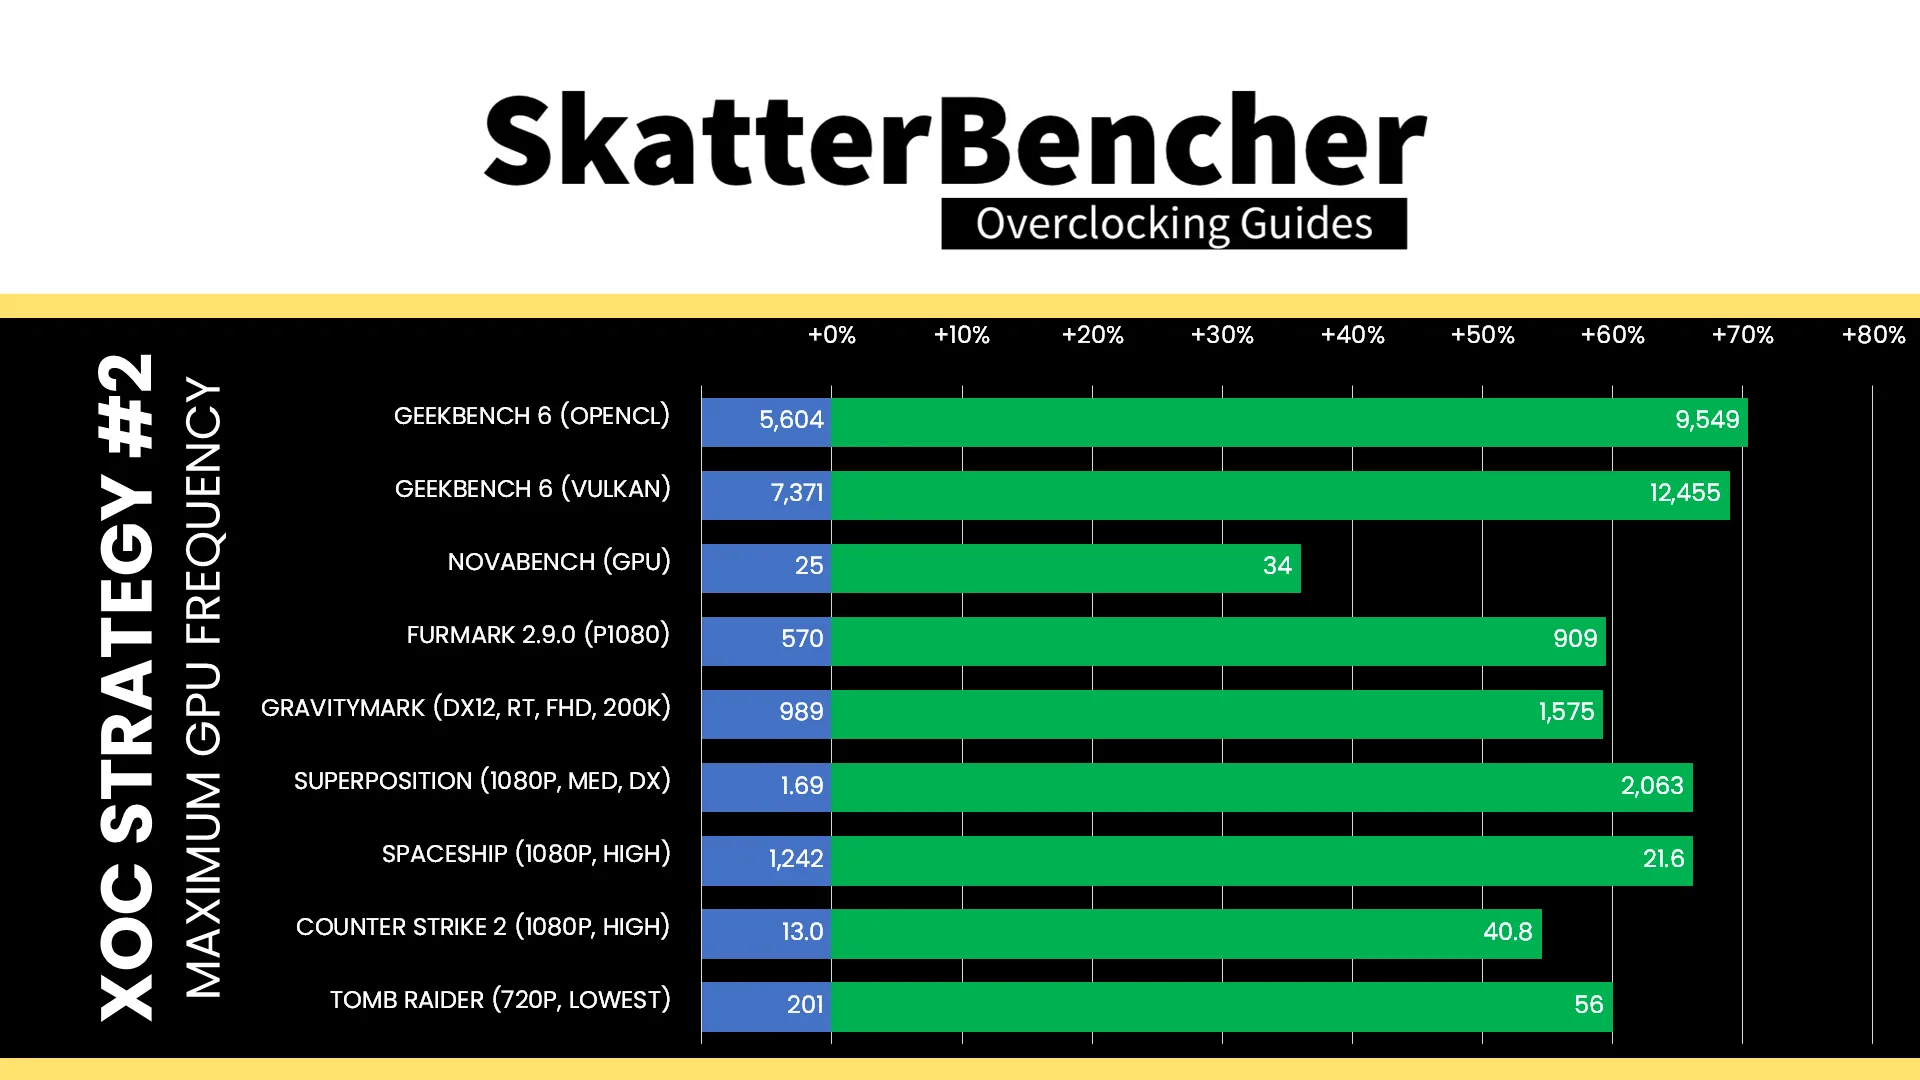
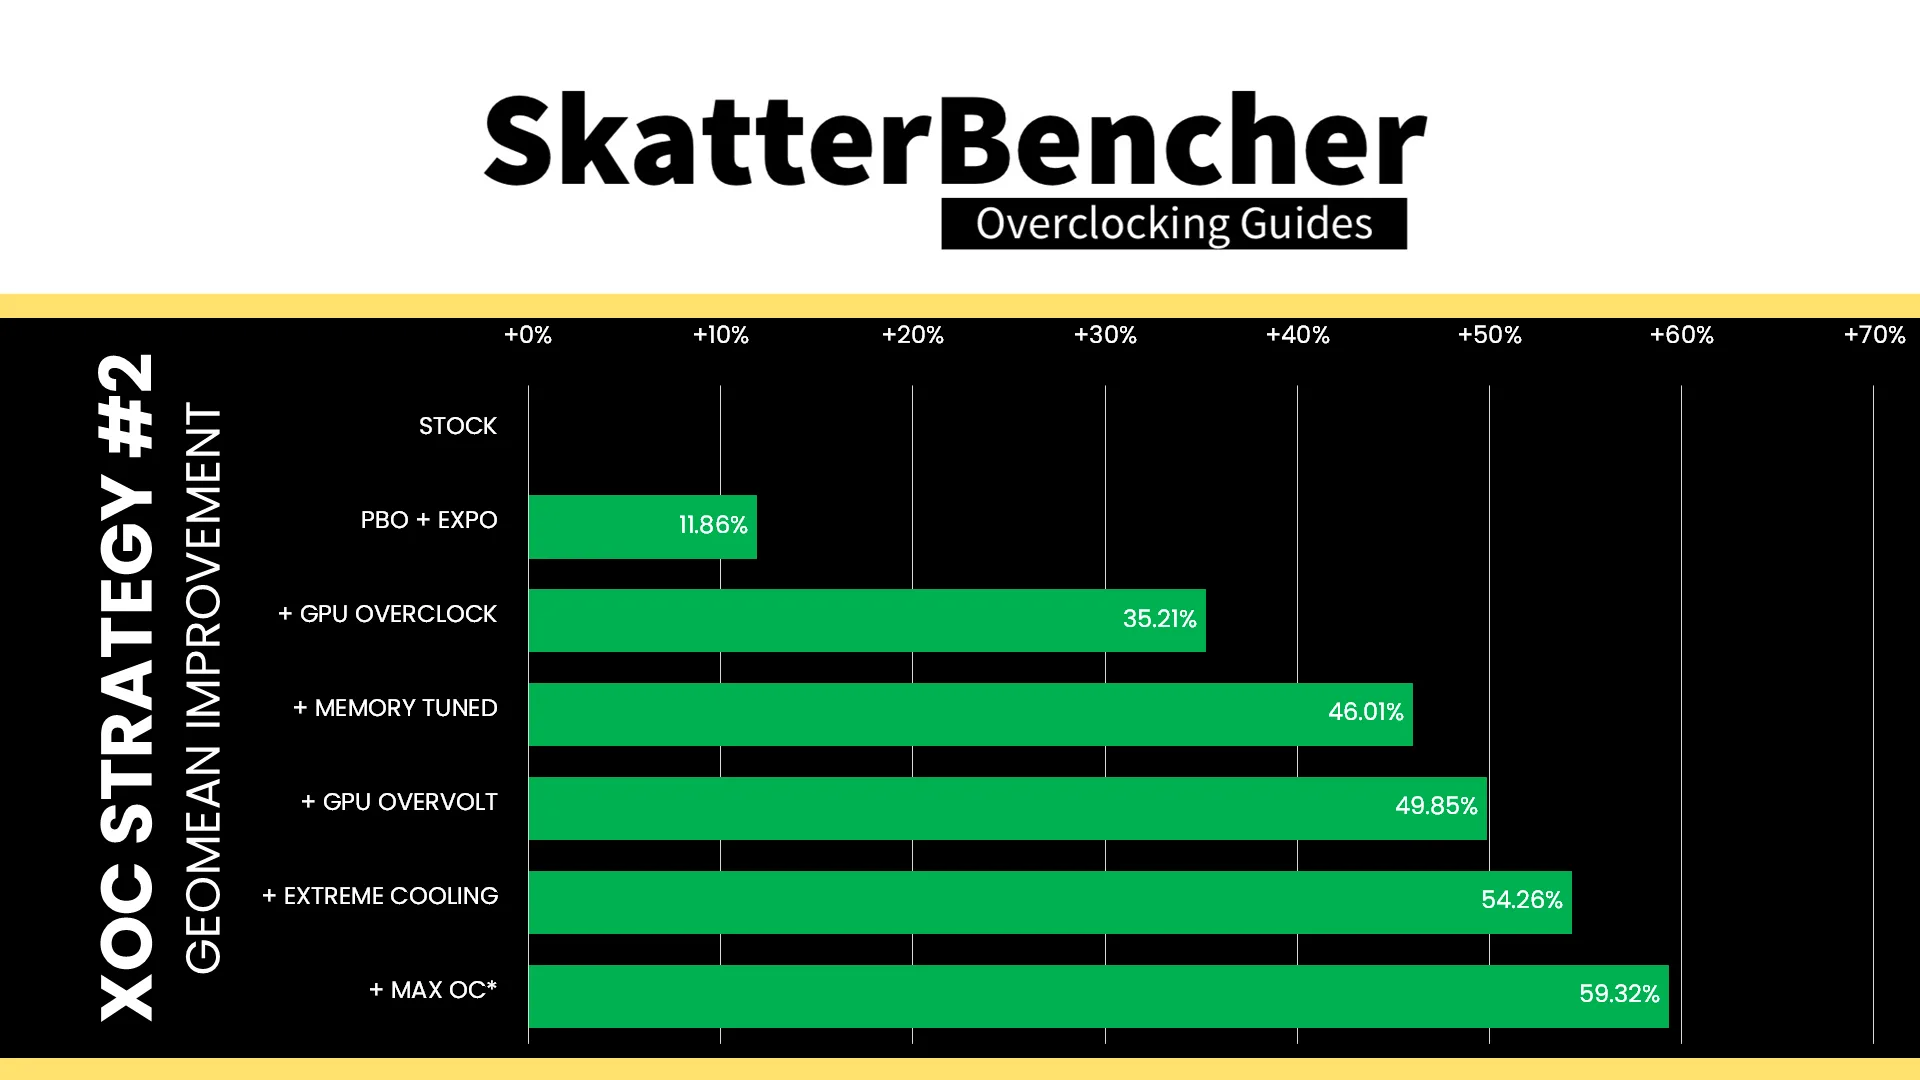
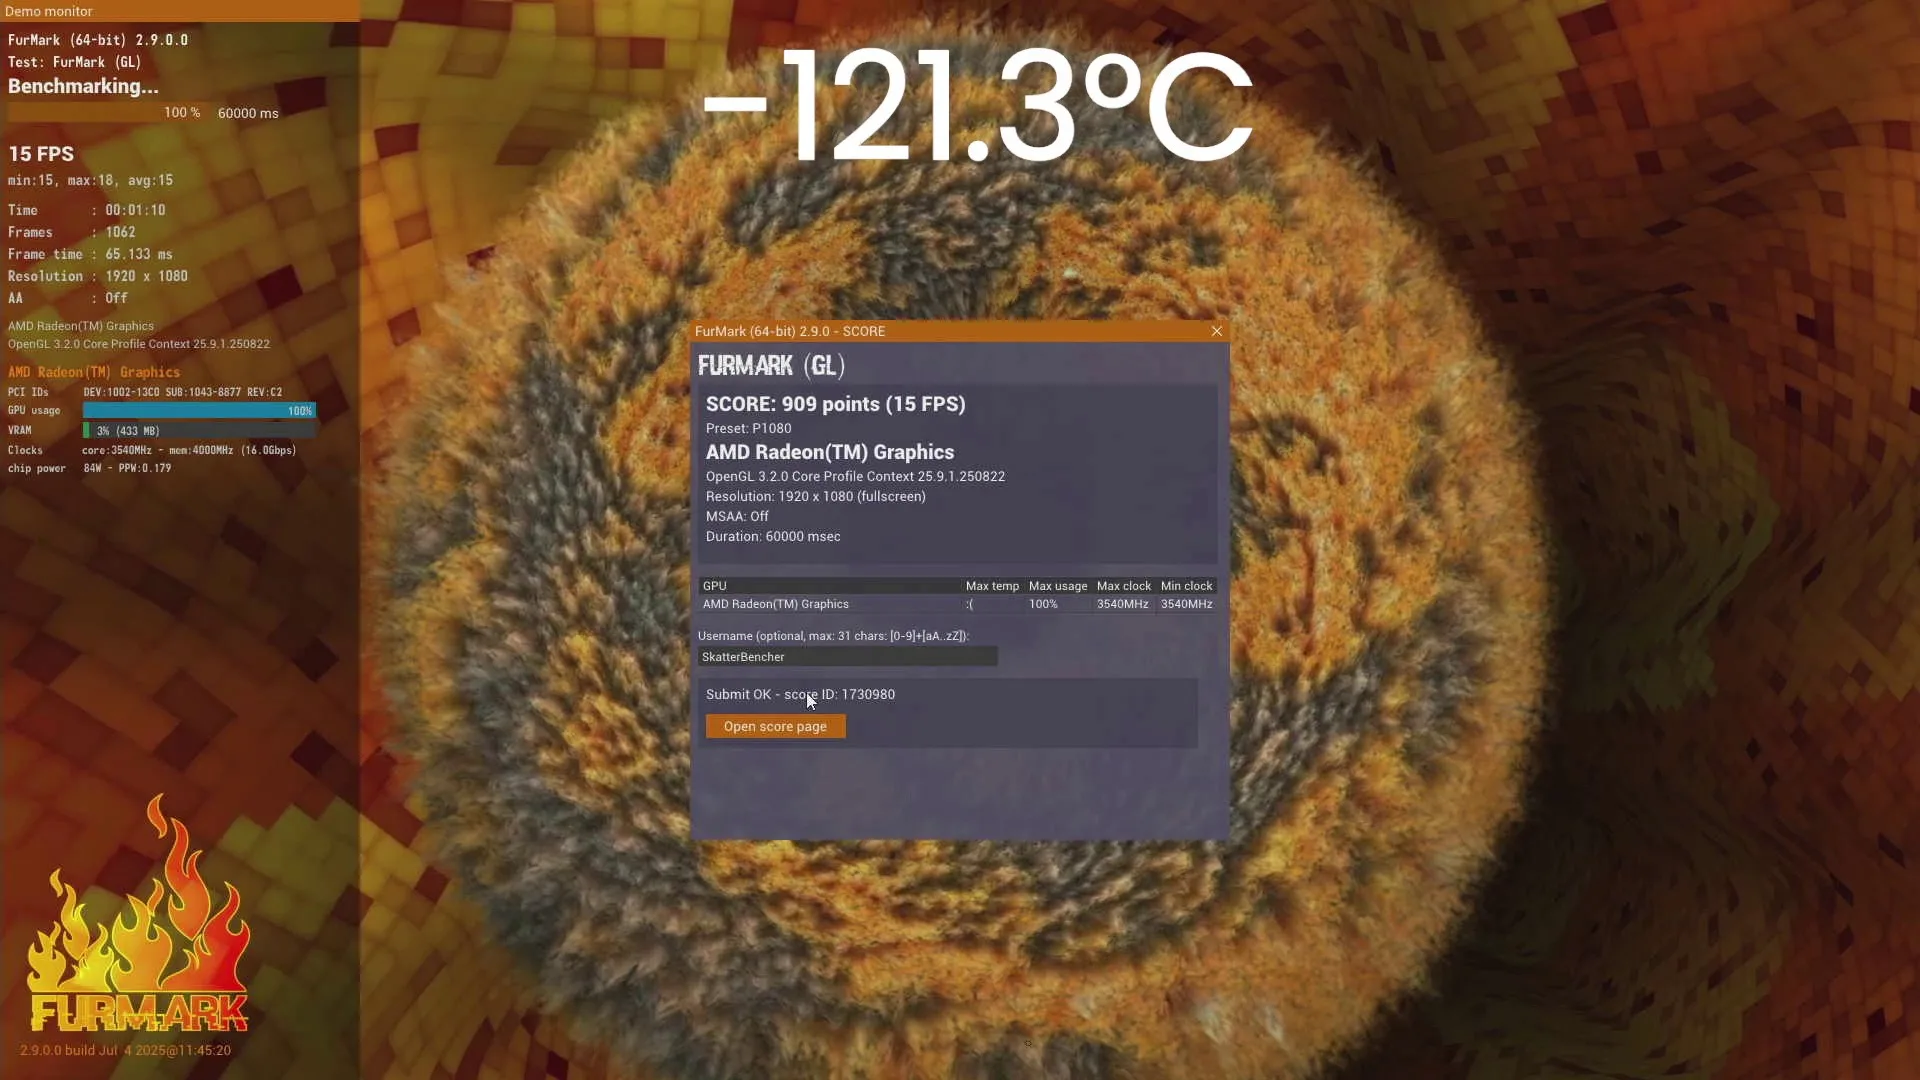
Obviously, the increased operating frequency helps improve performance further. The geomean performance speedup across the tested benchmarks is 59.32%, and we get a maximum benchmark speedup of +70.40% in Geekbench 6 OpenCL. I’m also particularly happy with the maximum score of 909 points in Furmark 2.
Here’s some links to the scores achieved during the session:
- Furmark 2: 909 points (link)
- Geekbench 6 Compute (OpenCL): 9549 points (link)
- Geekbench 6 Compute (Vulkan): 12455 points (link)
- GravityMark: 1575 points (link)
AMD Radeon Graphics (Granite Ridge) Extreme: Conclusion
Alright, let’s wrap this up.
Pushing the Radeon Graphics integrated in the Ryzen 9000 CPUs is difficult but not impossible. There are several issues making it more difficult that it needs to be:
- We can’t adjust the graphics frequency and curve optimizer in the operating system
- We can’t disable the AVFS clocking technology like we can with CPU cores
- We can’t disable the fail-safe state to stick with high frequency
But despite these challenges, it’s still possible to squeeze the most out of the integrated graphics using extreme cooling. A peak effective clock of almost 3.6 GHz is pretty impressive for the outdated RDNA 2.0 architecture. It’s about 300 MHz higher than the highest RDNA 2.0 clocked GPU I found on HWBOT (score, search)
Anyway, that’s it for this video. I want to thank my Patreon supporters and YouTube members for supporting my work. If you have any questions or comments, please drop them in the comment section below.
See you next time!