Granite Ridge Overclocking: Curve Shaper

I analyzed over 100,000 voltage-frequency points of my Ryzen 9 9950X “Granite Ridge” CPU to understand how AMD Curve Shaper works.
Introduction
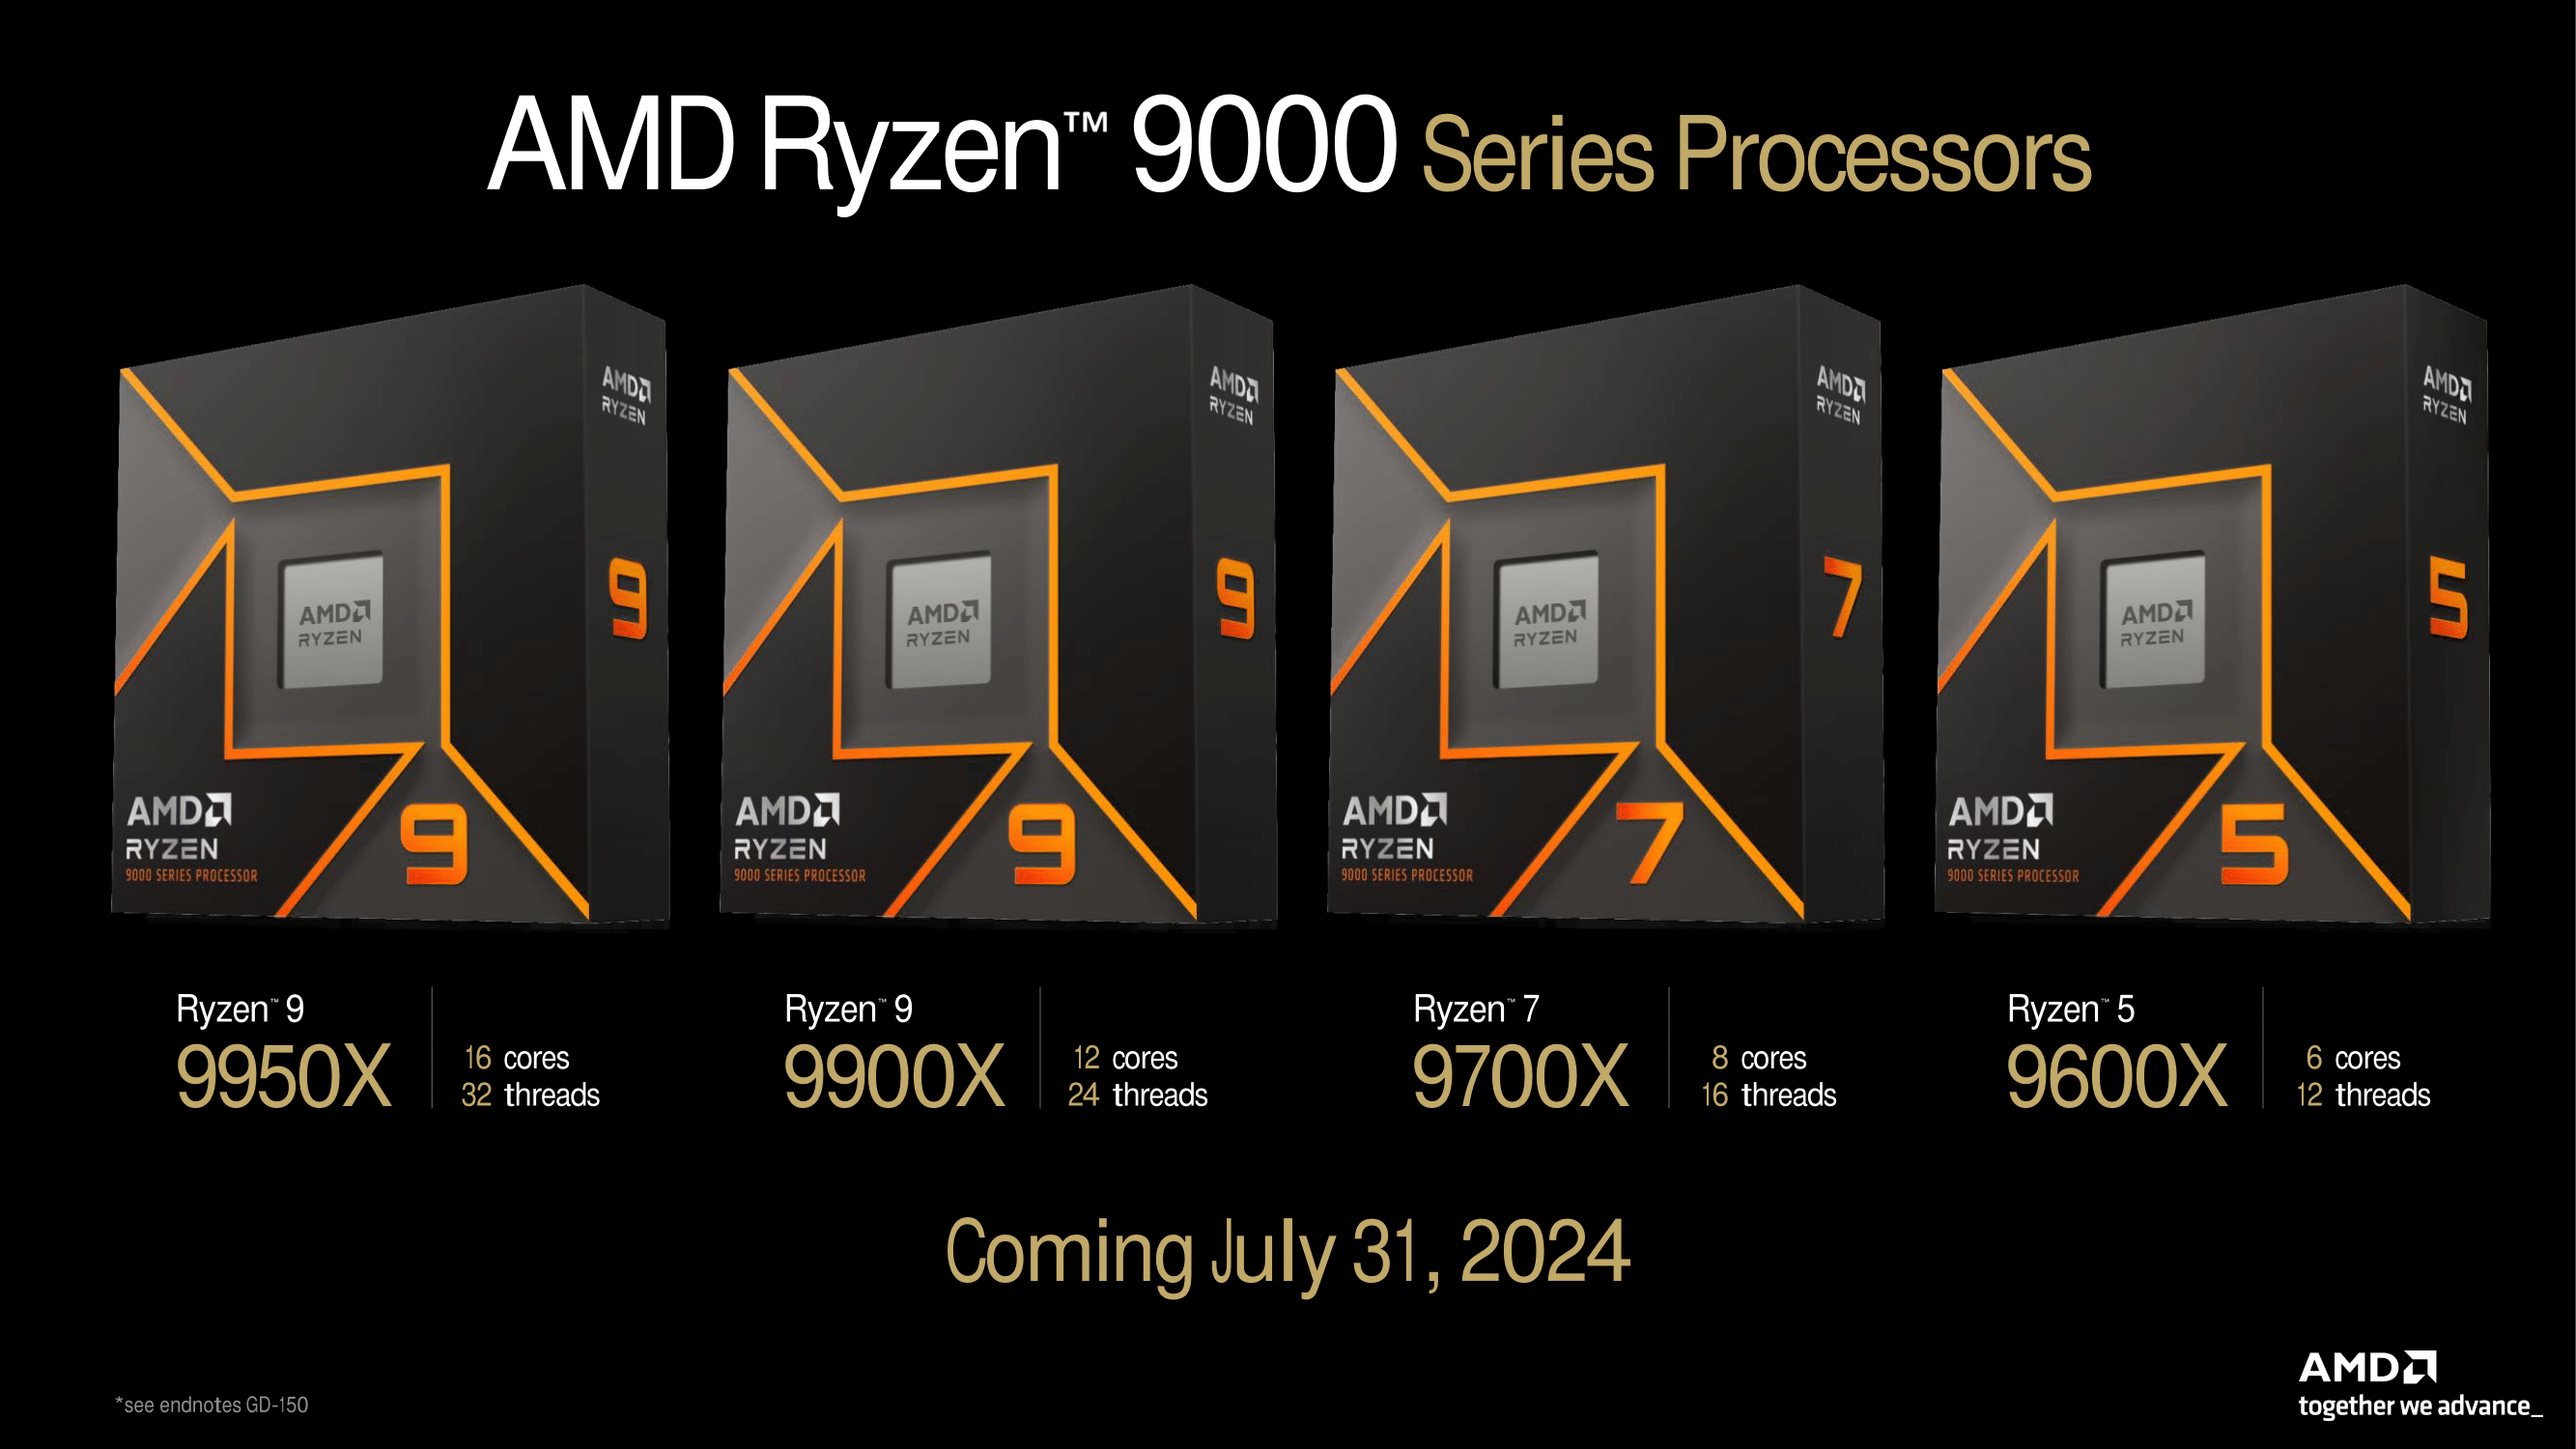
Curve Shaper is a prominent new overclocking feature AMD announced alongside its Zen 5 Ryzen 9000 “Granite Ridge” processor line-up. It’s an evolution of the Curve Optimizer tool enthusiasts have been using since Zen 3 Ryzen 5000.
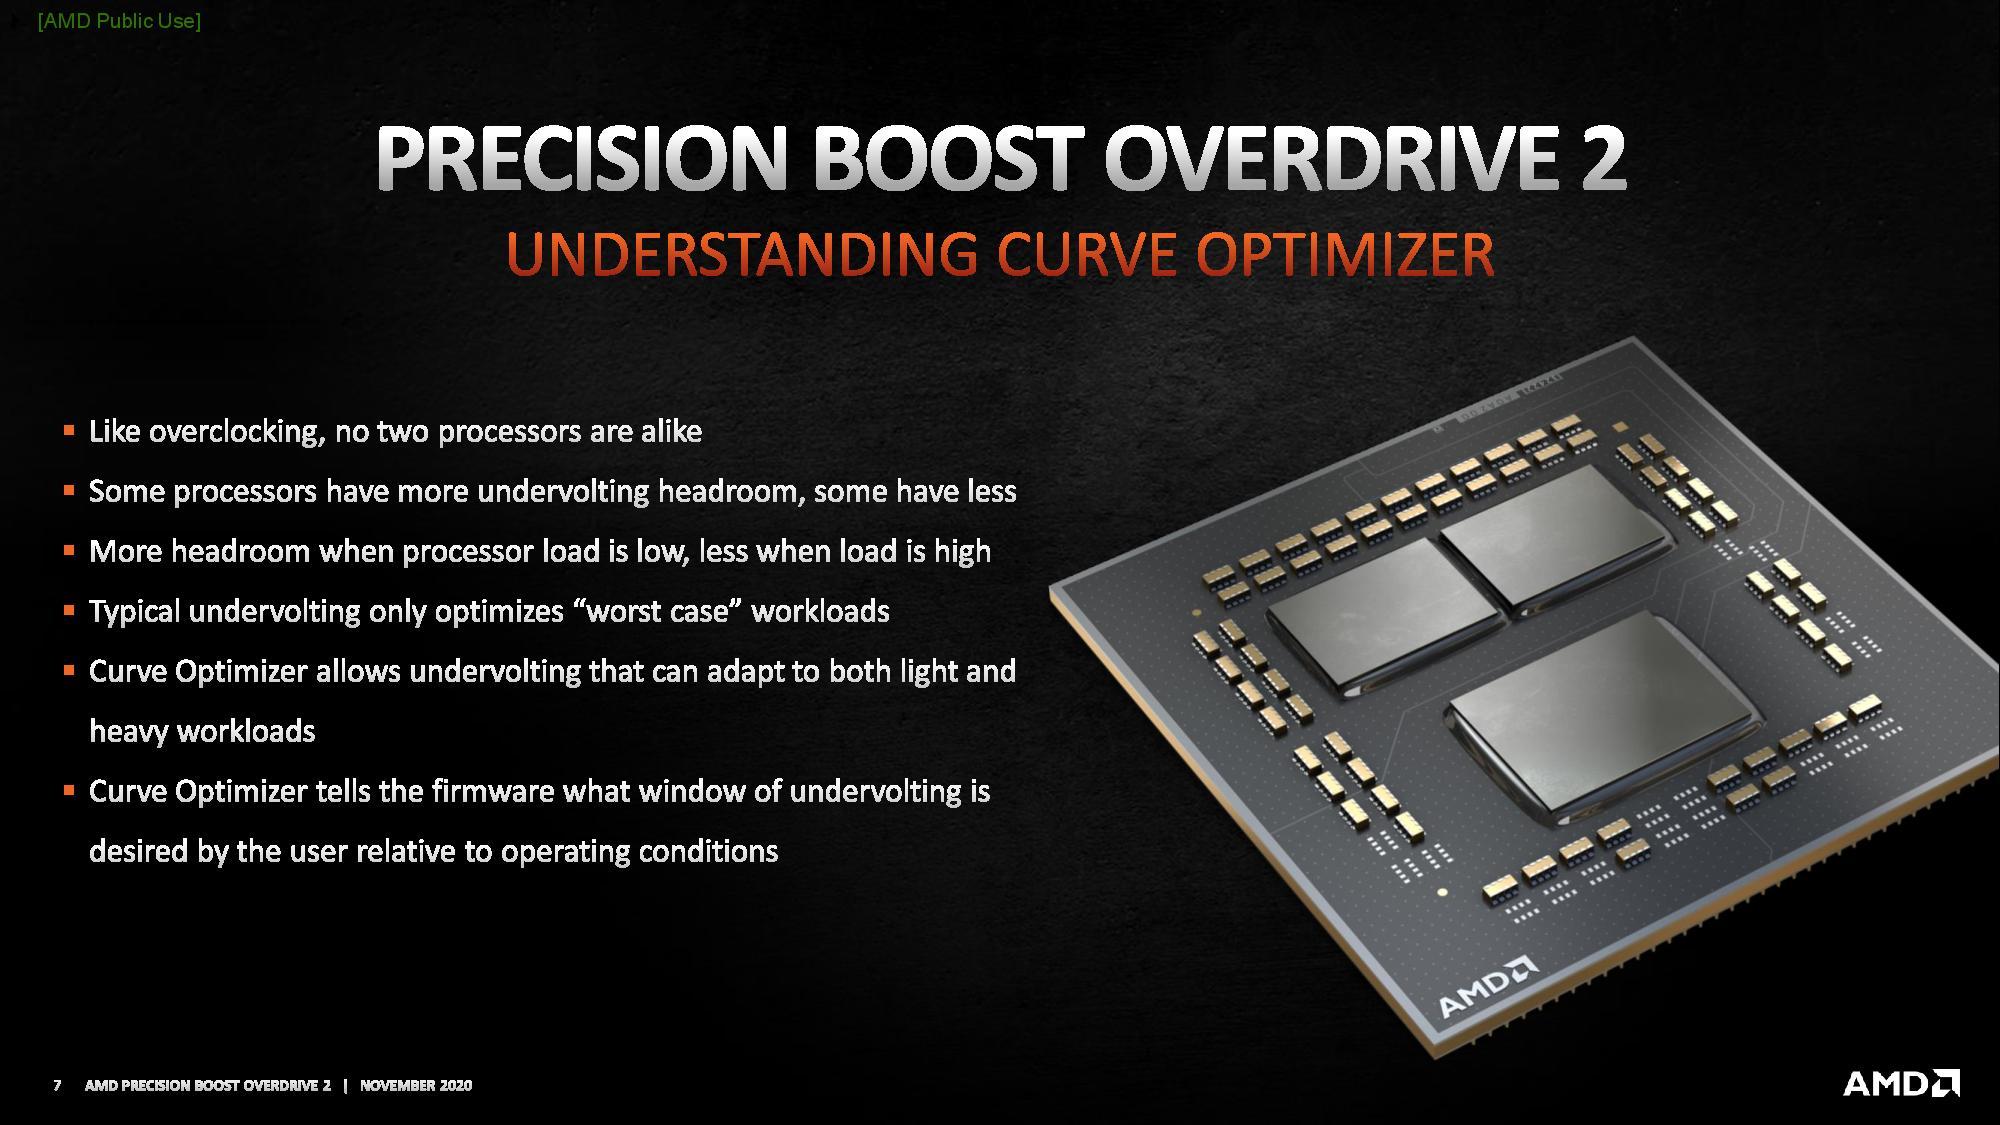
Curve Optimizer is a tool, part of Precision Boost Overdrive 2, that lets users exploit the voltage margin by Undervolting their processors. Undervolting an AMD Ryzen CPU helps in two ways:
- It lowers the operating temperature and power consumption.
- As a consequence, the Precision Boost 2 algorithm can use this additional headroom to boost to higher frequencies.
So, you tend to get lower temperatures and extra performance. It’s a win-win.
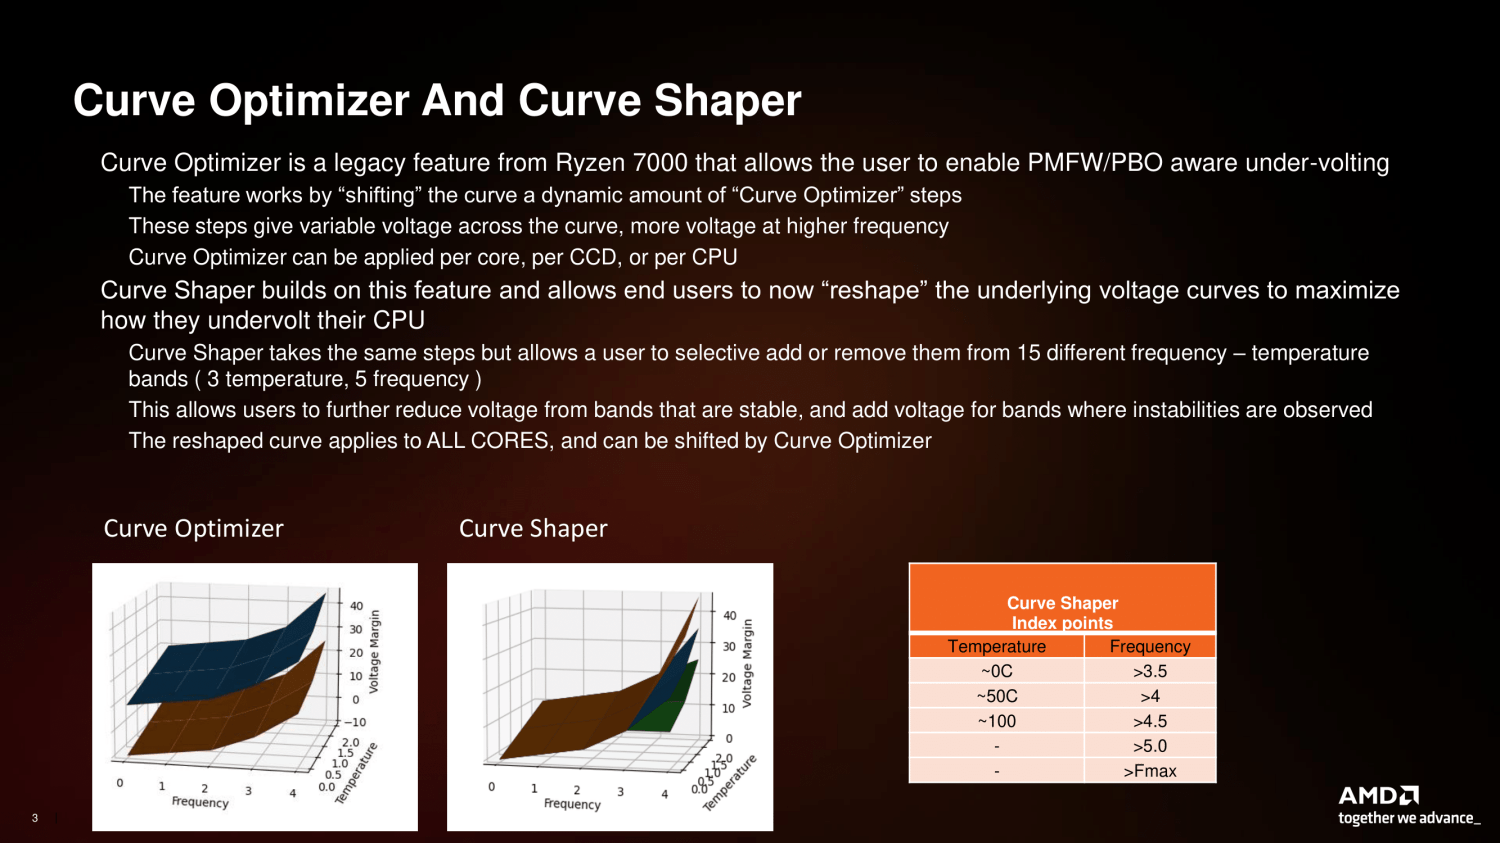
Curve Shaper adds to the Curve Optimizer functionality by expanding its flexibility with 15 additional tuning points. Let’s see how it works.
The Voltage-Frequency Curve
Let’s start with the basics: the voltage-frequency curve.
Simply put: a voltage-frequency curve describes the relationship between an operating frequency and the voltage required to operate at that frequency. Every modern SOC has a factory-fused voltage-frequency curve and uses this to dynamically adjust the power consumption depending on the workload needs.
Typically, it’s not possible to get the voltage-frequency curve from the SOC. However, we can put it together using hardware monitoring tools like HWiNFO and stress test tools like OCCT.
BIOS Settings
Disable SMT (this lowers the operating temperature)

Stress Test
OCCT Memory Test > 16 threads (low stress on CPU but all cores to C0)

Collecting Information
HWiNFO > save to CSV (collect CPU frequency and CPU VID information)
Shamino OC Tool > reduce Precision Boost Fmax at runtime in steps of 50MHz every 10 seconds

Analysis
Excel > Vstack frequency and VID of Core 0-7 (CCD0) & Core 8-15 (CCD1)
I collected well over 100,000 voltage-frequency data points from my AMD Ryzen 9 9950X to illustrate how Curve Shaper works.
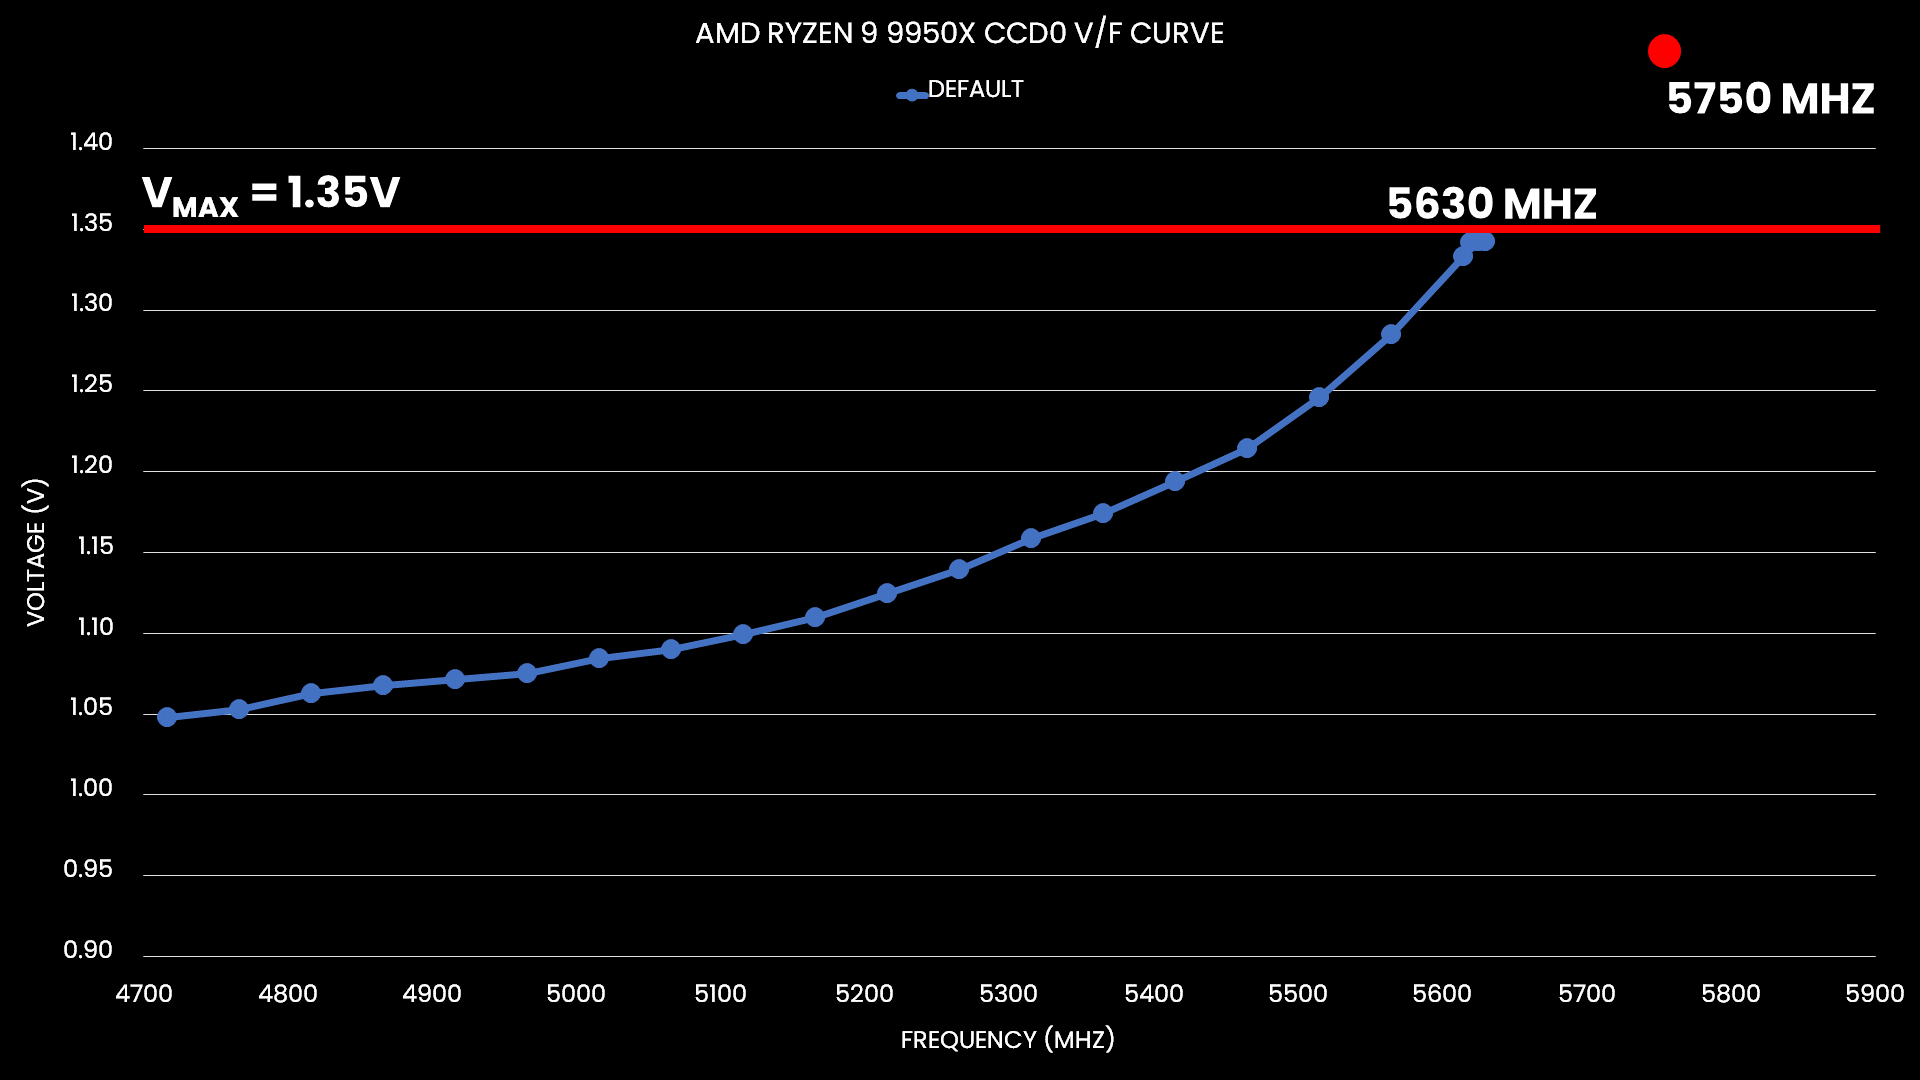
Here’s the default voltage-frequency curve of my Ryzen 9 9950X processor. Since the processor has two CCDs of quite different quality, we have two distinct curves These curves represent the average curve of the eight cores inside each CCD because, actually, each of the eight cores inside the CCD has its own curve.
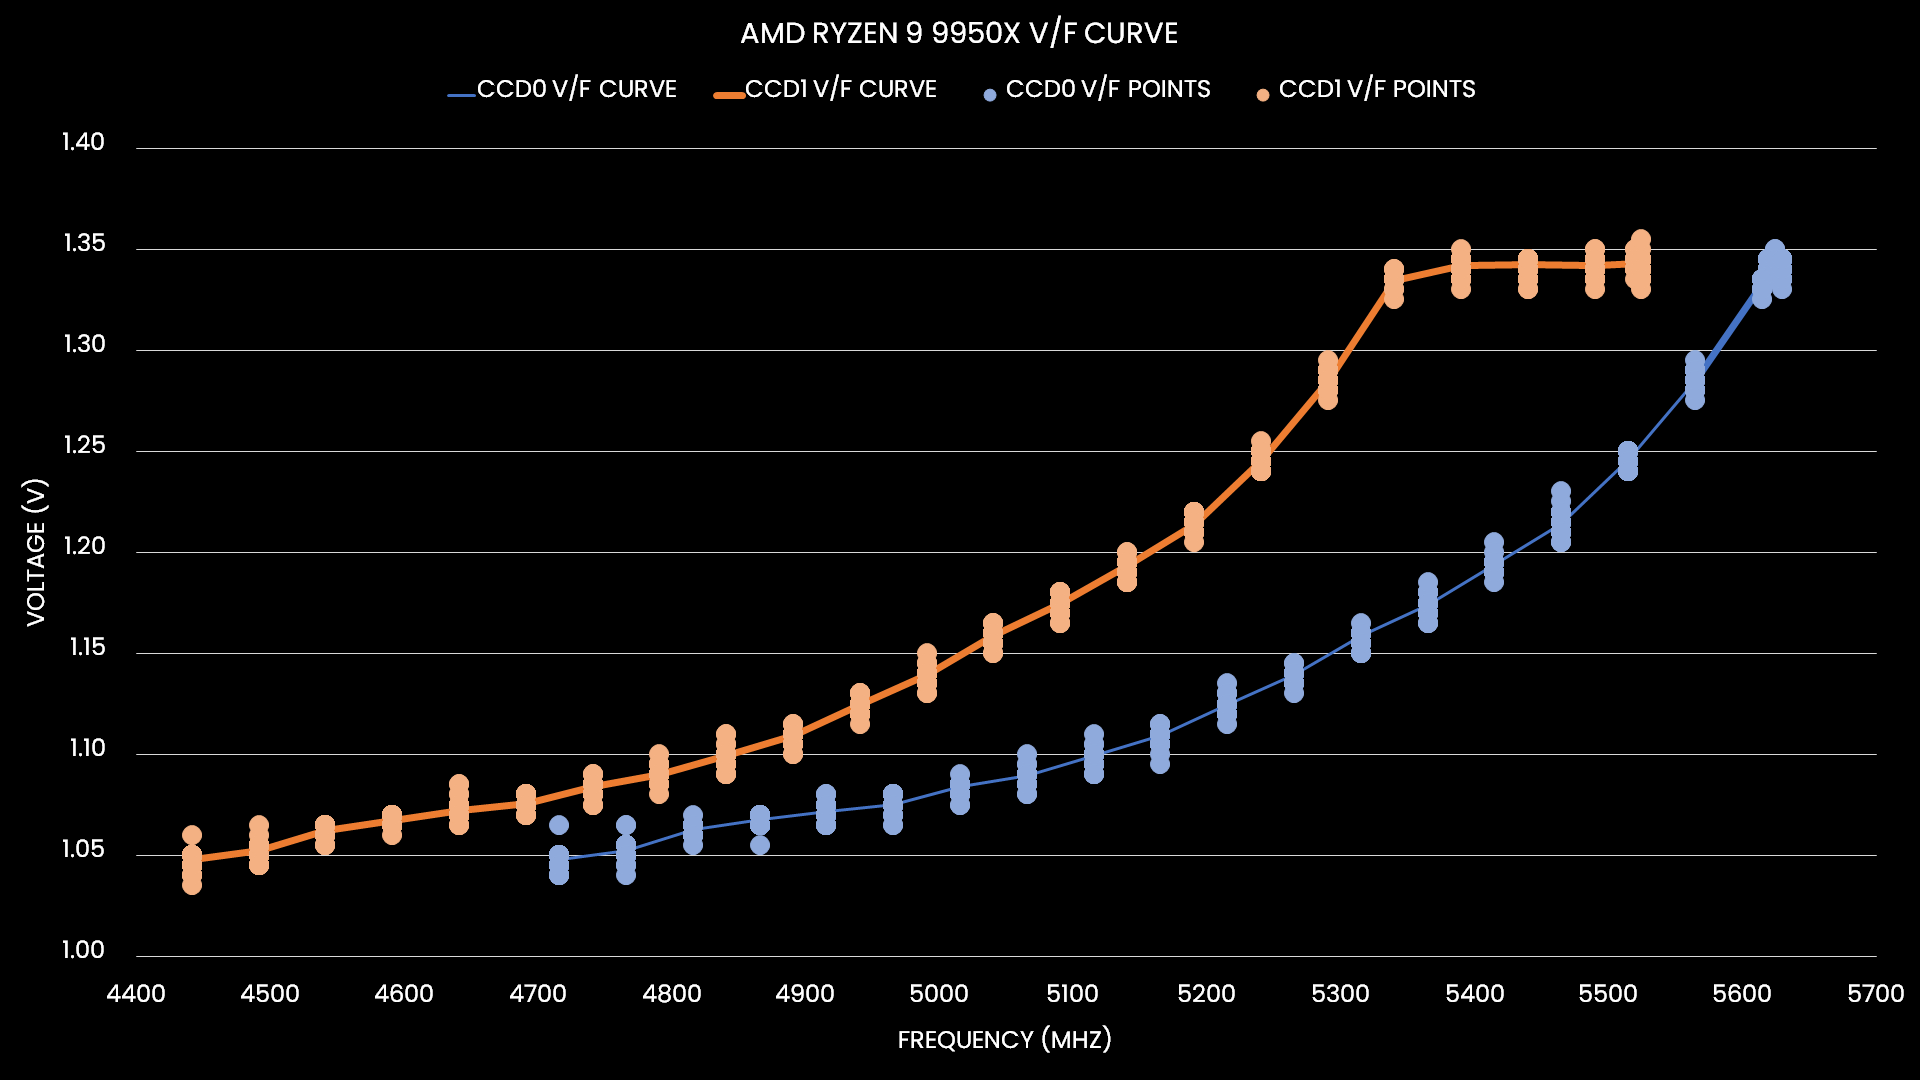
We can immediately make a simple and redundant observation: the higher the frequency, the more voltage is required. For example: for CCD0, we only need 1.05V for a frequency of about 4.75 GHz. However, we need 1.35V for a frequency over 5.6 GHz.
There’s another fundamental rule governing the V/F curve: the higher the temperature, the more voltage is required. That’s a little more difficult to illustrate, but here’s an example from CCD0.
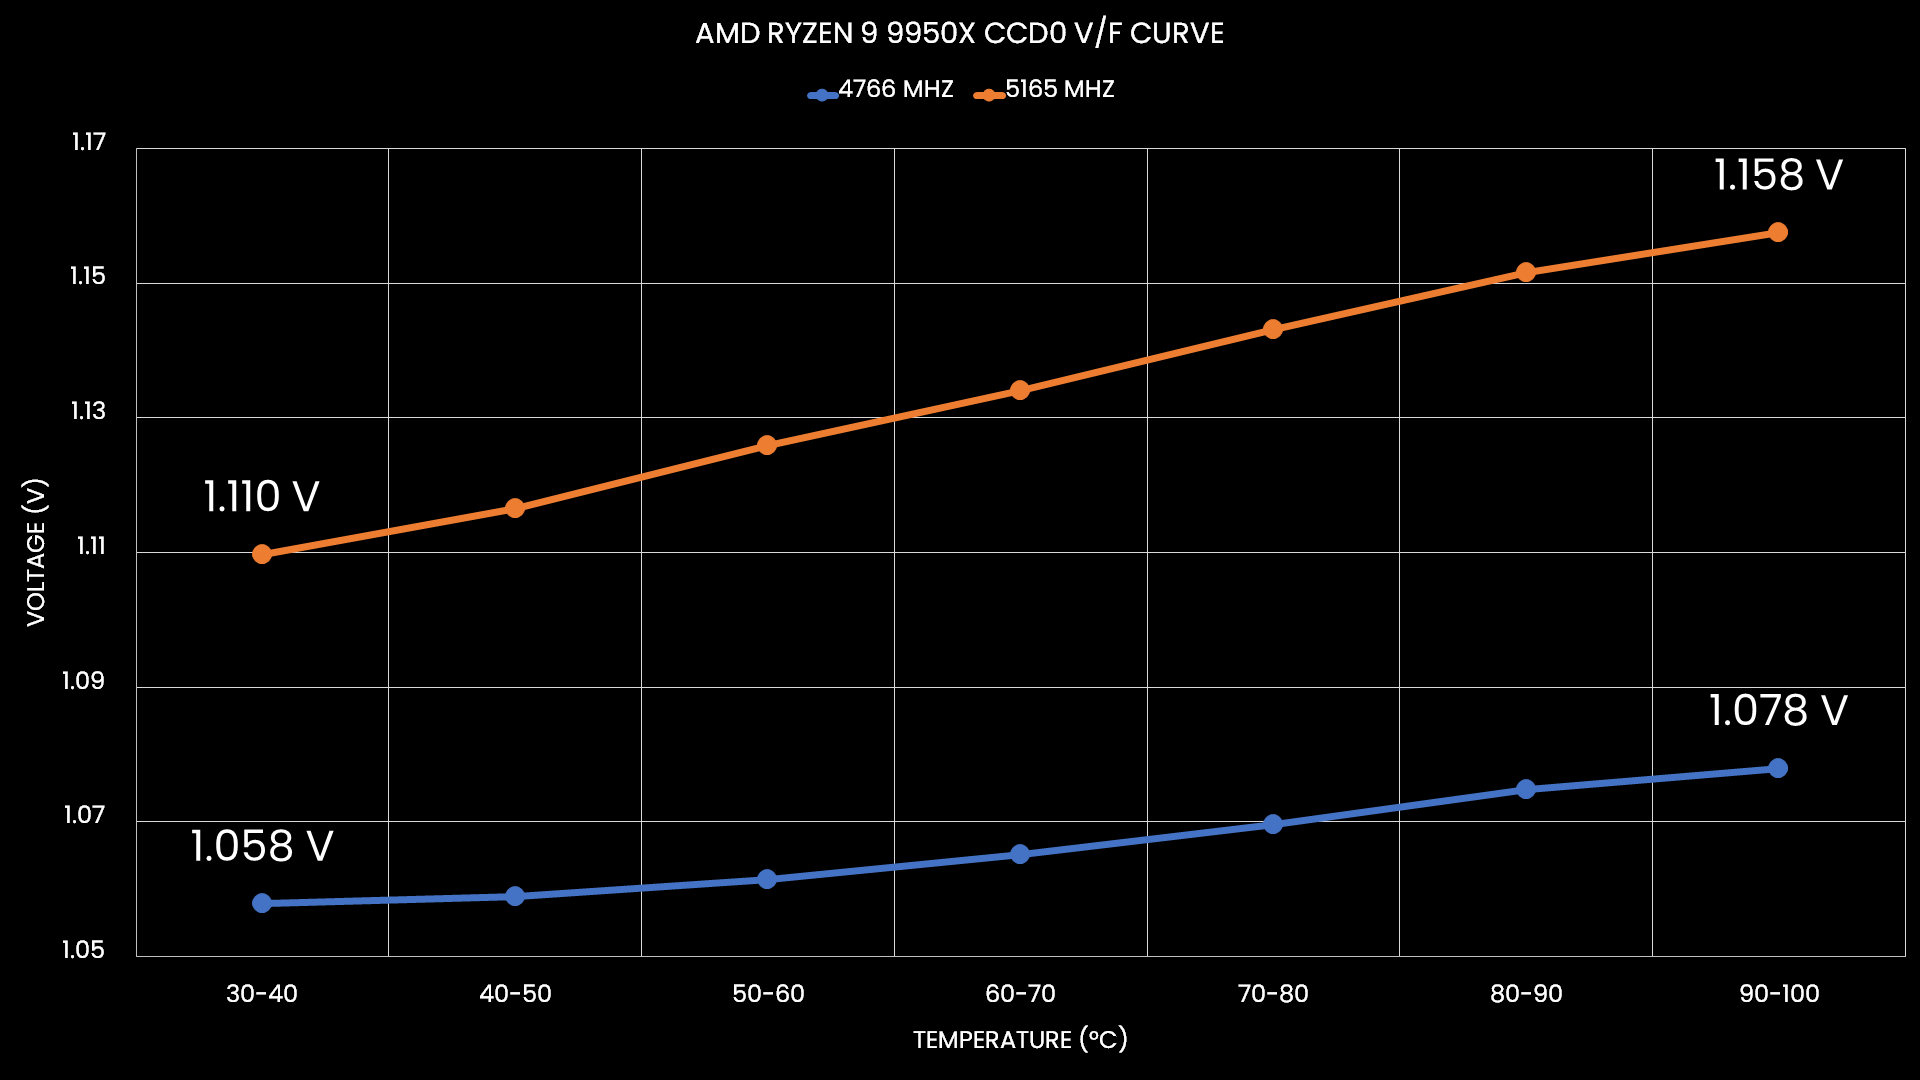
On average, for 4766 MHz, we need 1.06V below 40C and almost 1.08V above 90 degrees. And for 5165 MHz, we only need 1.11V below 40C and 1.158V above 90 degrees Celsius.
So, we have two fundamental rules governing the voltage-frequency curve:
- A higher frequency requires higher voltages, and
- A higher temperature requires higher voltages.
Curve Optimizer
Curve Optimizer has been one of the most important overclocking tools of the Precision Boost Overdrive 2 toolkit. It is most commonly known for its undervolting capabilities, but on AMD Ryzen CPUs it kind of also works as an overclocking tool.
Take the Ryzen 9 9950X CCD0, for example. When all cores are active, the maximum allowed voltage is 1.35V. The Precision Boost 2 algorithm utilizes the V/F curve to find what’s the maximum possible frequency at 1.35V. With the default curve, that’s about 5630 MHz. However, the programmed maximum frequency for the Ryzen 9 9950X is actually 5750 MHz. So, we miss out on more than 100 MHz. And, actually, we can use the Fmax Boost Override tool to increase the Fmax by another 200 MHz. So, we’re really missing out on about 300 MHz.
Negative Curve Optimizer
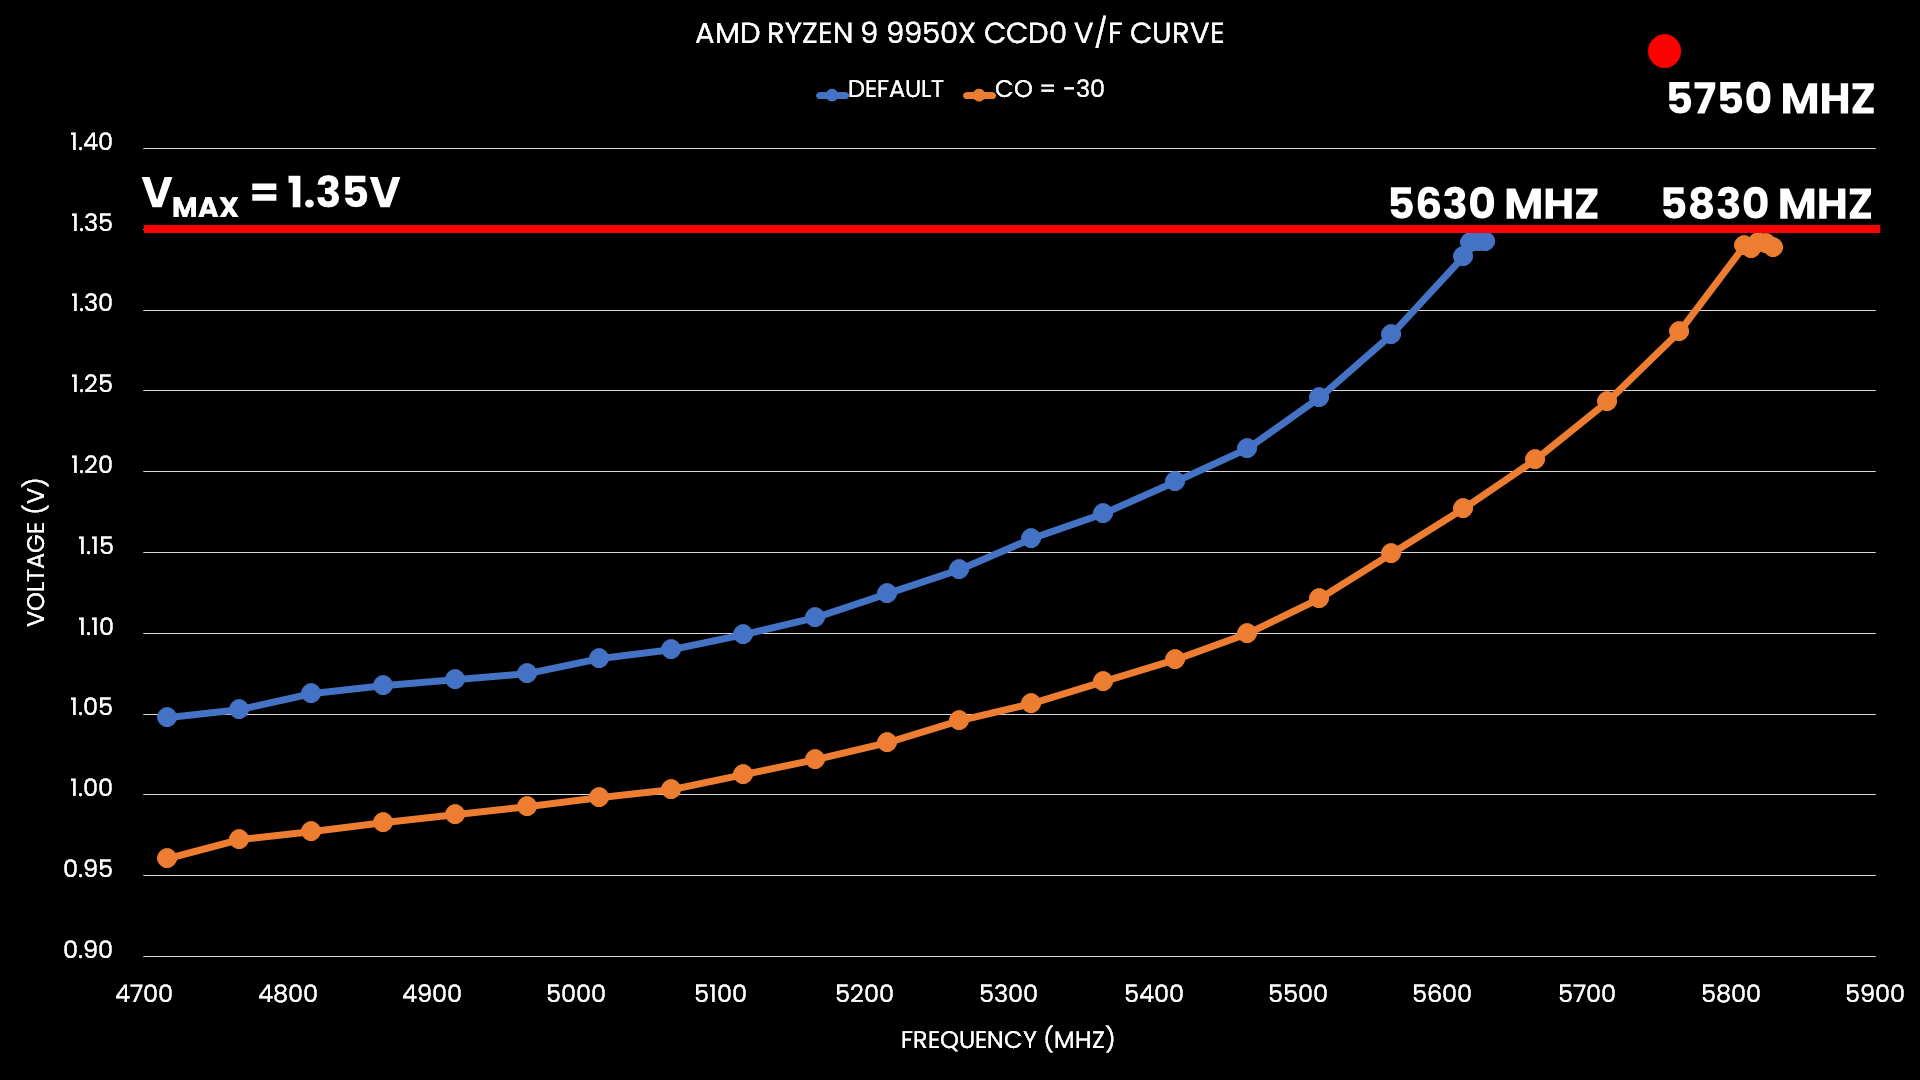
Curve Optimizer is an incredible overclocking tool, especially if you have a CPU with lots of undervolt margin. If we set a Curve Optimizer to negative 30, we can shift the entire voltage-frequency curve along the frequency axis. And, suddenly, we need a lot less voltage for every operating frequency.
For example, for 5 GHz we needed about 1.08V by default, but with a -30 Curve Optimizer, now we only need 0.995V! Moreover, the frequency is also boosting higher! The highest frequency with all eight cores active has increased by 200 MHz to 5830 MHz. These higher frequencies are now possible because our Curve Optimizer undervolting pulled them below the 1.35V threshold.
Positive Curve Optimizer
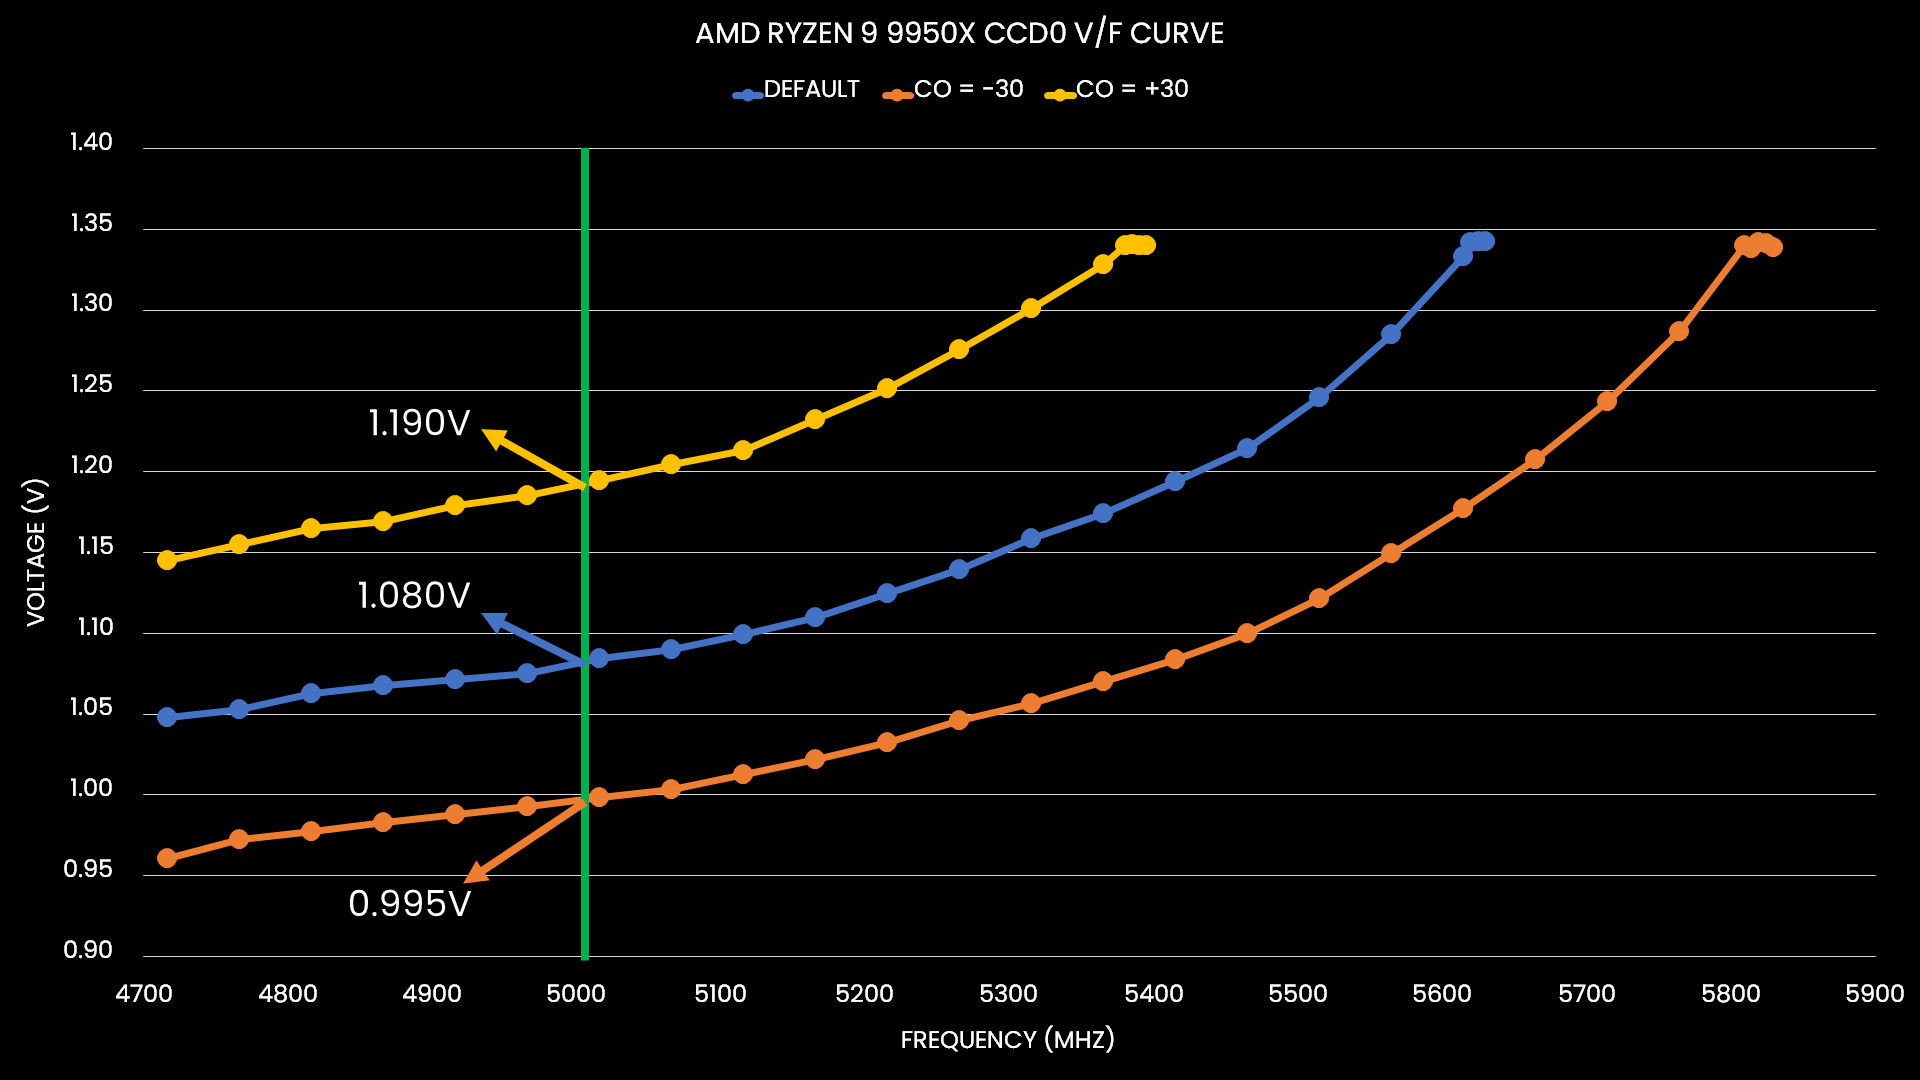
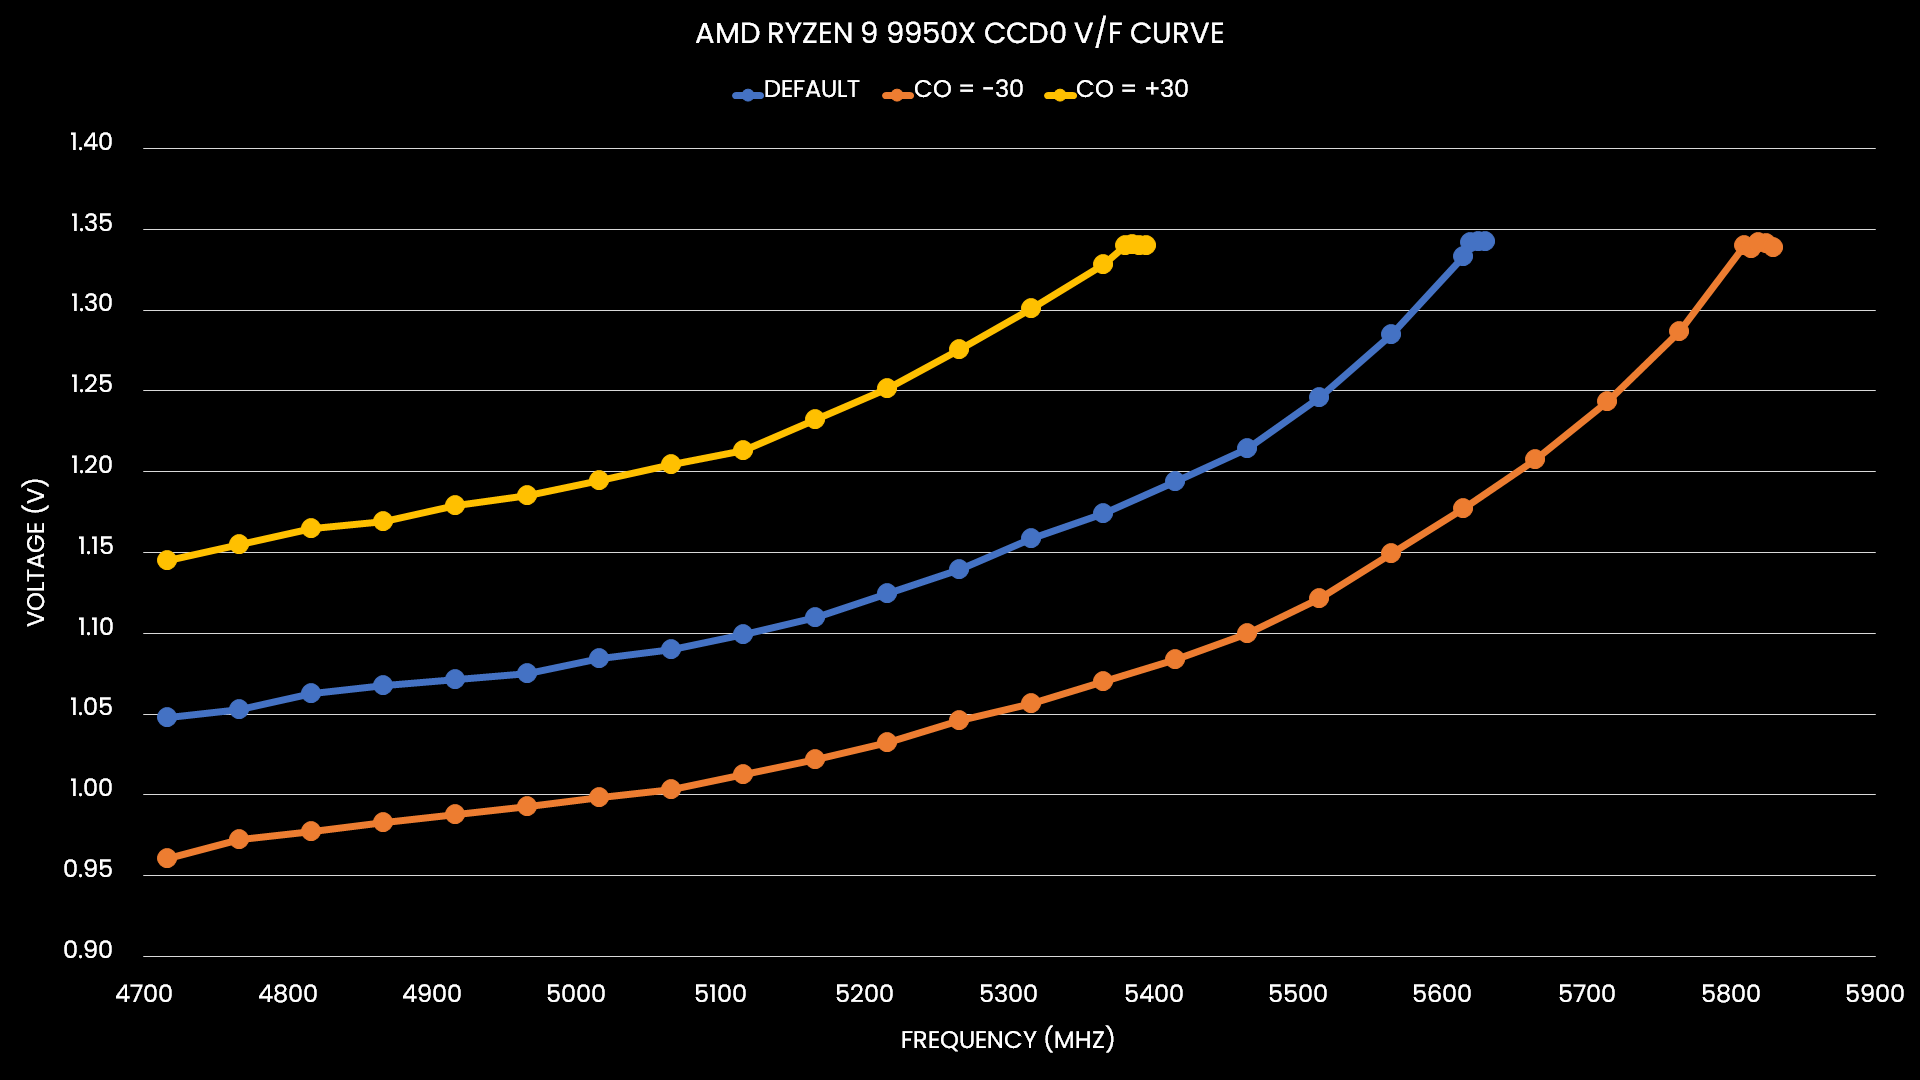
Curve Optimizer works in two ways: with a negative value with can undervolt and with a positive value we can overvolt.
For example, for 5 GHz we get about 1.08V by default, but with a +30 Curve Optimizer, now we get 1.19V! Using a positive Curve Optimizer is particularly useful in scenarios where you need to rely on eCLK. I’ve demonstrated that in previous Ryzen 7000 overclocking guides.
Curve Optimizer Tuning Challenges
Curve Optimizer is a powerful tuning tool. It’s simple but not simplistic. And the more you dig into the details of what it does, the more intricate it becomes to figure out how to apply it in a daily overclock.
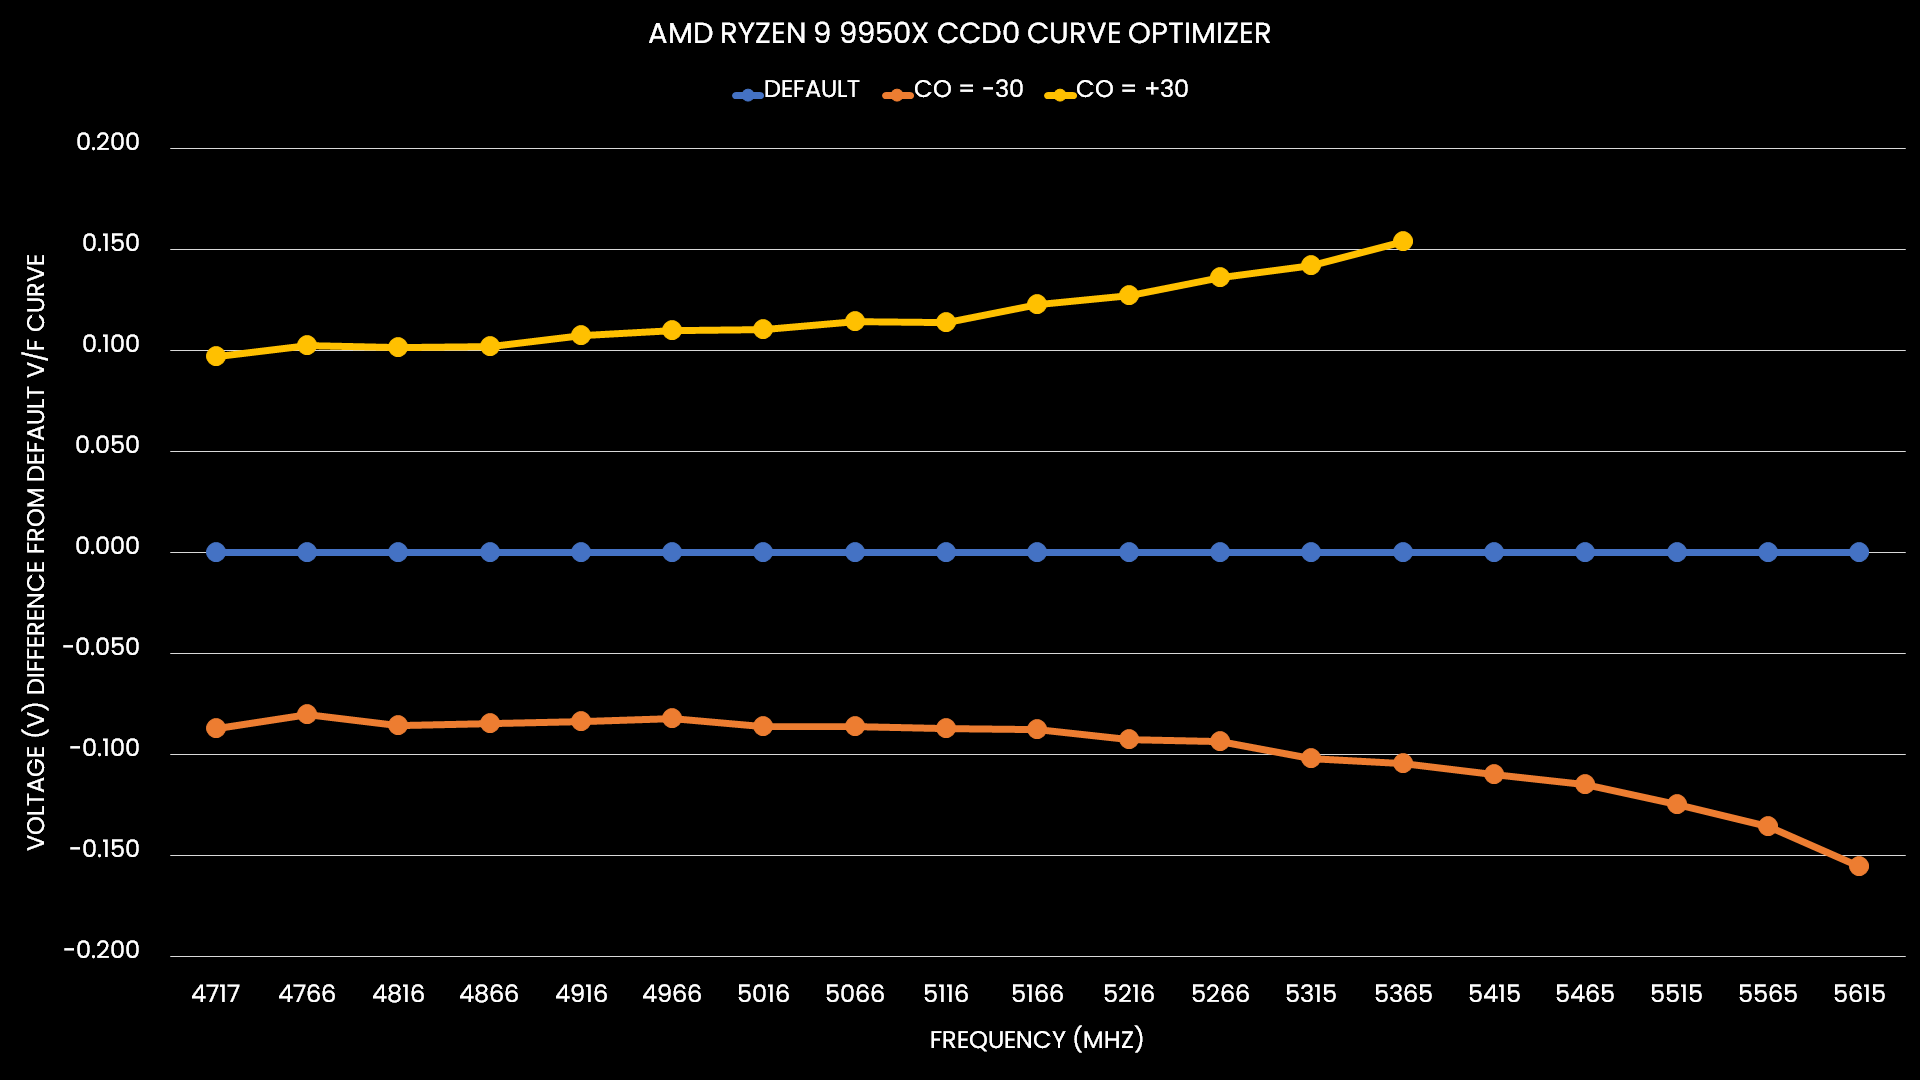
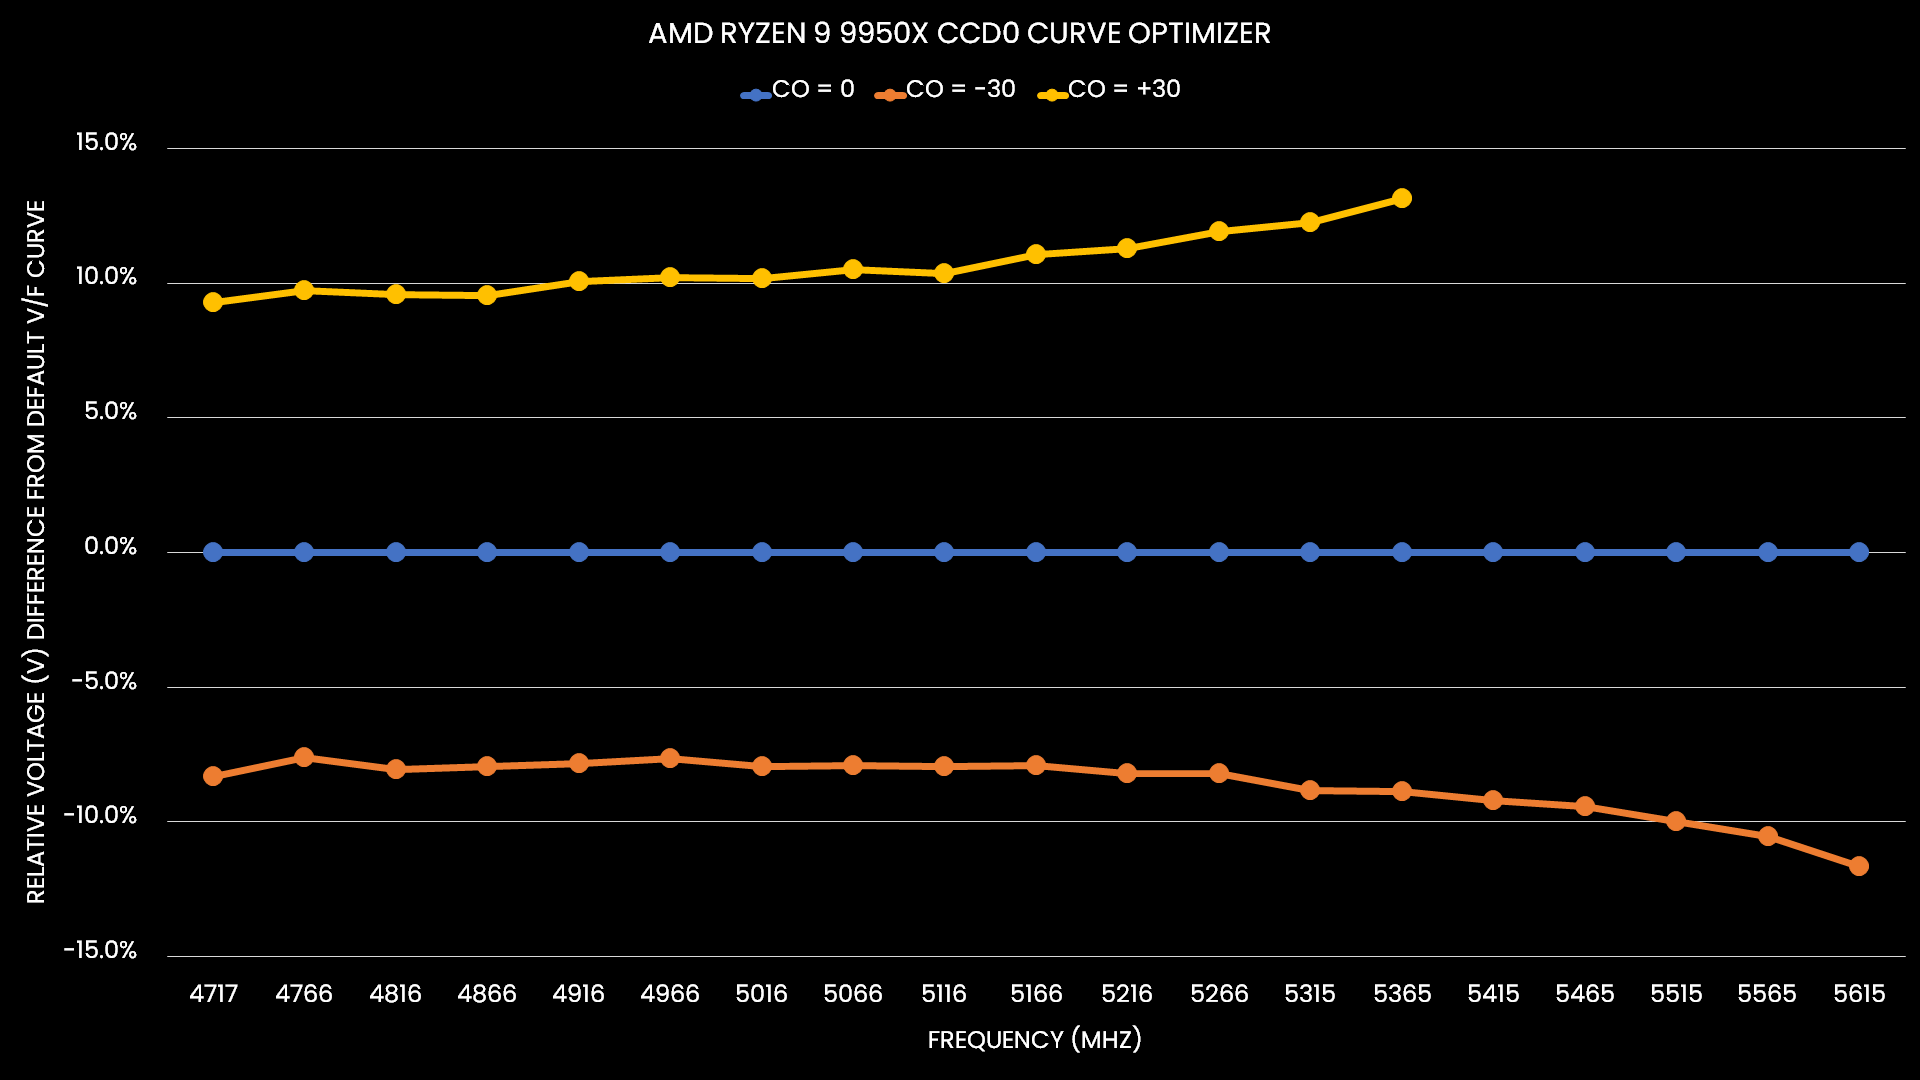
Let’s look at Curve Optimizer a little differently. Let’s express the voltage shift relative to the default V/F curve. We can see that at higher frequencies the voltage offset is larger. Even expressed as a percentage change, things aren’t linear! A -30 Curve Optimizer adjusts the default frequency above 5.6 GHz by more than 11% whereas at 4.7 GHz it’s only 8%. To make it even more complex: a +30 Curve Optimizer adjusts the voltage by almost +15% at 5.4 GHz.
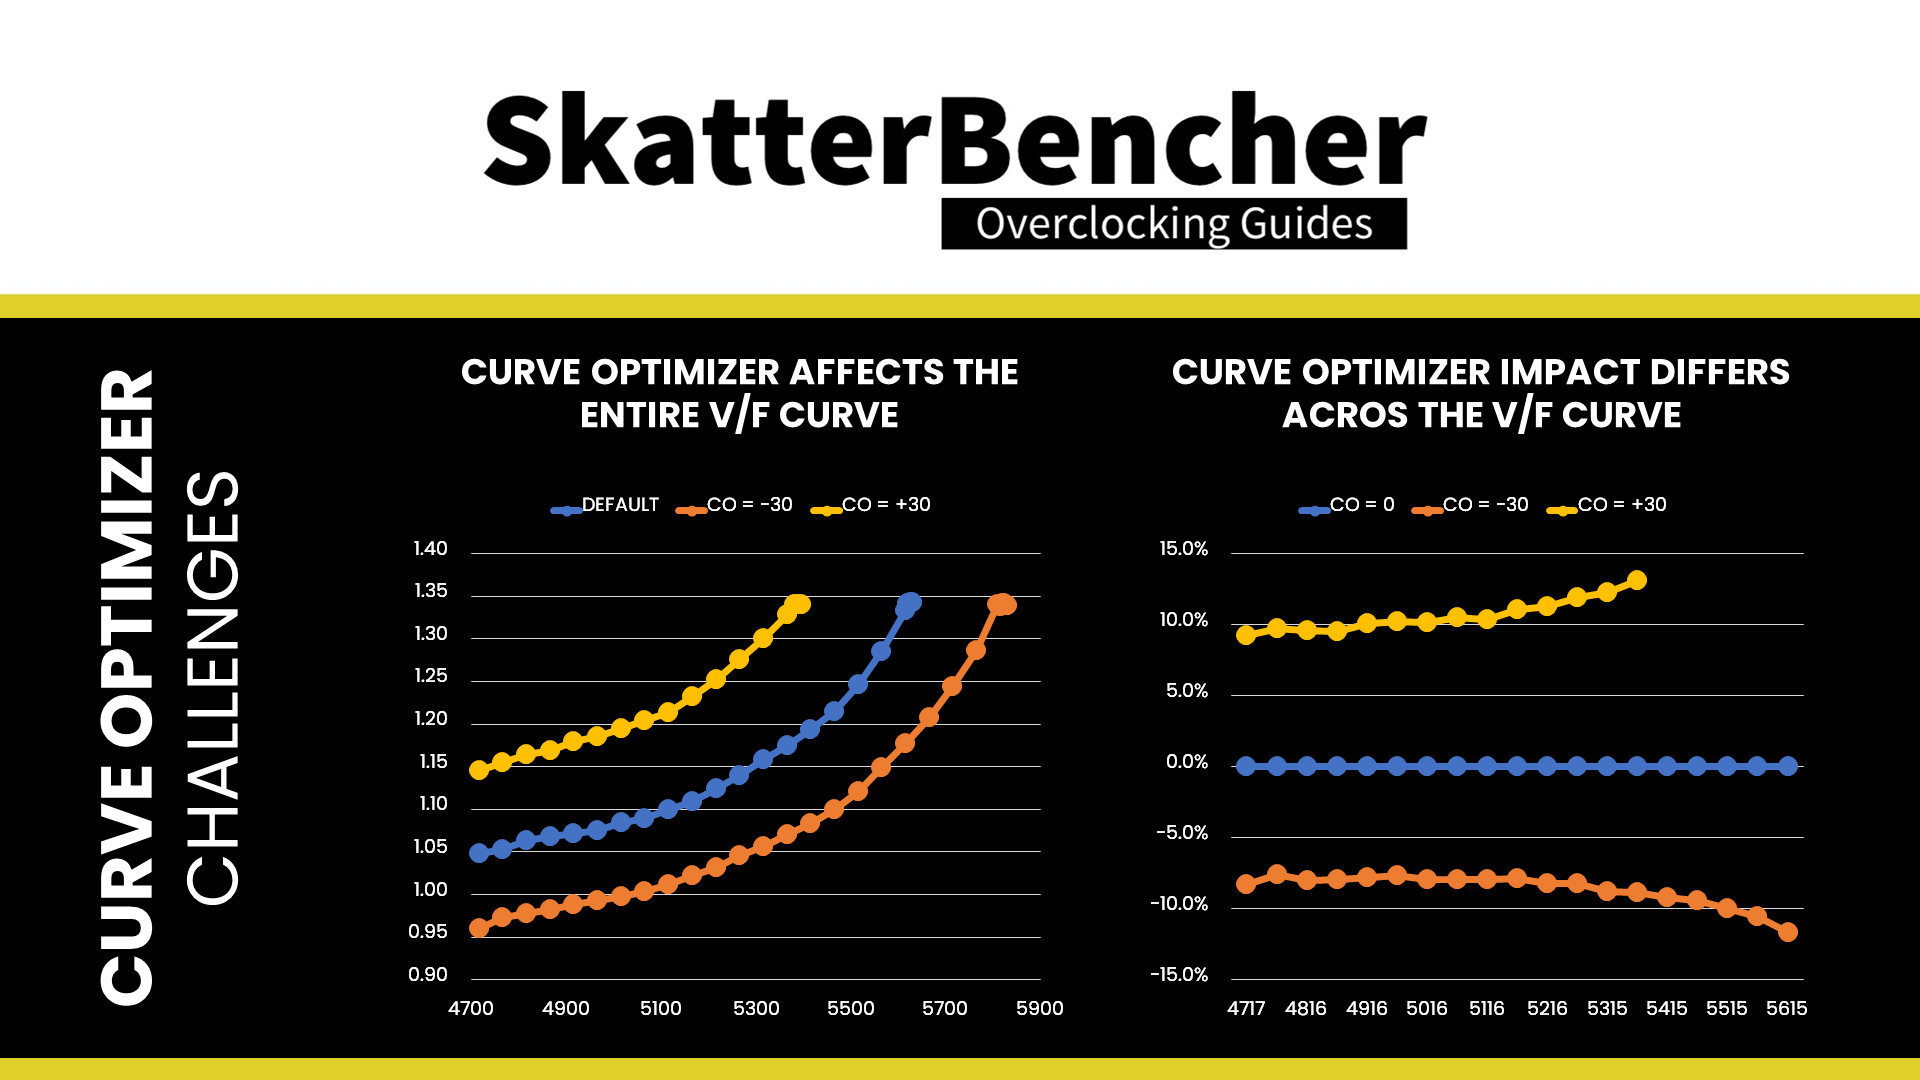
The reason tuning with Curve Optimizer for our daily overclocks is so difficult is two-fold.
- Curve Optimizer impacts the entire voltage-frequency curve. So, it affects stability across the entire range of operating frequencies: from 600 to 6000 MHz.
- The same Curve Optimizer value impacts differently across the curve.
If you’re lucky, your CPU’s undervolt margin matches how Curve Optimizer offsets the voltage across the curve. Then you’ll maximize the performance gains. But if you’re unlucky, and one part of your CPU’s V/F curve has a lot less margin, then your Curve Optimizer tuning journey will be a rough ride.
Well, until Curve Shaper.
Curve Shaper
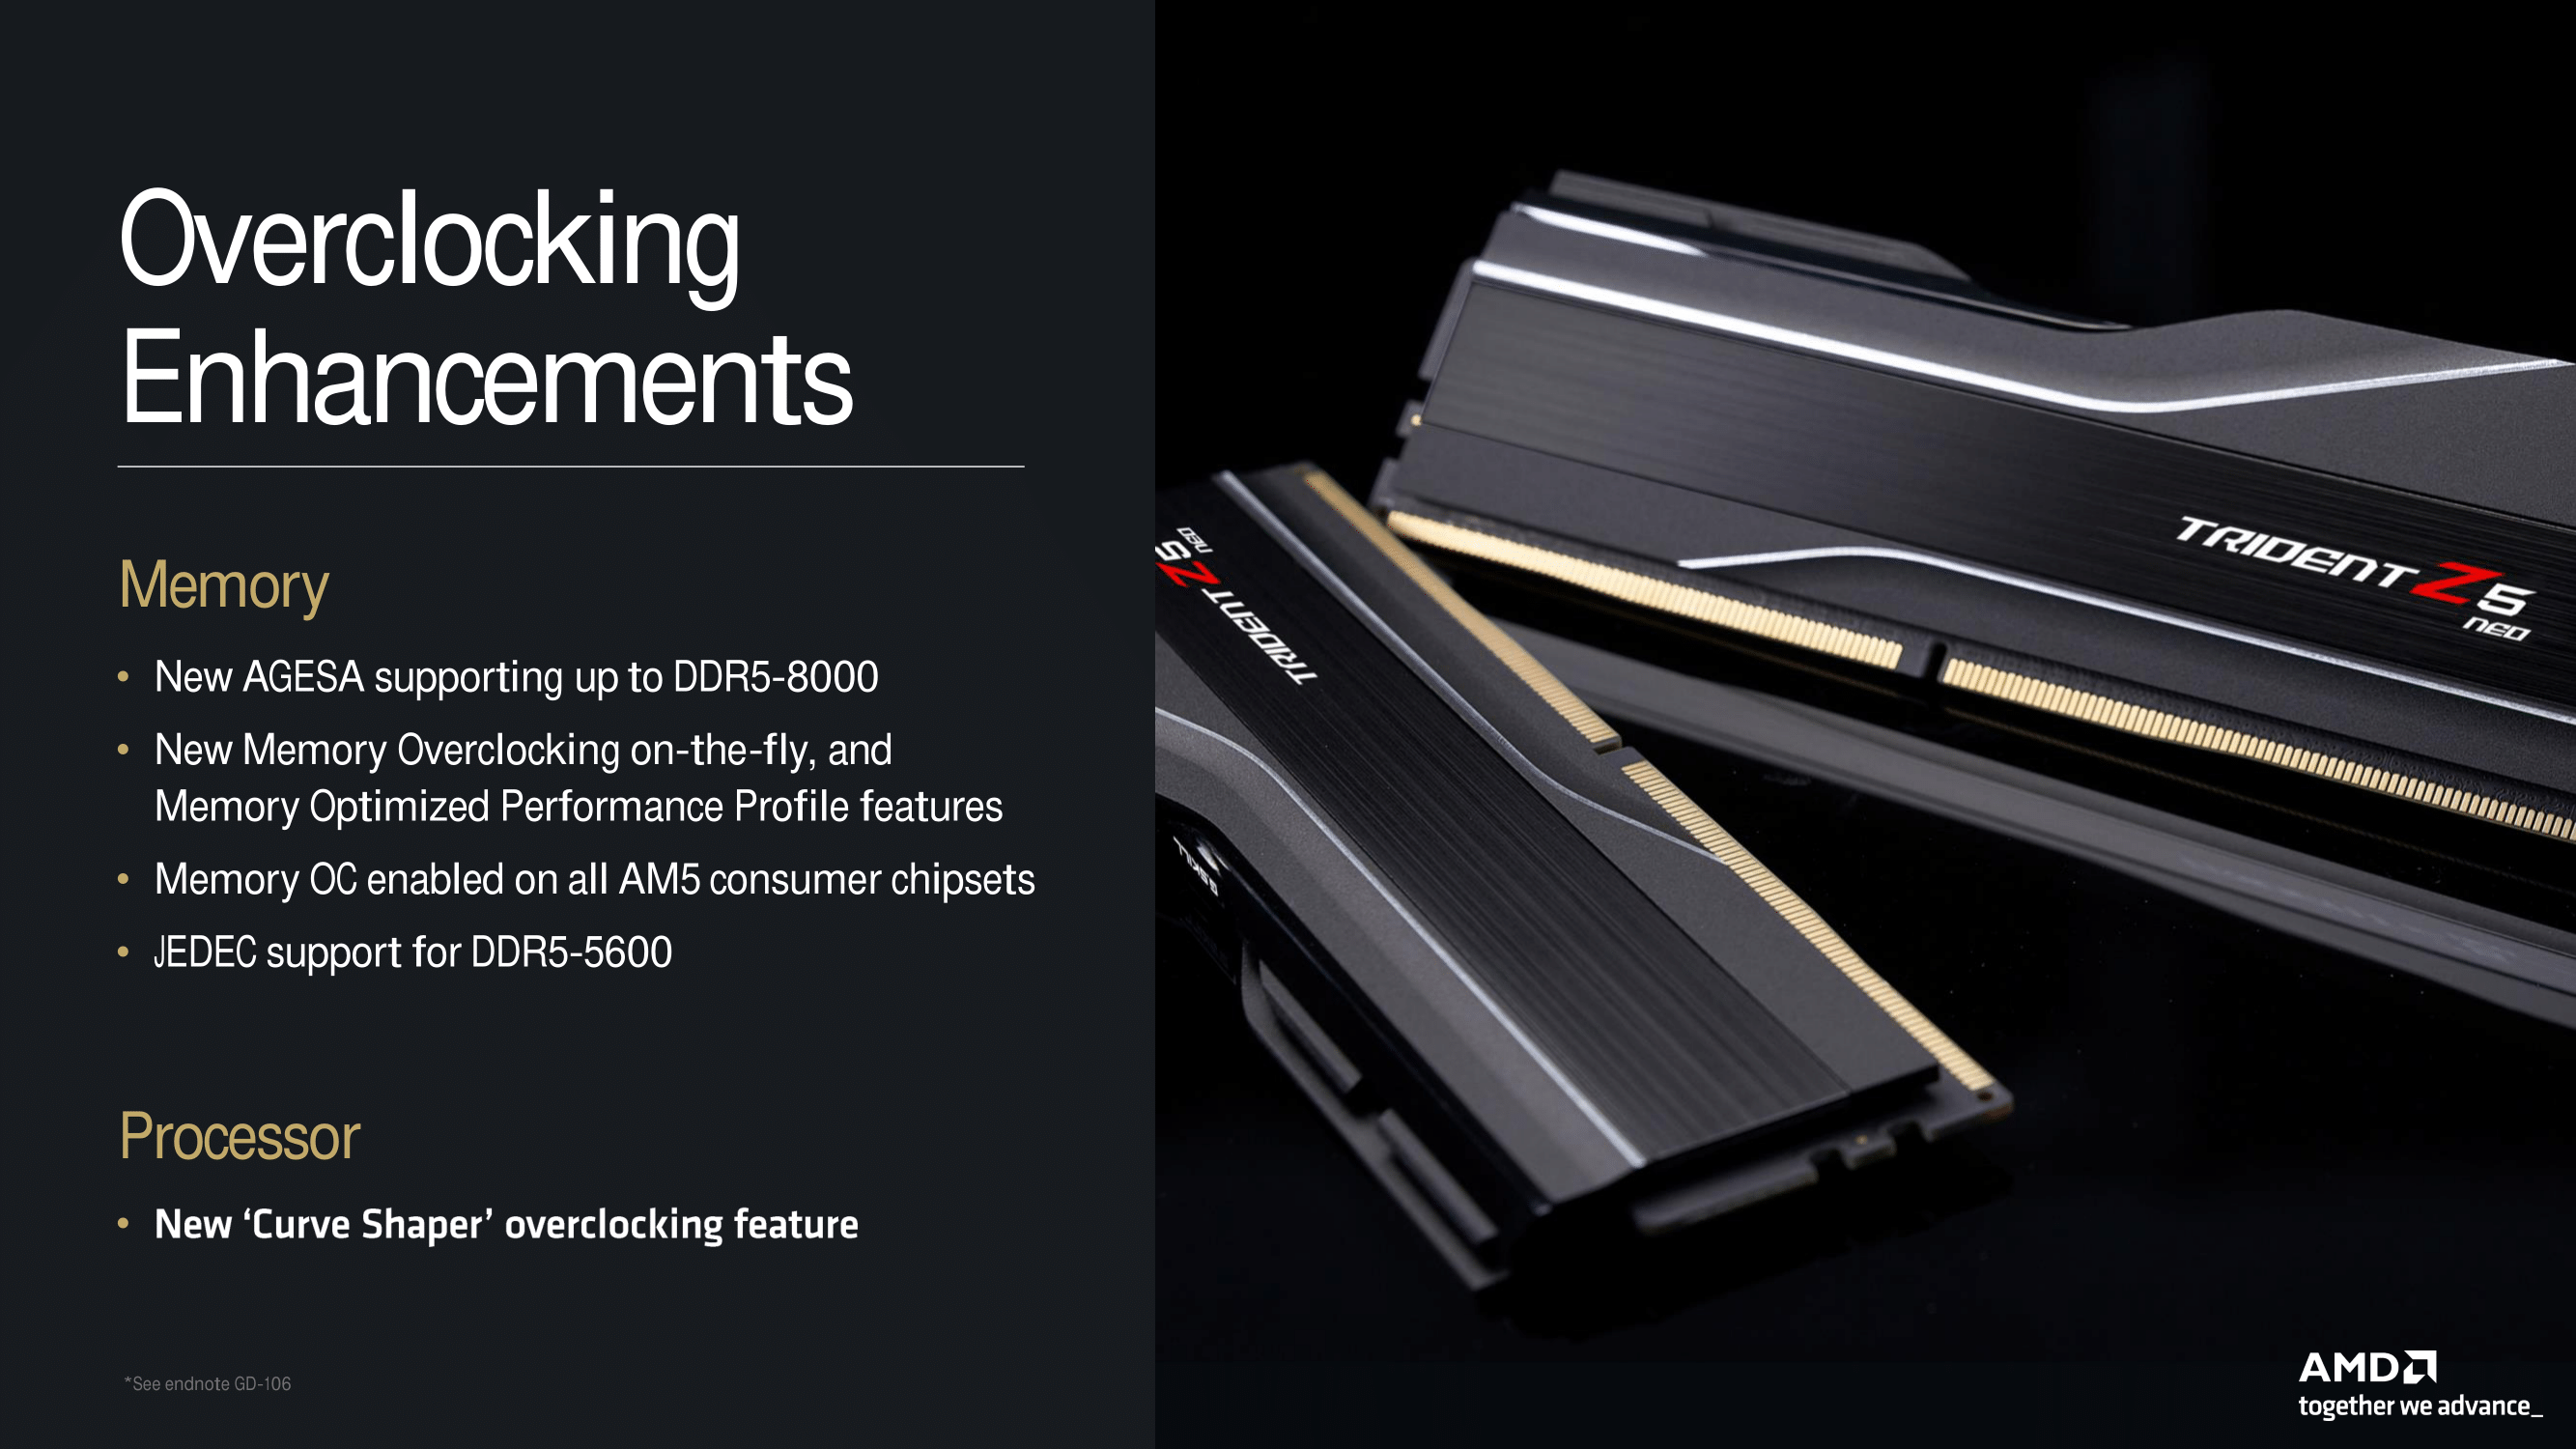
Curve Shaper is the newly announced tool of the Precision Boost Overdrive 2 toolkit. It was introduced alongside the Zen 5 Ryzen 9000 “Granite Ridge” processors. Let’s have a look at the feature in the BIOS.
Curve Shaper in Theory
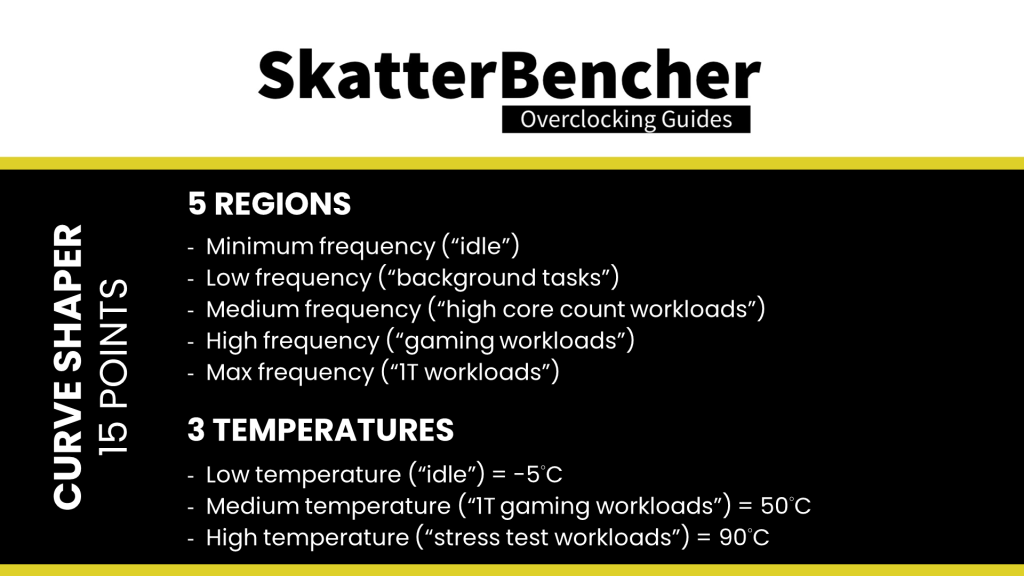
In theory, it seems Curve Shaper is pretty straightforward: you get fifteen additional tunable points across the V/F curve. But the devil is in the details because AMD’s Precision Boost 2 technology doesn’t really work with V/F points. So, instead of getting a list of specific tunable V/F points, we get five regions and three temperatures:
Regions:
- Minimum frequency (“idle”)
- Low frequency (“background tasks”)
- Medium frequency (“high core count workloads”)
- High frequency (“gaming workloads”)
- Max frequency (“1T workloads”)
Temperatures:
- Low temperature (“idle”) = -5°C
- Medium temperature (“1T gaming workloads”) = 50°C
- High temperature (“stress test workloads”) = 90°C
The regions have a bit of a vague terminology and are not clearly defined. I will get back to that in a minute. The temperature points are more straightforward as they’re defined as -5, 50, and 90 degrees Celsius.
The theory of Curve Shaper is that you can adjust the voltage-frequency curve in more specific areas than with Curve Optimizer. For example, you could say that you only want to undervolt in the High Frequency region for temperatures between 50 to 90 degrees Celsius. That would be a common approach to increase the operating frequency in gaming workloads.
However, things are not that simple. Let’s have a closer look.
Curve Shaper in Practice
Let us first set up our drawing board: we begin with three voltage-frequency curves of CCD0 of this Ryzen 9 9950X processor: the default curve, the +30 curve optimized, and the -30 curve optimized. That gives us a nice graph with essentially two guard bands around the default voltage-frequency curve.
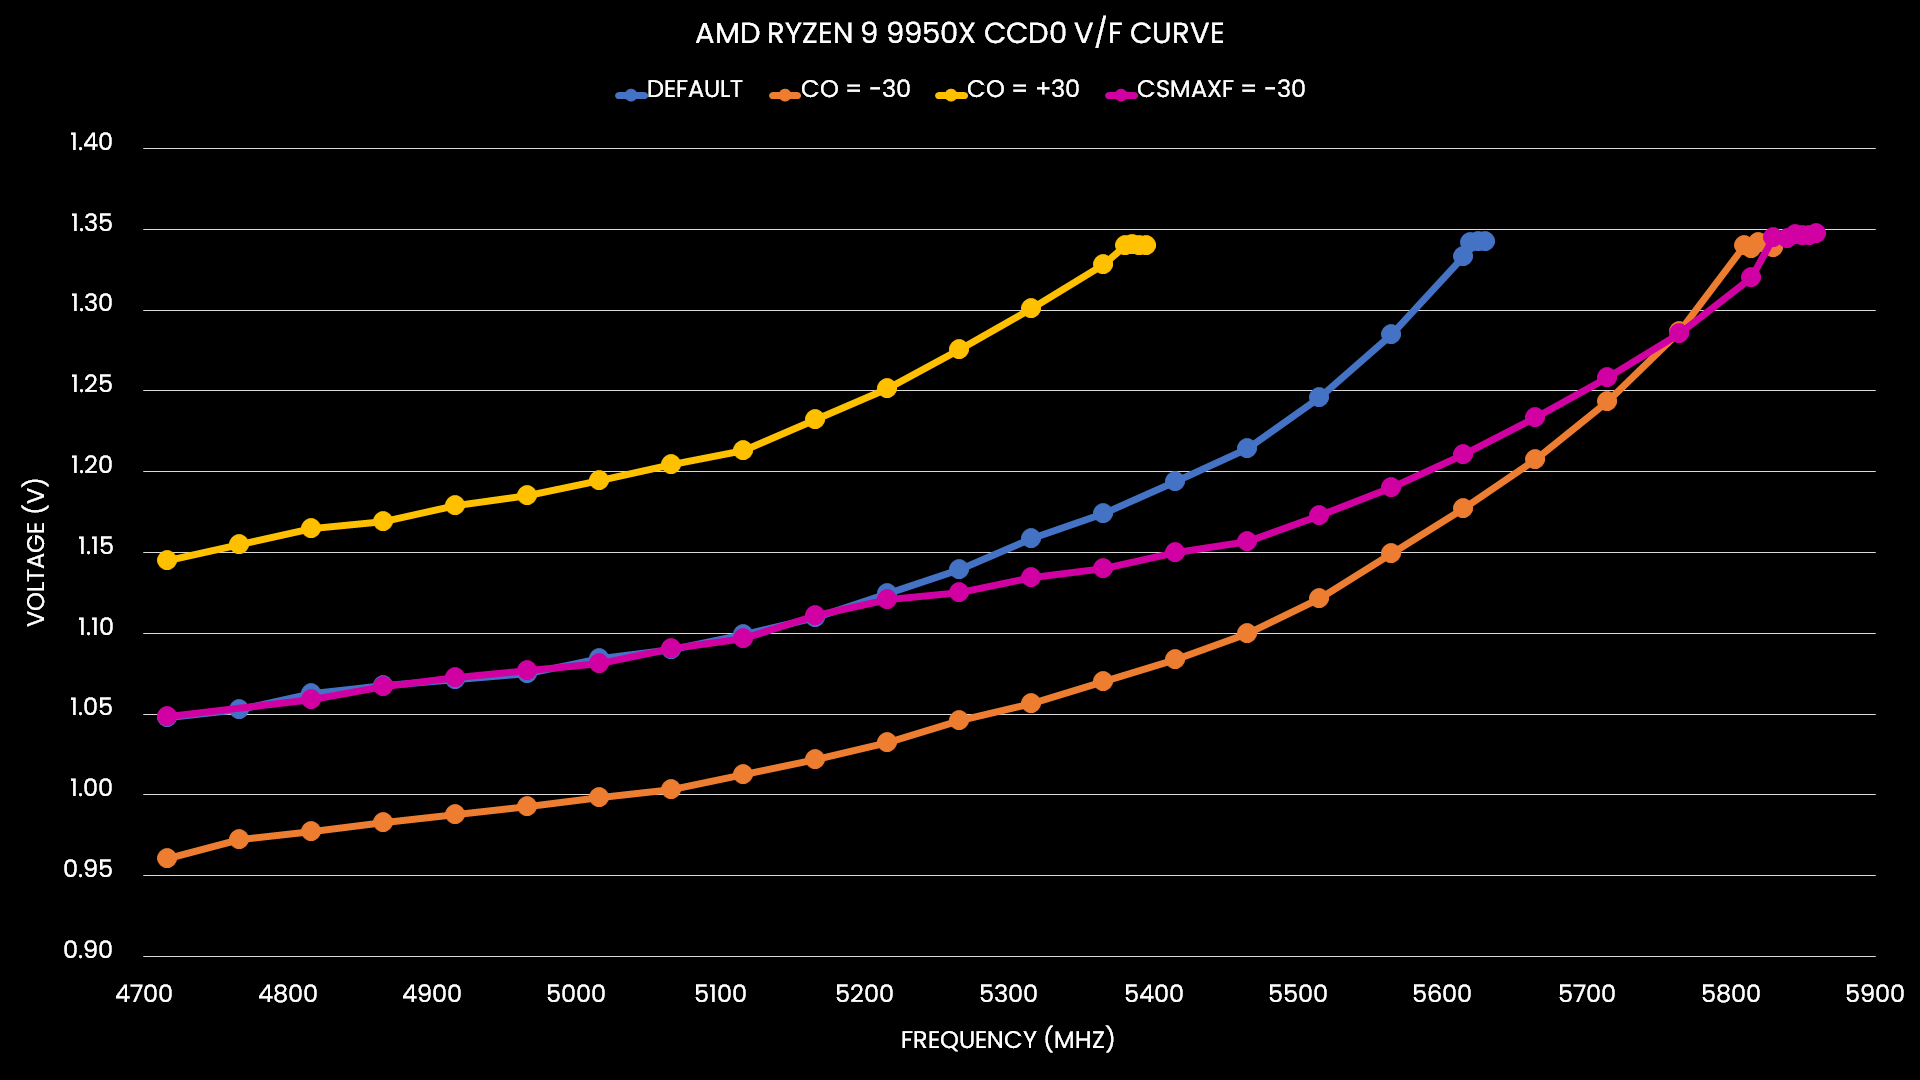
Now, let’s go into the BIOS and set a -30 Curve Shaper for all temperature points at Max Frequency and see what happens. We can see something exciting happen: the voltage-frequency curve is adjusted, but only at the very upper end of the curve near the maximum frequency. The voltage for frequencies below 5200 MHz is unaffected by our undervolt!
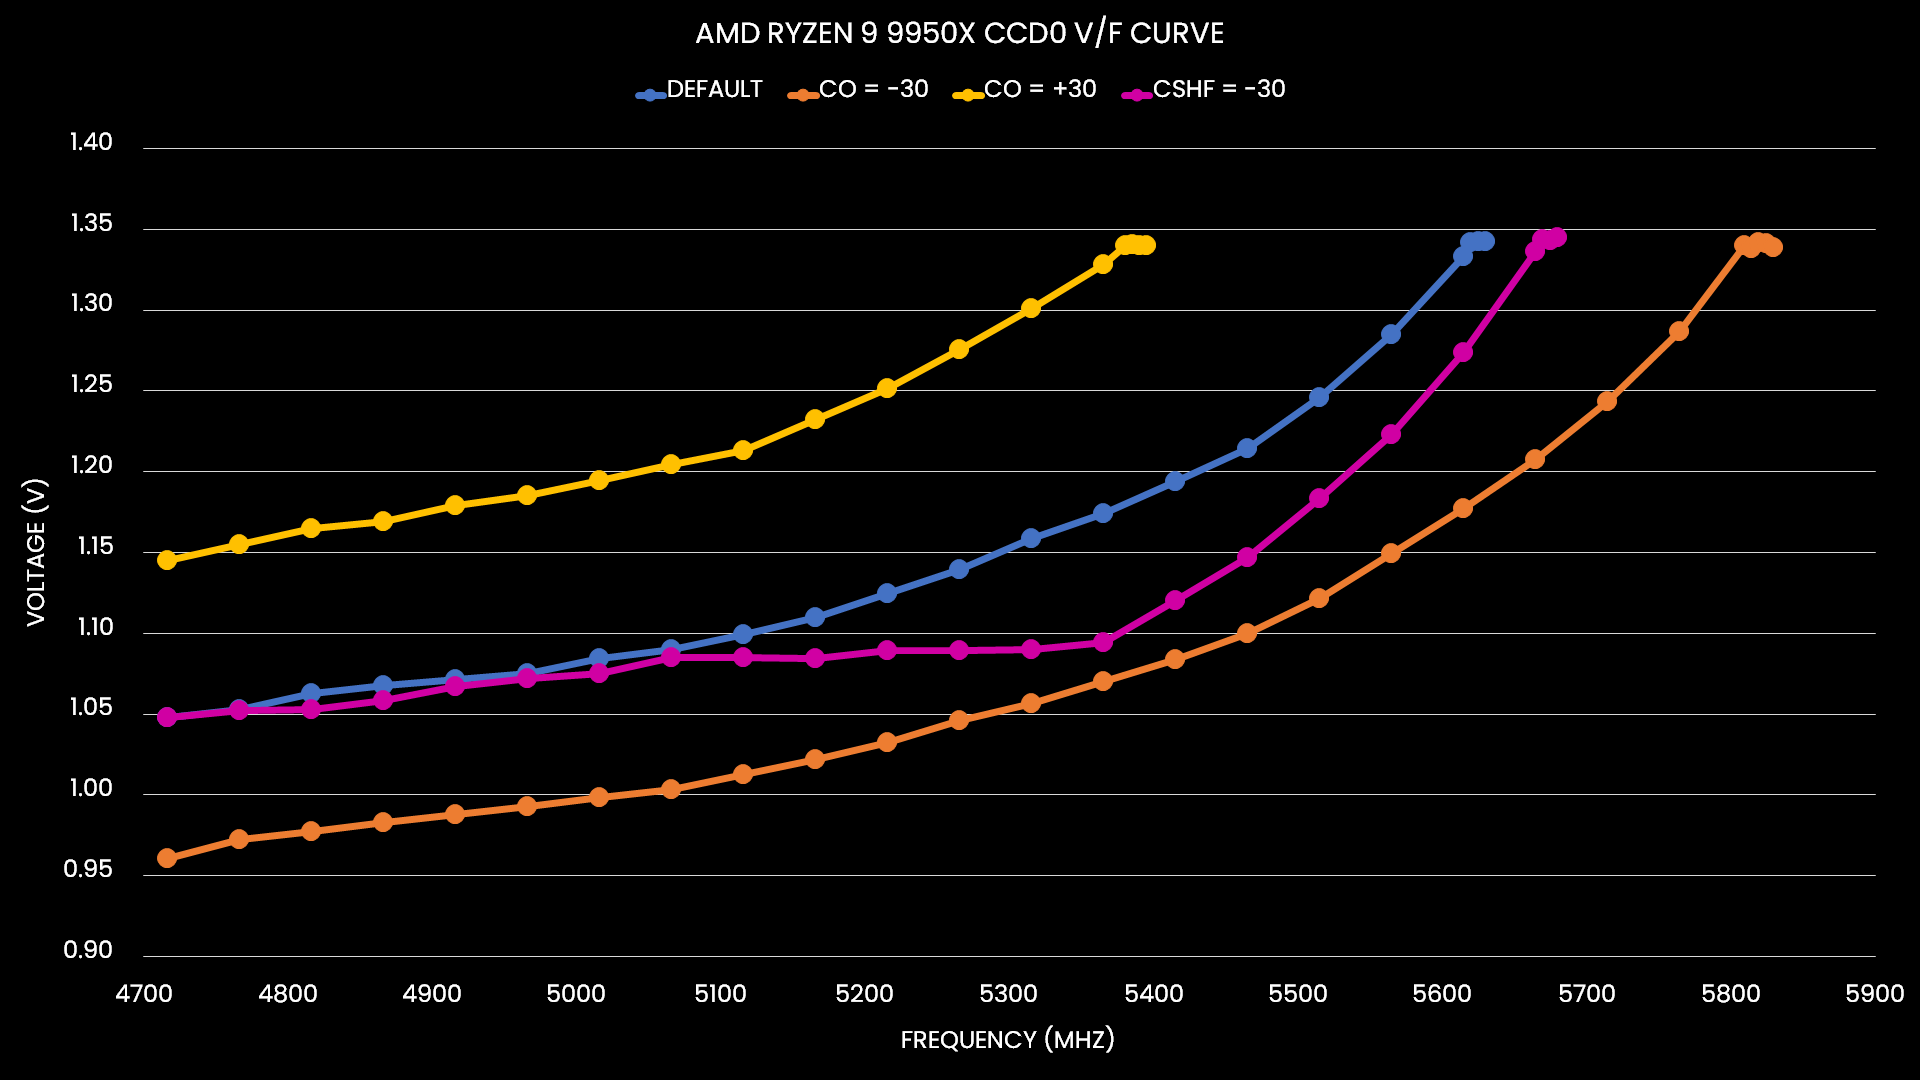
Now, let’s go into the BIOS and set a -30 Curve Shaper for all temperature points at High Frequency and see what happens. The voltage frequency curve is again adjusted, but this time the adjustment happens much earlier. In fact, the upper end of the voltage-frequency curve trends back to our default V/F curve. Only the voltages for frequencies between 4800 and 5700 MHz are affected.
Let’s continue and set a -30 Curve Shaper for all temperature points at Medium Frequency. The voltage-frequency curve is still adjusted, but now it happens early on. The peak offset from the default V/F curve appears to happen around 4800 MHz.
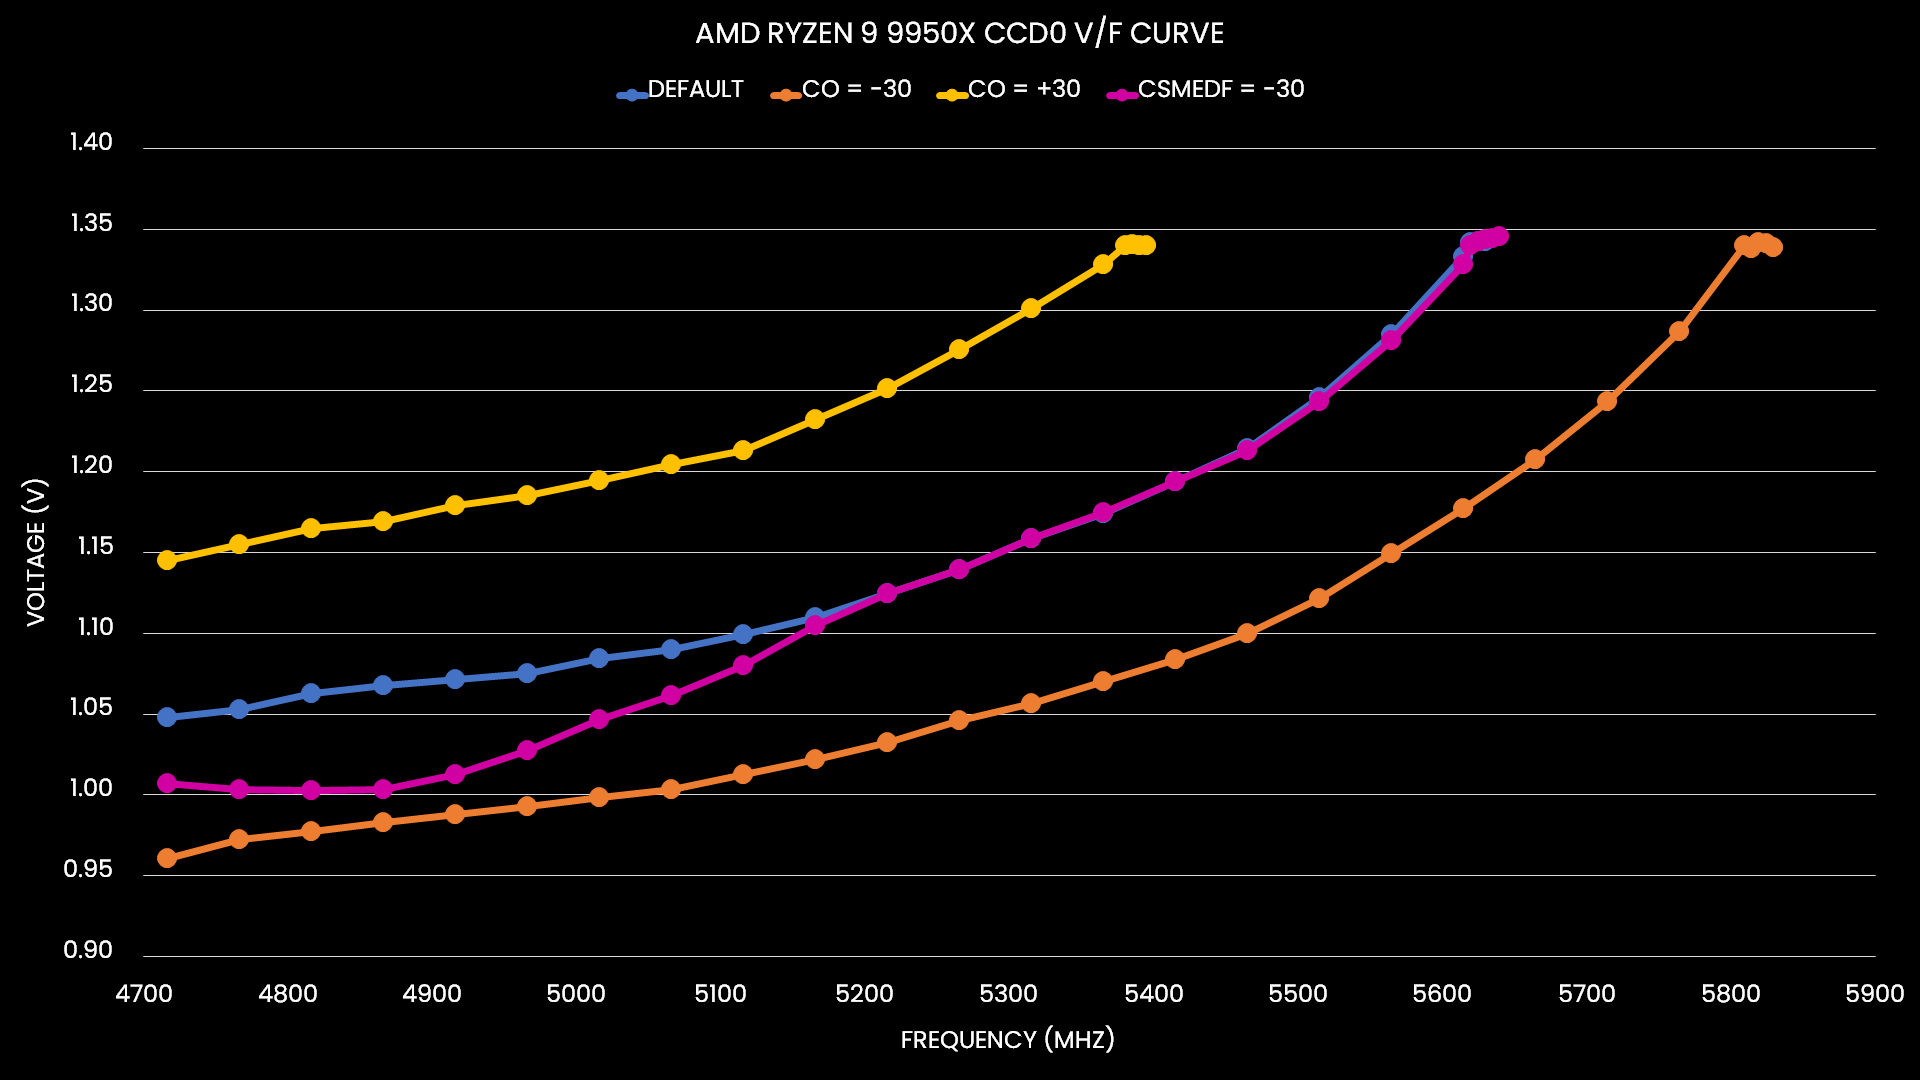
Lastly, let’s see what happens with the Low Frequency points at -30 Curve Shaper. Now we can see that the voltage-frequency curve is unaffected above 4700 MHz.

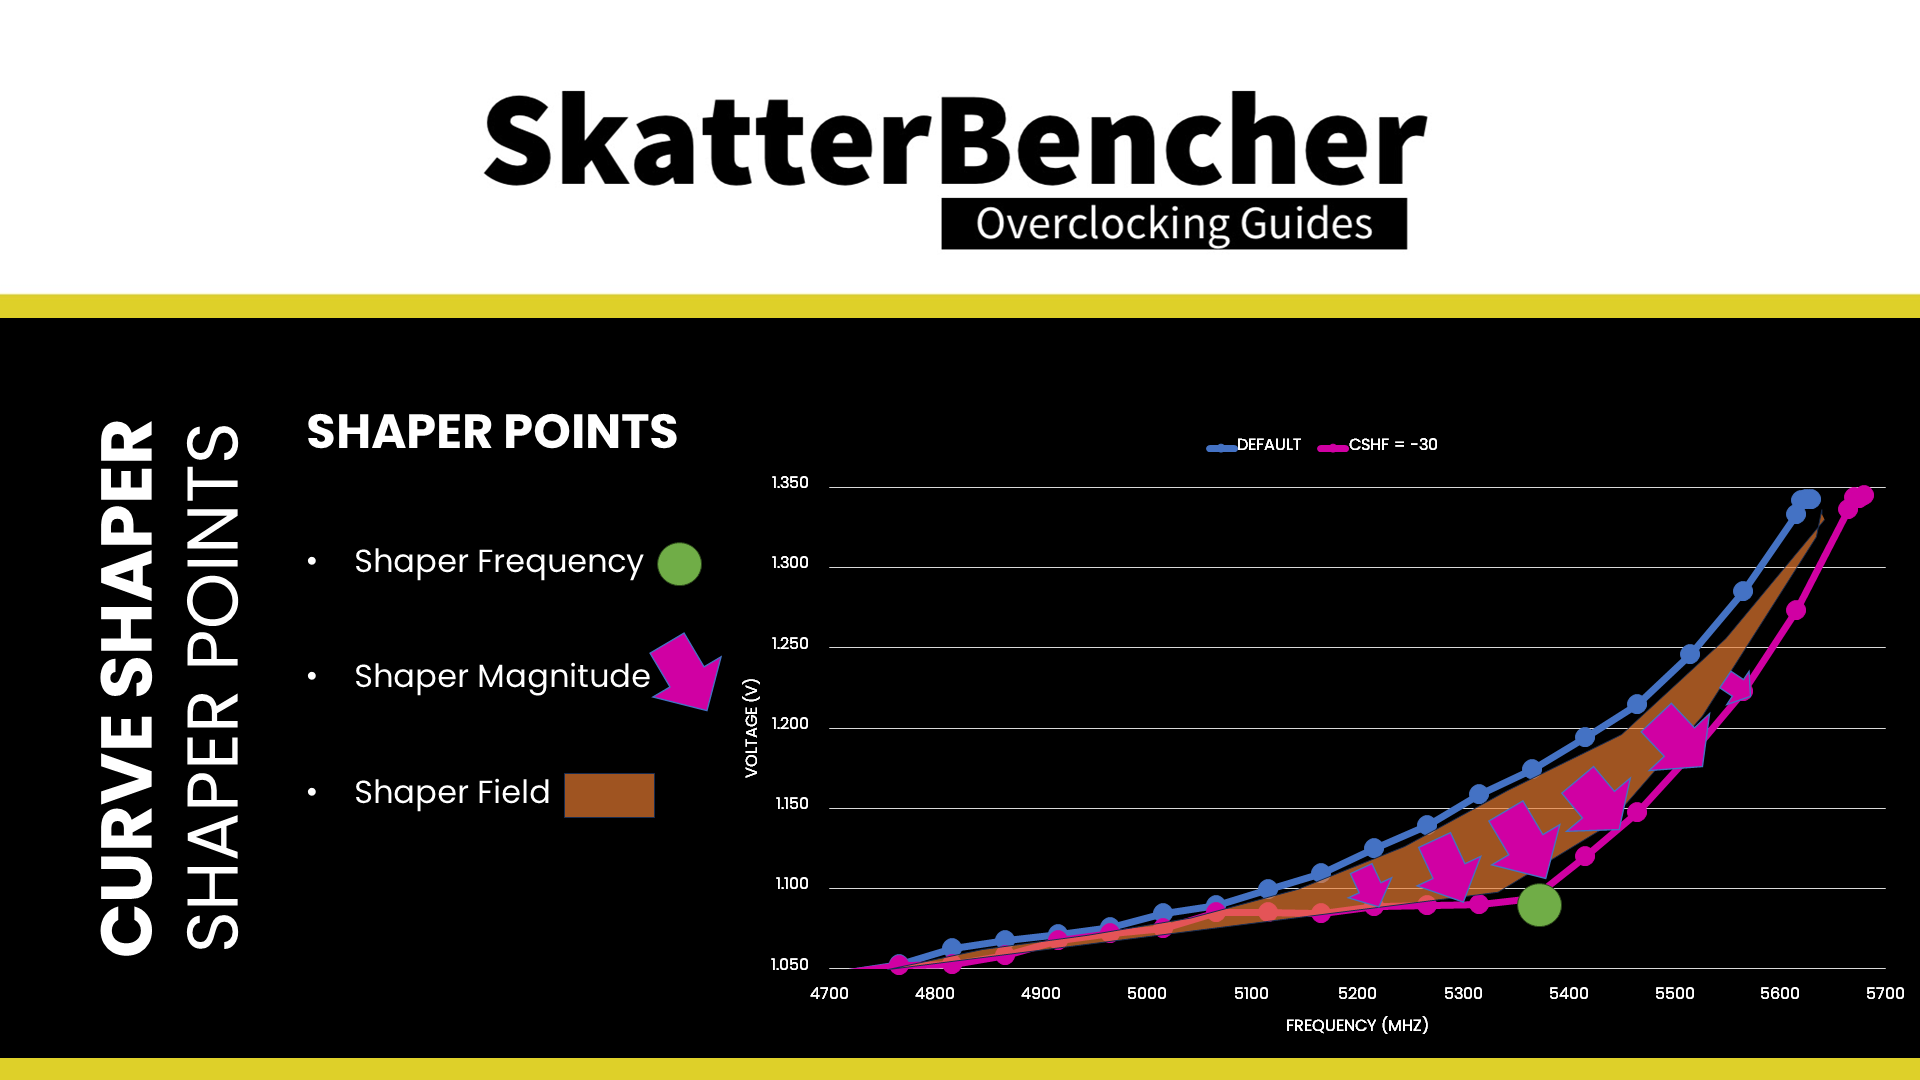
Shaper Points
Let’s sum up our findings.
Each of the regions appears to be defined by what we’ll call “Shaper Points.” A Shaper Point is defined by a Shaper frequency and a Shaper magnitude. The voltage for the frequencies around the Shaper Point behaves like they’re in a “gravitational” Shaper Field in the sense that, for frequencies within the Shaper Field, the closer to the Shaper Point, the larger the impact of the Shaper Magnitude.
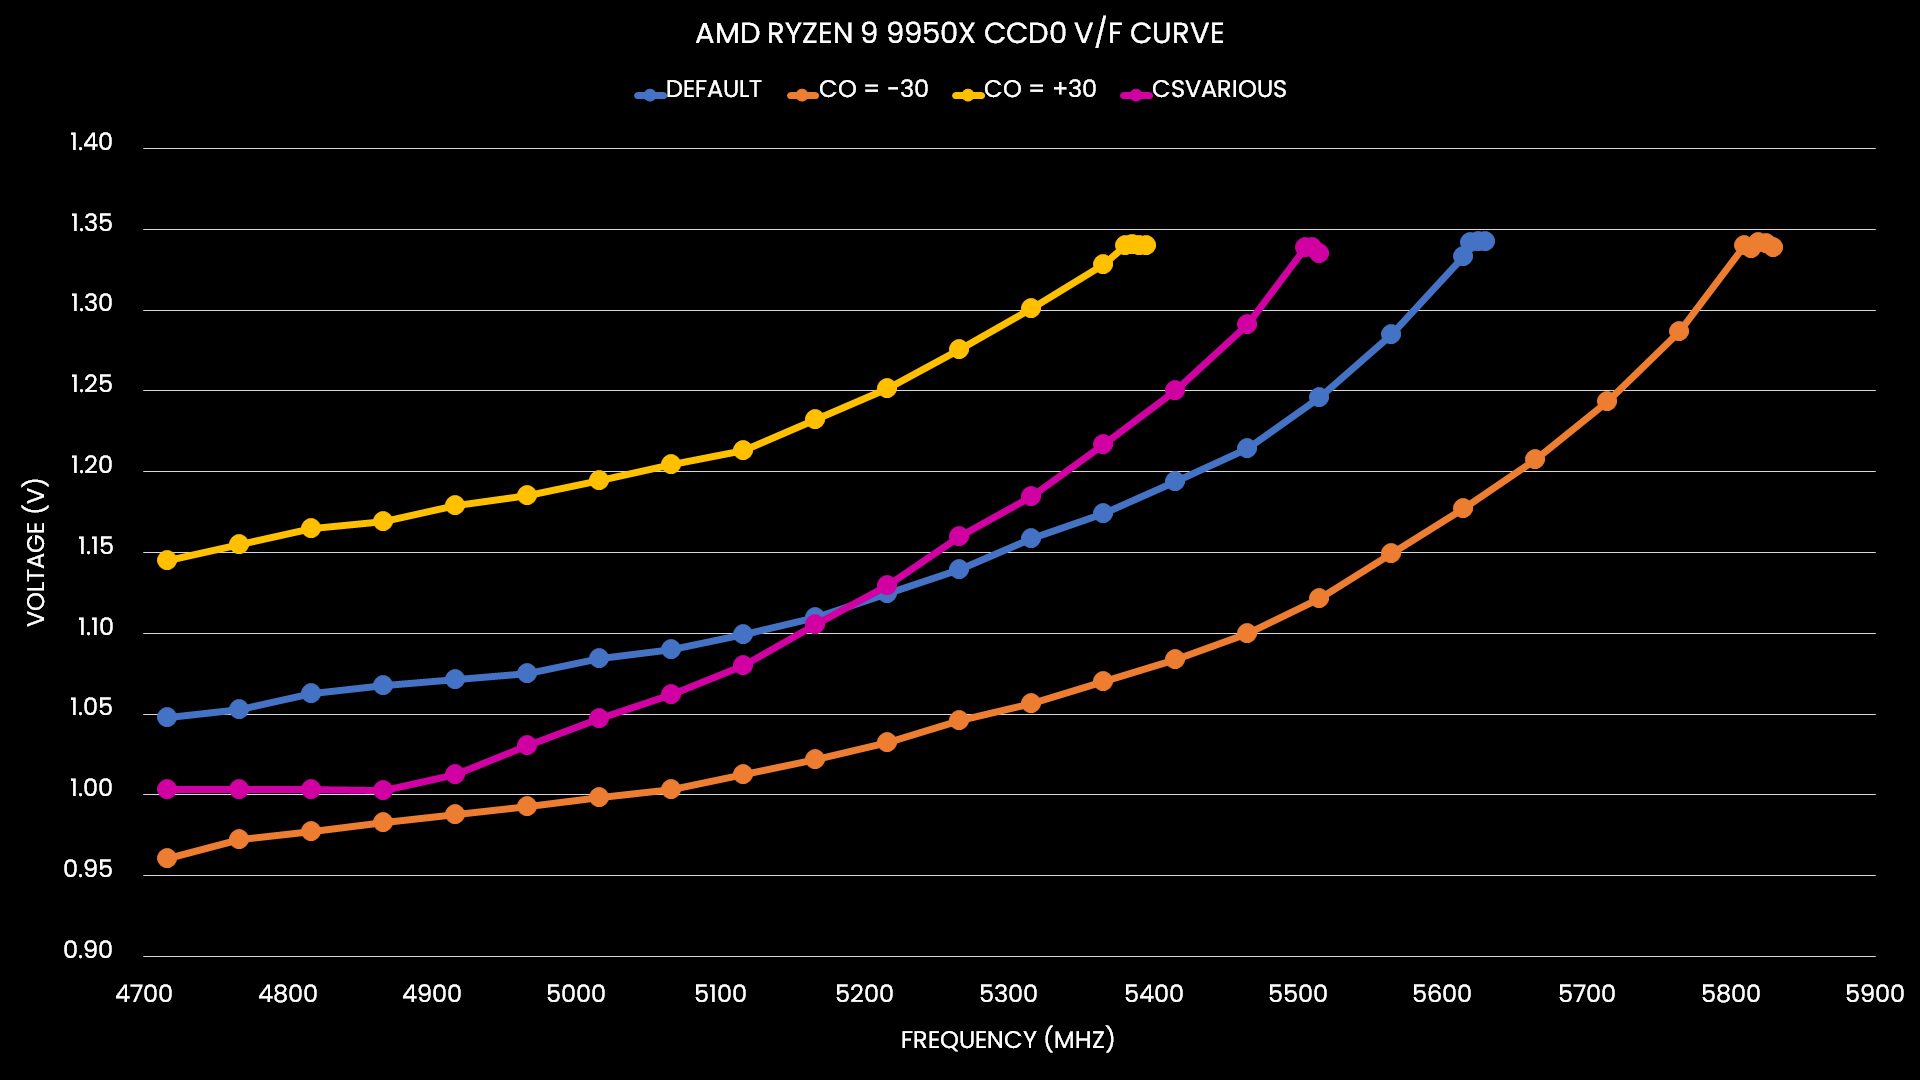
The Shaper Points behave independently, so we can come up with some very wonky V/F curves. For example, let’s set the Med Freq point to -30, the High Freq point to 0, and the Max Freq point to +30. Now we have a curve that undervolts below and overvolts above 5200 MHz.
So, that’s it right? We’ve identified the Shaper Points and the Shaper Fields they impact, so we can move on! Not so fast.
Remember I mentioned there’s a significant difference between the two CCDs on this Ryzen 9 9950X. The difference isn’t just the factory-fused voltage-frequency curve, but also the Fmax: CCD0 has a programmed Fmax of 5750 MHz whereas CCD1 has a programmed Fmax of 5450 MHz. And that significantly impacts the Curve Shaper behavior!
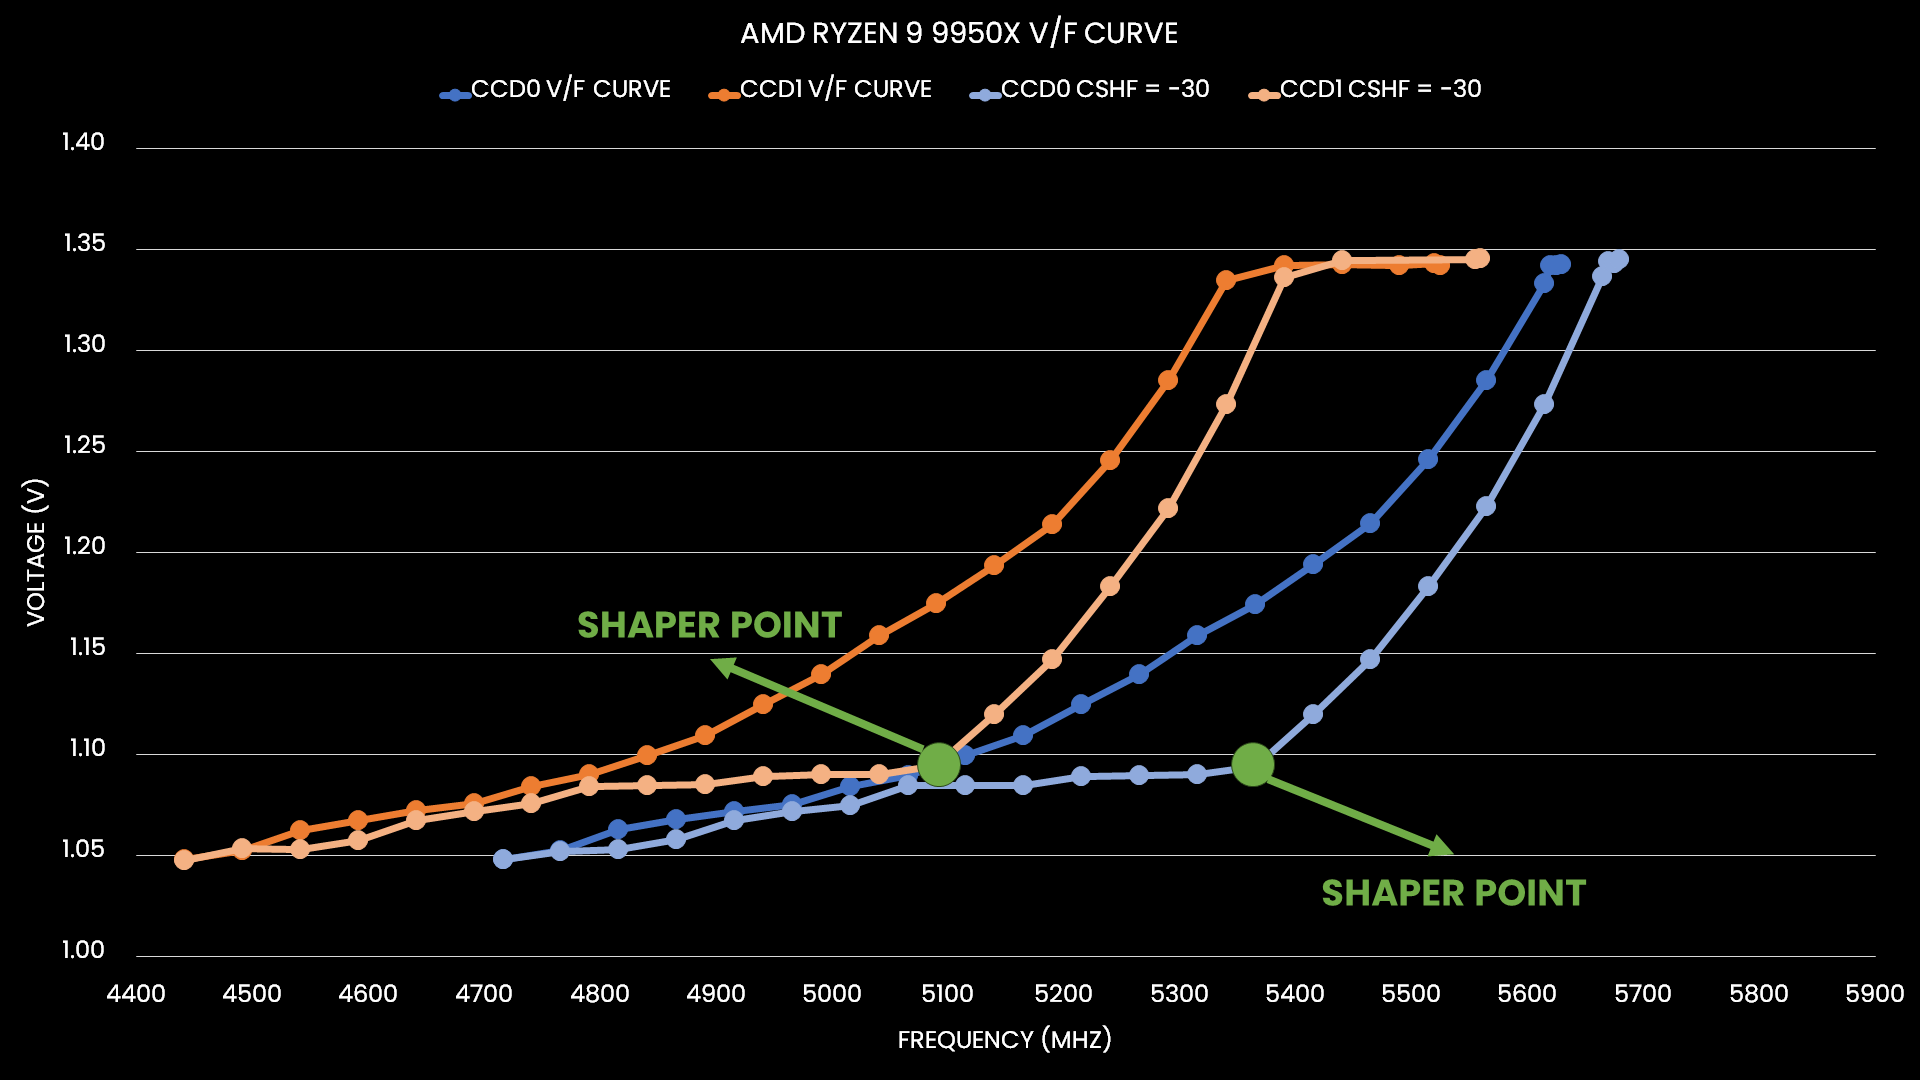
Here’s a graph illustrating the Ryzen 9 9950X CCD0 and CCD1 with the Curve Shaper High Frequency point set to -30. We find that the Curve Shape for both CCDs is remarkably similar. However, the Shape doesn’t start at the same point! Coincidence or not, that 300 MHz difference is also the difference of the Fmax.
So, are we done now? Not yet.
Shaped Optimizer or Optimized Shaper
One final important piece of the Curve Shaper puzzle is that it stacks on top of Curve Optimizer. That means we can combine Curve Optimizer and Curve Shaper to finetune the voltage-frequency curve.
Let’s illustrate by comparing five different curves:
- Default curve
- -15 Curve Optimizer (CO_m15)
- -30 Curve Optimizer (CO_m30)
- -15 High Frequency Curve Shaper (CShf_m15)
- -15 Curve Optimizer & High Frequency Curve Shaper (CO_CShf_m15)
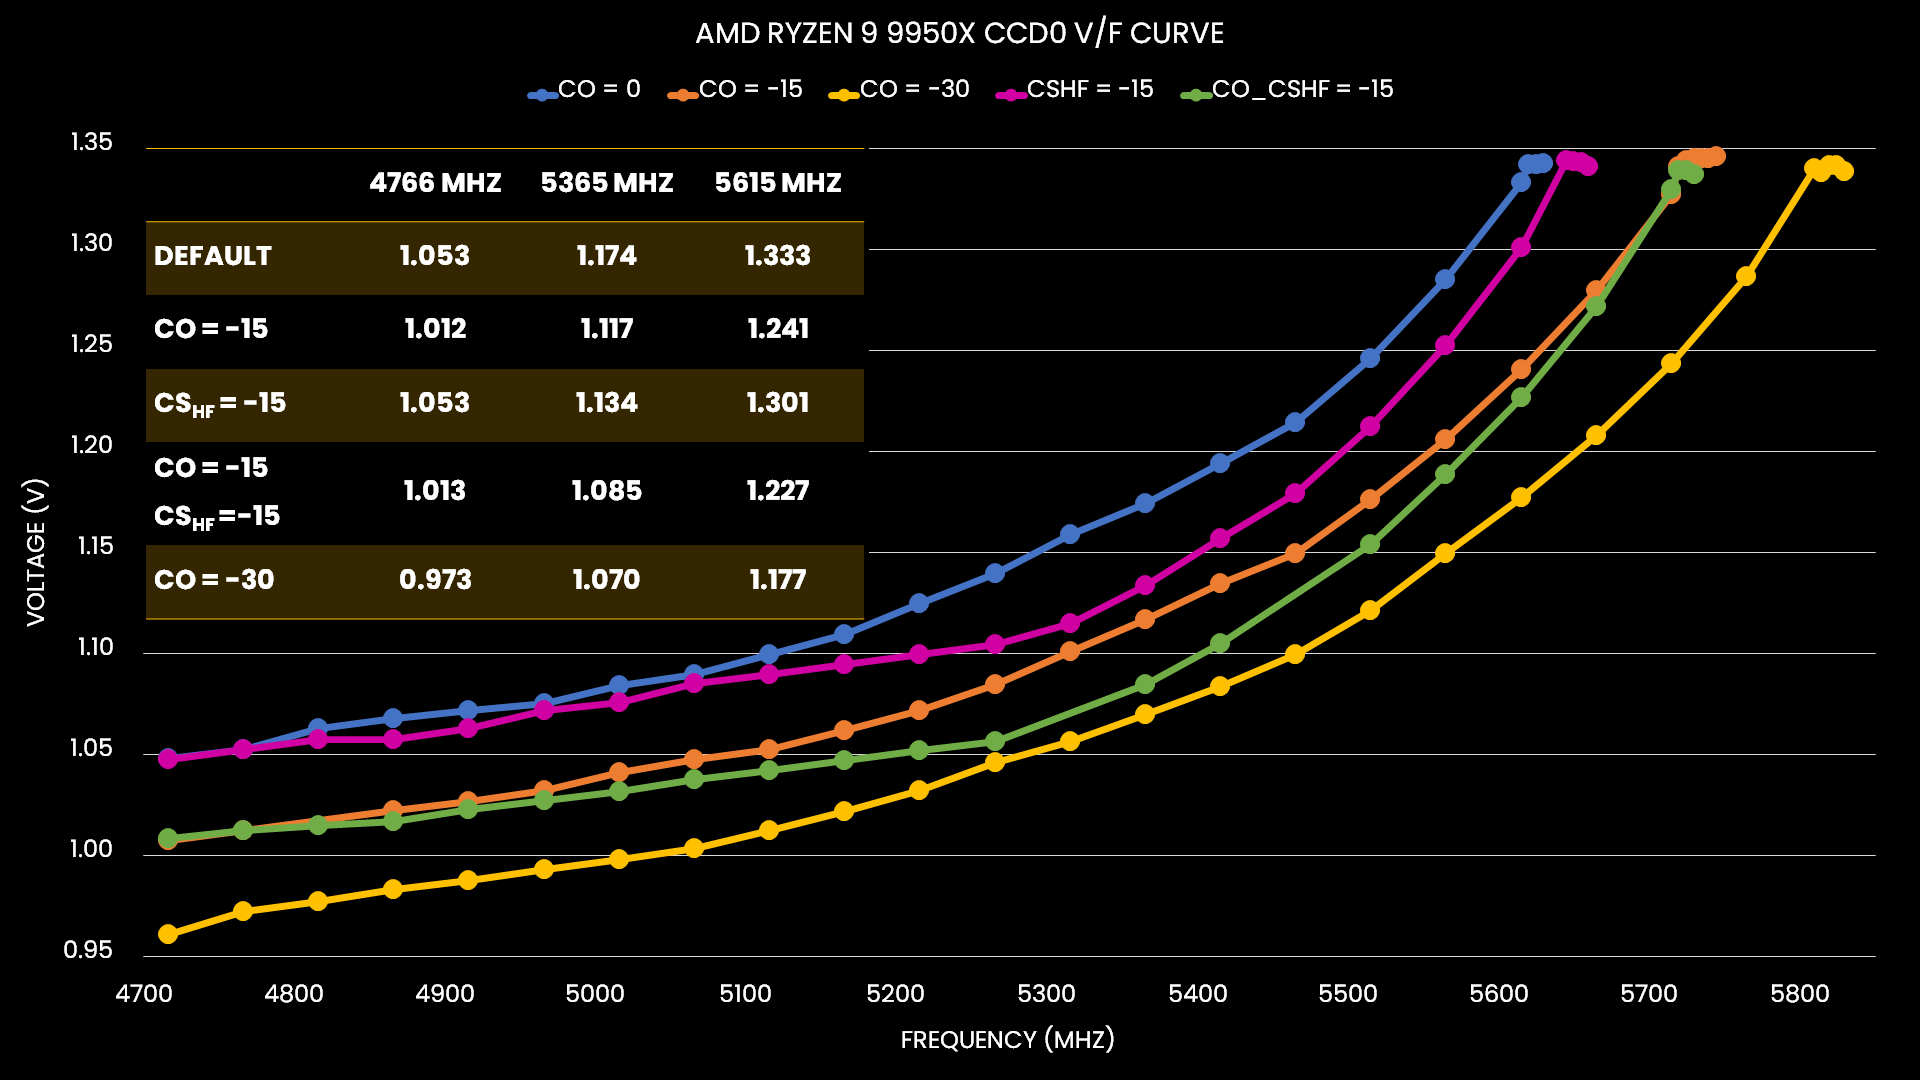
We can make two key observations:
First, Curve Shaper indeed adjusts the voltage-frequency curve beyond the Curve Optimizer. That confirms the two settings stacks on top of each other.
Second, it appears Curve Optimizer is the more impactful of the two tools as it provides a larger voltage offset across the entire curve. That’s not unexpected, since with Curve Shaper multiple points are pulling the curve in different directions. You can think of Curve Optimizer setting all the Shape Points to the same magnitude, thus pulling them all in the same direction.
Curve Shaper Conclusion
All right, let’s wrap this up.
When I started playing around with the new Ryzen 9000 series processors, I tried to get my SkatterBencher overclocking guides ready for launch day. However, once I started to explore the Curve Shaper feature, it became apparent that it’s a very powerful overclocking tool that demands deeper study to understand how to best use it.
In this video, I shared my findings.
I find that the easiest way to wrap my head around the Curve Shaper tool is to think of it as five customizable “gravitational Shaper Points.” By gravitational, I mean that the Shaper Points affect the frequencies around the point proportionally to their distance to the point. The closer a frequency is to the Shaper Point, the more it’s affected by the Shaper Point’s magnitude.
I know we shouldn’t really call them “Points” because the underlying architecture of the feature is much more complex than just hard-coded values. But, in practice, thinking of them as points and fields makes the overclocking and tuning process much easier.
By no means have I gained a full understanding of the powerful Curve Shaper tool. There’s still lots to uncover:
- I still need to validate the Shaper Points using the actual processors.
- I also want to visualize the temperature points of Curve Shaper and illustrate how they can impact your overclock.
And, most importantly, I need to find a “best practice” method for employing Curve Optimizer and Curve Shaper in my daily overclocked Ryzen 9000 systems. That will feature in my upcoming SkatterBencher overclocking guide.
I’d like to thank my Patreon supporters for supporting my work.
For those who prefer a written version of this content, I will also put up a written version of this video on my blog. As usual, if you have any questions or comments, feel free to drop them in the comment section below.
See you next time!
jojo
Where can I find Shamino`s work tool for Ryzen5 settings on Win?
Pieter
It’s available from the ROG forum: https://rog-forum.asus.com/t5/amd-600-series/x670-resource/m-p/901576 (ocpak)
My Two-Cents
I think the rules behind the curve shaper should be simpler:
At -5°C he 100% obeys the rule for low temperature and at 50°C he 100% obeys the rule for medium temperature. In between is just a linear interpolation of both rules. On top of that he does the same for frequencies.
So you can set curve optimizer @ -40 and then finetune the edge-cases with curve shaper.
Like -5 for max frequency and high temperature – so he works towards a -35 curve the higher the frequency and temperature goes…