Core i7-850 Overclocked to 4018 MHz
We overclock the Intel Core i7-850 to 4018 MHz. This guide was commissioned by MSI in the summer of 2009 as part of the P55 Reviewer’s Guide. I republished it here in its entirety with minimal editorial changes.
Introduction
Hello. Before we continue I, the author of this guide, would like to warn you about the possibly dangerous consequences of reading this guide. First of all there’s an increased risk of having a setup running at higher frequencies than everyone else’s, which could make them jealous. Secondly, it’s possible that after finished reading this guide, you will no longer be satisfied by any hardware running at stock frequency. Thirdly, it’s very likely that you will become addicted to getting the most out of every single system you will ever touch in the future. And that includes the one sitting on your test bed right now.
If you think you can handle this, please continue. If not, close the guide and just walk away.
Hello again. I want to apologize for the warning signs, but as you might understand, it’s very important to attract only those people who really want to get more out of their MSI P55-GD80 based platform. In a few words, this small guide will teach you a few techniques to get your hardware to run at higher frequencies as quickly yet thorough as possible. We’ll go over some of the basic features the MSI P55-GD80 has to offer; more specifically we’ll have a look at how they can help you to get more performance for less money.
Components
Main Components
Before we get things started, let me introduce the hardware that I will be using for explaining the basics of P55 overclocking.
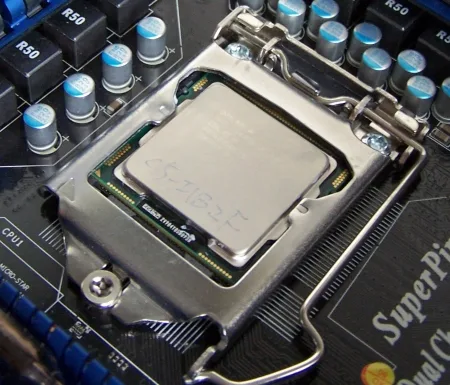
First of all, the processor I will be using is an engineering sample of the Core i7-850. The fact that this is not a retail sample is of no importance as it doesn’t affect the overclocking process. Overclocking an engineering sample is exactly the same as overclocking a retail sample.
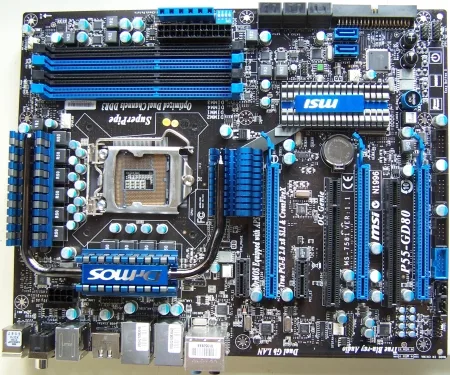
Next to that I will be using a retail version of the MSI P55-GD80, equipped with the latest bios version available at the time of writing, v1.1B3.
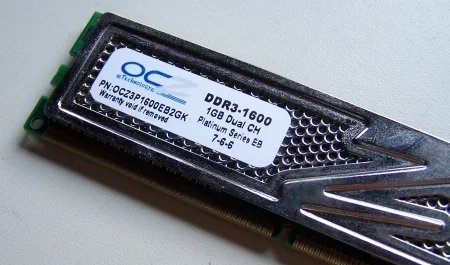
As for the memory I chose a 2x1GB dual channel kit from OCZ: the OCZ3P1600EB2GK. Note that this kit has not been pre-selected for overclocking purposes: this is a retail sample of the memory kit.
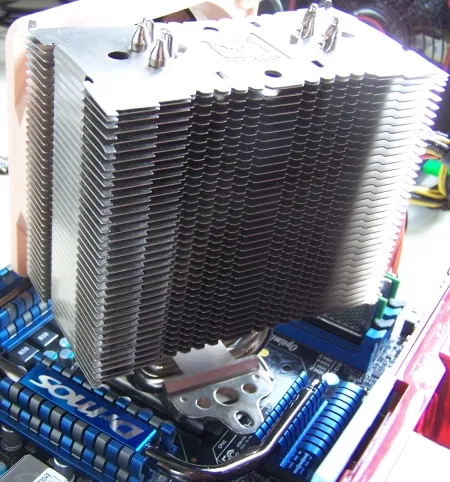
To cool the processor, I will be using a Noctua NH-U12P air cooler combined with one 120mm fan.
P55-GD80 Features
In this segment of the guide we will go over some of the features of the MSI P55-GD80 motherboard and will try to figure out how they can be useful when overclocking.
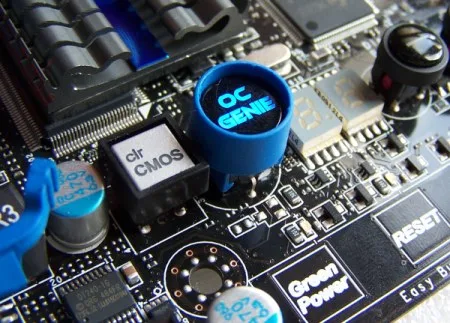
OC Genie
The OC Genie technology can be described as the first integrated overclocker on a motherboard; with one button, you can make this hardware-based overclocker figure out the most optimal settings for your configuration. Note that it will not push your system to the absolute maximum stable overclock, but it does help you figure out the initial limits of your configuration.
Press the button to activate the OC Genie.

If OC Genie is enabled, you’ll see it on the boot screen.
Check in Windows to see your Core i7-850 overclock.
In overclocking escapades, this tool can be very helpful in the very first stages of the overclocking process as it allows you to have a first estimate of the overclockability of your hardware. However, I would recommend doing the actual overclocking work yourself if you really want to get the most out of your system.
Direct OC
Direct OC basically does what it stands for: direct overclocking of the system without the need to go into the bios or use external software applications. The two buttons placed on the motherboard allow you to change the BCLK frequency on the fly, which comes in handy when you are pushing the system while benchmarking. Also, it’s a good replacement for the software-based utilities (such as SetFSB) as it doesn’t need any software to run: it’s a complete hardware-based solution. The downside is, however, that the values you set using the Direct OC buttons are set directly in the bios. In other words: pushing your system too far so that it induces a forced reboot may result in a non-booting system as the highest frequencies you use in an OS hardly ever are bootable.
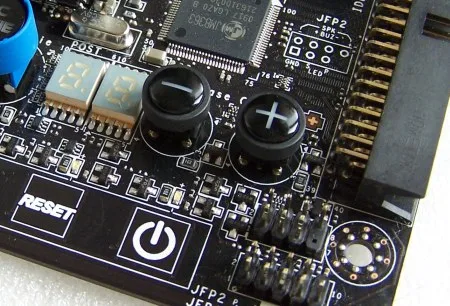
Push the buttons to increase or decrease the BCLK frequency on-the-fly.
There’s an easy solution to this problem in the form of OC Stepping. But, I would suggest using the Direct OC buttons for purposes other than completely maxing out the system anyway.
OC Stepping
One of the biggest problems of overclocking through the bios is that the settings you save in the bios have to be boot stable, which means that you’ll never be able to benchmark at the highest possible frequencies as the maximum boot stable frequency is often lower than the maximum benchmark stable frequency. So, even if your system can handle a certain frequency in certain benchmarks, when the system doesn’t boot after you saved the bios, you’ll have to clear the CMOS and start all over again. An easy tool to overcome this is the OC Stepping feature.
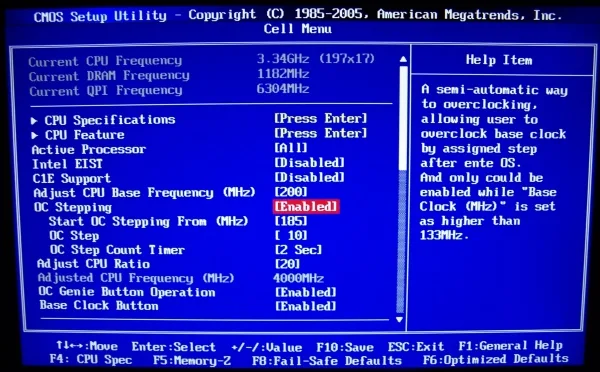
Enabling OC Stepping allows you to boot at a lower BCLK frequency.
With OC Stepping you can boot at a different BCLK frequency than the one you want to set in the bios. So, for instance, if you want to run 215MHz BCLK, but that frequency is not bootable, you use OC stepping to boot at 190MHz BCLK and when in windows, the frequency will increase to 215MHz automatically. This can come in handy when you are not absolutely certain that your system will boot at a certain frequency.
OC-Profile
When you actually have to clear the CMOS, it’s always nice to have an option to go back to previous working settings. This is where the OC-Profile comes in handy: you can safe your overclocking settings and reload them when things go wrong. Highly recommended when overclocking!
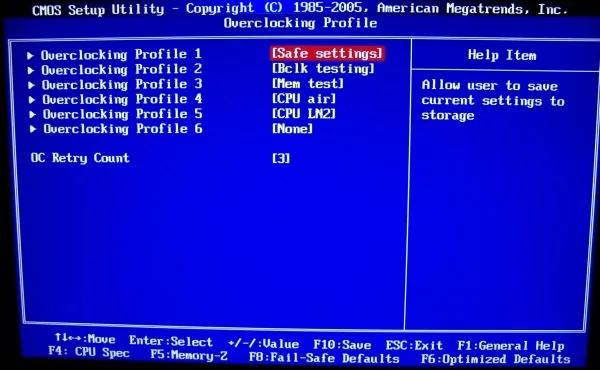
Having different profiles for different overclocking purposes is always a good idea.
V-Switch & V-Check Point
Back to the actual overclocking. When it comes to changing the voltages, there’s always some danger involved. So, in order to minimize the risk involved an overclocker wants to know what voltage is applied at any time to avoid unexpected hardware failure due to excessive voltage. Relying on software-based solutions is not the best way to go since you trust on the expertise of the software programmer. Better is to check the voltages yourself and in real-time.
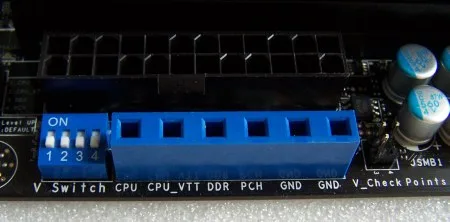
On the left you see the V-Switch, on the right the V-Check Points.
The V-Check Point helps you with that: you can use your own multi-meter to measure the voltage more accurately. Being an extreme overclocker myself, I would recommend this to anyone who plans to test his platform beyond the normal 24/7 overclocking.
The V-Switch can increase the voltage on-the-fly by 0.1V. Normally, there’s no need to use this feature, but sometimes it can come in handy. For instance, in a benchmark such as 3DMark Vantage, where the two CPU tests put more stress on the CPU than the two GPU tests. By increasing the voltage during the CPU tests you can make the CPU more stable and have the benchmark pass anyway. But again, you won’t need this feature on a daily basis.
M-Flash
Back to the bios. As an overclocker, you want to use the most stable bios version without compromising in performance. So, it’s very likely that you’ll be testing a lot of different versions, possibly even alpha and beta BIOSes to find the one most suitable for overclocking.
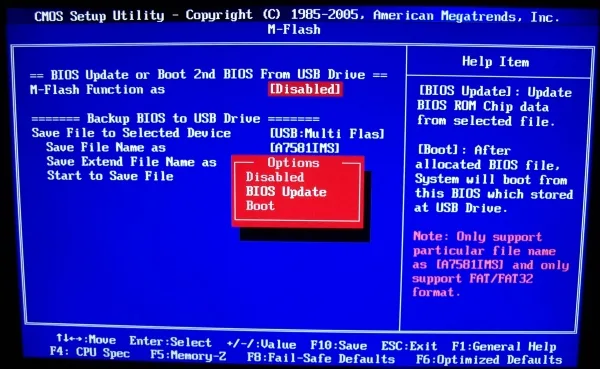
The M-Flash utility is quite handy for this. Without going too much in detail on how it works exactly, you can use it to either test, flash or save bios. As the option supports USB flash drives, you can just put your new bios on the USB drive, put the drive in the USB port and get started.
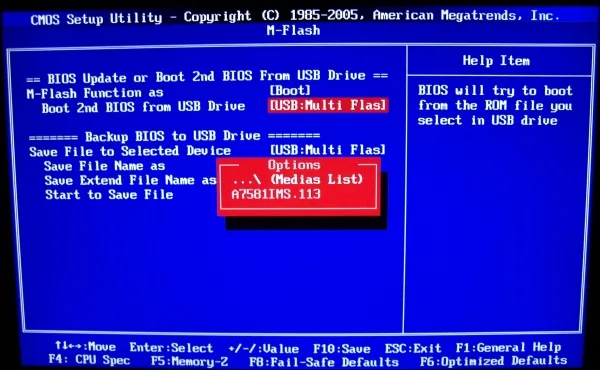
If you have a new bios to test out, but are not entirely sure it’ll work you can use the M-Flash utility to make the system boot from the bios on the USB key. Note: no changes can be made in the bios; it’s only to check if the bios works and what the new bios features are.
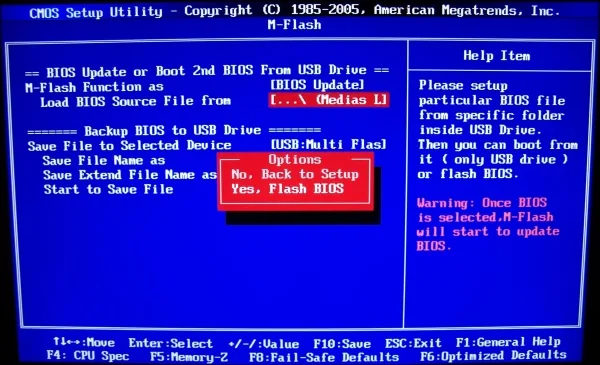
If the new bios works, you can use the utility to flash the new bios from the USB key. It’s very easy, it’s very simple. In case it goes wrong, the bios can be recovered as well: just put in your USB drive with the bios on and have the bios restored.
Mapping Out The Playing Field
Okay, now that we have listed everything we need it’s time to start testing. In (semi-)professional overclocking competitions it’s of big importance to understand the hardware as fast as possible, without getting too deep into everything too soon. If you ask any overclocker around the world, you’ll notice that there are a lot of different methods you can use to reach a certain goal, in this case the highest possible overclock. Through this guide, I will follow the so-called ‘zone-method’ which basically comes down to setting a few safety zones while overclocking. I try to find a working combination of settings from which I can continue to tweak and tune the motherboard. Each safety zone represents, in other words, a stable configuration to which you can go back when things go wrong.
Since there are so many different options and settings in the bios, it’s important to know the size of the playing field, or put differently, to know the limitations of the various aspects of the technology you are working with: frequencies, voltages and temperatures. Why? The more you know about the playing field, the faster you’ll be able to troubleshoot a problem when you’re hitting a certain limit. Of course, you can try a complete blind approach, but once you’ve hit a wall, chances are small you’ll know which wall it is, let alone be able to find a solution.
BCLK
The most important frequency in Core i5/i7 overclocking is the base clock (BCLK) frequency, which in a few words could be described as the main frequency from which all the important frequencies are derived, for instance CPU frequency, Uncore frequency and memory frequency. Now, we want to know how high we can push this base clock frequency to have a first estimate of the highest possible theoretical overclock. If the maximum BCLK frequency is 210MHz and your processor has a CPU multiplier of 21x, the highest theoretical overclock would be 4410MHz. It’s that simple!
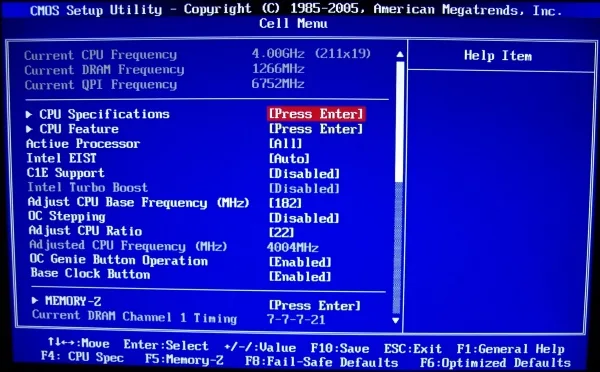
Okay, a few pointers to be as efficient as possible when testing the maximum BCLK. To begin with, lower the multiplier of the processor so that you are sure it will not limit the overclocking process. I mostly under-clock the processor in these early testing stages; after all, performance isn’t important at this point.
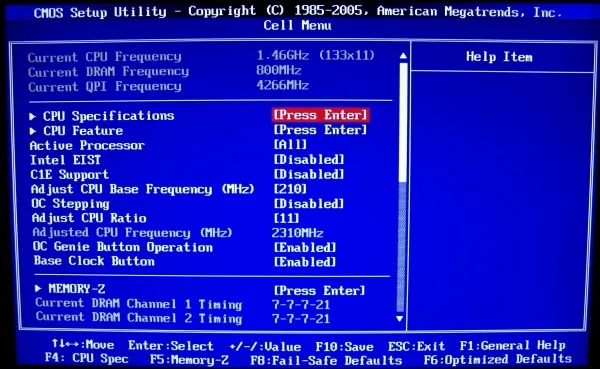
Adjusted the BCLK frequency to 210MHz, CPU Ratio to 11.
Next to the CPU frequency we also have the memory, uncore and QPI frequency that need to be adjusted. Since there’s no way to decrease the uncore multiplier on the LGA1156 platform, we can only lower the memory and QPI frequency to the lowest possible values.
Also noteworthy: it seems that the PCI-e frequency has a positive effect on BCLK overclocking. Why? No one is really certain, but that it helps is something no one has any doubt about. Be careful when overclocking the PCI-e frequency, though, since it’s possible that it’s linked to the SATA controller as well. Also, certain video-cards don’t function in combination with high PCI-e frequencies.
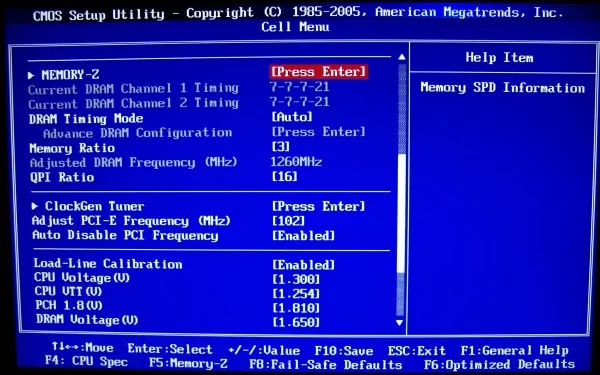
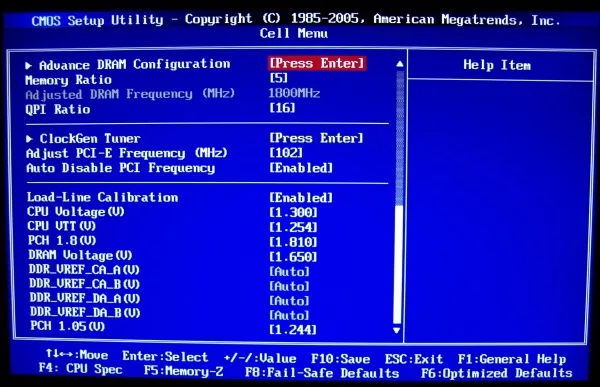
Set Memory and QPI Ratio to minimum, increased PCI-e frequency.
In the contrary to, for instance, the CPU and memory frequencies, there’s no direct voltage setting that increases the BCLK overclockability. From past overclocking experience, it does seem that the CPU Voltage as well as the CPU VTT voltage can have a positive effect on the maximum BCLK frequency. Don’t expect miracles, though. In early test procedures, just set the voltage to safe levels.
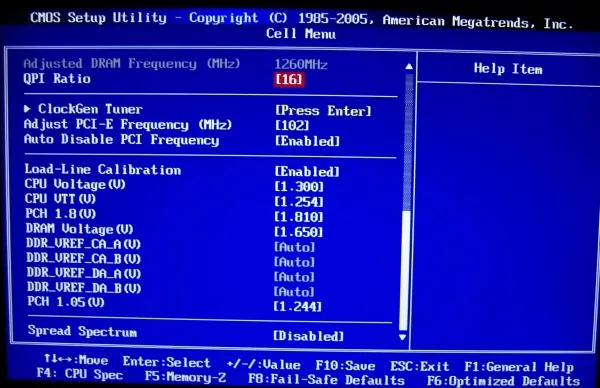
Set voltages to a level where I’m sure they won’t be limiting the overclocking process.
As a last remark it’s important to inform you that the maximum BCLK frequency can be an issue with the motherboard (in general or a particular sample), the processor and even temperature-related.
Memory
Next on the to-do list is checking the overclockability of the system memory. If you have no idea about the capabilities of the memory kit you’re using, I would suggest testing the kit in different configurations: the performance and power configuration.
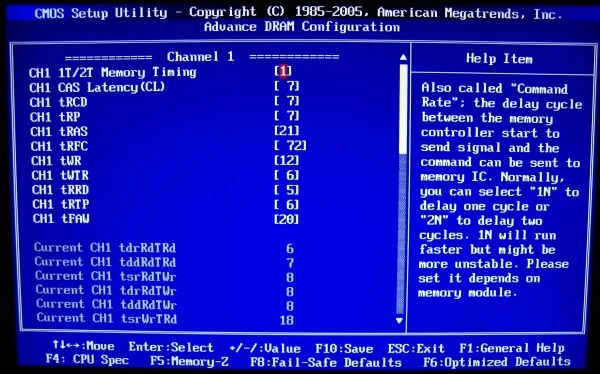
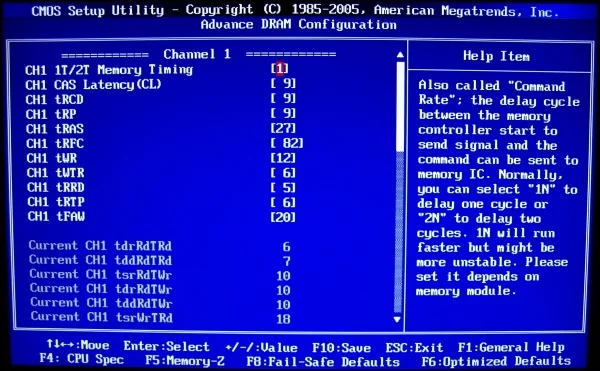
Basically, the performance configuration stands for keeping the timings relatively low in order to decrease the latency of the memory, and thus increase performance, but the maximum frequency will be lower. In the power configuration, we don’t care about latencies but go for the raw MHz overclocking. Underneath this paragraph, you find the BIOS settings for both the performance as the power configuration as used in this guide as well as the voltage, frequency and multiplier settings we used to test the memory overclocking capabilities.
Increase the memory multiplier to x5 so you will not be limited by the BCLK. For the overclocking tests in this guide, we only used 1.65V for the memory.
- Performance configuration: CL7-7-7-21
- Power configuration: CL9-9-9-27
Of course it’s important to verify your findings so that you know the limitations you run in to are motherboard, processor or memory related. The easiest solution would be to have a pre-tested memory kit in your configuration: you know what it does on other platforms, so you have a certain guaranteed range of working settings. But, even if you know the limitations of the memory, you need to be sure that whatever limitation you run into, not caused by the memory, is either the motherboard or processor. Again, the easiest solution would be to swap either the motherboard or CPU and go over the entire testing process again. But … that takes too much time.
Let’s assume that all components are new and un-tested. We’re trying to determine the dimensions of the memory playing field, but suddenly run into a wall. Here’s what we do:
- Increase the main memory timings. If you see a drastic increase in overclockability it’s the memory that was limiting you.
- Increase the B2B-Cas Delay timing (which you can find under ‘advanced timing’ menu of the memory timings). This particular timing has been quite a big topic in X58 overclocking as it seems to be the best method of getting your memory run stable at 2000CL7 or better. Note that a higher value means more stability, but less performance and the other way around. I would suggest ‘6’ as a starting point, ‘12’ if you want to test if this timing is holding you back. If there’s a change in overclockability, it’s most likely that you were limited by either the motherboard or the processor (memory controller).
- Increase the voltage of the memory. When there’s an increase in frequency, you can be sure it was the memory that was limiting you. If not, it’s probable that the processor is the problem, specifically the memory controller inside the CPU.
- Increase the CPU VTT voltage. This is mainly to check if there’s a limitation of the memory controller. If there’s an increase in maximum memory frequency, it’s very likely that you were limited by the memory controller.
At a certain point, none of the above will dramatically increase the overclockability of the memory anymore. Don’t worry, chances are small you have maxed out your system already, but our main objective has been achieved: you have an estimate of overclockability
Uncore
In the contrary to the Core i7 LGA1366 platform, it’s now not possible anymore to change the uncore multiplier. In other words, even if the uncore was holding you back, it’s impossible to verify without exchanging the CPU. The only thing you can try is to increase the CPU VTT voltage in the bios.
Given that the Uncore frequency is equal to 1.5x the memory frequency, it’s quite unlikely that the Uncore will be holding you back in your overclocking escapades.
Processor
We’re coming down to the most important part of the overclocking game: the processor. Many people believe it always comes down to just finding the maximum frequency of your processor, but that’s incorrect. Since many variables play a role in the maximum overclock, you need to learn how your processor scales. The best way to do this would be spending weeks to play with voltages and frequencies, possibly even temperature if you have a water-cooling or phase-change system at your disposal, but it’s quite time consuming. The easiest way is to find the approximate maximum frequency is to just check the overclockability at different voltage levels. Why? The voltage is the main solution for instable configurations and it affects the temperature as well. So, by increasing the voltage, we increase the overclockability, but also increase temperature which decreases the overclockability, so we can check the important interaction between voltage, overclockability and temperature.
As for Core i5 and Core i7, there’s a lot more to tell about the CPU multiplier. First of all, we have the turbo mode, which is a feature introduced by Intel to increase the processing power in single or dual threaded applications. In other words, instead of using all four cores, applications that only use one or two can benefit from a boost in frequency. Now, on the LGA1366 platform, the maximum multiplier increase was +1. On the MSI P55-GD80 and in fact all MSI P55 motherboards, it’s possible to increase the turbo multiplier even further to 2x. And that’s not the best part: it’s applied to all four cores!
To unlock the +2x Turbo Multiplier you have to set the Intel EIST option to AUTO. Then go to CPU Ratio and you’ll notice the amount of available multipliers has increased. Note: it’s not possible to have one multiplier higher, so if the stock multiplier is 20x, the Turbo Mode will be 22x, but it’s not possible to set it to 21x.
Before we close the topic of multipliers I need to let you know one more hint or trick for Core i5/i7 overclocking. Because of an unknown reason it seems that the so-called odd multipliers (un-even) are better for overclocking: at the same voltage they will be able to take your CPU higher in frequency or you’ll need less voltage to achieve a certain frequency. This phenomenon is widely known inside the extreme overclocking community, but mostly not outside the community.
To overclock the CPU frequency, use the multiplier as much as possible. Set EIST to ‘auto’ to force Turbo Mode on all cores.
Next to the multiplier, we also have the voltage levels we need to take into account. Although it’s not safe to play with excessive voltage, on air cooling, you’ll rather be limited by the temperature than the excessive voltage. But, just to be safe: always pay attention to the voltages!
A quick word on the voltage indicated in the bios. I have noticed that if you do not enable Load-Line Calibration, the voltage set in the bios is about 0.5V lower than the real voltage (measured with a digital multi-meter). With load-Line Calibration enabled there is no problem. For your own benefit, please enable the Load-Line Calibration feature.
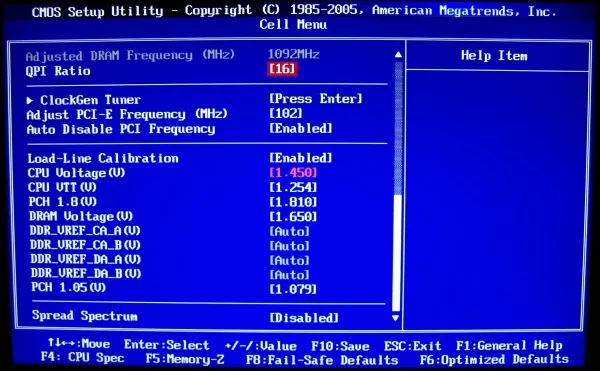
Voltages used to increase the CPU frequency to 4GHz on air cooling.
The Debug LEDs show, next to the POST codes when booting up, also the temperature when in Windows. It’s a very easy method to check the temperatures in early testing phases.
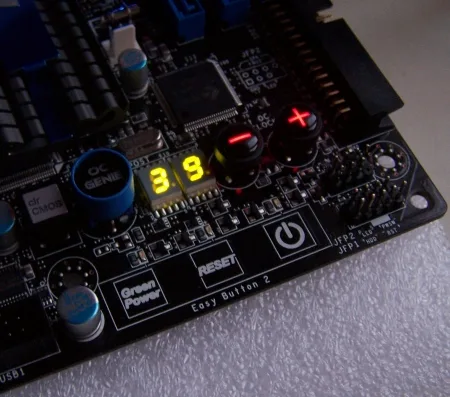
Using the Debug display to check the temperature of the processor.
Overclocking Put in Practice
Having explained all the basics of Core i5 overclocking and introducing the various aspects of the MSI P55-GD80 motherboard, it’s time to put all this theory in practice. For this guide, we have focused on overclocking the processor to 4GHz benchmark stable.
Step 1: Setting Up The BIOS
To begin with, let’s set up the bios for easier overclocking. Disable anything that has to do with power saving. Also, if you don’t use a lot of applications that benefit from multi-threading processors you can disable the Hyper-Threading technology. It will help you reduce the temperatures and it will, most likely, help you to increase the maximum stable overclock as well. For this guide, we kept the Hyper-Threading technology enabled.

No need for green computing while overclocking.
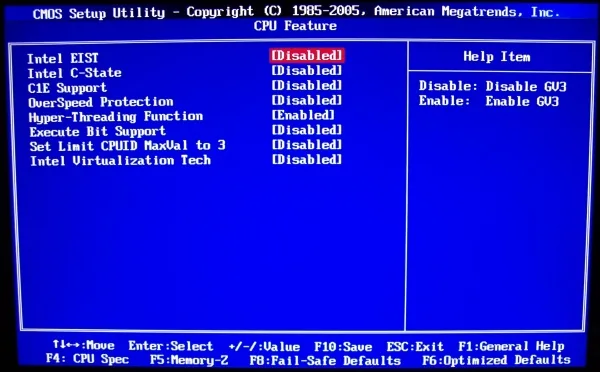
Options like C-State can sometimes mess up frequency read-outs, which is something we want to avoid.
After that, we should also disable any feature we are not going to be using: sound, firewire, raid … if you don’t need it, disable it. Also, although it’s nice to have a nice logo every time you boot up, disable it when overclocking. It’s important to follow-up the boot process when overclocking, especially when things don’t work as it should be.
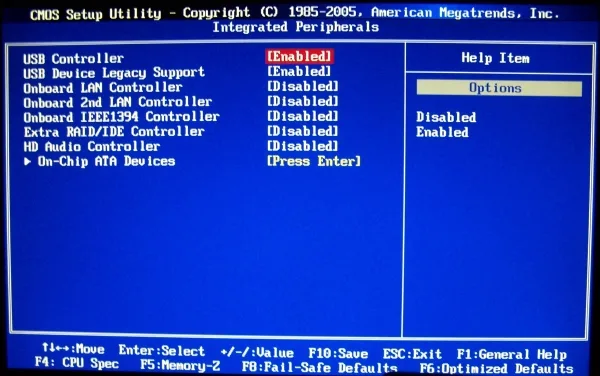
I only keep the USB feature enabled.
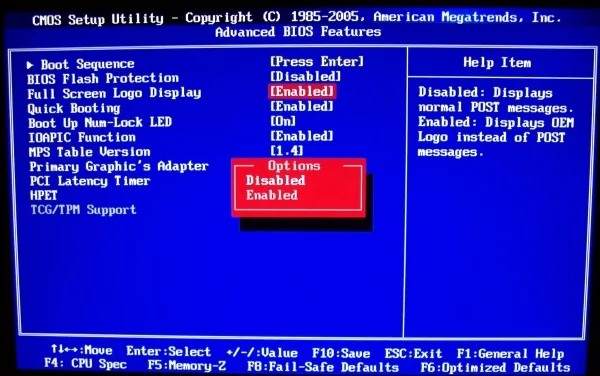
Preferably disable the boot logo to see the boot process.
Step 2: OC Genie at Work
Now we are ready to start testing for maximum frequencies. Before we start, let’s have a look at what the built-in overclocker says about the overclockability of this platform.

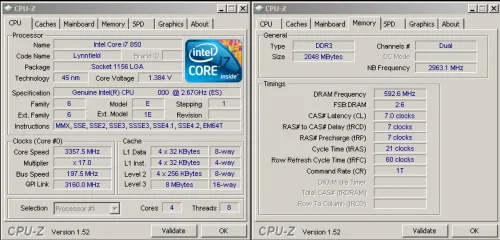
3.36GHz at 1.384V, I’m sure we can manage better.
Core i7-850 at 3.36GHz is far from bad, but with a voltage of 1.384V (which is 1.43V measured with a digital multi-meter) it should be better. At least, that’s what we hope!
Step 3: Overclocking On Your Own
Before we get started I want to spend a few lines on the benchmarks I use to test the overclockability of hardware. When browsing through the overclocking community forums, I see a lot of people discussing what utilities one should use to see if a certain overclock is stable or not; what temperatures your configuration should not exceed and so on. In my opinion, that’s complete non-sense: overclocking your system is about what you want, not about what others would want. If you want to get it stable for gaming, then you test your system by gaming; do you want it stable for video-editing, then you choose a stability test that involves video-editing.
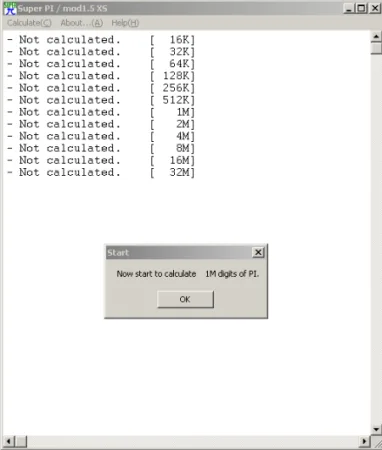
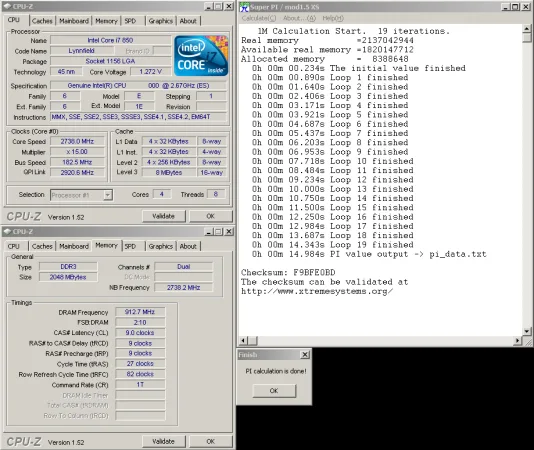
For the first part of the overclocking process I prefer to use fast benchmarks, because, well, they are fast. If you use the Super Pi 1M benchmark, you’ll quickly find the limitations or the hardware you are testing. Are these settings 100% stable? No, but that’s not important in this stage.
As for the CPU overclocking tests, things are a bit more complicated. Super Pi is a single threaded utility whereas the Core i5/i7 has 4 cores and some products even have the Hyper-Threading technology enabled, which means 8 threads. The overclocking result tested with a single threaded application hardly represents any form of stability of an 8 threaded processor. So, to test the stability of all 8 threads we use the two CPU tests of 3DMark06.
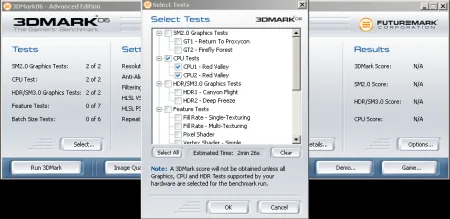
3DMark06, the two CPU tests are selected.
BCLK Frequency
My test method led me to a frequency of 214.5MHz in about 10 minutes. Having tested this CPU on a different motherboard already, it seems that this is the limitation of the CPU rather than motherboard and/or memory.

Memory Frequency
In past overclocking adventures, I had already tested the memory overclocking capabilities, so all I have to do is figure out if this platform can reach the same frequencies. With CL7 I was able to reach 873MHz, with CL9 913MHz.
Processor Frequency
Last but not least, the frequency of the processor. To find the limitation of the processor, we need to take into account the different variables that affect the overclockability of this component: voltage and temperature. Since we are using air cooling, the temperature will be determined largely by the voltage level we use, so we will have to pay attention to the temperature while testing our processor.
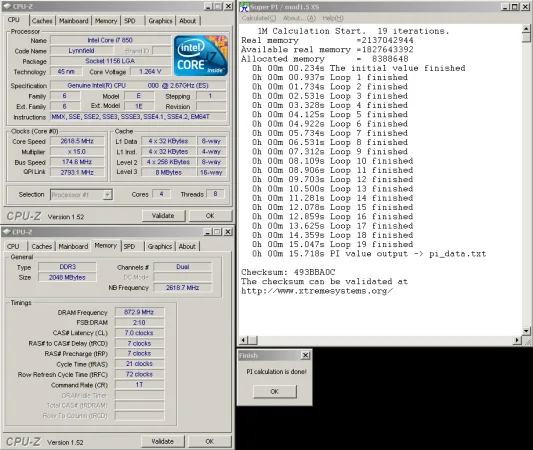
Since the overclockability of a processor varies from sample to sample, I will not show you any scaling progress as explained earlier in this guide. Instead, I just try to find the lowest possible voltage for a frequency of 4GHz. As it seems, this particular processor isn’t the best overclocker as we need a voltage of 1.45V to make the system stable. The temperature doesn’t rise above 50°C in this short test, so it’s no problem to set this voltage.
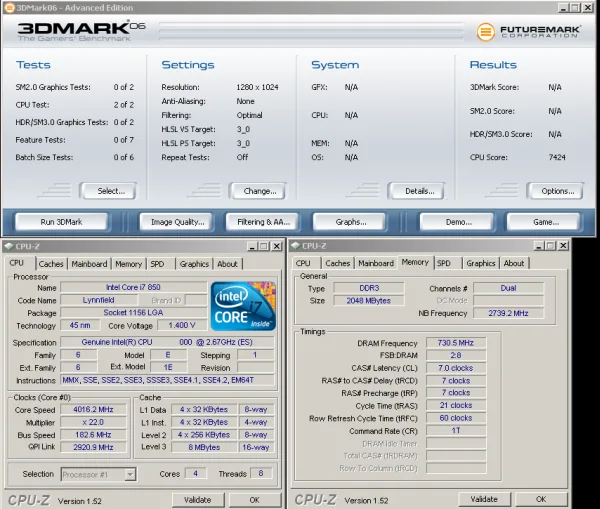
3DMark06 CPU Test stable at 4GHz, 1.45V.
Final Overclock
A wise man once told to me: “Run what’s fast, not what you think is fast”. It’s true, actually, in overclocking higher is not always better. Looking only at the memory frequency results, I already know that I prefer a lower clocked CL7 configuration over the higher clocked CL9 configuration. The problem with overclocking is, however, that in most cases there’s very little to choose since we have to make settlements when everything comes together.
So, we aim at running 4GHz. For this, we can use the following multipliers: 19x, 20x and 22x. Why not lower? Remember: our maximum stable BCLK frequency was 214MHz; 18x214MHz equals 3852MHz, which is not even near 4GHz. In the table underneath you can find a table containing the different possible combinations to have a 4GHz CPU at the one hand and still a nice overclock on the memory on the other hand.
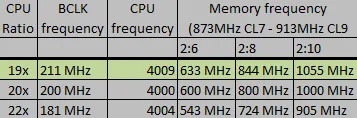
For our test system it seems that 19×211 with the memory clocked at 844MHz CL7 is the best possible combination.
So, after having found the ideal combination of settings, we go into the bios change the frequencies, voltages and memory timings to the correct settings. For more intensive testing, we used Wprime V1.55 to test our 8 threads simultaneously at 100% load.
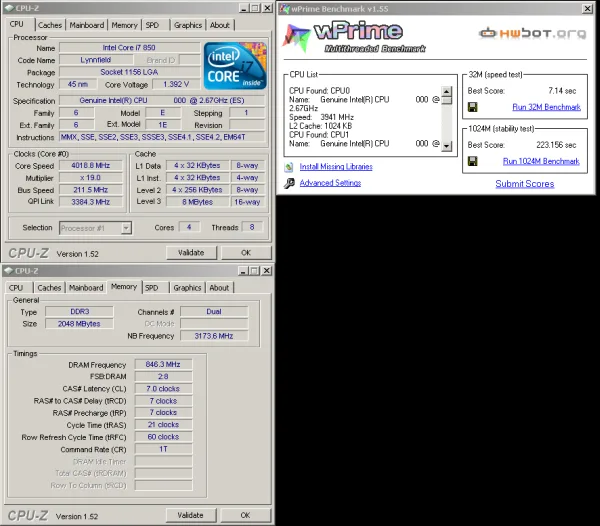
As you can see, the CPU passes this test, so it’s stable. At least stable enough for us.
Final Conclusion
Looking back at the result we achieved by overclocking, we can be satisfied. First, we went up from 2.67GHz to 3.36GHz in about 5 seconds using the OC Genie functionality and afterwards we even achieved 4GHz with relative ease by manual tuning.
Further Tuning for Your Own Specific Needs
General Concepts
In the previous two sections, we’ve gone over the basic principles of P55 overclocking and showed you how we put things in practice. Of course, when you want to tune your system for extra performance, things can be a little different. Using a different type of cooler can make the temperature become a bigger or smaller factor to take into account, using a more high-end processor increases the number of available CPU multipliers and gives you more options to tune the system.
Also, remember what I said earlier in this guide: “run what’s fast, not what you think is fast”. Too often I come across people who think their system is better tuned than mine because they have higher clock frequencies. Overclocking is not just about the frequency, it’s about the whole picture, especially when you’re dealing with a 24/7 daily setup. Increasing voltage means increasing the temperature, which has a negative effect on the overclockability of any of the components inside your case. For instance, if you increase the Vcore too much to keep your processor stable at a certain frequency, you might create a temperature issue inside your case, which can hurt the overclockability of your video-card, or the other way around. Smart overclocking involves weighing out the advantages of increasing the voltage to increase the frequency against the increase in temperature which hurts the overclockability. Also, it involves knowing where the overclocking is needed the most; if you’re a gamer; spend time on overclocking the video-card rather than the system memory. If you never use multi-threading applications, disable hyper-threading to remove some of the heat and be able to clock higher.
When people ask me for suggestions on how to improve their overclock, the first question I ask is if they know how their hardware scales with voltage and temperature. Sadly, that question remains un-answered most of the time and the few times I do get an answer, it’s negative. Knowing how your hardware scales with voltage is a very important aspect in figuring out how to balance the temperature and overclockability as already mentioned in the previous paragraph. If the CPU scales magnificently with voltage, then the extra temperature increase might be worth it, but if the scaling stops at around 1.4V, it’s maybe not worth it to increase the voltage to 1.5V just for that extra 100MHz.
Overclocking as a Method, Power-Saving as a Goal
When it comes to green computing, there have been quite some changes over the last few months. Manufacturers such as MSI have been trying to provide energy saving features to help decrease the monthly electricity bill. But, although these features do help it’s, just as overclocking, always better to do the work yourself.
MSI P55-GD80 Green Features
When we start talking about the power-saving features on the MSI P55-GD80 motherboard, we first need to talk about the features Intel already integrated in the Core i5/i7 platform. As you all know, there’s the EIST, C-State and C1E functionality that allows processors to down-clock when in idle mode and thus save energy.

Intel power-saving features enabled.
Next to this, MSI also developed the Dr.MOS and APS-technology. We will not go in detail on the technical side of the story, for that you can always refer to your motherboard’s manual.
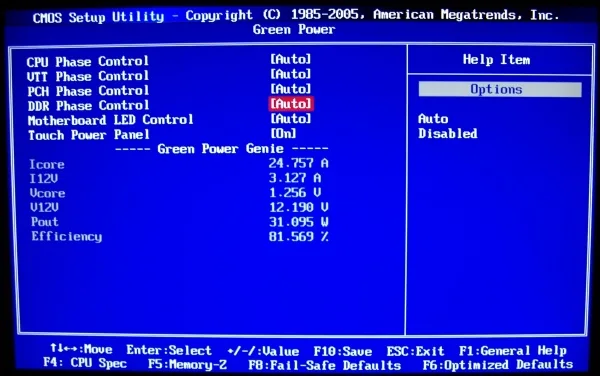
Green power technology enabled.
Power-Saving, Let’s Give It a Go
When we are talking about power-saving features, we’re obviously talking about saving money, not saving the planet. Apart from the very few people who are actually worried that their desktop system is killing the environment, most people are worried about the figures on their electricity bill at the end of the month. To show you what’s possible with the MSI P55-GD80 motherboard, I have gathered a little bit of data on the possible solutions to your energy problem. To decrease the power consumption of your system, without losing any performance, we can:
- Enable Intel EIST, C-State and C1E features
- Enable MSI Green Power features
- Tweak and tune the voltage settings manually
While testing this configuration, I found that this particular processor runs quite stable at 3.8GHz with a core voltage of 1.3V, which is a lot less than I need for 4GHz (1.45V). So, for the power-saving tests I used the following voltages:
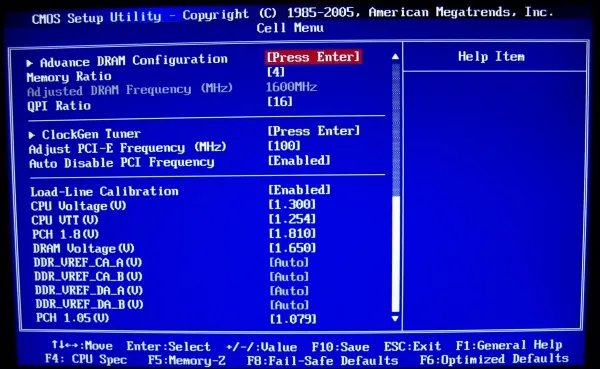
Voltage settings for a 3.8GHz stable configuration
In the previous paragraph (4.2.1) we already showed you how to enable the Intel and MSI power-saving features, so we’ll skip that part in this section, but what I didn’t show you yet was how I decreased the voltages. In short, it’s only a matter of applying the same test procedures as when overclocking, only in this case you focus on the voltages rather than the maximum obtained frequencies. For this particular setup we were able to decrease the voltages even further down:
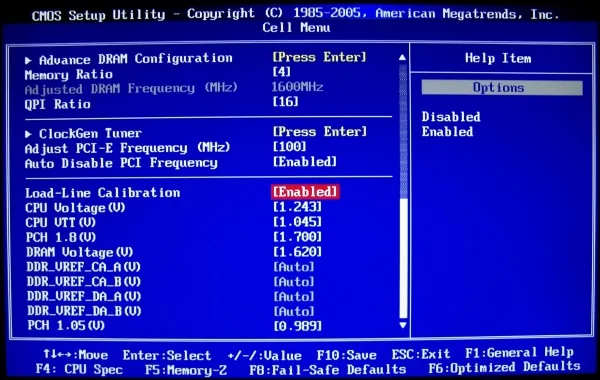
Decreasing the voltages without compromising the stability.
As for the measurement tools, we use a watt-meter and 3DMark06 to measure the power drawings from the wall. The usage reported as ‘load’ is the highest measured value, the usage reported as ‘idle’ is the power draw while the setup idles at the desktop.
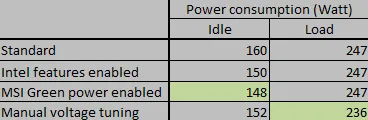
Power consumption results.
Taking It Even Further?
As you can see from the result table, it’s actually quite beneficial to spend some time on manually adjusting the voltage settings to lower the power consumption. Not only for the idle power consumption, but mainly to reduce the power consumption in full load mode, for instance when you are gaming. A few chapters ago, I already explained you why it’s interesting to figure out the scaling of your system and in this chapter I have to bring it up again. You see, for 4GHz my particular processor needs 1.45V, whereas for 3.8GHz I only need 1.3V (or even 1.25V). The difference in performance between 3.8GHz and 4GHz is incredibly small, but the difference in voltage is actually quite big. So, in other words, if I’m a smart 24/7 overclocker, I will opt for the 3.8GHz overclock as lower voltage means lower power consumption and more importantly a lower temperature.
Playing with the different voltages to lower the power consumption of your system is very interesting, especially if you want to do it thorough. In this guide we used an overclocked system to show you the difference, but at home you can do the same with a system that runs at stock frequencies. Instead of the normal voltage of 1.15V, you might be able to do the same at 1V or even lower.
Final Thoughts
Even while writing this guide it became clear to me that there’s so much more to tell about overclocking a Core i5/i7 processor, let alone tuning the entire platform for the best possible performance. The MSI P55-GD80 most definitely gives performance users the possibility to fine-tune their system: overclocking for the absolute maximum frequencies, overclocking for the best performance, overclocking for 24/7 settings, under-clocking to lower power consumption and so on, it’s all possible. The best advice I can give any user is just to play around with the platform and see where it leads you to.
I wish you the best of luck!