SkatterBencher #65: Intel Core i9-11980HK Overclocked to 5200 MHz

We overclock the Intel Core i9-11980HK Tiger Lake CPU up to 5.2 GHz with an 尔英 Polestar G613 Pro motherboard and EK custom loop water cooling.
While this may not be the most interesting overclocking guide for most of you, I’m excited to bring you along on this overclocking adventure for several reasons. First, while I did overclock a mobile CPU a long time ago, I never overclocked a Tiger Lake CPU. Second, this is my first time trying a motherboard from a non-Taiwanese manufacturer. Lastly, the BIOS options give us a great insight into how Intel CPU overclocking works behind the scenes.
I hope you enjoy watching the video as much as I enjoyed putting it together!
Intel Core i9-11980HK: Introduction
The Intel Core i9-11980HK is the flagship processor of Intel’s 11th-generation mobile Core lineup codenamed Tiger Lake. The Tiger Lake H 45W processors launched on May 11, 2021, about 9 months after introducing the first Tiger Lake mobile processors.

Tiger Lake is a bit of an unusual architecture because it never made it to the DIY desktop market. Intel famously opted for Rocket Lake instead. Well, kind of. Intel did release four Tiger Lake-B SKUs for system integrators, including a Core i9-11900KB, which ended up in the NUC 11 Extreme.
Intel Tiger Lake is the successor of the 10th generation Ice Lake mobile processor. Ice Lake is also an architecture that never reached the mainstream desktop. However, unlike Tiger Lake, it did appear in the 3rd generation Xeon processor lineup for workstations and servers.

Tiger Lake is built on the 10nm SuperFin process and, thus, falls between Ice Lake and Alder Lake regarding process technology. In a strict sense, we could say it has P-cores since the 8 P-cores feature the Willow Cove architecture, which makes it the direct predecessor of the Golden Cove architecture used for Alder Lake P-Cores.

Another distinct difference between Tiger Lake and the mainstream desktop CPUs is that it only comes in a BGA package, not LGA. So, the CPU has to be soldered directly onto the motherboard rather than put into a processor socket. We’ll talk a little bit more about that later in the video.
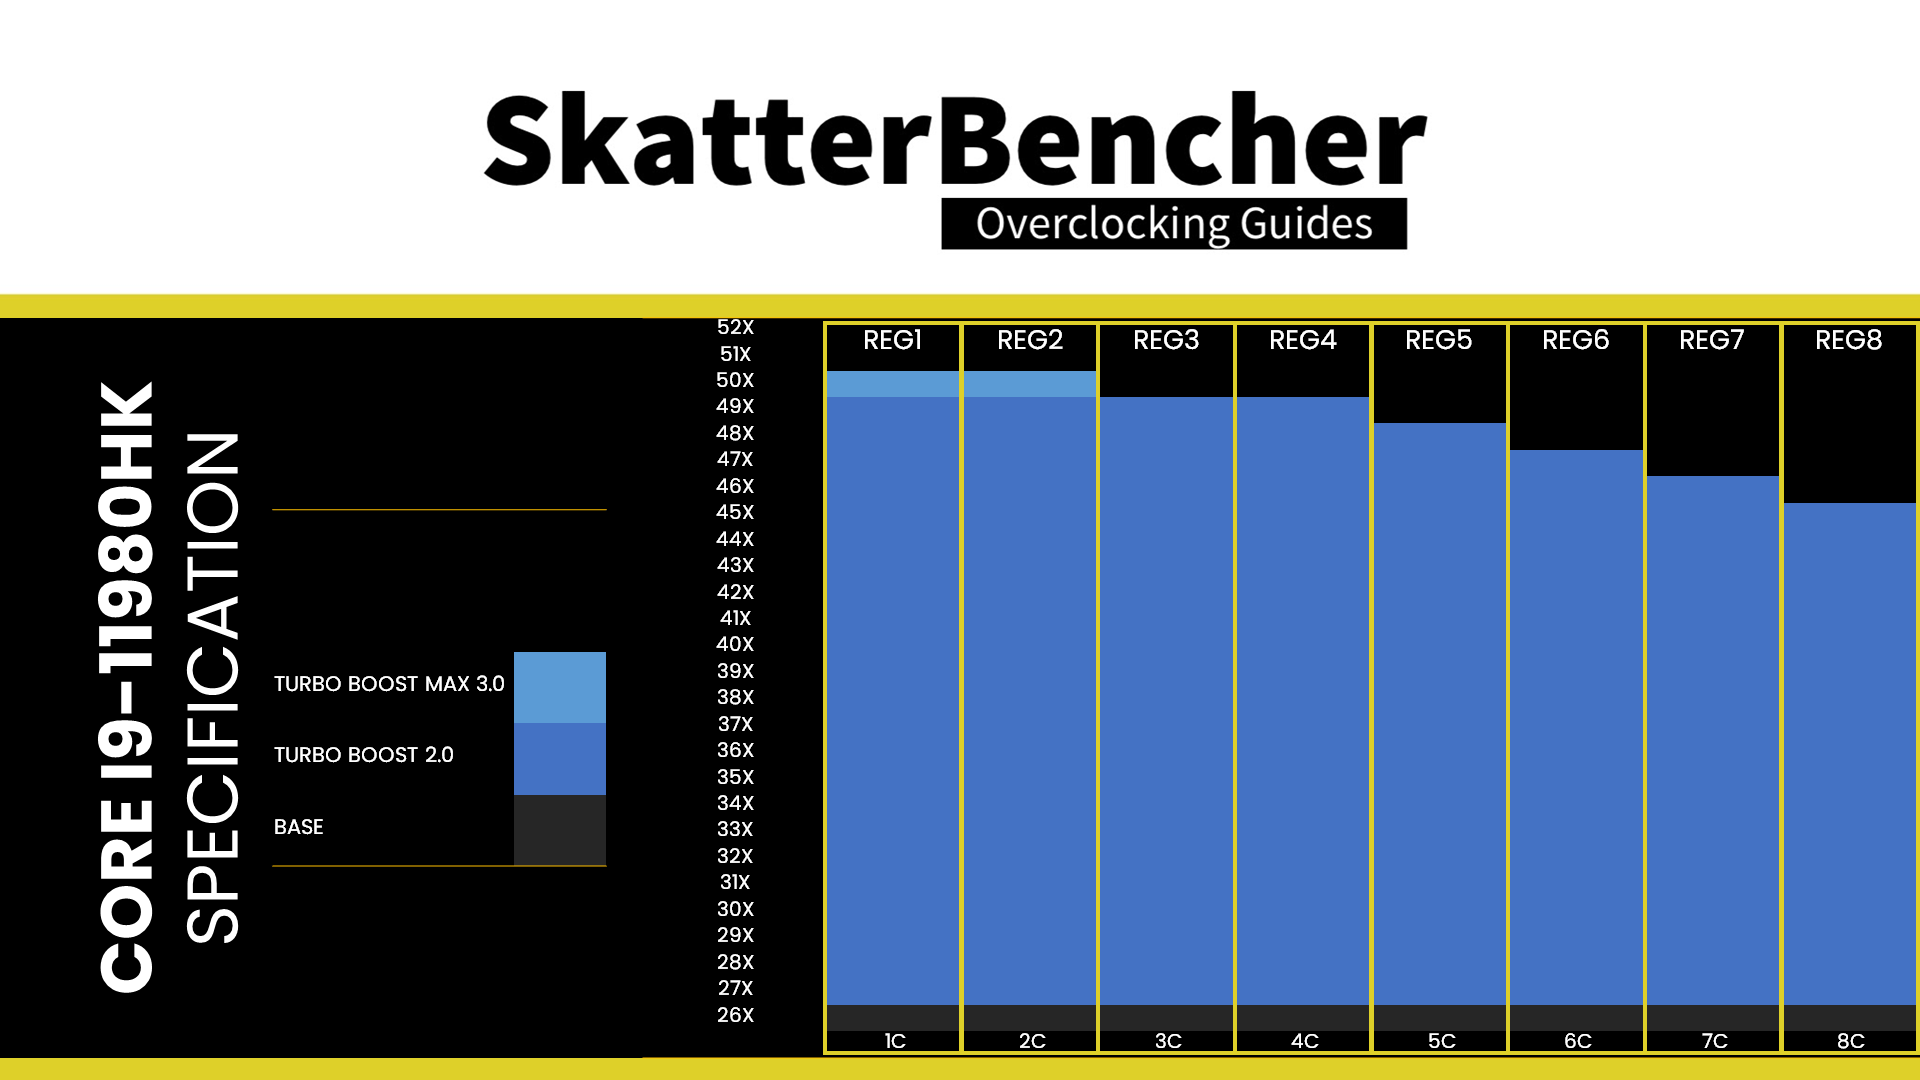
The Core i9-11980HK has 8 cores with 16 threads. The base frequency is 2.6 GHz, the Turbo Boost 2.0 boost frequency is 4.9 GHz, and the Turbo Boost Max 3.0 boost frequency is 5.0 GHz. The maximum boost frequency gradually decreases from 5.0 GHz for up to 2 active cores to 4.5 GHz when all cores are active. The base TDP is 45W, and the Turbo TDP is 109W. The TjMax is 98 degrees Celsius.

In this video, we will cover three different overclocking strategies:
- First, we unleash the power limits governing the CPU performance
- Second, we overclock the DDR4 memory
- Third, we get into the simple manual CPU core overclocking

However, before we jump into overclocking, let us quickly review the hardware and benchmarks used in this guide.
Intel Core i9-11980HK: Platform Overview
The system we’re overclocking today consists of the following hardware.
| Item | SKU | Price (USD) |
| CPU | Intel Core i9-11980HK | 234 |
| Motherboard | 尔英科技 Polestar G613 Pro | |
| CPU Cooling | EK-Quantum Velocity² D-RGB – 1200 EK-Pro QDC Kit P360 | 147 840 |
| Fan Controller | ElmorLabs EFC-X9 | 60 |
| Memory | G.SKILL Trident Z DDR4-4266 | 145 |
| Power Supply | Antec HCP 1000W Platinum | 110 |
| Graphics Card | ASUS ROG Strix RTX 2080 TI | 600 |
| Storage | Kingston 120GB SSDNow SSD | 77 |
| Chassis | Open Benchtable V2 | 200 |
尔英科技 Z590 + Core i9-11980HK
尔英 (Ěr Yīng) is perhaps one of the most interesting motherboard vendors I’ve come across in recent years. They’re a Chinese company based in Shenzhen, Guangdong, specializing in putting Intel BGA mobile processors on desktop form factor motherboards. That would normally not catch my eye, but when I saw they’re using HK processors, they caught my eye.
Since BGA processors don’t sit on top of a socket, their Z-height will be much lower than a normal desktop processor. 尔英put a special heat spreader on top of the BGA CPU to maintain compatibility with most desktop coolers. For example, this motherboard is compatible with any LGA1200 cooler.

BIOS-wise, it’s not much different from the motherboards we’re all familiar with. Aside from the lack of nice-looking UEFI skin, many settings and options are available. In fact, there are probably more options available in this BIOS than we find on some of the “big brand” products!

I purchased my board directly from Taobao, where you can find most of the SKUs. They also have a website you can visit for more information.
ElmorLabs EFC-X9
The ElmorLabs EFC-X9 is an evolution of the original EFC and its fancy brother, the Easy Fan Controller SkatterBencher Edition (EFC-SB). I’ve used these fan controllers in many previous SkatterBencher guides.
The EFC-X9 supports up to nine independent PWM fans and can supply 4.5A per header or a maximum of 20A total. Additionally, there are two external temperature sensor connectors, plus an onboard ambient temperature and humidity sensor. There’s also dedicated EFC software to control the device.

I explained how I use the EFC devices in many previous SkatterBencher guides. I monitor the ambient temperature (EFC), water temperature (EFC), and fan duty cycle (EFC). I include the measurements in my Prime95 stability test results.
I also use the device to map the radiator fan curve to the water temperature. Without going into too many details: I have attached an external temperature sensor from the water in the loop to the EFC-SB. Then, I use the low/high setting to map the fan curve from 25 to 40 degrees water temperature. I use this configuration for all overclocking strategies. The main takeaway from this configuration is that it gives us a good indicator of whether the cooling solution is saturated.

Intel Core i9-11980HK: Benchmark Software
We use Windows 11 and the following benchmark applications to measure performance and ensure system stability.
| BENCHMARK | LINK |
| SuperPI 4M | https://www.techpowerup.com/download/super-pi/ |
| Geekbench 6 | https://www.geekbench.com/ |
| Cinebench R23 | https://www.maxon.net/en/cinebench/ |
| CPU-Z | https://www.cpuid.com/softwares/cpu-z.html |
| V-Ray 5 | https://www.chaosgroup.com/vray/benchmark |
| AI-Benchmark | https://ai-benchmark.com/ |
| 3DMark CPU Profile | https://www.3dmark.com/ |
| 3DMark Night Raid | https://www.3dmark.com/ |
| CS:GO FPS Bench | https://steamcommunity.com/sharedfiles/filedetails/?id=500334237 |
| Shadow of the Tomb Raider | https://store.steampowered.com/app/750920/Shadow_of_the_Tomb_Raider_Definitive_Edition/ |
| Final Fantasy XV | http://benchmark.finalfantasyxv.com/na/ |
| Prime 95 | https://www.mersenne.org/download/ |
Intel Core i9-11980HK: Stock Performance
Before starting overclocking, we must check the system performance at default settings. The default Turbo Boost 2.0 parameters for the Core i9-11980HK are as follows:
- PL1: 45W
- PL2: 109W
- Tau: 33sec
- ICCMax: 105A
Here is the benchmark performance at stock:
- SuperPI 4M: 32.424 seconds
- Geekbench 6 (single): 2,143 points
- Geekbench 6 (multi): 8,793 points
- Cinebench R23 Single: 1,536 points
- Cinebench R23 Multi: 12,010 points
- CPU-Z V17.01.64 Single: 640.2 points
- CPU-Z V17.01.64 Multi: 6,161.5 points
- V-Ray 5: 9,301 vsamples
- AI Benchmark: 2,575 points
- 3DMark Night Raid: 58,339 marks
- CS:GO FPS Bench: 570.08 fps
- Tomb Raider: 161 fps
- Final Fantasy XV: 168.52 fps

Here are the 3DMark CPU Profile scores at stock
- CPU Profile 1 Thread: 993
- CPU Profile 2 Threads: 1,883
- CPU Profile 4 Threads: 3,036
- CPU Profile 8 Threads: 4,948
- CPU Profile 16 Threads: 7,641
- CPU Profile Max Threads: 7,771

When running Prime 95 Small FFTs with AVX-512 enabled, the average CPU core clock is 3078 MHz with 0.903 volts. The average CPU temperature is 51 degrees Celsius. The ambient and water temperature is 25.6 and 30.0 degrees Celsius. The average CPU package power is 45.4 watts.

When running Prime 95 Small FFTs with AVX disabled, the average CPU core clock is 3583 MHz with 0.951 volts. The average CPU temperature is 50 degrees Celsius. The ambient and water temperature is 25.8 and 29.6 degrees Celsius. The average CPU package power is 45.7 watts.

Now, let us try our first overclocking strategy.
However, before we get going, make sure to locate the CMOS Clear pins. Shorting the Clear CMOS pins will reset all your BIOS settings to default which is helpful if you want to start your BIOS configuration from scratch. The Clear CMOS pins are located at the bottom of the motherboard.
OC Strategy #1: Unleashed Power Limits
In our first overclocking strategy, we take advantage of unleashing the Turbo Boost 2.0 power limits. Usually, it’s effortless because motherboard vendors offer simple options in the BIOS. However, as you’ll see in a minute, things are slightly different on this motherboard. So, first, I’ll explain how Turbo Boost 2.0 Technology works. Afterward, I’ll explain how to configure it.
Turbo Boost 2.0 Technology
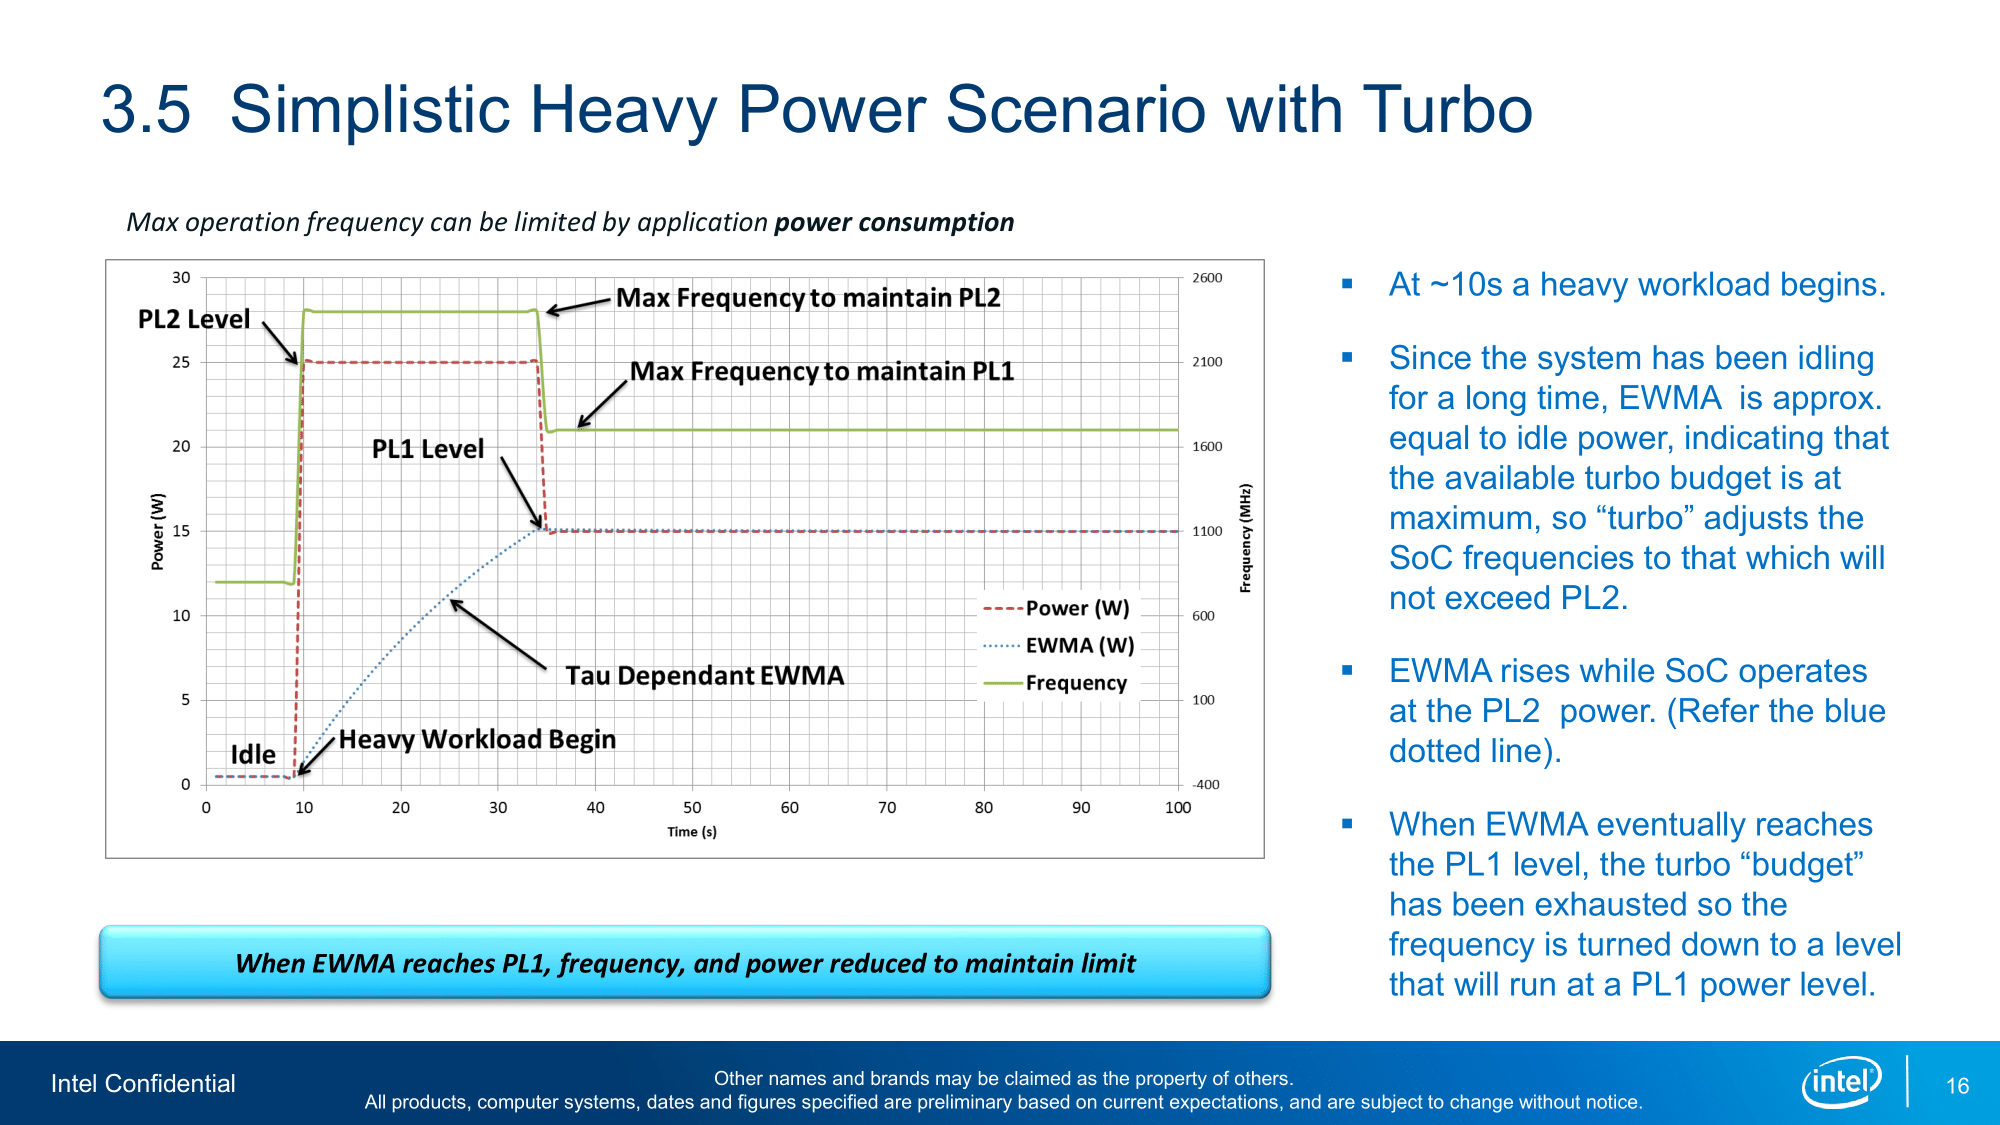
Intel Turbo Boost 2.0 Technology allows the processor cores to run faster than the base operating frequency. Turbo Boost is available when the processor works below its rated power, temperature, and current specification limits. The ultimate advantage is opportunistic performance improvements in both multi-threaded and single-threaded workloads.
Traditionally, when we talk about configuring Turbo Boost 2.0, we refer to the turbo boost algorithm, which works according to a proprietary EWMA formula. This stands for Exponentially Weighted Moving Average. Usually, there are only 3 parameters to consider: PL1, PL2, and Tau.
- Power Limit 1, or PL1, is the threshold the average power will not exceed. Historically, this has always been set equal to Intel’s advertised TDP. PL1 should not be set higher than the thermal solution cooling limits.
- Power Limit 2, or PL2, is the maximum power the processor can use for a limited time.
- Tau, in seconds, is the time window for calculating the average power consumption. The CPU will reduce the CPU frequency if the average power consumed exceeds PL1.
However, in addition to PL1 and PL2, we must consider several other parameters. These parameters include the system power limits, power delivery limits, and temperatures. In our case, we will specifically configure three additional parameters: PL4, VR_TDC, and VR_Imax.

Contrary to PL1, PL2, and PL3, PL4 is not a measured power limit but an estimated power limit. The power limit triggers preemptively when the CPU power control unit projects an extreme, short power surge beyond PL2 in the next instant. It projects the power by calculating the Potential Peak Power (PPP), a value based on the component characteristics and the present operating frequency. This calculation occurs prior to every frequency transition. For example, when an AVX instruction enters the pipeline or a core goes to sleep. When PPP exceeds PL4, the PCU will automatically set a lower frequency.


This is the same PL4 limit that I discussed when we overclocked the Intel Arc A380 graphics card.
VR_TDC is the average per-rail current limit of the voltage regulator for the CPU cores. It is designed to match the CPU throttling behavior to the motherboard voltage regulator design. It’s intended to gradually adjust the CPU frequency and voltage based on the capability of the voltage regulator.

VR_Imax is the maximum current limit for the voltage regulator.
Adjusting the power limits is strictly not considered overclocking, as we don’t change the CPU’s thermal, electrical, or frequency parameters. Intel provides the Turbo Boost parameters as guidance to motherboard vendors and system integrators to ensure their designs enable the base performance of the CPU. Better motherboard designs, thermal solutions, and system configurations can facilitate peak performance for longer.
If you don’t want to take my word for it, it will become evident from the BIOS options in the next OC strategy.
Turbo Boost 2.0 Configuration
I will cover the BIOS configuration in a minute, but before I do so, I want to explain how you can identify Turbo Boost 2.0-related performance limitations on your system.
We can use HWiNFO to identify what is limiting our Turbo Boost 2.0 performance. The objective as an overclocker is to have the Turbo Boost performance limited only by the Max Turbo Limit. That is the maximum CPU ratio configured in the BIOS, and we can override that to achieve higher frequencies and performance.

Let’s see how things work in the real world. We use Prime95 to push the workload and track the performance behavior in HWiNFO. When the system is idle, we can see Max Turbo Limit triggered.
When we launch Prime95 with all cores enabled, we find that quickly the Thermal Event performance limiter is triggered due to the CPU temperature. We find that the PL1 performance limiter is active a few moments later.


The solution for the latter is pretty simple: increase the PL1 limit. We go into the BIOS and program it to the maximum value of 4095.875W.
We then re-run Prime95 and find that a new performance limiter is activated: PL2 or PL3. So, we go back into the BIOS and program PL2 to its maximum value of 4095.875W.

We re-run Prime95 and find that a new performance limiter is activated: Electrical Design Point/Other, which includes ICCmax and PL4. So, we go back into the BIOS and program ICCmax to its maximum value of 1023A. We then re-run Prime95 and find that the same performance limiter is activated when we enable AVX. So, we go back into the BIOS and program PL4 to its maximum value of 4095.875W.

We re-run Prime95 and find that a new performance limiter is activated: VR TDC. So, we go back into the BIOS and program TDC Current Limit to its maximum value of 4095.875A.

After these changes, the only performance limiters still triggered are the Thermal Event, in case our CPU hits the TjMax, or Max Turbo Limit.

Now that we’ve reviewed the Turbo Boost 2.0 configuration let’s move forward with the full BIOS settings.
BIOS Settings & Benchmark Results
Upon entering the BIOS, go to the Advanced menu
- Enter the Power & Performance submenu
- Enter the CPU – Power Management Control submenu
- Enter the Config TDP Configurations submenu
- Set Power Limit 1 to 4095875
- Set Power Limit 2 to 4095875
- Leave the Config TDP Configurations submenu
- Enter the CPU VR Settings submenu
- Enter the VccIn VR Settings submenu
- Set VR Current Limit to 1023
- Set TDC Current Limit to 32767
- Leave the VccIn VR Settings submenu
- Enter the VccIn VR Settings submenu
- Leave the CPU VR Settings submenu
- Set Power Limit 4 Override to Enabled
- Set Power Limit 4 to 4095875
- Enter the Config TDP Configurations submenu
- Enter the CPU – Power Management Control submenu
Then save and exit the BIOS.
We re-ran the benchmarks and checked the performance increase compared to the default operation.
- SuperPI 4M: +2.32%
- Geekbench 6 (single): +0.93%
- Geekbench 6 (multi): +1.97%
- Cinebench R23 Single: +2.80%
- Cinebench R23 Multi: +20.43%
- CPU-Z V17.01.64 Single: +3.23%
- CPU-Z V17.01.64 Multi: +0.63%
- V-Ray 5: +15.49%
- AI Benchmark: +7.61%
- 3DMark Night Raid: +0.14%
- CS:GO FPS Bench: +0.19%
- Tomb Raider: +1.24%
- Final Fantasy XV: +4.47%

Here are the 3DMark CPU Profile scores:
- CPU Profile 1 Thread: +1.11%
- CPU Profile 2 Threads: +1.86%
- CPU Profile 4 Threads: +0.20%
- CPU Profile 8 Threads: +0.24%
- CPU Profile 16 Threads: +0.31%
- CPU Profile Max Threads: +2.90%

Unleashing the Turbo Boost 2.0 power limits has the highest impact in power-constrained scenarios. Unsurprisingly, we see the largest performance gains in heavy multi-threaded workloads such as Cinebench R23 and V-Ray. We get a maximum performance improvement of +20.43% in Cinebench R23.
When running Prime 95 Small FFTs with AVX-512 enabled, the average CPU core clock is 4248 MHz with 1.136 volts. The average CPU temperature is 93 degrees Celsius. The ambient and water temperature is 26.8 and 32.8 degrees Celsius. The average CPU package power is 118.9 watts.

When running Prime 95 Small FFTs with AVX disabled, the average CPU core clock is 4489 MHz with 1.143 volts. The average CPU temperature is 74 degrees Celsius. The ambient and water temperature is 26.5 and 32.0 degrees Celsius. The average CPU package power is 92.9 watts.

OC Strategy #2: Memory OC
In our second overclocking strategy, we want to increase the memory frequency. I rely partly on Intel’s Extreme Memory Profile 2.0 technology for this. But, in the end, I also have to do some manual tuning.
Intel Extreme Memory Profile 2.0
Intel Extreme Memory Profile, or XMP, is an Intel technology that lets you automatically overclock the system memory to improve system performance. It is an extension to the standard JEDEC specification that allows a memory vendor to program different settings onto the memory stick. The settings include the memory frequency, the memory timings, and the memory voltage.
There are two types of XMP certification:
- XMP ready: the module was programmed with an uncertain but stable profile
- XMP Certified: the module was programmed with settings that have passed supplier tests for the CPU and motherboard.
You can find the list of XMP Certified products on Intel’s website.
Intel XMP 1.0 was developed for DDR3 and was later superseded by XMP 2.0 for DDR4. With the launch of DDR5 memory, there is now an XMP 3.0 too.
Memory Overclocking
Memory overclocking on this motherboard isn’t as straightforward as simply enabling XMP. That’s not to say that the option to enable XMP isn’t available, but it’s because I cannot increase the memory frequency beyond DDR4-4000. I suspect that’s a limitation of the CPU memory controller, but I could not verify this.

As Buildzoid has explained in a series of videos about memory timings, a memory stick is a pretty dumb device. It’s actually the memory controller inside the CPU that sets the memory frequency and timings. The memory controller is located in the System Agent part of the CPU die. So, naturally, we find the memory configuration options in the System Agent BIOS menu.
In this menu, I copy the settings from the XMP profile and program them as a custom profile. The only thing I do differently is set the memory ratio to 30. Combined with a memory reference clock of 133 MHz, that yields DDR4-4000.
Configuring DDR4-4000 also sets Gear 2 so the memory controller runs at half the memory frequency.
BIOS Settings & Benchmark Results
Upon entering the BIOS, go to the Advanced menu
- Enter the Power & Performance submenu
- Enter the CPU – Power Management Control submenu
- Enter the Config TDP Configurations submenu
- Set Power Limit 1 to 4095875
- Set Power Limit 2 to 4095875
- Leave the Config TDP Configurations submenu
- Enter the CPU VR Settings submenu
- Enter the VccIn VR Settings submenu
- Set VR Current Limit to 1023
- Set TDC Current Limit to 32767
- Leave the VccIn VR Settings submenu
- Enter the VccIn VR Settings submenu
- Leave the CPU VR Settings submenu
- Set Power Limit 4 Override to Enabled
- Set Power Limit 4 to 4095875
- Enter the CPU Lock Configuration submenu
- Set CFG Lock to Disabled
- Set Overclocking Lock to Disabled
- Leave the CPU Lock Configuration submenu
- Enter the Config TDP Configurations submenu
- Leave the CPU – Power Management Control submenu
- Enter the CPU – Power Management Control submenu
- Leave the Power & Performance submenu
- Enter the OverClocking Performance Menu
- Set OverClocking Feature to Enabled
- Leave the OverClocking Performance Menu
- Go to the Chipset menu
- Enter the System Agent (SA) Configuration submenu
- Enter the Memory Configuration submenu
- Enter the Memory submenu
- Set Memory Profile to Custom profile
- Set Memory Reference Clock to 133
- Set Memory Ratio to 30
- Set tCL to 19
- Set tRCD/tRP to 19
- Set tRAS to 39
- Set tCWL to 20
- Set tFAW to 51
- Set tREF1 to 16381
- Set tRFC to 735
- Set tRRD to 0
- Set tRTP to 12
- Set tWR to 24
- Set Memory Voltage to 1.40 Volts
- Enter the Memory submenu
- Enter the Memory Configuration submenu
- Enter the System Agent (SA) Configuration submenu
Then save and exit the BIOS.
We re-ran the benchmarks and checked the performance increase compared to the default operation.
- SuperPI 4M: +3.56%
- Geekbench 6 (single): +5.09%
- Geekbench 6 (multi): +13.15%
- Cinebench R23 Single: +4.23%
- Cinebench R23 Multi: +25.89%
- CPU-Z V17.01.64 Single: +4.67%
- CPU-Z V17.01.64 Multi: +0.97%
- V-Ray 5: +20.89%
- AI Benchmark: +19.57%
- 3DMark Night Raid: +2.30%
- CS:GO FPS Bench: +3.35%
- Tomb Raider: +32.50%
- Final Fantasy XV: +12.72%

Here are the 3DMark CPU Profile scores:
- CPU Profile 1 Thread: +1.11%
- CPU Profile 2 Threads: +2.92%
- CPU Profile 4 Threads: +2.50%
- CPU Profile 8 Threads: +2.14%
- CPU Profile 16 Threads: +5.84%
- CPU Profile Max Threads: +5.77%

Increasing the memory frequency from DDR4-2133 to DDR4-4000 significantly improves performance in single-threaded and multi-threaded workloads. But the most impressive performance improvement is in the Tomb Raider game benchmark, with an increase of +32.50%. I double-checked these performance figures and always got the same result.
When running Prime 95 Small FFTs with AVX-512 enabled, the average CPU core clock is 4261 MHz with 1.139 volts. The average CPU temperature is 93 degrees Celsius. The ambient and water temperature is 25.2 and 32.2 degrees Celsius. The average CPU package power is 125.2 watts.

When running Prime 95 Small FFTs with AVX disabled, the average CPU core clock is 4489 MHz with 1.150 volts. The average CPU temperature is 76 degrees Celsius. The ambient and water temperature is 26.4 and 32.0 degrees Celsius. The average CPU package power is 101.1 watts.

OC Strategy #3: Manual CPU Overclock
In our third overclocking strategy, we finally overclock the CPU cores. The approach is based mainly on tuning the Turbo Boost 2.0 ratio configuration and adjusting the CPU adaptive voltage. However, I must also share information about the voltage topology, clocking topology, and Intel’s overclocking toolkit to explain why this affects the performance.
So, strap in. This will take a while.
Tiger Lake Clocking Topology
The standard Tiger Lake platform has a 24MHz crystal as a reference clock to the PCH. The PCH will then generate 3 clocks:
- Adjustable 100 MHz reference clock for the CPU
- Fixed 100 MHz PCIBCLK for PCIe, DMI, and I/O
- Fixed 24 MHz frequency for the display engine
Tiger Lake also supports using an external clock generator for driving the CPU reference clock.

Whichever way you get the 100 MHz BCLK, this clock is multiplied with specific ratios for each of the different parts in the CPU.
- Each CPU core has its own PLL and can run at its independent frequency. The maximum supported ratio is up to 120X.
- The Ring frequency ties together the Ring, last-level cache (L3), and CBo or Cache box. The Ring ratio can go up to 85X.
- The GT or graphics frequency is based on the same 100MHz BCLK but is first divided by 2 and then multiplied by the GT ratio. Surprisingly, it appears that Slice and Unslice frequency can be controlled independently. The GT slice and unslice ratio can go up to 60X.
- The System Agent ratio is either 4X, 8X, or 10X.
- Finally, the two memory controllers and system memory are driven by the same 100 MHz BCLK. However, it also supports 133 MHz as the base frequency. The memory controller drives the clock frequency for the system memory.
- The Tiger Lake memory controller supports two memory gears, Gear 1 and Gear 2. In Gear 1, the memory controller runs at the same frequency as the system memory. In Gear 2, the memory controller runs at half the system memory frequency.
- The memory ratio goes up to 84X. Combined with the 133 MHz frequency, that yields a maximum frequency of DDR4-11200.
Tiger Lake Voltage Topology
Tiger Lake uses a combination of fully integrated voltage regulators (FIVR) and motherboard voltage regulators (MBVR) for power management. Tiger Lake processors have three (3) distinct motherboard voltage regulator inputs. The FIVR then manages the voltage provided to specific parts of the CPU. The end user can control some of these voltages.

VccIN is the primary power source for the CPU. It provides the input power for the most important parts inside the CPU, including each CPU core, the ring, and the integrated graphics. The default voltage is 1.8V. It can be controlled using SVID via the PCU. Through Intel’s overclocking toolkit, we have access to up to 10 power domains:
- VccCOREn provides the voltage to up to 8 individual CPU cores.
- VccR provides the voltage to the ring
- VccGT provides the voltage to the graphics slice and unslice
VccIN_AUX is an auxiliary power source for the CPU. It provides the input power to the IO parts inside the CPU. The default voltage is 1.8V. It can be controlled by directly programming the voltage regulator. Through Intel’s overclocking toolkit, we have access to up to some of the power domains:
- VccSA provides the voltage to the System Agent, which includes the memory controller.
- VccIO provides the voltage to FIA, DDR logic, Display IO, OPIO
- VccDDQXTX provides the voltage for the DDR IO
- VccTcPhy provides the voltage for the Type C IOs
- VccPCIE provides the voltage for the PCIE PHY, Display PHY, DMI PHY, and DP-IN PHY
VDDQ2 is a third power source for the CPU. It provides the input power for the DRAM I/O part of the memory controller. It can be controlled by directly programming the voltage regulator.
Tiger Lake Overclocking Toolkit
I described the history of Intel’s overclocking toolkit in a previous video on this channel titled: “How is Alder Lake Non-K Overclocking Even Possible?!” Long story short, Intel developed and maintained a technology called the OC Mailbox which contains the entire overclocker’s toolkit. This toolkit is not always the same for each CPU architecture, as sometimes we need different tools. On Tiger Lake, the overclocking toolkit consists of the following tools:

Most, but not all, overclocking tools are available through the BIOS options. For example, per-core voltage configuration is unavailable in the BIOS but can be accessed through XTU.
Notably missing from the OC toolbox are prominent features we know from mainstream desktop like Advanced Voltage Offset, better known as V/F points, and OverClocking Thermal Velocity Boost, or OCTVB.
Turbo Boost 2.0 Ratio Configuration
We all know the Turbo Boost 2.0 technology from its impact on the power limits, but a second significant aspect of Turbo Boost 2.0 is configuring the CPU frequency based on the number of active cores.
Turbo Boost 2.0 Ratio Configuration allows us to configure the overclock for different scenarios ranging from 1 active core to all active cores. That enables us to run some cores significantly faster than others when the conditions are right. Intel provides eight (8) registers to configure the Turbo Boost 2.0 Ratio.
For mainstream platforms where the top SKU has no more than 8 P-cores, like this Core i9-11980HK, these registers are configured from 1-active P-core to 8-active P-cores. However, on platforms with core counts beyond eight cores, we can configure each register by target Turbo Boost Ratio and the number of active cores.
Note that configuring the Turbo Ratios on an active-core count basis is not the same as configuring each core individually. When using Turbo Ratios, we determine an overclock according to CPU usage. For example, if a workload uses four cores, the CPU determines which cores should execute this workload and applies our set frequency to those cores.
Turbo Boost Max 3.0 Technology
In 2016, Intel introduced the Turbo Boost Max Technology 3.0. While carrying the same name, Turbo Boost Max 3.0 is not an iteration of Turbo Boost 2.0.
Turbo Boost Max Technology 3.0 aims to exploit the natural variance in CPU core quality observed in multi-core CPUs. With Turbo Boost Max 3.0, Intel identifies the best cores in your CPU and calls those the “favored cores.” The favored cores are essential for two reasons.
- Intel allows for additional frequency boosts of the favored cores. On the Tiger Lake Core i9-11980HK, two favored P-cores can boost to 5.0 GHz. The six other non-favored cores are limited to 4.9 GHz.
- The operating system will automatically assign the most demanding workloads to these favored cores, ensuring potentially higher performance.

As an extension of the Turbo Boost Max 3.0 technology, Intel has included the Per-Core Ratio Limit in its overclocking toolkit. This tool allows us to control the maximum ratio for each core individually. This enables two crucial new avenues for CPU overclocking.
- It allows users to overclock each core and find its maximum stable frequency individually.
- It allows users to set an aggressive by core usage overclock while constraining the worst cores.
Tiger Lake Adaptive Voltage Mode
Like any previous Intel architecture, there are two main ways of configuring the voltage for the CPU cores: override mode and adaptive mode.
- Override mode specifies a single static voltage across all ratios. It is mainly used for extreme overclocking where stability at high frequencies is the only consideration.
- Adaptive mode is the standard mode of operation. In Adaptive Mode, the CPU relies on the factory-fused voltage-frequency curves to set the appropriate voltage for a given ratio. When configuring an adaptive voltage, it is mapped against the “OC Ratio, ” the highest configured ratio. We’ll get back to that in a minute.
Since Tiger Lake uses FIVR, we can only adjust the core voltage by configuring the CPU PCU via BIOS or specialized tools like XTU.
We can specify a voltage offset for override and adaptive modes. Of course, this doesn’t make much sense for override mode – if you set 1.15V with a +50mV offset, you could just set 1.20V – but it can be helpful in adaptive mode as you can offset the entire V/F curve by up to 500mV in both directions.

Let’s focus on adaptive mode voltage configuration.
When we set an adaptive voltage for a core, this voltage is mapped against the “OC Ratio.” The “OC Ratio” is the highest ratio configured for the CPU across all settings and cores. When you leave everything at default, the default maximum turbo ratio determines the OC ratio. In the case of the Core i9-11980HK, that ratio would be 50X because of the Turbo Boost Max 3.0. The “OC Ratio” equals the highest configured ratio if you overclock.
Specific rules govern what adaptive voltage can be set.
A) the voltage set for a given ratio n must be higher than or equal to the voltage set for ratio n-1.
Suppose our Core i9-11980HK runs 50X at 1.40V. Setting the adaptive voltage, mapped to 50X, lower than 1.40V, is pointless in that case. 50X always runs at 1.40V or higher. Usually, BIOSes may allow you to configure lower values. However, the CPU’s internal mechanisms will override your configuration if it doesn’t follow the rules.

B) the adaptive voltage configured for any ratio below the maximum default turbo ratio will be ignored.
Take the same example of the Core i9-11980HK, specified to run 50X at 1.40V. If you try to configure all cores to 45X and set 1.10V, the CPU will ignore this because it has its own factory-fused target voltage for all ratios up to 50X and will use this voltage. You can only change the voltage of the OC Ratio, which, as mentioned before, on the Core i9-11980HK, is 50X and up.

C) for ratios between the OC Ratio and the next highest factory-fused V/f point, the voltage is interpolated between the set adaptive voltage and the factory-fused voltage.
Returning to our example of a Core i9-11980HK specified to run 50X at 1.40V, let’s say we manually configure the OC ratio to be 54X at 1.5V. The target voltage for ratios 53X, 52X, and 51X will now be interpolated between 1.40V and 1.50V

When we set a global adaptive voltage, it maps this voltage to the OC Ratio for each core in our CPU. So, if our OC Ratio is 52X and the global adaptive voltage is 1.430V, then every core in our Core i9-11980HK CPU has a voltage frequency curve that goes up to 52X at 1.43V. That certainly makes things easier.
One last note: as I mentioned earlier, we can also configure a Per-Core Ratio Limit. Counter-intuitively, this Ratio doesn’t act as a core-specific OC Ratio but as a means to limit what parts of the V/F curve can be used. Let’s use that same example of the 54X at 1.50V. If we set the Per-Core Ratio Limit to 52X, the CPU core will boost up to 5.2 GHz at a voltage interpolated between 54X at 1.50V and 50X at 1.40V.
Adaptive Voltage Mode Configuration
Now that we have all this information, we can figure out how to configure the voltage for this OC Strategy.
First, we have to figure out the default voltage for this CPU. So, I plotted the default voltage frequency curve for this CPU. As you can see from the graph, the maximum CPU ratio of 50X is mapped against 1.417V. So that would be our starting point for setting an adaptive voltage when overclocking.

For entertainment purposes, I also plotted the V/F curve of some other Intel CPUs to see how this Core i9-11980HK Tiger Lake stacks up.

Looking at the 10th gen Core i9-10850K and 11th gen Core i9-11900K processors, both 14nm++, we can see that the V/F curve is very similar to this 10nm SuperFin Core i9-11980HK. The difference is perhaps +100 MHz at an equal voltage in favor of 14nm++ at the top end of the V/F curve.
However, as we know, the 11900K can reach frequencies up to 5.5 GHz, which this Core i9-11980HK cannot. So, given a similar curve and some challenges to achieve the desired high frequencies, perhaps it was a good idea to launch Rocket Lake on desktop and keep Tiger Lake for mobile.
When we compare 11th-gen Tiger Lake with 10nm SuperFin and 12th-gen Alder Lake with 10nm Enhanced SuperFin, which we now have to call Intel 7, we find that near the top end of the V/F curve, 12th gen can achieve the same frequency with 120mV less and achieve +700 MHz at the same voltage.
This difference is even greater when we compare the Core i9-11980HK with the 13th gen Raptor Lake’s halo SKU, the Core i9-13900KS. Raptor Lake uses an enhanced process node dubbed Intel 7 Ultra. Compared to Tiger Lake’s 10nm SuperFin, Raptor Lake achieves +900 MHz at the same voltage and requires 250mV less for the same frequency.
Anyway, let’s return to this Core i9-11980HK.
Since every core has its own voltage-frequency curve, I also looked at the different voltages for each core.

The first thing to note is that every core seems to have a V/F point mapped to 50X, even though only the two favored cores – Core 2 and Core 4 – can boost to that frequency.
Secondly, we also see quite a divergence in maximum voltage. Core 2 only requires 1.33V for 50X, while Core 0 needs 1.417V. Fortunately, our two favored cores have the lowest voltage requirement for 50X.
As I mentioned, setting a global adaptive voltage will apply to all our cores. So, our starting point for the adaptive voltage is 1.417V. In my case, I set the adaptive voltage to 1.43V as I feel 1.4V is already quite high.
BIOS Settings & Benchmark Results
Upon entering the BIOS, go to the Advanced menu
- Enter the Power & Performance submenu
- Enter the CPU – Power Management Control submenu
- Enter the View/Configure Turbo Options submenu
- Set 1-Core, 2-Core, and 3-Core Turbo Ratio Limit Ratio Override to 52
- Set 4-Core, 5-Core, and 6-Core Turbo Ratio Limit Ratio Override to 51
- Set 7-Core and 8-Core Turbo Ratio Limit Ratio Override to 50
- Leave the View/Configure Turbo Options submenu
- Enter the Config TDP Configurations submenu
- Set Power Limit 1 to 4095875
- Set Power Limit 2 to 4095875
- Leave the Config TDP Configurations submenu
- Enter the CPU VR Settings submenu
- Enter the VccIn VR Settings submenu
- Set VR Current Limit to 1023
- Set TDC Current Limit to 32767
- Leave the VccIn VR Settings submenu
- Enter the VccIn VR Settings submenu
- Leave the CPU VR Settings submenu
- Set Power Limit 4 Override to Enabled
- Set Power Limit 4 to 4095875
- Enter the CPU Lock Configuration submenu
- Set CFG Lock to Disabled
- Set Overclocking Lock to Disabled
- Leave the CPU Lock Configuration submenu
- Enter the View/Configure Turbo Options submenu
- Leave the CPU – Power Management Control submenu
- Enter the CPU – Power Management Control submenu
- Leave the Power & Performance submenu
- Enter the OverClocking Performance Menu
- Set OverClocking Feature to Enabled
- Set FIVR Faults to Disabled
- Set FIVR Efficiency to Disabled
- Set VccIn Max Limit to 2400
- Set VccIn Voltage Override to 2300
- Enter the Processor submenu
- Set Per Core Ratio Override to Enabled
- Set Core Max OC Ratio to 52
- Set Core 0, 2, 3, 4, 5, 6, and 7 Max Ratio to 52
- Set Core 1 Max Ratio to 51
- Set Core Voltage Mode to Adaptive
- Set Core Extra Turbo Voltage to 1430
- Leave the Processor submenu
- Leave the OverClocking Performance Menu
- Go to the Chipset menu
- Enter the System Agent (SA) Configuration submenu
- Enter the Memory Configuration submenu
- Enter the Memory submenu
- Set Memory Profile to Custom profile
- Set Memory Reference Clock to 133
- Set Memory Ratio to 30
- Set tCL to 19
- Set tRCD/tRP to 19
- Set tRAS to 39
- Set tCWL to 20
- Set tFAW to 51
- Set tREF1 to 16381
- Set tRFC to 735
- Set tRRD to 0
- Set tRTP to 12
- Set tWR to 24
- Set Memory Voltage to 1.40 Volts
- Enter the Memory submenu
- Enter the Memory Configuration submenu
Then save and exit the BIOS.
We re-ran the benchmarks and checked the performance increase compared to the default operation.
- SuperPI 4M: +7.13%
- Geekbench 6 (single): +9.80%
- Geekbench 6 (multi): +18.56%
- Cinebench R23 Single: +8.92%
- Cinebench R23 Multi: +27.52%
- CPU-Z V17.01.64 Single: +10.12%
- CPU-Z V17.01.64 Multi: +9.11%
- V-Ray 5: +21.65%
- AI Benchmark: +19.92%
- 3DMark Night Raid: +4.10%
- CS:GO FPS Bench: +3.67%
- Tomb Raider: +32.92%
- Final Fantasy XV: +14.66%

Here are the 3DMark CPU Profile scores:
- CPU Profile 1 Thread: +4.33%
- CPU Profile 2 Threads: +2.18%
- CPU Profile 4 Threads: +3.26%
- CPU Profile 8 Threads: +2.20%
- CPU Profile 16 Threads: +11.06%
- CPU Profile Max Threads: +9.37%

The overclocking capabilities of this Tiger Lake CPU aren’t great, and with only a marginal increase of 200 to 300 MHz for each core, we can’t expect drastic performance improvements. We see the largest gains in multi-threaded benchmarks as we increase the all-core Turbo Ratio from 45X to 50X. We get the maximum performance increase in Tomb Raider with +32.92%
When running Prime 95 Small FFTs with AVX-512 enabled, the average CPU core clock is 4151 MHz with 1.112 volts. The average CPU temperature is 94 degrees Celsius. The ambient and water temperature is 26.2 and 31.8 degrees Celsius. The average CPU package power is 121.6 watts.

When running Prime 95 Small FFTs with AVX disabled, the average CPU core clock is 4568 MHz with 1.185 volts. The average CPU temperature is 95 degrees Celsius. The ambient and water temperature is 26.1 and 32.4 degrees Celsius. The average CPU package power is 125.8 watts.

Further Tuning Opportunities
As I was trying out some of the next OC Strategy tactics, I realized there wasn’t much left in this system. That’s for two main reasons.
First, it seems Tiger Lake does not scale particularly well in terms of reaching higher peak frequencies. While seven of the eight cores could easily reach 5.2 GHz at 1.43V in my previous OC strategy, none can run 5.3 GHz stably, even with a significant increase in voltage. The highest frequency validation I could reach was 5.4 GHz with over 1.5v, which was incredibly unstable.
Second, the thermal situation is not good. As you can see from the Prime95 results, this configuration reaches TjMax at only 125W. By using the data from the EFC-X9, we can see that the main issue is heat transfer from the CPU die into the water loop. This thermal transfer issue translates into quite low all-core operating frequencies. In a non-AVX Prime95 workload, the frequency drops from 5 GHz to 4.5 GHz; in an AVX-512 workload, it drops even further to 4.15 GHz.

The only way we could hope to further increase the all-core frequency performance is by alleviating the thermal transfer issues. While undervolting is a strategy that could help, it seems the undervolting range is limited to only 50mV after quick testing. That’s not enough to make a substantial difference.
The next step would be to have a look at the 尔英 (Ěr Yīng) CPU heat spreader and see if any optimizations can be made. Perhaps the contact with the CPU die isn’t optimal? Or perhaps we can change the thermal interface material? Or maybe we can try direct die? I would still like to explore these options, but I will save them for a future video.

Or perhaps it’s just a matter of transistor density. There’s not a lot of information available on the transistor density of Tiger Lake or the capabilities of the 10nm SuperFin process technology. So maybe the chip will hit the thermal limit no matter what cooling solution we throw at it.
Either way, here’s a shortlist for those who’d like to know what further tuning opportunities are available.
Undervolting
Undervolting opportunities are available in the form of an adaptive voltage offset. As discussed earlier in the video, this adaptive voltage offset will apply to the entire voltage-frequency curve of each Core i9-11980HK CPU core. Unfortunately, there’s no Advanced Voltage Offset, better known as V/F Points, available for Tiger Lake. So, finetuning the undervolt is not possible. The maximum undervolt I was able to achieve was only 50mV.
Ring Overclocking
Just like on any modern Intel processor, we can independently tune the voltage and frequency of the Ring. Since Tiger Lake uses FIVR to control the voltage rails, the Ring voltage is independent of any other voltage. That’s different from desktop architectures like Raptor Lake, where the Core i9-11980HK CPU Cores and Ring share the same VccIA voltage rail.
Overclocking the ring is very similar to overclocking the Core i9-11980HK CPU Cores. There’s a voltage-frequency curve up to the maximum default ratio, which, in this case, is 40X. Frequencies beyond 4 GHz can be mapped against a configurable adaptive voltage which works according to the same adaptive voltage rules for the CPU cores I explained earlier in the video.

The factory-fused highest voltage-frequency point for the Ring on this Core i9-11980HK processor is 1.028V at 4 GHz. I achieved a maximum stable Ring frequency of 4.5 GHz at 1.2V when overclocking. The performance improvement from Ring overclocking was minimal.
AVX Performance Tuning
A final topic for performance tuning is AVX. Tiger Lake supports AVX2 and AVX-512 ratio offsets. But using them is a little counter-intuitive.
By default, the offset for both is 0, which means that, according to the Intel documentation, no offset should exist. Thus, in our OC Strategy #3, the AVX2 performance for all but one core should go up to 52X. However, that’s not the case. Furthermore, we’ve seen this odd behavior in the past on Alder Lake!
Here are the AVX rules you need to keep in mind:
- By default, the maximum ratio during an AVX workload is the Turbo Boost 2.0 ratio. Effectively, the AVX2 and AVX512 performance is limited to 4.5 GHz when all cores are active and 4.9 GHz when one core is active.
- The AVX Ratio Offset is applied for each core independently based on the Per Core Ratio Limit. That means setting an offset of -1 would result in a maximum AVX frequency of 4.9 GHz for the favored cores and 4.8 GHz for the non-favored cores.
- Increasing the Per Core Ratio Limit does not affect the maximum AVX frequency. The AVX offset is applied to the default Per Core Ratio Limits, not the manual configuration.
- Setting any ratio offset in the BIOS won’t apply. However, if you change the AVX ratio at runtime using, for example, XTU, then they will become active.

I presume this last point is a bug in the CPU microcode. We saw this issue when testing Alder Lake, and I showed its effect on benchmark performance in a video titled “World’s Fastest Alder Lake.”
Intel Core i9-11980HK: Conclusion
Alright, let us wrap this up.
I was very excited when I found this 尔英 (Ěr Yīng) motherboard with the Core i9-11980HK processor for two reasons:
- I’ve been trying to find ways to try out overclocking mobile processors, and
- I’ve never overclocked a Tiger Lake processor.
So, with this motherboard, I hit two birds with one stone. Overclocking Tiger Lake was an interesting journey for multiple reasons.
First, I was amazed that the motherboard BIOS offered so many overclocking options. I presume the engineers implement the standard Intel BIOS instead of hand-picking the options like other motherboard teams. 为尔英的伙伴們点个赞!
Second, Tiger Lake certainly lags behind Alder Lake regarding peak frequency. At default, 5 GHz already requires 1.4V, and I can barely increase the maximum frequency to 5.2 GHz with 1.43V. And that’s with a highly binned Core i9 variant! Even my Core i5-12400 Alder Lake could achieve 5.3 GHz with 1.3V, and my Core i5-12600KF could reach 5.5 GHz with 1.45V.
Third, in terms of thermal density, this is one of the most challenging configurations I’ve tried. We hit TjMax at a mere 125W! On desktop Intel CPUs, that usually happens at 300W or more. As a result, the all-core frequency is severely limited due to the thermal density challenge, especially in AVX-512 workloads.
But all things considered, I still feel this is one of the most interesting projects I’ve undertaken on this channel. I am tempted to further explore Tiger Lake overclocking capabilities in future videos. I already mentioned addressing the thermal issues, but there’s also the integrated graphics and maybe stopping by the ElmorLabs office to try liquid nitrogen.
Anyway, that’s all for today!
I want to thank my Patreon supporters for supporting my work. As usual, if you have any questions or comments, please drop them in the comment section below.
‘Till the next time!
randhis
such detailed review, i hope you will do more reviews of erying motherbaords, they have updated bios where you can use xmp profile seemlessly. also they have added vapor chamber for the heat issues.
Pieter
Thanks! Would love to do more of these BGA overclocks in the future 🙂
5 Minute Overclock: Intel Core i9-11980HK to 5200 MHz - 5 Minute Overclock
[…] I’ll speedrun you through the BIOS settings and provide some notes and tips along the way. Please note that this is for entertainment purposes only and not the whole picture. Please don’t outright copy these settings and apply them to your system. If you want to learn how to overclock this system, please check out the longer SkatterBencher blog post. […]