SkatterBencher #49: Intel Core i9-13900K Overclocked to 6100MHz
We overclock the Intel Core i9-13900K up to 6100 MHz with the GIGABYTE Z790 Aorus Master motherboard and EK custom loop water cooling.
As I’ve shown with my other Raptor Lake overclocking guides, there is a lot of performance headroom in Intel’s 13th gen Core CPUs. The Core i9-13900K is no different, though it’s already been pushed substantially out of the box. The overclocking journey proved slightly more challenging than expected. Nonetheless, I try to show you how to tame this beast.
Let’s get started!
I hope you enjoy the post.
Intel Core i9-13900K: Introduction
The Intel Core i9-13900K is part of the 13th generation Intel Core processor lineup.
Intel Raptor Lake builds on top of the performance hybrid architecture introduced with 12th gen Alder Lake. So, it also features Performance P-Cores and Efficient E-cores. Like Alder Lake, it is built on the Intel 7 process technology, formerly known as 10nm Enhanced SuperFin (ESF). While it may sound like Raptor Like is not much different from its predecessor, the spec sheet reads quite impressive.
Compared to its Core i9-12900K predecessor, launched one year ago, the 13900K has a 600 MHz higher maximum turbo boost frequency and eight additional threads while costing $60 less.


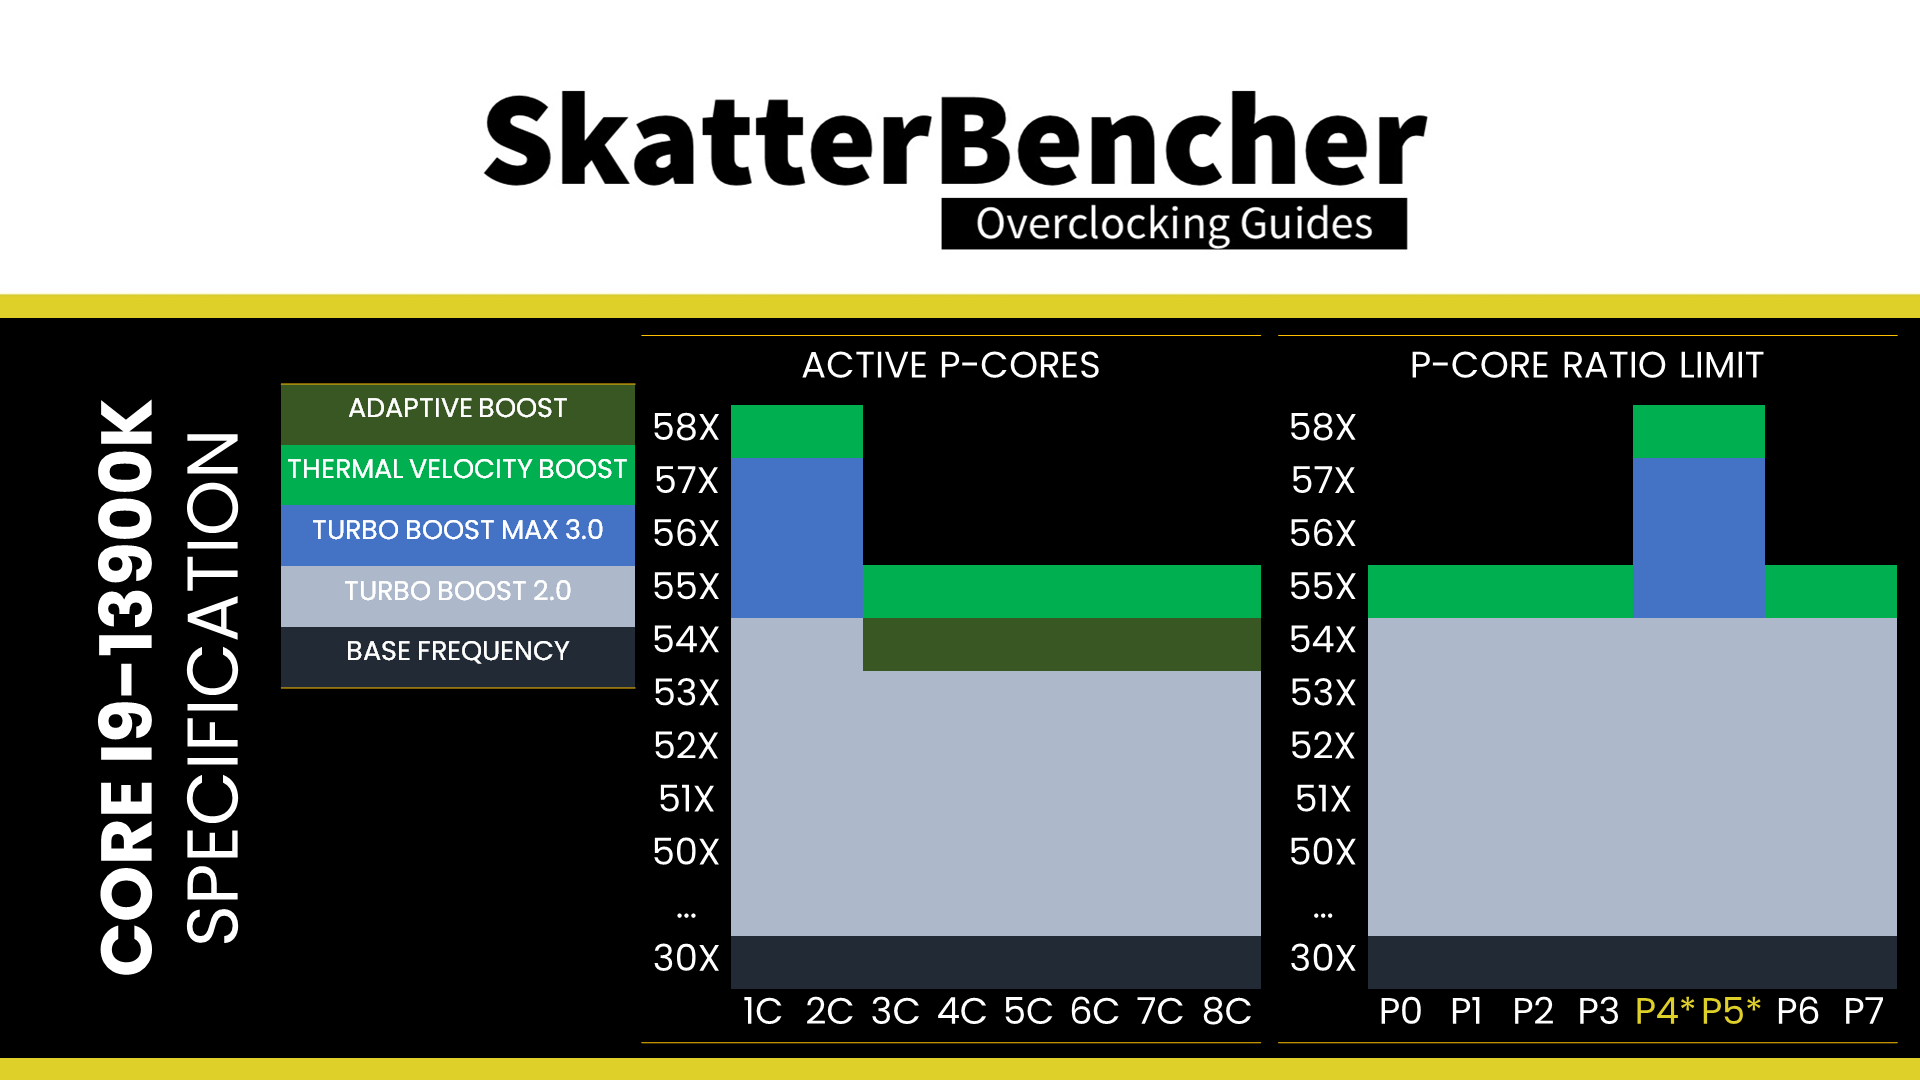
The Core i9-13900K has several automatic frequency-boosting technologies for the P-cores. The base configuration isn’t entirely clear to everyone, so I want to give a quick overview.
- The P-Core base frequency is 3.0 GHz
- The Turbo Boost 2.0 (TBT2) frequency is 5.4 GHz up to 2 active P-cores and 5.3 GHz up to 8 active P-cores. Every P-core can boost to 5.4 GHz.
- The Turbo Boost Max 3.0 (TBTM3) frequency is 5.7 GHz, for up to 2 active P-cores. Only the favored cores can boost to 5.7 GHz. The others are limited to 5.4 GHz.
- When Thermal Velocity Boost (TVB) is active, the two favored P-cores can boost to 5.8 GHz, and every non-favored P-cores can boost to 5.5 GHz.
- When Adaptive Boost Technology (ABT) is enabled, up to 8 P-cores can boost to 5.4 GHz
- When both Adaptive Boost Technology and Thermal Velocity Boost are active, up to 8 P-cores can boost to 5.5 GHz.
- The AVX negative ratio offset is -5. When the AVX negative ratio offset is activated, the maximum CPU ratio is the Turbo Boost 2.0 limit. The ratio is offset per core from their maximum allowed ratio. So, the favored cores can run up to 5.3 GHz, and the non-favored cores can run up to 5 GHz.
Thermal Velocity Boost is enabled when the CPU temperature is below 70 degrees Celsius.
In this article, we cover four different overclocking strategies:
- First, we try out GIGABYTE’s Instant 6GHz Profile, unleash Turbo Boost 2.0, and enable XMP 3.0
- Second, we try out the GIGABYTE Enhanced Multi-Core Performance profile
- Third, we get into the simple manual tuning of a Raptor Lake processor
- Lastly, we finetune our manual overclock with a couple of expert techniques

However, before we jump into overclocking, let us quickly review the hardware and benchmarks used in this article.
Intel Core i9-13900K: Platform Overview
The system we’re overclocking today consists of the following hardware.
| Item | SKU | Price (USD) |
| CPU | Intel Core i9-13900K | 589 |
| Motherboard | GIGABYTE Z790 Aorus Master | 650 |
| CPU Cooling | EK-Quantum Velocity2 EK-Quantum Power Kit Velocity² 360 | 137 686 |
| Fan Controller | ElmorLabs Easy Fan Controller ElmorLabs EVC2SX | 20 32 |
| Memory | Aorus DDR5-6200 | 250 |
| Power Supply | Enermax MAXREVO 1500W | 370 |
| Graphics Card | ASUS ROG Strix RTX 2080 TI | 880 |
| Storage | AORUS RGB 512 GB M.2-2280 NVME | 120 |
| Chassis | Open Benchtable V2 | 200 |
ElmorLabs EFC & EVC2
I explained how I use ElmorLabs products in SkatterBencher #34. By connecting the EFC to the EVC2 device, I monitor the ambient temperature (EFC), water temperature (EFC), and fan duty cycle (EFC). I include the measurements in my Prime95 stability test results.
I also use the ElmorLabs EFC to map the radiator fan curve to the water temperature. Without going into too many details: I have attached an external temperature sensor from the water in the loop to the EFC. Then, I use the low/high setting to map the fan curve from 25 to 40 degrees water temperature. I use this configuration for all overclocking strategies.
The main takeaway from this configuration is that it gives us a good indicator of whether the cooling solution is saturated. Suppose the CPU is at TjMax, and the water temperature exceeds 40 degrees Celsius. In that case, it means the fans are at maximum speed, and thus the cooling solution is saturated. Improving the cooling solution by adding radiators or changing to more powerful fans would be the right action.
Suppose the CPU is at TjMax and the water temperature is below 40 degrees Celsius. In that case, it means the cooling solution is not saturated. Therefore, to improve the CPU temperature, you may enhance the thermal transfer of the CPU heat into the loop by changing the thermal paste, delidding, or changing the water block.

Intel Core i9-13900K: Benchmark Software
We use Windows 11 and the following benchmark applications to measure performance and ensure system stability.
- SuperPI 4M https://www.techpowerup.com/download/super-pi/
- Geekbench 5 https://www.geekbench.com/
- Cinebench R23 https://www.maxon.net/en/cinebench/
- CPU-Z https://www.cpuid.com/softwares/cpu-z.html
- V-Ray 5 https://www.chaosgroup.com/vray/benchmark
- AI-Benchmark https://ai-benchmark.com/
- 3DMark CPU Profile https://www.3dmark.com/
- 3DMark Night Raid https://www.3dmark.com/
- CS:GO FPS Bench https://steamcommunity.com/sharedfiles/filedetails/?id=500334237
- Shadow of the Tomb Raider https://store.steampowered.com/app/750920/Shadow_of_the_Tomb_Raider_Definitive_Edition/
- Final Fantasy XV http://benchmark.finalfantasyxv.com/na/
- Prime 95 https://www.mersenne.org/download/

Intel Core i9-13900K: Stock Performance
Before starting overclocking, we must check the system performance at default settings.
Please note that out of the box, the Z790 Aorus Master unleashes the Turbo Boost 2.0 power limits. So, to check the performance at default settings, you must enter the BIOS and
- Switch to Advanced Mode
- Enter the Advanced CPU Settings submenu
- Set Turbo Power Limits to Intel POR
Then save and exit the BIOS.
The default Turbo Boost 2.0 parameters for the Core i9-13900K are as follows:
- PL1: 253W
- PL2: 253W
- Tau: 56sec
- ICCMax: 307A
Here is the benchmark performance at stock:
- SuperPI 4M: 26.592 seconds
- Geekbench 5 (single): 2,178 points
- Geekbench 5 (multi): 23,321 points
- Cinebench R23 Single: 2,276 points
- Cinebench R23 Multi: 39,012 points
- CPU-Z V17.01.64 Single: 927.9 points
- CPU-Z V17.01.64 Multi: 17,000.4 points
- V-Ray 5: 26,718 vsamples
- AI Benchmark: 6,192 points
- 3DMark Night Raid: 84,566 points
- CS:GO FPS Bench: 580.32 fps
- Tom Raider: 195 fps
- Final Fantasy XV: 199.22 fps

Here are the 3DMark CPU Profile scores at stock
- CPU Profile 1 Thread: 1,213
- CPU Profile 2 Threads: 2,425
- CPU Profile 4 Threads: 4,577
- CPU Profile 8 Threads: 8,619
- CPU Profile 16 Threads: 11,239
- CPU Profile Max Threads: 15,876

When running Prime 95 Small FFTs with AVX2 enabled, the average CPU P-core clock is 5030 MHz, and the average CPU E-core clock is 3843 MHz with 1.133 volts. The average CPU temperature is 84 degrees Celsius. The ambient and water temperature is 26.2 and 37.0 degrees Celsius. The average CPU package power is 253.0 watts.

When running Prime 95 Small FFTs with AVX disabled, the average CPU P-core clock is 5290 MHz, and the average CPU E-core clock is 4107 MHz with 1.247 volts. The average CPU temperature is 72 degrees Celsius. The ambient and water temperature is 25.8 and 37.0 degrees Celsius. The average CPU package power is 252.9 watts.

Now, let us try our first overclocking strategy.
However, before we get going, make sure to locate the CMOS Clear button
Pressing the Clear CMOS button resets all your BIOS settings to default which is helpful if you want to start your BIOS configuration from scratch. However, it does not delete any of the BIOS profiles previously saved. The Clear CMOS button is located on the rear IO panel.

OC Strategy #1: Instant 6GHz + Unleashed Turbo 2.0 + XMP 3.0
In our first overclocking strategy, we try GIGABYTE’s highly advertised Instant 6GHz technology, unleash the Intel Turbo Boost 2.0 power limits, and enable Intel XMP 3.0.
Turbo Boost 2.0 Technology
Intel Turbo Boost 2.0 Technology allows the processor cores to run faster than the base operating frequency. Turbo Boost is available when the processor works below its rated power, temperature, and current specification limits. The ultimate advantage is opportunistic performance improvements in both multi-threaded and single-threaded workloads.
The turbo boost algorithm works according to a proprietary EWMA formula which stands for Exponentially Weighted Moving Average. There are three parameters to consider: PL1, PL2, and Tau.

- Power Limit 1, or PL1, is the threshold the average power won’t exceed. Historically, this has always been set equal to Intel’s advertised TDP. PL1 should not be set higher than the thermal solution cooling limits.
- Power Limit 2, or PL2, is the maximum power the processor can use for a limited amount of time.
- Tau, in seconds, is the time window for calculating the average power consumption. The CPU reduces the CPU frequency if the average power consumed is higher than PL1.
Turbo Boost 2.0 technology is available on Raptor Lake as it’s the primary driver of performance over the base frequency.
Similar to Alder Lake, but a significant change from any previous Intel Core processors is that, at least for the K-SKU CPUs, PL1 is by default equal to PL2. That differs from before, where PL1 would equal the TDP, and PL2 would range from 200 to 250W. This change effectively means that Intel has enabled near-unlimited peak turbo by default!
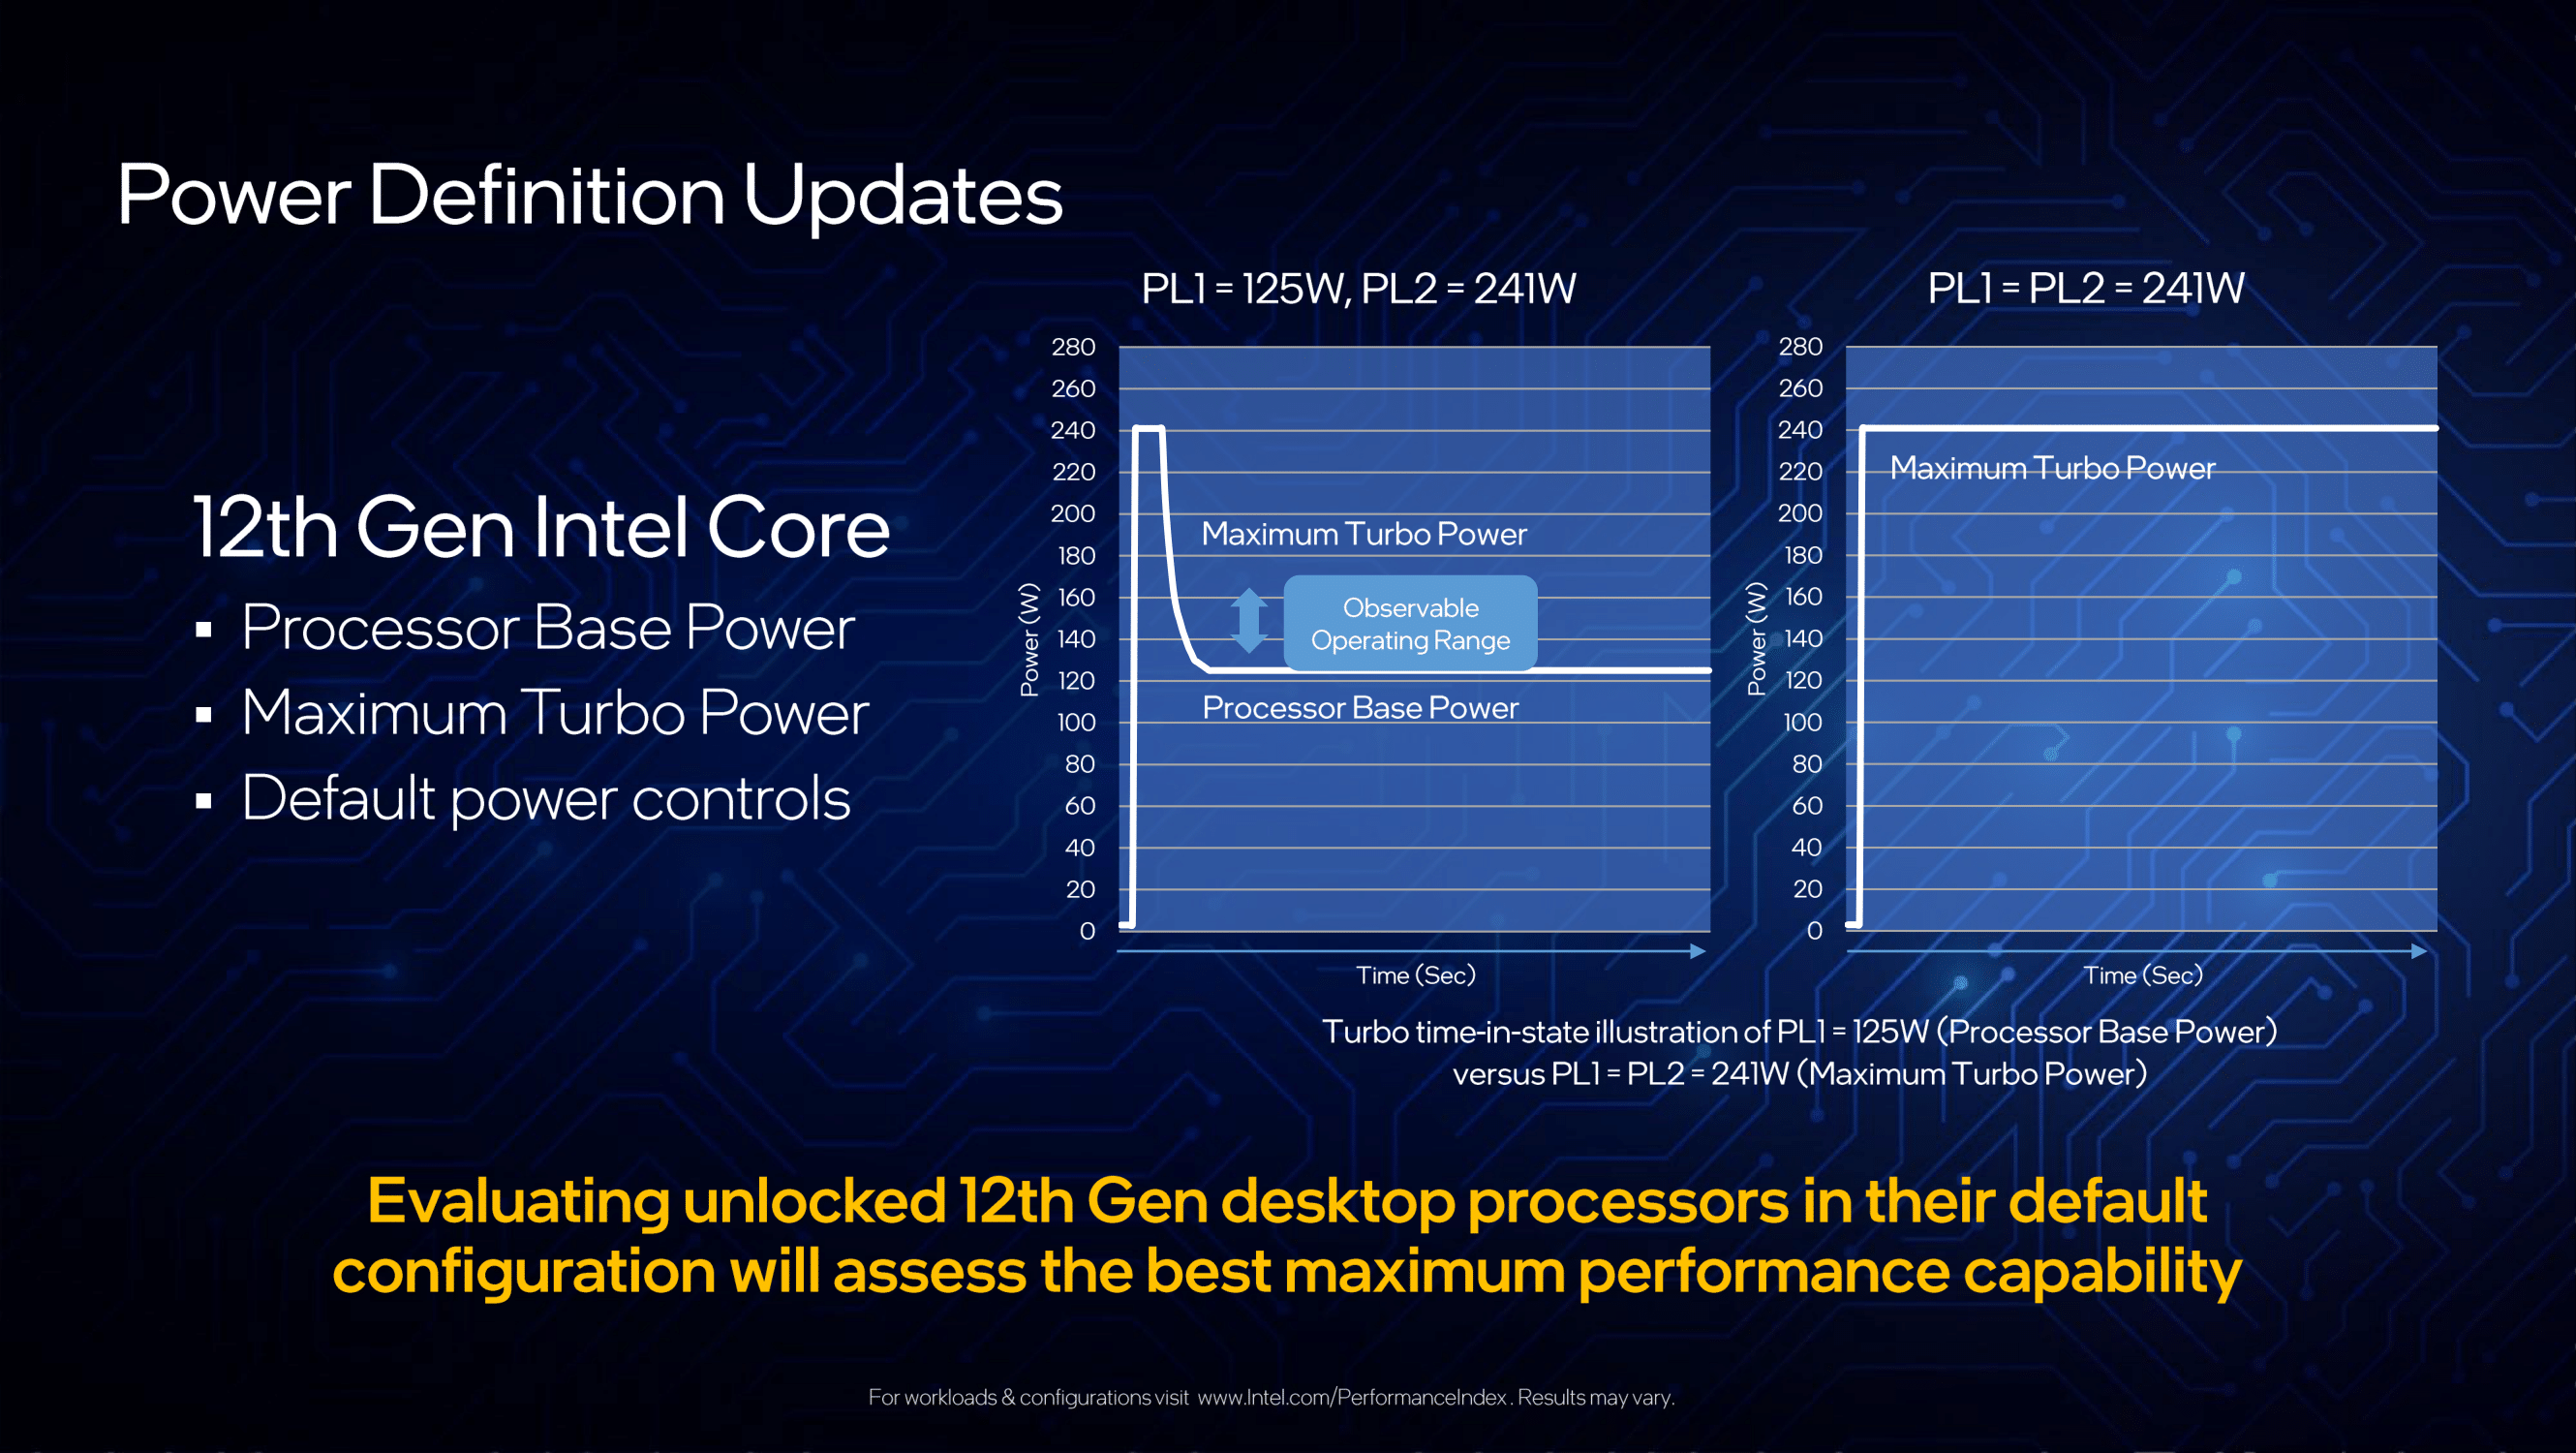
For the 13900K, the maximum power limit is set at 253W.
Adjusting the power limits is strictly speaking not considered overclocking, as we don’t change any of the CPU’s thermal, electrical, or frequency parameters. Intel provides the Turbo Boost parameters as guidance to motherboard vendors and system integrators to ensure their designs enable the base performance of the CPU. Better motherboard designs, thermal solutions, and system configurations can facilitate peak performance for longer.
Note that on some motherboards, including this Z790 Aorus Master, the default setting has fully unleashed the Turbo Boost 2.0 power limits. So it requires no additional configuration.
13900K Instant 6 GHz
In a press release from October 21, 2022, GIGABYTE introduces their Instant 6GHz technology as an exclusively designed feature of the GIGABYTE Z790 motherboards to improve the performance of the Core i9-13900K processor.
While GIGABYTE does a good job avoiding the comparison with the teased 6GHz Core i9-13900KS, one cannot help but make the comparison. However, assuming the Core i9-13900KS processor extends the Thermal Velocity Boost Frequency by 200 MHz, GIGABYTE’s Instant 6GHz technology should provide slightly higher performance.
The technology increases the Turbo Boost Max 3.0 frequency for the favored cores from 5.7 GHz to 6 GHz. Thus, it allows for a 6 GHz boost even if the CPU temperature is above the 70 degrees Celsius Thermal Velocity Boost threshold.

Intel Extreme Memory Profile 3.0
Intel Extreme Memory Profile, or XMP, is an Intel technology that lets you automatically overclock the system memory to improve system performance. It extends the standard JEDEC specification and allows a memory vendor to program different settings onto the memory stick.
Intel Extreme Memory Profile 3.0 is the new XMP standard for DDR5 memory. It is primarily based on the XMP 2.0 standard for DDR4 but has additional functionality.

There’s a lot more to the new XMP 3.0 standard, which is outside the scope of this overclocking guide. If you’re interested in more details about XMP 3.0, check out my Alder Lake launch article.
BIOS Settings & Benchmark Results
Upon entering the BIOS
- In Easy Mode, click XMP/EXPO – Disabled
- Switch to Advanced Mode
- Set CPU Upgrade to Instant 6GHz
Then save and exit the BIOS.
We re-ran the benchmarks and checked the performance increase compared to the default operation.
- SuperPI 4M: +2.05%
- Geekbench 5 (single): +4.50%
- Geekbench 5 (multi): +10.69%
- Cinebench R23 Single: +2.46%
- Cinebench R23 Multi: +3.50%
- CPU-Z V17.01.64 Single: +3.94%
- CPU-Z V17.01.64 Multi: +0.35%
- V-Ray 5: +2.79%
- AI Benchmark: +9.08%
- 3DMark Night Raid: +3.28%
- CS:GO FPS Bench: +0.98%
- Tomb Raider: +0.51%
- Final Fantasy XV: +1.06%

Here are the 3DMark CPU Profile scores
- CPU Profile 1 Thread: +1.73%
- CPU Profile 2 Threads: +0.99%
- CPU Profile 4 Threads: +1.27%
- CPU Profile 8 Threads: +1.91%
- CPU Profile 16 Threads: +1.40%
- CPU Profile Max Threads: +3.04%

Since we’re not pushing the clocks that much higher than stock – the 6 GHz only affects up to two active P-cores – we don’t expect that much improvement in performance. That said, improving the memory performance by using XMP 3.0 does help in memory-sensitive benchmark applications. We see the highest performance improvement of +10.69% in Geekbench 5.
When running Prime 95 Small FFTs with AVX2 enabled, the average CPU P-core clock is 5033 MHz, and the average CPU E-core clock is 4199 MHz with 1.213 volts. The average CPU temperature is 100 degrees Celsius. The ambient and water temperature is 27.6 and 42.0 degrees Celsius. The average CPU package power is 317.4 watts.

When running Prime 95 Small FFTs with AVX disabled, the average CPU P-core clock is 5350 MHz, and the average CPU E-core clock is 4300 MHz with 1.309 volts. The average CPU temperature is 100 degrees Celsius. The ambient and water temperature is 27.4 and 41.0 degrees Celsius. The average CPU package power is 325.4 watts.

OC Strategy #2: Enhanced Multi-Core Performance
In our second overclocking strategy, we rely on GIGABYTE’s Enhanced Multi-Core Performance profile
13900K Enhanced Multi-Core Performance (EMCP)
Enhanced Multi-Core Performance, or EMCP, is the second of four automatic overclocking profiles available on the Z790 Aorus Master. Unlike the Instant 6GHz profile from OC Strategy #1, EMCP does not increase the maximum turbo boost frequency. Instead it sets all P-cores to run at the highest configured turbo ratio.
On the Core i9-13900K, all P-cores can run at 5.8 GHz in all scenarios ranging from 1-active P-core to 8-active P-cores. The E-core frequency remains the same at 4.3 GHz as default.

BIOS Settings & Benchmark Results
Upon entering the BIOS
- In Easy Mode, click XMP/EXPO – Disabled
- Switch to Advanced Mode
- Set Enhanced Multi-Core Performance to Enabled
Then save and exit the BIOS.
We re-ran the benchmarks and checked the performance increase compared to the default operation.
- SuperPI 4M: +0.47%
- Geekbench 5 (single): +5.42%
- Geekbench 5 (multi): +11.06%
- Cinebench R23 Single: +0.09%
- Cinebench R23 Multi: -0.79%
- CPU-Z V17.01.64 Single: +1.91%
- CPU-Z V17.01.64 Multi: -0.57%
- V-Ray 5: +1.49%
- AI Benchmark: +12.31%
- 3DMark Night Raid: +4.94%
- CS:GO FPS Bench: +1.91%
- Tomb Raider: +0.51%
- Final Fantasy XV: +0.26%

Here are the 3DMark CPU Profile scores
- CPU Profile 1 Thread: +0.08%
- CPU Profile 2 Threads: +0.04%
- CPU Profile 4 Threads: +2.03%
- CPU Profile 8 Threads: +2.22%
- CPU Profile 16 Threads: +6.82%
- CPU Profile Max Threads: +3.91%

With EMCP, we increase the processor P-core significantly over the stock settings from 5.5 GHz to 5.8 GHz in all-core workloads. Therefore, we expect a significant performance uplift, especially in multi-threaded benchmarks. However, the voltages required for 5.8 GHz are pretty high; thus, in all-core workloads, the CPU hits TjMax much more quickly than before. So in benchmarks like Cinebench R23, we see that the performance is slightly lower than stock. We have the best performance improvement of +12.31% in AI Benchmark.
When running Prime 95 Small FFTs with AVX2 enabled, the average CPU P-core clock is 4926 MHz, and the average CPU E-core clock is 3829 MHz with 1.244 volts. The average CPU temperature is 100 degrees Celsius. The ambient and water temperature is 25.8 and 40.0 degrees Celsius. The average CPU package power is 289.2 watts.

When running Prime 95 Small FFTs with AVX disabled, the average CPU P-core clock is 5162 MHz, and the average CPU E-core clock is 4027 MHz with 1.331 volts. The average CPU temperature is 100 degrees Celsius. The ambient and water temperature is 25.8 and 40.0 degrees Celsius. The average CPU package power is 296.4 watts.

OC Strategy #3: Simple Manual Overclock
In our third overclocking strategy, we pursue a simple manual overclock. At least, that was the plan. But the simple overclock turned out to become more in-depth than anticipated.
So, rather than my usual approach of explaining the overclocking technologies, I go over my overclocking process step by step. I hope it shows you the thought process and how we use specific overclocking tools.
We can learn quite a bit from the benchmark and stability results of the previous two overclocking strategies.
Specifically, it’s interesting that the Prime95 non-AVX P-core frequency when we enable EMCP is almost 200 MHz lower when we unleash Turbo Boost 2.0. It tells us that the voltage-frequency curve used when enabling EMCP pushes the effective voltage under an all-core load too high. That causes the CPU to hit the TjMax thermal limit faster and thus forces the CPU to downclock quicker, resulting in a lower frequency on average.
So, we know that tuning the voltage-frequency curve at frequencies below the maximum ratio is vital for extracting more performance.Before we can start tuning and adjusting voltages, let’s first look at how voltages and frequencies are set on Raptor Lake CPUs.
Core i9-13900K Raptor Lake Overclocking Theory
VccIA Voltage Rail, V/F Curves, AC DC Loadline, & VRM Loadline
On Raptor Lake, the VccIA voltage rail drives the voltage for the CPU cores, P-core and E-core, and the Ring. That means a single voltage is used for all these parts of the CPU. How we configure that voltage is straightforward yet complex.

There are three key aspects to understanding how voltage is configured on Intel platforms: the CPU, the motherboard design, and the voltage regulator. Let’s start with the CPU side of the story.

V/F Curves
An Intel CPU relies on many factory-fused voltage-frequency curves, or V/F curves, to regulate its dynamic compute performance behavior. A V/F curve describes the relationship between an operating frequency and the voltage required for that frequency. Many parts inside your CPU have a V/f curve, including those relevant to the VccIA voltage rail:
- Each of the 8 P-cores
- Each of the 4 E-core groups of 4 cores
- The ring
In the case of the Core i9-13900K, the VccIA voltage rail is affected by no less than 13 different voltage-frequency curves. Based on these V/F curves, to get a specific voltage provided via the VccIA voltage rail, the CPU issues an SVID request to the voltage controller.
The VID requested is the highest among all the requested voltages according to every V/F curve affecting the voltage rail.

Let’s take an example:

The highest voltage requested according to the relevant V/F curves is 1.40V by P-Core 0. That would be the VID request to the voltage controller.
Here’s another example:

The highest voltage requested according to the relevant V/F curves is 1.30V by the Ring. That would be the SVID request to the voltage controller.
The goal of the SVID voltage request from the CPU to the voltage regulator is that the effective voltage at the CPU die is equal to the requested voltage. However, as overclockers and enthusiasts know very well, that’s not always the case. That’s because there are a lot of electrical components between the voltage regulator and the CPU die.
To avoid having a different voltage provided to the CPU die than the requested voltage, we have two main tools: (1) AC DC loadline and (2) VRM loadline.
AC DC Loadline
The AC DC loadline is designed for motherboard engineers to bring into the voltage-frequency curve equation the electrical impedance of the motherboard design. Electrical impedance is the opposition to alternating current and is affected by the VRM components, the PCB layout, and quality.
Electrical impedance can significantly affect the effective voltage at the CPU die. Therefore, there may be a significant difference between the requested and effective voltage. We can define the AC DC loadline parameters to account for this difference.
Adjusting the AC loadline offsets the requested voltage, defined by the factory-fused voltage-frequency curve, to account for any electrical impedance.
For example, suppose we know that a 1.4V voltage output by the voltage controller, as requested by the CPU, results in an effective voltage of 1.35V at the CPU die due to electrical impedance. In that case, we can configure the AC loadline such that the CPU requests 1.45V instead.


Adjusting the DC loadline informs the CPU about the expected effective voltage at the CPU die.
For example, suppose the voltage-frequency point is 1.4V, but we’ve configured the AC loadline such that it’s bumped up to 1.45V. If we don’t tell the CPU that a 1.45V VID request results in a 1.4V effective core voltage, then the CPU assumes the effective voltage is 1.45V. That skews any power management metrics that rely on the VID information.


By adjusting the DC loadline to account for the expected difference in voltage between the requested VID and the effective voltage, we ensure the CPU power management unit has the correct information to do its power calculations. If we don’t do this, we end up with power consumption reporting vastly different from reality which may impact the CPU’s Turbo Boost behavior.
Before we look at how to set up the AC DC loadline, we must talk about the VRM loadline.
The VRM loadline
The VRM loadline is essential for two reasons.
- First, it determines the Vdroop, which is the decrease in voltage during a sustained heavy workload.
- Second, it determines the undershoot and overshoot, which is the voltage increase or decrease during a transient load.
Vdroop is the decrease in voltage when the CPU goes from idle to load. You want your CPU to be stable in all scenarios, so knowing the lowest voltage the CPU runs at is very important. After all, if the voltage is too low, the overclock won’t be stable.
Undershoot and its counterpart, overshoot, is a brief voltage spike that occurs when the CPU switches from idle to load or from load to idle. These spikes cannot be measured easily and usually require an expensive oscilloscope to detect. I highly recommend the ElmorLabs article titled VRM Load-Line Visualized to see a great picture of undershoot and overshoot in action.
While undershoot and overshoot are temporary spikes, an undershoot that’s too low can also cause instability.

The VRM loadline setting is relevant to our overclock in two ways.
- First, it helps control the voltage in heavy workloads. Enthusiasts often rely on VRM loadline tuning to decrease the voltage in a heavy workload, which yields lower power consumption and operating temperatures.
- Second, since the VRM loadline can significantly affect the effective CPU core voltage, we must account for it when setting the DC loadline.
Adaptive Voltage Mode
There are two main ways of configuring the voltage for the CPU cores: override mode and adaptive mode.
- Override mode specifies a single static voltage across all ratios. It is mainly used for extreme overclocking purposes where stability at high frequencies is the only consideration.
- Adaptive mode is the standard mode of operation. In Adaptive Mode, the CPU relies on the V/F curves to set the appropriate voltage for the VccIA voltage rail.
Both override and adaptive mode settings are configurable via the CPU registers. So, in effect, we control the CPU VID request to the voltage controller. That’s Intel’s intended way of overclocking.

Of course, most voltage controllers also allow independent configuration. However, for this guide, let’s ignore the capabilities of the voltage controllers and focus on Intel’s intended way of overclocking.
We can specify a voltage offset for override and adaptive modes. Of course, this doesn’t make much sense for override mode – if you set 1.35V with a +50mV offset, you could just set 1.40V. But it can be helpful in adaptive mode as you can offset the entire V/F curve by up to 500mV in both directions.
As I mentioned, Intel offers great granularity for tuning the many V/F curves inside the CPU. Let’s forget about the E-cores and Ring to keep things simple and assume a case where we set a global adaptive voltage for the CPU P-cores. Now let’s dig into what happens when we set a global adaptive voltage.

First, disregarding any user-set global or V/f point offsets, the adaptive voltage set in the BIOS is mapped against what’s called the “OC ratio.” The “OC Ratio” is the highest ratio configured for the CPU. When you leave everything at default, the default maximum turbo ratio determines the OC Ratio. In the case of the 13900K, that ratio is 58X, which is the Thermal Velocity Boost Frequency. When you manually overclock, the OC ratio is the highest ratio you configure across all the various settings and options.

Second, specific rules govern what adaptive voltage can be set.
A) the voltage set for a given ratio n must be higher than or equal to the voltage set for ratio n-1.
Suppose our 13900K runs 58X at 1.45V. In that case, setting the adaptive voltage, mapped to 58X, lower than 1.45V, is pointless. 58X always runs at 1.45 or higher. Usually, BIOSes allow you to configure lower values. However, the CPU’s internal mechanisms override your configuration if it doesn’t follow the rules.

B) the adaptive voltage configured for any ratio below the maximum default turbo ratio is ignored.
Take the same example of the 13900K, specified to run 58x at 1.45V. Suppose you try to configure all cores to 55x and set 1.45V. In that case, the CPU ignores this because it has its own factory-fused target voltage for all ratios up to 58X and uses this voltage. You can only change the voltage of the OC Ratio, which, as mentioned before, on the 13900K, is 58X and up.

C) for ratios between the OC Ratio and the next highest factory-fused V/f point, the voltage is interpolated between the set adaptive voltage and the factory-fused voltage.

Returning to our example of our 13900K specified to run 58X at 1.45V, let’s say we manually configure the OC ratio to be 62X at 1.50V. The target voltage for ratios 59X, 60X, and 61X is now interpolated between 1.45V and 1.50V.
So, in conclusion.
The adaptive voltage set in BIOS is mapped against the “OC Ratio.” Unless explicitly programmed, the OC Ratio is the highest ratio configured for the CPU across all settings, including by core usage, per core ratio limit, and OCTVB. The voltage for ratios lower than the OC ratio is set either by its factory-fused V/f point or, if there’s no V/f point, interpolated between the next and previous V/f point.
Advanced Voltage Offset – V/F Points
Advanced voltage offset, or V/F Points, is an extension of the Adaptive Voltage as it exposes some of the points on the V/f curve to the end-user and allows for manual adjustment of these points. The amount of V/f points is not architectural and can differ between SKUs.
The primary purpose of the Advanced Voltage Offset is to provide end-users with the ability to under-volt their CPUs at specific parts of the V/f curve. In addition to undervolting, this feature also allows overvolting.
Overclockers commonly use the Advanced Voltage Offset function in two ways.
- First, you configure a positive voltage offset for the highest V/f point, which helps achieve a higher single-threaded boost frequency.
- Second, you configure a negative voltage offset for the second-highest V/f point. That helps achieve lower voltage for all-core boost, which results in a lower temperature in all-core boost, and thus potential additional overclocking headroom.
On Raptor Lake, there are 15 distinct voltage-frequency points. However, only points one to eleven are used. Furthermore, some points can be copies of other points. On the 13900K, the V/F points are as follows:
- V/F Point 1: 8X
- V/F Point 2: 14X
- V/F Point 3: 24X
- V/F Point 4: 34X
- V/F Point 5: 43X
- V/F Point 6: 51X
- V/F Point 7: 54X
- V/F Point 8: 57X
- V/F Point 9: 58X
- V/F Point 10: 58X
- V/F Point 11: 58X
V/F Point 7 matches the Turbo Boost 2.0 frequency, V/F Point 8 matches the Turbo Boost Max 3.0 frequency, V/F Point 9 matches the Thermal Velocity Boost frequency, and V/F Point 11 matches the OC ratio. V/F Point 10 is a copy of V/F Point 9.

Ideally, we would now adjust the V/F Curve with the following modifications:
- Offset V/F Points 7, 8, and 9 with a negative value to undervolt the CPU. That reduces the effective voltage when the CPU reduces the frequency in extreme workloads, resulting in higher average frequencies
- Offset V/F Point 11 with a positive value to overvolt the CPU. That enables additional frequency headroom, allowing us to push the CPU frequency higher in single-threaded or light workloads.

Lastly, unfortunately, it looks like the implementation of the V/F Points is not mature yet. There are quite a few issues when using it for a daily overclock. Two problems, in particular, can be frustrating:
- Sometimes the V/F Points don’t work correctly in combination with 100 MHz BCLK. An easy workaround is to have the BCLK frequency slightly lower or higher than 100 MHz.
- Sometimes programming V/F Point 9 conflicts with V/F Point 10. The easy workaround is to program both V/F Points to the same value.
Also, sometimes motherboards have auto-rules that automatically set an adaptive voltage when end-users set high CPU ratios. It’s important to know that V/F Point 11 adds to the adaptive voltage. If you’re not careful and leave the adaptive voltage set at Auto, you may end up with really high voltage. The easy workaround here is to set the adaptive voltage manually.
Turbo Ratios
Now that we understand how voltage works on Raptor Lake, let’s look at how the CPU ratios are configured. Generally speaking, on Intel platforms, there are two ways to configure the CPU ratio manually: sync all cores or use turbo ratio configuration.
Sync All Cores sets a single fixed ratio applied to all cores, which is very much the historical way of Intel CPU overclocking. Turbo Ratio configuration allows us to modify the default Intel frequency specification and configure an overclock for various scenarios.
There are three critical elements of understanding any Turbo Ratio configuration:
- You can configure the maximum allowed CPU core ratio for any amount of active cores
- You can configure the maximum allowed CPU core ratio for a given CPU core
- The turbo ratio configuration for P-core and E-cores is independent.
To explain the first point, let’s take the default configuration of the 13900K. The 13900K has a total of 8 P-cores. Therefore, we can configure the maximum allowed P-core ratio for when 1 P-core is active, when 2 P-cores are active, all the way up to when 8 P-cores are active.
To explain the second point, let’s again consider the 13900K specification. The 13900K has 8 P-Cores, two of which can boost 300 MHz higher than the other six. Those cores are called the favored cores and are part of the Turbo Boost Max 3.0 Technology. In my Rocket Lake launch article, I highlighted that Intel had introduced a new overclocking tool called Per Core Ratio Limit. This technology is also available on Raptor Lake. It allows us to set a maximum ratio for each P-core individually.

To explain the third point, again, let’s refer to the 13900K specification. The CPU has a total of eight P-cores and sixteen E-cores. While each P-core can boost up to 5.4 GHz, the E-cores can only boost up to 4.3 GHz.
The P-core rules for the maximum allowed frequency also apply to the E-cores. However, with one major caveat: the E-core CPU ratio can only be controlled in groups of 4 E-cores. So, for the 13900K, since it has sixteen E-cores in total, we can configure the maximum allowed core ratio for a total of four groups of four E-cores. However, we can still configure the maximum allowed frequency for 1 active E-core up to 16 active E-cores.

AVX Negative Ratio Offset
AVX negative ratio offset is a feature that allows the CPU to reduce the operating ratio when it detects AVX instructions. It is a valuable tool to achieve maximum performance for both SSE and AVX workloads
While AVX negative ratio offset has been on Intel CPUs for ages, since Alder Lake, there’s been a couple of changes in the behavior. Here are the key things to know:
- First, on Raptor Lake, the AVX negative ratio offset is only applied to the P-cores. The E-core frequency is unaffected.
- Second, by default, the maximum ratio during an AVX workload is the Turbo Boost 2.0 ratio. If you want an offset of 0, so AVX workload doesn’t reduce the frequency, you’ll need to set 0 manually.
- Third, the AVX negative offset is referenced against each core’s maximum ratio limit since Raptor Lake supports per P-core ratio control. That is important if you’re using the Per-Core Ratio Limit function to restrict the worst cores from boosting to the maximum frequency.
- Lastly, Intel has changed how it flags an AVX workload. The effect is that some light AVX workloads will no longer trigger the AVX negative offset. We can demonstrate this new behavior using Y-cruncher.
We used the Y-cruncher component tester to test various AVX workloads on the 13900K. Four of the 6 pure AVX2 workloads trigger a frequency reduction when an AVX Negative Ratio is set. For the other two workloads, the frequency remains elevated.

Core i9-13900K Raptor Lake Overclocking Practical
Now that we know everything there is to know about the voltage and ratios of the Core i9-13900K let’s get started with our “simple” overclock. I overclock the CPU in the following steps:
- The main priority is maximizing the P-core frequency in all-core workloads
- The second priority is maximizing the P-core peak frequency in single-core workloads
- The final priority is ensuring our configuration is stable in AVX workloads and under transient conditions.
But before we can set the ratios, let’s first set up the VccIA voltage controller.
Z790 Aorus Master Voltage Controller Configuration
As mentioned in the previous section, an essential part of overclocking with the Z790 Aorus Master is setting up the voltage controller.
By default, the board uses an elevated AC loadline with a relatively steep VRM loadline. That has two main effects:
- When the CPU issues the SVID request to the voltage controller, it offsets the factory-fused voltage-frequency curve with additional voltage. This results in higher voltage requested to the voltage regulator and higher voltage output to the CPU.
- As the workload increases, the voltage regulator outputs a lower voltage due to the steep VRM loadline. That lowers the effective voltage in an all-core workload, thus lowering the temperature and possibly increasing the frequency under load.
When we pursue a manual overclock, we aim to control the voltage frequency curve perfectly. So, the first step we must take is to get the CPU to issue the voltage request according to the voltage-frequency curve and not deviate from it. Therefore, I set the following configuration:
- AC loadline: 1 (0.01mOhm)
- VRM loadline: Turbo
- DC loadline: 1 (0.01mOhm)
The AC loadline setting ensures the CPU issues its SVID voltage request to the voltage regulator precisely according to the voltage-frequency curve
The VRM loadline setting I found, after some testing, most suitable to ensure the voltage did not drop under load.
The DC loadline setting tells the CPU that the effective core voltage does not deviate from the requested voltage

13900K Default V/F Curve
The next step is to determine the CPU’s default voltage-frequency curve.
In SkatterBencher #31, I covered the Alder Lake V/F curve in detail. Since Raptor Lake is very similar to Alder Lake, we can follow the same procedure to extract the voltage-frequency curve for this specific Core i9-13900K processor.
In addition to the P-core V/F curve, I extracted the E-Core and Ring V/F Curves, which turned out to be very important when we start tuning the CPU. As you can see, the E-cores require substantially more voltage at significantly lower frequencies than the Ring and P-Cores.

If we ran all parts at 4 GHz, the SVID request to the voltage controller would be 1.255V, as determined by the E-core V/F Curve. As you can see, that is almost 300mV higher than what the P-cores need for 4 GHz.

13900K All-P-core Tuning
Now we have all the puzzle pieces to start tuning our CPU. Let’s get going! I aim to boost the P-cores to 5.6 or 5.7 GHz in an all-core heavy workload like Prime95 Small FFTs without AVX.
According to the factory-fused voltage-frequency curve, the voltage is 1.382V for 56X and 1.410V for 57X. To tune the voltage for 57X, we can rely on V/F Point 8. Still, we must know that lowering V/F Point 8 affects the interpolated voltages for 55X and 56X.

Furthermore, we have to consider the E-core and Ring voltage frequency curves. Suppose we could reduce the frequency for 57X by 100mV to 1.31V. In that case, the VccIA voltage is determined by the E-core voltage-frequency curve as the factory-fused voltage for the E-core maximum frequency of 4.3 GHz is 1.365V.

So, for the initial configuration, l set the following:
- 8 P-core Active Turbo Ratio to 57X to try the frequency
- V/F Point 8 to -25mV to undervolt at 5.7 GHz
- 16 E-core Active Turbo Ratio to 40X, limiting the E-core voltage to 1.255V
- Max Ring Ratio to 48X, limiting the Ring voltage to 1.234V
Then run Prime95 Small FFTs non-AVX with affinity set to the P-cores only. You’ll find that the CPU still hits TjMax relatively quickly, so further undervolting of V/F Point 8 is the next step.
I can undervolt six out of the eight cores for my CPU to -75mV, but two cores are struggling a lot: P-core 4 and 6. So, my choice is to limit these two cores to a maximum CPU ratio of 56X using the Per Core Ratio Limit feature.

13900K Peak P-core Tuning
The next step is to push the peak P-core frequency up. The first decision to make is the maximum voltage you’re comfortable with. In my case, I prefer not to go over 1.45V. That’s not much more than the maximum voltage of the factory-fused voltage-frequency curve, which is 1.445V.

As a side note, I already mentioned that each P-core has its own V/F curve. In my CPU’s case, six of the eight P-cores have a maximum voltage of 1.42V, while the two others have 1.445V. When we set the 1.45V adaptive voltage, we re-configure the maximum voltage for each core to 1.45V.

Then, it’s a matter of finding the maximum stable frequency for this voltage. Generally, I rely on a combination of CoreCycler and Prime95 to validate stability for each core. For the initial configuration, l set the following:
- 1 and 2 P-core Active Turbo Ratio to 60X to try the frequency
- Adaptive Voltage to 1.45V
- Per Core Ratio Limit for each core to 60X
If multiple cores are stable, you can choose to increase the ratio. However, be aware of the Adaptive Voltage rules I explained before! Suppose your OC Ratio is 61X and you want a voltage of 1.45V for 60X. In that case, the voltage for 60X is interpolated between the V/F points at 61X and 58X!
For my CPU, I find that all cores can pass at 6 GHz with 1.45. However, I’ve already decided to restrict two to boost to 56X due to the undervolting.

AVX P-core Tuning
As I already explained, on modern Intel CPUs, there are three aspects to tuning your overclock for AVX workloads:
- All-core AVX workloads that don’t trigger the AVX negative ratio offset
- Few-core AVX workloads that don’t trigger the AVX offset
- AVX workloads that trigger the AVX offset
For this OC Strategy, there are four challenges with AVX stability.
- Cinebench R23 does not trigger the AVX negative ratio offset despite using AVX instructions. That means we must make sure the voltage-frequency curve is tuned for AVX stability
- AI Benchmark triggers the AVX negative ratio offset. However, due to the dynamic nature of this benchmark, it’s vital to ensure our AVX negative offset configuration accounts for the fact that it’s offset from the Per Core Ratio Limit.
- Prime95 AVX all-core stability test also triggers the AVX offset. Therefore, we must ensure the ratio is set to be stable for this workload.
- In addition to the AVX frequency we want to run, there’s also the issue that dynamic workloads that switch between AVX and non-AVX can cause stressful transient conditions.
So it’s not just a matter of figuring out if the workload can run stably but also whether the system is stable starting, stopping, and switching between those workloads.
Unfortunately, other than manually testing, there’s no simple way to know what your CPU is capable of in each of the three scenarios mentioned above. In my overclock, I use an AVX negative ratio offset of -2 to deal with the AVX workloads and drop the 8 P-core Active ratio from 57X to 56X to deal with transient conditions.

BIOS Settings & Benchmark Results
Upon entering the BIOS
- In Easy Mode, click XMP/EXPO – Disabled
- Switch to Advanced Mode
- Set CPU Base Clock to 99.85 MHz
- Enter the Advanced CPU Settings submenu
- Set Voltage Reduction Initiated TVB to Disabled
- Set AVX Settings to User Defined
- Set AVX Offset to 2
- Set Active Turbo Ratios to Manual
- Set Turbo Ratio (1 P-Core Active) to 60
- Set Turbo Ratio (2 P-Core Active) to 60
- Set Turbo Ratio (3 P-Core Active) to 60
- Set Turbo Ratio (4 P-Core Active) to 60
- Set Turbo Ratio (5 P-Core Active) to 59
- Set Turbo Ratio (6 P-Core Active) to 59
- Set Turbo Ratio (7 P-Core Active) to 57
- Set Turbo Ratio (8 P-Core Active) to 56
- Set Turbo E-Core Ratio 1 to 44
- Set Turbo E-Core Range 1 to 16
- Set Turbo Per Core Limit Control to Manual
- Set Turbo P-Core 0 Ratio Limit to 60
- Set Turbo P-Core 1 Ratio Limit to 60
- Set Turbo P-Core 2 Ratio Limit to 60
- Set Turbo P-Core 3 Ratio Limit to 60
- Set Turbo P-Core 4 Ratio Limit to 56
- Set Turbo P-Core 5 Ratio Limit to 60
- Set Turbo P-Core 6 Ratio Limit to 56
- Set Turbo P-Core 7 Ratio Limit to 60
- Leave the Advanced CPU Settings submenu
- Set Vcore Voltage Mode to Adaptive Vcore
- Set VF Offset Mode to Selection
- Set Internal CPU Vcore to 1.45
- Set VF Point 6 Offset to -0.05
- Set VF Point 7 Offset to -0.05
- Set VF Point 8 Offset to -0.05
- Set VF Point 9 Offset to -0.05
- Set VF Point 10 Offset to -0.05
- Enter the Advanced Voltage Settings submenu
- Enter the CPU-VRM Settings submenu
- Set CPU Vcore Loadline Calibration to Turbo
- Enter the Internal VR Control submenu
- Set IA AC Loadline to 1
- Set IA DC Loadline to 1
- Enter the CPU-VRM Settings submenu
Then save and exit the BIOS.
We re-ran the benchmarks and checked the performance increase compared to the default operation.
- SuperPI 4M: +3.47%
- Geekbench 5 (single): +9.09%
- Geekbench 5 (multi): +11.72%
- Cinebench R23 Single: +3.34%
- Cinebench R23 Multi: +4.99%
- CPU-Z V17.01.64 Single: +4.12%
- CPU-Z V17.01.64 Multi: +2.24%
- V-Ray 5: +5.04%
- AI Benchmark: +12.73%
- 3DMark Night Raid: +7.26%
- CS:GO FPS Bench: +1.63%
- Tomb Raider: +0.51%
- Final Fantasy XV: +1.53%

Here are the 3DMark CPU Profile scores
- CPU Profile 1 Thread: +5.77%
- CPU Profile 2 Threads: +5.53%
- CPU Profile 4 Threads: +9.80%
- CPU Profile 8 Threads: +6.80%
- CPU Profile 16 Threads: +10.57%
- CPU Profile Max Threads: +9.59%

We don’t push the operating frequencies much higher than stock. Furthermore, we rely primarily on undervolting opportunities to squeeze more performance out of our CPU in all-core workloads. Generally, the performance improvement is not spectacular. Still, we get a performance uplift of up to +12.73% in AI Benchmark.
When running Prime 95 Small FFTs with AVX2 enabled, the average CPU P-core clock is 5227 MHz, and the average CPU E-core clock is 4051 MHz with 1.221 volts. The average CPU temperature is 100 degrees Celsius. The ambient and water temperature is 26.0 and 39.0 degrees Celsius. The average CPU package power is 331.6 watts.

When running Prime 95 Small FFTs with AVX disabled, the average CPU P-core clock is 5492 MHz, and the average CPU E-core clock is 4287 MHz with 1.319 volts. The average CPU temperature is 100 degrees Celsius. The ambient and water temperature is 26.0 and 39.0 degrees Celsius. The average CPU package power is 337.1 watts.

OC Strategy #4: OCTVB
In our fourth and final overclocking strategy, we resort to advanced manual overclocking with the help of OverClocking Thermal Velocity Boost to squeeze more performance out of our system.
OCTVB – OverClocking Thermal Velocity Boost
In 2018 Intel introduced Thermal Velocity Boost along with the Core i9-8950HK Coffee Lake mobile flagship processor, and it’s since been an indispensable feature on Intel Core processors.
Thermal Velocity Boost does two things.
- First, it decreases the operating voltage if the CPU temperature is below the TjMax.
- Two, it opportunistically increases the clock frequency above the Turbo Boost 2.0 and 3.0 frequencies if the CPU operates below a part-specific temperature threshold. This threshold is usually 70 degrees Celsius on desktop CPUs.
With the introduction of the Intel Cryo Cooling Technology in 2020, Intel opened up the TVB configuration to motherboard vendors. The feature is named OverClocking Thermal Velocity Boost, or OCTVB for short.
The easiest way to think of OCTVB is limiting, or clipping, the maximum allowed CPU ratio based on the CPU operating temperature. The hotter the CPU, the more you clip the CPU ratio. OCTVB is based on the by core usage Turbo Ratio configuration. For each number of active cores, you can define two temperature points, each with a unique number of “down-bins’. A down-bin is essentially the number of ratios you want to drop.
Let’s take the configuration of this OC Strategy as an example:

When 1 P-core is active, the base ratio is 61X, so the frequency is 6.1 GHz. However, when the temperature is 80 degrees Celsius, the ratio is clipped by 1X. That means the maximum ratio is now 60X.

When all 8 P-cores are active, the base ratio is 59X, so the frequency is 5.9 GHz. However, when the temperature is 70 degrees Celsius, the ratio is clipped by 2X. That means the maximum ratio is now 57X. When the temperature hits 90 degrees Celsius, the ratio is clipped once more by 1X. So, the resulting maximum ratio is now 56X.

Note that OCTVB is only available for the P-cores and not for the E-cores.
Testing an OCTVB configuration is notoriously tricky because you can’t simply stress-test as you’d typically do. So, most of OCTVB validation is just running your benchmark test suite to see if there are any instabilities. Still, there is one technique we can use to get a rough idea of how many extra bins we can get with lower temperatures. That’s by relying on the Thermal Velocity Boost Voltage Optimizations I mentioned briefly in the previous OC Strategy.
When the voltage optimizations are enabled, we can use HWiNFO to track the CPU VID request as the CPU is heats up. The data collected shows an apparent increase in minimum, maximum, and average VID at a given temperature. The difference is about 50mV for 60 degrees Celsius.
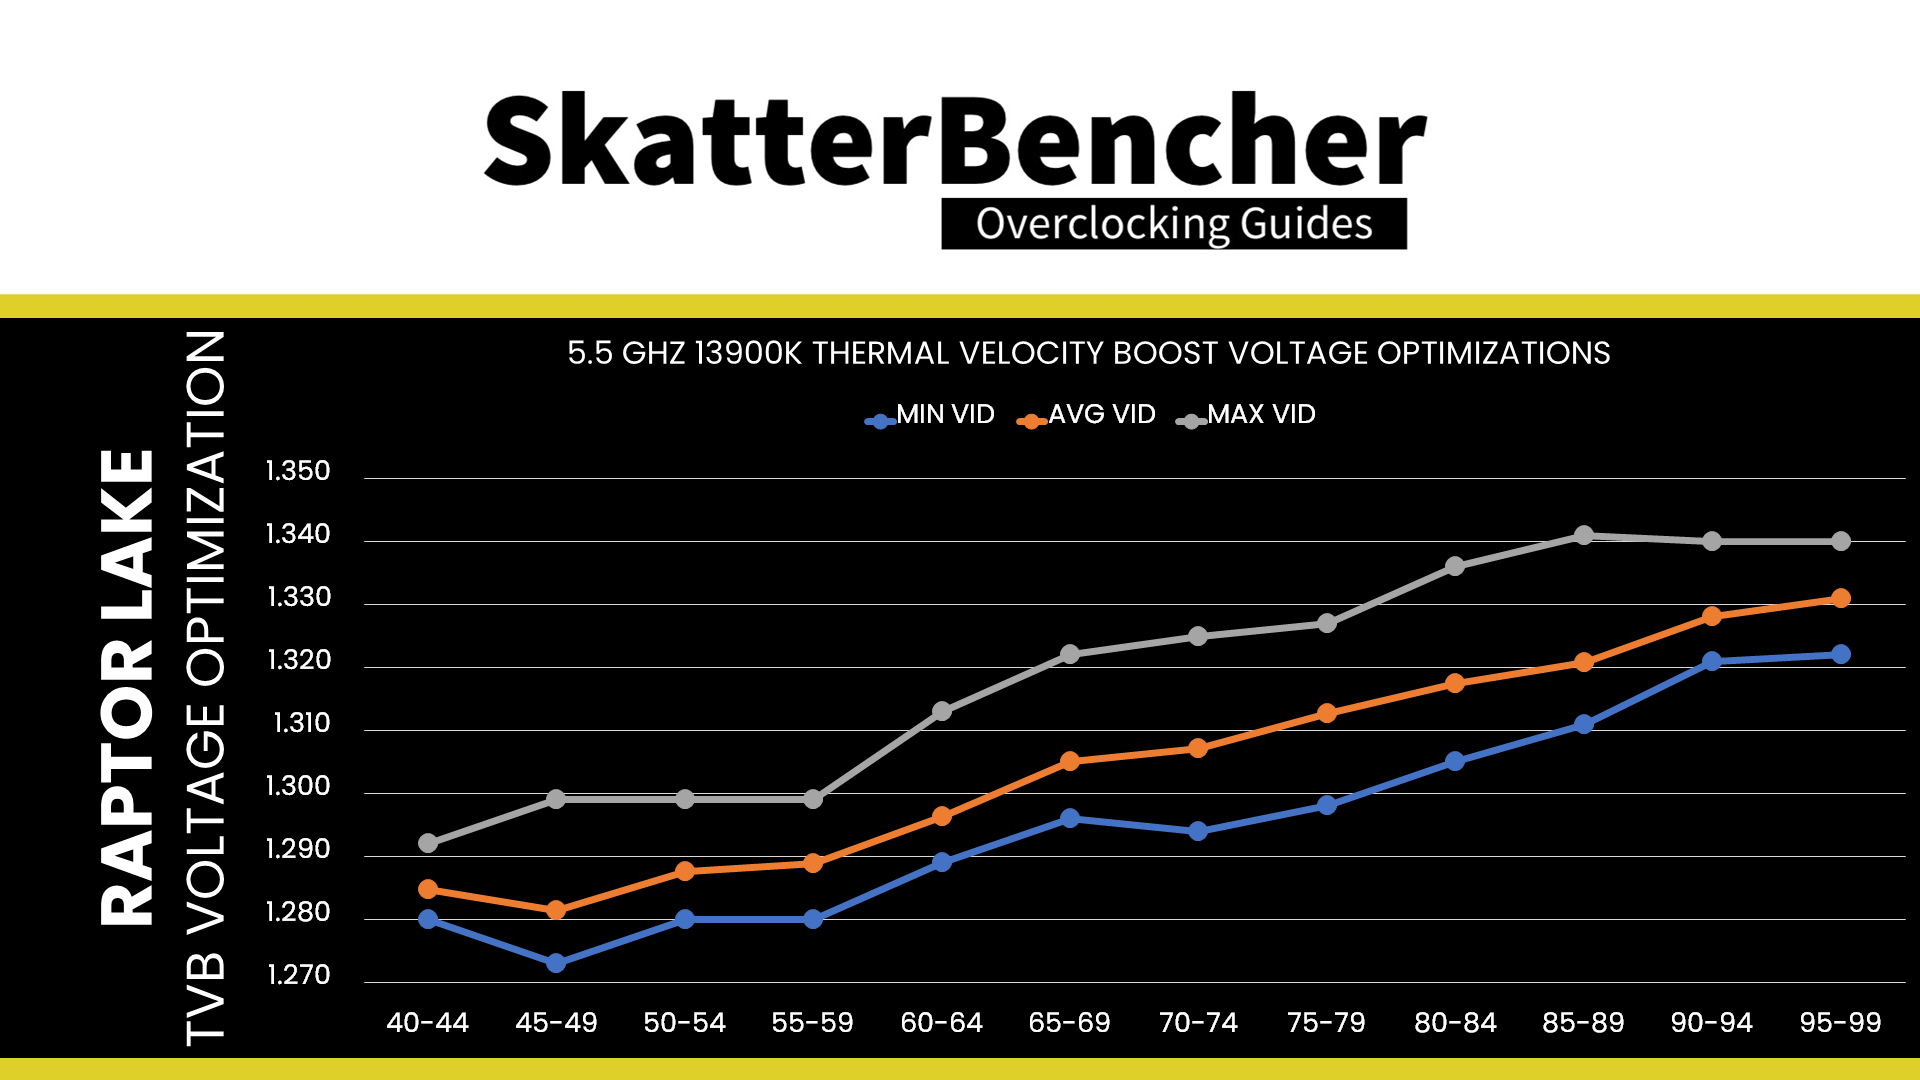
When running a regression, the voltage decreases at about 1 mV per degree Celsius. Now we can combine this with the information from our V/F curve. From the V/F Curve we use in OC Strategy #3, we find an average of 29 mV step for each ratio increase between 54X and 60X.

So, we have an increase of 29 mV per CPU ratio and a decrease of 1 mV per degree Celsius. Thus, we can derive that at a given voltage, we can increase the ratio for every 29 degrees Celsius reduction in temperature.

Of course, this is a rough estimate, and nothing beats real-world testing. But hopefully, it can give you some idea of how to approach or get started with OCTVB tuning.
OCTVB Configuration Commentary
To end this OC Strategy, I want to provide additional commentary on my OCTVB configuration.
Why Only 6.1 GHz Maximum Frequency?
As you can see from my configuration, I only increased the maximum Turbo Boost frequency from 6.0 GHz to 6.1 GHz. However, many of the P-cores can run light loads at 6.2 GHz with a voltage of 1.45V. Well, that’s mainly because of the challenges imposed by the adaptive voltage mode.

Unfortunately, when we set the Turbo Ratio configuration to boost to 62X and maintain the adaptive voltage of 1.45V, we slightly alter the voltage-frequency curve. That’s because the adaptive voltage maps to the OC Ratio, 62X, and the voltage for the points between the OC Ratio and the previous V/F Point, 58X, is interpolated between these points. As it turns out, while many P-cores can run 6.2 GHz 1.45V, they aren’t quite stable at frequencies between 5.8 GHz and 6.2 GHz.
The only solution would be to increase the adaptive voltage to maintain the same voltages for 59X and 60X as we had before. While I can accept a maximum voltage of 1.485V for an OC Ratio of 61X, an OC Ratio of 62X would require an adaptive voltage of 1.515V. That’s too much for my taste, so I settle for 61X as the maximum ratio.
Why -1X at 100C?
As you can see from the configuration, I have OCTVB Point B for 1-Active to 6-Active P-cores configured to down bin 1 ratio 100C. What I wanted to configure was no down bins beyond OCTVB Point A. However, if I leave the Point configuration at Auto, it configures a down bin of 2 ratios at 100 degrees Celsius. So, manually configuring a down bin of 1 ratio is the best solution.

Why -2X at 70C for All-core Loads?
As you can see from the configuration, I have OCTVB Point A for 7-Active and 8-Active P-cores configured to down bin 2 steps at 70 degrees Celsius. That is pretty unusual, as we usually use single down bins.

To keep it short: the reason for the aggressive two-step down bin is stability at transient loads. When the CPU goes from idle or all-core light load to an all-core heavy workload, the voltage at 59X is too high, and the CPU responds erratically. By having an aggressive down bin, the ratio at any medium-load would already be 57X with lower voltage. That improves the system stability in transient loads.
Overall, the benefits from OCTVB are pretty limited on the Core i9-13900K. That’s because
- One, the maximum voltage at default is already pretty high, thus not much headroom to increase the voltage;
- Two, the high voltage results in pretty high temperatures even with few active cores, thus there are not that many situations where the CPU is at lower temperatures; and
- Three, because there are so many E-cores which share the VccIA voltage rail, any all-core load, light or heavy, tends to push the CPU quickly to TjMax.
BIOS Settings & Benchmark Results
Upon entering the BIOS
- In Easy Mode, click XMP/EXPO – Disabled
- Switch to Advanced Mode
- Set CPU Base Clock to 99.85 MHz
- Enter the Advanced CPU Settings submenu
- Enter the Frequency TVB submenu
- Set Frequency Clipping TVB to Core Split
- Set TVB Core1 and Core2 Temperature 0 to 80
- Set TVB Core3, Core4, Core5, and Core6 Temperature 0 to 75
- Set TVB Core7 and Core8 Temperature 0 to 70
- Set TVB Core1, Core2, Core3, Core4, Core5, and Core6 DownBin0 to 1
- Set TVB Core7 and Core8 DownBin0 to 2
- Set TVB Core1, Core2, Core3, Core4, Core5, and Core6 Temperature 1 to 100
- Set TVB Core7 and Core8 Temperature 1 to 90
- Set for all TVB Core DownBin1 to 1
- Set Voltage Reduction Initiated TVB to Disabled
- Set AVX Settings to User Defined
- Set AVX Offset to 3
- Set Active Turbo Ratios to Manual
- Set Turbo Ratio (1 P-Core Active) to 61
- Set Turbo Ratio (2 P-Core Active) to 61
- Set Turbo Ratio (3 P-Core Active) to 61
- Set Turbo Ratio (4 P-Core Active) to 61
- Set Turbo Ratio (5 P-Core Active) to 60
- Set Turbo Ratio (6 P-Core Active) to 60
- Set Turbo Ratio (7 P-Core Active) to 59
- Set Turbo Ratio (8 P-Core Active) to 59
- Set Turbo E-Core Ratio 1 to 45
- Set Turbo E-Core Range 1 to 15
- Set Turbo E-Core Ratio 2 to 44
- Set Turbo E-Core Range 2 to 16
- Set Turbo Per Core Limit Control to Manual
- Set Turbo P-Core 0 Ratio Limit to 61
- Set Turbo P-Core 1 Ratio Limit to 60
- Set Turbo P-Core 2 Ratio Limit to 61
- Set Turbo P-Core 3 Ratio Limit to 61
- Set Turbo P-Core 4 Ratio Limit to 56
- Set Turbo P-Core 5 Ratio Limit to 61
- Set Turbo P-Core 6 Ratio Limit to 56
- Set Turbo P-Core 7 Ratio Limit to 61
- Enter the Frequency TVB submenu
- Leave the Advanced CPU Settings submenu
- Set Vcore Voltage Mode to Adaptive Vcore
- Set VF Offset Mode to Selection
- Set Internal CPU Vcore to 1.485
- Set VF Point 6 Offset to -0.05
- Set VF Point 7 Offset to -0.05
- Set VF Point 8 Offset to -0.05
- Set VF Point 9 Offset to -0.05
- Set VF Point 10 Offset to -0.05
- Enter the Advanced Voltage Settings submenu
- Enter the CPU-VRM Settings submenu
- Set CPU Vcore Loadline Calibration to Turbo
- Enter the Internal VR Control submenu
- Set IA AC Loadline to 1
- Set IA DC Loadline to 1
- Enter the CPU-VRM Settings submenu
Then save and exit the BIOS.
We re-ran the benchmarks and checked the performance increase compared to the default operation.
- SuperPI 4M: +4.49%
- Geekbench 5 (single): +6.29%
- Geekbench 5 (multi): +11.78%
- Cinebench R23 Single: +4.61%
- Cinebench R23 Multi: +4.72%
- CPU-Z V17.01.64 Single: +4.53%
- CPU-Z V17.01.64 Multi: +0.43%
- V-Ray 5: +3.70%
- AI Benchmark: +12.00%
- 3DMark Night Raid: +6.35%
- CS:GO FPS Bench: +1.21%
- Tomb Raider: +0.51%
- Final Fantasy XV: +0.99%

Here are the 3DMark CPU Profile scores
- CPU Profile 1 Thread: +6.02%
- CPU Profile 2 Threads: +5.44%
- CPU Profile 4 Threads: +9.57%
- CPU Profile 8 Threads: +6.62%
- CPU Profile 16 Threads: +9.64%
- CPU Profile Max Threads: +7.45%

Due to the limited cases where the Core i9-13900K doesn’t quickly ramp to TjMax, there are a few benchmark scenarios where we can see a performance benefit from OCTVB. The performance result is, therefore, quite similar to the previous OC Strategy. We see the maximum performance increase of +12.00% in AI Benchmark.
When running Prime 95 Small FFTs with AVX2 enabled, the average CPU P-core clock is 5222 MHz, and the average CPU E-core clock is 4029 MHz with 1.220 volts. The average CPU temperature is 100 degrees Celsius. The ambient and water temperature is 26.5 and 40.0 degrees Celsius. The average CPU package power is 330.9 watts.

When running Prime 95 Small FFTs with AVX disabled, the average CPU P-core clock is 5469 MHz, and the average CPU E-core clock is 4283 MHz with 1.316 volts. The average CPU temperature is 100 degrees Celsius. The ambient and water temperature is 25.5 and 40.0 degrees Celsius. The average CPU package power is 335.3 watts

Intel Core i9-13900K: Conclusion
All right, let us wrap this up.
Overclocking this Core i9-13900K was pretty interesting. It’s always fun to hit 6 GHz using regular water cooling, and it’s become the standard for any Raptor Lake CPU.
Overclocking the Core i9 Raptor Lake is more tricky than its Core i7 and Core i5 counterparts. That’s mainly because the CPU was already pushed quite hard at default. Also, there are more E-cores. So there’s little voltage or thermal headroom.
Using the V/F Points and undervolting the CPU at specific parts of the V/F Curve is the way to extract more performance from the 13900K. But a lot comes into play when doing this, and you must understand all the different puzzle pieces that affect your final overclock.
To be clear, though, the minor downsides fade away compared to the significant upsides. Raptor Lake is a fantastic overclocking platform, and it’s very satisfactory to see 6 GHz in real workloads.
Anyway, that’s all for today! I want to thank my Patreon supporters for supporting my work. As per usual, if you have any questions or comments, feel free to drop them in the comment section below. See you next time!
Zorbax
i know this is a old thread, but, this OC works with the new code 0x012b?
Pieter
I haven’t specifically tried but the overclocking process should be the same as with older microcode.
zorbax
thank for the reply, It’s only now that I realize that you had answered me.
what do you think about all the isues around the 13 and 14 gen cpu? what parameters would do you recomend for an i9 13900k?
owono
“Furthermore, we have to consider the E-core and Ring voltage frequency curves. Suppose we could reduce the frequency for 57X by 100mV to 1.31V. In that case, the VccIA voltage is determined by the E-core voltage-frequency curve as the factory-fused voltage for the E-core maximum frequency of 4.3 GHz is 1.365V.
So, for the initial configuration, l set the following:
8 P-core Active Turbo Ratio to 57X to try the frequency
V/F Point 8 to -25mV to undervolt at 5.7 GHz
16 E-core Active Turbo Ratio to 40X, limiting the E-core voltage to 1.255V
Max Ring Ratio to 48X, limiting the Ring voltage to 1.234V”
I don’t quite understand this part. So letting the cpu on auto and follow its own tables but just applying a VF Point offset to undervolt it – you can’t have the E-Core OR Ring too high, otherwise their tables will go higher than what you’ve undervolted the Vcore at and they’ll request more vcore than the computer is going to allow given, then crash?
Am I understanding it correctly?
For example I have this config:
Auto VCore (0.10 acll / 0.73 dcll) no Offset, VF Point #10 @ +0.075mv. L2 Cache 1.315, SA 1.25.
62×2, 61×4, 58×6, 56×6 — 44x E-Core — 48x Ring.
It’s unstable without at least a +0.070mv vf point 10 @ 46x Ring.
If I was to raise the Ring to 50 and E Cores to 46, for example, I don’t know the tables or curves exactly, would they then request more vcore than the +0.075mv allow and then introduce instability? While the actual main cores would actually be fine?
Pieter
Not exactly. Let me try to explain better.
The core thing to keep in mind is that, on Raptor Lake, there is a single voltage rail (VccCore or VccIA) that powers the P-cores, E-cores, and Ring. The CPU power control unit manages the voltage configuration for this ratio by checking voltage-frequency curve of each P-core, each E-core group, and Ring. It then takes the highest voltage required and requests that to the motherboard voltage regulator.
The issue I describe is the situation where you’d try to undervolt the P-cores to get lower temperature at a given frequency (and ultimately higher boost), but the adjusted P-core V/F curve falls under the the E-core or Ring V/F curve. Let me give a practical example. Let’s take the following situation:
P-core (55X at 1.25V), E-core (40X at 1.20V), Ring (45X at 1.15V) -> in this case the VccCore voltage will be MAX(1.25, 1.20, 1.15)=1.25V, as determined by the P-core voltage curve.
Now, let’s say we undervolt the P-core to run 55X at 1.1V, then the new situation is:
P-core (55X at 1.1V), E-core (40X at 1.20V), Ring (45X at 1.15V) -> in this case the VccCore voltage will be MAX(1.1, 1.20, 1.15)=1.2V, as determined by the E-core voltage curve.
So, even though we are trying to achieve 55X at 1.1V for the P-cores, it will effectively run at 1.2V because the E-core needs higher voltage.
Lasse Kristensen
Hello. Very nice examples here I have played a little with! However I am very confused about the last 6100 Mhz 13900K OC. You detail it as x61-x60-x59 OC. And the pictures show the OCTVB table. But in your text (BIOS recipe) it says:
Set Turbo P-Core 0 Ratio Limit to 61
Set Turbo P-Core 1 Ratio Limit to 60
Set Turbo P-Core 2 Ratio Limit to 61
Set Turbo P-Core 3 Ratio Limit to 61
Set Turbo P-Core 4 Ratio Limit to 56 <—— What are x56 ratio suddenly doing here?
Set Turbo P-Core 5 Ratio Limit to 61
Set Turbo P-Core 6 Ratio Limit to 56 <—— What are x56 ratio suddenly doing here?
Set Turbo P-Core 7 Ratio Limit to 61
Is it a typo? Is it supposed to say x59? Anyway I tried the example and could not get it stable.. LLC8 and that much voltage are my CPU not so happy about. I have used HOURS of testing your techniques but my CPU eventually terminates the game im playing to desktop no event or log or anything… I wanted a setup with 6 x x60 and 8 x x58 .. I could play up to 20 min… 4K Ultra Doom Eternal- something that REALLY works out the CPU. Uses all cores dynamic, very high tech game engine. So its a great OC tester. Im trying The first one of ypur examples now- seems to work! the 6000 Mhz. I am getting a direct die EK block in a few weeks. My SP is 105 on P cores so very average (VID 5.8 @ 1.438v all core fused)
My main issue is cooling of course. Even though I have delid and liquid metal, its a bitch! 😀
Anyway you are doing incredible work, I have watched quite a bit.
Pieter
Thanks for the kind words and great question.
I cover this in OC Strategy #3: “I can undervolt six out of the eight cores for my CPU to -75mV, but two cores are struggling a lot: P-core 4 and 6. So, my choice is to limit these two cores to a maximum CPU ratio of 56X using the Per Core Ratio Limit feature.”
So basically I used V/F Points to undervolt the curve, but the V/F Point Offset wasn’t stable for these two cores. Since 56X is an interpolated voltage point on the 13900K I can either increase the voltage or just prevent those cores from ever trying to run over 57X. In this overclock I chose the latter, though maybe in other situations I would pick the former.
SkatterBencher #52: Intel Core i9-13900K P-core Overclocked to 6500MHz - SkatterBencher
[…] guide than my previous Raptor Lake content. Since I already overclocked the Core i9-13900K in SkatterBencher #49, I want to focus exclusively on the P-cores in this post. Furthermore, I will leverage Intel Cryo […]
Core i9-13900K Overclocked to 6100 MHz With Z790 Aorus Master | SkatterBencher #49 – Cortinas Persianas
[…] Join the discord: https://discord.gg/vt5ZKcMkQx Join the Patreon: https://www.patreon.com/skatterbencher SkatterBencher blog: https://skatterbencher.com/2022/12/04/skatterbencher-49-intel-core-i9-13900k-overclocked-to-6100mhz […]