ElmorLabs EFC Easy Fan Controller
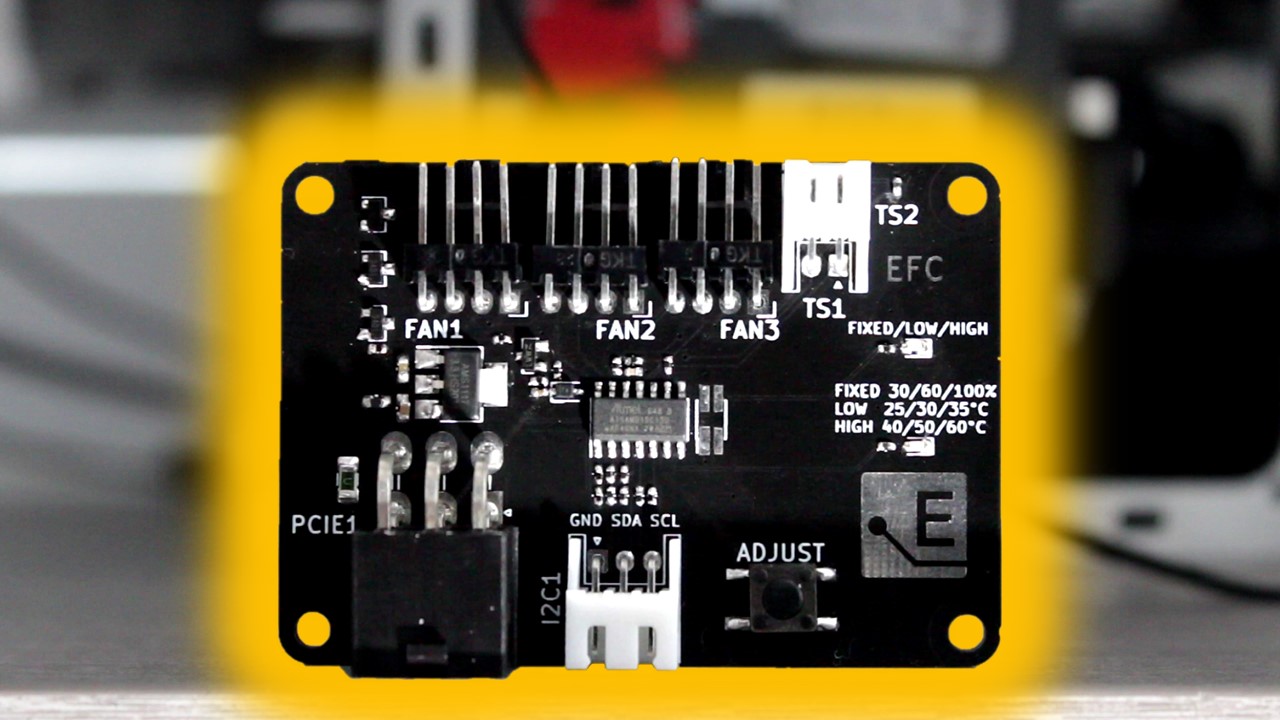
The ElmorLabs EFC temperature-controlled fan curve solves a fundamental overheating problem of Intel Cryo Cooling in Unregulated Mode.
The Problem: Unregulated Mode
If you have been following this website for a while, you will know that we have looked at Intel Cryo Cooling a couple of times now. We used Intel Cryo Cooling to get a 6 GHz Comet Lake system and a 5.6 GHz Rocket Lake system.
However, Cryo Cooling is not as straight-forward as installing regular water cooling. Hence why the videos where we detail the configuration specifics are about one-hour long. One recurring challenge with Cryo Cooling is that the Peltier inside the EK-QuantumX Delta TEC dumps a bunch of heat in the water loop that is generally not accounted for by traditional fan configurations.
The Intel Cryo Cooling Technology has two modes of operation, aside from standby of course: Cryo Mode and Unregulated Mode.
In Cryo mode, the Peltier element inside the Delta TEC water block is only switched on when required and is switched off when not required. This greatly reduces the overall power consumed as the TEC is not running at full power all the time. The Intel software regulates the cooler temperature by assessing the humidity in the room as well as the CPU temperature. Based on this input, the software ensures that maximum cooling is provided at any time while ensuring the temperature does not drop below the dew point. This mode is indicated by a green icon in the desktop tray and a green LED on the TEC controller.
In Unregulated mode, the Peltier inside the Delta TEC is turned on to full power all the time. As a result, the Delta TEC cools well below ambient temperature. In this mode there will be condensation risk on the heatsink surfaces and surroundings due to the lower-than-ambient temperature. This mode is indicated by a white icon in the desktop tray and a purple LED on the TEC controller.
In either mode, as the Peltier is cooled by the water block, the additional heat it produces is dumped in the water loop.
In a traditional fan configuration, the system fans are mapped against the CPU temperature. So, when the CPU temperature increases because you load up a game or another workload, the fans will gradually increase RPM to ensure the system is cooled at all times.
In custom water loop systems, we do not use the fans to cool the CPU directly. Instead we use water to transport the heat generated by the CPU away from the CPU to the radiator, and then cool the radiator with our system fans.
Here is the problem.

When we set the Cryo Cooling to Unregulated mode, the CPU temperature will be exceptionally low in idle. Therefore, the radiator fans will not spin up and thus the radiator will not be actively cooled.
However, in Unregulated mode the TEC is working at full power and must be actively cooled. In our case, the Delta TEC adds 200W of load in the water loop.
So, this creates a problem. One the one hand, we are adding heat in the loop because of unregulated mode and on the other hand the fans are not spinning up also because of unregulated mode.
The result is that, if you are not careful, the water temperature will increase too much and result in a less than comfortable situation.
To illustrate the problem, we set up a simple test. We put together our 5.6GHz Rocket Lake system with the Core i9-11900K, ASUS ROG Maximus XIII APEX, and EK-QuantumX Delta TEC. We enable XMP, ABT, and MCE and go into the operating system. We set the Cryo cooler to Unregulated mode and track the CPU temperature, water temperature and fan speed while idling in the operating system.
The Problem: Unregulated Mode Data
We can very clearly see the issue from the data.
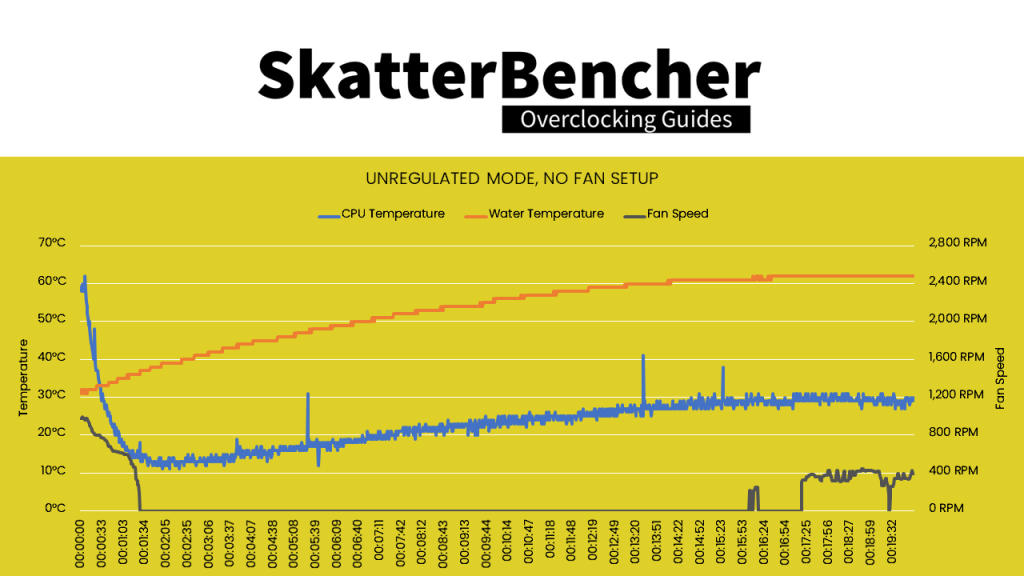
When enabling unregulated mode, the water temperature quickly increases from 30 degrees Celsius to 50 degrees Celsius in less than 7 minutes. The temperature keeps increasing to 62 degrees Celsius after 20 minutes even when just idling in the operating system. However, all this time the fans do not spin up at all because the CPU temperature is too low.
We also tried the same test with Cryo Mode.

The situation is slightly different since Cryo mode only enables the Peltier when the cooler is above the dew point. So, when sitting idle that means the Peltier is not on most of the time.
While the result is much less dramatic than that of Unregulated mode, we also clearly see the water temperature increasing from 33 to 45 degrees Celsius. Again, the increase in water temperature is not counteracted by an increase in fan speed.
The Solution (So Far): ASUS Q-Fan
The solution I have been using so far is to manually configure the ASUS Q-FAN Chassis Fan 2 to follow the T_sensor. Then I connect a temperature sensor to the header available on the motherboard and put the sensor in the water loop.
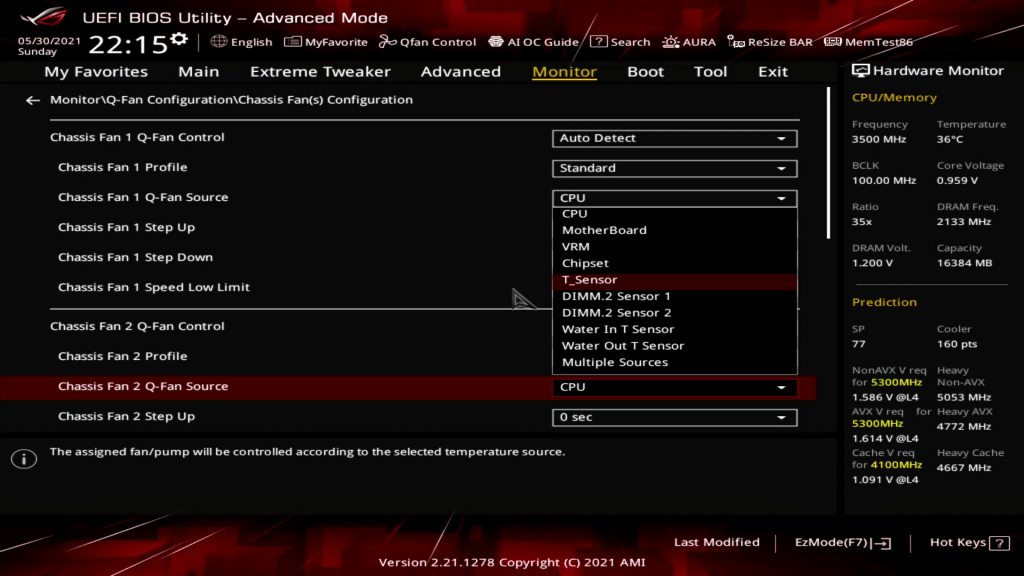
With this configuration we ensure that the water temperature will be monitored at all times and the radiator fans will spin up according to the actual water temperature.
The Solution (So Far): ASUS Q-Fan Data
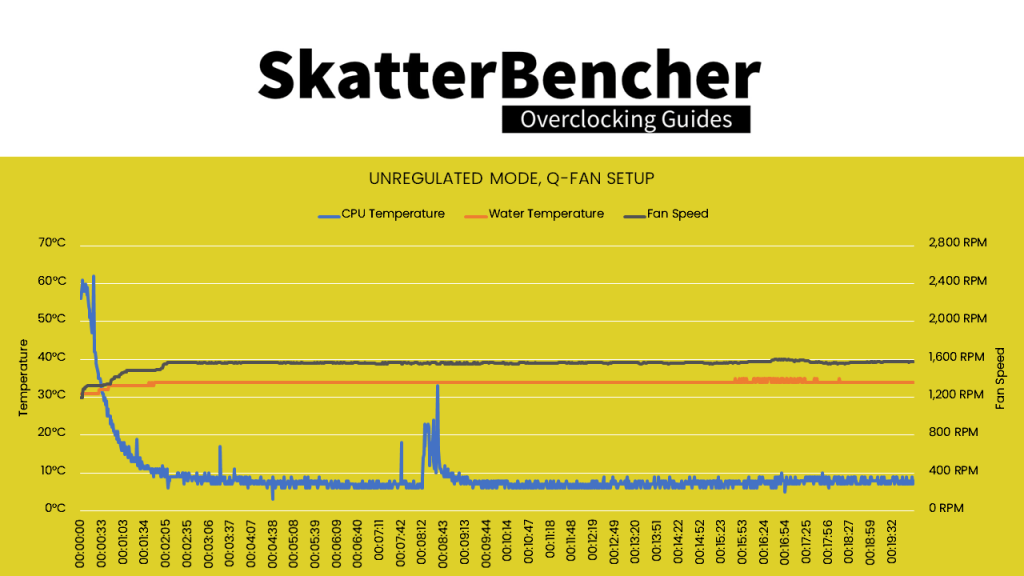
With the Q-Fan configured to increase the fan speed according to the water temperature, we see there are no more overheating issues. The water temperature remains stable at around 34 degrees Celsius, keeping the CPU at around 10 degrees Celsius, with the fans spinning at about 1,600 RPM.
The Real Solution: ElmorLabs EFC
Of course, the ASUS Q-Fan is a great solution to our problem. But there are some caveats.
- Not all motherboards have an on-board temperature sensor header. Without the temperature input, we cannot have the fans spin up when needed.
- Not everyone has an ASUS motherboard, so the solution will be different with other motherboard brands.
- You must always remember to configure the Q-fan after a BIOS reset or flash. Some people, me included, can be forgetful.
- It also requires you to have full trust in the BIOS configuration actually behaving according to the settings you have configured.
A more general solution to our problem is the ElmorLabs EFC.

EFC stands for Easy Fan Controller and is a straightforward PCB with 3 fan headers rated up to 10 amps total, a temperature sensor header, a PCIe power connector, and an I2C header. It also has a temperature sensor onboard.
The purpose of the EFC is also very straightforward: map your fans against a temperature.
Setting up the EFC is also pretty straightforward. Simply plug the fans into the fan headers, the power into the power connector, and if you are using an external temperature sensor plug that into the temperature sensor header.
Then use the button to navigate through the configuration menu.
Short pressing the button once allows you to select between 3 menu items: fixed, low, and high. Fixed lets you set a fixed fan duty cycle setting, and low/high lets you configure a lower and upper ceiling for the temperature-controlled fan curve.
As you cycle through the menu items, you will find the upper LED go from least bright to most bright in 3 steps. This indicates which item is currently selected: lowest brightness is Fixed, medium brightness is Low, and maximum brightness is High.
Long pressing the button after selecting one of the 3 menu items allows you to choose one of three options for each menu item:
- Fixed can be set to 30%, 60%, or 100% fan duty cycle.
- Low can be set to 25, 30, or 35 degrees Celsius.
- High can be set to 40, 50, or 60 degrees Celsius.
As you cycle through the options, you will see the lower LED go from least to most bright indicating which option is currently selected. After selecting the option, you do not have to do anything to apply the setting.
When you set a low and high point, the EFC will complete the fan curve using a linear function. So, in total the EFC supports 9 different fan curves mapped to a temperature sensor and 3 fixed fan curves.
In our case, we want to use the lowest fan curve mapped against the water temperature. So,
- Short press twice to select Low (medium brightness LED)
- Long-press once to go to the options.
- Leave the option 25 selected (lowest brightness LED)
- Long-press to return to the menu items.
- Short press twice to select High (maximum brightness LED)
- Long-press once to go to the options.
- Leave the option 40 selected (lowest brightness LED)
And that is it.
The Real Solution: ElmorLabs EFC Data
We performed the same tests as before and tried three configurations.
- Temperature Control Low/High set to 25/40
- Temperature Control Low/High set to 35/60
- Fixed fan duty cycle of 100%
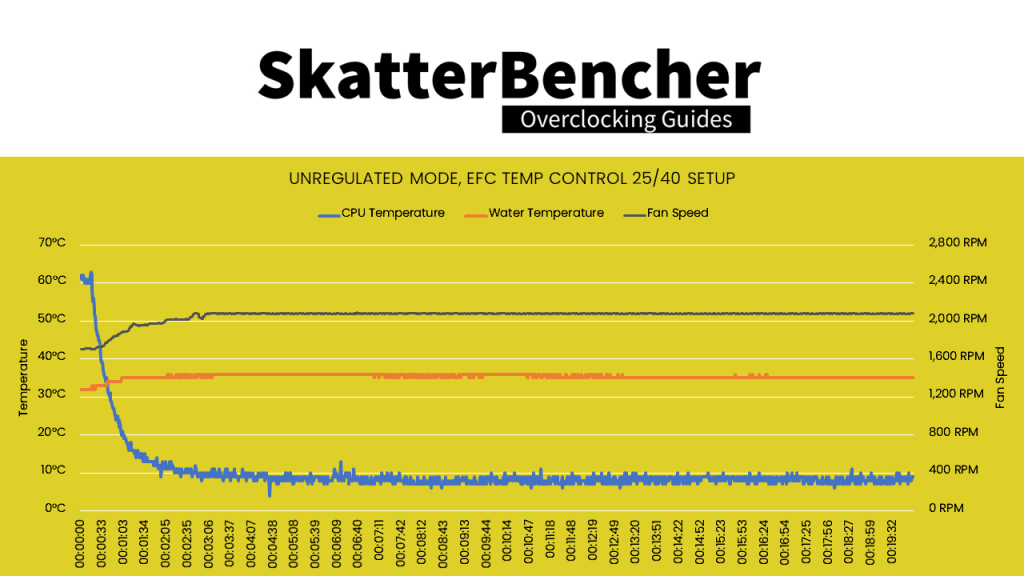
When configuring the ElmorLabs EFC to temperature-controlled fan curve with low/high points set to 25 and 40 degrees Celsius, we see that the water temperature remains stable at around 35 degrees Celsius with a fan speed of 2100 RPM.
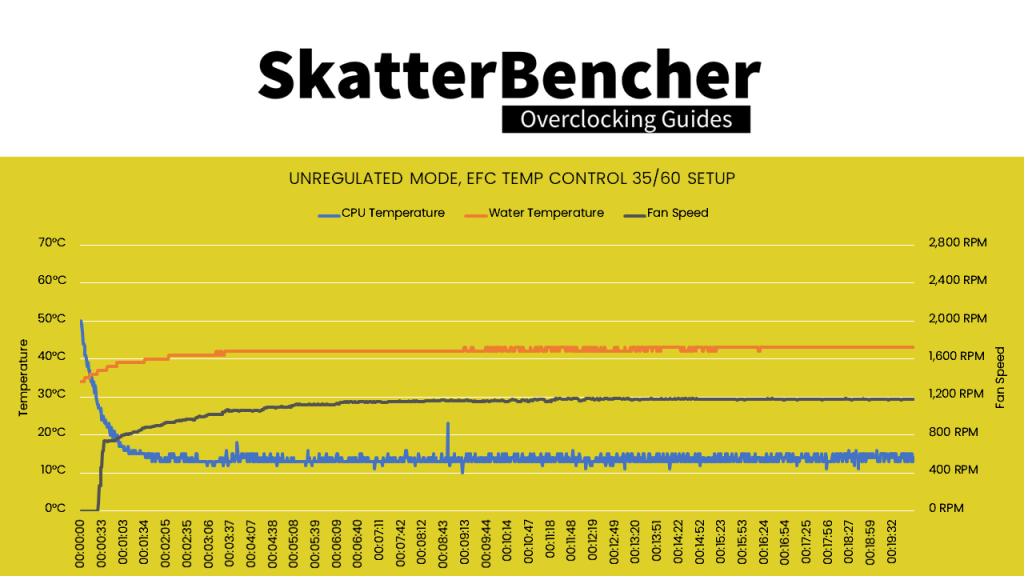
When configuring the ElmorLabs EFC to temperature-controlled fan curve with low/high points set to 35 and 60 degrees Celsius, we see that the water temperature remains stable at around 43 degrees Celsius with a fan speed of 1200 RPM.
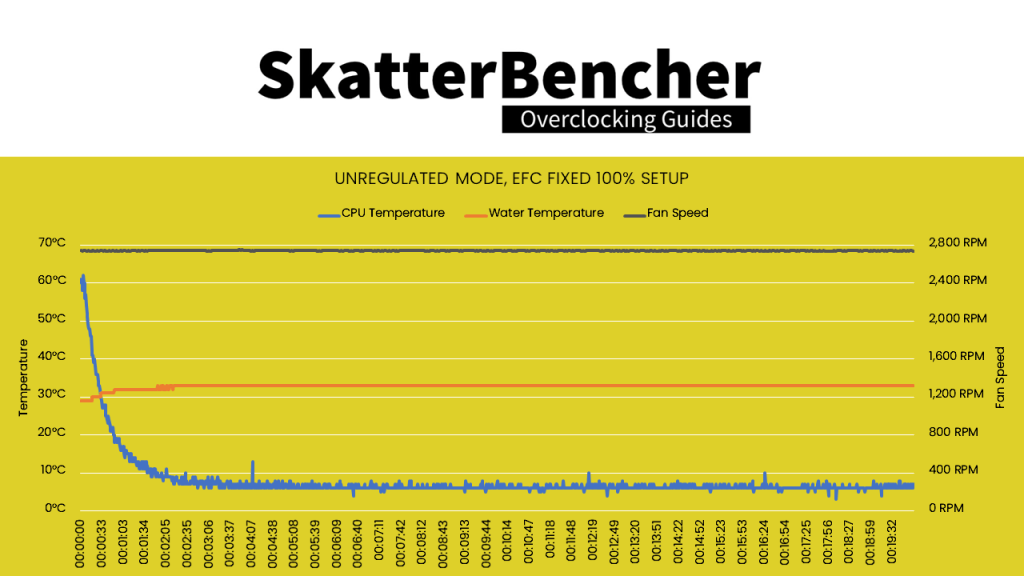
When configuring the ElmorLabs EFC to fixed fan duty cycle of 100%, we see that the water temperature remains stable at around 33 degrees Celsius with a fan speed of 2800 RPM.
At the end of the day, each of these configurations are a set-and-forget kind of a thing as the fan curve is controlled entirely by the EFC. It just boils down to what kind of water temperature and fan RPM you are comfortable with.
The Real Solution (Extended): ElmorLabs EVC2
The ElmorLabs EFC can also be connected to the ElmorLabs EVC2 to extend the functionality.
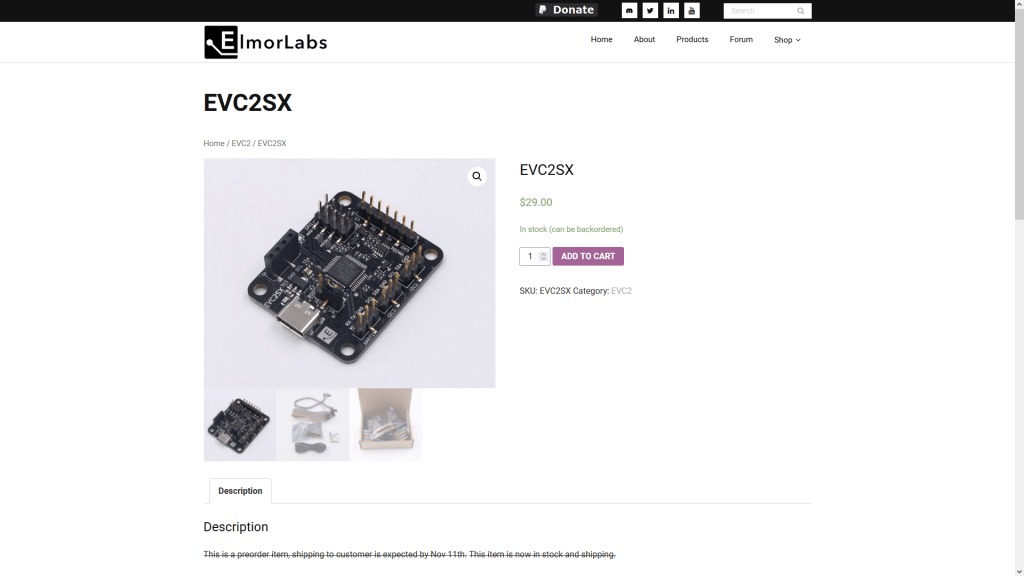
The ElmorLabs EVC2 aims to enable DIY users to get more out of their computer parts. Its main focus is enabling digital or analog voltage control using I2C/SMBus/PMBus, but the device also has UART and SPI functionality. There are three variants of the EVC2: the original EVC2, the EVC2S, and EVC2SX. Only the latter is still available while former two are discontinued.
ElmorLabs is a company founded by former ASUS ROG motherboard engineer and extreme overclocker Elmor. The EVC journey started in 2014 with a hobby project and a little device that provided an I2C bus, an USB interface, and a software interface so users could gain control over any I2C voltage controller on their motherboard or graphics card.
Hobby turned into a business in 2018 as ElmorLabs Ltd was founded in Taipei, Taiwan. Since 2018, ElmorLabs has launched some interesting and useful products for PC DIY enthusiasts and overclockers including of course the EVC2 and EFC, but also a P80DB2 LPC Debug Card, an Ample Power Card, the KTH K-type Thermometer, a Power Limit Modifier adjustable shunt resistor, a HOT Heater Controller, and most recently the NVB-3S GPU Interconnect Bridge for NVIDIA Ampere graphics cards.
The EVC2 can be considered as somewhat the foundation for the ElmorLabs ecosystem as you can expand the functionality of some ElmorLabs products by connecting it to an EVC2.
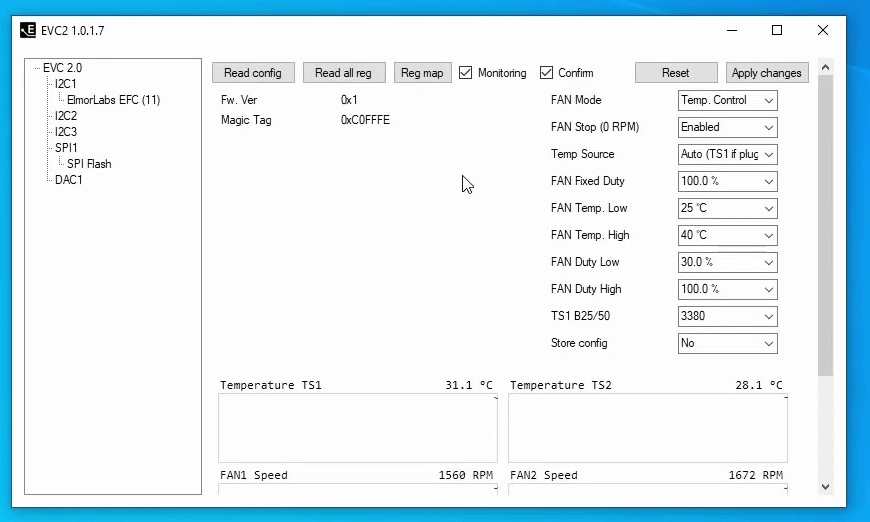
For example, I can connect the EFC to the EVC2 to monitor and log the temperatures, fan speeds, and fan duty cycle. I can also use it to turn the Easy Fan Controller in a more Advanced Fan Controller with more options to customize the fan curve.
To do all this, first connect the EFC to the EVC2 using the I2C header. Then connect the EVC2 device to a USB port on your motherboard.
- Now, download the EVC2 software from the ElmorLabs website.
- Next, open the software and select the I2C bus connected to the EFC. In my case, that’s I2C1
- Click on “Find Devices” and the ElmorLabs EFC should be detected automatically.
- Navigate to the ElmorLabs EFC item in the menu, now you have access to all the extended functionality of the EFC.
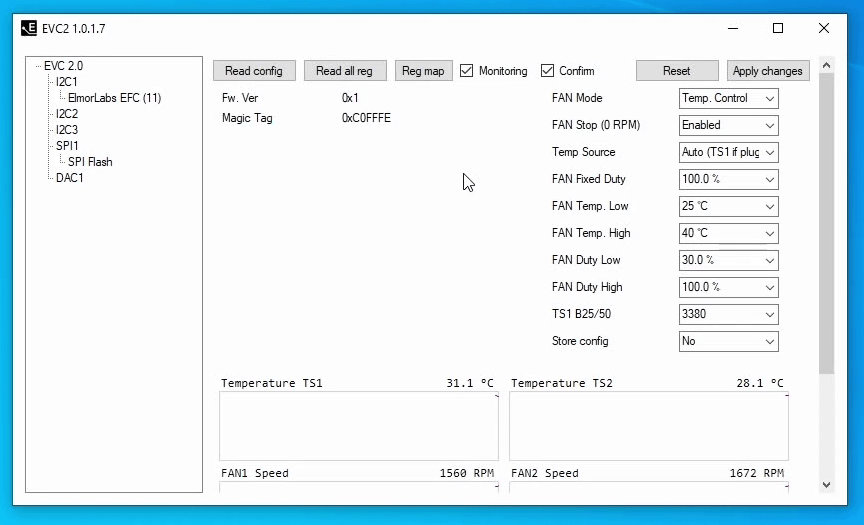
The extended functionality includes:
- Switching between fixed mode and temperature control mode
- Enabling Fan Stop
- Changing the temperature source between the internal and external sensor
- Adjusting the fixed fan duty from 0% to 100% in .625% intervals
- Adjusting the temperature control parameters
- Low and high temperature from 10C to 60C in 0.1C intervals
- Low and high fan duty cycle from 0% to 100% in .625% intervals
- Switching between different types of temperature sensors
- Store a custom configuration to the device which will be loaded on power up.
- Monitoring and logging of both internal and external temperatures,
- Monitoring and logging of each fan speed
- Monitoring and logging of the Fan duty cycle
To enable monitoring, simply check “Monitoring” in the software.
To enable data logging,
- Right click on any of the graphs that you would like to log the data of and select Add to Data Logger.
- Navigate to the home menu and click Data Logger.
- Ensure that the data points you want to log are selected.
- Click File and select a folder where you want to save the data log.
- Then click Start Logging.
The data logger creates a simple csv file that you can import into for example Excel and make your charts.
ElmorLabs EFC Conclusion
So, some final words.
Actually, there is not much more to say than simply that I will be using the ElmorLabs EFC in future systems that require temperature-controlled fan behavior. It is pretty simple to configure the EFC using just the button on the PCB and it is pretty much a set-and-forget kind of a product.
For water cooling enthusiast, I think the ideal configuration will be to use the external temperature sensor in the water loop and use the low/high 25/40 configuration.
I have not actually tested this yet, but I think for people who use air or AIO cooling inside a closed computer chassis, then probably you can just use the internal temperature sensor and use the low/high 35/60 configuration. Please let me know in the comments if you use the EFC inside a chassis and what are your results!
The ElmorLabs EFC is available for pre-order at US$20. If you want to learn more about this and ElmorLabs products, you can connect via the forum, newsletter, or the discord channel.
That is about it for this article. Enjoy your day and ‘till the next one!
SkatterBencher #69: AMD Ryzen 7 8700G Overclocked to 5350 MHz - SkatterBencher
[…] ElmorLabs EFC is original Easy Fan Controller which formed the basis for its fancy brother, the (EFC-SB). I’ve used these fan controllers […]
SkatterBencher #65: Intel Core i9-11980HK Overclocked to 5200 MHz - SkatterBencher
[…] ElmorLabs EFC-X9 is an evolution of the original EFC and its fancy brother, the Easy Fan Controller SkatterBencher Edition (EFC-SB). I’ve used […]
SkatterBencher #51: Intel Core i5-13600K Overclocked to 6200MHz - SkatterBencher
[…] also use the ElmorLabs EFC to map the radiator fan curve to the water temperature. Without going into too many details: I have […]
SkatterBencher #50: Intel Core i7-13700K Overclocked to 6000MHz - SkatterBencher
[…] also use the ElmorLabs EFC to map the radiator fan curve to the water temperature. Without going into too many details: I have […]
SkatterBencher #52: Intel Core i9-13900K P-core Overclocked to 6500MHz - SkatterBencher
[…] explained how I use ElmorLabs products in SkatterBencher #34. By connecting the EFC to the EVC2 device, I monitor the ambient temperature (EFC), water temperature (EFC), and fan duty […]
SkatterBencher #61: Intel Xeon w5-3435X Overclocked to 5200 MHz - SkatterBencher
[…] Easy Fan Controller SkatterBencher Edition (EFC-SB) is a customized EFC resulting from a collaboration between SkatterBencher and […]
ElmorLabs EFC-SB SkatterBencher Edition - SkatterBencher
[…] EFC-SB, or EFC SkatterBencher edition, is a customized version of the original ElmorLabs Easy Fan Controller. I’ve used since SkatterBencher #26. The base product functions and features are the same as […]
SkatterBencher #53: Intel Core i9-13900KS Overclocked to 6300MHz - SkatterBencher
[…] ElmorLabs EFC-X9 is an evolution of the original EFC, which I’ve used in many previous SkatterBencher guides. The X9 supports up to nine […]
Let's talk 6.7 GHz Core i9-13900KS Raptor Lake - SkatterBencher
[…] ElmorLabs EFC-X9 is an evolution of the original EFC, which I’ve used in many previous SkatterBencher guides. The X9 supports up to nine […]
SkatterBencher #43: AMD Ryzen Threadripper "5990X" Overclocked to 4825 MHz - SkatterBencher
[…] the water temperature was a crucial limiting factor. As in all my overclocking guides, I use the ElmorLabs Easy Fan Controller to control the radiator fans and regulate the water […]
SkatterBencher #39: AMD Ryzen 7 5800X3D Overclocked to 4741 MHz - SkatterBencher
[…] also use the ElmorLabs EFC to map the radiator fan curve to the water temperature. Without going into too many details: I have […]
SkatterBencher #36: AMD Ryzen Threadripper 3990X Overclocked to 4500 MHz - SkatterBencher
[…] also use the ElmorLabs EFC to map the radiator fan curve to the water temperature. Without going into too many details, I have […]
SkatterBencher #35: AMD Ryzen 3 5300GE Overclocked to 4628 MHz - SkatterBencher
[…] also use the ElmorLabs EFC to map the radiator fan curve to the water temperature. Without going into too many details, I have […]
SkatterBencher #34: Intel Core i9-12900KF Overclocked to 5700 MHz - SkatterBencher
[…] covered the ElmorLabs EFC in a separate article on this blog. The EFC allows me to map the radiator fan curve to the water temperature. Without […]
SkatterBencher #31: Intel Core i7-12700K Overclocked to 5400 MHz - SkatterBencher
[…] covered the ElmorLabs EFC in a separate article on this blog. Without going into too many details, I have attached an external temperature sensor from the water […]
SkatterBencher #30: Intel Core i9-12900K Overclocked to 5500 MHz - SkatterBencher
[…] covered the ElmorLabs EFC in a separate article on this […]
SkatterBencher #29: AMD Ryzen 9 5900 B2 Overclocked to 5152 MHz - SkatterBencher
[…] I covered the ElmorLabs EFC in a separate article on this blog. […]
SkatterBencher #28: Intel UHD Graphics 750 Overclocked to 1750 MHz | SkatterBencher
[…] the ElmorLabs Easy Fan Controller. I covered the use case of this fan controller in a separate article on this website, so I won’t bore you with the details. To keep it short and […]
SkatterBencher #27: AMD Ryzen 9 5950X Overclocked to 5117 MHz | SkatterBencher
[…] I covered the ElmorLabs EFC in a separate article on this website. […]
SkatterBencher #26: AMD Ryzen 9 5900X Overclocked to 5223 MHz | SkatterBencher
[…] covered the ElmorLabs EFC in a separate article on this […]